-
Installation Guide for the Cisco 1120 Secure Access Control Server 4.2
-
Preface
-
Cisco 1120 Secure Access Control Server Overview
-
Preparing for Installation
-
Installing and Configuring the Cisco 1120 Secure Access Control Server 4.2
-
Administering the Cisco 1120 Secure Access Control Server
-
Upgrading and Migrating to Cisco 1120 Secure Access Control Server
-
Site Log
-
Windows Service Advisement
-
Command Reference
-
Troubleshooting
-
Maintaining the Cisco 1120 Secure Access Control Server
-
Index
-
 Feedback
Table Of Contents
Troubleshooting the Power and Cooling Systems
Environmental Reporting Features
Troubleshooting Adapter Cards, Cables, and Connections
Product Serial Number Location
Cisco Product Identification Tool
Troubleshooting
The CSACS 1120 Series appliance undergoes extensive testing before it leaves the factory. If you encounter problems, use the information in this appendix to help isolate problems or to eliminate the appliance as the source of the problem.
Although an overtemperature or overvoltage condition is unlikely at initial startup, a discussion of environmental temperature and voltage monitoring functions is provided in Environmental Monitoring, page 1-9 section.
Note
The procedures in this chapter assume that you are troubleshooting the initial CSACS 1120 Series appliance startup, and that the appliance is in the original factory configuration. If you have removed or replaced components, or changed any default settings, the recommendations in this chapter might not apply.
This appendix does not cover every possible issue that might occur on an appliance but instead focuses on those events that are frequently seen by the customer.
This appendix contains:
•
Troubleshooting Overview
At the initial system boot, you should verify the following:
•
•
•
•
When each of these conditions is met, the hardware installation is complete, and you should proceed to perform a basic configuration. For proper configuration features, see Chapter 3, "Installing and Configuring the Cisco 1120 Secure Access Control Server 4.2".
If you cannot locate the source of the problem, contact a customer service representative for information on how to proceed. For technical support information, see the Cisco Information Packet publication that is shipped with your appliance. Before you call, ensure that you have the following information ready:
•
•
•
•
•
Note
Problem Solving
The key to problem solving is to isolate the problem to a specific location by comparing what the CSACS 1120 Series appliance is doing with what it should be doing. In other words, when troubleshooting, define the specific symptoms, identify all potential problems that could be causing the symptoms, and then systematically eliminate each potential problem (from most likely to least likely) until the symptoms disappear.
The following steps provide guidelines you can use during the troubleshooting process.
Step 1
Step 2
Step 3
Step 4
Step 5
Step 6
Step 7
Step 8
Note
When troubleshooting, check the following appliance subsystems first:
•
•
•
Troubleshooting the Power and Cooling Systems
Both the power LED and the fans can help you troubleshoot a power problem. Check the following items to help isolate the problem:
•
•
–
–
–
Checking this connection will require you to shut down the appliance, remove any external cables, and open up the appliance.
–
–
•
–
–
Environmental Reporting Features
The CSACS 1120 Series appliance has protection circuits that monitor and detect overcurrent, overvoltage, and overtemperature conditions inside the appliance. If the power supply shuts down or latches off, an AC cycle switches off for 15 seconds and switches on for 1 second to reset the power supply. For more information, see Environmental Monitoring, page 1-9.
The following conditions can cause an abnormally high appliance temperature:
•
•
•
Take steps to correct the problem. For information about environmental operating conditions, see Temperature and Humidity Guidelines, page 2-9.
Troubleshooting Adapter Cards, Cables, and Connections
Network problems can be caused by an adapter card, cables or cable connections, or external devices such as a hub, wall jack, WAN interface, or terminal. Check for the following symptoms to help isolate a problem:
•
–
–
–
•
–
–
–
•
–
–
•
–
–
(a) The terminal should have the same data rate that the appliance has (9600 bps is the default).
(b) 8 data bits.
(c) No parity generated or checked.
(d) 1 stop bit.
•
•
Reading the LEDs
There are several LEDs on the CSACS 1120 Series appliance. LEDs serve the following purposes:
•
•
•
The LEDs on the front-panel of the CSACS 1120 Series appliance and corresponding adapter card are aids for determining appliance and adapter performance and operation.
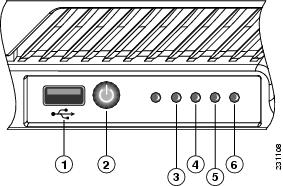
Front-Panel LEDs
Figure D-1 shows the locations of the appliance's front-panel LEDs.
Figure D-1 Front-Panel LEDs
The following table describes the callouts in Figure D-1.
USB port
Hard disk drive activity LED
Power button
NIC 1 LED
Appliance power LED
NIC 2 LED
Table D-1 describes the front-panel LEDs.
Note
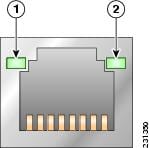
NIC LEDs
Figure D-2 shows the NIC 1 and NIC 2 LEDs located at the rear of the appliance. These LEDs indicate the connection activity and speed of the NIC ports.
Figure D-2 NIC 1 and NIC 2 LEDs
Table D-2 describes the activity and connection speed associated with each LED state.
Product Serial Number Location
On the CSACS 1120 Series appliance, the serial number label is located on the front-panel of the appliance, at the lower-left. Figure D-3 shows the location of the serial number label.
Figure D-3 Serial Number Location for the CSACS 1120 Series Appliance
Note
Cisco Product Identification Tool
The Cisco Product Identification (CPI) tool helps you retrieve the serial number of your Cisco products.
Before you submit a request for service online or by phone, use the CPI tool to locate your product serial number. You can access this tool from the Cisco Support website.
To access the CPI tool:
Step 1
Step 2
Step 3
This tool offers three search options:
•
•
•
Search results show an illustration of your product with the location of the serial number label highlighted. Locate the serial number label on your product and record the information before you place a service call.
You can access the CPI tool from Cisco.com at:
http://tools.cisco.com/Support/CPI/index.do
Access to the CPI tool on the Cisco Support website requires a Cisco.com user ID and password. If you have a valid service contract but do not have a user ID or password, you can register at:
http://tools.cisco.com/RPF/register/register.do