
 Feedback
Contents
- XML-PI
- Finding Feature Information
- Prerequisites for XML-PI
- Restrictions for XML-PI
- Information About XML-PI
- XML-PI Overview
- NETCONF Overview
- NETCONF Enhancements
- Enhancement to Retrieve show running-config Output
- Enhancement to Change the Running Configuration
- Enhancement for Retrieving show Commands
- ODM Tool and Spec Files
- XML-CLI Conversion Algorithms
- X2C Algorithm
- C2X Algorithm
- How to Use XML-PI
- Configuring NETCONF for XML-PI
- Generating XML Format for Commands
- Generating XSD Format for Commands
- Troubleshooting ODM Errors
- Managing Files
- Displaying Files on a Cisco IOS Filesystem Example
- Managing Spec Files
- Validating Spec Files
- Configuration Examples for XML-PI
- Example Configuring NETCONF for XML-PI
- Examples Generating show Command XML Format
- Examples Generating show running-config XML Format
- Example Generating show Command XSD Format
- Example Displaying the SFEs
- Example Displaying Spec File Tag Hierarchy
- Example Validating a Spec File
- Additional References
- Feature Information for XML-PI
- Glossary
XML-PI
The eXtensible Markup Language Programmatic Interface (XML-PI) Release 1.0 leverages the Network Configuration Protocol (NETCONF) and offers new data models that collect show command output down to the keyword level and running configurations without the complexity and expense of screen-scraping technologies or external XML-to-Command Line Interface (CLI) gateways. XML-PI allows you to quickly develop XML-based network management applications that remotely adapt and control the behavior of any number of network devices simultaneously. XML-PI uses an industry standard protocol that allows Cisco network devices to be managed in a more automatic and programmatic way and is CLI accessible.
Finding Feature Information
Your software release may not support all the features documented in this module. For the latest feature information and caveats, see the release notes for your platform and software release. To find information about the features documented in this module, and to see a list of the releases in which each feature is supported, see the Feature Information Table at the end of this document.
Use Cisco Feature Navigator to find information about platform support and Cisco software image support. To access Cisco Feature Navigator, go to www.cisco.com/go/cfn. An account on Cisco.com is not required.
Prerequisites for XML-PI
- You must be familiar with NETCONF and the Programmer's Guide for Cisco Enhanced Device Interface 2.2 .
- You must be familiar with RFC 4741, NETCONF Configuration Protocol and RFC 4742, Using the NETCONF Configuration Protocol over Secure SHell (SSH) .
- NETCONF and Secure Shell Version 2 (SSHv2) are both required to run XML-PI. SSHv2 is the only transport protocol supported for XML-PI Release 1.0. Together, NETCONF and SSHv2 terminate the session layer and provide a secure connection. See the Network Configuration Protocol document for additional prerequisites and information about NETCONF and SSHv2.
Restrictions for XML-PI
XML-PI Supported Only on Crypto Image Files
Use of NETCONF and SSHv2 with XML-PI functionality is supported only on Cisco IOS crypto reformation images, such as IPBASEK9. Use Cisco Feature Navigator to find information about platform and software support for Cisco IOS crypto security images; see the GUID-BB3F6ACB-3AD0-42CD-AA50-1D90EC670E8E in this document for more information about Feature Navigator.
Spec Files Must Be Local
Spec files (described in the ODM Tool and Spec Files section) must reside locally on the network device. Using spec files from a remote filesystem is not supported.
XML-PI and NETCONF
There are two ways XML-PI can deliver XML output from show commands: using either NETCONF or via the Cisco CLI from the console. In cases where non-CLI access to XML-PI is desirable, only NETCONF can be used to retrieve show command output.
Configuration changes using XML-PI can only be done using NETCONF. XML cannot be directly entered on the console CLI.
The Cisco IOS running configuration can be retrieved from the console by executing the show running-config | formatcommand, in addition to being available via NETCONF.
Invalid XML Response with <get-config> Operation
The <get-config> operation with the config-format-xml filter returns missing or wrong closing tags for <X-Interface>, as shown in the following examples:
<LineVty0-Configuration>
	<X-Interface> password cisco<X-Interface> <X-Interface> transport input
	all<X-Interface> </LineVty0-Configuration>
XML Tag for Parameters Is Not Interpreted Correctly
The <edit-config> operation with a merge or create containing an invalid XML tag for parameters is not interpreted correctly. You must be sure to enter the string with proper capitalization.
In the following example, the router hostname becomes "systemnetworkname" (text in bold for purpose of example):
<?xml version="1.0"?>
<rpc message-id="7" xmlns="urn:ietf:params:xml:ns:netconf:base:1.0"
xmlns:xsi="http://www.w3.org/2001/XMLSchema-instance">
  <edit-config>
    <target>
      <running/>
    </target>
    <config>
      <xml-config-data>
        <Device-Configuration>
        <hostname>
          <systemnetworkname operation="create">XmlpiRouter</systemnetworkname>
        </hostname>
        </Device-Configuration>
      </xml-config-data>
    </config>
  </edit-config>
</rpc>
In the following example, the router hostname becomes "XmlpiRouter" because the "Systemnetworkname" string was entered correctly with an initial capital letter:
<?xml version="1.0"?>
<rpc message-id="7" xmlns="urn:ietf:params:xml:ns:netconf:base:1.0"
xmlns:xsi="http://www.w3.org/2001/XMLSchema-instance">
  <edit-config>
    <target>
      <running/>
    </target>
    <config>
      <xml-config-data>
        <Device-Configuration>
        <hostname>
          <Systemnetworkname operation="create">XmlpiRouter</Systemnetworkname>
        </hostname>
        </Device-Configuration>
      </xml-config-data>
    </config>
  </edit-config>
</rpc>
Information About XML-PI
XML-PI Overview
XML-PI Release 1.0 offers new NETCONF data models that collect show command output down to the keyword level and running configurations without the complexity and expense of screen-scraping technologies or external XML-to-CLI gateways. XML-PI allows the native conversion of Cisco IOS show command output into tagged XML and provides the associated schema definition. The resulting output is in a consistent, unambiguous format that is easily interpreted. Additional tools allow the output format to be customized for individual user requirements.
The following XML-PI Release 1.0 capabilities will help you quickly develop XML-based network management applications:
- Execute selected show commands and retrieve the output in well-formed XML.
Use a format modifier that feeds the show command output through an XML converter.
- Retrieve the XML Schema Definition (XSD) for selected show commands.
Execute the show xsd-format command to display the XSD to which the XML output conforms.
- Execute the show format command to display a list of commands with a spec file entry (SFE) in the spec file, display the XML format SFE for a specific command, or validate a spec file. For more information on spec files and SFEs, see the ODM Tool and Spec Files
- Retrieve the running configuration in XML.
XML-PI Release 1.0 provides native XML output for the show running-config command.
- Change the running configuration on a network device by sending an XML fragment of a configuration change.
- Quickly adapt capabilities of XML-PI using fully formed sample applications.
You can use a built-in file containing definitions for the most commonly used show commands to get started on application development immediately.
The commands and output files are associated with NETCONF using the netconf format global configuration command. Commands are also available to help you see XML tag hierarchy, list the show commands that have been converted, and debug output.
NETCONF Overview
The following sections summarize the NETCONF operations:
- NETCONF Enhancements
- Enhancement to Retrieve show running-config Output
- Enhancement to Change the Running Configuration
- Enhancement for Retrieving show Commands
NETCONF Enhancements
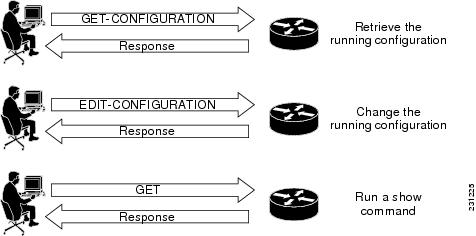
XML-PI is integrated as a data model for NETCONF, which builds on top of the industry standard protocol that allows Cisco network devices to be managed in a more automatic and programmatic way.
In XML-PI, each command keyword, parameter, and submode change is wrapped in XML tokens, which are generated based on, respectively, the keyword, help, and submode strings.
The figure below shows the key enhancements to the get-config, edit-config, and get operations, which are entered as <get-config>, <edit-config>, and <get> strings respectively in the enhanced device interface for XML-PI Release 1.0.
The following sections summarize these enhancements. Refer to the Programmer's Guide for Cisco Enhanced Device Interface 2.2 for more information.
Enhancement to Retrieve show running-config Output
The following subtree is added to the <get-config> operation to allow XML output for the show running-config to be retrieved using NETCONF:
<get-config>
    <source><running/></source>
    <filter type="cli"><config-format-xml options".."></config-format-xml></filter>
</get-config>
The NETCONF <get-config> operation with the filter containing the string <config-format-xml> in the request expects a response in XML-PI format. Only the running configuration is supported. Following is an example:
<?xml version="1.0" encoding="UTF-8"?>
<rpc message-id="4" xmlns="urn:ietf:params:xml:ns:netconf:base:1.0">
 <get-config>
  <source><running/></source>
  <filter type="cli"><config-format-xml options="all"></config-format-xml></filter>
 </get-config>
</rpc>]]>]]>
Enhancement to Change the Running Configuration
The following subtree is added to the Config node to allow the running configuration to be changed using NETCONF:
<xml-config-data> ...entire subtree with C2X encoded payload </xml-config-data>
XML-PI configuration mode is allowed using the NETCONF <edit-config> operation only. The mode is identified when the config-format-xml XML tag is seen in an <edit-config> operation. The response is standard NETCONF success or fail. The configuration carried in the <edit-config> operation is converted to CLI using the X2C algorithm. All standard NETCONF options such as syntax check and rollback-on-error are supported. If the CLI generated from XML causes an error, an operation failed message is sent back to the request originator.
The ability for a NETCONF <edit-config> operation to accept XML-PI formatted requests is not related to the spec files. The understanding of the XML-PI configuration format is built into Cisco IOS and is an algorithmic conversion, so it cannot be modified dynamically like the spec files for the show commands.
A partial configuration as a subset of the full device configuration can be sent to the network device provided that the partial configuration unambiguously maps to a CLI configuration. The partial configuration must have context information such as interface or other submode information, if required, and must support rollback if the configuration cannot be applied.
 Note | Rollback is supported only when "archive" is configured on the network device, which is a Cisco IOS requirement. |
Adding Two IP Hosts: Example
The following is an example of using the <edit-config> operation to modify the running configuration by adding two IP hosts:
<?xml version="1.0" encoding="UTF-8"?>
<rpc message-id="2"  xmlns="urn:ietf:params:xml:ns:netconf:base:1.0">
  <edit-config>
    <target><running/></target>
    <config>
      <xml-config-data>
        <Device-Configuration>
          <ip>
            <host>
              <NameHost>host1</NameHost>
              <HostIPAddress>10.2.3.4</HostIPAddress>
            </host>
          </ip>
          <ip>
            <host>
              <NameHost>host2</NameHost>
              <HostIPAddress>10.2.3.5</HostIPAddress>
            </host>
          </ip>
        </Device-Configuration>
      </xml-config-data>
    </config>
  </edit-config>
</rpc>]]>]]>
Deleting Two IP Hosts: Example
The following is an example of using the <edit-config> operation to modify the running configuration by deleting two IP hosts:
<?xml version="1.0" encoding="UTF-8"?>
<rpc message-id="3"  xmlns="urn:ietf:params:xml:ns:netconf:base:1.0">
  <edit-config>
    <target><running/></target>
    <config>
      <xml-config-data>
        <Device-Configuration>
          <ip>
            <host operation="delete">
              <NameHost>host1</NameHost>
             <HostIPAddress>10.2.3.4</HostIPAddress>
           </host>
         </ip>
         <ip>
            <host operation="delete">
             <NameHost>host2</NameHost>
             <HostIPAddress>10.2.3.5</HostIPAddress>
            </host>
          </ip>
        </Device-Configuration>
      </xml-config-data>
    </config>
  </edit-config>
</rpc>]]>]]>
Enhancement for Retrieving show Commands
NETCONF for retrieving show commands has the ability to collect command output down to the keyword level. The following subtree is added under the <get> operation:
    <filter type="cli">
      <config-format-text-block><text-filter-spec>| inc netconf</text-filter-spec></config-format-text-block>
      <oper-data-format-xml><show xsd="true">...</show><show>...</show></oper-data-format-xml>
    </filter>
<get> Response
The reply to the <get> operation generates the following response:
<?xml version="1.0" encoding="UTF-8"?>
<rpc-reply message-id="XXXX" xmlns="urn:ietf:params:netconf:base:1.0">
  <data>
    <cli-config-data-xml>... config gets embedded here ...</cli-config-data-xml>
    <cli-oper-data-xml>
      <item>
        <show>...</show>
        <xsd>  ... xsd text gets embedded here ... </xsd>
      </item>
      ...multiple items ...
    </cli-oper-data-xml>
  </data>
</rpc-reply>]]>]]>
ODM Tool and Spec Files
The Operational Data Model (ODM) tool developed by Cisco Enhanced Device Interface (E-DI) provides an interface for creating a new ODM spec file from a CLI data file, for a particular show command. Spec files are defined by an E-DI metalanguage and contain a pattern-matching algorithm that collects output from Cisco IOS EXEC show commands and places it into a specific schema. The output of each show command is associated with an ODM spec file.
The spec file represents spatial information to extract or parse data and structural information to model the data. A benefit of using spec files is that different format descriptions can be embedded in them, thereby making the task of customizing applications easy.
The spec file can contain many individual command definitions stored as an SFE. Each SFE is delimited by a line containing three pound signs (###). The lines immediately following the ### delimiter contain the name of the command to convert. Following the command name line is spec file data, which must begin with an XML header, for example <?xml version="1.0" encoding="UTF-8"?> . The ### is both a start and stop delimiter unless the end of file (EOF) string is encountered, as shown in the following sample format:
###
show ip arp
<?xml version="1.0" encoding="UTF-8"?>
 ... the spec conversion for ip arp
###
show ip interface brief
<?xml version="1.0" encoding="UTF-8"?>
... the spec conversion for show ip interface brief
###
show interfaces *
show another cli
<?xml version="1.0" encoding="UTF-8"?>
... The spec conversion for ip interface
A wildcard character (*) can be used to match command names, and uses the following search order: Find an exact match or, if not an exact match, use the wildcard character to match the maximum number of characters. The table below provides examples of how the wildcard character can be used in the spec file to match command names.
| Table 1 | Wildcard Character Command Name Matching |
|
String |
Example of Characters Matched |
|---|---|
|
show interfaces |
Matches "show interfaces" |
|
show interfaces s* |
Matches "show interfaces summary" |
|
show interfaces * |
Matches "show interfaces FastEthernet 0/0" |
You can change the spec filename, and you can modify and customize the SFE to specific interpretation formats. If the contents of the SFE do not comply with the spec file format and language, the conversion is not loaded and no interpretation of data occurs. An error message stating the SFE is uninterpretable is generated. The format of the error message depends on the source of the request to access the spec file. NETCONF requests return a Remote Procedure Call (RPC) get rpc-reply with an error condition; CLI-based requests return get error messages on the console. Limited format debug capability is provided by the debug format all command. Each SFE is treated independently, and a badly formatted SFE does not affect any other SFE in the file.
You can use the show format command to display a list of commands with an SFE in the spec file, display the XML format SFE for a specific command, or validate a spec file.
Note | Sample spec files are available for most commonly used Cisco IOS show commands and can be downloaded from Cisco.com. You can use the sample files "as is" or modify them for your application. |
XML-CLI Conversion Algorithms
The X2C and C2X conversion algorithms are used to convert XML into CLI and CLI into XML, respectively. There are no schema used with these algorithms. The following sections provide more information about these algorithms:
X2C Algorithm
The X2C algorithm builds a Document Object Model (DOM) tree from XML. Each node in the tree can be classified as one of three node types, depending on its name, as follows:
- KEYWORD_NODE--The tag name starts with a lowercase letter or an underscore. [a...z, _]. The underscore is used to prefix any numeric value that is a keyword.
- SUBMODE_NODE--The tag name ends with -Configuration.
- PARAM_NODE--Any other nonzero length string.
The X2C algorithm then decodes a DOM tree by recursively descending the tree. In the following example, this_node is used to track the current DOM node and this_cmd is the CLI string being built:
decode_node(this_node)
    if (this_node is KEYWORD_NODE) {
        if  (this_node has attribute isNegation) {
          prepend "no" to this_cmd
        }
        convert this_node name to be a keyword.
        Add keyword to end of this_cmd
        iterate children of this_node through decode_node.
    } else if (this_node is PARAM_NODE) {
        add the node body data to this_cmd
    } else if (this_node is SUBMODE_NODE) {
      this_cmd is finalised and reset to ""
      iterate children of this_node through decode_node.
    }
}
C2X Algorithm
For the C2X algorithm, each CLI word is categorized as one of the three node types, the same as described in the X2C Algorithm. The Cisco IOS CLI parser is used to generate the running configuration of the network device. As each line is generated, each word in the line is parsed through and, depending upon whether the parser encounters a KEYWORD_NODE or a PARAM_NODE, the appropriate XML tag conversion is made. If traversing through to the next line causes a SUBMODE_NODE change, the submode XML wrapper is entered or closed depending on whether the mode is entered or exited.
The C2X algorithm converts Cisco IOS CLI into XML based on keywords and parameters. CLI keywords become XML tags and parameters become the bodies of tags whose names are made by parsing the CLI help strings.
The following example is the CLI view of an interface command:
interface GigabitEthernet0/1
 ip address 10.4.0.13 255.0.0.0
 duplex auto
 speed auto
 media-type rj45
 no negotiation auto
The following example shows the C2X equivalent:
<Device-Configuration>
  <interface>
    <Param>GigabitEthernet0/1</Param>
    <ConfigIf-Configuration>
      <ip>
        <address>
          <IPAddress>10.4.0.13</IPAddress>
          <IPSubnetMask>255.0.0.0</IPSubnetMask>
        </address>
      </ip>
      <duplex><auto/></duplex>
      <speed><auto/></speed>
      <media-type><rj45/></media-type>
      <negotiation operation="delete" ><auto/></negotiation>
    </ConfigIf-Configuration>
  </interface>
</Device-Configuration>
How to Use XML-PI
- Configuring NETCONF for XML-PI
- Generating XML Format for Commands
- Generating XSD Format for Commands
- Troubleshooting ODM Errors
- Managing Files
Configuring NETCONF for XML-PI
Perform this required task to configure a secure login environment and define the file to use for XML-formatted requests.
DETAILED STEPS
Generating XML Format for Commands
To convert Cisco IOS show command output into XML format, XML-PI provides the formatoutput modifier to the show command output. This section describes how to use this modifier. For examples of command output, see the Examples Generating show Command XML Format and the Examples Generating show running-config XML Format.
Note | The show running-config command output is generated natively in XML, so the spec filename could be an empty file. If a default spec file has been defined with the format global command, no filename is required. |
DETAILED STEPS
| Step 1 |
show-command
| format[location:local-filename] This command executes the show command then redirects the output into the format function that will generate XML based on the specified spec file or, if no spec file is specified, the default spec file defined by the format global configuration command. Command names can be truncated. The location : local-filenamearguments and keyword are the location and filename of the ODM spec file. Valid locations are bootflash:, flash:, nvram:, and any valid disk or slot number (for example: disk0: or slot1:). ODM spec files have a .odm suffix. The following is a sample command that uses the default ODM file to generate XML: Example:
Router# show arp | format slot0:spec3.3.odm
|
| Step 2 |
show
running-config
{all| brief| full| interface interface-name} | format[filename If you are generating output for the show running-config command, you can supply the following keywords and arguments with this command:
The following is a sample command: Example:
Router# show running-config brief | format
|
Generating XSD Format for Commands
The show xsd-format command is used to display the XSD to which the XML output conforms. This section describes how to use this command. For example of command output, see Example Generating show Command XSD Format.
DETAILED STEPS
|
show
xsd-format
[location:local-filename] cli command
The locationand local-filenamearguments are the location and filename of the ODM spec file Valid location keywords are bootflash:, flash:, nvram:, and any valid disk or slot number (for example: disk0: or slot1:). ODM spec files have a .odm suffix. These arguments are not required if you want to use a default ODM file defined with the format global command. The first of the following two examples, displays XSD output from a defined default ODM spec file: Example: Router# show xsd-format cli show arp Router# show xsd-format disk2:spec3.3.odm cli show arp
|
Troubleshooting ODM Errors
DETAILED STEPS
| Step 1 |
enable
Enter this command to enable the privileged EXEC mode required to run debug commands. |
| Step 2 |
debug
format
all
Enter this command to enable a verbose debugging mode that displays all ODM errors. |
| Step 3 |
show-command
format
location:local-filename
Enter this command to generate XML output for the show interfacescommand. The following is sample output: Example:
Router# show interfaces | format slot0:spec3.3.odm
Selected debug data is displayed with comments followed by the full debug output. The debug format statements are read in groups of two lines. As the following example shows, the first line describes what the attempted match was; the second line provides the offset and the byte count from the beginning of the show interfacescommand output that the cursor of the screen scraper is currently at: Example: *May 4 01:20:35.279: ODM: Could not match Property mcast *May 4 01:20:35.279: offset 703: 5 minute output rate 0 bits/sec, 0 packets/sec The following example shows where the SFE caused the ODM algorithm to return a truncated XML. Notice how the offset jumps from 703 to 3001. This is a large jump that implies a search between multicast and IP multicast probably caused the screen scraper to jump too far into the text. Because the cursor is not at a buffer, this condition is the likely candidate for the error. Looking at the spec file entry and doing a manual search through the show command output will confirm this suspicion. Example:
*May 4 01:20:35.279: offset 703: 5 minute output rate 0 bits/sec, 0 packets/sec
786 pa
*May  4 01:20:35.279: ODM: Could not match Property mcast
*May  4 01:20:35.279: offset 703: 5 minute output rate 0 bits/sec, 0 packets/sec
786 pa
*May 4 01:20:35.279: ODM: Could not match Property IP multicasts
*May 4 01:20:35.279: offset 3001: no buffer
Received 0 broadcasts, 0 runts, 0 giants, 0
*May 4 01:20:35.279: ODM: Could not match Property watchdog
*May 4 01:20:35.279: offset 3122: ignored, 0 abort
0 packets output, 0 bytes, 0 underru
*May 4 01:20:35.279: ODM: Could not match Property input packets with dribble condition detected
|
| Step 4 |
no
debug
format
all
Disable the debug command when troubleshooting is complete. |
Managing Files
This section provides the following procedures for managing files in XML-PI:
Displaying Files on a Cisco IOS Filesystem Example
The following example shows how to display a list of files:
Router# show format slot0:?
slot0:spec3.3.odm      slot0:spec3.ALR.odm      slot0:spec3.empty.odm
Note | The question mark (?) command can be used following any of the locationkeywords (bootflash, slot, and so on) in the show format and show xsd-format commands, to list all files. Spec files have a .odm file extension. |
Managing Spec Files
Use the spec-file install privileged EXEC command to manage the spec files. The following commands allow you to make backup copies of the built-in spec file before changing the contents of the file, and to restore the contents of a previous spec file. You can also copy and remove SFEs from one spec file to another.
Valid locations for local files are bootflash:, flash:, nvram:, and any valid disk or slot number (example: disk0: or slot1:).
Valid URLs for remote files are archive:, bootflash:, cns:, flash:, ftp:, http:, null:, nvram:, pram:, rcp:, scp:, system:, tar:, tftp:, tmpsys:and any valid disk or slot number (for example, disk0: or slot1:).
In all cases, the force keyword performs the command without prompting you to verify the file operation by entering a "yes" or "no" response.
DETAILED STEPS
| Command or Action | Purpose | |
|---|---|---|
Step 1 |
spec-file
install
[force] location:local-filename add-entry url:remote-filename command Example: Router# spec-file install slot0:spec_file.odm add-entry tftp://system1/user1/show_arp.odm show arp |
Copies an SFE from a remote location and adds it to a local spec file.
|
Step 2 |
spec-file
install
[force] location:local-filename built-in Example: Router# spec-file install slot0:spec_file.odm built-in |
Replaces the current spec file with the built-in spec file.
|
Step 3 |
spec-file
install
[force] location:local-filename file url:remote-filename Example: Router# spec-file install slot0:spec_file.odm file tftp://system1/user1/spec_file.odm |
Replaces a local spec file with a remote spec file.
|
Step 4 |
spec-file
install
[force] location:local-filename remove-entry command Example: Router# spec-file install slot0:spec_file.odm remove-entry show arp |
Removes an SFE from a spec file.
|
Step 5 |
spec-file
install
[force] location:local-filename restore Example: Router# spec-file install slot0:spec_file.odm restore |
Restores a spec file to its original contents using a backup (.bak) file.
|
Validating Spec Files
This section describes use of the show formatcommand to validate a spec file.
The show format built-in validate form of the command is used to validate the built-in spec file. The show format location : local-filename validate form of the command is used to validate a specific spec file.
Note | Spec files must reside locally on the network device. Using spec files from a remote filesystem is not supported. > |
DETAILED STEPS
| Command or Action | Purpose | |
|---|---|---|
Step 1 |
enable
Example: Router> enable |
Enables privileged EXEC mode.
|
Step 2 |
show
format
[built-in
|
location:local-filename]
[cli
command
|
validate]
Example: Router# show format built-in validate |
Validates the built-in spec file. |
Configuration Examples for XML-PI
- Example Configuring NETCONF for XML-PI
- Examples Generating show Command XML Format
- Examples Generating show running-config XML Format
- Example Generating show Command XSD Format
- Example Displaying the SFEs
- Example Displaying Spec File Tag Hierarchy
- Example Validating a Spec File
Example Configuring NETCONF for XML-PI
The following example shows how to configure a secure login environment. Cisco recommends that you define a default ODM file to be used for all requests using the format globalcommand. You can associate that file with NETCONF for all XML-formatted requests using the netconf format command. If no file is specified, the built-in spec file is used for all requests. See the format global and netconf format command reference pages for more information. The netconf ssh configuration command enables NETCONF over SSHv2, which terminates the session layer and provides a secure connection.
ip domain-name cisco.com
crypto key generate rsa
ip ssh timeout 60
ip ssh authentication-retries 3
ip ssh version 2
line vty 0 8
  login local
  transport input ssh
  exit
username me privilege 15 password mypassword
format global disk2:spec3.3.odm
netconf format disk2:spec3.3.odm
netconf ssh
end
Examples Generating show Command XML Format
Standard show Command Output
Following is an example of the Cisco IOS show arp command output:
Router# show arp
Protocol  Address          Age (min)  Hardware Addr   Type   Interface
Internet  10.1.1.1               67   0001.42df.59e2  ARPA   FastEthernet0/0
Internet  10.3.1.2                8   0002.55c6.19a0  ARPA   FastEthernet0/0
Internet  10.4.0.5                -   000b.60dc.9408  ARPA   FastEthernet0/0
Generating XML
Following is an example of generating XML output of the show arp command from a default ODM file:
Router# show arp | format
<?xml version="1.0" encoding="UTF-8"?>
  <ShowArp xmlns="ODM://disk0:/spec.odm//show_arp">
    <ARPTable>
      <entry>
        <Protocol>Internet</Protocol>
        <Address>10.1.1.1</Address>
        <Age>67</Age>
        <MAC>0001.42df.59e2</MAC>
        <Type>ARPA</Type>
        <Interface>FastEthernet0/0</Interface>
      </entry>
      <entry>
        <Protocol>Internet</Protocol>
        <Address>10.3.1.2</Address>
        <Age>8 </Age>
        <MAC>0002.55c6.19a0</MAC>
        <Type>ARPA</Type>
        <Interface>FastEthernet0/0</Interface>
      </entry>
      <entry>
        <Protocol>Internet</Protocol>
        <Address>10.4.0.5</Address>
        <MAC>000b.60dc.9408</MAC>
        <Type>ARPA</Type>
        <Interface>FastEthernet0/0</Interface>
      </entry>
    </ARPTable>
  </ShowArp>
Examples Generating show running-config XML Format
The following examples show the mapping between actual show running-config command output and the XSD format generated by piping the output through the spec3.3.odm spec file. (For sake of brevity, output from each command has been truncated.)
show running-config Command
Router# show running-config
Building configuration...
Current configuration : 1190 bytes
!
upgrade fpd auto
version 12.4
service timestamps debug datetime msec
service timestamps log datetime msec
no service password-encryption
service internal
!
hostname Router1
!
boot-start-marker
boot system flash:c7200-js-mz.123-5.9.T
boot-end-marker
!
logging message-counter syslog
enable password secret
!
no aaa new-model
ip cef
!
no ip domain lookup
ip domain name cisco.com
ip host host1 10.66.152.11
ip host host2 10.2.2.2
multilink bundle-name authenticated
.
.
.
Piped Output to Generate XML
Router# show running-config | format
Building configuration...
<Device-Configuration>
<upgrade><fpd><auto/></fpd></upgrade>
<version><Param>12.4</Param></version>
<service><timestamps><debug><datetime><msec/></datetime></debug></timestamps></>
<service><timestamps><log><datetime><msec/></datetime></log></timestamps></serv>
<service operation="delete" ><password-encryption/></service>
<service><internal/></service>
<hostname><SystemNetworkName>Router1</SystemNetworkName></hostname>
<boot-start-marker></boot-start-marker>
<boot><system><TFTPFileNameURL>flash:c7200-js-mz.123-5.9.T</TFTPFileNameURL></s>
<boot-end-marker></boot-end-marker>
<logging><message-counter><syslog/></message-counter></logging>
<enable><password><UnencryptedEnablePassword>secret</UnencryptedEnablePassword><>
<aaa operation="delete" ><new-model/></aaa>
<ip><cef/></ip>
<ip operation="delete" ><domain><lookup/></domain></ip>
<ip><domain><name><DefaultDomainName>cisco.com</DefaultDomainName></name></doma>
<ip><host><NameHost>host1 </NameHost><HostIPAddress>10.66.152.11</HostIPAddre>
<ip><host><NameHost>host2 </NameHost><HostIPAddress>10.2.2.2</HostIPAddress></ho>
<multilink><bundle-name><authenticated/></bundle-name></multilink>
.
.
.
The returned data is the requested configuration converted using the C2X algorithm.
Example Generating show Command XSD Format
The following example shows how to generate XSD for the show arp command:
Router# show xsd-format disk2:spec3.3.odm cli show arp
<?xml version="1.0"?>
  <xsd:schema elementFormDefault="qualified" attributeFormDefault="unqualified" xmlns:xsd="http://www.w3.org/2001/XMLSchema">
    <xsd:complexType name="ShowArp_def">
      <xsd:sequence>
        <xsd:choice minOccurs="0" maxOccurs="unbounded">
          <xsd:element ref="Info"/>
          <xsd:element name="ARPTable" minOccurs="0">
            <xsd:complexType>
              <xsd:sequence>
                <xsd:element name="entry" minOccurs="0" maxOccurs="unbounded">
                  <xsd:complexType>
                    <xsd:sequence>
                      <xsd:element name="Protocol" minOccurs="0" type="string" />
                      <xsd:element name="Address" minOccurs="0" type="string" />
                      <xsd:element name="Age" minOccurs="0" type="integer" />
                      <xsd:element name="MAC" minOccurs="0" type="string" />
                      <xsd:element name="Type" minOccurs="0" type="string" />
                      <xsd:element name="Interface" minOccurs="0" type="string" />
                    </xsd:sequence>
                  </xsd:complexType>
                </xsd:element>
              </xsd:sequence>
            </xsd:complexType>
          </xsd:element>
        </xsd:choice>
      </xsd:sequence>
    </xsd:complexType>
    <xsd:element name="Info" type="xsd:string"/>
    <xsd:element name="ShowArp" type="ShowArp_def"/>
  </xsd:schema>
Example Displaying the SFEs
The following example shows how to display the SFE for the show arp command:
Router# show format disk2:spec3.3.odm cli show arp
<?xml version="1.0" encoding="UTF-8"?>
<ODMSpec>
  <Command>
    <Name>show arp</Name>
  </Command>
  <OS>ios</OS>
  <DataModel>
    <Container name="ShowArp" >
      <Table name="ARPTable">
        <Header name = "Protocol" start = "0" end = "10" type = "String"/>
        <Header name = "Address" start = "10" end = "26" type = "IpAddress"/>
        <Header name = "Age (min)" alias = "Age" start = "26" end = "36" type = "Integer"/>
        <Header name = "Hardware Addr" alias="MAC" start = "36" end = "53" type = "String"/>
        <Header name = "Type" start = "53" end = "59" type = "String"/>
        <Header name = "Interface" start = "59" end = "-1" nullable = "true" type = "String"/>
      </Table>
    </Container>
  </DataModel>
</ODMSpec>
The following example shows a list of fully expanded command names that have spec files in the default ODM file:
Router# show format
The following CLI are supported in slot0:spec3.3.odm
show arp
show cdp neighbors detail
show context
show flash:
show interfaces*
show inventory
show ip interface brief
show ip nat translations
show line value
show line
show processes cpu
show processes memory
show region
show spanning-tree
show stacks
show vlans
Example Displaying Spec File Tag Hierarchy
The show odm-formatcommand displays the spec file structure in a fixed output that you can refer to in order to understand the spec file tag hierarchy. The following example shows the fixed output from the show odm-formatcommand. Refer to the Programmer's Guide for Cisco Enhanced Device Interface 2.2 for more information about the ODM tool and tag hierarchy.
Router# show odm format
New Name Space ''
<NotARealTag> Either 0 or 1 allowed
  <ODMSpec> Exactly 1 required
    <Command> Exactly 1 required
      <Name> Exactly 1 required
      <AliasSet> Either 0 or 1 allowed
        <Alias> At least 1 required
    <OS> Either 0 or 1 allowed
    <DataModel> Exactly 1 required
      <Container> Exactly 1 required
        <Table> 0 or more is allowed
          <Header> At least 1 required
            <Option> 0 or more is allowed
          <EndOfTheTable> Either 0 or 1 allowed
        <Property> 0 or more is allowed
          <Option> 0 or more is allowed
        <Container> 0 or more is allowed
          <Table> 0 or more is allowed
            <Header> At least 1 required
              <Option> 0 or more is allowed
            <EndOfTheTable> Either 0 or 1 allowed
          <Property> 0 or more is allowed
            <Option> 0 or more is allowed
             <Container> 0 or more is allowed
          <Legends> 0 or more is allowed
            <Legend> At least 1 required
          <IgnorableLinesList> 0 or more is allowed
            <Line> At least 1 required
        <Legends> 0 or more is allowed
          <Legend> At least 1 required
        <IgnorableLinesList> 0 or more is allowed
          <Line> At least 1 required
Additional References
Related Documents
MIBs
Technical Assistance
|
Description |
Link |
|---|---|
|
The Cisco Support website provides extensive online resources, including documentation and tools for troubleshooting and resolving technical issues with Cisco products and technologies. To receive security and technical information about your products, you can subscribe to various services, such as the Product Alert Tool (accessed from Field Notices), the Cisco Technical Services Newsletter, and Really Simple Syndication (RSS) Feeds. Access to most tools on the Cisco Support website requires a Cisco.com user ID and password. |
Feature Information for XML-PI
The following table provides release information about the feature or features described in this module. This table lists only the software release that introduced support for a given feature in a given software release train. Unless noted otherwise, subsequent releases of that software release train also support that feature.
Use Cisco Feature Navigator to find information about platform support and Cisco software image support. To access Cisco Feature Navigator, go to www.cisco.com/go/cfn. An account on Cisco.com is not required.
| Table 2 | Feature Information for XML-PI |
|
Feature Name |
Releases |
Feature Information |
|---|---|---|
|
XML-PI |
12.4(20)T 12.2(33)SRE 12.2(54)SG 12.2(50)SY |
The eXtensible Markup Language Programmatic Interface (XML-PI) Release 1.0 leverages the Network Configuration Protocol (NETCONF) and offers new data models that collect show command output down to the keyword level and running configurations without the complexity and expense of screen-scraping technologies or external XML-to-CLI gateways. XML-PI allows you to quickly develop XML-based network management applications. The following commands were introduced or modified by this feature: debug format, format global, netconf format show format, show odm-format, show xsd-format, spec-file install add-entry, spec-file install built-in, spec-file install file, spec-file install remove-entry, and spec-file install restore. This feature was integrated into Cisco IOS Release 12.2(33)SRE. The following command was introduced or modified by this feature: show format. |
Glossary
C2X --CLI to XML.
CLI --command-line interface. An interface that allows the user to interact with the operating system by entering commands and optional arguments.
E-DI --Enhanced Device Interface.
NETCONF --Network Configuration Protocol.
ODM --Operational Data Model.
RSA --Rivest, Shamir, and Adelman, the inventors of the technique. Public-key cryptographic system that can be used for encryption and authentication.
SSH --Secure Shell.
X2C --XML to CLI.
XML --eXtensible Markup Language.
XSD --XML Schema Definition.