
 Feedback
Contents
- Configuring Authentication Proxy
- Finding Feature Information
- Prerequisites for Configuring Authentication Proxy
- Restrictions for Configuring Authentication Proxy
- Information About Configuring Authentication Proxy
- How Authentication Proxy Works
- Secure Authentication
- Operation with JavaScript
- Operation Without JavaScript
- Using Authentication Proxy
- When to Use the Authentication Proxy
- Applying Authentication Proxy
- Operation with One-Time Passwords
- Compatibility with Other Security Features
- NAT Compatibility
- CBAC Compatibility
- VPN Client Compatibility
- Compatibility with AAA Accounting
- Protection Against Denial-of-Service Attacks
- Risk of Spoofing with Authentication Proxy
- Comparison with the Lock-and-Key Feature
- AAA Fail Policy
- Customization of the Authentication Proxy Web Pages
- How to Configure Authentication Proxy
- Configuring AAA
- Configuring the HTTP Server for Authentication Proxy
- Configuring Authentication Proxy
- Verifying Authentication Proxy
- Checking the Authentication Proxy Configuration
- Displaying the User Authentication Entries
- Establishing User Connections with JavaScript
- Establishing User Connections Without JavaScript
- Monitoring and Maintaining Authentication Proxy
- Displaying Dynamic ACL Entries
- Deleting Authentication Proxy Cache Entries
- Configuration Examples for Authentication Proxy
- Authentication Proxy Configuration Example
- AAA Configuration Example
- HTTP Server Configuration Example
- Authentication Proxy Configuration Example
- Interface Configuration Example
- Authentication Proxy IPSec and CBAC Configuration Example
- Router 1 Configuration Example
- Router 2 Configuration Example
- Authentication Proxy IPSec NAT and CBAC Configuration Example
- Router 1 Configuration Example
- Router 2 Configuration Example
- AAA Server User Profile Example
- CiscoSecure ACS 2.3 for Windows NT
- CiscoSecure ACS 2.3 for UNIX
- TACACS+ Server
- Livingston Radius Server
- Ascend Radius Server
- Additional References
- Feature Information for Authentication Proxy
Configuring Authentication Proxy
The Cisco IOS Firewall Authentication Proxy feature provides dynamic, per-user authentication and authorization, authenticating users against industry standard TACACS+ and RADIUS authentication protocols. Authenticating and authorizing connections by users provides more robust protection against network attacks.
- Finding Feature Information
- Prerequisites for Configuring Authentication Proxy
- Restrictions for Configuring Authentication Proxy
- Information About Configuring Authentication Proxy
- How to Configure Authentication Proxy
- Monitoring and Maintaining Authentication Proxy
- Configuration Examples for Authentication Proxy
- Additional References
- Feature Information for Authentication Proxy
Finding Feature Information
Your software release may not support all the features documented in this module. For the latest feature information and caveats, see the release notes for your platform and software release. To find information about the features documented in this module, and to see a list of the releases in which each feature is supported, see the Feature Information Table at the end of this document.
Use Cisco Feature Navigator to find information about platform support and Cisco software image support. To access Cisco Feature Navigator, go to www.cisco.com/go/cfn. An account on Cisco.com is not required.
Prerequisites for Configuring Authentication Proxy
Prior to configuring authentication proxy, review the following:
-
For the authentication proxy to work properly, the client host must be running the following browser software:
- Microsoft Internet Explorer 3.0 or later
- Netscape Navigator 3.0 or later
- The authentication proxy has an option to use standard access lists. You must have a solid understanding of how access lists are used to filter traffic before you attempt to configure the authentication proxy. For an overview of how to use access lists with the Cisco IOS Firewall, refer to the chapter "Access Control Lists: Overview and Guidelines."
- The authentication proxy employs user authentication and authorization as implemented in the Cisco authentication, authorization, and accounting (AAA) paradigm. You must understand how to configure AAA user authentication, authorization, and accounting before you configure the authentication proxy. User authentication, authorization, and accounting are explained in the chapter "Authentication, Authorization, and Accounting (AAA)."
- To run the authentication proxy successfully with Cisco IOS Firewall, configure CBAC on the firewall. For complete information on the CBAC feature, refer to the chapter "Configuring Context-Based Access Control."
Restrictions for Configuring Authentication Proxy
- The authentication proxy triggers only on HTTP connections.
- HTTP services must be running on the standard (well-known) port, which is port 80 for HTTP.
- Client browsers must enable JavaScript for secure authentication.
- The authentication proxy access lists apply to traffic passing through the router. Traffic destined to the router is authenticated by the existing authentication methods provided by Cisco IOS software.
- The authentication proxy does not support concurrent usage; that is, if two users try to log in from the same host at the same time, authentication and authorization applies only to the user who first submits a valid username and password.
- Load balancing using multiple or different AAA servers is not supported.
Information About Configuring Authentication Proxy
The Cisco IOS Firewall authentication proxy feature allows network administrators to apply specific security policies on a per-user basis. Previously, user identity and related authorized access were associated with a user IP address, or a single security policy had to be applied to an entire user group or subnetwork. Now, users can be identified and authorized on the basis of their per-user policy. Tailoring of access privileges on an individual basis is possible, as opposed to applying a general policy across multiple users.
With the authentication proxy feature, users can log in to the network or access the Internet via HTTP, and their specific access profiles are automatically retrieved and applied from a CiscoSecure ACS, or other RADIUS, or TACACS+ authentication server. The user profiles are active only when there is active traffic from the authenticated users.
The authentication proxy is compatible with other Cisco IOS security features such as Network Address Translation (NAT), Context-based Access Control (CBAC), IP Security (IPSec) encryption, and Cisco Secure VPN Client (VPN client) software.
This section contains the following sections:
- How Authentication Proxy Works
- Secure Authentication
- Using Authentication Proxy
- When to Use the Authentication Proxy
- Applying Authentication Proxy
- Operation with One-Time Passwords
- Compatibility with Other Security Features
- Compatibility with AAA Accounting
- Protection Against Denial-of-Service Attacks
- Risk of Spoofing with Authentication Proxy
- Comparison with the Lock-and-Key Feature
- AAA Fail Policy
- Customization of the Authentication Proxy Web Pages
How Authentication Proxy Works
When a user initiates an HTTP session through the firewall, the authentication proxy is triggered. The authentication proxy first checks to see if the user has been authenticated. If a valid authentication entry exists for the user, the connection is completed with no further intervention by the authentication proxy. If no entry exists, the authentication proxy responds to the HTTP connection request by prompting the user for a username and password.
The figure below illustrates the authentication proxy HTML login page.
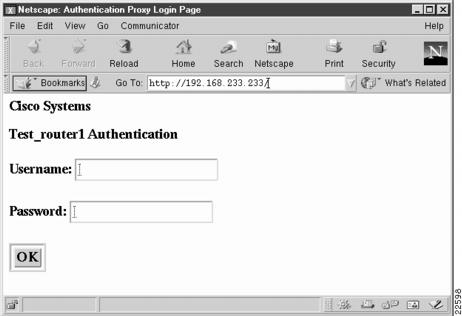
Users must successfully authenticate themselves with the authentication server by entering a valid username and password.
If the authentication succeeds, the user's authorization profile is retrieved from the AAA server. The authentication proxy uses the information in this profile to create dynamic access control entries (ACEs) and add them to the inbound (input) access control list (ACL) of an input interface and to the outbound (output) ACL of an output interface, if an output ACL exists at the interface. This process enables the firewall to allow authenticated users access to the network as permitted by the authorization profile. For example, a user can initiate a Telnet connection through the firewall if Telnet is permitted in the user's profile.
If the authentication fails, the authentication proxy reports the failure to the user and prompts the user with multiple login retries. If the user fails to authenticate after five attempts, the user must wait two minutes and initiate another HTTP session to trigger authentication proxy.
The login page is refreshed each time the user makes requests to access information from a web server.
The authentication proxy customizes each of the access list entries in the user profile by replacing the source IP addresses in the downloaded access list with the source IP address of the authenticated host.
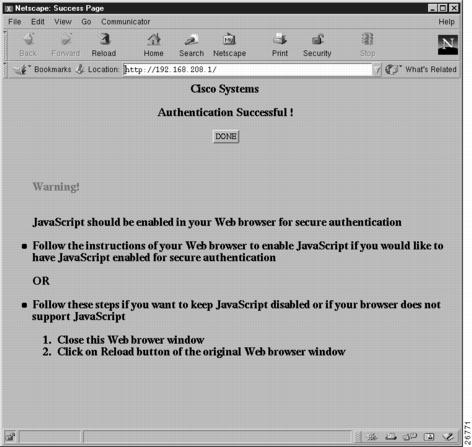
At the same time that dynamic ACEs are added to the interface configuration, the authentication proxy sends a message to the user confirming that the login was successful. The figure below illustrates the login status in the HTML page.

The authentication proxy sets up an inactivity (idle) timer for each user profile. As long as there is activity through the firewall, new traffic initiated from the user's host does not trigger the authentication proxy, and authorized user traffic is permitted access through the firewall.
If the idle timer expires, the authentication proxy removes the user's profile information and dynamic access lists entries. When this happens, traffic from the client host is blocked. The user must initiate another HTTP connection to trigger the authentication proxy.
Secure Authentication
The authentication proxy uses JavaScript to help achieve secure authentication using the client browser. Secure authentication prevents a client from mistakenly submitting a username and password to a network web server other than the authentication proxy router.
Operation with JavaScript
Users should enable JavaScript on the browser prior to initiating an HTTP connection. With JavaScript enabled on the browser, secure authentication is done automatically, and the user sees the authentication message shown in the Authentication Proxy Login Status Message figure, in the How the Authentication Proxy Works module. The HTTP connection is completed automatically for the user.
Operation Without JavaScript
If the client browser does not support JavaScript, or if site security policy prevents users from enabling JavaScript, any login attempt generates a popup window with instructions for manually completing the connection. The figure below illustrates the authentication proxy login status message with JavaScript disabled on the browser.
To close this window, click Close on the browser File menu.
After closing the popup window, the user should click Reload (Refresh for Internet Explorer) in the browser window in which the authentication login page is displayed. If the user's last authentication attempt succeeds, clicking Reload brings up the web page the user is trying to retrieve. If the user's last attempt fails, clicking Reload causes the authentication proxy to intercept the client HTTP traffic again, prompting the user with another login page that solicits the username and password.
If JavaScript is not enabled, it is strongly recommended that site administrators advise users of the correct procedure for closing the popup window as described in the section Establishing User Connections Without JavaScript.
Using Authentication Proxy
Unlike some Cisco IOS Firewall features that operate transparently to the user, the authentication proxy feature requires some user interaction on the client host. The table below describes the interaction of the authentication proxy with the client host.
| Table 1 | Authentication Proxy Interaction with the Client Host |
|
Authentication Proxy Action with Client |
Description |
|---|---|
|
Triggering on HTTP connections |
If a user is not currently authenticated at the firewall router, any HTTP connection initiated by the user triggers the authentication proxy. If the user is already authenticated, the authentication proxy is transparent to the user. |
|
Logging in using the login page |
Triggering the authentication proxy generates an HTML-based login page.The user must enter a username and password to be authenticated with the AAA server. The Authentication Proxy Login Page figure, in the How the Authentication Proxy Works module, illustrates the authentication proxy login page. |
|
Authenticating the user at the client |
Following the login attempt, the authentication proxy action can vary depending on whether JavaScript is enabled in the browser. If JavaScript is enabled, and authentication is successful, the authentication proxy displays a message indicating the status of the authentication as shown in the Authentication Proxy Login Status Message figure, in the How the Authentication Proxy Works module. After the authentication status is displayed, the proxy automatically completes the HTTP connection. If JavaScript is disabled, and authentication is successful, the authentication proxy generates a popup window with additional instructions for completing the connection. See the Authentication Proxy Login Status Message with JavaScript Disabled figure, in the Secure Authentication module. If authentication is unsuccessful in any case, the user must log in again from the login page. |
When to Use the Authentication Proxy
Here are examples of situations in which you might use the authentication proxy:
- You want to manage access privileges on an individual (per-user) basis using the services provided by the authentication servers instead of configuring access control based on host IP address or global access policies. Authenticating and authorizing users from any host IP address also allows network administrators to configure host IP addresses using DHCP.
- You want to authenticate and authorize local users before permitting access to intranet or Internet services or hosts through the firewall.
- You want to authenticate and authorize remote users before permitting access to local services or hosts through the firewall.
- You want to control access for specific extranet users. For example, you might want to authenticate and authorize the financial officer of a corporate partner with one set of access privileges while authorizing the technology officer for that same partner to use another set of access privileges.
- You want to use the authentication proxy in conjunction with VPN client software to validate users and to assign specific access privileges.
- You want to use the authentication proxy in conjunction with AAA accounting to generate "start" and "stop" accounting records that can be used for billing, security, or resource allocation purposes, thereby allowing users to track traffic from the authenticated hosts.
Applying Authentication Proxy
Apply the authentication proxy in the inbound direction at any interface on the router where you want per-user authentication and authorization. Applying the authentication proxy inbound at an interface causes it to intercept a user's initial connection request before that request is subjected to any other processing by the firewall. If the user fails to gain authentication with the AAA server, the connection request is dropped.
How you apply the authentication proxy depends on your security policy. For example, you can block all traffic through an interface and enable the authentication proxy feature to require authentication and authorization for all user initiated HTTP connections. Users are authorized for services only after successful authentication with the AAA server.
The authentication proxy feature also allows you to use standard access lists to specify a host or group of hosts whose initial HTTP traffic triggers the proxy.
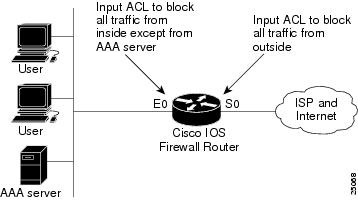
The figure below shows the authentication proxy applied at the LAN interface with all network users required to be authenticated upon the initial connection (all traffic is blocked at each interface).
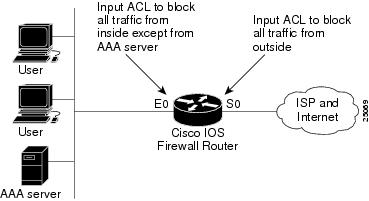
The figure below shows the authentication proxy applied at the dial-in interface with all network traffic blocked at each interface.
Operation with One-Time Passwords
Given a one-time password, the user enters the username and one-time password in the HTML login page as usual.
The user must enter the correct token password within the first three attempts. After three incorrect entries, the user must enter two valid token passwords in succession before authentication is granted by the AAA server.
Compatibility with Other Security Features
The authentication proxy is compatible with Cisco IOS software and with Cisco IOS security features:
- Cisco IOS Firewall Intrusion Detection System (IDS)
- NAT
- CBAC
- IPSec encryption
- VPN client software
The authentication proxy works transparently with the Cisco IOS Firewall IDS and IPSec encryption features.
NAT Compatibility
The authentication proxy feature is compatible with NAT only if the ACL and authentication are completed prior to the NAT translation. Although NAT is compatible with the authentication proxy feature, NAT is not a requirement of the feature.
CBAC Compatibility
Although authentication proxy is compatible with CBAC security functions, CBAC is not required to use the authentication proxy feature.
Authentication proxy's authorization returns Access Control Entries (ACEs) that are dynamically prepended into a manually created ACL. Thereafter, apply the ACL to the "protected side" inbound interface, allowing or disallowing an authorized user's source IP address access to the remote networks.
VPN Client Compatibility
Using the authentication proxy, network administrators can apply an extra layer of security and access control for VPN client traffic. If a VPN client initiates an HTTP connection, the authentication proxy first checks for prior client authentication. If the client is authenticated, authorized traffic is permitted. If the client is not authenticated, the HTTP request triggers the authentication proxy, and the user is prompted for a username and password.
If the user authentication is successful, the authentication proxy retrieves the user profile from the AAA server. The source address in the user profile entries is replaced with the IP address of the authenticated VPN client from the decrypted packet.
Compatibility with AAA Accounting
Using the authentication proxy, you can generate "start" and "stop" accounting records with enough information to be used for billing and security auditing purposes. Thus, you can monitor the actions of authenticated hosts that use the authentication proxy service.
When an authentication proxy cache and associated dynamic access control lists are created, the authentication proxy will start to track the traffic from the authenticated host. Accounting saves data about this event in a data structure stored with the data of other users. If the accounting start option is enabled, you can generate an accounting record (a "start" record) at this time. Subsequent traffic from the authenticated host will be recorded when the dynamic ACL created by the authentication proxy receives the packets.
When an authentication proxy cache expires and is deleted, additional data, such as elapsed time, is added to the accounting information and a "stop" record is sent to the server. At this point, the information is deleted from the data structure.
The accounting records for the authentication proxy user session are related to the cache and the dynamic ACL usage.
 Note | The accounting records must include RADIUS attributes 42, 46, and 47 for both RADIUS and TACACS+. |
For more information on RADIUS attributes, refer to the appendix "RADIUS Attributes."
Protection Against Denial-of-Service Attacks
The authentication proxy monitors the level of incoming HTTP requests. For each request, the authentication proxy prompts the user's for login credentials. A high number of open requests could indicate that the router is the subject of a denial-of-service (DoS) attack. The authentication proxy limits the level of open requests and drops additional requests until the number of open requests has fallen below 40.
If the firewall is experiencing a high level of connection requests requiring authentication, legitimate network users may experience delays when making connections, or the connection may be rejected and the user must try the connection again.
Risk of Spoofing with Authentication Proxy
When the authentication proxy is triggered, it creates a dynamic opening in the firewall by temporarily reconfiguring an interface with user access privileges. While this opening exists, another host might spoof the authenticated users address to gain access behind the firewall. The authentication proxy does not cause the address spoofing problem; the problem is only identified here as a matter of concern to the user. Spoofing is a problem inherent to all access lists, and the authentication proxy does not specifically address this problem.
Comparison with the Lock-and-Key Feature
Lock-and-key is another Cisco IOS Firewall feature that uses authentication and dynamic access list to provide user access through the firewall. The table below compares the authentication proxy and lock-and-key features.
| Table 2 | Comparison of the Authentication Proxy and Lock-and-Key Features |
|
Lock-and-Key |
Authentication Proxy |
|---|---|
|
Triggers on Telnet connection requests. |
Triggers on HTTP connection requests. |
|
TACACS+, RADIUS, or local authentication. |
TACACS+ or RADIUS authentication and authorization. |
|
Access lists are configured on the router only. |
Access lists are retrieved from the AAA server only. |
|
Access privileges are granted on the basis of the user's host IP address. |
Access privileges are granted on a per-user and host IP address basis. |
|
Access lists are limited to one entry for each host IP address. |
Access lists can have multiple entries as defined by the user profiles on the AAA server. |
|
Associates a fixed IP addresses with a specific user. Users must log in from the host with that IP address. |
Allows DHCP-based host IP addresses, meaning that users can log in from any host location and obtain authentication and authorization. |
Use the authentication proxy in any network environment that provides a per-user security policy. Use lock-and-key in network environments that might benefit from local authentication and a limited number of router-based access control policies based on host addresses. Use lock-and-key in environments not using the Cisco Secure Integrated Software.
AAA Fail Policy
The AAA fail policy, supported in Cisco IOS Release 12.2(33)SXI and later releases, is a method for allowing a user to connect or to remain connected to the network if the AAA server is not available. If the AAA server cannot be reached when web-based authentication of a client is needed, instead of rejecting the user (that is, not providing the access to the network), an administrator can configure a default AAA fail policy that can be applied to the user.
This policy is advantageous for the following reasons:
While the AAA fail policy is in effect, the session state is maintained as AAA Down.
Customization of the Authentication Proxy Web Pages
The switch's internal HTTP server hosts four HTML pages for delivery to an authenticating client during the web-based authentication process. The four pages allow the server to notify the user of the following four states of the authentication process:
In Cisco IOS Release 12.2(33)SXI and later releases, you can substitute your custom HTML pages for the four default internal HTML pages, or you can specify a URL to which the user will be redirected upon successful authentication, effectively replacing the internal Success page.
How to Configure Authentication Proxy
For authentication proxy configuration examples using the commands in this chapter, refer to the section Configuration Examples for Authentication Proxy at the end of this module.
- Configuring AAA
- Configuring the HTTP Server for Authentication Proxy
- Configuring Authentication Proxy
- Verifying Authentication Proxy
Configuring AAA
You must configure the authentication proxy for AAA services. Use the following commands in global configuration mode to enable authorization and to define the authorization methods:
DETAILED STEPS
| Command or Action | Purpose | |
|---|---|---|
Step 1 | router(config)#
aaa
new-model
|
Enables the AAA functionality on the router. |
Step 2 | router(config)#
aaa
authentication
login
default
TACACS+
RADIUS
|
Defines the list of authentication methods at login. |
Step 3 | router(config)#
aaa
authorization
auth-proxy
default [method1 [method2...]]
|
Uses the auth-proxy keyword to enable authentication proxy for AAA methods. |
Step 4 | router(config)#
aaa
accounting
auth-proxy
default
start-stop
group
tacacs+
|
Uses the auth-proxy keyword to set up the authorization policy as dynamic ACLs that can be downloaded. This command activates authentication proxy accounting. |
Step 5 | router(config)#
tacacs-server
host
hostname
|
Specifies an AAA server. For RADIUS servers, use the radius server host command. |
Step 6 | router(config)#
tacacs-server
key
key
|
Sets the authentication and encryption key for communications between the router and the AAA server. For RADIUS servers use the radius server key command. |
Step 7 | router(config)#
access-list
access-list-number
Example: permit tcp host source eq tacacs host destination |
Creates an ACL entry to allow the AAA server to return traffic to the firewall. The source address is the IP address of the AAA server, and the destination is the IP address of the router interface where the AAA server resides. |
In addition to configuring AAA on the firewall router, the authentication proxy requires a per-user access profile configuration on the AAA server. To support the authentication proxy, configure the AAA authorization service auth-proxy on the AAA server as outlined here:
- Define a separate section of authorization for the auth-proxy keyword to specify the downloadable user profiles. This keyword does not interfere with other type of services, such as EXEC. The following example shows a user profile on a TACACS server:
default authorization = permit
key = cisco
user = newuser1 {
login = cleartext cisco
service = auth-proxy
{
priv-lvl=15
proxyacl#1="permit tcp any any eq 26"
proxyacl#2="permit icmp any host 60.0.0.2"
proxyacl#3="permit tcp any any eq ftp"
proxyacl#4="permit tcp any any eq ftp-data"
proxyacl#5="permit tcp any any eq smtp"
proxyacl#6="permit tcp any any eq telnet"
}
}
- The only supported attribute in the AAA server user configuration is proxyacl#n.Use the proxyacl#n attribute when configuring the access lists in the profile. The attribute proxyacl#n is for both RADIUS and TACACS+ attribute-value (AV) pairs.
- The privilege level must be set to 15 for all users.
- The access lists in the user profile on the AAA server must have access commands that contain only the permitkeyword.
- Set the source address to the anykeyword in each of the user profile access list entries. The source address in the access lists is replaced with the source address of the host making the authentication proxy request when the user profile is downloaded to the firewall.
- The supported AAA servers are:
- CiscoSecure ACS 2.1.x for Windows NT
- CiscoSecure ACS 2.3 for Windows NT
- CiscoSecure ACS 2.2.4 for UNIX
- CiscoSecure ACS 2.3 for UNIX
- TACACS+ server (vF4.02.alpha)
- Ascend RADIUS server radius-980618 (required attribute-value pair patch)
- Livingston RADIUS server (v1.16)
Refer to the section AAA Server User Profile Example for sample AAA server configurations.
Configuring the HTTP Server for Authentication Proxy
This task is used to enable the HTTP server on the firewall and configure the HTTP server's AAA authentication method for authentication proxy.
DETAILED STEPS
Configuring Authentication Proxy
DETAILED STEPS
Verifying Authentication Proxy
- Checking the Authentication Proxy Configuration
- Displaying the User Authentication Entries
- Establishing User Connections with JavaScript
- Establishing User Connections Without JavaScript
Checking the Authentication Proxy Configuration
To check the current authentication proxy configuration, use the show ip auth-proxy configuration command in privileged EXEC mode:
|
Command |
Purpose |
|---|---|
router# show ip auth-proxy configuration
|
Displays the authentication proxy configuration. |
In the following example, the global authentication proxy idle timeout value is set to 60 minutes, the named authentication proxy rule is "pxy", and the idle timeout value for this named rule is one minute. The display shows that no host list is specified, meaning that all connections initiating HTTP traffic at the interface are subject to the authentication proxy rule.
router# show ip auth-proxy configuration
Authentication cache time is 60 minutes
Authentication Proxy Rule Configuration
Auth-proxy name pxy
http list not specified auth-cache-time 1 minutes
To verify that the authentication proxy is successfully configured on the router, ask a user to initiate an HTTP connection through the router. The user must have authentication and authorization configured at the AAA server. If the user authentication is successful, the firewall completes the HTTP connection for the user. If the authentication is unsuccessful, check the access list and the AAA server configurations.
Displaying the User Authentication Entries
Display the user authentication entries using the show ip auth-proxy cache command in privileged EXEC mode:
The authentication proxy cache lists the host IP address, the source port number, the timeout value for the authentication proxy, and the state of the connection. If the authentication proxy state is HTTP_ESTAB, the user authentication was successful.
router# show ip auth-proxy cache
Authentication Proxy Cache
 Client IP 192.168.25.215 Port 57882, timeout 1, state HTTP_ESTAB
Wait for one minute, which is the timeout value for this named rule, and ask the user to try the connection again. After one minute, the user connection is denied because the authentication proxy has removed the user's authentication entry and any associated dynamic ACLs. The user is presented with a new authentication login page and must log in again to gain access through the firewall.
Establishing User Connections with JavaScript
To verify client connections using the authentication proxy with JavaScript enabled on the client browser, follow this procedure:
DETAILED STEPS
| Step 1 | From a client host, initiate an HTTP connection through the firewall. This generates the authentication proxy login page. |
| Step 2 | At the authentication proxy login page, enter a username and password. |
| Step 3 |
Click OK to submit the username and password to the AAA server.
A popup window appears indicating whether the login attempt succeeded or failed. If the authentication is successful, the connection is completed automatically. If the authentication fails, the authentication proxy reports the failure to the user and prompts the user with multiple retries. |
What to Do Next
Note | If the authentication attempt is unsuccessful after five attempts, the user must wait two minutes and initiate another HTTP session to trigger authentication proxy. |
Establishing User Connections Without JavaScript
To ensure secure authentication, the authentication proxy design requires JavaScript. You can use the authentication proxy without enabling JavaScript on the browser, but this poses a potential security risk if users do not properly establish network connections. The following procedure provides the steps to properly establish a connection with JavaScript disabled. Network administrators are strongly advised to instruct users on how to properly establish connections using the procedure in this section.
Note | Failure to follow this procedure can cause user credentials to be passed to a network web server other than the authentication proxy or can cause the authentication proxy to reject the login attempt. |
To verify client connections using the authentication proxy when JavaScript is not enabled on the client browser, follow this procedure:
DETAILED STEPS
| Step 1 |
Initiate an HTTP connection through the firewall.
This generates the authentication proxy login page. | ||
| Step 2 | From the authentication proxy login page at the client, enter the username and password. | ||
| Step 3 |
Click
OK to submit the username and password to the AAA server.
A popup window appears indicating whether the login attempt succeeded or failed. If the popup window indicates successful authentication, go to Step7. | ||
| Step 4 |
If the popup window displays a failed authentication message, click
Close on the browser
File menu.
| ||
| Step 5 |
From the original authentication login page, click
Reload (Refresh for Internet Explorer) on the browser toolbar. The user login credentials are cleared from the form.
| ||
| Step 6 |
Enter the username and password again.
If the authentication is successful, a window appears displaying a successful authentication message. If the window displays a failed authentication message, go to Step 4. | ||
| Step 7 | Click Close on the browser File menu. | ||
| Step 8 |
From the original authentication proxy login page, click
Reload (Refresh for Internet Explorer) on the browser toolbar.
The authentication proxy completes the authenticated connection with the web server. |
Monitoring and Maintaining Authentication Proxy
Displaying Dynamic ACL Entries
You can display dynamic access list entries when they are in use. After an authentication proxy entry is cleared by you or by the idle timeout parameter, you can no longer display it. The number of matches displayed indicates the number of times the access list entry was hit.
To view dynamic access lists and any temporary access list entries that are currently established by the authentication proxy, use the show ip access-lists command in privileged EXEC mode:
|
Command |
Purpose |
|---|---|
router# show ip access-lists
|
Displays the standard and extended access lists configured on the firewall, including dynamic ACL entries. |
Consider the following example where ACL 105 is applied inbound at the input interface where you configure authentication proxy. The initial display shows the contents of the ACLs prior to authentication. The second display shows the same displays after user authentication with the AAA server.
Note | If NAT is configured, the show ip access list command might display the translated host IP address for the dynamic ACL entry or the IP address of the host initiating the connection. If the ACL is applied on the NAT outside interface, the translated address is displayed. If the ACL is applied on the NAT inside interface, the IP address of the host initiating the connection is displayed. The show ip auth-proxy cache command always displays the IP address of the host initiating the connection. |
For example, the following is a list of ACL entries prior to the authentication proxy:
Router# show ip access-lists
    .
    .
    .
Extended IP access list 105
 deny tcp any any eq telnet
 deny udp any any
 permit tcp any any (28 matches)
 permit ip any any
The following sample output shows a list of ACL entries following user authentication:
Router# show ip access-lists
    .
    .
    .
Extended IP access list 105
! The ACL entries following user authentication are shown below.
 permit tcp host 192.168.25.215 any eq 26
 permit icmp host 192.168.25.215 host 60.0.0.2
 permit tcp host 192.168.25.215 any eq telnet
 permit tcp host 192.168.25.215 any eq ftp
 permit tcp host 192.168.25.215 any eq ftp-data
 permit tcp host 192.168.25.215 any eq smtp
 deny tcp any any eq telnet
 deny udp any any
 permit tcp any any (76 matches)
 permit ip any any
Deleting Authentication Proxy Cache Entries
When the authentication proxy is in use, dynamic access lists dynamically grow and shrink as authentication entries are added and deleted. To display the list of authentication entries, use the show ip auth-proxy cachecommand. To manually delete an authentication entry, use the clear ip auth-proxy cachecommand in privileged EXEC mode:
Configuration Examples for Authentication Proxy
- Authentication Proxy Configuration Example
- Authentication Proxy IPSec and CBAC Configuration Example
- Authentication Proxy IPSec NAT and CBAC Configuration Example
- AAA Server User Profile Example
Authentication Proxy Configuration Example
- AAA Configuration Example
- HTTP Server Configuration Example
- Authentication Proxy Configuration Example
- Interface Configuration Example
AAA Configuration Example
aaa new-model
aaa authentication login default group tacacs group radius
! Set up the aaa new model to use the authentication proxy.
aaa authorization auth-proxy default group tacacs group radius
! Define the AAA servers used by the router.
aaa accounting auth-proxy default start-stop group tacacs+
! Set up authentication proxy with accounting.
tacacs-server host 172.31.54.143
tacacs-server key cisco
radius-server host 172.31.54.143
radius-server key cisco
Authentication Proxy IPSec and CBAC Configuration Example
The following example shows a router configuration with the authentication proxy, IPSec, and CBAC features. The figure below illustrates the configuration.
Note | If you are using this feature with Cisco IOS software release 12.3(8)T or later, see the Crypto Access Check on Clear-Text Packets document. |
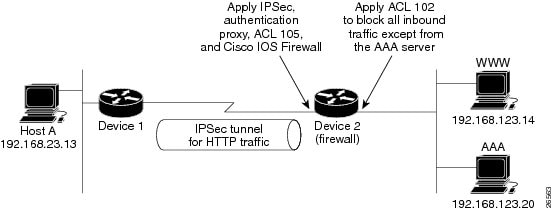
In this example, Host A initiates an HTTP connection with the web server (WWW). The HTTP traffic between Router 1 and Router 2 is encrypted using IPSec. The authentication proxy, IPSec, and CBAC are configured at interface Serial0 on Router 2, which is acting as the firewall. ACL 105 blocks all traffic at interface Serial0. ACL 102 is applied at interface Ethernet0 on Router 2 to block all traffic on that interface except traffic from the AAA server.
When Host A initiates an HTTP connection with the web server, the authentication proxy prompts the user at Host A for a username and password. These credentials are verified with the AAA server for authentication and authorization. If authentication is successful, the per-user ACLs are downloaded to the firewall to permit services.
Router 1 Configuration Example
! Configure Router 1 for IPSec.
version 12.0
service timestamps debug uptime
service timestamps log uptime
no service password-encryption
!
hostname Router1
!
logging buffered 4096 debugging
no logging console
enable secret 5 $1$E0OB$AQF1vFZM3fLr3LQAOsudL/
enable password junk
!
username Router2 password 0 welcome
crypto isakmp policy 1
 authentication pre-share
crypto isakmp key cisco1234 address 10.0.0.2
!
crypto ipsec transform-set rule_1 ah-sha-hmac esp-des esp-sha-hmac
!
!
 crypto map testtag 10 ipsec-isakmp
 set peer 10.0.0.2
 set transform-set rule_1
 match address 155
!
interface Ethernet0/0
 ip address 192.168.23.2 255.255.255.0
 no ip directed-broadcast
 no ip route-cache
 no ip mroute-cache
!
interface Serial3/1
 ip address 10.0.0.1 255.0.0.0
 no ip directed-broadcast
 encapsulation PPP
 ip route-cache
 no ip mroute-cache
 no keepalive
 no fair-queue
 clockrate 56000
 crypto map testtag
!
!
ip classless
ip route 192.168.123.0 255.255.255.0 10.0.0.2
! Identify the IPSec specific traffic.
access-list 155 permit tcp host 192.168.23.13 host 192.168.123.14 eq www
access-list 155 permit tcp host 192.168.23.13 eq www host 192.168.123.14
Router 2 Configuration Example
! Configure Router 2 as the firewall, using the authentication proxy, IPSec, and CBAC.
version 12.0
service timestamps debug uptime
service timestamps log uptime
no service password-encryption
!
hostname Router2
!
logging buffered 4096 debugging
aaa new-model
aaa authentication login default group tacacs
aaa authentication login console_line none
aaa authentication login special none
aaa authentication ppp default group tacacs
aaa authorization exec default group tacacs
! Configure AAA for the authentication proxy.
aaa authorization auth-proxy default group tacacs+
enable password junk
!
! Create the CBAC inspection rule HTTP_TEST.
ip inspect name rule22 http
ip inspect name rule22 tcp
ip inspect name rule22 ftp
ip inspect name rule22 smtp
!
! Create the authentication proxy rule PXY.
ip auth-proxy name pxy http
! Turn on display of the router name in the authentication proxy login page.
ip auth-proxy auth-proxy-banner
ip audit notify log
ip audit po max-events 100
!
! Configure IPSec.
crypto isakmp policy 1
 authentication pre-share
crypto isakmp key cisco1234 address 10.0.0.1
!
crypto ipsec transform-set rule_1 ah-sha-hmac esp-des esp-sha-hmac
!
 crypto map testtag 10 ipsec-isakmp
 set peer 10.0.0.1
 set transform-set rule_1
 match address 155
!
! Apply the CBAC inspection rule and the authentication proxy rule at interface
! Serial0/0.
interface Serial0/0
 ip address 10.0.0.2 255.0.0.0
 ip access-group 105 in
 no ip directed-broadcast
 ip inspect rule22 in
 ip auth-proxy pxy
 encapsulation ppp
 no ip route-cache
 no ip mroute-cache
 no keepalive
 no fair-queue
crypto map testtag
!
interface Ethernet0/1
 ip address 192.168.123.2 255.255.255.0
 ip access-group 102 in
 no ip directed-broadcast
 ip route-cache
 no ip mroute-cache
!
no ip classless
ip route 192.168.23.0 255.255.255.0 10.0.0.1
ip route 192.168.50.0 255.255.255.0 16.0.0.1
! Configure the HTTP server.
ip http server
ip http access-class 15
ip http authentication aaa
!
! Create ACL 15 to block all traffic for the http server.
access-list 15 deny any
! Create ACL 102 to block all traffic inbound on interface Ethernet0/1 except for
! traffic from the AAA server.
access-list 102 permit tcp host 192.168.123.20 eq tacacs host 192.168.123.2
access-list 102 deny   tcp any any
access-list 102 deny   udp any any
access-list 102 permit ip any any
! Create ACL 105 to block all traffic inbound on interface Serial0/0. Permit only IP
! protocol traffic.
access-list 105 deny   tcp any any
access-list 105 deny   udp any any
access-list 105 permit ip any any
! Identify the IPSec specific traffic.
access-list 155 permit tcp host 192.168.123.14 host 192.168.23.13 eq www
access-list 155 permit tcp host 192.168.123.14 eq www host 192.168.23.13
!
! Define the AAA server host and encryption key.
tacacs-server host 192.168.123.14
tacacs-server key cisco
!
line con 0
 exec-timeout 0 0
 login authentication special
 transport input none
line aux 0
 transport input all
 speed 38400
 flowcontrol hardware
line vty 0 4
 password lab
Authentication Proxy IPSec NAT and CBAC Configuration Example
The following example provides a router configuration with the authentication proxy, IPSec, NAT, and CBAC features. The figure below illustrates the configuration.
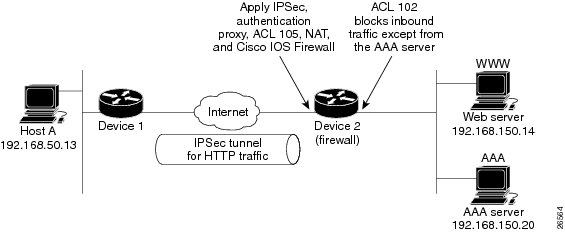
In this example, Host A initiates an HTTP connection with the web server (WWW). The HTTP traffic between router 1 (interface BRI0) and router 2 (interface Serial2) is encrypted using IPSec. The authentication proxy is configured on router 2, which is acting as the firewall. The authentication proxy, NAT, and CBAC are configured at interface Serial2, which is acting as the firewall. ACL 105 blocks all traffic at interface Serial2. ACL 102 is applied at interface Ethernet0 on router 2 to block all traffic on that interface except traffic from the AAA server. In this example, the authentication proxy uses standard ACL 10 to specify the hosts using the authentication proxy feature.
When any host in ACL 10 initiates an HTTP connection with the web server, the authentication proxy prompts the user at that host for a username and password. These credentials are verified with AAA server for authentication and authorization. If authentication is successful, the per-user ACLs are downloaded to the firewall to permit services.
Router 1 Configuration Example
! Configure router 1 for IPSec.
version 12.0
 service timestamps debug uptime
 service timestamps log uptime
 no service password-encryption
 !
 hostname Router1
 !
 logging buffered 4096 debugging
 no logging console
 !
isdn switch-type basic-5ess
 !
 crypto isakmp policy 1
  authentication pre-share
 crypto isakmp key cisco1234 address 16.0.0.2
 crypto ipsec transform-set rule_1 ah-sha-hmac esp-des esp-sha-hmac
 !
  !
  crypto map testtag 10 ipsec-isakmp
  set peer 16.0.0.2
  set transform-set rule_1
  match address 155
 !
 !
 process-max-time 200
 !
 interface BRI0
  ip address 16.0.0.1 255.0.0.0
  no ip directed-broadcast
  encapsulation ppp
  dialer idle-timeout 5000
  dialer map ip 16.0.0.2 name router2 broadcast 50006
  dialer-group 1
  isdn switch-type basic-5ess
  crypto map testtag
 !
 interface FastEthernet0
  ip address 192.168.50.2 255.255.255.0
  no ip directed-broadcast
 !
 ip classless
 ip route 192.168.150.0 255.255.255.0 16.0.0.2
 no ip http server
! Identify the IPSec specific traffic.
 access-list 155 permit tcp host 192.168.50.13 host 192.168.150.100 eq www
 access-list 155 permit tcp host 192.168.50.13 eq www host 192.168.150.100
 dialer-list 1 protocol ip permit
 !
 line con 0
  exec-timeout 0 0
  transport input none
 line aux 0
 line vty 0 4
  password lab
  login
Router 2 Configuration Example
! Configure router 2 as the firewall, using the authentication proxy, IPSec, NAT, and
! CBAC.
 version 12.0
 service timestamps debug uptime
 service timestamps log uptime
 no service password-encryption
 !
 hostname router2
 !
 logging buffered 4096 debugging
 aaa new-model
 aaa authentication login default group tacacs+
 aaa authentication login console_line none
 aaa authorization exec default group tacacs+
 ! Configure AAA for the authentication proxy.
 aaa authorization auth-proxy default group tacacs+
!
 ! Create the CBAC inspection rule "rule44."
 ip inspect name rule44 http java-list 5
 ip inspect name rule44 tcp
 ip inspect name rule44 ftp
 ip inspect name rule44 smtp
 !
 ! Create the authentication proxy rule "pxy." Set the timeout value for rule
 ! pxy to three minutes. Standard ACL 10 is applied to the rule.
 ip auth-proxy name pxy http list 10 auth-cache-time 3
 isdn switch-type primary-5ess
 !
 ! Configure IPSec.
 crypto isakmp policy 1
  authentication pre-share
 crypto isakmp key cisco1234 address 16.0.0.1
 !
 !
 crypto ipsec transform-set rule_1 ah-sha-hmac esp-des esp-sha-hmac
 !
  !
  crypto map testtag 10 ipsec-isakmp
  set peer 16.0.0.1
  set transform-set rule_1
  match address 155
!
 controller T1 2/0
  framing esf
  linecode b8zs
  pri-group timeslots 1-24
!
! Apply ACL 102 inbound at interface Ethernet0/1 and configure NAT.
interface Ethernet0/1
 ip address 192.168.150.2 255.255.255.0
 ip access-group 102 in
 no ip directed-broadcast
 ip nat inside
 no ip mroute-cache
!
! Apply the authentication proxy rule PXY, CBAC inspection rule HTTP_TEST, NAT, and
! and ACL 105 at interface Serial2/0:23.
interface Serial2/0:23
 ip address 16.0.0.2 255.0.0.0
 ip access-group 105 in
 no ip directed-broadcast
 ip nat outside
 ip inspect rule44 in
 ip auth-proxy pxy
 encapsulation ppp
 ip mroute-cache
 dialer idle-timeout 5000
 dialer map ip 16.0.0.1 name router1 broadcast 71011
 dialer-group 1
 isdn switch-type primary-5ess
 fair-queue 64 256 0
 crypto map testtag
!
! Use NAT to translate the Web server address.
ip nat inside source static 192.168.150.14 192.168.150.100
ip classless
ip route 192.168.50.0 255.255.255.0 16.0.0.1
! Configure the HTTP server.
ip http server
ip http access-class 15
ip http authentication aaa
!
! Create standard ACL 5 to specify the list of hosts from which to accept java applets.
! ACL 5 is used to block Java applets in the CBAC inspection rule named "rule44," which
! is applied at interface Serial2/0:23.
access-list 5 permit any
! Create standard ACL 10 to specify the hosts using the authentication proxy. This ACL
! used in the authentication proxy rule named "PXY", which is applied at interface
! Serial2/0:23.
access-list 10 permit any
! Create ACL 15 to block all traffic for the http server.
access-list 15 deny any
! Create extended ACL 102 to block all traffic inbound on interface Ethernet0/1
! except for traffic from the AAA server.
access-list 102 permit tcp host 192.168.150.20 eq tacacs 192.168.150.2
access-list 102 deny   tcp any any
access-list 102 deny   udp any any
access-list 102 permit ip any any
! Create extended ACL 105 to block all TCP and UDP traffic inbound on interface
! Serial2/0:23.
access-list 105 deny   tcp any any
access-list 105 deny   udp any any
access-list 105 permit ip any any
! Identify the IPSec specific traffic.
access-list 155 permit tcp host 192.168.150.100 host 192.168.50.13 eq www
access-list 155 permit tcp host 192.168.150.100 eq www host 192.168.50.13
dialer-list 1 protocol ip permit
! Define the AAA server host and encryption key.
tacacs-server host 192.168.126.14
tacacs-server key cisco
!
line con 0
 exec-timeout 0 0
! Define the AAA server host and encryption key.
 login authentication console_line
 transport input none
 line aux 0
 line vty 0 4
 password lab
!
!
 end
AAA Server User Profile Example
This section includes examples of the authentication proxy user profile entries on the AAA servers. The "proxyacl" entries define the user access privileges. After the user has successfully used the authentication proxy to log in, these entries are transferred to the firewall router. Each entry in the profile must specify "permit" access for the service or application. The source address in each entry is set to "any", which is replaced with the IP address of the authenticating host when the profile is downloaded to the firewall. The privilege level must be set to 15 for all AAA users.
- CiscoSecure ACS 2.3 for Windows NT
- CiscoSecure ACS 2.3 for UNIX
- TACACS+ Server
- Livingston Radius Server
- Ascend Radius Server
CiscoSecure ACS 2.3 for Windows NT
This section describes how to configure authentication proxy on CiscoSecure ACS 2.3 for Windows NT. For detailed information about CiscoSecure ACS, refer to the documentation for that product.
The following sample configuration is for the TACACS+ service of CiscoSecure ACS for Windows NT.
1. Click the Interface Configuration icon and click TACACS+ (Cisco).
2. Click the Network Configuration icon.
3. Click the Group Setup icon.
4. Click the User Setup icon.
5. Click Group Setup icon again.
DETAILED STEPS
| Step 1 |
Click the Interface Configuration icon and click TACACS+ (Cisco).
|
| Step 2 |
Click the Network Configuration icon.
|
| Step 3 |
Click the Group Setup icon.
|
| Step 4 |
Click the User Setup icon.
|
| Step 5 |
Click Group Setup icon again.
|
CiscoSecure ACS 2.3 for UNIX
This section describes how to configure authentication proxy on CiscoSecure ACS 2.3 for UNIX. For detailed information regarding CiscoSecure ACS, refer to the documentation for that product.
To manage the CiscoSecure ACS using the Administrator program, you need a web browser that supports Java and JavaScript. You must enable Java in the browser application. You can start the Java-based CiscoSecure Administrator advanced configuration program from any of the CiscoSecure ACS Administrator web pages.
The following sample configuration procedure is for the TACACS+ service of CiscoSecure ACS 2.3 for UNIX.
DETAILED STEPS
| Step 1 |
On the CiscoSecure ACS web menu bar of the CiscoSecure ACS web interface, click Advanced and then click Advanced again.
The Java-based CiscoSecure Administrator advanced configuration program appears. It might require a few minutes to load. |
| Step 2 |
In the CiscoSecure Administrator advanced configuration program, locate and deselect Browse in the Navigator pane of the tabbed Members page.
This displays the Create New Profile icon. |
| Step 3 |
In the Navigator pane, do one of the following:
|
| Step 4 | Click Create Profile to display the New Profile dialog box. |
| Step 5 | Make sure the Group check box is cleared. |
| Step 6 | Enter the name of the user you want to create and click OK. The new user appears in the tree. |
| Step 7 | Click the icon for the group or user profile in the tree that is displayed in the Navigator pane of the tabbed Members page. |
| Step 8 |
If necessary, in the Profile pane, click the Profile icon to expand it.
A list or dialog box that contains attributes applicable to the selected profile or service appears in the window at the bottom right of the screen. The information in this window changes depending on what you have selected in the Profile pane. |
| Step 9 | Click Service-String. |
| Step 10 | Click string, enter auth-proxy in the text field, and click Apply. |
| Step 11 | Select the Option menu. |
| Step 12 | On the Option menu, click Default Attributes. |
| Step 13 | Change the attribute from Deny to Permit. |
| Step 14 | Click Apply. |
| Step 15 |
On the Option menu, click Attribute and enter the privilege level in the text field:
Example:
priv-lvl=15
|
| Step 16 |
On the Option menu, click Attribute and enter the proxyacl entries in the text field:
Example:
proxyacl#1="permit tcp any any eq 26"
Repeat this step for each additional service or protocol to add: Example: proxyacl#2="permit icmp any host 60.0.0.2" proxyacl#3="permit tcp any any eq ftp" proxyacl#4="permit tcp any any eq ftp-data" proxyacl#5="permit tcp any any eq smtp" proxyacl#6="permit tcp any any eq telnet" |
| Step 17 | When you have finished making all your changes, click Submit. |
TACACS+ Server
default authorization = permit
key = cisco
user = Brian {
login = cleartext cisco
service = auth-proxy
 {
  priv-lvl=15
  proxyacl#1="permit tcp any any eq 26"
  proxyacl#2="permit icmp any host 60.0.0.2
  proxyacl#3="permit tcp any any eq ftp"
  proxyacl#4="permit tcp any any eq ftp-data"
  proxyacl#5="permit tcp any any eq smtp"
  proxyacl#6="permit tcp any any eq telnet"
 }
}
Livingston Radius Server
Bob Password = "cisco" User-Service-Type=Outbound-User
cisco-avpair = "auth-proxy:priv-lvl=15",
cisco-avpair = "auth-proxy:proxyacl#1=permit tcp any any eq 26",
cisco-avpair = "auth-proxy:proxyacl#2=permit icmp any host 60.0.0.2",
cisco-avpair = "auth-proxy:proxyacl#3=permit tcp any any eq ftp",
cisco-avpair = "auth-proxy:proxyacl#4=permit tcp any any eq ftp-data",
cisco-avpair = "auth-proxy:proxyacl#5=permit tcp any any eq smtp",
cisco-avpair = "auth-proxy:proxyacl#6=permit tcp any any eq telnet"
Ascend Radius Server
Alice Password = "cisco" User-Service = Dialout-Framed-User
cisco-avpair = "auth-proxy:priv-lvl=15",
cisco-avpair = "auth-proxy:proxyacl#1=permit tcp any any eq 26",
cisco-avpair = "auth-proxy:proxyacl#2=permit icmp any host 60.0.0.2",
cisco-avpair = "auth-proxy:proxyacl#3=permit tcp any any eq ftp",
cisco-avpair = "auth-proxy:proxyacl#4=permit tcp any any eq ftp-data",
cisco-avpair = "auth-proxy:proxyacl#5=permit tcp any any eq smtp",
cisco-avpair = "auth-proxy:proxyacl#6=permit tcp any any eq telnet"
Additional References
MIBs
Technical Assistance
|
Description |
Link |
|---|---|
|
The Cisco Support website provides extensive online resources, including documentation and tools for troubleshooting and resolving technical issues with Cisco products and technologies. To receive security and technical information about your products, you can subscribe to various services, such as the Product Alert Tool (accessed from Field Notices), the Cisco Technical Services Newsletter, and Really Simple Syndication (RSS) Feeds. Access to most tools on the Cisco Support website requires a Cisco.com user ID and password. |
Feature Information for Authentication Proxy
The following table provides release information about the feature or features described in this module. This table lists only the software release that introduced support for a given feature in a given software release train. Unless noted otherwise, subsequent releases of that software release train also support that feature.
Use Cisco Feature Navigator to find information about platform support and Cisco software image support. To access Cisco Feature Navigator, go to www.cisco.com/go/cfn. An account on Cisco.com is not required.
| Table 3 | Feature Information for Configuring Authentication |
|
Feature Name |
Releases |
Feature Information |
|---|---|---|
|
Authentication Proxy |
12.1(5)T |
The Cisco IOS Firewall Authentication Proxy feature provides dynamic, per-user authentication and authorization, authenticating users against industry standard TACACS+ and RADIUS authentication protocols. Authenticating and authorizing connections by users provides more robust protection against network attacks. In 12.1(5)T, this feature was introduced on the Cisco IOS. |
|
Web Authentication with Critical Authentication support |
15.2(2)T |
The AAA fail policy is a method for allowing a user to connect or to remain connected to the network if the AAA server is not available. |
|
Web Authentication Enhancements |
15.2(2)T |
Substitute your custom HTML pages for the four default internal HTML pages or specify a URL to which the user will be redirected upon successful authentication, effectively replacing the internal Success page. |
Cisco and the Cisco logo are trademarks or registered trademarks of Cisco and/or its affiliates in the U.S. and other countries. To view a list of Cisco trademarks, go to this URL: www.cisco.com/go/trademarks. Third-party trademarks mentioned are the property of their respective owners. The use of the word partner does not imply a partnership relationship between Cisco and any other company. (1110R)
Any Internet Protocol (IP) addresses and phone numbers used in this document are not intended to be actual addresses and phone numbers. Any examples, command display output, network topology diagrams, and other figures included in the document are shown for illustrative purposes only. Any use of actual IP addresses or phone numbers in illustrative content is unintentional and coincidental.