
 Feedback
Contents
- SSL VPN
- Finding Feature Information
- Prerequisites for SSL VPN
- Restrictions for SSL VPN
- General Restrictions for SSL VPN
- Cisco AnyConnect VPN Client
- Thin-Client Control List Support
- HTTP Proxy
- Features Not Supported on the Cisco IOS SSL VPN
- Information About SSL VPN
- SSL VPN Overview
- Licensing
- Modes of Remote Access
- Remote Access Overview
- Clientless Mode
- Thin-Client Mode
- Options for Configuring HTTP Proxy and the Portal Page
- Tunnel Mode
- SSL VPN Features
- Access Control Enhancements
- SSL VPN Client-Side Certificate-Based Authentication
- Certificate-Only Authentication and Authorization Mode
- Two-Factor Authentication and Authorization Mode
- Identification of WebVPN Context at Runtime Using Certificate Map Match Rules
- Support for AnyConnect Client to Implement Certificate Matching Based on Client Profile Attributes
- AnyConnect Client Support
- Application ACL Support
- Automatic Applet Download
- Backend HTTP Proxy
- Front-Door VRF Support
- Full-Tunnel Cisco Express Forwarding Support
- GUI Enhancements
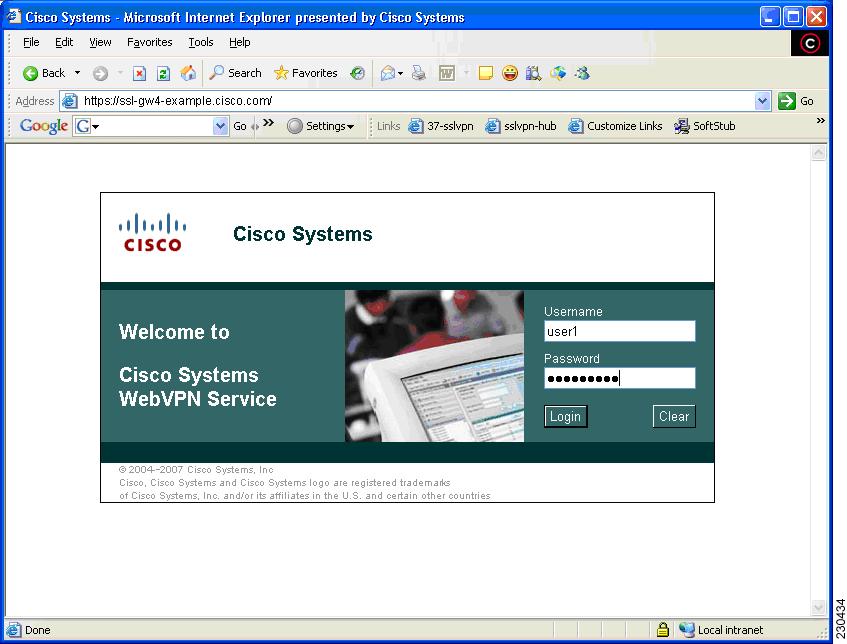
- Login Screen
- Banner
- Customization of a Login Page
- Portal Page
- Internationalization
- Max-User Limit Message
- Netegrity Cookie-Based Single SignOn Support
- NTLM Authentication
- RADIUS Accounting
- Stateless High Availability with Hot Standby Router Protocol
- TCP Port Forwarding and Thin Client
- URL Obfuscation
- URL Rewrite Splitter
- User-Level Bookmarking
- Virtual Templates
- License String Support for the 7900 VPN Client
- SSL VPN DVTI Support
- Prerequisites for SSL VPN DVTI Support
- Restrictions for SSL VPN DVTI Support
- Virtual Template Infrastructure
- SSL VPN Phase-4 Features
- Prerequisites for SSL VPN Phase-4 Features
- Full Tunnel Package
- SSL VPN per-User Statistics
- DTLS Support for IOS SSL VPN
- Prerequisites for DTLS Support for IOS SSL VPN
- Restrictions for DTLS Support for IOS SSL VPN
- Cisco AnyConnect VPN Client Full Tunnel Support
- Remote Client Software from the SSL VPN Gateway
- Address Pool
- Manual Entry to the IP Forwarding Table
- Other SSL VPN Features
- Platform Support
- How to Configure SSL VPN Services on a Router
- Configuring an SSL VPN Gateway
- What to Do Next
- Configuring a Generic SSL VPN Gateway
- Configuring an SSL VPN Context
- What to Do Next
- Configuring an SSL VPN Policy Group
- What to Do Next
- Configuring Local AAA Authentication for SSL VPN User Sessions
- What to Do Next
- Configuring AAA for SSL VPN Users Using a Secure Access Control Server
- What to Do Next
- Configuring RADIUS Accounting for SSL VPN User Sessions
- Monitoring and Maintaining RADIUS Accounting for an SSL VPN Session
- Configuring RADIUS Attribute Support for SSL VPN
- What to Do Next
- Configuring a URL List for Clientless Remote Access
- What to Do Next
- Configuring Microsoft File Shares for Clientless Remote Access
- What to Do Next
- Configuring Citrix Application Support for Clientless Remote Access
- What to Do Next
- Configuring Application Port Forwarding
- Configuring the SSL VPN Gateway to Distribute CSD and Cisco AnyConnect VPN Client Package Files
- What to Do Next
- Configuring Cisco Secure Desktop Support
- What to Do Next
- Configuring Cisco AnyConnect VPN Client Full Tunnel Support
- Examples
- What to Do Next
- Configuring Advanced SSL VPN Tunnel Features
- Examples
- Configuring VRF Virtualization
- Configuring ACL Rules
- Associating an ACL Attribute with a Policy Group
- Monitoring and Maintaining ACLs
- Configuring SSO Netegrity Cookie Support for a Virtual Context
- Associating an SSO Server with a Policy Group
- Configuring URL Obfuscation (Masking)
- Adding a CIFS Server URL List to an SSL VPN Context and Attaching It to a Policy Group
- Configuring User-Level Bookmarks
- Configuring FVRF
- Disabling Full-Tunnel Cisco Express Forwarding
- Configuring Automatic Authentication and Authorization
- Configuring SSL VPN Client-Side Certificate-Based Authentication
- Configuring a URL Rewrite Splitter
- Configuring a Backend HTTP Proxy
- Configuring Stateless High Availability with HSRP for SSL VPN
- Configuring Internationalization
- Generating the Template Browser Attribute File
- What to Do Next
- Importing the Browser Attribute File
- What to Do Next
- Verifying That the Browser Attribute File Was Imported Correctly
- What to Do Next
- Creating the Language File
- What to Do Next
- Importing the Language File
- What to Do Next
- Verifying That the Language File Was Imported Correctly
- What to Do Next
- Creating the URL List
- What to Do Next
- Importing the File into the URL List and Binding It to a Policy Group
- What to Do Next
- Verifying That the URL List File Was Bound Correctly to the Policy Group
- Configuring a Virtual Template
- Configuring SSL VPN DVTI Support
- Configuring per-Tunnel Virtual Templates
- Troubleshooting Tips
- Configuring per-Context Virtual Templates
- Troubleshooting Tips
- Configuring SSL VPN Phase-4 Features
- Configuring the Start Before Logon Functionality
- Troubleshooting Tips
- Configuring Split ACL Support
- Configuring IP NetMask Functionality
- Configuring the DTLS Port
- Troubleshooting Tips
- Using SSL VPN clear Commands
- Verifying SSL VPN Configurations
- Using SSL VPN Debug Commands
- Configuration Examples for SSL VPN
- Example: Configuring a Generic SSL VPN Gateway
- Example: Configuring an ACL
- Example: Configuring HTTP Proxy
- Example: Configuring Microsoft File Shares for Clientless Remote Access
- Example: Configuring Citrix Application Support for Clientless Remote Access
- Example: Configuring Application Port Forwarding
- Example: Configuring VRF Virtualization
- Example: RADIUS Accounting for SSL VPN Sessions
- Example: URL Obfuscation (Masking)
- Example: Adding a CIFS Server URL List and Attaching It to a Policy List
- Example: Typical SSL VPN Configuration
- Example: Cisco Express Forwarding-Processed Packets
- Example: Multiple AnyConnect VPN Client Package Files
- Example: Local Authorization
- Example: URL Rewrite Splitter
- Example: Backend HTTP Proxy
- Example: Stateless High Availability with HSRP
- Example: Internationalization
- Example: Generated Browser Attribute Template
- Example: Copying the Browser Attribute File to Another PC for Editing
- Example: Copying the Edited File to flash
- Example: Output Showing That the Edited File Was Imported
- Example: Copying the Language File to Another PC for Editing
- Example: Copying the Edited Language File to the Storage Device
- Example: Language Template Created
- Example: URL List
- Example: Virtual Template
- Example: SSL VPN DVTI Support
- Example: Configuring per-Tunnel Virtual Templates
- Example: Configuring in the per-Tunnel Context Using Virtual Templates
- Example: Configuring in the per-Tunnel Context Using Virtual Templates and a AAA Server
- Example: Configuring per-Context Virtual Templates
- Example: SSL VPN Phase-4 Features
- Example: Configuring the Start Before Logon (SBL) Functionality
- Example: Configuring Split ACL Support
- Example: Configuring IP NetMask Functionality
- Example: Debug Command Output
- Example: Configuring SSO
- Example: Show Command Output
- Example: show webvpn context
- Example: show webvpn context name
- Example: show webvpn gateway
- Example: show webvpn gateway name
- Example: show webvpn nbns context all
- Example: show webvpn policy
- Example: show webvpn policy (with NTLM Disabled)
- Example: show webvpn session
- Example: show webvpn session user
- Example: show webvpn stats
- Example: show webvpn stats sso
- Example: FVRF show Command Output
- Additional References
- Feature Information for SSL VPN
SSL VPN
The SSL VPN feature or WebVPN provides support in the Cisco IOS software for remote user access to enterprise networks from anywhere on the Internet. Remote access is provided through a Secure Socket Layer (SSL)-enabled SSL VPN gateway. The SSL VPN gateway allows remote users to establish a secure VPN tunnel using a web browser. This feature provides a comprehensive solution that allows easy access to a broad range of web resources and web-enabled applications using native HTTP over SSL (HTTPS) browser support. SSL VPN delivers three modes of SSL VPN access: clientless, thin-client, and full-tunnel client support.
This document is primarily for system administrators. If you are a remote user, see the document"SSL VPN Remote User Guide".
 Note | Security threats, as well as the cryptographic technologies to help protect against them, are constantly changing. For more information about the latest Cisco cryptographic recommendations, see the Next Generation Encryption (NGE) white paper. |
Finding Feature Information
Your software release may not support all the features documented in this module. For the latest caveats and feature information, see Bug Search Tool and the release notes for your platform and software release. To find information about the features documented in this module, and to see a list of the releases in which each feature is supported, see the feature information table at the end of this module.
Use Cisco Feature Navigator to find information about platform support and Cisco software image support. To access Cisco Feature Navigator, go to www.cisco.com/go/cfn. An account on Cisco.com is not required.
Prerequisites for SSL VPN
To securely access resources on a private network behind an SSL VPN gateway, the remote user of an SSL VPN service must have the following:
- An account (login name and password)
- An SSL-enabled browser (for example, Internet Explorer, Netscape, Mozilla, or Firefox)
- Operating system support
- "Thin-client" support used for TCP port-forwarding applications requires administrative privileges on the computer of the remote user.
- "Tunnel mode" for Cisco SSL VPN requires administrative privileges for initial installation of the full-tunnel client.
- The remote user must have local administrative privileges to use thin-client or full-tunnel client features.
- The SSL VPN gateway and context configuration must be completed before a remote user can access resources on a private network behind an SSL VPN. For more information, see the "How to Configure SSL VPN Services on a Router" section.
- Access control list (ACL) Support--The time range should have already been configured.
- Single SignOn Netegrity Cookie Support--A Cisco plug-in must be installed on a Netegrity SiteMinder server.
- Licensing--In Cisco IOS Release 15.0(1)M, the SSL VPN gateway is a seat-counted licensing feature on Cisco 880, Cisco 890, Cisco 1900, Cisco 2900, and Cisco 3900 platforms. A valid license is required for a successful SSL VPN session.
- SSL VPN-supported browser--The following browsers have been verified for SSL VPN. Other browsers might not fully support SSL VPN features.
Note
Later versions of the following browsers are also supported.
Restrictions for SSL VPN
- General Restrictions for SSL VPN
- Cisco AnyConnect VPN Client
- Thin-Client Control List Support
- HTTP Proxy
- Features Not Supported on the Cisco IOS SSL VPN
Cisco AnyConnect VPN Client
The Cisco AnyConnect VPN Client is not supported on Windows Mobile when the client connects to a Cisco IOS headend router (supported in Cisco IOS Release 15.0(1)M and later releases). The Cisco AnyConnect VPN Client does not support the following:
Thin-Client Control List Support
Although there is no limitation on the maximum number of filtering rules that can be applied for each ACL entry, keeping the number below 50 should have no impact on router performance.
HTTP Proxy
The HTTP Proxy feature works only with Microsoft Internet Explorer.
The HTTP Proxy feature will not work if the browser proxy setup cannot be modified because of any security policies that have been placed on the client workstation.
Features Not Supported on the Cisco IOS SSL VPN
The following features are not supported on the Cisco IOS SSL VPN:
- Application Profile Customization Framework (APCF): an XML-based rule set for clientless SSL VPN
- Cisco Unified Communications Manager (Cisco UCM) 8.0.1 VPN-enabled 7900 series IP phones
- Dynamic Access Policies (DAP)
- Java and ActiveX Client Server Plugins
- Lightweight Directory Access Protocol (LDAP) Support
- On Board Built-in Single Sign On
- Portal Page Customization
- SharePoint Support
- Smart Tunnels
- Support for External Statistics Reporting and Monitoring Tools
- Using Smartcard for Authentication (supported in Cisco IOS Release 15.0(1)M and later releases)
- The following features were introduced in the AnyConnect 2.5.217 release:
Information About SSL VPN
- SSL VPN Overview
- Licensing
- Modes of Remote Access
- SSL VPN Features
- Other SSL VPN Features
- Platform Support
SSL VPN Overview
Cisco IOS SSL VPN provides SSL VPN remote-access connectivity from almost any Internet-enabled location using only a web browser that locally supports SSL encryption. This feature allows your company to extend access to any authorized user/corporate resources to its secure enterprise network by providing remote-access connectivity from any Internet-enabled location.
Cisco IOS SSL VPN can also support access from noncorporate-owned machines, including home computers, Internet kiosks, and wireless hot spots. These locations are difficult places to deploy and manage VPN client software and the remote configuration required to support IPsec VPN connections.
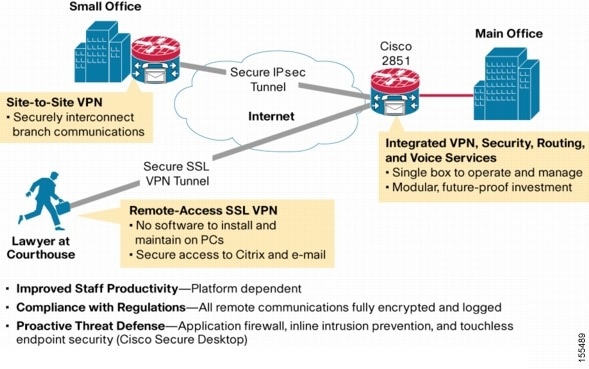
The figure below shows how a mobile worker (For example, a lawyer at the courthouse) can access protected resources from a main office and its branch offices. Site-to-site IPsec connectivity between the main and remote sites is unaltered. The mobile worker needs only Internet access and supported software (web browser and operating system) to securely access the corporate network.
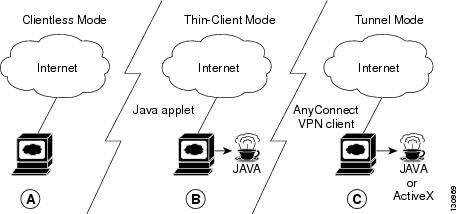
SSL VPN delivers the following three modes of SSL VPN access:
- Clientless--Clientless mode provides secure access to private web resources and will provide access to web content. This mode is useful for accessing most content that you would expect to access in a web browser, such as Internet access, databases, and online tools that employ a web interface.
- Thin client (port-forwarding Java applet)--Thin-client mode extends the capability of the cryptographic functions of the web browser to enable remote access to TCP-based applications such as Post Office Protocol version 3 (POP3), Simple Mail Transfer Protocol (SMTP), Internet Message Access protocol (IMAP), Telnet, and Secure Shell (SSH).
- Tunnel mode--Full-tunnel client mode offers extensive application support through its dynamically downloaded Cisco AnyConnect VPN Client (next-generation SSL VPN Client) for SSL VPN. Full tunnel client mode delivers a lightweight, centrally configured and easy-to-support SSL VPN tunneling client that provides network layer access to virtually any application.
SSL VPN application accessibility is somewhat constrained relative to IPsec VPNs; however, SSL-based VPNs provide access to a growing set of common software applications, including web page access, web-enabled services such as file access, e-mail, and TCP-based applications (by way of a downloadable thin-client applet). SSL-based VPN requires slight changes to user workflow because some applications are presented through a web browser interface, not through their native GUI. The advantage for SSL VPN comes from accessibility from almost any Internet-connected system without the need to install additional desktop software.
Licensing
Starting in Cisco IOS Release 15.0(1)M, the SSL VPN gateway is a seat-counted licensing feature on the Cisco 880, Cisco 890, Cisco 1900, Cisco 2900, and Cisco 3900 platforms. A license count is associated with each license, and the count indicates the instances of the feature available for use in the system. In the case of SSL VPN, a seat refers to the maximum number of sessions allowed at a time.
You can get the license at http://www.cisco.com/go/license.
For instructions on installing a license using Cisco License Manager (CLM), see the User Guide for Cisco License Manager, Release 2.2 at http://www.cisco.com/en/US/docs/net_mgmt/license_manager/lm_2_2/2.2_user_guide/clm_book.html.
For instructions on installing a license using Cisco CLI, see the "Cisco IOS Software Activation Tasks and Commands" chapter of the Software Activation Configuration Guide at http://www.cisco.com/en/US/docs/ios/csa/configuration/guide/csa_commands_ps6441_TSD_Products_Configuration_Guide_Chapter.html.
SSL VPN supports the following types of licenses:
- Permanent licenses--No usage period is associated with these licenses. All permanent licenses are node locked and validated during installation and usage.
- Evaluation licenses--These are metered licenses that are valid for a limited period. The usage period of a license is based on a system clock. The evaluation licenses are built into the image and are not node locked. The evaluation licenses are used only when there are no permanent, extension or grace period licenses available for a feature. An end-user license agreement (EULA) has to be accepted before using an evaluation license.
- Extension licenses--Extension licenses are node-locked metered licenses. These licenses are installed using the management interfaces on the device. A EULA has to be accepted as part of installation.
- Grace-rehost licenses--Grace period licenses are node locked metered licenses. These licenses are installed on the device as part of the rehost operation. A EULA has to be accepted as a part of the rehost operation.
For all the license types, except the evaluation license, a EULA has to be accepted during the license installation. This means that all the license types except the evaluation license are activated after installation. In the case of an evaluation license, a EULA is presented during an SSL VPN gateway configuration or an SSL VPN context configuration.
An SSL VPN session corresponds to a successful login of a user to the SSL VPN service. An SSL VPN session is created when a valid license is installed and the user credentials are successfully validated. On a successful user validation, a request is made to the licensing module to get a seat. An SSL VPN session is created only when the request is successful. If a valid license is not installed, the SSL VPN gateway configuration and SSL VPN context configuration can be successful, but the user cannot log in successfully. When multiple gateways and contexts are configured, the total number of sessions are equal to the total sessions allowed by the license. A seat count is released when a session is deleted. A session is deleted because of reasons such as log out by the user, session idle timeout or Dead Peer Detection (DPD) failure.
Note | Rarely a few sessions which do not have active connections may appear to be consuming licenses. This typically denotes that this is a transition state and the session will get expired soon. |
The same user can create multiple sessions and for each session a seat count is reserved. The seat reservation does not happen in the following cases:
- Multiple TCP connections, such as web server content, Outlook Web Access (OWA), and Common Intermediate Format (CIF) file shares.
- Port forward session initiation.
- Full-tunnel session creation from a browser session.
- Full-tunnel session is up and a crypto rekey is done.
When the total active sessions are equal to the maximum license count of the current active license, no more new sessions are allowed.
The reserved seat count or session is released when
- a user logs out.
- a DPD failure happens.
- a session timeout occurs.
- an idle timeout occurs.
- a session is cleared administratively using the clear webvpn session command.
- a user is disconnected from the tunnel.
- a context is removed even when there are active sessions.
You can use the show webvpn license command to display the available count and the current usage. To display the current license type and time period left in case of a nonpermanent license, use the show license command. To get information related to license operations, events, and errors, use the debug webvpn license command.
For migrating from any Cisco IOS 12.4T release to Cisco IOS 15.x release, use the license migration tool at https://tools.cisco.com/SWIFT/Licensing/LicenseAdminServlet/migrateLicense.
New Cisco IOS SSL VPN licenses that are generated are cumulative. Therefore the old licenses become inactive when a new license is applied. For example, when you are upgrading your license from 10 counts to 20 counts (an increase of 10 counts on the current 10 counts), Cisco provides a single 20 count license. The old license for 10 counts is not required when a permanent license for a higher count is available. However, the old license will exist in an inactive state as there is no reliable method to clear the old license.
In Cisco IOS Release 15.1(4)M1 and later releases, a Crypto Export Restrictions Manager (CERM) license is reserved only after the user logs in. If you have an Integrated Services Router Generation 2 (ISR G2) router with a CERM license, you must upgrade to Cisco IOS Release 15.1(4)M1 or later releases. Before Cisco IOS Release 15.1(4)M1, a CERM license is reserved for every SSL or Transport Layer Security (TLS) session.
Modes of Remote Access
Remote Access Overview
End-user login and authentication is performed by the web browser to a secure gateway using an HTTP request. This process creates a session that is referenced by a cookie. After authentication, the remote user is shown a portal page that allows access to the SSL VPN networks. All requests sent by the browser include the authentication cookie. The portal page provides all the resources available on the internal networks. For example, the portal page could provide a link to allow the remote user to download and install a thin-client Java applet (for TCP port forwarding) or a tunneling client.
The figure below shows an overview of the remote access modes.
The following table summarizes the level of SSL VPN support that is provided by each access mode.
Clientless Mode
In a clientless mode, the remote user accesses the internal or corporate network using the web browser on the client machine. The PC of the remote user must run the Windows 2000, Windows XP or Linux operating systems.
The following applications are supported in a clientless mode:
- Web browsing (using HTTP and HTTPS)--provides a URL box and a list of web server links in the portal page that allows the remote user to browse the web.
- File sharing [using common Internet file system (CIFS)]--provides a list of file server links in the portal page that allows the remote user to do the following operations:
Note | Linux requires that the Samba application is installed before CIFS file shares can be remotely accessed. |
Thin-Client Mode
Thin-client mode, also called TCP port forwarding, assumes that the client application uses TCP to connect to a well-known server and port. In thin-client mode, the remote user downloads a Java applet by clicking the link provided on the portal page, or the Java applet is downloaded automatically (see the Options for Configuring HTTP Proxy and the Portal Page and Options for Configuring HTTP Proxy and the Portal Page section). The Java applet acts as a TCP proxy on the client machine for the services that you configure on the gateway.
The applications that are supported in thin-client mode are mainly e-mail-based (SMTP, POP3, and Internet Map Access Protocol version 4 [IMAP4]) applications.
The Java applet initiates an HTTP request from the remote user client to the SSL VPN gateway. The name and port number of the internal e-mail server is included in the HTTP request (POST or CONNECT). The SSL VPN gateway creates a TCP connection to that internal e-mail server and port.
The Java applet starts a new SSL connection for every client connection.
You should observe the following restrictions when using thin-client mode:
- The remote user must allow the Java applet to download and install.
- You cannot use thin-client mode for applications such as FTP, where the ports are negotiated dynamically. You can use TCP port forwarding only with static ports.
Options for Configuring HTTP Proxy and the Portal Page
Effective with Cisco IOS Release 12.4(11)T, administrators have more options for configuring the HTTP proxy and the portal page. If HTTP proxy is enabled, the Java applet acts as the proxy for the browser of the user, thereby connecting the client workstation with the gateway. The home page of the user (as defined by the user group) is opened automatically or, if configured by the administrator, the user is directed to a new website.
HTTP proxy supports both HTTP and HTTPS.
Benefits of Configuring HTTP Proxy
HTTP supports all client-side web technologies (including HTML, Cascading Style Sheets [CSS], JavaScript, VBScript, ActiveX, Java, and flash), HTTP Digest authentication, and client certificate authentication. Remote users can use their own bookmarks, and there is no limit on cookies. Because there is no mangling involved and the client can cache the objects, performance is much improved over previous options for configuring the HTTP proxy and portal page.
Illustrations of Port Forwarding with and Without an HTTP Proxy Configuration
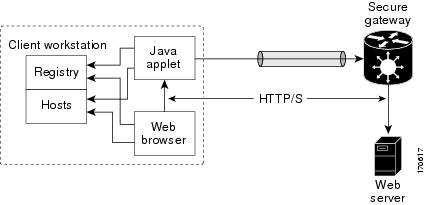
The figure below illustrates TCP port forwarding without HTTP proxy configured.

In the figure above, the following steps occur:
- User downloads the proxy applet.
- Applet updates the registry to add HTTP as a Remote Procedure Call (RPC) transport.
- Applet examines the registry to determine the exchange (and local catalog) server and create server entries that refer to those servers.
- Applet opens local port 80 and listens for connections.
- User starts Outlook, and Outlook connects to 10.0.0.254:80.
- Applet opens a connection to the secure gateway and delivers the requests from Outlook.
- Secure gateway examines the requests to determine the endpoint exchange server.
- Data flows from Outlook, through the applet and the secure gateway, to the exchange server.
- User terminates Outlook.
- User closes the applet. Before closing, the applet undoes configuration Steps 3 and 4.
The figure below illustrates TCP port forwarding when HTTP proxy is configured.
In the figure above, the following steps occur:
- Proxy applet is downloaded automatically.
- Applet saves the original proxy configuration of the browser.
- Applet updates the proxy configuration of the browser to be the local loopback address with an available local port (by default, port 8080).
- Applet opens the available local port and listens for connections.
- Applet, if so configured, opens the home page of the user, or the user browses to a new website.
- Applet accepts and looks at the HTTP or HTTPS request to determine the destination web server.
- Applet opens a connection to the secure gateway and delivers the requests from the browser.
- Secure gateway examines the requests to determine the endpoint web server.
- Data flows from the browser, through the applet and the secure gateway, to the web server.
- User closes applet. Before closing, the applet undoes configuration Steps 2 and 3.
Note | HTTP proxy can also be enabled on an authentication, authorization, and accounting (AAA) server. See the table SSL VPN RADIUS Attribute-Value Pairs in the Configuring RADIUS Attribute Support for SSL VPN section (port-forward-http-proxy and port-forward-http-proxy-url attributes). |
Tunnel Mode
In a typical clientless remote access scenario, remote users establish an SSL tunnel to move data to and from the internal networks at the application layer (for example, web and e-mail). In tunnel mode, remote users use an SSL tunnel to move data at the network (IP) layer. Therefore, tunnel mode supports most IP-based applications. Tunnel mode supports many popular corporate applications (for example, Microsoft Outlook, Microsoft Exchange, Lotus Notes E-mail, and Telnet).
The tunnel connection is determined by the group policy configuration. The Cisco AnyConnect VPN Client is downloaded and installed on the remote user PC, and the tunnel connection is established when the remote user logs into the SSL VPN gateway.
By default, the Cisco AnyConnect VPN Client is removed from the client PC after the connection is closed. However, you have the option to keep the Cisco AnyConnect VPN Client installed on the client PC.
SSL VPN Features
- Access Control Enhancements
- SSL VPN Client-Side Certificate-Based Authentication
- AnyConnect Client Support
- Application ACL Support
- Automatic Applet Download
- Backend HTTP Proxy
- Front-Door VRF Support
- Full-Tunnel Cisco Express Forwarding Support
- GUI Enhancements
- Internationalization
- Max-User Limit Message
- Netegrity Cookie-Based Single SignOn Support
- NTLM Authentication
- RADIUS Accounting
- Stateless High Availability with Hot Standby Router Protocol
- TCP Port Forwarding and Thin Client
- URL Obfuscation
- URL Rewrite Splitter
- User-Level Bookmarking
- Virtual Templates
- License String Support for the 7900 VPN Client
- SSL VPN DVTI Support
- SSL VPN Phase-4 Features
- DTLS Support for IOS SSL VPN
- Cisco AnyConnect VPN Client Full Tunnel Support
Access Control Enhancements
Effective with Cisco IOS Release 12.4(20)T, administrators can configure automatic authentication and authorization for users. Users provide their usernames and passwords via the gateway page URL and do not have to reenter their usernames and passwords from the login page. Authorization is enhanced to support more generic authorization, including local authorization. In previous releases, only RADIUS authorization was supported.
For information about configuring this feature, see the "Configuring Automatic Authentication and Authorization" section.
SSL VPN Client-Side Certificate-Based Authentication
This feature enables SSL VPN to authenticate clients based on the client's AAA username and password and also supports WebVPN gateway authentication of clients using AAA certificates.
SSL VPN Client-Side Certificate-Based Authentication feature includes the following features:
- Certificate-Only Authentication and Authorization Mode
- Two-Factor Authentication and Authorization Mode
- Identification of WebVPN Context at Runtime Using Certificate Map Match Rules
- Support for AnyConnect Client to Implement Certificate Matching Based on Client Profile Attributes
Certificate-Only Authentication and Authorization Mode
Certificate-only authorization requires the user to provide a AAA authentication certificate as part of the WebVPN request, but does not require the username and password for authorization. The user requests WebVPN access with the AAA authentication certificate from the WebVPN gateway. The WebVPN gateway validates the identity of the client using the AAA authentication certificate presented to it. The WebVPN extracts the username from the AAA authentication certificate presented to it and uses it as the username in the AAA request. AAA authentication and AAA authorization are then completed with a hard-coded password. To configure certificate-only authorization use the authentication certificate command.
Two-Factor Authentication and Authorization Mode
Two-factor authorization requires the user to request WebVPN access and present a AAA authentication certificate. The AAA authentication certificate is validated and the client's identity is verified. The WebVPN gateway then presents the login page to the user. The user enters their username and password and WebVPN sends AAA authentication and AAA authorization requests to the AAA server. The AAA authentication list and the AAA authorization lists configured on the server are then used for authentication and authorization. To configure two-factor authentication and authorization mode use the authentication certificate aaa command.
Note | If the username-prefill command is configured, the username textbox on the login page will be disabled. The user will be asked only for their password on the login page. |
Identification of WebVPN Context at Runtime Using Certificate Map Match Rules
Certificate map match rules are used by SSL VPN to identify the WebVPN context at runtime. The WebVPN context is required for AAA authentication and authorization mode and trustpoint configuration. When the user does not provide the WebVPN context, the identification of the WebVPN context at runtime is possible using certificate map matching by matching the certificate presented by the client with the certificate map match rules. To configure certificate map matching in WebVPN use the match-certificate command.
Support for AnyConnect Client to Implement Certificate Matching Based on Client Profile Attributes
Cisco AnyConnect client has certificate match functionality allowing it to select a suitable certificate while initiating tunnel connection with SSL VPN. In the case of standalone mode, the certificate selection is made based on the certificate match. When selecting a certificate, Cisco AnyConnect client can select the appropriate certificate based on the AnyConnect client profile attributes. This requires SSL VPN to support AnyConnect client profiles. The profile file is imported after modification by the administrator using the svc profile command. To create an AnyConnect client profile use the template that appears after installing Cisco AnyConnect in this location: \Documents and Settings\All Users\Application Data\Cisco\ CiscoAnyConnectVPNClient\Profile\AnyConnectProfile.tmpl.
The following are the certificate match types available with Cisco AnyConnect client:
Certificate Key Usage Matching
Certificate key usage matching offers a set of constraints based on the broad types of operations that can be performed with a given certificate.
Extended Certificate Key Usage Matching
This matching allows an administrator to limit the certificates that can be used by the client based on the Extended Key Usage fields.
Certificate Distinguished Name Mapping
This certificate matching capability allows an administrator to limit the certificates that can be used by the client to those matching the specified criteria and criteria match conditions. This includes the ability to specify that a certificate must or must not have a specified string and also if wild carding for the string should be allowed.
AnyConnect Client Support
Effective with Cisco IOS Release 12.4(20)T, AnyConnect Client support is added for several client-side platforms, such as Microsoft Windows, Apple-Mac, and Linux. The ability to install AnyConnect in a standalone mode is also added. In addition, the Release 12.4(20)T allows you to install multiple AnyConnect VPN client packages to a gateway. For information on configuring multiple packages, see the "Configuring the SSL VPN Gateway to Distribute CSD and Cisco AnyConnect VPN Client Package Files" section.
Application ACL Support
Effective with Cisco IOS Release 12.4(11)T, the Application ACL Support feature provides administrators with the flexibility to fine-tune access control at the application layer level, for example, on the basis of a URL.
For information about configuring this feature, see the "Configuring ACL Rules" section, and "Associating an ACL Attribute with a Policy Group" section.
Automatic Applet Download
Effective with Cisco IOS Release 12.4(9)T, administrators have the option of automatically downloading the port-forwarding Java applet. The Automatic Applet Download feature must be configured on a group policy basis.
Note | Users still have to allow the Java applet to be downloaded. The dialog box appears, asking for permission. |
To configure the automatic download, see the "Configuring an SSL VPN Policy Group" section.
Backend HTTP Proxy
The Backend HTTP Proxy feature, added in Cisco IOS Release 12.4(20)T, allows administrators to route user requests through a backend HTTP proxy, providing more flexibility and control than routing requests through internal web servers. This feature adds the following new AAA attributes:
http-proxy-server
http-proxy-server-port
For information about configuring this feature, see the "Configuring a Backend HTTP Proxy" section.
Front-Door VRF Support
Effective with Cisco IOS Release 12.4(15)T, front-door virtual routing and forwarding (FVRF) support, coupled with the already supported internal virtual routing and forwarding (IVRF), provides for increased security. The feature allows the SSL VPN gateway to be fully integrated into a Multiprotocol Label Switching (MPLS) or non-MPLS network (wherever the VRFs are deployed). The virtual gateway can be placed into a VRF that is separate from the Internet to avoid internal MPLS and IP network exposure. This placement reduces the vulnerability of the router by separating the Internet routes or the global routing table. Clients can now reach the gateway by way of the FVRF, which can be separate from the global VRF. The backend, or IVRF, functionality remains the same.
This FVRF feature provides for overlapping IP addresses.
The figure below is a scenario in which FVRF has been applied.
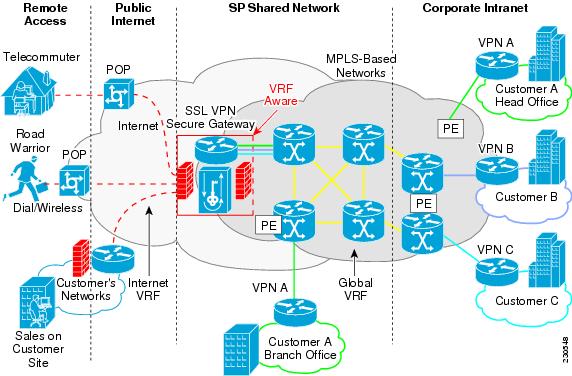
To configure FVRF, see the "Configuring FVRF" section.
Full-Tunnel Cisco Express Forwarding Support
Effective with Cisco IOS Release 12.4(20)T, Full-Tunnel Cisco Express Forwarding support is added for better throughput performance than in earlier releases. This feature is enabled by default. To turn off full-tunnel Cisco Express Forwarding support, use the no webvpn cef command.
Note | To take full advantage of Cisco Express Forwarding support, the hardware crypto engine is required. |
For sample output showing Cisco Express Forwarding-processed packets, see the Example Cisco Express Forwarding-Processed Packets.
Network Address Translation (NAT) configuration is sometimes used to forward TCP port 443 traffic destined to the WAN interface of a router through an internal webserver.
There are two methods of implementing Cisco IOS SSL VPN on a preexisting NAT configuration. The Cisco-recommended method is to use the WebVPN gateway IP address as the secondary address on the WAN interface. This method helps improve the WebVPN throughput performance. The following is a sample configuration of the recommended method on Cisco IOS SSL VPN:
interface GigabitEthernet 0/0
  ip address 10.1.1.1 255.255.255.0
  ip address 10.1.1.2 255.255.255.0 secondary !
webvpn gateway ssl_vpn
  ip address 10.1.1.2 port 443
In the second method the WebVPN gateway uses a private IP address configured on a loopback interface and performs a NAT operation to convert the private IP address to a publically routable address. The following configuration is not supported on Cisco IOS SSL VPN because this configuration causes packets to become process-switched instead of being Cisco Express Forwarding-switched:
interface Loopback 10
  ip address 192.0.2.1 255.255.255.0
!
interface GigabitEthernet 0/0
  description WAN interface
  ip address 10.1.1.1 255.0.0.0
!
ip nat inside source static 192.0.2.1 10.1.1.2 !
webvpn gateway ssl_vpn
  ip address 192.0.2.1 port 443
GUI Enhancements
In Cisco IOS Release 12.4(15)T, ergonomic improvements are made to the GUI of the Cisco IOS SSL VPN gateway. The improved customization of the user interface provides for greater flexibility and the ability to tailor portal pages for individualized views. Enhancements are made to the following web screens:
Banner
The banner is a small popup box that appears before the portal page displays and after a user is logged in.
The message in the popup box is configured using the banner command.

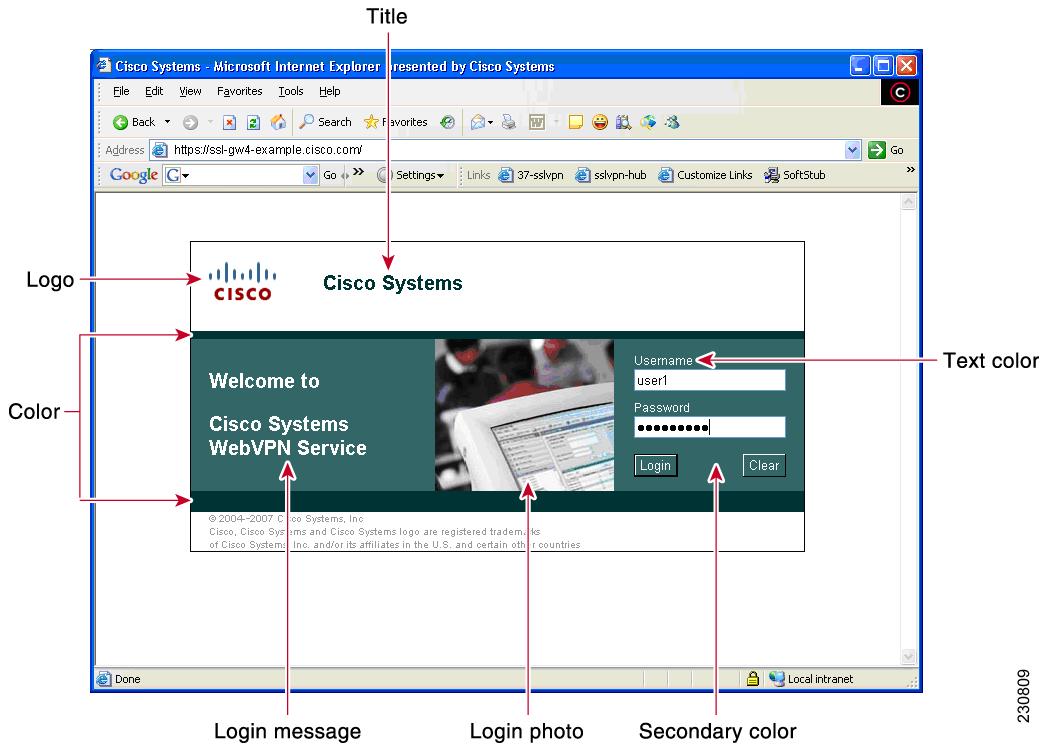
Customization of a Login Page
Login screens can be customized by an administrator. The following figure shows the fields that can be customized.
For information about setting various elements of the login page, see also Cisco IOS Security Command Reference, Release 12.4T for the color, logo, login-message, login-photo, secondary-color, text-color, title, title-color, and text-color commands.
Portal Page
The portal page (see the figure below) is the main page for the SSL VPN functionality. You can customize this page to contain the following:
- Custom logo (the default is the Cisco bridge logo)
- Custom title (the default is "WebVPN Services")
- Custom banner (the default is an empty string)
- Custom colors (the default is a combination of white and greens)
- List of web server links (customizable)
Note | The Bookmark links are listed under the Personal folder, and the server links are listed under Network File in the figure below. |
- URL entry box (may be present or can be hidden using the hide-url-bar command)
- Thin Client link (may or may not be present)
Note | The Application Access box allows you to download and install the Tunnel Connection and Thin Client Application. |
Items that you have not configured are not displayed on the portal page.
Note | E-mail access is supported by thin-client mode, which is downloaded using the Thin Client link. |
The figure below is an example of a WebVPN portal page.
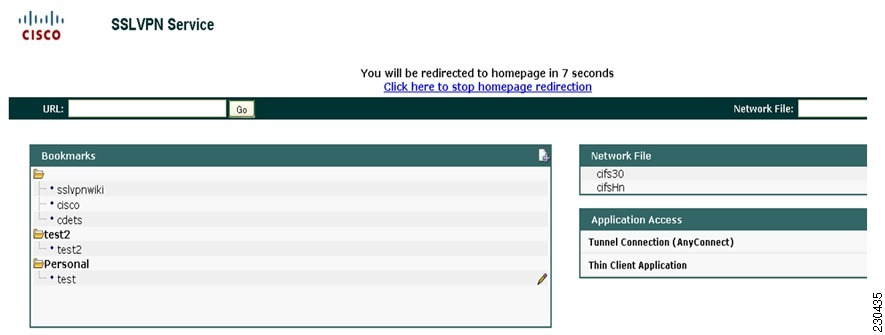
Note | Time to redirect to the home page is displayed on the WebVPN portal page if you have configured the home page redirect time using the webvpn-homepage command. See the Cisco IOS Security Command Reference for information about the webvpn-homepage command. You can click the "Click here to stop homepage redirection" link to stop redirection. |
Customization of a Portal Page
Portal pages can be customized by an administrator. The following figure shows various fields, including the fields that can be customized by an administrator. The fields that can be customized by an administrator are as follows:

The table below provides information about various fields on the portal page. For information about setting elements such as color or titles, see command information in the Cisco IOS Security Command Reference, Release 12.4T for the color, functions, hide-url-bar, logo, port-forward, title, title-color, secondary-color, secondary-text-color, and url-list commands.
| Table 2 | Information About Fields on the Portal Page |
|
Field |
Description |
|---|---|
|
User-level bookmark add icon |
When a user selects this icon, a dialog box is added so that a new bookmark can be added to the Personal folder. |
|
Network File location bar |
Allows a user to enter the file server here. The functions file-access and functions file-entry commands must be configured for the input box to display. |
|
Header |
Shares the same color value as the title. |
|
Last login |
Time stamp of the last login. |
|
Browse network |
Allows a user to browse the file network. The functions file-access and functions file-browse commands must be configured for the icon to appear. |
|
Tunnel Connection |
Allows a user to choose when to start the tunnel connection by configuring the functions svc-enabled command. |
|
Port forwarding |
Downloads the applet and starts port forwarding. |
|
User-level bookmark edit icon |
Allows a user to edit or delete an existing bookmark. |
|
User-level bookmarks |
Allows a user to add a bookmark by using the plus icon on the bookmark panel or toolbar. See the document "SSL VPN Remote User Guide" for information about the toolbar. A new window displays when the link is clicked. |
|
Administrator-defined bookmarks |
Does not allow a user to edit an administrator-defined URL lists. |
|
URL address bar |
A new window displays when a user selects Go. |

Internationalization
The Internationalization feature provides multilanguage support for messages initiated by the headend for SSL VPN clients, such as Cisco Secure Desktop (CSD) and SSL VPN Client (SVC). With the Internationalization feature, administrators can import their own attribute files in an XML format so that other languages can be imported using an editor that supports multilanguages.
The figure below shows a portal page in English. Users can select any language you have imported for certain SSL VPN web pages (login message, title page, and URL lists).

The figure below shows that an administrator has imported files in Japanese; a user has selected Japanese as the language for certain SSL VPN web pages (login message, title, and URL lists).

For information about configuring this feature, see the "Configuring Internationalization" section. For examples relating to this feature, see the "Examples Internationalization" section.
Max-User Limit Message
A "Max user limit reached" message displays when a user logs in to a Web VPN context that has already reached the maximum users limit.
Netegrity Cookie-Based Single SignOn Support
The Netegrity SiteMinder product provides a Single SignOn feature that allows a user to log in a single time for various web applications. In this feature, a cookie is set in your browser for the first time when you are prompted to log in so that only a one-time login is required to access various web applications.
Effective with Cisco IOS Release 12.4(11)T, Netegrity cookie-based SSO is integrated with SSL VPN. It allows administrators to configure an SSO server that sets a SiteMinder cookie in a user's browser when the user initially logs in. This cookie is validated by a SiteMinder agent on subsequent user requests to resources that are protected by a SiteMinder realm. The agent decrypts the cookie and verifies user authentication.
For information about configuring SSO Netegrity Cookie Support and associating it with a policy group using the CLI, see the "Configuring SSO Netegrity Cookie Support for a Virtual Context" section and "Associating an SSO Server with a Policy Group" section.
The following example shows that an SSO server can also be associated with a policy group using RADIUS attributes:
webvpn:sso-server-name=server1
For a list of RADIUS attribute-value (AV) pairs that support SSL VPN, see the "Configuring RADIUS Attribute Support for SSL VPN" section.
NTLM Authentication
NT LAN Manager (NTLM) is supported for SSL VPN effective with Cisco IOS Release 12.4(9)T. The feature is configured by default.
RADIUS Accounting
Effective with Cisco IOS Release 12.4(9)T, this feature provides for RADIUS accounting of SSL VPN user sessions.
For information about configuring SSL VPN RADIUS accounting for SSL VPN user sessions, see the "Configuring RADIUS Accounting for SSL VPN User Sessions" section.
For more information about configuring RADIUS accounting, see the "Configuring RADIUS" chapter in the Cisco IOS Security Configuration Guide: Securing User Services.
For a list of RADIUS AV pairs that support SSL VPN, see the "Configuring RADIUS Attribute Support for SSL VPN" section.
Stateless High Availability with Hot Standby Router Protocol
Hot Standby Router Protocol (HSRP) provides high network availability by routing IP traffic from hosts on Ethernet networks without having to rely on the availability of any single router. HSRP is particularly useful for hosts that do not support a router discovery protocol, such as ICMP Router Discovery Protocol (IRDP), and that do not have the functionality to switch to a new router when their selected router reloads or loses power. Without this functionality, a router that loses its default gateway because of a router failure is unable to communicate with the network.
HSRP is configurable on LAN interfaces using standby CLI. It is possible to use the standby IP address from an interface as the local IPsec identity, or local tunnel endpoint.
You can use the standby IP address as the SSL VPN gateway address to apply failover to VPN routers by using HSRP. Remote SSL VPN users connect to the local VPN gateway using the standby address that belongs to the active device in the HSRP group. In the event of a failover, the standby device takes over ownership of the standby IP address and begins to service remote VPN users.
Using the Stateless High Availability with Hot Standby Router Protocol feature, the remote user has to be aware of only the HSRP standby address instead of a list of gateway addresses.
The figure below shows the enhanced HSRP functionality topology. Traffic is serviced by the active Router P, the active device in the standby group. In the event of failover, traffic is diverted to Router S, the original standby device. Router S assumes the role of the new active router and takes ownership of the standby IP address.

For information about configuring Stateless High Availability with HSRP, see the "Configuring Stateless High Availability with HSRP for SSL VPN" on section .
TCP Port Forwarding and Thin Client
Note | The TCP Port Forwarding and Thin Client feature requires the Java Runtime Environment (JRE) version 1.4 or later releases to properly support SSL connections. |
When the remote user clicks the Start button of the Thin Client Application (under "Application Access), a new window is displayed. This window initiates the downloading of a port-forwarding applet. Another window is then displayed. This window asks the remote user to verify the certificate with which this applet is signed. When the remote user accepts the certificate, the applet starts running, and port-forwarding entries are displayed (see the figure below ). The number of active connections and bytes that are sent and received is also listed on this window.
You should have configured IP addresses, Domain Name System (DNS) names, and port numbers for the e-mail servers. The remote user can then launch the e-mail client, which is configured to contact the e-mail servers and send and receive e-mails. POP3, IMAP, and SMTP protocols are supported.
The window attempts to close automatically if the remote user is logged out using JavaScript. If the session terminated and a new port forwarding connection is established, the applet displays an error message.


The table below lists remote system requirements for Thin Client.
| Table 3 | SSL VPN Remote System Thin-Client Requirements |
|
Remote User System Requirements |
Specifications or Use Suggestions |
||
|---|---|---|---|
|
Client applications installed. |
- |
||
|
Cookies enabled on browser. |
- |
||
|
Administrator privileges. |
You must be the local administrator on your PC. |
||
|
Sun Microsystems JRE version 1.4 or later installed. |
SSL VPN automatically checks for JRE whenever the remote user starts Thin Client. If it is necessary to install JRE, a popup window displays directing remote users to a site where it is available. |
||
|
Client applications configured, if necessary.
|
To configure the client application, use the locally mapped IP address and port number of the server. To find this information, do the following:
|
||
|
Windows XP SP2 patch. |
If you are running Windows XP SP2, you must install a patch from Microsoft that is available at the following address: http://support.microsoft.com/?kbid=884020 This is a known Microsoft issue. |
URL Obfuscation
The URL Obfuscation feature provides administrators with the ability to obfuscate, or mask, sensitive portions of an enterprise URL, such as IP addresses, hostnames, or part numbers. For example, if URL masking is configured for a user, the URL in the address bar could have the port and hostname portion obfuscated, as in this example:
https://slvpn-gateway.examplecompany.com/http/cF9HxnBjRmSFEzBWpDtfXfigzL559MQo51Qj/cgi-bin/submit.p
For information about configuring this feature, see the "Associating an SSO Server with a Policy Group" section.
URL Rewrite Splitter
Effective with Cisco IOS Release 12.4(20)T, the URL Rewrite Splitter feature allows administrators to mangle selective URLs. Mangling is a CPU-intensive and time-consuming process, so mangling only selective URLs can result in a savings of memory and time.
For information about configuring this feature, see the "Configuring a URL Rewrite Splitter" section.
User-Level Bookmarking
Effective with Cisco IOS Release 12.4(15)T, users can bookmark URLs while connected through an SSL VPN tunnel. Users can access the bookmarked URLs by clicking the URLs.
User-level bookmarking is turned by default. There is no way to turn it off. To set the storage location, administrators can use the user-profile location command. If the user-profile location command is not configured, the location flash:/webvpn/{context name}/ is used.
Virtual Templates
A virtual template enables SSL VPN to interoperate with IP features such as Network Address Translation (NAT), firewall, and policy-based routing.
For information about configuring this feature, see Configuring a_Virtual_Template section.
License String Support for the 7900 VPN Client
The Cisco IOS SSL VPN accepts license strings from Cisco IP Phones. Cisco IOS VPN concentrators support the VPN license type linksys-phone in order to support the Galactica VPN client on 79x 2 and 79x 5 phones.
In the case of a transformer platform, response to the license message (linksys-phone) will succeed if the license requirements are met. However, an Integrated Services Routers (ISR) router must always respond with a success message so that the Galactica VPN client can attempt to establish a VPN connection.
SSL VPN DVTI Support
The SSL VPN DVTI Support feature adds Dynamic Virtual Tunnel Interface (DVTI) support to the Secure Socket Layer Virtual Private Network (SSL VPN) and hence enables seamless interoperability with IP features such as Firewall, Network Address Translation (NAT), access Control Lists (ACLs), and Virtual Routing and Forwarding (VRF). This feature also provides DVTI support, which allows IP feature configuration on a per-tunnel basis.
SSL VPN provides three modes to access a VPN: clientless, thin client, and full tunnel. The full tunnel mode uses an internal virtual interface to route the traffic to and from the SSL VPN tunnel. Before the SSL VPN DVTI Support feature was introduced, the virtual interface was created during the SSL VPN virtual interface configuration and users were not allowed to apply IP features to the SSL VPN traffic.
The SSL VPN DVTI Support feature uses a virtual template infrastructure to provide DVTI support for SSL VPN. IP features are configured in a virtual template that is associated with the SSL VPN or WebVPN context. The IP features configured in the virtual template are used to create a virtual access interface that is internally used to tunnel SSL VPN traffic. Virtual templates in a WebVPN context are applied in two ways: per-context and per-tunnel.
The SSL VPN DVTI Support feature contains the following:
- Prerequisites for SSL VPN DVTI Support
- Restrictions for SSL VPN DVTI Support
- Virtual Template Infrastructure
Prerequisites for SSL VPN DVTI Support
- You must have the IP features configured in a virtual template. See the "Configuring a Virtual Template" section for information on configuring a virtual template.
- SSL VPN must be able to fetch configurations from the AAA server.
- The SSL VPN gateway and context configurations must be enabled and operational.
- If VRF is needed, configure it before creating the virtual template.
Virtual Template Infrastructure
A generic interface template service is required with features such as stackability, Virtual Private Dialup Network (VPDN), Multilink PPP (MLP), and virtual profiles. Virtual template interface service delivers a generic interface template service. The virtual template interface, command buffer, and virtual access interface functions enables you to populate a virtual-access interface using a pre-defined configuration that is stored in a virtual template interface and security servers such as TACACS+ and RADIUS.
For example, in stackability, a virtual template interface is assigned to a stack group. Whenever a stack member needs a virtual interface, the virtual template interface service is called by a member to obtain a virtual access interface cloned with the same configuration as the configuration of the assigned virtual template interface.
In a virtual profile, the per-user configuration can be stored in a security server. That is, when the user dials in, the desired configuration can be cloned into the virtual access interface associated with the user. The virtual template service provides an application programming interface (API) for a virtual profile to clone a buffer of commands to a virtual access interface. The virtual profile does the actual interaction with the security server.
Note | If you do not configure a virtual template, then the default virtual template (VT0) will be used for cloning the virtual access interface. |
SSL VPN Phase-4 Features
The SSL VPN Phase-4 Features feature provides the following enhancements to the Cisco IOS Secure Sockets Layer Virtual Private Network (SSL VPN):
- ACL support for split tunneling
- IP mask for IP pool address assignment
- Undoing the renaming of AnyConnect or SSL VPN Client (SVC) Full Tunnel Cisco package during installation on a Cisco IOS router
- Adding per-user SSL VPN session statistics
- "Start before logon" option for the Cisco IOS SSL VPN headend
The SSL VPN Phase-4 features contains the following:
Prerequisites for SSL VPN Phase-4 Features
You must use a valid K9 image to configure the SSL VPN Phase-4 Features.
Full Tunnel Package
When you install the AnyConnect or SVC full tunnel package using the crypto vpn command on the Cisco IOS headend, the package name gets renamed to svc_pkg_<number>. This renaming omits package information and Base Station Ethernet (BSE) operating system information, and thus makes you difficult to remove or uninstall the package. This functionality was modified in Cisco IOS Release 15.1(1)T to retain the name during installation of the package.
The limit on the filename size on the Cisco IOS file system (IFS) is 120 bytes. Unless the package name is greater than this limit, the package name does not change. If the filename exceeds this limit, then the installation fails. The following error message is displayed on the router console:
Error: Package name exceeds 120 characters
SSL VPN per-User Statistics
Per-user statistics functionality provides an option to filter the cumulative statistics on a per-user basis for the Cisco IOS SSL VPN sessions. Use the show webvpn session user command to enable this functionality. This command is applicable only for user session statistics and tunnel statistics. See Cisco Cisco IOS Security Command Reference for more information on the show webvpn session command.
DTLS Support for IOS SSL VPN
The DTLS Support for IOS SSL VPN feature enables DTLS as a transport protocol for the traffic tunneled through SSL VPN.
An AnyConnect client with a Transport Layer Security (TLS) tunnel can face problems for real-time traffic and the traffic that is not sensitive to data loss, such as VoIP. This happens because of the delay introduced by the TCP channel (AnyConnect client uses TLS over TCP channel). Also, when the TCP sessions are channeled over the TLS tunnel we have TCP in TCP. Here both the TCPs try to control the flow and achieve in-sequence reliable delivery. This causes slow down of the application and also increases the network bandwidth utilization. DTLS solves this problem by hosting TLS over UDP after making the necessary changes to TLS.
The DTLS Support for IOS SSL VPN feature is enabled by default on the Cisco IOS SSL VPN. You can use the no svc dtls command in the WebVPN group policy configuration mode to disable the DTLS support on the SSL VPN.
Prerequisites for DTLS Support for IOS SSL VPN
You must use a valid K9 image to have the DTLS Support for IOS SSL VPN feature.
Cisco AnyConnect VPN Client Full Tunnel Support
Remote Client Software from the SSL VPN Gateway
The Cisco AnyConnect VPN Client software package is pushed from the SSL VPN gateway to remote clients when support is needed. The remote user (PC or device) must have either the Java Runtime Environment for Windows (version 1.4 later), or the browser must support or be configured to permit Active X controls. In either scenario, the remote user must have local administrative privileges.
Address Pool
The address pool is first defined with the ip local pool command in global configuration mode. The standard configuration assumes that the IP addresses in the pool are reachable from a directly connected network.
Address Pools for Nondirectly Connected Networks
If you need to configure an address pool for IP addresses from a network that is not directly connected, perform the following steps:
- Create a local loopback interface and configure it with an IP address and subnet mask from the address pool.
- Configure the address pool with the ip local pool command. The range of addresses must fall under the subnet mask configured in Step 1.
- Set up the route. If you are using the Routing Information Protocol (RIP), configure the router rip command and then the network command, as usual, to specify a list of networks for the RIP process. If you are using the Open Shortest Path First (OSPF) protocol, configure the ip ospf network point-to-point command in the loopback interface. As a third choice (instead of using the RIP or OSPF protocol), you can set up static routes to the network.
- Configure the svc address-pool command with the name configured in Step 2.
Manual Entry to the IP Forwarding Table
If the SSL VPN software client is unable to update the IP forwarding table on the PC of the remote user, the following error message will be displayed in the router console or syslog:
Error : SSL VPN client was unable to Modify the IP forwarding table ......
This error can occur if the remote client does not have a default route. You can work around this error by performing the following steps:
- Open a command prompt (DOS shell) on the remote client.
- Enter the route print command.
- If a default route is not displayed in the output, enter the route command followed by the add and mask keywords. Include the default gateway IP address at the end of the route statement. See the following example:
C:\>route ADD 0.0.0.0 MASK 0.0.0.0 10.1.1.1
Other SSL VPN Features
The following table lists the requirements for various SSL VPN features.
| Table 4 | SSL VPN Remote User System Requirements |
|
Task |
Remote User System Requirements |
Additional Information |
||||
|---|---|---|---|---|---|---|
|
Web Browsing |
Usernames and passwords for protected websites |
Users should log out on SSL VPN sessions when they are finished. The look and feel of web browsing with SSL VPN might be different from what users are accustomed to. For example, when they are using SSL VPN, the following should be noted: Also, depending on how a particular account was configured, the following might have occurred: |
||||
|
Network Browsing and File Management |
File permissions configured for shared remote access Server name and passwords are necessary for protected file servers Domain, workgroup, and server names where folders and files reside |
Only shared folders and files are accessible through SSL VPN. A user might not be familiar with how to locate files through the network of an organization. |
||||
|
Using e-mail:Thin Client |
Same requirements as for Thin Client (see the "TCP Port Forwarding and Thin Client" ). Other Mail Clients
|
To use e-mail, users must start Thin Client from the SSL VPN home page. The e-mail client is then available for use. Microsoft Outlook Express versions 5.5 and 6.0 have been tested. SSL VPN should support other SMTPS, POP3S, or IMAP4S e-mail programs, such as Netscape Mail, Lotus Notes, and Eudora, but they have not been verified. |
||||
|
Using e-mail: Web Access |
Web-based e-mail product installed |
Supported products are as follows: Netscape, Mozilla, and Internet Explorer are supported with OWA 5.5 and 2000. Internet Explorer 6.0 or a later version is required with OWA 2003. Netscape and Mozilla are supported with OWA 2003. Operating system support:
SSL VPN-supported browser: The following browsers have been verified for SSL VPN. Other browsers might not fully support SSL VPN features.
Other web-based e-mail products should also work, but they have not been verified. |
||||
|
Using the Cisco Tunnel Connection |
-- |
To retrieve Tunnel Connection log messages using the Windows Event Viewer, go to Program Files > Administrative Tools > Event Viewer in Windows. |
||||
|
Using Secure Desktop Manager |
A Secure Desktop Manager-supported browser |
On Microsoft Windows: On Linux: |
||||
|
Using Cache Cleaner or Secure Desktop |
A Cisco Secure Desktop-supported browser |
Any browser supported for Secure Desktop Manager. |
Platform Support
For information about platform support for the SSL VPN feature, see the Cisco IOS SSL VPN data sheet section.
How to Configure SSL VPN Services on a Router
- Configuring an SSL VPN Gateway
- Configuring a Generic SSL VPN Gateway
- Configuring an SSL VPN Context
- Configuring an SSL VPN Policy Group
- Configuring Local AAA Authentication for SSL VPN User Sessions
- Configuring AAA for SSL VPN Users Using a Secure Access Control Server
- Configuring RADIUS Accounting for SSL VPN User Sessions
- Monitoring and Maintaining RADIUS Accounting for an SSL VPN Session
- Configuring RADIUS Attribute Support for SSL VPN
- Configuring a URL List for Clientless Remote Access
- Configuring Microsoft File Shares for Clientless Remote Access
- Configuring Citrix Application Support for Clientless Remote Access
- Configuring Application Port Forwarding
- Configuring the SSL VPN Gateway to Distribute CSD and Cisco AnyConnect VPN Client Package Files
- Configuring Cisco Secure Desktop Support
- Configuring Cisco AnyConnect VPN Client Full Tunnel Support
- Configuring Advanced SSL VPN Tunnel Features
- Configuring VRF Virtualization
- Configuring ACL Rules
- Associating an ACL Attribute with a Policy Group
- Configuring SSO Netegrity Cookie Support for a Virtual Context
- Associating an SSO Server with a Policy Group
- Configuring URL Obfuscation (Masking)
- Adding a CIFS Server URL List to an SSL VPN Context and Attaching It to a Policy Group
- Configuring User-Level Bookmarks
- Configuring FVRF
- Disabling Full-Tunnel Cisco Express Forwarding
- Configuring Automatic Authentication and Authorization
- Configuring SSL VPN Client-Side Certificate-Based Authentication
- Configuring a URL Rewrite Splitter
- Configuring a Backend HTTP Proxy
- Configuring Stateless High Availability with HSRP for SSL VPN
- Configuring Internationalization
- Configuring a Virtual Template
- Configuring SSL VPN DVTI Support
- Configuring SSL VPN Phase-4 Features
- Configuring the DTLS Port
- Using SSL VPN clear Commands
- Verifying SSL VPN Configurations
- Using SSL VPN Debug Commands
Configuring an SSL VPN Gateway
The SSL VPN gateway acts as a proxy for connections to protected resources. Protected resources are accessed through an SSL-encrypted connection between the gateway and a web-enabled browser on a remote device, such as a personal computer. Entering the webvpn gateway command places the router in SSL VPN gateway configuration mode. The following configuration are accomplished in this task:
- The gateway is configured with an IP address.
- A port number is configured to carry HTTPS traffic (443 is default).
- A hostname is configured for the gateway.
- Crypto encryption and trust points are configured.
- The gateway is configured to redirect HTTP traffic (port 80) over HTTPS.
- The gateway is enabled.
Note | Security threats, as well as the cryptographic technologies to help protect against them, are constantly changing. For more information about the latest Cisco cryptographic recommendations, see the Next Generation Encryption (NGE) white paper. |
The SSL VPN provides remote-access connectivity from almost any Internet-enabled location using only a web browser and its native SSL encryption. The ssl encryption command is configured to restrict the encryption algorithms that SSL uses in Cisco IOS software.
The configuration of the ssl trustpoint command is required only if you need to configure a specific certification authority (CA) certificate. A self-signed certificate is automatically generated when an SSL VPN gateway is put in service.
DETAILED STEPS
Configuring a Generic SSL VPN Gateway
To configure a generic SSL VPN gateway, perform the following steps in privileged EXEC mode.
Note | The advantage of this configuration over the one in the configuration task in the "Configuring an SSL VPN Gateway" section on section is that basic commands and context can be configured quickly using just the webvpn enable command. |
DETAILED STEPS
Configuring an SSL VPN Context
The SSL VPN context defines the virtual configuration of the SSL VPN. Entering the webvpn context command places the router in SSL VPN configuration mode. The following configurations are accomplished in this task:
- A gateway and domain is associated.
- The AAA authentication method is specified.
- A group policy is associated.
- The remote user portal (web page) is customized.
- A limit on the number users sessions is configured.
- The context is enabled.
The ssl authenticate verify all command is enabled by default when a context configuration is created. The context cannot be removed from the router configuration while an SSL VPN gateway is in an enabled state (in service).
A virtual hostname is specified when multiple virtual hosts are mapped to the same IP address on the SSL VPN gateway (similar to the operation of a canonical domain name). The virtual hostname differentiates host requests on the gateway. The host header in the HTTP message is modified to direct traffic to the virtual host. The virtual hostname is configured with the gateway command in WebVPN context configuration mode.
DETAILED STEPS
What to Do Next
An SSL VPN policy group configuration must be defined before an SSL VPN gateway can be operationally deployed. Proceed to the Configuring_an_SSL_VPN_Policy_Group_1054618 section to see information on SSL VPN policy group configuration.
Configuring an SSL VPN Policy Group
The policy group is a container that defines the presentation of the portal and the permissions for resources that are configured for a group of remote users. Entering the policy group command places the router in WebVPN group policy configuration mode. After it is configured, the group policy is attached to the SSL VPN context configuration by configuring the default-group-policy command. The following tasks are accomplished in this configuration:
- The presentation of the SSL VPN portal page is configured.
- A NetBIOS server list is referenced.
- A port-forwarding list is referenced.
- The idle and session timers are configured.
- A URL list is referenced.
Outlook Web Access (OWA) 2003 is supported by the SSL VPN gateway upon completion of this task. The Outlook Exchange Server must be reachable by the SSL VPN gateway via TCP/IP.
A URL list can be configured under the SSL VPN context configuration and then separately for each individual policy group configuration. Individual URL list configurations must have unique names.
DETAILED STEPS
| Command or Action | Purpose | |
|---|---|---|
Step 1 |
enable
Example: Device> enable |
Enables privileged EXEC mode. |
Step 2 |
configure
terminal
Example: Device# configure terminal |
Enters global configuration mode. |
Step 3 |
webvpn
context
name
Example: Device(config)# webvpn context context1 |
Enters WebVPN context configuration mode to configure the SSL VPN context. |
Step 4 |
policy
group
name
Example: Device(config-webvpn-context)# policy group ONE |
Enters WebVPN group policy configuration mode to configure a group policy. |
Step 5 |
banner
string
Example: Device(config-webvpn-group)# banner "Login Successful" |
(Optional) Configures a banner to be displayed after a successful login. |
Step 6 |
hide-url-bar
Example: Device(config-webvpn-group)# hide-url-bar |
(Optional) Prevents the URL bar from being displayed on the SSL VPN portal page. |
Step 7 |
nbns-list
name
Example: Device(config-webvpn-group)# nbns-list SERVER_LIST |
(Optional) Attaches a NetBIOS Name Service (NBNS) server list to a policy group configuration. |
Step 8 |
port-forward
name
[auto-download[http-proxy [proxy-url
homepage-url]] |
http-proxy [proxy-url
homepage-url] [auto-download]]
Example: Device(config-webvpn-group)# port-forward EMAIL auto-download http-proxy proxy-url "http://www.example.com" |
(Optional) Attaches a port-forwarding list to a policy group configuration.
|
Step 9 |
timeout
{idle
seconds |
session
seconds}
Example: Device(config-webvpn-group)# timeout idle 1800 |
(Optional) Configures the length of time that a remote user session can remain idle or the total length of time that the session can remain connected. |
Step 10 |
url-list
name
Example: Device(config-webvpn-group)# url-list ACCESS |
(Optional) Attaches a URL list to policy group configuration. |
Step 11 |
end
Example: Device(config-webvpn-group)# end |
Exists the WebVPN group configuration mode and enters the privileged EXEC mode. |
What to Do Next
At the completion of this task, the SSL VPN gateway and context configurations are operational and enabled (in service), and the policy group has been defined. The SSL VPN gateway is operational for clientless remote access (HTTPS only). Proceed to the Configuring_Local_AAA_Authentication_for_SSL_VPN_User_Sessions section to see information about configuring AAA for remote-user connections.
Configuring Local AAA Authentication for SSL VPN User Sessions
The steps in this task show how to configure a local AAA database for remote-user authentication. AAA is configured in global configuration mode. In this task, the aaa authentication command is not configured under the SSL VPN context configuration. Omitting this command from the SSL VPN context configuration causes the SSL VPN gateway to use global authentication parameters by default.
DETAILED STEPS
| Command or Action | Purpose | |
|---|---|---|
Step 1 |
enable
Example: Device> enable |
Enables privileged EXEC mode. |
Step 2 |
configure
terminal
Example: Device# configure terminal |
Enters global configuration mode. |
Step 3 |
aaa
new-model
Example: Device(config)# aaa new-model |
Enables the AAA access control model. |
Step 4 |
username
name
secret
{0
user-secret
|
5
secret-string |
user-secret}
Example: Device(config)# username USER1 secret 0 PsW2143 |
Establishes a username-based authentication system. |
Step 5 |
aaa
authentication
login
default
local
Example: Device(config)# aaa authentication login default local |
Configures local AAA authentication. |
Step 6 |
end
Example: Device(config-webvpn-group)# end |
Exists the WebVPN group configuration mode and enters the privileged EXEC mode. |
What to Do Next
The database that is configured for remote-user authentication on the SSL VPN gateway can be a local database, as shown in this task, or the database can be accessed through any RADIUS or TACACS+ AAA server.
It is recommended that you use a separate AAA server, such as a Cisco ACS. A separate AAA server provides a more robust security solution. It allows you to configure unique passwords for each remote user and accounting and logging for remote-user sessions. Proceed to the "Configuring_AAA_for_SSL_VPN_Users_Using_a_Secure_Access_Control_Server" section to see more information.
Configuring AAA for SSL VPN Users Using a Secure Access Control Server
The steps in this task show how to configure AAA using a separate RADIUS or TACACS+ server. AAA is configured in global configuration mode. The authentication list or method is referenced in the SSL VPN context configuration with the aaa authentication command. The steps in this task configure AAA using a RADIUS server.
- SSL VPN gateway and context configurations are enabled and operational.
- A RADIUS or TACACS+ AAA server is operational and reachable from the SSL VPN gateway.
DETAILED STEPS
| Command or Action | Purpose | |
|---|---|---|
Step 1 |
enable
Example: Device> enable |
Enables privileged EXEC mode. |
Step 2 |
configure
terminal
Example: Device# configure terminal |
Enters global configuration mode. |
Step 3 |
aaa
new-model
Example: Device(config)# aaa new-model |
Enables the AAA access control model. |
Step 4 |
aaa
group
server
{radius
group-name |
tacacs+
group-name}
Example: Device(config)# aaa group server radius myServer |
Configures a RADIUS or TACACS+ server group and specifies the authentication list or method, and enters server-group configuration mode. |
Step 5 |
server
ip-address
[auth-port
port-number] [acct-port
port-number]
Example: Device(config-sg-radius)# server 10.1.1.20 auth-port 1645 acct-port 1646 |
Configures the IP address of the AAA group server. |
Step 6 |
exit
Example: Device(config-sg-radius)# exit |
Exits server-group configuration mode. |
Step 7 |
aaa
authentication
login
{default |
list-name}
method1 [method2...]
Example: Device(config)# aaa authentication login default local group myServer |
Sets AAA login parameters. |
Step 8 |
radius-server
host
{hostname |
ip-address} [auth-port
port-number] [acct-port
port-number] [timeout
seconds] [retransmit
retries] [key
string] [alias
{hostname |
ip-address}]
Example: Device(config)# radius-server host 10.1.1.20 auth-port 1645 acct-port 1646 |
Specifies a host as the group server. |
Step 9 |
webvpn
context
name
Example: Device(config)# webvpn context context1 |
Enters SSL VPN configuration mode to configure the SSL VPN context. |
Step 10 |
aaa
authentication
{domain
name |
list
name}
Example: Device(config-webvpn-context)# aaa authentication domain myServer |
Configures AAA authentication for SSL VPN sessions. |
Step 11 |
end
Example: Device(config-webvpn-context)# end |
Exists the SSL VPN configuration mode and enters the privileged EXEC mode. |
What to Do Next
Proceed to the section "Configuring_RADIUS_Attribute_Support_for_SSL_VPN" section to see RADIUS attribute-value pair information introduced to support this feature.
Configuring RADIUS Accounting for SSL VPN User Sessions
Before configuring RADIUS accounting for SSL VPN user sessions, you should first have configured AAA-related commands (in global configuration mode) and have set the accounting list.
DETAILED STEPS
| Command or Action | Purpose | |
|---|---|---|
Step 1 |
enable
Example: Device> enable |
Enables privileged EXEC mode. |
Step 2 |
configure
terminal
Example: Device# configure terminal |
Enters global configuration mode. |
Step 3 |
aaa
new-model
Example: Device(config)# aaa new-model |
Enables the AAA access control model. |
Step 4 |
webvpn
context
context-name
Example: Device(config)# webvpn context context1 |
Enters WebVPN context configuration mode to configure the SSL VPN context. |
Step 5 |
aaa
accounting
list
aaa-list
Example: Device(config-webvpn-context)# aaa accounting list list1 |
Enables AAA accounting when you are using RADIUS for SSL VPN sessions. |
Step 6 |
end
Example: Device(config-webvpn-context)# end |
Exists the WebVPN context configuration mode and enters the privileged EXEC mode. |
Monitoring and Maintaining RADIUS Accounting for an SSL VPN Session
To monitor and maintain your RADIUS accounting configuration, perform the following steps (the debug commands can be used together or individually).
DETAILED STEPS
| Command or Action | Purpose | |
|---|---|---|
Step 1 |
enable
Example: Device> enable |
Enables privileged EXEC mode. |
Step 2 |
debug
webvpn
aaa
Example: Device# debug webvpn aaa |
Enables SSL VPN session monitoring for AAA. |
Step 3 |
debug
aaa
accounting
Example: Device# debug aaa accounting |
Displays information on accountable events as they occur. |
Step 4 |
end
Example: Device# end |
Enters the privileged EXEC mode. |
Configuring RADIUS Attribute Support for SSL VPN
This section lists RADIUS attribute-value (AV) pair information introduced to support SSL VPN. For information on using RADIUS AV pairs with Cisco IOS software, see the "Configuring RADIUS" chapter in the RADIUS Configuration Guide.
The following table shows information about SSL VPN RADIUS attribute-value pairs. All SSL VPN attributes (except for the standard IETF RADIUS attributes) start with webvpn: as follows:
webvpn:urllist-name=cisco webvpn:nbnslist-name=cifs webvpn:default-domain=cisco.com
| Table 5 | SSL VPN RADIUS Attribute-Value Pairs |
|
Attribute |
Type of Value |
Values |
Default |
|---|---|---|---|
|
addr (Framed-IP-Address1) |
ipaddr |
IP_address |
-- |
|
addr-pool |
string |
name |
-- |
|
auto-applet-download |
integer |
0 (disable) 1 (enable)2 |
0 |
|
banner |
string |
-- |
|
|
citrix-enabled |
integer |
0 (disable) 1 (enable)3 |
0 |
|
default-domain |
string |
-- |
-- |
|
dns-servers |
ipaddr |
IP_address |
-- |
|
dpd-client-timeout |
integer (seconds) |
0 (disabled)-3600 |
300 |
|
dpd-gateway-timeout |
integer (seconds) |
0 (disabled)-3600 |
300 |
|
file-access |
integer |
0 (disable) 1 (enable). See the "Configuring RADIUS Attribute Support for SSL VPN" section. |
0 |
|
file-browse |
integer |
0 (disable) 1 (enable). See the "Configuring RADIUS Attribute Support for SSL VPN" section. |
0 |
|
file-entry |
integer |
0 (disable) 1 (enable). See the "Configuring RADIUS Attribute Support for SSL VPN" section. |
0 |
|
hide-urlbar |
integer |
0 (disable) 1 (enable). See the "Configuring RADIUS Attribute Support for SSL VPN" section. |
0 |
|
home-page |
string |
-- |
-- |
|
idletime (Idle-Timeout). See the "Configuring RADIUS Attribute Support for SSL VPN" section. |
integer (seconds) |
0-3600 |
2100 |
|
ie-proxy-exception |
string |
DNS_name |
-- |
|
ipaddr |
IP_address |
-- |
|
|
ie-proxy-server |
ipaddr |
IP_address |
-- |
|
inacl |
integer |
1-199, 1300-2699 |
-- |
|
string |
name |
-- |
|
|
keep-svc-installed |
integer |
0 (disable) 1 (enable). See the "Configuring RADIUS Attribute Support for SSL VPN" section. |
1 |
|
nbnslist-name |
string |
name |
-- |
|
netmask (Framed-IP-Netmask) "Configuring RADIUS Attribute Support for SSL VPN" section. |
ipaddr |
IP_address_mask |
-- |
|
port-forward-auto |
integer |
0 (disable) 1 (enable) |
If this AV pair is not configured, the default is whatever was configured for the group policy. If this AV pair is configured with an integer of 1, the 1 will override a group policy value of 0. |
|
port-forward-http-proxy |
integer |
0 (disable) 1 (enable) |
HTTP proxy is not enabled. If this AV pair is configured with an integer of 1, the 1 will override a group policy value of 0. |
|
port-forward-http-proxy-url |
string |
URL address (for example, http://example.com) |
-- |
|
port-forward-name |
string |
name |
-- |
|
primary-dns |
ipaddr |
IP_address |
-- |
|
rekey-interval |
integer (seconds) |
0-43200 |
21600 |
|
secondary-dns |
ipaddr |
IP_address |
-- |
|
split-dns |
string |
-- |
-- |
|
split-exclude4 |
ipaddr ipaddr |
IP_address IP_address_mask |
-- |
|
word |
local-lans |
-- |
|
|
split-include "Configuring RADIUS Attribute Support for SSL VPN" section. |
ipaddr ipaddr |
IP_address IP_address_mask |
-- |
|
sso-server-name |
string |
name |
-- |
|
svc-enabled5 |
integer |
0 (disable) 1 (enable). See the "Configuring RADIUS Attribute Support for SSL VPN" section. |
0 |
|
svc-ie-proxy-policy |
word |
none, auto, bypass-local |
-- |
|
svc-required "Configuring RADIUS Attribute Support for SSL VPN" section. |
integer |
0 (disable) 1 (enable). See the "Configuring RADIUS Attribute Support for SSL VPN" section. |
0 |
|
timeout (Session-Timeout) "Configuring RADIUS Attribute Support for SSL VPN" section. |
integer (seconds) |
1-1209600 |
43200 |
|
urllist-name |
string |
name |
-- |
|
user-vpn-group |
string |
name |
-- |
|
wins-server-primary |
ipaddr |
IP_address |
-- |
|
wins-servers |
ipaddr |
IP_address |
-- |
|
wins-server-secondary |
ipaddr |
IP_address |
-- |
What to Do Next
See the Configuring_a_URL_List_for_Clientless_Remote_Access section for information about customizing the URL list configured in Step 10 of the Configuring_an_SSL_VPN_Policy_Group section.
Configuring a URL List for Clientless Remote Access
The steps in this configuration task show how to configure a URL list. The URL list, as the name implies, is a list of HTTP URLs that are displayed on the portal page after a successful login. The URL list is configured in WebVPN context configuration and WebVPN group policy configuration modes.
DETAILED STEPS
| Command or Action | Purpose | |
|---|---|---|
Step 1 |
enable
Example: Device> enable |
Enables privileged EXEC mode. |
Step 2 |
configure
terminal
Example: Device# configure terminal |
Enters global configuration mode. |
Step 3 |
webvpn
context
name
Example: Device(config)# webvpn context context1 |
Enters WebVPN context configuration mode to configure the SSL VPN context. |
Step 4 |
url-list
name
Example: Device(config-webvpn-context)# url-list ACCESS |
Enters WebVPN URL list configuration mode to configure the list of URLs to which a user has access on the portal page of an SSL VPN. |
Step 5 |
heading
text-string
Example: Device(config-webvpn-url)# heading "Quick Links" |
Configures the heading that is displayed above URLs listed on the portal page of an SSL VPN. |
Step 6 |
url-text
name
url-value
url
Example: Device(config-webvpn-url)# url-text "Human Resources" url-value example.com |
Adds an entry to a URL list. |
Step 7 |
exit
Example: Device(config-webvpn-url)# exit |
Exits WebVPN URL list configuration mode, and enters SSL VPN context configuration mode. |
Step 8 |
policy
group
name
Example: Device(config-webvpn-context)# policy group ONE |
Enters WebVPN group policy configuration mode to configure a group policy. |
Step 9 |
url-list
name
Example: Device(config-webvpn-group)# url-list ACCESS |
Attaches the URL list to the policy group configuration. |
Step 10 |
end
Example: Device(config-webvpn-group)# end |
Exists the WebVPN group policy configuration mode and enters the privileged EXEC mode. |
What to Do Next
See the Configuring_Microsoft_File_Shares_for_Clientless_Remote_Access section for information about configuring clientless remote access to file shares.
Configuring Microsoft File Shares for Clientless Remote Access
In clientless remote access mode, files and directories created on Microsoft Windows servers can be accessed by the remote client through the HTTPS-enabled browser. When clientless remote access is enabled, a list of file server and directory links is displayed on the portal page after login. The administrator can customize permissions on the SSL VPN gateway to provide limited read-only access for a single file or full-write access and network browsing capabilities. The following access capabilities can be configured:
- Network browse (listing of domains)
- Domain browse (listing of servers)
- Server browse (listing of shares)
- Listing files in a share
- Downloading files
- Modifying files
- Creating new directories
- Creating new files
- Deleting files
Common Internet File System Support--CIFS is the protocol that provides access to Microsoft file shares and support for common operations that allow shared files to be accessed or modified.
NetBIOS Name Service Resolution--Windows Internet Name Service (WINS) uses NetBIOS name resolution to map and establish connections between Microsoft servers. A single server must be identified by its IP address in this configuration. Up to three servers can be added to the configuration. If multiple servers are added, one server should be configured as the master browser.
Samba Support--Microsoft file shares can be accessed through the browser on a Linux system that is configured to run Samba.
- SSL VPN gateway and context configurations are enabled and operational.
- A Microsoft file server is operational and reachable from the SSL VPN gateway over TCP/IP.
Note | File shares configured on Windows 2008 is not supported. Only file shares configured on Microsoft Windows 2000, Windows 2003, Windows XP, and Red Hat Linux servers are supported. |
DETAILED STEPS
| Command or Action | Purpose | |
|---|---|---|
Step 1 |
enable
Example: Device> enable |
Enables privileged EXEC mode. |
Step 2 |
configure
terminal
Example: Device# configure terminal |
Enters global configuration mode. |
Step 3 |
webvpn
context
name
Example: Device(config)# webvpn context context1 |
Enters WebVPN context configuration mode to configure the SSL VPN context. |
Step 4 |
nbns-list
name
Example: Device(config-webvpn-context)# nbns-list SERVER_LIST |
Enters WebVPN NBNS list configuration mode to configure an NBNS server list for CIFS name resolution. |
Step 5 |
nbns-server
ip-address
[master] [timeout
seconds] [retries
number]
Example: Device(config-webvpn-nbnslist)# nbns-server 172.16.1.1 master |
Adds a server to an NBNS server list and enters WebVPN NBNS list configuration mode. |
Step 6 |
exit
Example: Device(config-webvpn-nbnslist)# exit |
Exits WebVPN NBNS list configuration mode and enters WebVPN context configuration mode. |
Step 7 |
policy
group
name
Example: Device(config-webvpn-context)# policy group ONE |
Enters WebVPN group policy configuration mode to configure a group policy. |
Step 8 |
nbns-list
name
Example: Device(config-webvpn-group)# nbns-list SERVER_LIST |
Attaches an NBNS server list to a policy group configuration. |
Step 9 |
functions
{file-access |
file-browse |
file-entry |
svc-enabled |
svc-required}
Example: Device(config-webvpn-group)# functions file-access |
Configures access for Microsoft file shares.
|
Step 10 |
end
Example: Device(config-webvpn-group)# end |
Exists the WebVPN group policy configuration mode and enters the privileged EXEC mode. |
What to Do Next
See the Configuring_Citrix_Application_Support_for_Clientless_Remote_Access section for information about configuring clientless remote access for Citrix- enabled applications.
Configuring Citrix Application Support for Clientless Remote Access
Clientless Citrix support allows the remote user to run Citrix-enabled applications through the SSL VPN as if the application were locally installed (similar to traditional thin-client computing). Citrix applications run on a MetaFrame XP server (or server farm). The SSL VPN gateway provides access to the remote user. The applications run in real time over the SSL VPN. This task shows how to enable Citrix support for policy group remote users.
The Independent Computing Architecture (ICA) client carries keystrokes and mouse clicks from the remote user to the MetaFrame XP server. ICA traffic is carried over TCP port number 1494. This port is opened when a Citrix application is accessed. If multiple application are accessed, the traffic is carried over a single TCP session.
- A Citrix MetaFrame XP server is operational and reachable from the SSL VPN gateway over TCP/IP.
- SSL VPN gateway and context configurations are enabled and operational.
DETAILED STEPS
| Command or Action | Purpose | |
|---|---|---|
Step 1 |
enable
Example: Device> enable |
Enables privileged EXEC mode. |
Step 2 |
configure
terminal
Example: Device# configure terminal |
Enters global configuration mode. |
Step 3 |
access-list
access-list-number
{permit |
deny}
protocol
source
destination
Example: Device(config)# access-list 100 permit ip 192.168.1.0 0.255.255.255 |
Configures the access list mechanism for filtering frames by protocol type or vendor code. |
Step 4 |
webvpn
context
name
Example: Device(config)# webvpn context context1 |
Enters WebVPN context configuration mode to configure the SSL VPN context. |
Step 5 |
policy
group
name
Example: Device(config-webvpn-context)# policy group ONE |
Enters WebVPN group policy configuration mode to configure a group policy. |
Step 6 |
citrix
enabled
Example: Device(config-webvpn-group)# citrix enabled |
Enables Citrix application support for remote users in a policy group. |
Step 7 |
filter
citrix
extended-acl
Example: Device(config-webvpn-group)# filter citrix 100 |
Configures a Citrix Thin Client filter. |
Step 8 |
end
Example: Device(config-webvpn-group)# end |
Enters WebVPN group policy configuration mode and enters the privileged EXEC mode. |
What to Do Next
Support for standard applications that use well-known port numbers, such as e-mail and Telnet, can be configured using the port forwarding feature. See the Configuring_Application_Port_Forwarding section for more information.
Configuring Application Port Forwarding
Application port forwarding is configured for thin-client mode SSL VPN. Port forwarding extends the cryptographic functions of the SSL-protected browser to provide remote access to TCP and UDP-based applications that use well-known port numbers, such as POP3, SMTP, IMAP, Telnet, and SSH.
When port forwarding is enabled, the hosts file on the SSL VPN client is modified to map the application to the port number configured in the forwarding list. The application port mapping is restored to default when the user terminates the SSL VPN session.
When you are enabling port forwarding, the SSL VPN gateway will modify the hosts file on the PC of the remote user. Some software configurations and software security applications will detect this modification and prompt the remote user to choose "Yes" to permit. To permit the modification, the remote user must have local administrative privileges.
Note | There is a known compatibility issue with the encryption type and Java. If the Java port-forwarding applet does not download properly and the configuration line ssl encryption 3des-sha1 aes-sha1 is present, you should remove the line from the WebVPN gateway subconfiguration. |
DETAILED STEPS
| Command or Action | Purpose | |
|---|---|---|
Step 1 |
enable
Example: Device> enable |
Enables privileged EXEC mode. |
Step 2 |
configure
terminal
Example: Device# configure terminal |
Enters global configuration mode. |
Step 3 |
webvpn
context
name
Example: Device(config)# webvpn context context1 |
Enters WebVPN context configuration mode to configure the SSL VPN context. |
Step 4 |
port-forward
name
Example: Device(config-webvpn-context)# port-forward EMAIL |
Enters WebVPN port-forward list configuration mode to configure a port forwarding list. |
Step 5 |
local-port
number
remote-server
name
remote-port
number
description
text-string
Example: Device(config-webvpn-port-fwd)# local-port 30016 remote-server example.com remote-port 110 description POP3 |
Remaps (forwards) an application port number in a port forwarding list. |
Step 6 |
exit
Example: Device(config-webvpn-port-fwd)# exit |
Exits WebVPN port-forward list configuration mode, and enters WebVPN context configuration mode. |
Step 7 |
policy
group
name
Example: Device(config-webvpn-context)# policy group ONE |
Enters WebVPN group policy configuration mode to configure a group policy. |
Step 8 |
port-forward
name
Example: Device(config-webvpn-group)# port-forward EMAIL |
Attaches a port forwarding list to a policy group configuration. |
Step 9 |
exit
Example: Device(config-webvpn-context)# exit |
Exits WebVPN port-forward list configuration mode, and enters WebVPN context configuration mode. |
Step 10 |
end
Example: Device(config-webvpn-group)# end |
Exists the WebVPN context configuration mode and enters the privileged EXEC mode. |
Configuring the SSL VPN Gateway to Distribute CSD and Cisco AnyConnect VPN Client Package Files
The SSL VPN gateway is preconfigured to distribute Cisco Secure Desktop (CSD) or Cisco AnyConnect VPN Client software package files to remote users. The files are distributed only when CSD or Cisco AnyConnect VPN Client support is needed. The administrator performs the following tasks to prepare the gateway:
- The current software package is downloaded from www.cisco.com.
- The package file is copied to a local file system.
- The package file is installed for distribution by configuring the crypto vpn command.
The remote user must have administrative privileges, and the JRE for Windows version 1.4 or later must be installed before the CSD client package can be installed.
For Cisco AnyConnect VPN Client software installation, the remote user must have either the Java Runtime Environment for Windows (version 1.4 or later), or the browser must support or be configured to permit Active X controls.
CSD and Cisco AnyConnect VPN Client software packages should be installed for distribution on the SSL VPN gateway. Download the latest version that supports your device and the image you are using (consult a compatibility matrix for your particular setup).
The CSD software package can be downloaded at the following URL:
The Cisco AnyConnect VPN Client software package can be downloaded at the following URL:
The Cisco SSL VPN Client software package can be downloaded at the following URL:
You will be prompted to enter your login name and password to download these files from cisco.com.
- SSL VPN gateway and context configurations are enabled and operational.
- Software installation packages are copied to a local files system, such as flash memory.
Note | Effective with Cisco IOS Release 12.4(20)T, multiple packages can be downloaded to a gateway. |
DETAILED STEPS
| Command or Action | Purpose | |
|---|---|---|
Step 1 |
enable
Example: Device> enable |
Enables privileged EXEC mode. |
Step 2 |
configure
terminal
Example: Device# configure terminal |
Enters global configuration mode. |
Step 3 |
crypto vpn
{anyconnect
file name
sequence
sequence-number}
Example: Device(config)# crypto vpn anyconnect filea sequence 5 |
Installs a CSD or Cisco AnyConnect VPN Client package file to an SSL VPN gateway for distribution to remote users. |
Step 4 |
end
Example: Device(config)# end |
Exists the global configuration mode and enters the privileged EXEC mode. |
Configuring Cisco Secure Desktop Support
CSD provides a session-based interface where sensitive data can be shared for the duration of an SSL VPN session. All session information is encrypted. All traces of the session data are removed from the remote client when the session is terminated, even if the connection is terminated abruptly. CSD support for remote clients is enabled in this task.
The remote user (PC or device) must have administrative privileges, and the JRE for Windows version 1.4 or later must be installed before the CSD client packages can be installed.
- SSL VPN gateway and context configurations are enabled and operational.
- The CSD software package is installed for distribution on the SSL VPN gateway.
See the Configuring the SSL VPN Gateway to Distribute CSD and Cisco AnyConnect VPN Client Package Files section if you have not already prepared the SSL VPN gateway to distribute CSD software.
Note | Only Microsoft Windows 2000, Windows XP, Windows Vista, Apple-Mac, and Linux are supported on the remote client. |
DETAILED STEPS
| Command or Action | Purpose | |
|---|---|---|
Step 1 |
enable
Example: Device> enable |
Enables privileged EXEC mode. |
Step 2 |
configure
terminal
Example: Device# configure terminal |
Enters global configuration mode. |
Step 3 |
crypto vpn
Example: Device(config)# crypto vpn csd bgl12 |
Installs the CSD on an SSL VPN gateway. |
Step 4 |
csd
enable
Example: Device(config)# csd enable |
Enables CSD support for SSL VPN sessions. |
Step 5 |
end
Example: Device(config)# end |
Exists the global configuration mode and enters the privileged EXEC mode. |
What to Do Next
Upon completion of this task, the SSL VPN gateway has been configured to provide clientless and thin-client support for remote users. The SSL VPN feature also has the capability to provide full VPN access (similar to IPsec). Proceed to the Configuring_Cisco_AnyConnect_VPN_Client_Full_Tunnel_Support section to see more information.
Configuring Cisco AnyConnect VPN Client Full Tunnel Support
The Cisco AnyConnect VPN Client is an application that allows a remote user to establish a full VPN connection similar to the type of connection that is established with an IPsec VPN. Cisco AnyConnect VPN Client software is pushed (downloaded) and installed automatically on the PC of the remote user. The Cisco AnyConnect VPN Client uses SSL to provide the security of an IPsec VPN without the complexity required to install IPsec in your network and on remote devices. The following tasks are completed in this configuration:
- An access list is applied to the tunnel to restrict VPN access.
- Cisco AnyConnect VPN Client tunnel support is enabled.
- An address pool is configured for assignment to remote clients.
- The default domain is configured.
- DNS is configured for Cisco AnyConnect VPN Client tunnel clients.
- Dead peer timers are configured for the SSL VPN gateway and remote users.
- The login home page is configured.
- The Cisco AnyConnect VPN Client software package is configured to remain installed on the remote client.
- Tunnel key refresh parameters are defined.
- SSL VPN gateway and context configurations are enabled and operational.
- The Cisco AnyConnect VPN Client software package is installed for distribution on the SSL VPN gateway.
- The remote client has administrative privileges. Administrative privileges are required to download the SSL VPN software client.
See the Configuring the SSL VPN Gateway to Distribute CSD and Cisco AnyConnect VPN Client Package Files section if you have not already prepared the SSL VPN gateway to distribute SSL VPN software.
Note | Only Microsoft Windows 2000, Windows XP, Windows Vista, Apple-Mac, and Linux are supported on the remote client. |
DETAILED STEPS
| Command or Action | Purpose | |
|---|---|---|
Step 1 |
enable
Example: Device> enable |
Enables privileged EXEC mode. |
Step 2 |
configure
terminal
Example: Device# configure terminal |
Enters global configuration mode. |
Step 3 |
webvpn
context
name
Example: Device(config)# webvpn context context1 |
Enters WebVPN context configuration mode to configure the SSL VPN context. |
Step 4 |
policy
group
name
Example: Device(config-webvpn-context)# policy group ONE |
Enters WebVPN group policy configuration mode to configure a group policy. |
Step 5 |
filter
tunnel
extended-acl
Example: Device(config-webvpn-group)# filter tunnel 101 |
Configures an SSL VPN tunnel access filter. |
Step 6 |
functions
{file-access |
file-browse |
file-entry |
svc-enabled |
svc-required}
Example: Device(config-webvpn-group)# functions svc-enabled |
Configures Cisco AnyConnect VPN Client tunnel mode support.
|
Step 7 |
svc
address-pool
name
netmask
ip-netmask
Example: Device(config-webvpn-group)# svc address-pool ADDRESSES netmask 255.255.255.0 |
Configures a pool of IP addresses to assign to remote users in a policy group.
|
Step 8 |
svc
default-domain
name
Example: Device(config-webvpn-group)# svc default-domain cisco.com |
Configures the default domain for a policy group. |
Step 9 |
svc
dns-server
{primary |
secondary}
ip-address
Example: Device(config-webvpn-group)# svc dns-server primary 192.168.3.1 |
Configures DNS servers for policy group remote users. |
Step 10 |
svc
dpd-interval
{client |
gateway}
seconds
Example: Device(config-webvpn-group)# svc dpd-interval gateway 30 |
Configures the dead peer detection (DPD) timer value for the gateway or client. |
Step 11 |
svc
keepalive
seconds
Example: Device(config-webvpn-group)# svc keepalive 300 |
(Optional) Enables the SVC to send keepalive messages by default with a frequency of 30 seconds.
|
Step 12 |
svc
homepage
string
Example: Device(config-webvpn-group)# svc homepage www.cisco.com |
Configures the URL of the web page that is displayed upon successful user login. |
Step 13 |
svc
keep-client-installed
Example: Device(config-webvpn-group)# svc keep-client-installed |
Configures the remote user to keep Cisco AnyConnect VPN Client software installed when the SSL VPN connection is not enabled. |
Step 14 |
svc
rekey
{method {new-tunnel |
ssl} |
time
seconds}
Example: Device(config-webvpn-group)# svc rekey method new-tunnel |
Configures the time and method that a tunnel key is refreshed for policy group remote users. |
Step 15 |
end
Example: Device(config-webvpn-group)# end |
Exists the WebVPN group policy configuration mode and enters the privileged EXEC mode. |
Examples
Tunnel Filter Configuration
The following example, starting in global configuration mode, configures a deny access filter for any host from the 172.16.2/24 network:
Device(config)# access-list 101 deny ip 172.16.2.0 0.0.0.255 any
Device(config)# webvpn context context1
Device(config-webvpn-context)# policy group ONE
Device(config-webvpn-group)# filter tunnel 101
Device(config-webvpn-group)# end
Address Pool (Directly Connected Network) Configuration
The following example, starting in global configuration mode, configures the 192.168.1/24 network as an address pool:
Device(config)# ip local pool ADDRESSES 192.168.1.1 192.168.1.254
Device(config)# webvpn context context1
Device(config-webvpn-context)# policy group ONE
Device(config-webvpn-group)# svc address-pool ADDRESSES
Device(config-webvpn-group)# end
Address Pool (Nondirectly Connected Network) Configuration
The following example, starting in global configuration mode, configures the 172.16.1/24 network as an address pool. Because the network is not directly connected, a local loopback interface is configured.
Device(config)# interface loopback 0
Device(config-int)# ip address 172.16.1.126 255.255.255.0
Device(config-int)# no shutdown
Device(config-int)# exit
Device(config)# ip local pool ADDRESSES 172.16.1.1 172.16.1.254
Device(config)# webvpn context context1
Device(config-webvpn-context)# policy group ONE
Device(config-webvpn-group)# svc address-pool ADDRESSES
Device(config-webvpn-group)# end
Full Tunnel Configuration
The following example, starting in global configuration mode, configures full Cisco AnyConnect VPN Client tunnel support on an SSL VPN gateway:
Device(config)# webvpn context context1
Device(config-webvpn-context)# policy group ONE
Device(config-webvpn-group)# functions svc-enabled
Device(config-webvpn-group)# functions svc-required
Device(config-webvpn-group)# svc default-domain cisco.com
Device(config-webvpn-group)# svc dns-server primary 192.168.3.1
Device(config-webvpn-group)# svc dns-server secondary 192.168.4.1
Device(config-webvpn-group)# svc dpd-interval gateway 30
Device(config-webvpn-group)# svc dpd-interval client 300
Device(config-webvpn-group)# svc homepage www.cisco.com
Device(config-webvpn-group)# svc keep-client-installed
Device(config-webvpn-group)# svc rekey method new-tunnel
Device(config-webvpn-group)# svc rekey time 3600
Device(config-webvpn-group)# end
What to Do Next
Proceed to the Configuring_Advanced_SSL_VPN_Tunnel_Features section to see advanced Cisco AnyConnect VPN Client tunnel configuration information.
Configuring Advanced SSL VPN Tunnel Features
This section describes advanced Cisco AnyConnect VPN Client tunnel configurations. The following configuration steps are completed in this task:
- Split tunnel support and split DNS resolution are enabled on the SSL VPN gateway.
- SSL VPN gateway support for Microsoft Internet Explorer proxy settings is configured.
- WINS resolution is configured for Cisco AnyConnect VPN Client tunnel clients.
Microsoft Internet Explorer Proxy Configuration--The SSL VPN gateway can be configured to pass or bypass Microsoft Internet Explorer (MSIE) proxy settings. Only HTTP proxy settings are supported by the SSL VPN gateway. MSIE proxy settings have no effect on any other supported browser.
Split Tunneling--Split tunnel support allows you to configure a policy that permits specific traffic to be carried outside of the Cisco AnyConnect VPN Client tunnel. Traffic is either included (resolved in tunnel) or excluded (resolved through the Internet service provider [ISP] or WAN connection). Tunnel resolution configuration is mutually exclusive. An IP address cannot be both included and excluded at the same time. Entering the local-lans keyword permits the remote user to access resources on a local LAN, such as network printer.
- SSL VPN gateway and context configurations are enabled and operational.
- The Cisco AnyConnect VPN Client software package is installed for distribution on the SSL VPN gateway.
Note | Only Microsoft Windows 2000, Windows XP, Windows Vista, Apple-Mac, and Linux are supported on the remote client. |
DETAILED STEPS
| Command or Action | Purpose | |
|---|---|---|
Step 1 |
enable
Example: Device> enable |
Enables privileged EXEC mode. |
Step 2 |
configure
terminal
Example: Device# configure terminal |
Enters global configuration mode. |
Step 3 |
webvpn
context
name
Example: Device(config)# webvpn context context1 |
Enters WebVPN context configuration mode to configure the SSL VPN context. |
Step 4 |
policy
group
name
Example: Device(config-webvpn-context)# policy group ONE |
Enters WebVPN group policy configuration mode to configure a group policy. |
Step 5 |
svc
split
exclude
{{ip-address
mask |
local-lans} |
include
ip-address
mask}
Example: Device(config-webvpn-group)# svc split exclude 192.168.1.1 0.0.0.255 |
Configures split tunneling for policy group remote users. |
Step 6 |
svc
split
dns
name
Example: Device(config-webvpn-group)# svc split dns www.examplecompany.com |
Configures the SSL VPN gateway to resolve the specified fully qualified DNS names through the Cisco AnyConnect VPN Client tunnel. |
Step 7 |
svc
msie-proxy
{exception
host |
option {auto |
bypass-local |
none}}
Example: Device(config-webvpn-group)# svc msie-proxy option auto |
Configures MSIE browser proxy settings for policy group remote users. |
Step 8 |
svc
msie-proxy
server
host
Example: Device(config-webvpn-group)# svc msie-proxy server 10.10.10.1:80 |
Specifies an MSIE proxy server for policy group remote users. |
Step 9 |
svc
wins-server
{primary |
secondary}
ip-address
Example: Device(config-webvpn-group)# svc wins-server primary 172.31.1.1 |
Configures WINS servers for policy group remote users. |
Step 10 |
end
Example: Device(config-webvpn-group)# end |
Exists the WebVPN group policy configuration mode and enters the privileged EXEC mode. |
Examples
Split DNS Configuration
The following example, starting in global configuration mode, configures the following DNS names to be resolved in the Cisco AnyConnect VPN Client tunnel:
Device(config)# webvpn context context1
Device(config-webvpn-context)# policy group ONE
Device(config-webvpn-group)# svc split dns www.example.com
Device(config-webvpn-group)# svc split dns myexample.com
Including and Excluding IP Prefixes
The following example configures a list of IP addresses to be resolved over the tunnel (included) and a list to be resolved outside of the tunnel (excluded):
Device(config-webvpn-group)# svc split exclude 192.168.1.0 255.255.255.0
Device(config-webvpn-group)# svc split include 172.16.1.0 255.255.255.0
MSIE Proxy Configuration
The following example configures MSIE proxy settings:
Device(config-webvpn-group)# svc msie-proxy option auto
Device(config-webvpn-group)# svc msie-proxy exception www.example.com
Device(config-webvpn-group)# svc msie-proxy exception 10.20.20.1
Device(config-webvpn-group)# svc msie-proxy server 10.10.10.1:80
WINS Server Configuration
The following example configures primary and secondary WINS servers for the policy group:
Device(config-webvpn-group)# svc wins-server primary 172.31.1.1
Device(config-webvpn-group)# svc wins-server secondary 172.31.2.1
Device(config-webvpn-group)# svc wins-server secondary 172.31.3.1
Device(config-webvpn-group)# end
Configuring VRF Virtualization
VRF Virtualization allows you to associate a traditional VRF with an SSL VPN context configuration. This feature allows you to apply different configurations and reuse address space for different groups of users in your organization.
- A VRF has been configured in global configuration mode.
- SSL VPN gateway and context configurations are enabled and operational.
- A policy group has been configured and associated with the WebVPN context.
Note | Only a single VRF can be configured for each SSL VPN context configuration. |
DETAILED STEPS
| Command or Action | Purpose | |||
|---|---|---|---|---|
Step 1 |
enable
Example: Device> enable |
Enables privileged EXEC mode. | ||
Step 2 |
configure
terminal
Example: Device# configure terminal |
Enters global configuration mode. | ||
Step 3 |
webvpn
context
name
Example: Device(config)# webvpn context context1 |
Enters WebVPN context configuration mode to configure the SSL VPN context. | ||
Step 4 |
vrf-name
name
Example: Device(config-webvpn-context)# vrf-name vrf1 |
Associates a VRF with an SSL VPN context.
% IP VRF vrf1 configuration applied.
% But please use Virtual-Template to configure VRF.
See the Configuring SSLVPN DVTI Support section for the procedure to configure IP features using virtual template. | ||
Step 5 |
end
Example: Device(config-webvpn-context)# end |
Exists the WebVPN context configuration mode and enters the privileged EXEC mode. |
Configuring ACL Rules
The ACL rules can be overridden for an individual user when the user logs in to the gateway (using AAA policy attributes). If a user session has no ACL attribute configured, all application requests from that user session are permitted by default.
Before configuring the ACL rules, you must have first configured the time range using the time-range command (this prerequisite is in addition to optionally configuring the time range, in the task table, as part of the permit or deny entries).
Note | There is no limitation on the maximum number of filtering rules that can be configured for each ACL entry, but keeping the number below 50 should have no significant impact on router performance. |
- permit [url [any | url-string]] [ip | tcp | udp | http | https | cifs] [any | source-ip source-mask] [any | destination-ip destination-mask] [time-range time-range-name] [syslog]
- deny [url [any | url-string]] [ip | tcp | udp | http | https | cifs] [any | source-ip source-mask] [any | destination-ip destination-mask] [time-range time-range-name] [syslog]
DETAILED STEPS
| Command or Action | Purpose | |
|---|---|---|
Step 1 |
enable
Example: Device> enable |
Enables privileged EXEC mode. |
Step 2 |
configure
terminal
Example: Device# configure terminal |
Enters global configuration mode. |
Step 3 |
webvpn
context
name
Example: Device(config)# webvpn context context1 |
Enters WebVPN context configuration mode to configure the SSL VPN context. |
Step 4 |
acl
acl-name
Example: Device(config-webvpn-context)# acl acl1 |
Defines the ACL and enters WebVPN ACL configuration mode. |
Step 5 | Do one of the following:
Example: Device(config-webvpn-acl)# permit url any |
Sets conditions in a named SSL VPN access list that will permit or deny packets. |
Step 6 |
add
position
acl-entry
Example: Device(config-webvpn-acl)# add 3 permit url any |
(Optional) Adds an ACL entry at a specified position. |
Step 7 |
error-url
access-deny-page-url
Example: Device(config-webvpn-acl)# error-url "http://www.example.com" |
(Optional) Defines a URL as an ACL violation page. |
Step 8 |
error-msg
message-string
Example: Device(config-webvpn-acl)# error-msg "If you have any questions, please contact <a href+mailto:employee1@example.com>Employee1</a>." |
(Optional) Displays a specific error message when a user logs in and his or her request is denied. |
Step 9 |
list
Example: Device(config-webvpn-acl)# list |
(Optional) Lists the currently configured ACL entries sequentially and assigns a position number. |
Step 10 |
end
Example: Device(config-webvpn-acl)# end |
Exists the WebVPN ACL configuration mode and enters the privileged EXEC mode. |
Associating an ACL Attribute with a Policy Group
Note | Associating an ACL attribute for an individual user must be performed as part of a AAA operation. |
DETAILED STEPS
| Command or Action | Purpose | |
|---|---|---|
Step 1 |
enable
Example: Device> enable |
Enables privileged EXEC mode. |
Step 2 |
configure
terminal
Example: Device# configure terminal |
Enters global configuration mode. |
Step 3 |
webvpn
context
name
Example: Device(config)# webvpn context context1 |
Configures the SSL VPN context and enters WebVPN context configuration mode. |
Step 4 |
policy
group
name
Example: Device(config-webvpn-context)# policy group group1 |
Defines a policy that can be applied to the user and enters WebVPN policy group configuration mode. |
Step 5 |
exit
Example: Device(config-webvpn-group)# exit |
Exits WebVPN policy group configuration mode. |
Step 6 |
acl
acl-name
Example: Device(config-webvpn-context)# acl acl1 |
Defines the ACL and enters WebVPN ACL configuration mode. |
Step 7 |
end
Example: Device(config-webvpn-acl)# end |
Exists the WebVPN ACL configuration mode and enters the privileged EXEC mode. |
Configuring SSO Netegrity Cookie Support for a Virtual Context
DETAILED STEPS
| Command or Action | Purpose | |
|---|---|---|
Step 1 |
enable
Example: Device> enable |
Enables privileged EXEC mode. |
Step 2 |
configure
terminal
Example: Device# configure terminal |
Enters global configuration mode. |
Step 3 |
webvpn
context
name
Example: Device(config)# webvpn context context1 |
Enters WebVPN context configuration mode to configure the SSL VPN context. |
Step 4 |
sso-server
name
Example: Device(config-webvpn-context)# sso-server "test-sso-server" |
Creates an SSO server name under an SSL VPN context and enters WebVPN SSSO server configuration mode. |
Step 5 |
web-agent-url
url
Example: Device(config-webvpn-sso-server)# web-agent-url http://www.example.comwebvpn/ |
Configures the Netegrity agent URL to which SSO authentication requests will be dispatched. |
Step 6 |
secret-key
key-name
Example: Device(config-webvpn-sso-server)# secret-key "12345" |
Configures the policy server secret key that is used to secure authentication requests. |
Step 7 |
max-retry-attempts
number-of-retries
Example: Device(config-webvpn-sso-server)# max-retry-attempts 3 |
Sets the maximum number of retries before SSO authentication fails. |
Step 8 |
request-timeout
number-of-seconds
Example: Device(config-webvpn-sso-server)# request-timeout 15 |
Sets the number of seconds before an authentication request times out. |
Step 9 |
end
Example: Device(config-webvpn-ssso-server)# end |
Exists the WebVPN SSSO server configuration mode and enters the privileged EXEC mode. |
Associating an SSO Server with a Policy Group
DETAILED STEPS
| Command or Action | Purpose | |
|---|---|---|
Step 1 |
enable
Example: Device> enable |
Enables privileged EXEC mode. |
Step 2 |
configure
terminal
Example: Device# configure terminal |
Enters global configuration mode. |
Step 3 |
webvpn
context
name
Example: Device(config)# webvpn context context1 |
Configures the SSL VPN context and enters WebVPN context configuration mode. |
Step 4 |
policy
group
name
Example: Device(config-webvpn-context)# policy group ONE |
Configures a group policy and enters WebVPN group policy configuration mode. |
Step 5 |
sso-server
name
Example: Device(config-webvpn-group)# sso-server "test-sso-server" |
Attaches an SSO server to a policy group. |
Step 6 |
end
Example: Device(config-webvpn-group)# end |
Exists the WebVPN group policy configuration mode and enters the privileged EXEC mode. |
Configuring URL Obfuscation (Masking)
DETAILED STEPS
| Command or Action | Purpose | |
|---|---|---|
Step 1 |
enable
Example: Device> enable |
Enables privileged EXEC mode. |
Step 2 |
configure
terminal
Example: Device# configure terminal |
Enters global configuration mode. |
Step 3 |
webvpn
context
name
Example: Device(config)# webvpn context context1 |
Configures the SSL VPN context and enters WebVPN context configuration mode. |
Step 4 |
policy
group
name
Example: Device(config-webvpn-context)# policy group ONE |
Configures a group policy and enters group policy configuration mode. |
Step 5 |
mask-urls
Example: Device(config-webvpn-group)# mask-urls |
Obfuscates, or masks, sensitive portions of an enterprise URL, such as IP addresses, hostnames, or port numbers. |
Step 6 |
end
Example: Device(config-webvpn-group)# end |
Exists the WebVPN group policy configuration mode and enters the privileged EXEC mode. |
Adding a CIFS Server URL List to an SSL VPN Context and Attaching It to a Policy Group
Before adding a CIFS server URL list to an SSL VPN context, you must have already set up the Web VPN context using the webvpn context command, and you must be in WebVPN context configuration mode.
DETAILED STEPS
| Command or Action | Purpose | |
|---|---|---|
Step 1 |
cifs-url-list
name
Example: Device(config-webvpn-context)# cifs-url-list c1 |
Enters WebVPN URL list configuration mode to configure a list of CIFS server URLs to which a user has access on the portal page of an SSL VPN. |
Step 2 |
heading
text-string
Example: Device(config-webvpn-url)# heading "cifs-url" |
Configures the heading that is displayed above URLs listed on the portal page of an SSL VPN. |
Step 3 |
url-text
name
Example: Device(config-webvpn-url)# url-text "SSLVPN-SERVER2" url-value "\\SLVPN-SERVER2" |
Adds an entry to a URL list. |
Step 4 |
end
Example: Device(config-webvpn-url)# end |
Exits WebVPN URL list configuration mode and returns to WebVPN context configuration mode. |
Step 5 |
policy
group
name
Example: Device(config-webvpn-context)# policy group ONE |
Enters WebVPN group policy configuration mode to configure a group policy. |
Step 6 |
cifs-url-list
name
Example: Device(config-webvpn-group)# cifs-url-list "c1" |
Attaches a URL list to a policy group. |
Step 7 |
end
Example: Device(config-webvpn-group)# end |
Exits WebVPN group policy configuration mode. |
Configuring User-Level Bookmarks
DETAILED STEPS
| Command or Action | Purpose | |
|---|---|---|
Step 1 |
enable
Example: Device> enable |
Enables privileged EXEC mode. |
Step 2 |
configure terminal
Example: Device# configure terminal |
Enters global configuration mode. |
Step 3 |
webvpn context
name
Example: Device(config)# webvpn context context1 |
Configures the SSL VPN context and enters WebVPN context configuration mode. |
Step 4 |
user-profile location
flash:
directory
Example: Device(config-webvpn-context)# user-profile location flash:webvpn/sslvpn/vpn_context/ |
Stores bookmarks on a directory. |
Step 5 |
end
Example: Device(config-webvpn-context)# end |
Exists the WebVPN context configuration mode and enters the privileged EXEC mode. |
Configuring FVRF
To configure FVRF so that the SSL VPN gateway is fully integrated into an MPLS network, perform the following steps.
As the following configuration task shows, IP VRF must be configured before the FVRF can be associated with the SSL VPN gateway. For more information about configuring IP VRF, see the Configuring IP VRF (ip vrf command) in the Cisco IOS IP Application Services Command Reference section.
DETAILED STEPS
| Command or Action | Purpose | |||
|---|---|---|---|---|
Step 1 |
enable
Example: Device> enable |
Enables privileged EXEC mode. | ||
Step 2 |
configure
terminal
Example: Device# configure terminal |
Enters global configuration mode. | ||
Step 3 |
ip
vrf
vrf-name
Example: Device(config)# ip vrf vrf_1 |
Defines a VPN VRF instance and enters VRF configuration mode.
| ||
Step 4 |
exit
Example: Device(config-vrf)# exit |
Exits VRF configuration mode. | ||
Step 5 |
webvpn gateway
name
Example: Device(config)# webvpn gateway mygateway |
Enters WebVPN gateway configuration mode to configure an SSL VPN gateway. | ||
Step 6 |
vrfname
name
Example: Device(config-webvpn-gateway)# vrfname vrf_1 |
Associates a VPN FVRF with an SSL VPN gateway.
| ||
Step 7 |
exit
Example: Device(config-webvpn-gateway)# exit |
Exits WebVPN gateway configuration mode. |
Disabling Full-Tunnel Cisco Express Forwarding
Note | The no webvpn cef command disables all Web VPN Cisco Express Forwarding support, not just full-tunnel Cisco Express Forwarding support. |
DETAILED STEPS
| Command or Action | Purpose | |||
|---|---|---|---|---|
Step 1 |
enable
Example: Device> enable |
Enables privileged EXEC mode. | ||
Step 2 |
configure terminal
Example: Device# configure terminal |
Enters global configuration mode. | ||
Step 3 |
no webvpn cef
Example: Device(config)# no webvpn cef |
Disables full-tunnel Cisco Express Forwarding support.
| ||
Step 4 |
exit
Example: Device(config-webvpn-group)# exit |
Exists the WebVPN group policy configuration mode and enters the privileged EXEC mode. |
Configuring Automatic Authentication and Authorization
DETAILED STEPS
| Command or Action | Purpose | |
|---|---|---|
Step 1 |
enable
Example: Device> enable |
Enables privileged EXEC mode. |
Step 2 |
configure terminal
Example: Device# configure terminal |
Enters global configuration mode. |
Step 3 |
webvpn context
name
Example: Device(config)# webvpn context context1 |
Enters WebVPN context configuration mode to configure the SSL VPN context. |
Step 4 |
aaa authentication auto
Example: Device(config-webvpn-context)# aaa authentication auto |
Allows automatic authentication for users. |
Step 5 |
aaa authorization list
name
Example: Device(config-webvpn-context)# aaa authorization list 11 |
Allows user attributes to get "pushed" during authentication. |
Step 6 |
exit
Example: Device(config-webvpn-context)# exit |
Exists the WebVPN context configuration mode and enters the privileged EXEC mode. |
Configuring SSL VPN Client-Side Certificate-Based Authentication
DETAILED STEPS
| Command or Action | Purpose | |
|---|---|---|
Step 1 |
enable
Example: Device> enable |
Enables privileged EXEC mode. |
Step 2 |
configure terminal
Example: Device# configure terminal |
Enters global configuration mode. |
Step 3 |
webvpn import svc profile
profile-name
device-name
Example: Device(config)# webvpn import svc profile profile1 flash:AnyconnectProfile.tmpl |
Imports an AnyConnect profile. |
Step 4 |
webvpn context
context-name
Example: Device(config)# webvpn context context1 |
Enters WebVPN context configuration mode to configure the SSL VPN context. |
Step 5 |
authentication certificate aaa
Example: Device(config-webvpn-context)# authentication certificate aaa |
Enables certificate-based AAA authentication. |
Step 6 |
username-prefill
Example: Device(config-webvpn-context)# username-prefill |
Enables trustpoint configuration to prefill the username field from an authentication certificate. |
Step 7 |
ca trustpoint
trustpoint-name
Example: Device(config-webvpn-context)# ca trustpoint trustpoint1 |
Enables the trustpoint to authenticate users using the specified trust point name. |
Step 8 |
match-certificate
certificate-name
Example: Device(config-webvpn-context)# match-certificate certificate1 |
Enables certificate map matching. |
Step 9 |
policy group
policy-name
Example: Device(config-webvpn-context)# policy group policy3 |
Enters WebVPN group policy configuration mode to configure a WebVPN group policy. |
Step 10 |
svc profile
profile-name
Example: Device(config-webvpn-group)# svc profile profile1 |
Enables a WebVPN group policy with an AnyConnect profile. |
Step 11 |
exit
Example: Device(config-webvpn-group)# exit |
Exits WebVPN group policy mode. |
Configuring a URL Rewrite Splitter
DETAILED STEPS
| Command or Action | Purpose | |||
|---|---|---|---|---|
Step 1 |
enable
Example: Device> enable |
Enables privileged EXEC mode. | ||
Step 2 |
configure terminal
Example: Device# configure terminal |
Enters global configuration mode. | ||
Step 3 |
webvpn context
name
Example: Device(config)# webvpn context context1 |
Enters WebVPN context configuration mode to configure the SSL VPN context. | ||
Step 4 |
url rewrite
Example: Device(config-webvpn-context)# url rewrite |
Allows you to mangle selective URL requests and enters URL rewrite mode.
| ||
Step 5 |
host
host-name
Example: Device(config-webvpn-url-rewrite)# host www.examplecompany.com |
Hostname of the site to be mangled.
| ||
Step 6 |
ip
ip-address
Example: Device(config-webvpn-url-rewrite)# ip 10.1.1.0 255.255.0.0 |
IP address of the site to be mangled.
| ||
Step 7 |
unmatched-action
[direct-access |
redirect]
Example: Device(config-webvpn-url-rewrite)# unmatched-action direct-access |
(Optional) Defines the action for the request to the public website. | ||
Step 8 |
exit
Example: Device(config-webvpn-url-rewrite)# exit |
Exists the WebVPN URL rewrite mode and enters the privileged EXEC mode. |
Configuring a Backend HTTP Proxy
DETAILED STEPS
| Command or Action | Purpose | |
|---|---|---|
Step 1 |
enable
Example: Device> enable |
Enables privileged EXEC mode. |
Step 2 |
configure
terminal
Example: Device# configure terminal |
Enters global configuration mode. |
Step 3 |
webvpn
context
name
Example: Device(config)# webvpn context context1 |
Enters WebVPN context configuration mode to configure the SSL VPN context. |
Step 4 |
policy
group
name
Example: Device(config-webvpn-context)# policy group g1 |
Enters WebVPN group policy configuration mode to configure a group policy. |
Step 5 |
http proxy-server {ip-address |
dns-name}
port
port-number
Example: Device(config-webvpn-context)# http proxy-server 10.1.1.1 port 2034 |
Allows user requests to go through a backend HTTP proxy. |
Step 6 |
exit
Example: Device(config-webvpn-group)# exit |
Exists the WebVPN group policy configuration mode and enters the privileged EXEC mode. |
Configuring Stateless High Availability with HSRP for SSL VPN
DETAILED STEPS
| Command or Action | Purpose | |||
|---|---|---|---|---|
Step 1 |
enable
Example: Device> enable |
Enables privileged EXEC mode. | ||
Step 2 |
configure
terminal
Example: Device# configure terminal |
Enters global configuration mode. | ||
Step 3 |
interface
type
slot/port
Example: Device(config)# interface gateway 0/0 |
Configures an interface type and enters interface configuration mode. | ||
Step 4 |
standby
number
ip
ip-address
Example: Device(config-if)# standby 0 ip 10.1.1.1 |
Configures a standby IP address. | ||
Step 5 |
standby
number
name
standby-name
Example: Device(config-if)# standby 0 name SSLVPN |
Configures a standby name. | ||
Step 6 |
exit
Example: Device(config-if)# exit |
Exits interface configuration mode. | ||
Step 7 |
webvpn gateway
name
Example: Device(config)# webvpn gateway Gateway1 |
Enters WebVPN gateway configuration mode to configure an SSL VPN gateway. | ||
Step 8 |
ip address
number
port
port-number
standby
name
Example: Device(config-webvpn-gateway)# ip address 10.1.1.1 port 443 standby SSLVPN |
Configures a standby IP address as the proxy IP address on an SSL VPN gateway.
| ||
Step 9 |
exit
Example: Device(config-webvpn-gateway)# exit |
Exists the WebVPN gateway configuration mode and enters the privileged EXEC mode. |
Configuring Internationalization
- Generating the Template Browser Attribute File
- Importing the Browser Attribute File
- Verifying That the Browser Attribute File Was Imported Correctly
- Creating the Language File
- Importing the Language File
- Verifying That the Language File Was Imported Correctly
- Creating the URL List
- Importing the File into the URL List and Binding It to a Policy Group
- Verifying That the URL List File Was Bound Correctly to the Policy Group
Generating the Template Browser Attribute File
DETAILED STEPS
| Command or Action | Purpose | |
|---|---|---|
Step 1 |
enable
Example: Device> enable |
Enables privileged EXEC mode. |
Step 2 |
webvpn create template browser-attribute
device:
Example: Device# webvpn create template browser-attribute flash: |
Generates the browser attribute template XML file (battr_tpl.xml). |
Step 3 | Copy the browser attribute file to another device on which you can edit the language being configured.
|
For an example of how to copy the file to your PC, see the "Example: Copying the Browser Attribute File to Another PC for Editing". |
Step 4 | Copy the edited file back to the storage device.
|
For an example of how to copy the edited file to a storage device, see the "Example: Copying the Edited File to flash". |
Importing the Browser Attribute File
DETAILED STEPS
| Command or Action | Purpose | |
|---|---|---|
Step 1 |
enable
Example: Device> enable |
Enables privileged EXEC mode. |
Step 2 |
configure terminal
Example: Device# configure terminal |
Enters global configuration mode. |
Step 3 |
webvpn context
name
Example: Device(config)# webvpn context context1 |
Enters WebVPN context configuration mode to configure the SSL VPN context. |
Step 4 |
browser-attribute import
device:file-name
Example: Device(config-webvpn-context)# browser-attribute import flash:battr_tpl.xml |
Imports the edited browser attribute file from the storage device. |
Step 5 |
exit
Example: Device(config-webvpn-context)# exit |
Exists the WebVPN context configuration mode and enters the privileged EXEC mode. |
What to Do Next
Proceed to the "Verifying_That_the_Browser_Attribute_File_Was_Imported_Correctly" section.
Verifying That the Browser Attribute File Was Imported Correctly
Creating the Language File
DETAILED STEPS
| Command or Action | Purpose | |||
|---|---|---|---|---|
Step 1 |
enable
Example: Device> enable |
Enables privileged EXEC mode. | ||
Step 2 |
webvpn create template language
device:
Example: Device# webvpn create template language flash: |
Creates the language template file lang.js.
| ||
Step 3 | Copy the language lang.js file to a PC for editing.
|
For an example of how to copy the language file to another PC, see the "Example: Copying the Language File to Another PC for Editing". | ||
Step 4 | Copy the edited language lang.js file to the storage device.
|
For an example of how to copy the edited file to the storage device, see the "Example: Copying the Edited Language File to the Storage Device". | ||
Step 5 |
webvpn create template language {japanese |
customize
language-name
device:file}
Example: Device# webvpn create template language japanese |
Creates templates for multilanguage support for messages initiated by the headend in an SSL VPN. |
Importing the Language File
DETAILED STEPS
| Command or Action | Purpose | |
|---|---|---|
Step 1 |
enable
Example: Device> enable |
Enables privileged EXEC mode. |
Step 2 |
configure terminal
Example: Device# configure terminal |
Enters global configuration mode. |
Step 3 |
webvpn context
name
Example: Device# webvpn context context1 |
Enters WebVPN context configuration mode to configure the SSL VPN context. |
Step 4 |
language {japanese |
customize
language-name
device:file}
Example: Device(config-webvpn-context)# language Japanese |
Imports the language file. |
Step 5 |
exit
Example: Device(config-webvpn-context)# exit |
Exists the WebVPN context configuration mode and enters the privileged EXEC mode. |
Verifying That the Language File Was Imported Correctly
DETAILED STEPS
| Command or Action | Purpose | |
|---|---|---|
Step 1 |
enable
Example: Device> enable |
Enables privileged EXEC mode. |
Step 2 |
show running-config
Example: Device# show running-config |
Verifies that the language file was imported correctly. |
Step 3 |
exit
Example: Device# exit |
Exists the privileged EXEC mode. |
Creating the URL List
DETAILED STEPS
| Command or Action | Purpose | |
|---|---|---|
Step 1 |
enable
Example: Device> enable |
Enables privileged EXEC mode. |
Step 2 |
webvpn create template url-list
device:
Example: Device# webvpn create template url-list flash: |
Creates the url-list template. |
Step 3 | Copy the XML file to a PC for editing.
|
For an example of how to copy an XML file to a PC for editing, see the Examples URL List. |
Step 4 | Copy the edited url-list XML file back to the storage device.
|
For an example of how to copy the edited url-list XML file back to a storage device, see the Examples URL List. |
Step 5 |
exit
Example: Device# exit |
Exists the privileged EXEC mode. |
What to Do Next
Proceed to the "Importing_the_File_into_the_URL_List_and_Binding_It_to_a_Policy_Group" section.
Importing the File into the URL List and Binding It to a Policy Group
DETAILED STEPS
| Command or Action | Purpose | |
|---|---|---|
Step 1 |
enable
Example: Device> enable |
Enables privileged EXEC mode. |
Step 2 |
configure terminal
Example: Device# configure terminal |
Enters global configuration mode. |
Step 3 |
webvpn context
name
Example: Device(config)# webvpn context context1 |
Enters WebVPN context configuration mode to configure the SSL VPN context. |
Step 4 |
url-list
name
Example: Device(config-webvpn-context)# url-list testlist |
Enters WebVPN URL list configuration mode to configure a list of URLs to which a user has access on the portal page of an SSL VPN and attaches the URL list to a policy group. |
Step 5 |
import
device:file
Example: Device(config-webvpn-url)# import flash:testlist |
Imports the user-defined URL list. |
Step 6 |
exit
Example: Device(config-webvpn-url)# exit |
Exits WebVPN URL list configuration mode. |
Step 7 |
policy group
group
name
Example: Device(config-webvpn-context)# policy group policygroup1 |
Enters WebVPN group policy configuration mode to configure a group policy. |
Step 8 |
url-list
name
Example: Device(config-webvpn-group)# url-list testlist |
Binds the URL list to the policy group. |
What to Do Next
Proceed to the "Verifying_That_the_URL_List_File_Was_Bound_Correctly_to_the_Policy_Group" section.
Verifying That the URL List File Was Bound Correctly to the Policy Group
DETAILED STEPS
| Command or Action | Purpose | |
|---|---|---|
Step 1 |
enable
Example: Device> enable |
Enables privileged EXEC mode. |
Step 2 |
show running-config
Example: Device# show running-config |
Verifies that the url-list file was bound correctly to the policy group. |
Step 3 |
exit
Example: Device# exit |
Exists the privileged EXEC mode. |
Configuring a Virtual Template
A virtual template enables SSL VPN to interoperate with IP features such as NAT, firewall, and policy-based routing.
- SSL VPN gateway and context configurations are enabled and operational.
- If a VRF is needed, configure it before creating the virtual template.
- If the virtual template is to be associated with a firewall security zone, create the security zone before creating the virtual template.
Note | In order for a virtual template to work with SSL VPN, you must configure theip unnumbered command on the virtual template. |
DETAILED STEPS
| Command or Action | Purpose | |
|---|---|---|
Step 1 |
enable
Example: Device> enable |
Enables privileged EXEC mode. |
Step 2 |
configure terminal
Example: Device# configure terminal |
Enters global configuration mode. |
Step 3 |
interface virtual-template
number
Example: Device(config)# interface virtual-template 200 |
Creates an interface for the virtual template and enters interface configuration mode. |
Step 4 |
ip unnumbered
type
number
Example: Device(config-if)# ip unnumbered GigabitEthernet 0/0 |
Enables IP processing on an interface without assigning an explicit IP address to the interface. |
Step 5 |
exit
Example: Device(config-if)# exit |
Exits interface configuration mode. |
Step 6 |
webvpn context
name
Example: Device(config)# webvpn context context1 |
Enters WebVPN context configuration mode to configure the SSL VPN context. |
Step 7 |
virtual-template
number
Example: Device(config-webvpn-context)# virtual-template 200 |
Associates a virtual template with an SSL VPN context. |
Step 8 |
exit
Example: Device(config-webvpn-context)# exit |
Exists the WebVPN context configuration mode. |
Step 9 |
show webvpn context [name]
Example: Device# show webvpn context context1 |
Verifies that the virtual template is configured correctly. |
Configuring SSL VPN DVTI Support
Configuring per-Tunnel Virtual Templates
Perform this task to configure per-tunnel virtual templates. This task describes how to provide DVTI support for an SSL VPN.
A virtual template is configured with the desired IP features. This virtual template is configured in a WebVPN context on a per-tunnel or per-user basis (because a user will have only one tunnel established at a time). Hence the virtual template configuration is applied on a per-tunnel basis for each SSL VPN full tunnel established in the WebVPN context. This configuration also helps you apply a distinct configuration to each user connecting to the WebVPN context using a AAA server.
The distinct per-user policy configuration is downloaded from the AAA server. This configuration includes group policy attributes and ACLs, and is applied to every user connecting to the WebVPN context on a per-user basis.
If a per-user attribute such as ACL is configured both on the AAA server and the virtual template, then the attribute configured on the AAA server takes precedence. The users logged in to the client computer will have the ACL configuration from the AAA server but will have other configurations, such as firewalls and VRF, from the virtual template. That is, the configuration applied to the users will be a combination of the virtual template configuration and the configuration available on the AAA server.
For example, if IP features such as firewalls, ACLs, and VRF are configured in a virtual template and user attributes such as ACLs are configured on the AAA server, the attributes configured on the AAA server take precedence. The users logged in to the client computer will have the ACL configuration from the AAA server but will have firewall and VRF configurations from the virtual template. That is, the configuration applied to the users will be a combination of virtual templates and AAA, where AAA attributes have a higher priority when there is a configuration conflict.
See the "Configuring_RADIUS_Attribute_Support_for_SSL_VPN" section for a list of AAA attributes that support SSL VPN.
DETAILED STEPS
| Command or Action | Purpose | |||
|---|---|---|---|---|
Step 1 |
enable
Example: Device> enable |
Enables privileged EXEC mode. | ||
Step 2 |
configure
terminal
Example: Device# configure terminal |
Enters global configuration mode. | ||
Step 3 |
webvpn
context
context-name
Example: Device(config)# webvpn context context1 |
Enters WebVPN context configuration mode to configure the SSL VPN context. | ||
Step 4 |
virtual-template
interface-number
tunnel
Example: Device(config-webvpn-context)# virtual-template 1 tunnel |
Associates virtual templates for each full tunnel session. | ||
Step 5 |
inservice
Example: Device(config-webvpn-context)# inservice |
Enables an SSL VPN context.
| ||
Step 6 |
exit
Example: Device(config-webvpn-context)# exit |
Exits WebVPN context configuration mode. |
Configuring per-Context Virtual Templates
This task describes how to configure virtual tunnel interface support on a per-context basis.
A virtual template is configured with IP features such as NAT, firewalls, and PBR. This virtual template is configured in a WebVPN context, and enables SSL VPN to interoperate with the IP features configured. This configuration is applied to all users connecting to that WebVPN context.
DETAILED STEPS
| Command or Action | Purpose | |||
|---|---|---|---|---|
Step 1 |
enable
Example: Device> enable |
Enables privileged EXEC mode. | ||
Step 2 |
configure
terminal
Example: Device# configure terminal |
Enters global configuration mode. | ||
Step 3 |
webvpn
context
context-name
Example: Device(config)# webvpn context context1 |
Enters WebVPN context configuration mode to configure the SSL VPN context. | ||
Step 4 |
virtual-template
interface-number
Example: Device(config-webvpn-context)# virtual-template 1 |
Associates a virtual template with an SSL VPN context. | ||
Step 5 |
inservice
Example: Device(config-webvpn-context)# inservice |
Enables an SSL VPN context.
| ||
Step 6 |
exit
Example: Device(config-webvpn-context)# exit |
Exits WebVPN context configuration mode. |
Configuring SSL VPN Phase-4 Features
- Configuring the Start Before Logon Functionality
- Configuring Split ACL Support
- Configuring IP NetMask Functionality
Configuring the Start Before Logon Functionality
In order to import the AnyConnect profile to the Cisco IOS headend, the administrator must download the AnyConnect profile from an AnyConnect client (this profile comes by default with AnyConnect), update the UseStartBeforeLogin XML tag available in the profile file to inform AnyConnect to support SBL, and then import the modified profile into the Cisco IOS software.
The secure gateway administrator maintains the AnyConnect profile file and distributes it to the clients.
Following is an extract of the Cisco IOS AnyConnect VPN client profile XML file:
<?xml version="1.0" encoding="UTF-8"?>
<AnyConnectProfile xmlns="http://schemas.xmlsoap.org/encoding/"
xmlns:xsi="http://www.w3.org/2001/XMLSchema-instance"
xsi:schemaLocation="http://schemas.xmlsoap.org/encoding/
AnyConnectProfile.xsd">
<ClientInitialization>
<UseStartBeforeLogon UserControllable="false">true</UseStartBeforeLogon>
</ClientInitialization>
You can select the hosts from the above list.
<ServerList>
  <HostEntry>
    <HostName>abc</HostName>
    <HostAddress>abc.cisco.com</HostAddress>
  </HostEntry> </ServerList>
</AnyConnectProfile>
Data is required to connect to a specific host.
The SBL functionality connects the client PC to the enterprise network even before the users log into the PC. This functionality allows the administrator to run the logon scripts even if the user is not connected to the enterprise network. This is useful for a number of deployment scenarios where the user is outside the physical corporate network and cannot access the resources until his system is connected to the corporate network.
Only an administrator can enable or disable SBL. The end users accessing the client PC are not allowed to enable or disable this functionality.
SSL VPN must have the ability to import profiles on the Cisco IOS software and must be able to send the AnyConnect profile to the client.
DETAILED STEPS
| Command or Action | Purpose | |||
|---|---|---|---|---|
Step 1 |
enable
Example: Device> enable |
Enables privileged EXEC mode. | ||
Step 2 |
configure terminal
Example: Device# configure terminal |
Enters global configuration mode. | ||
Step 3 |
webvpn import svc profile
profile-name
device-name
Example: Device(config)# webvpn import svc profile profile1 flash:newName |
Imports the AnyConnect profile to the Cisco IOS headend. | ||
Step 4 |
webvpn context
context-name
Example: Device(config)# webvpn context context1 |
Enters WebVPN context configuration mode to configure the SSL VPN context. | ||
Step 5 |
policy group
group-name
Example: Device(config-webvpn-context)# policy group group1 |
Enters WebVPN group policy configuration mode to configure a group policy. | ||
Step 6 |
svc profile
profile-name
Example: Device(config-webvpn-group)# svc profile profile1 |
Applies the concerned profile to the respective WebVPN group policy. | ||
Step 7 |
svc module
module-name
Example: Device(config-webvpn-group)# svc module vpngina |
Enables the SBL functionality support for the Cisco IOS SSL VPN headend.
| ||
Step 8 |
end
Example: Device(config-webvpn-group)# end |
Exits WebVPN group policy configuration mode.
| ||
Step 9 |
show running-config
Example: Device# show running-config |
(Optional) Displays the contents of the current running configuration file or the configuration for a specific module, Layer 2 VLAN, class map, interface, map class, policy map, or virtual circuit (VC) class. |
Configuring Split ACL Support
Perform this task to configure split ACL support.
When the tunnel is active, Cisco IOS SSL VPN supports the split include and split exclude commands to filter and classify the traffic based on IP. Because the Cisco IOS software supports ACLs to classify the traffic, standard ACL support is provided to filter the traffic.
DETAILED STEPS
| Command or Action | Purpose | |||
|---|---|---|---|---|
Step 1 |
enable
Example: Device> enable |
Enables privileged EXEC mode. | ||
Step 2 |
configure
terminal
Example: Device# configure terminal |
Enters global configuration mode. | ||
Step 3 |
ip
access-list
standard
{access-list-number |
access-list-name}
Example: Device(config)# ip access-list standard 1 |
Defines an IP access list or object group access control list (OGACL) by name or number and enters the standard ACL configuration mode. | ||
Step 4 |
permit
ip-address
Example: Device(config-std-nacl)# permit 10.0.0.1 |
Sets conditions to allow packets to pass a named SSL VPN access list.
| ||
Step 5 |
deny
ip-address
Example: Device(config-std-nacl)# deny 10.0.0.2 |
Sets conditions in a named SSL VPN access list that will deny packets.
| ||
Step 6 |
exit
Example: Device(config-std-nacl)# exit |
Exits standard ACL configuration mode. | ||
Step 7 |
webvpn
context
context-name
Example: Device(config)# webvpn context context1 |
Enters WebVPN context configuration mode to configure the SSL VPN context. | ||
Step 8 |
policy
group
policy-name
Example: Device(config-webvpn-context)# policy group default |
Enters WebVPN group policy configuration mode to configure a group policy. | ||
Step 9 |
svc
split
{include |
exclude}
acl
acl-list-name
Example: Device(config-webvpn-group)# svc split include acl 1 |
Enables split tunneling for Cisco AnyConnect VPN Client tunnel clients. | ||
Step 10 |
end
Example: Device(config-webvpn-group)# end |
Exits WebVPN group policy configuration mode. | ||
Step 11 |
show
running-config
Example: Device# show running-config |
(Optional) Displays the contents of the current running configuration file or the configuration for a specific module, Layer 2 VLAN, class map, interface, map class, policy map, or virtual circuit (VC) class. |
Configuring IP NetMask Functionality
The IP NetMask functionality provides SVC or AnyConnect client provision to configure the network mask when the ip local pool command is configured on the router. This mask must be a classless mask.
DETAILED STEPS
| Command or Action | Purpose | |
|---|---|---|
Step 1 |
enable
Example: Device> enable |
Enables privileged EXEC mode. |
Step 2 |
configure terminal
Example: Device# configure terminal |
Enters global configuration mode. |
Step 3 |
webvpn context
context-name
Example: Device(config)# webvpn context context1 |
Enters WebVPN context configuration mode to configure the SSL VPN context. |
Step 4 |
policy group
group-name
Example: Device(config-webvpn-context)# policy group default |
Enters WebVPN group policy configuration mode to configure a group policy. |
Step 5 |
svc
address-pool
pool-name
netmask
ip-netmask
Example: Device(config-webvpn-group)# svc address-pool pool1 netmask 255.255.0.0 |
Configures the desired netmask on the router. |
Step 6 |
end
Example: Device(config-webvpn-group)# end |
Exits WebVPN group policy configuration mode. |
Step 7 |
show
running-config
Example: Device# show running-config |
(Optional) Displays the contents of the current running configuration file or the configuration for a specific module, Layer 2 VLAN, class map, interface, map class, policy map, or virtual circuit (VC) class. |
Configuring the DTLS Port
DETAILED STEPS
| Command or Action | Purpose | |
|---|---|---|
Step 1 |
enable
Example: Device> enable | |
Step 2 | configure terminal
Example: Device# configure terminal |
Enters global configuration mode. |
Step 3 | webvpn gateway
gateway-name
Example: Device(config)# webvpn gateway gateway1 |
Enters WebVPN gateway configuration mode to configure a SSL VPN gateway. |
Step 4 | dtls port
port-number
Example: Device(config-webvpn-gateway)# dtls port 1045 |
Configures a DTLS port. |
Step 5 | end
Example: Device(config-webvpn-gateway)# end |
Exits WebVPN gateway configuration mode. |
Step 6 | show webvpn session [user
user-name]
context {context-name |
all} [detail]
Example: Device# show webvpn session context all |
(Optional) Displays SSL VPN user session information. |
Using SSL VPN clear Commands
DETAILED STEPS
| Command or Action | Purpose | |
|---|---|---|
Step 1 |
enable
Example: Device> enable |
Enables privileged EXEC mode. |
Step 2 |
clear
webvpn
nbns
[context {name |
all}]
Example: Device# clear webvpn nbns context all |
Clears the NBNS cache on an SSL VPN gateway. |
Step 3 |
clear
webvpn
session
[user
name]
context {name |
all}
Example: Device# clear webvpn session context all |
Clears SSL VPN remote user sessions. |
Step 4 |
clear
webvpn
stats
[cifs |
citrix |
mangle |
port-forward |
sso |
tunnel] [context {name |
all}]
Example: Device# clear webvpn stats |
Clears SSL VPN application and access counters. |
Verifying SSL VPN Configurations
DETAILED STEPS
| Command or Action | Purpose | |
|---|---|---|
Step 1 |
enable
Example: Device> enable |
Enables privileged EXEC mode. |
Step 2 |
show
webvpn
context
[name]
Example: Device# show webvpn context |
Displays the operational status and configuration parameters for SSL VPN context configurations. |
Step 3 |
show
webvpn
gateway
[name]
Example: Device# show webvpn gateway |
Displays the status of the SSL VPN gateway. |
Step 4 |
show
webvpn
nbns
context
{all |
name}
Example: Device# show webvpn nbns context all |
Displays information in the NBNS cache. |
Step 5 |
show
webvpn
policy
group
name
context
{all |
name}
Example: Device# show webvpn policy group ONE context all |
Displays the context configuration associated with a policy group. |
Step 6 |
show
webvpn
session
[user
name]
context {all |
name}
Example: Device# show webvpn session context all |
Displays SSL VPN user session information. |
Step 7 |
show
webvpn
stats
[cifs |
citrix |
mangle |
port-forward |
sso |
tunnel] [detail] [context {all |
name}]
Example: Device# show webvpn stats tunnel detail context all |
Displays SSL VPN application and network statistics. |
Step 8 |
show
webvpn
context
[context-name |
brief]
Example: Device# show webvpn context brief |
(Optional) Displays the operational status and configuration parameters for SSL VPN context configurations. |
Step 9 |
show
interface
virtual-access
interface-number
Example: Device# show interface virtual-access 1 |
(Optional) Displays detailed information about the virtual access interface. |
Step 10 |
show
webvpn
session
[user
user-name]
context {context-name |
all} [detail]
Example: Device# show webvpn session user user1 context all |
(Optional) Displays SSL VPN user session information. |
Step 11 |
show
running-config
interface
virtual-access
interface-number
Example: Device# show running-config interface virtual-access 1 |
(Optional) Displays the configuration applied on the virtual access interface. |
Using SSL VPN Debug Commands
DETAILED STEPS
| Command or Action | Purpose | |
|---|---|---|
Step 1 |
enable
Example: Device> enable |
Enables privileged EXEC mode. |
Step 2 |
debug
webvpn
[verbose] [aaa |
acl |
cifs |
citrix [verbose] |
cookie [verbose] |
count |
csd |
data |
dns |
emweb [state] |
entry
context-name [source
ip[network-mask] |
user
username] |
http [authentication |
trace |
verbose] |
package |
sdps [level
number] |
sock [flow] |
sso|
timer |
trie |
tunnel [traffic
acl-number |
verbose] |
url-disp |
webservice [verbose]]
Example: Device# debug webvpn |
Enables the display of debug information for SSL VPN applications and network activity. |
Configuration Examples for SSL VPN
- Example: Configuring a Generic SSL VPN Gateway
- Example: Configuring an ACL
- Example: Configuring HTTP Proxy
- Example: Configuring Microsoft File Shares for Clientless Remote Access
- Example: Configuring Citrix Application Support for Clientless Remote Access
- Example: Configuring Application Port Forwarding
- Example: Configuring VRF Virtualization
- Example: RADIUS Accounting for SSL VPN Sessions
- Example: URL Obfuscation (Masking)
- Example: Adding a CIFS Server URL List and Attaching It to a Policy List
- Example: Typical SSL VPN Configuration
- Example: Cisco Express Forwarding-Processed Packets
- Example: Multiple AnyConnect VPN Client Package Files
- Example: Local Authorization
- Example: URL Rewrite Splitter
- Example: Backend HTTP Proxy
- Example: Stateless High Availability with HSRP
- Example: Internationalization
- Example: Virtual Template
- Example: SSL VPN DVTI Support
- Example: SSL VPN Phase-4 Features
- Example: Debug Command Output
- Example: Show Command Output
Example: Configuring a Generic SSL VPN Gateway
The following output example shows how to configure a generic SSL VPN gateway in privileged EXEC mode:
webvpn gateway SSL_gateway2
 ip address 10.1.1.1. port 442
 ssl trustpoint TP_self_signed _4138349635
 inservice
!
webvpn context SSL_gateway2
 ssl authenticate verify all
!
!
policy group default
default-group-policy default
 gateway SSL_gateway2
inservice
Example: Configuring an ACL
The following output example shows how to associate acl1 (ACL) with policy group "default."
webvpn context context1
 ssl authenticate verify all
 !
 acl "acl1"
   error-msg "warning!!!..."
   permit url "http://www.example1.com"
   deny url "http://www.example2.com"
   permit http any any
 !
 nbns-list l1
   nbns-server 10.1.1.20
 !
 cifs-url-list "c1"
   heading "cifs-url"
   url-text "SSL VPN-SERVER2" url-value "\\SSL VPN-SERVER2"
   url-text "SSL-SERVER2" url-value "\\SSL-SERVER2"
 !
 policy group default
   acl "acl1"
   cifs-url-list "c1"
   nbns-list "l1"
   functions file-access
   functions file-browse
   functions file-entry
 default-group-policy default
 gateway public
 inservice
!
Example: Configuring HTTP Proxy
The following output example shows how to configure HTTP proxy and how to automatically download the home page of the user from the portal (home) page of "http://www.example.com":
webvpn context myContext
 ssl authenticate verify all
 !
 !
 port-forward "email"
   local-port 20016 remote-server "ssl-server1.SSL example1.com" remote-port 110 description "POP-ssl-server1"
 !
 policy group myPolicy
   port-forward "email" auto-download http-proxy proxy-url "http://www.example.com"
 inservice
Example: Configuring Microsoft File Shares for Clientless Remote Access
NBNS Server List Example
The following output example, starting in global configuration mode shows how to configure a server list for NBNS resolution:
Device(config)# webvpn context context1
Device(config-webvpn-context)# nbns-list SERVER_LIST
Device(config-webvpn-nbnslist)# nbns-server 172.16.1.1 master
Device(config-webvpn-nbnslist)# nbns-server 172.16.2.2 timeout 10 retries 5
Device(config-webvpn-nbnslist)# nbns-server 172.16.3.3 timeout 10 retries 5
Device(config-webvpn-nbnslist)# exit
File Share Permissions Example
The following output example shows how to attach the server list to and enable full file and network access permissions for the policy group ONE:
Device(config-webvpn-context)# policy group ONE
Device(config-webvpn-group)# nbns-list SERVER_LIST
Device(config-webvpn-group)# functions file-access
Device(config-webvpn-group)#  functions file-browse
Device(config-webvpn-group)# functions file-entry
Device(config-webvpn-group)# end
Example: Configuring Citrix Application Support for Clientless Remote Access
The following output example, starting in global configuration mode, shows how to enable Citrix application support for remote users with a source IP address in the 192.168.1.0/24 network:
Device(config)# access-list 100 permit ip 192.168.1.0 0.255.255.255 any
Device(config)# webvpn context context1
Device(config-webvpn-context)# policy group ONE
Device(config-webvpn-group)# citrix enabled
Device(config-webvpn-group)# filter citrix 100
Example: Configuring Application Port Forwarding
The following output example, starting in global configuration mode, shows how to configure port forwarding for well-known e-mail application port numbers:
Device(config)# webvpn context context1
Device(config-webvpn-context)# port-forward EMAIL
Device(config-webvpn-port-fwd)# local-port 30016 remote-server mail1.company.com remote-port 110 description POP3
Device(config-webvpn-port-fwd)# local-port 30017 remote-server mail2.company.com remote-port 25 description SMTP
Device(config-webvpn-port-fwd)# local-port 30018 remote-server mail3.company.com remote-port 143 description IMAP
Device(config-webvpn-port-fwd)# exit
Device(config-webvpn-context)# policy group ONE
Device(config-webvpn-group)# port-forward EMAIL
Device(config-webvpn-group)# end
Example: Configuring VRF Virtualization
The following output example, starting in global configuration mode, show how to associate the VRF under the SSL VPN context configuration:
Device(config)# ip vrf vrf1
Device(config-vrf)# rd 10.100.100.1:1
Device(config-vrf)# exit
Device(config)# webvpn context context1
Device(config-webvpn-context)# policy group group1
Device(config-webvpn-group)# exit
Device(config-webvpn-context)# default-group-policy policy1
Device(config-webvpn-context)# vrf-name vrf2
Device(config-webvpn-context)# end
When you configure the VRF Virtualization feature in Cisco IOS Release 12.4(24)T1 and later releases, the following message is displayed:
% IP VRF vrf1 configuration applied.
% But please use Virtual-Template to configure VRF.
See the SSL VPN DVTI Support section for an example on how to use a virtual template to configure a VRF.
Example: RADIUS Accounting for SSL VPN Sessions
The following output example shows how to configure RADIUS accounting for SSL VPN user sessions:
version 12.4
service timestamps debug datetime msec
service timestamps log datetime msec
no service password-encryption
!
hostname host1
!
aaa new-model
!
!
aaa accounting network SSL VPNaaa start-stop group radius
aaa accounting update periodic 1
aaa session-id common
ip subnet-zero
ip cef
!
!
no ip domain lookup
ip domain name cisco.com
ip name-server 172.16.2.133
ip name-server 172.16.11.48
!
line con 0
 exec-timeout 0 0
line aux 0
line vty 0 4
!
!
webvpn gateway GW1
 ip address 172.19.216.141 port 443
 inservice
 !
webvpn gateway SSL VPN
 no inservice
 !
webvpn install svc flash:/webvpn/svc.pkg
webvpn aaa accounting-list SSL VPNaaa
 !
webvpn context Default_context
 ssl encryption
 ssl authenticate verify all
 !
 no inservice
!
!
Example: Adding a CIFS Server URL List and Attaching It to a Policy List
The following output example shows how to add the CIFS server URLs "SSLVPN-SERVER2" and "SSL-SERVER2" as portal page URLs to which a user has access. The example also shows how the two servers are attached to a policy group.
webvpn context context_1
 ssl authenticate verify all
 !
 acl "acl1"
   error-msg "warning!!!..."
   permit url "http://www.example1.com"
   deny url "http://www.example2.com"
   permit http any any
 !
 nbns-list l1
   nbns-server 10.1.1.20
 !
 cifs-url-list "c1"
   heading "cifs-url"
   url-text "SSLVPN-SERVER2" url-value "\\SSLVPN-SERVER2"
   url-text "SSL-SERVER2" url-value "\\SSL-SERVER2"
 !
 policy group default
   acl "acl1"
   cifs-url-list "c1"
   nbns-list "l1"
   functions file-access
   functions file-browse
   functions file-entry
 default-group-policy default
 gateway public
 inservice
!
Example: Typical SSL VPN Configuration
The following output example shows how to configure an SSL VPN that includes most of the features that are available using SSL VPN:
hostname sslvpn
!
!
aaa new-model
!
!
aaa authentication login default local group radius
!
!
crypto pki trustpoint Gateway
 enrollment selfsigned
 ip-address 192.168.22.13
 revocation-check crl
 rsakeypair KeyPair1 2048 2048
!
!
crypto pki certificate chain Gateway
 certificate self-signed 02
!
!
interface Loopback0
 ip address 10.10.10.1 255.255.255.0
!
!
interface GigabitEthernet0/1
 ip address 192.168.22.14 255.255.255.0 secondary
 ip address 192.168.22.13 255.255.255.0
 duplex auto
 speed auto
 media-type rj45
!
!
ip local pool svc-pool 10.10.10.100 10.10.10.110
!
!
ip radius source-interface FastEthernet1/1
!
!
webvpn gateway ssl-vpn
 ip address 192.168.22.13 port 443
 http-redirect port 80
 ssl trustpoint Gateway
 inservice
 !
! The following line is required for SSLVPN Client.
webvpn install svc flash:/webvpn/svc.pkg
!
! The following line is required for Cisco Secure Desktop.
webvpn install csd flash:/webvpn/sdesktop.pkg
!
webvpn context ssl-vpn
 ssl authenticate verify all
!
 url-list "sslvpn-dt"
   url-text "sslvpn-dt" url-value "http://10.1.1.40"
   url-text "Exchange Server" url-value "http://10.1.1.40/exchange"
!
 sso-server "netegrity"
   web-agent-url "http://10.1.1.37/vpnauth/"
   secret-key "sslvpn1"
   retries 3
   timeout 15
!
 nbns-list cifs
   nbns-server 10.1.1.40
!
 port-forward "mail_test"
   local-port 30016 remote-server "example1.com" remote-port 143 description "IMAP-test"
   local-port 30017 remote-server "example2.com" remote-port 110 description "POP3-test"
   local-port 30018 remote-server "example3.com" remote-port 25 description "SMTP-test"
 !
 policy group default
! The following line applies the URL list.
   url-list "sslvpn-dt"
! The following line applies TCP port forwarding.
   port-forward "mail_test"
! The following line applies CIFS.
   nbns-list "cifs"
! The following line enables CIFS functionality.
   functions file-access
! The following line enables CIFS functionality.
   functions file-browse
! The following line enables CIFS functionality.
   functions file-entry
! The following line enables SSLVPN Client.
   functions svc-enabled
! The following line enables clientless Citrix.
   citrix enabled
 default-group-policy default
! The following line maps this context to the virtual gateway and defines the domain to use.
 gateway ssl-vpn domain sslvpn
! The following line enables Cisco Secure Desktop.
 csd enable
 inservice
!
!
end
Example: Cisco Express Forwarding-Processed Packets
The following output example from the show webvpn stats command displays information about Cisco Express Forwarding-processed packets:
Device# show webvpn stats
User session statistics:
    Active user sessions       : 56         AAA pending reqs           : 0
    Peak user sessions         : 117        Peak time                  : 00:13:19
    Active user TCP conns      : 0         Terminated user sessions    : 144
    Session alloc failures     : 0          Authentication failures    : 0
    VPN session timeout        : 0          VPN idle timeout           : 0
    User cleared VPN sessions  : 0      Exceeded ctx user limit        : 0
    Exceeded total user limit  : 0
    Client process rcvd pkts   : 1971       Server process rcvd pkts   : 441004
    Client process sent pkts   : 921291     Server process sent pkts   : 2013
    Client CEF received pkts   : 1334       Server CEF received pkts   : 951610
    Client CEF rcv punt pkts   : 0          Server CEF rcv punt pkts   : 779
    Client CEF sent pkts       : 1944439    Server CEF sent pkts       : 0
    Client CEF sent punt pkts  : 21070      Server CEF sent punt pkts  : 0
Example: Multiple AnyConnect VPN Client Package Files
The following output example shows how to install three AnyConnect VPN Client packages to a gateway and displays the resulting show webvpn install command output:
Device(config)# webvpn install svc vpn1_i386-Release-2.0.0077-k9.pkg sequence 6
Device(config)# webvpn install svc vpn2_powerpc-Release-2.0.0077-k9.pkg sequence 8
Device(config)# webvpn install svc svc_1.pkg sequence 4
Device# show webvpn install status svc

SSLVPN Package SSL-VPN-Client version installed:
CISCO STC win2k+
2,0,0148
Fri 12/29/2006 19:13:56.37
SSLVPN Package SSL-VPN-Client version installed:
CISCO STC Darwin_i386
2,0,0
Wed Nov  8 04:01:57 MST 2006
SSLVPN Package SSL-VPN-Client version installed:
CISCO STC Darwin_powerpc
2,0,0
Wed Nov  8 03:54:50 MST 2006
The following example shows that three AnyConnect VPN client packages have been configured and typical output from the show running-config command:
Device# show running-config | begin webvpn
webvpn install svc flash:/webvpn/svc_4.pkg sequence 4
!
webvpn install svc flash:/webvpn/svc_6.pkg sequence 6
!
webvpn install svc flash:/webvpn/svc_9.pkg sequence 9
Example: Local Authorization
The following output example shows how to configure local authorization:
aaa new-model
!
aaa authentication login default local
aaa authorization network default local
!
aaa attribute list l2
  attribute type banner "user2"
!
aaa attribute list l1
  attribute type banner "user1"
  attribute type urllist-name "my-url-list"
!
username user1 password 0 passwd1
username user1 aaa attribute list l1
username user2 password 0 passwd2
username user2 aaa attribute list l2
!
webvpn context best
  ssl authenticate verify all
  !
  url-list "my-url-list"
    heading "external url"
    url-text "example" url-value "http://www.example.com"
  !
  policy group default
  default-group-policy default
  aaa authorization list default
  gateway public domain d1
  inservice
Example: Stateless High Availability with HSRP
The figure below shows the topology of a typical stateless high availability with HSRP setup. The output example following the figure shows how to configure Device 1 and Device 2 for HSRP on gateway Webvpn. .
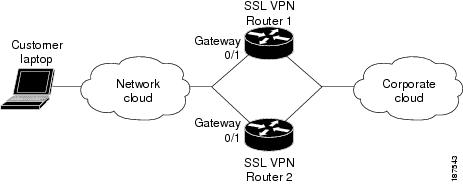
Example: Internationalization
- Example: Generated Browser Attribute Template
- Example: Copying the Browser Attribute File to Another PC for Editing
- Example: Copying the Edited File to flash
- Example: Output Showing That the Edited File Was Imported
- Example: Copying the Language File to Another PC for Editing
- Example: Copying the Edited Language File to the Storage Device
- Example: Language Template Created
- Example: URL List
Example: Generated Browser Attribute Template
The following output example is a generated browser attribute template:
<?xml version="1.0" encoding="utf-8"?>
<!--
  - Template file for browser attributes import
    <color> - primary color
    <scolor> - secondary color
    <tcolor> - text color
    <stcolor> - secondary text color
    <lmsg> - login message
    <title> - browser title
    <ticolor> - title color
    Default value will be used if the field is not defined
  Copyright (c) 2007-2008 by Cisco Systems, Inc. All rights reserved.
-->
<settings>
  <color>#003333</color>
  <scolor>#336666</scolor>
  <tcolor>white</tcolor>
  <stcolor>black</stcolor>
  <lmsg>Welcome to<p>Cisco Systems WebVPN Service</lmsg>
  <title>WebVPN Service</title>
  <ticolor>#003333</ticolor>
</settings>
Example: Language Template Created
The following show running-config command output example shows how to import the language file "lang.js" correctly:
Device# show running-config
policy group default
   functions file-access
   functions file-browse
   functions file-entry
   functions svc-enabled
   mask-urls
   svc address-pool "mypool"
   svc keep-client-installed
   svc split include 10.1.1.0 255.255.255.0
  default-group-policy default
  gateway g
  language customize mylang flash:lang.js
inservice
Example: URL List
The following output example shows how to copy the URL list template file to another PC for editing:
Device# copy flash: tftp:
  Source filename [url_list_tpl.xml
]?
  Address or name of remote host []? 10.1.1.30
Destination filename [url_list_tpl.xml
The following example shows that the URL template file has been copied to flash:
Device# copy tftp://directory/edited_url_list_tpl.xml

flash:
The following show running-config command output shows that URL list file has been imported into the url-list and that it has been bound to the policy group:
Device# show running-config
policy group default
   url-list "test"
   functions file-access
   functions file-browse
   functions file-entry
   functions svc-enabled
   mask-urls
   svc address-pool "mypool"
   svc keep-client-installed
   svc split include 10.1.1.0 255.255.255.0
  default-group-policy default
  gateway g
  language customize mylang flash:lang.js
  inservice
Example: Virtual Template
The following configuration and output examples display various aspects of the virtual template feature. The following example, starting in global configuration mode, shows how to create a virtual template and associate it with an SSL VPN context configuration. It also shows how to configure the virtual template for VRF and NAT:
Device(config)# interface virtual-template 100
Device(config-if)# ip unnumbered GigabitEthernet 0/0
Device(config-if)# ip vrf forwarding vrf1
Device(config-if)# ip nat inside
Device(config-if)# exit
Device(config)# webvpn context context1
Device(config-webvpn-context)# virtual-template 100
Device(config-webvpn-context)# exit
The following output example shows how to create a virtual template and associate it with a security zone:
Device(config)# interface virtual-template 200
Device(config-if)# ip unnumbered GigabitEthernet 0/0
Device(config-if)# zone-member security vpn
Device(config-if)# exit
Device(config)# webvpn context context2
Device(config-webvpn-context)# virtual-template 200
Device(config-webvpn-context)# exit
Example: SSL VPN DVTI Support
Example: Configuring per-Tunnel Virtual Templates

- Example: Configuring in the per-Tunnel Context Using Virtual Templates
- Example: Configuring in the per-Tunnel Context Using Virtual Templates and a AAA Server
Example: Configuring in the per-Tunnel Context Using Virtual Templates
The following example shows how to apply VRF, a firewall policy, and ACLs to each user based on the virtual template configuration.
If the VRF, firewall policy, and ACL features are configured in the virtual template and user policies are not configured on the AAA server, then only the IP features configured in the virtual template are applied to the users. In this example, User1 and User2 belonging to Context1 have zone1, vrf1, and ACL 1 configured whereas User3 belonging to Context2 has zone3, vrf3, and ACL 3 configured. Hence, different users have different IP features configured.
Virtual Template for User1 and User2
configure terminal
 interface virtual-template 1
 zone-member security zone1
 ip vrf forwarding vrf1
 ip access-group 1 in
 ip unnumbered GigabitEthernet 0/1
Virtual Template for User3
configure terminal
 interface virtual-template 3
 zone-member security zone3
 ip vrf forwarding vrf3
 ip access-group 3 in
 ip unnumbered GigabitEthernet 0/1
Example: Configuring in the per-Tunnel Context Using Virtual Templates and a AAA Server
The following example shows how to apply the IP feature configuration to the users based on the user-specific configuration available on the AAA server. The user-specific attributes configured on the AAA server are applied to the users when an SSL VPN session establishes a virtual tunnel. The configuration applied to the users will be a combination of the configurations in the virtual template and the AAA server, where AAA attributes have a higher priority when there is a configuration conflict.
In this example, ACL 1 is configured for User1, ACL 2 is configured for User2, and ACL 3 is configured for User3 on the AAA server using the inacl attribute. Even though ACL 4 is applied to all the users in the virtual template, User1 has ACL 1, User2 has ACL 2, and User3 has ACL 3 configured along with zone and VRF configurations available in the virtual template.
Virtual Template for User1 and User2
configure terminal
 interface virtual-template 1
 zone-member security zone1
 ip vrf forwarding vrf1
 ip access-group 4 in
 ip unnumbered GigabitEthernet 0/1
Virtual Template for User3
configure terminal
 interface virtual-template 3
 zone-member security zone3
 ip vrf forwarding vrf3
 ip access-group 4 in
 ip unnumbered GigabitEthernet 0/1
Example: Configuring per-Context Virtual Templates
The following figure shows remote users User1 and User2 belonging to context1 and User3 belonging to context2, connecting to the SSL VPN gateway and accessing the backend server in the corporate network. Here, the IP feature configuration is applied to each user based on the configuration applied to the WebVPN context of the user.

The following output example shows how to apply VRF and a firewall policy to each user based on the WebVPN context of the user. In this example, User1 and User 2 connected to Context1 have zone1 and vrf1 configured on the virtual template 1, and User3 connected to Context2 has zone2 and vrf2 configured on virtual template 2.
Virtual Template for User1
configure terminal
 interface virtual-template 1
 zone-member security zone1
 ip vrf forwarding vrf1
 ip unnumbered GigabitEthernet 0/1
Example: SSL VPN Phase-4 Features
- Example: Configuring the Start Before Logon (SBL) Functionality
- Example: Configuring Split ACL Support
- Example: Configuring IP NetMask Functionality
Example: Debug Command Output
Example: Configuring SSO
The following output example displays how to create ticket, setup session, and how to handle response information for an SSO configuration:
Device# debug webvpn sso
*Jun 12 20:37:01.052: WV-SSO: Redirect to SSO web agent URL - http://example.examplecompany.com/vpnauth/
*Jun 12 20:37:01.052: WV_SSO: Set session cookie with SSO redirect
*Jun 12 20:37:01.056: WV-SSO: Set SSO auth flag
*Jun 12 20:37:01.056: WV-SSO: Attach credentials - building auth ticket
*Jun 12 20:37:01.060: WV-SSO: user: [user11], secret: [secret123], version: [1.0], login time: [BCEFC86D], session key: [C077F97A], SHA256 hash : [B07D0A924DB33988D423AE9F937C1C5A66404819]
*Jun 12 20:37:01.060: WV-SSO: auth_ticket : user11:1.0@C077F97A@BCEFC86D@B07D0A924DB33988D423AE9F937C1C5A66404819
*Jun 12 20:37:01.060: WV-SSO: Base64 credentials for the auth_ticket: dXNlcjExOjEuMEBDMDc3Rjk3QUBCQ0VGQzg2REBCMDdEMEE5MjREQjMzOTg4RDQyM0FFOUY5MzdDMUM1QTY2NDA0ODE5
*Jun 12 20:37:01.060: WV-SSO: Decoded credentials = user11:1.0@C077F97A@BCEFC86D@B07D0A924DB33988D423AE9F937C1C5A66404819
*Jun 12 20:37:01.060: WV-SSO: Starting SSO request timer for 15-second
*Jun 12 20:37:01.572: WV-SSO: SSO auth response rcvd - status[200]
*Jun 12 20:37:01.572: WV-SSO: Parsed non-SM cookie: SMCHALLENGE
*Jun 12 20:37:01.576: WV-SSO: Parsed SMSESSION cookie
*Jun 12 20:37:01.576: WV-SSO: Sending logon page after SSO auth success
Example: Show Command Output
- Example: show webvpn context
- Example: show webvpn context name
- Example: show webvpn gateway
- Example: show webvpn gateway name
- Example: show webvpn nbns context all
- Example: show webvpn policy
- Example: show webvpn policy (with NTLM Disabled)
- Example: show webvpn session
- Example: show webvpn session user
- Example: show webvpn stats
- Example: show webvpn stats sso
- Example: FVRF show Command Output
Example: show webvpn context
The following is sample output from the show webvpn context command:
Device# show webvpn context
Codes: AS - Admin Status, OS - Operation Status
       VHost - Virtual Host
Context Name        Gateway  Domain/VHost      VRF      AS    OS
------------        -------  ------------      -------  ----  --------
Default_context     n/a      n/a               n/a      down  down
con-1               gw-1     one               -        up    up
con-2               -        -                 -        down  down
Example: show webvpn context name
The following is sample output from the show webvpn context command, entered with the name of a specific SSL VPN context:
Device# show webvpn context context1
Admin Status: up
Operation Status: up
CSD Status: Disabled
Certificate authentication type: All attributes (like CRL) are verified
AAA Authentication List not configured
AAA Authentication Domain not configured
Default Group Policy: PG_1
Associated WebVPN Gateway: GW_ONE
Domain Name: DOMAIN_ONE
Maximum Users Allowed: 10000 (default)
NAT Address not configured
VRF Name not configured
Example: show webvpn policy
The following is sample output from the show webvpn policy command:
Device# show webvpn policy group ONE context all
WEBVPN: group policy = ONE ; context = SSL VPN
      idle timeout = 2100 sec
      session timeout = 43200 sec
      citrix disabled
      dpd client timeout = 300 sec
      dpd gateway timeout = 300 sec
      keep SSL VPN client installed = disabled
      rekey interval = 3600 sec
      rekey method =
      lease duration = 43200 sec
WEBVPN: group policy = ONE ; context = SSL VPN_TWO
      idle timeout = 2100 sec
      session timeout = 43200 sec
      citrix disabled
      dpd client timeout = 300 sec
      dpd gateway timeout = 300 sec
      keep SSL VPN client installed = disabled
      rekey interval = 3600 sec
      rekey method =
      lease duration = 43200 sec
Example: show webvpn policy (with NTLM Disabled)
The following is sample output from the show webvpn policy command. NTLM authentication has been disabled.
Device# show webvpn policy group ntlm context ntlm
WEBVPN: group policy = ntlm; context = ntlm
      url list name = "ntlm-server"
      idle timeout = 2100 sec
      session timeout = 43200 sec
      functions =
                httpauth-disabled
                file-access
                svc-enabled

      citrix disabled
      dpd client timeout = 300 sec
      dpd gateway timeout = 300 sec
      keep SSL VPN client installed = disabled
      rekey interval = 3600 sec
      rekey method =
      lease duration = 43200 sec
Example: show webvpn session
The following is sample output from the show webvpn session command. The output is filtered to display user session information for only the specified context.
Device# show webvpn session context SSL VPN

WebVPN context name: SSL VPN
Client_Login_Name  Client_IP_Address  No_of_Connections  Created  Last_Used
user1              10.2.1.220                 2         04:47:16  00:01:26
user2              10.2.1.221                 2         04:48:36  00:01:56
Example: show webvpn session user
The following is a sample output from the show webvpn session command. The output is filtered to display session information for a specific user.
Device# show webvpn session user user1 context all

WebVPN user name = user1 ; IP address = 10.2.1.220; context = SSL VPN
    No of connections: 0
    Created 00:00:19, Last-used 00:00:18
    CSD enabled
    CSD Session Policy
       CSD Web Browsing Allowed
       CSD Port Forwarding Allowed
       CSD Full Tunneling Disabled
       CSD FILE Access Allowed
    User Policy Parameters
      Group name = ONE
    Group Policy Parameters
      url list name = "Example"
      idle timeout = 2100 sec
      session timeout = 43200 sec
      port forward name = "EMAIL"
      tunnel mode = disabled
      citrix disabled
      dpd client timeout = 300 sec
      dpd gateway timeout = 300 sec
      keep stc installed = disabled
      rekey interval = 3600 sec
      rekey method = ssl
      lease duration = 3600 sec
Example: show webvpn stats
The following is an output example from the show webvpn stats command entered with the detail and context keywords:
Device# show webvpn stats detail context SSL VPN
WebVPN context name : SSL VPN
User session statistics:
    Active user sessions     : 0          AAA pending reqs         : 0
    Peak user sessions       : 0          Peak time                : never
    Active user TCP conns    : 0          Terminated user sessions : 0
    Session alloc failures   : 0          Authentication failures  : 0
    VPN session timeout      : 0          VPN idle timeout         : 0
    User cleared VPN sessions: 0          Exceeded ctx user limit  : 0
    CEF switched packets - client: 0         , server: 0
    CEF punted packets - client: 0         , server: 0
Mangling statistics:
    Relative urls            : 0          Absolute urls            : 0
    Non-http(s) absolute urls: 0          Non-standard path urls   : 0
    Interesting tags         : 0          Uninteresting tags       : 0
    Interesting attributes   : 0          Uninteresting attributes : 0
    Embedded script statement: 0          Embedded style statement : 0
    Inline scripts           : 0          Inline styles            : 0
    HTML comments            : 0          HTTP/1.0 requests        : 0
    HTTP/1.1 requests        : 0          Unknown HTTP version     : 0
    GET requests             : 0          POST requests            : 0
    CONNECT requests         : 0          Other request methods    : 0
    Through requests         : 0          Gateway requests         : 0
    Pipelined requests       : 0          Req with header size >1K : 0
    Processed req hdr bytes  : 0          Processed req body bytes : 0
    HTTP/1.0 responses       : 0          HTTP/1.1 responses       : 0
    HTML responses           : 0          CSS responses            : 0
    XML responses            : 0          JS responses             : 0
    Other content type resp  : 0          Chunked encoding resp    : 0
    Resp with encoded content: 0          Resp with content length : 0
    Close after response     : 0          Resp with header size >1K: 0
    Processed resp hdr size  : 0          Processed resp body bytes: 0
    Backend https response   : 0          Chunked encoding requests: 0
CIFS statistics:
  SMB related Per Context:
    TCP VC's                 : 0          UDP VC's                 : 0
    Active VC's              : 0          Active Contexts          : 0
    Aborted Conns            : 0
  NetBIOS related Per Context:
    Name Queries             : 0          Name Replies             : 0
    NB DGM Requests          : 0          NB DGM Replies           : 0
    NB TCP Connect Fails     : 0          NB Name Resolution Fails : 0
  HTTP related Per Context:
    Requests                 : 0          Request Bytes RX         : 0
    Request Packets RX       : 0          Response Bytes TX        : 0
    Response Packets TX      : 0          Active Connections       : 0
    Active CIFS context      : 0          Requests Dropped         : 0

Socket statistics:
    Sockets in use           : 0          Sock Usr Blocks in use   : 0
    Sock Data Buffers in use : 0          Sock Buf desc in use     : 0
    Select timers in use     : 0          Sock Select Timeouts     : 0
    Sock Tx Blocked          : 0          Sock Tx Unblocked        : 0
    Sock Rx Blocked          : 0          Sock Rx Unblocked        : 0
    Sock UDP Connects        : 0          Sock UDP Disconnects     : 0
    Sock Premature Close     : 0          Sock Pipe Errors         : 0
    Sock Select Timeout Errs : 0
Port Forward statistics:
    Connections serviced     : 0          Server Aborts (idle)     : 0
  Client                                Server
    in pkts                  : 0          out pkts                 : 0
    in bytes                 : 0          out bytes                : 0
    out pkts                 : 0          in pkts                  : 0
    out bytes                : 0          in bytes                 : 0
WEBVPN Citrix statistics:
Connections serviced : 0
               Server                   Client
  Packets in  : 0                        0
  Packets out : 0                        0
  Bytes in    : 0                        0
  Bytes out   : 0                        0
Tunnel Statistics:
    Active connections       : 0
    Peak connections         : 0          Peak time                : never
    Connect succeed          : 0          Connect failed           : 0
    Reconnect succeed        : 0          Reconnect failed         : 0
    SVCIP install IOS succeed: 0          SVCIP install IOS failed : 0
    SVCIP clear IOS succeed  : 0          SVCIP clear IOS failed   : 0
    SVCIP install TCP succeed: 0          SVCIP install TCP failed : 0
    DPD timeout              : 0
  Client                                Server
    in  CSTP frames          : 0          out IP pkts              : 0
    in  CSTP data            : 0          out stitched pkts        : 0
    in  CSTP control         : 0          out copied pkts          : 0
    in  CSTP Addr Reqs       : 0          out bad pkts             : 0
    in  CSTP DPD Reqs        : 0          out filtered pkts        : 0
    in  CSTP DPD Resps       : 0          out non fwded pkts       : 0
    in  CSTP Msg Reqs        : 0          out forwarded pkts       : 0
    in  CSTP bytes           : 0          out IP bytes             : 0
    out CSTP frames          : 0          in  IP pkts              : 0
    out CSTP data            : 0          in  invalid pkts         : 0
    out CSTP control         : 0          in  congested pkts       : 0
    out CSTP Addr Resps      : 0          in  bad pkts             : 0
    out CSTP DPD Reqs        : 0          in  nonfwded pkts        : 0
    out CSTP DPD Resps       : 0          in  forwarded pkts       : 0
    out CSTP Msg Reqs        : 0
    out CSTP bytes           : 0          in  IP bytes             : 0
Example: show webvpn stats sso
The following output example displays statistics for an SSO server:
Device# show webvpn stats sso
Single Sign On statistics:
   Auth Requests           : 4         Pending Auth Requests    :0
   Successful Requests     : 1         Failed Requests          :3
   Retranmissions          : 0         DNS Errors               :0
   Connection Errors       : 0         Request Timeouts         :0
   Unknown Responses       :
The following output example displays extra information about how to configure SSO servers for the SSL VPN context:
Device# show webvpn context test_sso
  Context SSO server: sso-server
      Web agent URL :  "http://example1.examplecompany.com/vpnauth/"
      Policy Server Secret : "Secret123"
      Request Re-tries : 5, Request timeout: 15-second
The following output example displays extra information about how to configure an SSO server for the policy group of the SSL VPN context:
Device# show webvpn policy group sso context test_sso

WV: group policy = sso ; context = test_sso
      idle timeout = 2100 sec
      session timeout = 43200 sec
      sso server name = "server1"
      citrix disabled
      dpd client timeout = 300 sec
      dpd gateway timeout = 300 sec
      keep SSL VPN client installed = disabled
      rekey interval = 3600 sec
      rekey method =
      lease duration = 43200 sec
Additional References
Related Documents
|
Related Topic |
Document Title |
|---|---|
|
Cisco IOS commands |
|
|
Cisco AnyConnect VPN Client |
|
|
Cisco Secure Desktop |
|
|
IP application services commands |
|
|
IANA application port numbers |
|
|
OpenSSL Project |
|
|
RADIUS accounting |
"Configuring RADIUS" chapter in the RADIUS Configuration Guide |
|
Security commands |
|
|
SSL VPN platforms |
Cisco IOS SSL VPN Data Sheet |
|
SSL VPN |
|
|
Recommended cryptographic algorithms |
Technical Assistance
|
Description |
Link |
|---|---|
|
The Cisco Support and Documentation website provides online resources to download documentation, software, and tools. Use these resources to install and configure the software and to troubleshoot and resolve technical issues with Cisco products and technologies. Access to most tools on the Cisco Support and Documentation website requires a Cisco.com user ID and password. |
Feature Information for SSL VPN
The following table provides release information about the feature or features described in this module. This table lists only the software release that introduced support for a given feature in a given software release train. Unless noted otherwise, subsequent releases of that software release train also support that feature.
Use Cisco Feature Navigator to find information about platform support and Cisco software image support. To access Cisco Feature Navigator, go to www.cisco.com/go/cfn. An account on Cisco.com is not required.
| Table 6 | Feature Information for SSL VPN |
|
Feature Name |
Release |
Feature Information |
||
|---|---|---|---|---|
|
Access Control Enhancements |
12.4(20)T |
This feature allows administrators to configure automatic authentication and authorization for users. Users provide their username and password via the gateway page URL and do not have to re-enter their usernames and passwords from the login page. Authorization is enhanced to support more generic authorization, including local authorization. The following commands were introduced by this feature: aaa authentication auto, aaa authorization list. |
||
|
AnyConnect Client Support |
12.4(20)T |
Effective with this release, AnyConnect Client adds support for several client-side platforms, such as Microsoft Windows, Apple-Mac, and Linux. The ability to install AnyConnect in a standalone mode is also added. In addition, this feature allows multiple SSL VPN client package files to be configured on a gateway. The following command was modified by this feature: webvpn install. |
||
|
Application ACL Support |
12.4(11)T |
This feature provides administrators with the flexibility to fine-tune access control at the application layer level. The following commands were introduced by this feature: acl add error-msg, error-url, list. |
||
|
Auto Applet Download |
12.4(9)T |
This feature provides administrators with the option of automatically downloading the port-forwarding applet under the policy group. The following command was modified by this feature: port-forward (policy group). |
||
|
Backend HTTP Proxy |
12.4(20)T |
This feature allows administrators to route user requests through a backend HTTP proxy, providing more flexibility and control than routing through internal web servers. The following command was added by this feature: http proxy-server. |
||
|
Cisco AnyConnect VPN Client |
12.4(15)T |
This feature is the next-generation SSL VPN Client. The feature provides remote users with secure VPN connections to the router platforms supported by SSL VPN and to the Cisco 5500 Series Adaptive Security Appliances. If you have Cisco IOS releases before Release 12.4(15)T see SSL VPN Client GUI and if you have Cisco IOS Release 12.4(15)T and later releases, see Cisco AnyConnect VPN Client GUI. The task configurations in this document for tunnel mode apply to SVC and AnyConnect VPN Client. For more information about the Cisco AnyConnect VPN Client feature, see the Cisco AnyConnect VPN Client Administrator Guide, Release 2.4 and the Release Notes for Cisco AnyConnect VPN Client, Release 2.4.
|
||
|
Debug Infrastructure |
12.4(11)T |
Updates to the webvpn debug command provide administrators with the ability to turn debugging on for any one user or group. The following keywords were introduced by this feature: acl, entry sso, verbose. The following keyword options were added for the http keyword: authentication, trace, and verbose. The verbose keyword option was added for the citrix, cookie, tunnel, and webservice keywords. The port-forward keyword was deleted and the detail keyword option for the tunnel keyword was deleted. |
||
|
Front-Door VRF Support |
12.4(15)T |
Coupled with the already supported internal VRF, this feature allows the SSL VPN gateway to be fully integrated into an MPLS network. |
||
|
Full-Tunnel CEF Support |
12.4(20)T |
This feature provides better performance for full-tunnel packets. |
||
|
GUI Enhancements |
12.4(15)T |
These enhancements provide updated examples and explanation of the Web VPN GUIs. |
||
|
Internationalization |
12.4(22)T |
The Internationalization feature provides multi-language support for SSL VPN clients, such as Cisco Secure Desktop (CSD) and SSL VPN Client (SVC). The following commands were introduced: browser-attribute import, import language, webvpn create template. |
||
|
Licensing Support for Cisco IOS SSL VPNs |
15.0(1)M |
A license count is associated with each counted license and the count indicates the instances of the feature available for use in the system. In Cisco IOS Release 15.0(1)M, support was added for Cisco 880, Cisco 890, Cisco 1900, Cisco 2900, and Cisco 3900 series routers. The following commands were introduced or modified: debug webvpn license, show webvpn license. |
||
|
Max-user Limit Message |
12.4(22)T |
This error message is received when you try to log in to a Web VPN context and a maximum limit has been reached. |
||
|
Netegrity Cookie-Based Single SignOn (SSO) Support |
12.4(11)T |
This feature allows administrators to configure an SSO server that sets a SiteMinder cookie in the browser of a user when the user initially logs in. The benefit of this feature is that users are prompted to log in only a single time. The following commands were modified for this feature: clear webvpn stats, debug webvpn, show webvpn context, show webvpn policy, and show webvpn stats. The following commands were added for this feature: max-retry-attempts, request-timeout, secret-key, sso-server, and web-agent-url. |
||
|
NTLM Authentication |
12.4(9)T |
This feature provides NT LAN Manager (NTLM) authentication support. The following command was modified by this feature: functions |
||
|
Port-Forward Enhancements |
12.4(11)T |
This feature provides administrators with more options for configuring HTTP proxy and portal pages. The following commands were added for this feature: acl, add, deny, error-msg, error-url, list, and permit. |
||
|
RADIUS Accounting |
12.4(9)T |
This feature provides for RADIUS accounting for SSL VPN sessions. The following command was added by this feature: webvpn aaa accounting-list. |
||
|
SSL VPN |
12.4(6)T |
This feature enhances SSL VPN support in the Cisco IOS software. This feature provides a comprehensive solution that allows easy access to a broad range of web resources and web-enabled applications using native HTTP over SSL (HTTPS) browser support. SSL VPN introduced three modes of SSL VPN access: clientless, thin-client, and full-tunnel client support. The following command was introduced in Cisco IOS Release 12.4(15)T: cifs-url-list |
||
|
SSL VPN Client-Side Certificate-Based Authentication |
15.0(1)M |
This feature enables SSL VPN to authenticate clients based on the client's AAA username and password, and supports webvpn gateway authentication of clients using AAA certificates. The following command was modified by this feature: authentication certificate, ca trustpoint, match-certificate, svc profile, username-prefill, webvpn import svc profile. |
||
|
SSL VPN DVTI Support |
15.1(1)T |
The SSL VPN DVTI Support feature adds DVTI support to the SSL VPN and hence enables seamless interoperability with IP features, such as firewalls, NAT, ACL, and VRF. This feature also provides DVTI support, which allows the configuration of IP features on a per-tunnel basis. The following command was introduced or modified: virtual-template. |
||
|
SSL VPN Phase-4 Features |
15.1(1)T |
The SSL VPN Phase-4 Features feature provides the following enhancements to the Cisco IOS SSL VPN:
The following commands were introduced or modified: show webvpn session, svc address-pool, svc module, svc split. |
||
|
DTLS Support for IOS SSL VPN |
15.1(2)T |
The DTLS Support for IOS SSL VPN feature enables DTLS as a transport protocol for the traffic tunneled through SSL VPN. The following commands were introduced or modified: debug webvpn dtls, dtls port, svc dtls. |
||
|
Stateless High Availability with Hot Standby Router Protocol (HSRP) |
12.4(20)T |
This feature allows stateless failover to be applied to VPN routers by using HSRP. The following command was modified by this feature: ip address. |
||
|
URL Obfuscation |
12.4(11)T |
This feature provides administrators with the ability to obfuscate, or mask, sensitive portions of an enterprise URL, such as IP addresses, hostnames, or port numbers. The following command was added by this feature: mask-urls. |
||
|
URL Rewrite Splitter |
12.4(20)T |
This feature allows administrators to selectively mangle requests to the gateway. The following commands were added by this feature: host, ip, unmatched-action, and url rewrite. |
||
|
User-Level Bookmarking |
12.4(15)T |
This feature allows a user to bookmark URLs while connected through an SSL VPN tunnel. The following command was added by this feature: user-profile location. |
||
|
Virtual Templates |
12.4(24)T1 |
A virtual template enables SSL VPN to interoperate with IP features such as NAT, firewall, and policy-based routing. The following command was introduced: virtual-template. |
Cisco and the Cisco logo are trademarks or registered trademarks of Cisco and/or its affiliates in the U.S. and other countries. To view a list of Cisco trademarks, go to this URL: www.cisco.com/go/trademarks. Third-party trademarks mentioned are the property of their respective owners. The use of the word partner does not imply a partnership relationship between Cisco and any other company. (1110R)
Any Internet Protocol (IP) addresses and phone numbers used in this document are not intended to be actual addresses and phone numbers. Any examples, command display output, network topology diagrams, and other figures included in the document are shown for illustrative purposes only. Any use of actual IP addresses or phone numbers in illustrative content is unintentional and coincidental.