IPsec IPv6 Phase 2 Support

IPsec IPv6 Phase 2 Support

Last Updated: March 30, 2012

Cisco IOS IPv6 security features for your Cisco networking devices can protect your network against degradation or failure and also against data loss or compromise resulting from intentional attacks and from unintended but damaging mistakes by well-meaning network users.

Cisco IOS IPsec functionality provides network data encryption at the IP packet level, offering a robust, standards-based security solution. IPsec provides data authentication and anti-replay services in addition to data confidentiality services.

IPsec is a mandatory component of IPv6 specification. OSPF for IPv6 provides IPsec authentication support and protection, and IPv6 IPsec tunnel mode and encapsulation is used to protect IPv6 unicast and multicast traffic. This document provides information about implementing IPsec in IPv6 security.

Finding Feature Information

Your software release may not support all the features documented in this module. For the latest feature information and caveats, see the release notes for your platform and software release. To find information about the features documented in this module, and to see a list of the releases in which each feature is supported, see the Feature Information Table at the end of this document.

Use Cisco Feature Navigator to find information about platform support and Cisco software image support. To access Cisco Feature Navigator, go to www.cisco.com/go/cfn. An account on Cisco.com is not required.

Information About IPsec IPv6 Phase 2 Support

IPsec for IPv6

IP Security, or IPsec, is a framework of open standards developed by the Internet Engineering Task Force (IETF) that provide security for transmission of sensitive information over unprotected networks such as the Internet. IPsec acts at the network layer, protecting and authenticating IP packets between participating IPsec devices (peers), such as Cisco routers. IPsec provides the following optional network security services. In general, local security policy will dictate the use of one or more of these services:

  • Data confidentiality--The IPsec sender can encrypt packets before sending them across a network.
  • Data integrity--The IPsec receiver can authenticate packets sent by the IPsec sender to ensure that the data has not been altered during transmission.
  • Data origin authentication--The IPsec receiver can authenticate the source of the IPsec packets sent. This service depends upon the data integrity service.
  • Antireplay--The IPsec receiver can detect and reject replayed packets.

With IPsec, data can be sent across a public network without observation, modification, or spoofing. IPsec functionality is similar in both IPv6 and IPv4; however, site-to-site tunnel mode only is supported in IPv6.

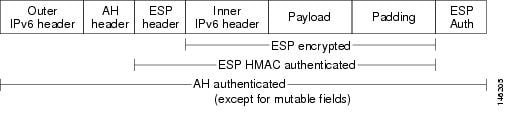
In IPv6, IPsec is implemented using the AH authentication header and the ESP extension header. The authentication header provides integrity and authentication of the source. It also provides optional protection against replayed packets. The authentication header protects the integrity of most of the IP header fields and authenticates the source through a signature-based algorithm. The ESP header provides confidentiality, authentication of the source, connectionless integrity of the inner packet, antireplay, and limited traffic flow confidentiality.

The Internet Key Exchange (IKE) protocol is a key management protocol standard that is used in conjunction with IPsec. IPsec can be configured without IKE, but IKE enhances IPsec by providing additional features, flexibility, and ease of configuration for the IPsec standard.

IKE is a hybrid protocol that implements the Oakley key exchange and Skeme key exchange inside the Internet Security Association Key Management Protocol (ISAKMP) framework (ISAKMP, Oakley, and Skeme are security protocols implemented by IKE) (see the figure below). This functionality is similar to the security gateway model using IPv4 IPsec protection.

IPv6 IPsec Site-to-Site Protection Using Virtual Tunnel Interface

The IPsec virtual tunnel interface (VTI) provides site-to-site IPv6 crypto protection of IPv6 traffic. Native IPv6 IPsec encapsulation is used to protect all types of IPv6 unicast and multicast traffic.

The IPsec VTI allows IPv6 routers to work as security gateways, establish IPsec tunnels between other security gateway routers, and provide crypto IPsec protection for traffic from internal networks when it is sent across the public IPv6 Internet (see the figure below). This functionality is similar to the security gateway model using IPv4 IPsec protection.

Figure 1IPsec Tunnel Interface for IPv6


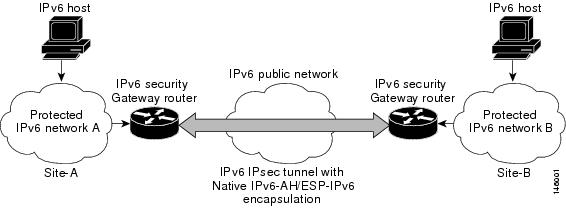
When the IPsec tunnel is configured, IKE and IPsec security associations (SAs) are negotiated and set up before the line protocol for the tunnel interface is changed to the UP state. The remote IKE peer is the same as the tunnel destination address; the local IKE peer will be the address picked from tunnel source interface which has the same IPv6 address scope as tunnel destination address.

The following figures shows the IPsec packet format.

Figure 2IPv6 IPsec Packet Format


How to Configure IPsec IPv6 Phase 2 Support

Configuring a VTI for Site-to-Site IPv6 IPsec Protection

Creating an IKE Policy and a Preshared Key in IPv6

Because IKE negotiations must be protected, each IKE negotiation begins by agreement of both peers on a common (shared) IKE policy. This policy states which security parameters will be used to protect subsequent IKE negotiations and mandates how the peers are authenticated.

After the two peers agree upon a policy, the security parameters of the policy are identified by an SA established at each peer, and these SAs apply to all subsequent IKE traffic during the negotiation.

You can configure multiple, prioritized policies on each peer--each with a different combination of parameter values. However, at least one of these policies must contain exactly the same encryption, hash, authentication, and Diffie-Hellman parameter values as one of the policies on the remote peer. For each policy that you create, you assign a unique priority (1 through 10,000, with 1 being the highest priority).


Note


If you are interoperating with a device that supports only one of the values for a parameter, your choice is limited to the value supported by the other device. Aside from this limitation, there is often a trade-off between security and performance, and many of these parameter values represent such a trade-off. You should evaluate the level of security risks for your network and your tolerance for these risks.

When the IKE negotiation begins, IKE searches for an IKE policy that is the same on both peers. The peer that initiates the negotiation will send all its policies to the remote peer, and the remote peer will try to find a match. The remote peer looks for a match by comparing its own highest priority policy against the policies received from the other peer. The remote peer checks each of its policies in order of its priority (highest priority first) until a match is found.

A match is made when both policies from the two peers contain the same encryption, hash, authentication, and Diffie-Hellman parameter values, and when the remote peer's policy specifies a lifetime that is less than or equal to the lifetime in the policy being compared. (If the lifetimes are not identical, the shorter lifetime--from the remote peer's policy--will be used.)

If a match is found, IKE will complete negotiation, and IPsec security associations will be created. If no acceptable match is found, IKE refuses negotiation and IPsec will not be established.


Note


Depending on which authentication method is specified in a policy, additional configuration might be required. If a peer's policy does not have the required companion configuration, the peer will not submit the policy when attempting to find a matching policy with the remote peer.

You should set the ISAKMP identity for each peer that uses preshared keys in an IKE policy.

When two peers use IKE to establish IPsec SAs, each peer sends its identity to the remote peer. Each peer sends either its hostname or its IPv6 address, depending on how you have set the ISAKMP identity of the router.

By default, a peer's ISAKMP identity is the IPv6 address of the peer. If appropriate, you could change the identity to be the peer's hostname instead. As a general rule, set the identities of all peers the same way--either all peers should use their IPv6 addresses or all peers should use their hostnames. If some peers use their hostnames and some peers use their IPv6 addresses to identify themselves to each other, IKE negotiations could fail if the identity of a remote peer is not recognized and a DNS lookup is unable to resolve the identity.

SUMMARY STEPS

1.    enable

2.    configure terminal

3.    crypto isakmp policy priority

4.    authentication {rsa-sig | rsa-encr | pre-share}

5.    hash {sha | md5}

6.    group {1 | 2 | 5}

7.    encryption {des | 3des | aes | aes 192 | aes 256}

8.    lifetime seconds

9.    exit

10.    crypto isakmp key enc-type-digit keystring { address peer-address [mask] | ipv6 {ipv6-address/ipv6-prefix} | hostname hostname} [ no-xauth]

11.    crypto keyring keyring-name [vrf fvrf-name]

12.    pre-shared-key {address address [mask] | hostname hostname | ipv6 {ipv6-address | ipv6-prefix}} key key

13.   end


DETAILED STEPS
 Command or ActionPurpose
Step 1
enable


Example:

Router> enable


Enables privileged EXEC mode.

  • Enter your password if prompted.
 
Step 2
configure terminal


Example:

Router# configure terminal


Enters global configuration mode.

 
Step 3
crypto isakmp policy priority


Example:

Router(config)# crypto isakmp policy 15


Defines an IKE policy, and enters ISAKMP policy configuration mode.

Policy number 1 indicates the policy with the highest priority. The smaller the priority argument value, the higher the priority.

 
Step 4
authentication {rsa-sig | rsa-encr | pre-share}


Example:

Router(config-isakmp-policy)# authentication pre-share


Specifies the authentication method within an IKE policy.

The rsa-sig and rsa-encr keywords are not supported in IPv6.

 
Step 5
hash {sha | md5}


Example:

Router(config-isakmp-policy)# hash md5


Specifies the hash algorithm within an IKE policy.

 
Step 6
group {1 | 2 | 5}


Example:

Router(config-isakmp-policy)# group 2


Specifies the Diffie-Hellman group identifier within an IKE policy.

 
Step 7
encryption {des | 3des | aes | aes 192 | aes 256}


Example:

Router(config-isakmp-policy)# encryption 3des


Specifies the encryption algorithm within an IKE policy.

 
Step 8
lifetime seconds


Example:

Router(config-isakmp-policy)# lifetime 43200


Specifies the lifetime of an IKE SA. Setting the IKE lifetime value is optional.

 
Step 9
exit


Example:

Router(config-isakmp-policy)# exit


Enter this command to exit ISAKMP policy configuration mode and enter global configuration mode.

 
Step 10
crypto isakmp key enc-type-digit keystring { address peer-address [mask] | ipv6 {ipv6-address/ipv6-prefix} | hostname hostname} [ no-xauth]


Example:

Router(config)# crypto isakmp key 0 my-preshare-key-0 address ipv6 3ffe:1001::2/128


Configures a preshared authentication key.

 
Step 11
crypto keyring keyring-name [vrf fvrf-name]


Example:

Router(config)# crypto keyring keyring1


Defines a crypto keyring to be used during IKE authentication.

 
Step 12
pre-shared-key {address address [mask] | hostname hostname | ipv6 {ipv6-address | ipv6-prefix}} key key


Example:

Router (config-keyring)# pre-shared-key ipv6 3FFE:2002::A8BB:CCFF:FE01:2C02/128


Defines a preshared key to be used for IKE authentication.

 
Step 13
end


Example:

Router (config-keyring)# end


Exits crypto keyring configuration mode and returns to privileged EXEC mode.


Configuring ISAKMP Aggressive Mode

You likely do not need to configure aggressive mode in a site-to-site scenario. The default mode is typically used.

SUMMARY STEPS

1.    enable

2.    configure terminal

3.    crypto isakmp peer {address {ipv4-address | ipv6 ipv6-address ipv6-prefix-length} | hostname fqdn-hostname}

4.    set aggressive-mode client-endpoint {client-endpoint | ipv6 ipv6-address}

5.    end


DETAILED STEPS
 Command or ActionPurpose
Step 1
enable


Example:

Router> enable


Enables privileged EXEC mode.

  • Enter your password if prompted.
 
Step 2
configure terminal


Example:

Router# configure terminal


Enters global configuration mode.

 
Step 3
crypto isakmp peer {address {ipv4-address | ipv6 ipv6-address ipv6-prefix-length} | hostname fqdn-hostname}


Example:

Router(config)# crypto isakmp peer address ipv6 3FFE:2002::A8BB:CCFF:FE01:2C02/128


Enables an IPsec peer for IKE querying for tunnel attributes.

 
Step 4
set aggressive-mode client-endpoint {client-endpoint | ipv6 ipv6-address}


Example:

Router(config-isakmp-peer)# set aggressive mode client-endpoint ipv6 3FFE:2002::A8BB:CCFF:FE01:2C02/128


Defines the remote peer's IPv6 address, which will be used by aggressive mode negotiation. The remote peer's address is usually the client side's end-point address.

 
Step 5
end


Example:

Router(config-isakmp-peer)# end


Exits crypto ISAKMP peer configuration mode and returns to privileged EXEC mode.


Configuring an IPsec Transform Set and IPsec Profile

A transform set is a combination of security protocols and algorithms that is acceptable to the IPsec routers.

SUMMARY STEPS

1.    enable

2.    configure terminal

3.    crypto ipsec transform-set transform-set-name transform1 [transform2] [transform3] [transform4]

4.    crypto ipsec profile name

5.    set transform-set transform-set-name [transform-set-name2...transform-set-name6]

6.    end


DETAILED STEPS
 Command or ActionPurpose
Step 1
enable


Example:

Router> enable


Enables privileged EXEC mode.

  • Enter your password if prompted.
 
Step 2
configure terminal


Example:

Router# configure terminal


Enters global configuration mode.

 
Step 3
crypto ipsec transform-set transform-set-name transform1 [transform2] [transform3] [transform4]


Example:

Router(config)# crypto ipsec transform-set myset0 ah-sha-hmac esp-3des


Defines a transform set, and places the router in crypto transform configuration mode.

 
Step 4
crypto ipsec profile name


Example:

Router(config)# crypto ipsec profile profile0


Defines the IPsec parameters that are to be used for IPsec encryption between two IPsec routers.

 
Step 5
set transform-set transform-set-name [transform-set-name2...transform-set-name6]


Example:

Router (config-crypto-transform)# set-transform-set myset0


Specifies which transform sets can be used with the crypto map entry.

 
Step 6
end


Example:

Router (config-crypto-transform)# end


Exits crypto transform configuration mode and returns to privileged EXEC mode.


Defining an ISAKMP Profile in IPv6

SUMMARY STEPS

1.    enable

2.    configure terminal

3.    crypto isakmp profile profile-name [accounting aaalist

4.    self-identity {address | address ipv6] | fqdn | user-fqdn user-fqdn}

5.    match identity {group group-name | address {address [mask] [fvrf] | ipv6 ipv6-address} | host host-name | host domain domain-name | user user-fqdn | user domain domain-name}

6.    end


DETAILED STEPS
 Command or ActionPurpose
Step 1
enable


Example:

Router> enable


Enables privileged EXEC mode.

  • Enter your password if prompted.
 
Step 2
configure terminal


Example:

Router# configure terminal


Enters global configuration mode.

 
Step 3
crypto isakmp profile profile-name [accounting aaalist


Example:

Router(config)# crypto isakmp profile profile1


Defines an ISAKMP profile and audits IPsec user sessions.

 
Step 4
self-identity {address | address ipv6] | fqdn | user-fqdn user-fqdn}


Example:

Router(config-isakmp-profile)# self-identity address ipv6


Defines the identity that the local IKE uses to identify itself to the remote peer.

 
Step 5
match identity {group group-name | address {address [mask] [fvrf] | ipv6 ipv6-address} | host host-name | host domain domain-name | user user-fqdn | user domain domain-name}


Example:

Router(config-isakmp-profile)# match identity address ipv6 3FFE:2002::A8BB:CCFF:FE01:2C02/128


Matches an identity from a remote peer in an ISAKMP profile.

 
Step 6
end


Example:

Router(config-isakmp-profile)# end


Exits ISAKMP profile configuration mode and returns to privileged EXEC mode.


Configuring IPv6 IPsec VTI

Before You Begin

Use the ipv6 unicast-routing command to enable IPv6 unicast routing.


SUMMARY STEPS

1.    enable

2.    configure terminal

3.    ipv6 unicast-routing

4.    interface tunnel tunnel-number

5.    ipv6 address ipv6-address/prefix

6.    ipv6 enable

7.    tunnel source {ip-address | ipv6-address | interface-type interface-number}

8.    tunnel destination {host-name | ip-address | ipv6-address}

9.    tunnel mode {aurp | cayman | dvmrp | eon | gre | gre multipoint | gre ipv6 | ipip [decapsulate-any] | ipsec ipv4 | iptalk | ipv6 | ipsec ipv6 | mpls | nos | rbscp}

10.    tunnel protection ipsec profile name [shared]

11.    end


DETAILED STEPS
 Command or ActionPurpose
Step 1
enable


Example:

Router> enable


Enables privileged EXEC mode.

  • Enter your password if prompted.
 
Step 2
configure terminal


Example:

Router# configure terminal


Enters global configuration mode.

 
Step 3
ipv6 unicast-routing


Example:

Router(config)# ipv6 unicast-routing


Enables IPv6 unicast routing. You only need to enable IPv6 unicast routing once, not matter how many interface tunnels you want to configure.

 
Step 4
interface tunnel tunnel-number


Example:

Router(config)# interface tunnel 0


Specifies a tunnel interface and number, and enters interface configuration mode.

 
Step 5
ipv6 address ipv6-address/prefix


Example:

Router(config-if)# ipv6 address 3FFE:C000:0:7::/64 eui-64


Provides an IPv6 address to this tunnel interface, so that IPv6 traffic can be routed to this tunnel.

 
Step 6
ipv6 enable


Example:

Router(config-if)# ipv6 enable


Enables IPv6 on this tunnel interface.

 
Step 7
tunnel source {ip-address | ipv6-address | interface-type interface-number}


Example:

Router(config-if)# tunnel source ethernet0


Sets the source address for a tunnel interface.

 
Step 8
tunnel destination {host-name | ip-address | ipv6-address}


Example:

Router(config-if)# tunnel destination 2001:DB8:1111:2222::1


Specifies the destination for a tunnel interface.

 
Step 9
tunnel mode {aurp | cayman | dvmrp | eon | gre | gre multipoint | gre ipv6 | ipip [decapsulate-any] | ipsec ipv4 | iptalk | ipv6 | ipsec ipv6 | mpls | nos | rbscp}


Example:

Router(config-if)# tunnel mode ipsec ipv6


Sets the encapsulation mode for the tunnel interface. For IPsec, only the ipsec ipv6 keywords are supported.

 
Step 10
tunnel protection ipsec profile name [shared]


Example:

Router(config-if)# tunnel protection ipsec profile profile1


Associates a tunnel interface with an IPsec profile. IPv6 does not support the shared keyword.

 
Step 11
end


Example:

Router(config-if)# end


Exits interface configuration mode and returns to privileged EXEC mode.


Verifying IPsec Tunnel Mode Configuration

SUMMARY STEPS

1.    show adjacency [summary [interface-type interface-number]] | [prefix] [interface interface-number] [connectionid id] [link {ipv4| ipv6 | mpls}] [detail]

2.    show crypto engine {accelerator | brief | configuration | connections [active | dh | dropped-packet | show] | qos}

3.    show crypto ipsec sa [ipv6] [interface-type interface-number] [detailed]

4.    show crypto isakmp peer [config | detail]

5.    show crypto isakmp policy

6.    show crypto isakmp profile [tag profilename | vrf vrfname]

7.    show crypto map [interface interface | tag map-name]

8.    show crypto session [detail] | [local ip-address [port local-port] | [remote ip-address [port remote-port]] | detail] | fvfr vrf-name | ivrf vrf-name]

9.    show crypto socket

10.    show ipv6 access-list [access-list-name]

11.    show ipv6 cef [ipv6-prefix / prefix-length] | [interface-type interface-number] [longer-prefixes | similar-prefixes | detail | internal | platform | epoch | source]]

12.    show interface type number stats


DETAILED STEPS
 Command or ActionPurpose
Step 1
show adjacency [summary [interface-type interface-number]] | [prefix] [interface interface-number] [connectionid id] [link {ipv4| ipv6 | mpls}] [detail]


Example:

Router# show adjacency detail


Displays information about the Cisco Express Forwarding adjacency table or the hardware Layer 3-switching adjacency table.

 
Step 2
show crypto engine {accelerator | brief | configuration | connections [active | dh | dropped-packet | show] | qos}


Example:

Router# show crypto engine connection active


Displays a summary of the configuration information for the crypto engines.

 
Step 3
show crypto ipsec sa [ipv6] [interface-type interface-number] [detailed]


Example:

Router# show crypto ipsec sa ipv6


Displays the settings used by current SAs in IPv6.

 
Step 4
show crypto isakmp peer [config | detail]


Example:

Router# show crypto isakmp peer detail


Displays peer descriptions.

 
Step 5
show crypto isakmp policy


Example:

Router# show crypto isakmp policy


Displays the parameters for each IKE policy.

 
Step 6
show crypto isakmp profile [tag profilename | vrf vrfname]


Example:

Router# show crypto isakmp profile


Lists all the ISAKMP profiles that are defined on a router.

 
Step 7
show crypto map [interface interface | tag map-name]


Example:

Router# show crypto map


Displays the crypto map configuration.

The crypto maps shown in this command output are dynamically generated. The user does not have to configure crypto maps.

 
Step 8
show crypto session [detail] | [local ip-address [port local-port] | [remote ip-address [port remote-port]] | detail] | fvfr vrf-name | ivrf vrf-name]


Example:

Router# show crypto session


Displays status information for active crypto sessions.

IPv6 does not support the fvfr or ivrf keywords or the vrf-name argument.

 
Step 9
show crypto socket


Example:

Router# show crypto socket


Lists crypto sockets.

 
Step 10
show ipv6 access-list [access-list-name]


Example:

Router# show ipv6 access-list


Displays the contents of all current IPv6 access lists.

 
Step 11
show ipv6 cef [ipv6-prefix / prefix-length] | [interface-type interface-number] [longer-prefixes | similar-prefixes | detail | internal | platform | epoch | source]]


Example:

Router# show ipv6 cef


Displays entries in the IPv6 Forwarding Information Base (FIB).

 
Step 12
show interface type number stats


Example:

Router# show interface fddi 3/0/0 stats


Displays numbers of packets that were process switched, fast switched, and distributed switched.


Troubleshooting IPsec for IPv6 Configuration and Operation

SUMMARY STEPS

1.    enable

2.    debug crypto ipsec

3.    debug crypto engine packet [detail]


DETAILED STEPS
 Command or ActionPurpose
Step 1
enable


Example:

Router# enable


Enables privileged EXEC mode.

  • Enter your password if prompted.
 
Step 2
debug crypto ipsec


Example:

Router# debug crypto ipsec


Displays IPsec network events.

 
Step 3
debug crypto engine packet [detail]


Example:

Router# debug crypto engine packet


Displays the contents of IPv6 packets.

Caution   

Using this command could flood the system and increase CPU usage if several packets are being encrypted.


Configuration Examples for IPsec IPv6 Phase 2 Support

Example: Configuring ISAKMP Aggressive Mode

Router# show crypto isakmp peer detail

Peer: 2001:DB8:0:1::1 Port: 500 Local: 2001:DB8:0:2::1
Phase1 id: 2001:DB8:0:1::1
flags: 
NAS Port: 0 (Normal)
IKE SAs: 1 IPsec SA bundles: 1
last_locker: 0x141A188, last_last_locker: 0x0
last_unlocker: 0x0, last_last_unlocker: 0x0

Example: Configuring an ISAKMP Profile in IPv6

The following sample output shows the ISAKMP profiles that are defined on an IPv6 router.

Router# show crypto isakmp profile

ISAKMP PROFILE tom
Identities matched are:
ipv6-address 2001:DB8:0:1::1/32 
Certificate maps matched are:
Identity presented is: ipv6-address fqdn
keyring(s): <none>
trustpoint(s): <all>

Example: Configuring a VTI for Site-to-Site IPv6 IPsec Protection

crypto isakmp policy 1
  authentication pre-share
!
crypto isakmp key myPreshareKey0 address ipv6 3FFE:2002::A8BB:CCFF:FE01:2C02/128
crypto isakmp keepalive 30 30
!
crypto ipsec transform-set 3des ah-sha-hmac esp-3des 
!
crypto ipsec profile profile0
  set transform-set 3des 
!
ipv6 cef
!
interface Tunnel0
  ipv6 address 3FFE:1001::/64 eui-64
  ipv6 enable
  ipv6 cef
  tunnel source Ethernet2/0
  tunnel destination 3FFE:2002::A8BB:CCFF:FE01:2C02
  tunnel mode ipsec ipv6
  tunnel protection ipsec profile profile0

Additional References

Standards and RFCs

Standard/RFC Title

RFCs for IPv6

IPv6 RFCs

Technical Assistance

Description Link

The Cisco Support and Documentation website provides online resources to download documentation, software, and tools. Use these resources to install and configure the software and to troubleshoot and resolve technical issues with Cisco products and technologies. Access to most tools on the Cisco Support and Documentation website requires a Cisco.com user ID and password.

http://www.cisco.com/cisco/web/support/index.html

Feature Information for IPsec IPv6 Phase 2 Support

The following table provides release information about the feature or features described in this module. This table lists only the software release that introduced support for a given feature in a given software release train. Unless noted otherwise, subsequent releases of that software release train also support that feature.

Use Cisco Feature Navigator to find information about platform support and Cisco software image support. To access Cisco Feature Navigator, go to www.cisco.com/go/cfn. An account on Cisco.com is not required.

Table 1Feature Information for IPsec IPv6 Phase 2 Support
Feature Name Releases Feature Information

IPsec IPv6 Phase 2 Support

12.4(4)T

Features in this phase support tunnel mode for site-to-site IPsec protection of IPv6 traffic. This feature allows the use of IPv6 IPsec encapsulation to protect IPv6 unicast and multicast traffic.

The following commands were introduced or modified: authentication (IKE policy), crypto ipsec profile, crypto isakmp key, crypto isakmp peer, crypto isakmp policy, crypto isakmp profile, crypto keyring, debug crypto ipv6 ipsec, encryption (IKE policy), group (IKE policy), hash (IKE policy), lifetime (IKE policy), match identity, pre-shared-key, self-identity, set aggressive-mode client-endpoint, set transform-set, show adjacency, show crypto engine, show crypto ipsec sa, show crypto isakmp peers, show crypto isakmp policy, show crypto isakmp profile, show crypto map, show crypto session, show crypto socket, show ipv6 access-list, show ipv6 cef, tunnel destination, tunnel mode, tunnel source.

Cisco and the Cisco logo are trademarks or registered trademarks of Cisco and/or its affiliates in the U.S. and other countries. To view a list of Cisco trademarks, go to this URL: www.cisco.com/go/trademarks. Third-party trademarks mentioned are the property of their respective owners. The use of the word partner does not imply a partnership relationship between Cisco and any other company. (1110R)

Any Internet Protocol (IP) addresses and phone numbers used in this document are not intended to be actual addresses and phone numbers. Any examples, command display output, network topology diagrams, and other figures included in the document are shown for illustrative purposes only. Any use of actual IP addresses or phone numbers in illustrative content is unintentional and coincidental.

© 2012 Cisco Systems, Inc. All rights reserved.