Feedback
Table Of Contents
Performing the Upgrade from a CD
Performing the Upgrade from a Downloaded File
Transferring the Upgrade File to the Server
Performing the Upgrade at the Server
Performing the Upgrade from a Remote Location
Upgrading Cisco IPICS
When Cisco releases a new version of Cisco IPICS, you receive the upgrade in one of two ways:
•
Downloading an installer by following the link that Cisco provides you when an upgrade becomes available. You would then use a Secure File Transfer Protocol (SFTP) utility program to transfer the file to the Cisco IPICS server. This section includes a procedure that describes how to use the SSH Tectia File Transfer Client to accomplish this task.
•
The Cisco IPICS upgrade procedure installs new application software files, but preserves your database and log files. Cisco recommends that you back up your files before you begin the upgrade procedure. For information on backing up files, refer to the Cisco IPICS Backup and Restore Guide.
This chapter provides information about the procedures that you need to follow to upgrade Cisco IPICS after you have initially installed the system. This chapter includes the following sections:
•
•
Performing the Upgrade from a CD
When Cisco provides an upgrade to Cisco IPICS, you may receive a CD so that you can perform the upgrade in a similar manner to the way that you performed the original Cisco IPICS installation.
Note
To upgrade Cisco IPICS from a CD, perform the following procedure:
Procedure
Step 1
Cisco Linux displays a window with a password field.
Step 2
The Cisco Linux desktop displays.
Step 3
Step 4
If you did not install CSA, or if CSA is not running on the Cisco IPICS server, continue to Step 6.
If you installed CSA, a window displays a message about the removable media you placed in the disk drive and allows you to continue or terminate the mounting of the CD.
Step 5
Note
The Cisco IPICS CD icon displays on the desktop. See Figure 3-1 for an example.
Figure 3-1 Cisco IPICS CD Icon
Step 6
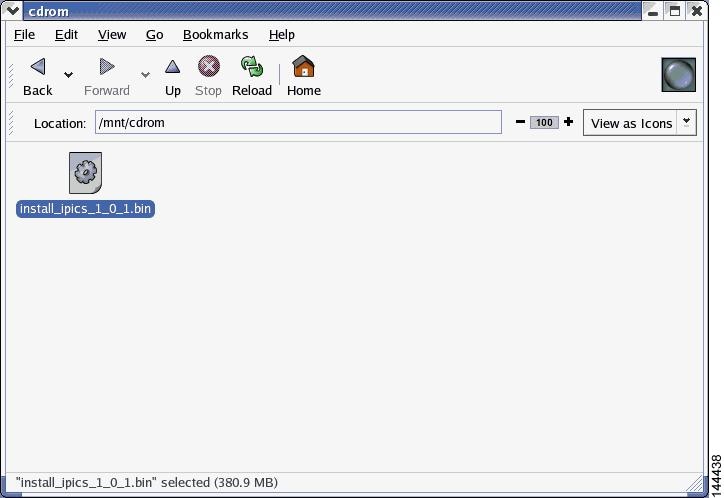
Cisco Linux displays a window that shows the Cisco IPICS installer file. See Figure 3-2 for an example.
Note
Figure 3-2 Installer File on the Cisco IPICS CD
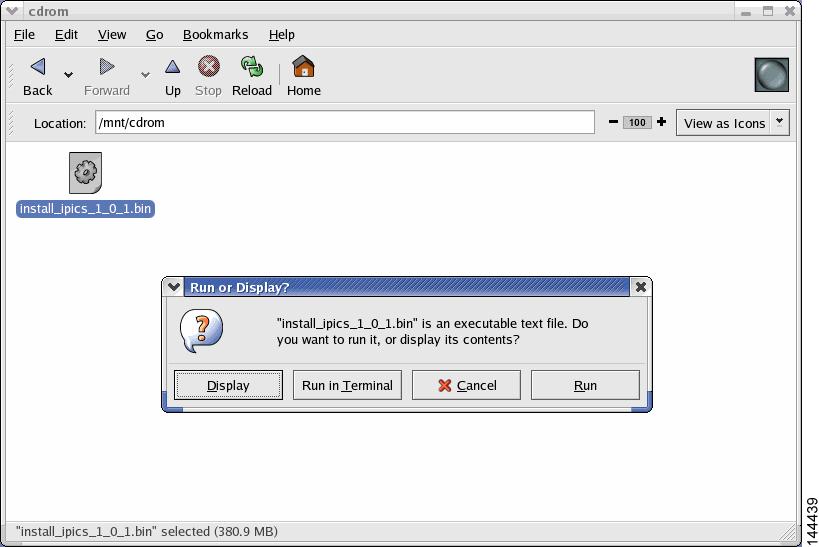
Step 7
Cisco Linux displays a message window that offers options to display or run the installer file. See Figure 3-3 for an example.
Figure 3-3 Run or Display Message Window
Step 8
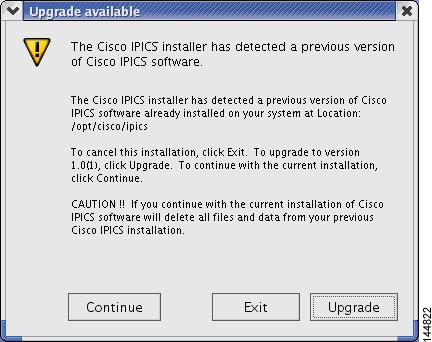
Note
A message window displays and indicates that the installer has detected a previous version of Cisco IPICS exists on your server. See Figure 3-4 for an example of the window. You can choose from the following options:
•
•
•
Figure 3-4 Upgrade Available Message
Step 9
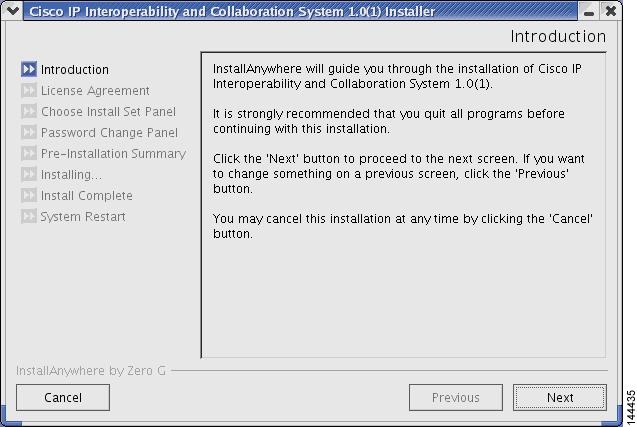
The Cisco IPICS installer window displays with an introduction to the process. See Figure 3-5 for an example of the window.
Figure 3-5 Introduction in the Installer Window
Step 10
The Cisco IPICS installer displays the End User License Agreement.
Step 11
Note
The Choose Install Set window displays with the following installation options:
•
•
•
Step 12
The Cisco IPICS installer displays the Preinstallation Summary. See Figure 3-6 for an example.
The Preinstallation Summary displays the following information:
•
•
•
–
–
Figure 3-6 Preinstallation Summery
Step 13
The installer prompts you to enter a new password for the informix user.
Step 14
The installer prompts you to re-enter the informix password.
Step 15
Caution
The Installation Progress window displays, showing the files and folders being written to the disk.
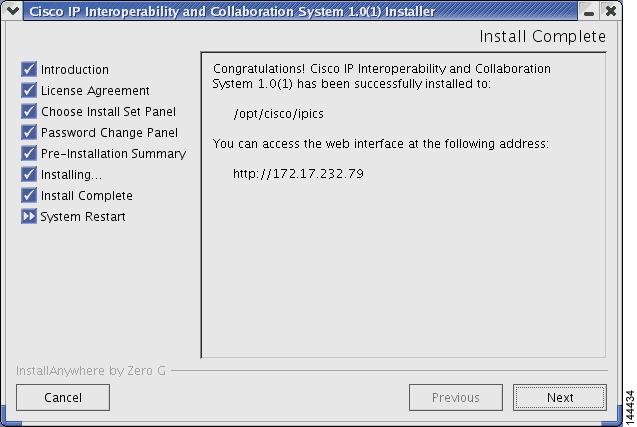
When the upgrade completes, the Cisco IPICS Install Complete window displays. See Figure 3-7 for an example.
Figure 3-7 Install Complete Window
Step 16
The installer closes this window and returns you to the Cisco Linux desktop.
Performing the Upgrade from a Downloaded File
If Cisco makes an upgrade file available on a Cisco website, you must download the upgrade file to your PC and then transfer it to the Cisco IPICS server.
After you place the upgrade file on the server, you can choose to use the graphical installer utility to perform the upgrade or you can perform the upgrade remotely, using the console option.
This section includes the following topics:
•
•
•
Transferring the Upgrade File to the Server
When you transfer the upgrade file to the Cisco IPICS server, you place the file in the root directory, where you can access it from the server or from a remote location on the network.
To download the file from a website and transfer it to the server, perform the following procedure:
Procedure
Step 1
Step 2
Step 3
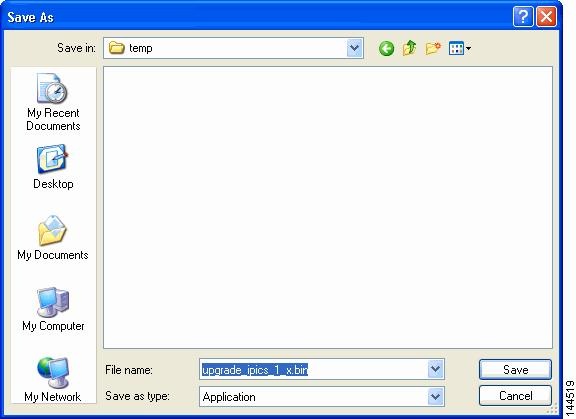
A Save As window displays, that shows files and folders on your computer.
Step 4
Figure 3-8 Saving the Upgrade File to Your Computer
Step 5
The file downloads to the directory that you specified.
Step 6
SSH Tectia Client > SSH Tectia Client - File Transfer.The SSH Tectia File Transfer window displays. The desktop of your PC displays in the left pane.
Step 7
The Connect to Remote Host window displays.
Step 8
Step 9
The Enter Password window displays.
Step 10
The SSH Tectia File Transfer Client connects to the Cisco IPICS server and displays the contents of the root directory in the right pane of the window.
Step 11
Step 12
A progress window displays while the file copies to the server. When the copy completes, the upgrade file displays in the right pane.
Step 13
Performing the Upgrade at the Server
When you perform the upgrade directly from the server, you use a Cisco Linux terminal window. The procedure in this section assumes that you have transferred the upgrade file to the root directory of the Cisco IPICS server. If you have not already performed this step, see the "Transferring the Upgrade File to the Server" section.
Note
To perform the upgrade at the Cisco IPICS server, perform the following procedure:
Procedure
Step 1
The Cisco Linux desktop displays.
Step 2
A terminal window displays.
Step 3
[root] #ls -al
The contents of the root directory display in the window.
Step 4
[root] #./<name of upgrade file>.bin
where name of upgrade file represents the name of the .bin file that you downloaded and transferred to the server.
A message window displays and indicates that the installer has detected a previous version of Cisco IPICS exists on your server. See Figure 3-9 for an example of the window. You can choose from the following options:
•
•
•
Figure 3-9 Upgrade Available Message
Step 5
The Cisco IPICS installer window displays with an introduction to the process. See Figure 3-10 for an example.
Figure 3-10 Introduction in the Installer Window
Step 6
The Cisco IPICS installer displays the End User License Agreement.
Step 7
Note
The Choose Install Set window displays with the following installation options:
•
•
•
Step 8
The Cisco IPICS installer displays the Preinstallation Summary. See Figure 3-6 for an example.
The Preinstallation Summary displays the following information:
•
•
•
–
–
Figure 3-11 Preinstallation Summery
The installer prompts you to enter a new password for the informix user.
Step 9
The installer prompts you to re-enter the informix password.
Step 10
Caution
The Installation Progress window displays, showing the files and folders being written to the disk. When the upgrade completes, the Cisco IPICS Install Complete window displays. See Figure 3-7 for an example of the window.
Figure 3-12 Install Complete Window
Step 11
Performing the Upgrade from a Remote Location
Cisco IPICS allows you to perform an upgrade remotely, using the SSH Tectia Client on a PC. This upgrade process includes all of the steps that you would follow if you performed the procedure at the server. However, this procedure displays all of your instructions in text, rather than in the graphic format of the installer utility.
The procedure in this section assumes that you have transferred the upgrade file to the Cisco IPICS server. If you have not completed the download and transfer, see the "Transferring the Upgrade File to the Server" section
Note
To perform the upgrade from a network PC, perform the following procedure:
Procedure
Step 1
The SSH Tectia Client displays.
Step 2
The Connect to Remote Host window displays.
Step 3
Step 4
The Enter Password window displays.
Step 5
An SSH Tectia Client window displays.
Step 6
[root] #ls -l
The contents of the root directory display in the window.
Step 7
[root] #./<name of upgrade file>.bin -i console
where name of upgrade file represents the name of the .bin file you downloaded and transferred to the server.
The window displays a message that informs you that the installer is extracting. The extraction may take up to two minutes to complete.
A message displays and indicates that the installer has detected a previous version of Cisco IPICS exists on your server. You can choose from the following options:
•
•
•
Step 8
The first page of the End User License Agreement displays. There are approximately eight pages to the agreement.
Step 9
At the end of the final page of the End User License Agreement, a question displays that asks if you accept the terms of the license agreement.
Step 10
The Choose Install Set menu displays. You can choose from the following options:
•
•
•
Step 11
The Preinstallation Summary displays.
Step 12
The installer prompts you to enter a new password for the informix user.
Step 13
The installer prompts you to re-enter the informix password.
Step 14
Caution
The upgrade process install files. When the file installation completes, the screen displays a message that the upgrade is complete.
The installer quits and returns you to a SSH Tectia Client prompt.
Step 15