Feedback
Table Of Contents
Customizing the PMC Application
Customizing the PMC End-User Interface
Configuring the Express and Channels Settings
Using the Optional Settings Menu
Customizing the PMC Application
This chapter provides information about customizing the PMC application end-user interface.
This chapter includes the following sections:
•
Customizing the PMC End-User Interface
•
Customizing the PMC End-User Interface
The Cisco IPICS server manages the configuration for the PMC. However, as a PMC end-user, you may customize the PMC skin, reconfigure the Express and Channels settings, and set up the PMC logs.
For information about using the PMC logs, see "Identifying the PMC Logs" section.
This section describes how to change the PMC skin setting and certain caveats that you should be aware of when you configure the PMC skin. It also includes information about using the Express and Channels settings that appear in the Settings menu. This section describes the following topics:
•
Configuring the PMC Skins
With this release, Cisco IPICS supports a maximum of eight channels and four skins for the PMC. See the "Support for Maximum Number of Channels" section for more information about Cisco IPICS channel support.
The Cisco IPICS administrator creates and configures the skins that are available for the PMC, including the default skin configuration for each channel and the number of channels that the PMC retrieves from the Cisco IPICS server.
The ability to customize the PMC skin allows you to individualize your own PMC "look and feel." You may choose a different skin to create your own customized look by accessing the Settings > Skin menu in the PMC application. The PMC stores the skin locally on the PMC client machine.
For information about accessing the Settings menu, see the "Procedure" section.
Caution
Note
Note
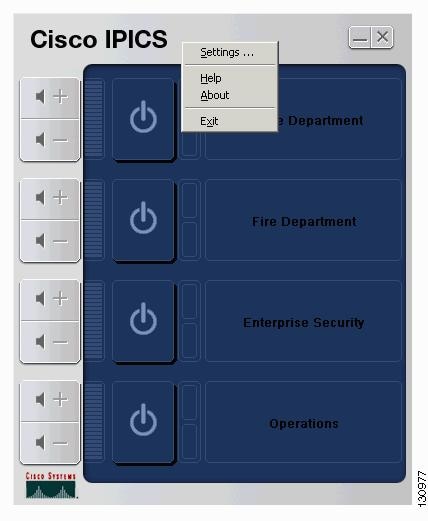
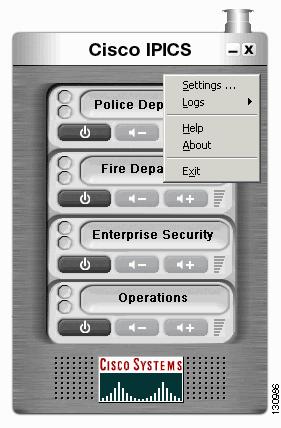
Figure 4-1 shows an illustration of the Cisco IPICS Touch 4-Channel skin with the Settings menu. The Settings menu displays on the PMC application when you position your cursor over the PMC window and then right-click anywhere inside the window.
Figure 4-1 PMC 4-Channel Touch Skin with Settings Menu
To access the skin configuration in the PMC Settings menu, follow this procedure:
Procedure
Step 1
Step 2
The Express, Skin, and Channels tabs appear in the PMC window.
Step 3
The Skin menu displays the available options for 4-channel and 8-channel mouse and touch screen formats.
Step 4
Step 5
The PMC skin changes to reflect the new setting.
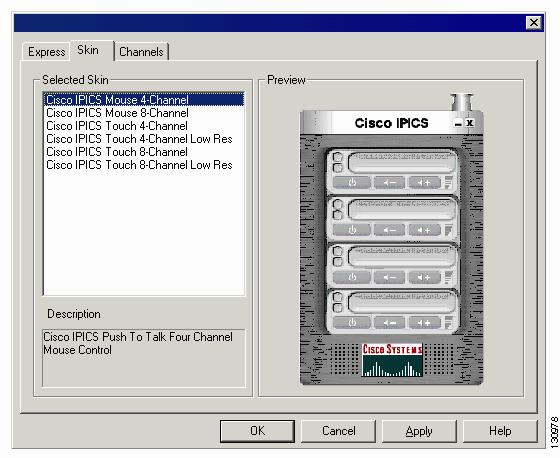
Figure 4-2 shows an illustration of an example of the PMC Skin menu with the Cisco IPICS Mouse 4-Channel skin shown in the display.
Figure 4-2 PMC Skin Menu
If you reconfigure your PMC skin and your association to channels and VTGs is greater than what has been specified, the Cisco IPICS dispatcher receives an error message that states that the maximum number of channels is already in use and some channels must be disassociated before adding a new channel.
For more information about skin mismatch conditions, see the "Skin Caveats" section.
Note
Skin Caveats
The configuration in the Cisco IPICS server defines the default skin for the PMC. This definition also determines the number of channels that the PMC retrieves from the Cisco IPICS server.
Note
When you have a mismatch condition and the server tries to download more channels than the PMC can display, the PMC processes only the channels that it can support and ignores the rest.
For example, if you configure the 4-channel skin on the PMC and the Cisco IPICS server tries to download eight channels based on the assignment by the dispatcher, the PMC processes the first four channels and ignores the other four channels.
If the PMC displays more than four channels and you attempt to change to the 4-channel skin, the PMC performs the following actions to warn you about the mismatch:
•
•
When you attempt to switch from an 8-channel skin to a 4-channel skin when five or more channels are assigned, a dialog box displays to inform you and ask if you want to switch to a skin that displays fewer channels.
•
•
If the server tries to assign more than the maximum number of supported channels, a pop-up message displays to inform you.
In addition, the PMC reports the number of channels that are visible in the skin to the Cisco IPICS server. Therefore, if the dispatcher attempts to assign additional channels for the PMC user when the 4-channel skin is configured, a warning message displays to notify the dispatcher that the PMC user can only view four channels.
To support urgent communications when skin mismatches occur, Cisco IPICS provides the following functionality:
•
•
See the "Implementing Policies" section for more information about policies.
Configuring the Express and Channels Settings
You can change the settings that appear under the Express and Channels tabs.
You can access the Express menu by navigating to Settings > Express in the PMC application.
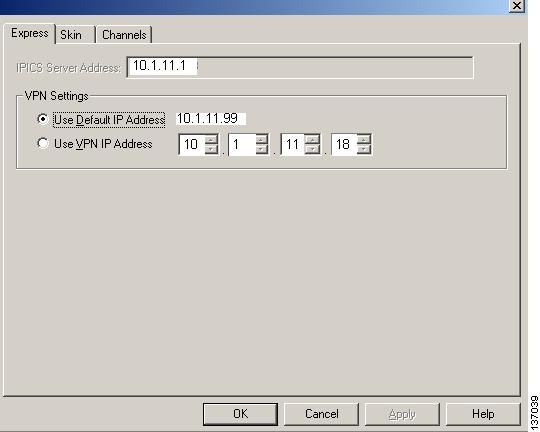
Figure 4-3 shows an illustration of the PMC Express menu.
Figure 4-3 PMC Express Menu
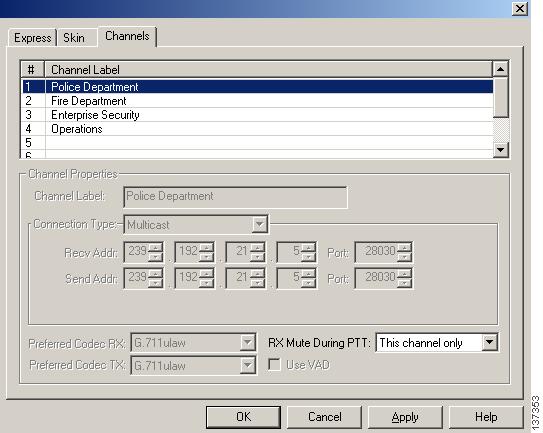
You can access the Channels menu by navigating to Settings > Channels in the PMC application.
Figure 4-4 shows an example of the fields that display in the PMC Channels menu.
Figure 4-4 PMC Channels Menu
To access the Express and Channels configuration menus in the PMC Settings menu, follow this procedure:
Procedure
Step 1
Step 2
The Express, Skin, and Channels tabs appear in the PMC window.
Step 3
The Express menu displays the following fields:
•
•
–
At startup, the PMC attempts to determine the best IP address to use for connection to the server; that is, the default IP address. Under most conditions, this default IP address requires no reconfiguration.
–
Contact your system administrator if you are not sure about whether you need to choose the Use VPN Address option for your connection.
Step 4
Step 5
The Channels menu displays the channel number and the associated channel name, along with the following channel properties:
•
•
–
Local Chan ID—This fields specifies a unique channel identifier for the type of channel that you are using for your connection. For example, the Local Chan ID for a channel displays as "chan<uid>" where uid represents the unique identifier for that channel; for a VTG, the Local Chan ID displays as "vtg<uid>" where the uid is the unique identifier for that VTG.
Dialed Number—This number specifies the number that your PMC dials to connect on the corresponding channel.
SIP Proxy—This IP address specifies the preconfigured address and port of the SIP proxy that Cisco IPICS uses for this connection.
–
Recv Addr—This IP address specifies the multicast address and port that has been configured for your PMC to receive traffic.
Send Addr—This IP address specifies the multicast address and port that has been configured for your PMC to send traffic.
•
–
–
•
–
–
–
•
Note
Step 6
Using the Optional Settings Menu
The optional settings menu provides access to additional submenus, such as the PMC log files. This section describes how to access and use the optional settings submenus.
Caution
To access the PMC optional settings, follow this procedure:
Procedure
Step 1
Step 2
The following submenu items display:
•
•
From here, you can manually turn on and turn off logging, as well as set the debug log levels.
Note
See "Identifying the PMC Logs" section for more information about using the PMC log files.
•
•
•
Step 3
Note
Figure 4-5 shows an illustration of the PMC optional settings submenus as they appear on the PMC window.
Figure 4-5 PMC Optional Settings Submenus
Related Topics
Where to Find More Information
•