簡介
本文說明如何將網狀存取點(AP)連線至Catalyst 9800無線LAN控制器(WLC)的基本組態範例。
必要條件
需求
思科建議您瞭解以下主題:
- Catalyst無線9800組態型號
- LAP的配置
- 無線存取點的控制和調配(CAPWAP)
- 配置外部DHCP伺服器
- Cisco交換機的配置
採用元件
此範例使用輕量存取點(1572AP和1542),其可設定為根AP (RAP)或網狀AP (MAP)以加入Catalyst 9800 WLC。1542或1562存取點的程式完全相同。RAP透過Cisco Catalyst交換機連線到Catalyst 9800 WLC。
本文中的資訊係根據以下軟體和硬體版本:
- C9800-CL v16.12.1
- 思科第2層交換器
- 適用於網橋的思科Aironet 1572系列輕量戶外存取點部分
- 適用於Flex+Bridge部分的Cisco Aironet 1542
本文中的資訊是根據特定實驗室環境內的裝置所建立。文中使用到的所有裝置皆從已清除(預設)的組態來啟動。如果您的網路運作中,請確保您瞭解任何指令可能造成的影響。
設定
案例分析1:網橋模式
組態
網狀網AP需要經過身份驗證才能加入9800控制器。本案例研究認為,您首先將本地模式下的AP加入WLC,然後將其轉換為網橋(a.k.a)網狀模式。 要避免分配AP加入配置檔案,請使用此示例,但配置預設aaa authorization credential-download方法,以允許任何網格AP加入控制器。
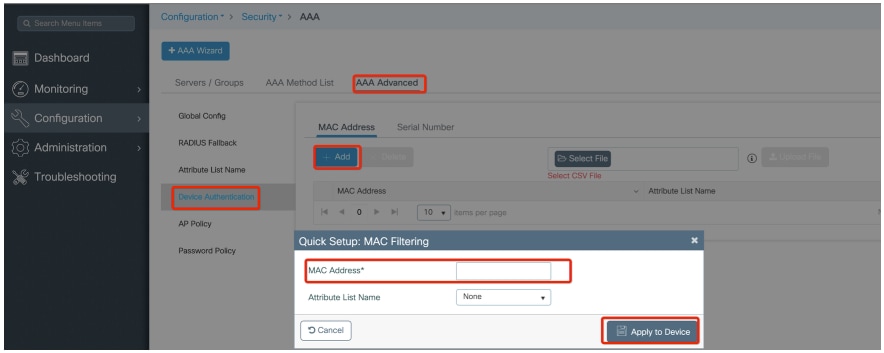
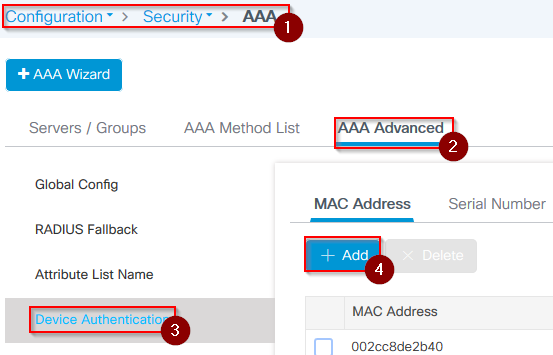
第1步:在裝置身份驗證下配置RAP/MAP MAC地址。
導航到Configuration > AAA > AAA Advanced > Device Authentication。

增加網狀無線存取點的基本乙太網MAC地址。加入時不含任何特殊字元,不含'.'或':'
注意:從17.3.1版本開始,如果增加了「。」、「:」或「-」等mac地址分隔符,AP將無法加入。目前已針對此漏洞開啟兩項增強功能:思科漏洞ID CSCvv43870和思科漏洞ID CSCvr07920。將來,9800將接受所有mac地址格式。
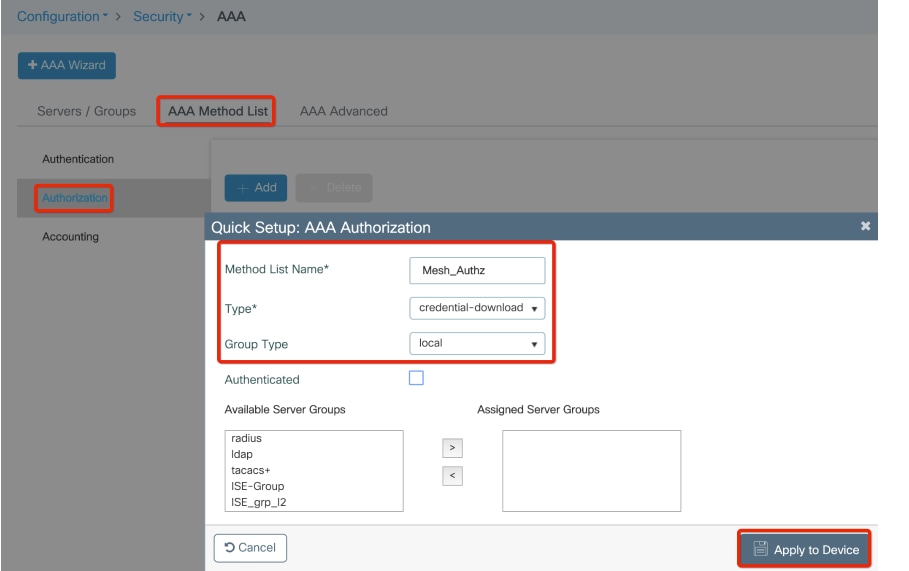
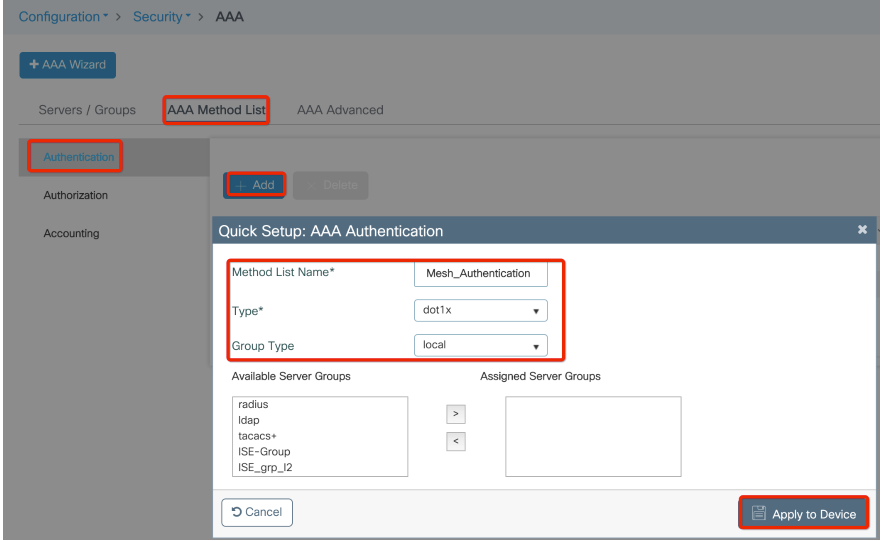
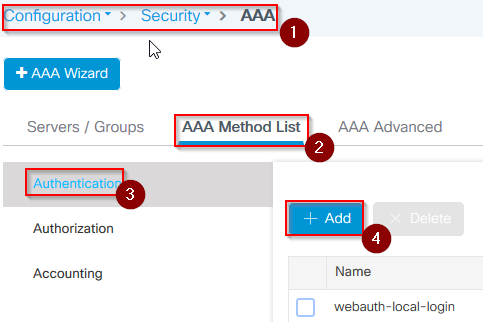
第2步:配置身份驗證和授權方法清單。
導航到Configuration > Security > AAA > AAA Method list > Authentication,然後建立身份驗證方法清單和授權方法清單。
步驟3:配置全局網格引數。
導航到配置>網格>全局引數。最初,您可以將這些值保留為預設值。
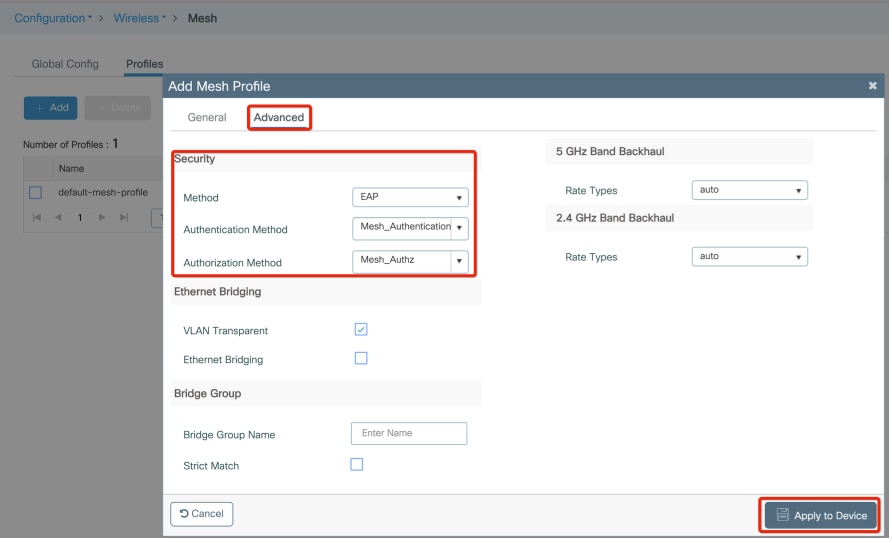
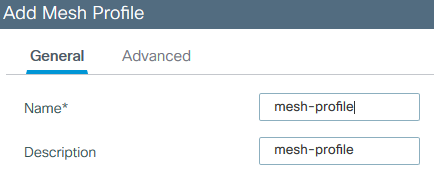
第4步:在配置>網格>配置檔案> +增加下建立新的網格配置檔案。
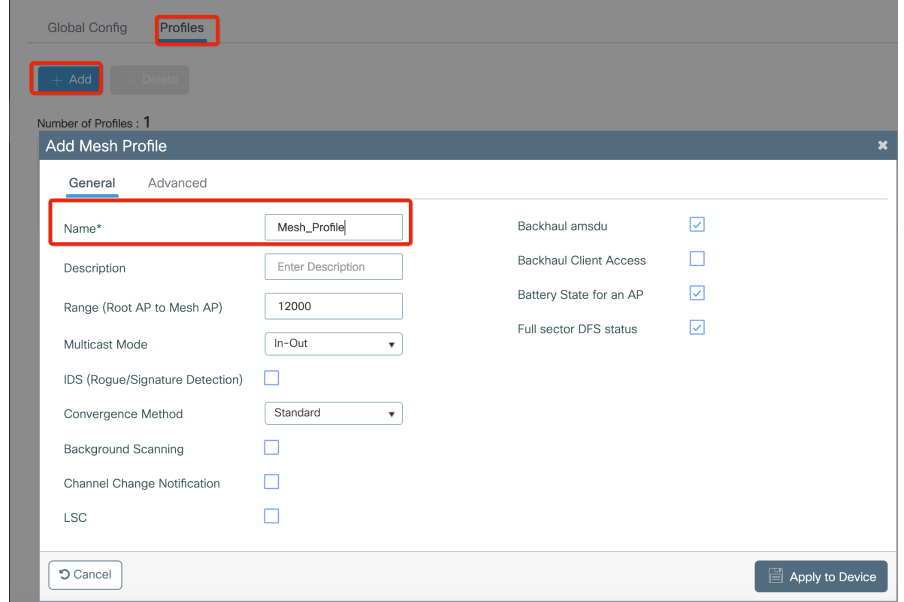
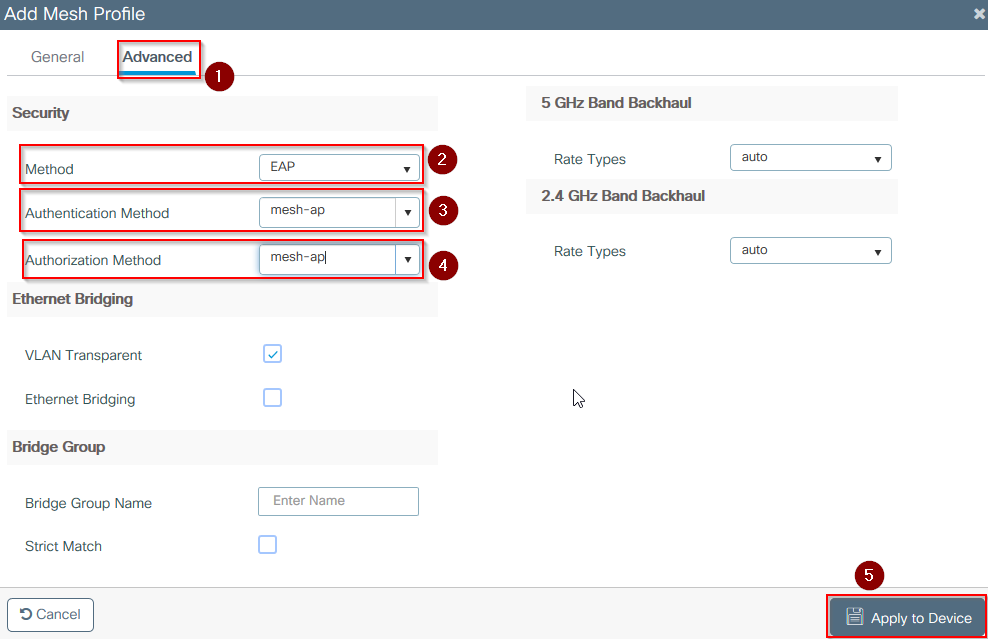
按一下已建立的網格輪廓以編輯網格輪廓的「一般」和「進階」設定。
如圖所示,您需要將之前建立的身份驗證和授權配置檔案對映到網狀配置檔案。
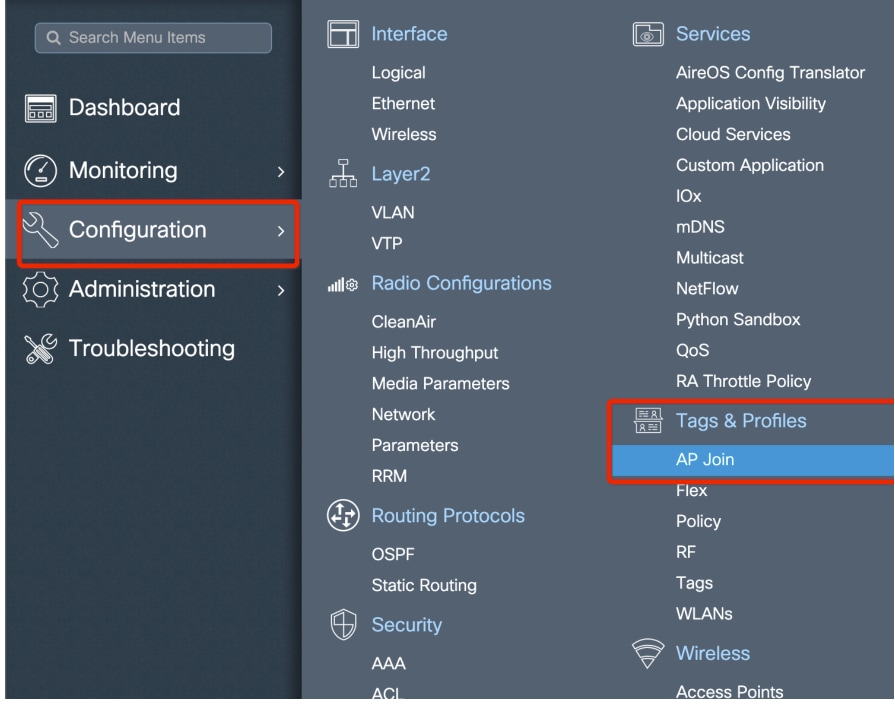
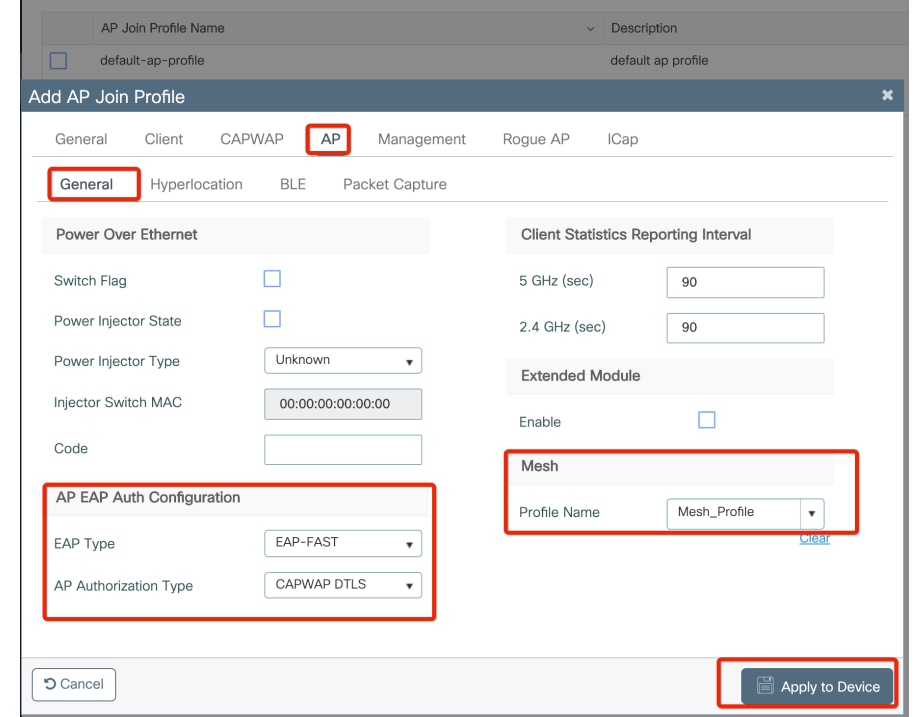
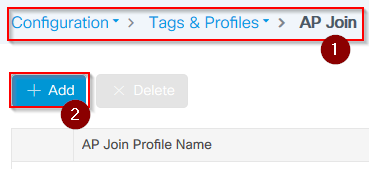
第5步:建立新的AP加入配置檔案。導航到Configure > Tags and Profiles: AP Join。
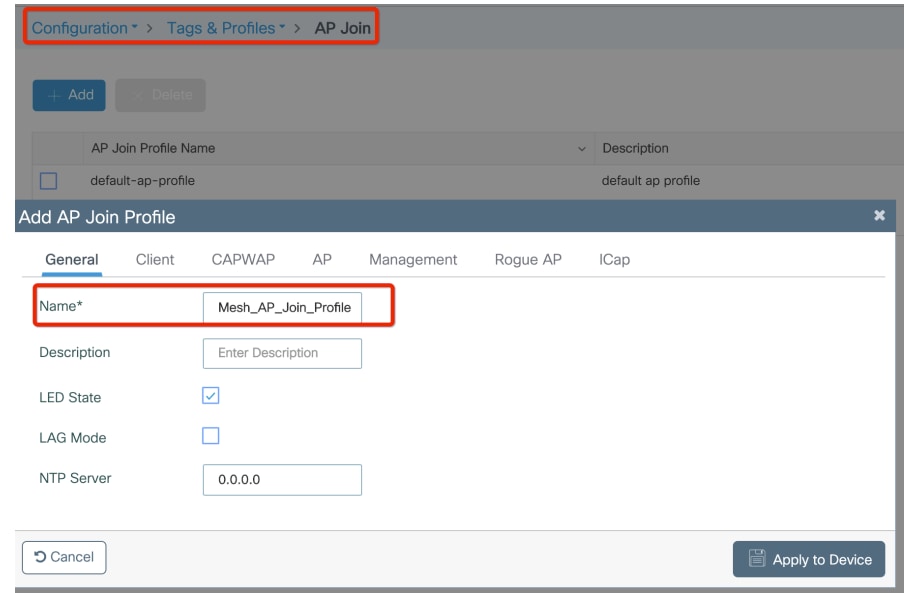
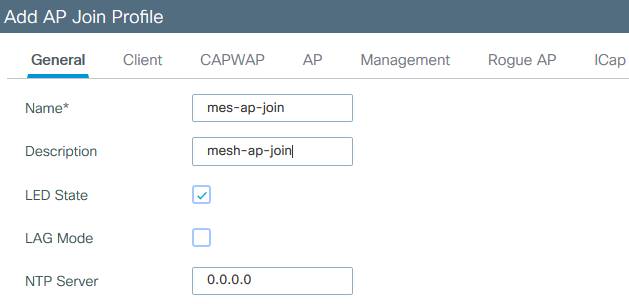
應用以前配置的網狀配置檔案並配置AP EAP身份驗證:
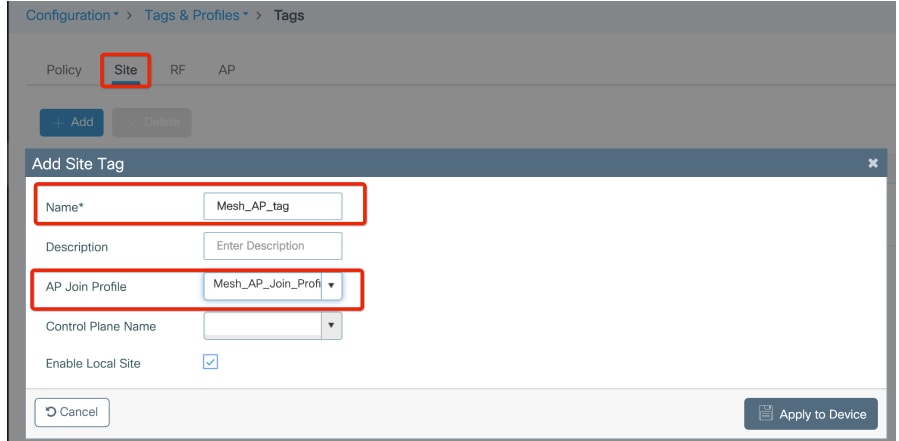
第6步:建立網格位置標籤,如下所示。
Configure按一下步驟6中建立的Mesh location TAG進行配置。
導航到站點頁籤,將之前配置的網狀AP加入配置檔案應用於該頁籤:
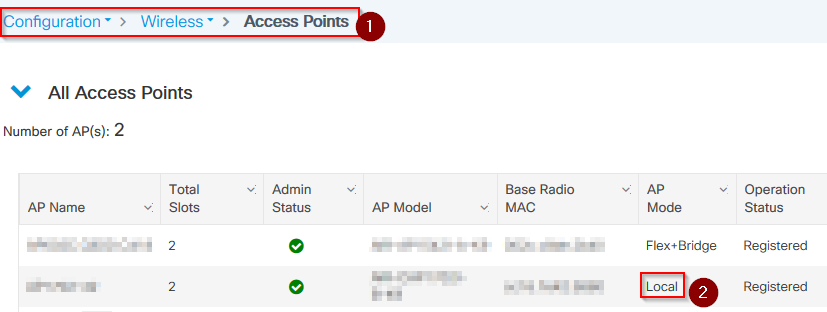
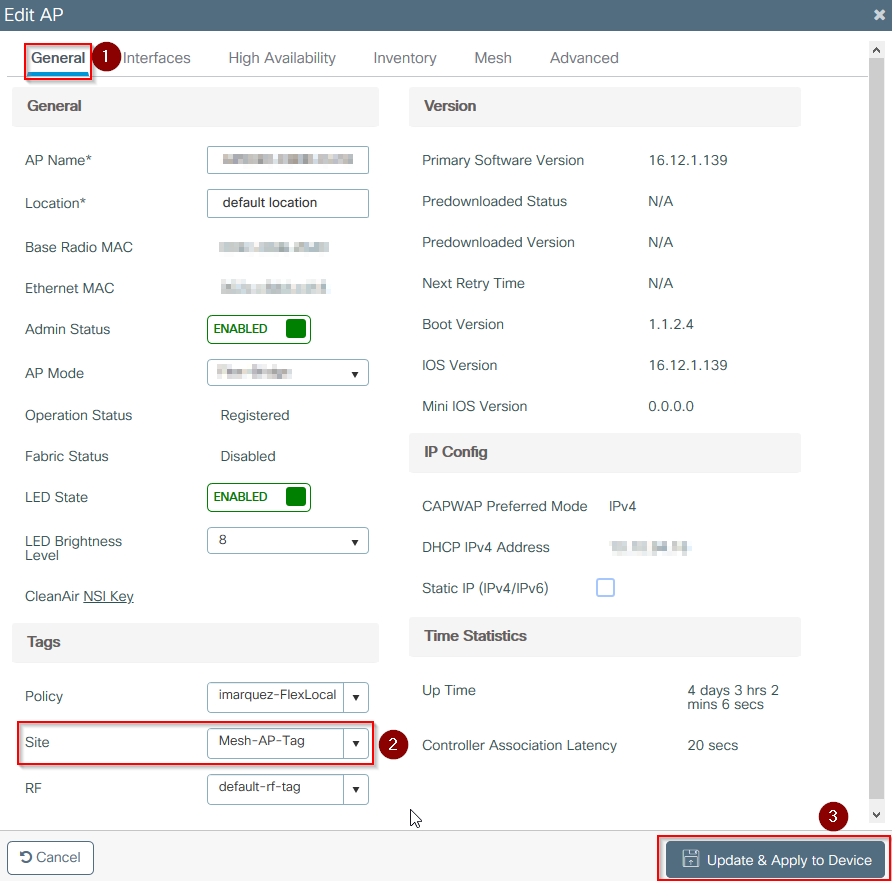
步驟 7.為AP分配站點標籤。導航到Configuration > Wireless > Access points,然後點選Mesh AP。指定網站標籤。
 指派網站標籤
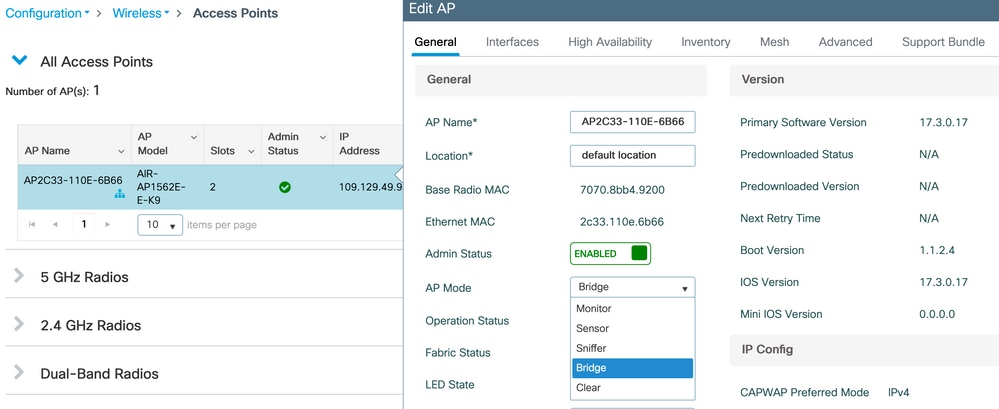
步驟 8.將AP轉換為網橋模式。
透過CLI,可以在AP上使用以下命令:
capwap ap mode bridge
AP重新啟動後作為網橋模式重新加入。
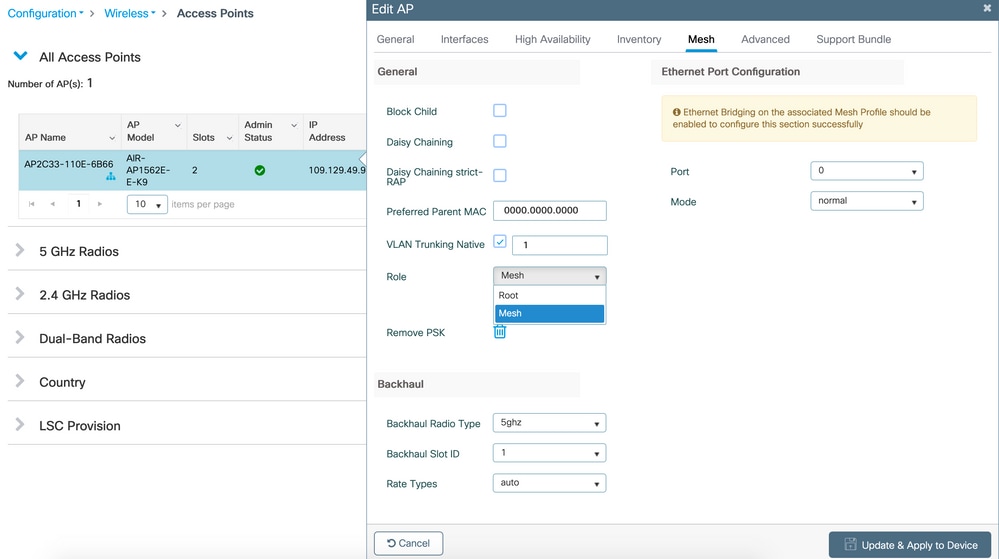
步驟 9.現在,您可以定義AP的角色:根AP或網格AP。
根AP是透過有線連線至WLC的AP,而網格AP透過其嘗試連線根AP的無線電加入WLC。 網狀無線存取點在無法通過其無線電找到根AP以進行調配時,可以透過其有線介面加入WLC。 如果中繼本徵vlan與預設VLAN 1不同,則不要忘記在AP設定中指定中繼本徵vlan。
 分配網狀角色
驗證
aaa new-model
aaa local authentication default authorization default
!
!
aaa authentication dot1x default local
aaa authentication dot1x Mesh_Authentication local
aaa authorization network default local
aaa authorization credential-download default local
aaa authorization credential-download Mesh_Authz local
username 111122223333 mac
wireless profile mesh Mesh_Profile
 method authentication Mesh_Authentication
 method authorization Mesh_Authz
wireless profile mesh default-mesh-profile
 description "default mesh profile"
wireless tag site Mesh_AP_Tag
 ap-profile Mesh_AP_Join_Profile
ap profile Mesh_AP_Join_Profile
 hyperlocation ble-beacon 0
 hyperlocation ble-beacon 1
 hyperlocation ble-beacon 2
 hyperlocation ble-beacon 3
 hyperlocation ble-beacon 4
 mesh-profile Mesh_Profile
疑難排解
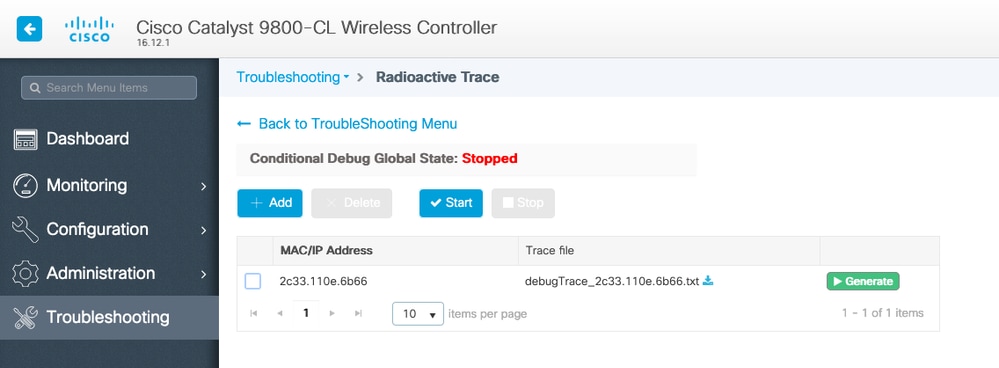
在故障排除 > Radiative Trace Web UI頁中,按一下add並輸入AP mac地址。

按一下Start,然後等待AP再次嘗試加入控制器。 完成後,按一下Generate並選擇一個時間段以收集日誌(例如過去10或30分鐘)。
按一下Trace file name,從瀏覽器中下載該檔案。
以下是由於定義了錯誤的aaa授權方法名稱而未加入的AP示例:
019/11/28 13:08:38.269 {wncd_x_R0-0}{1}: [capwapac-smgr-srvr] [23388]: (info): Session-IP: 192.168.88.48[5272] Mac: DTLS session has been established for AP
2019/11/28 13:08:38.288 {wncd_x_R0-0}{1}: [ewlc-infra-evq] [23388]: (info): DTLS record type: 23, application data
2019/11/28 13:08:38.288 {wncd_x_R0-0}{1}: [capwapac-smgr-sess] [23388]: (info): Session-IP: 192.168.88.48[5272] Mac: Capwap message received, type: join_request
2019/11/28 13:08:38.288 {wncd_x_R0-0}{1}: [capwapac-smgr-sess] [23388]: (info): Session-IP: 192.168.88.48[5272] Mac: Received CAPWAP join request
2019/11/28 13:08:38.288 {wncd_x_R0-0}{1}: [mesh-config] [23388]: (ERR): Failed to get ap PMK cache rec status
2019/11/28 13:08:38.288 {wncd_x_R0-0}{1}: [mesh-config] [23388]: (ERR): Failed to get ap PMK cache rec status
2019/11/28 13:08:38.288 {wncd_x_R0-0}{1}: [mesh-config] [23388]: (ERR): Failed to get ap PMK cache rec status
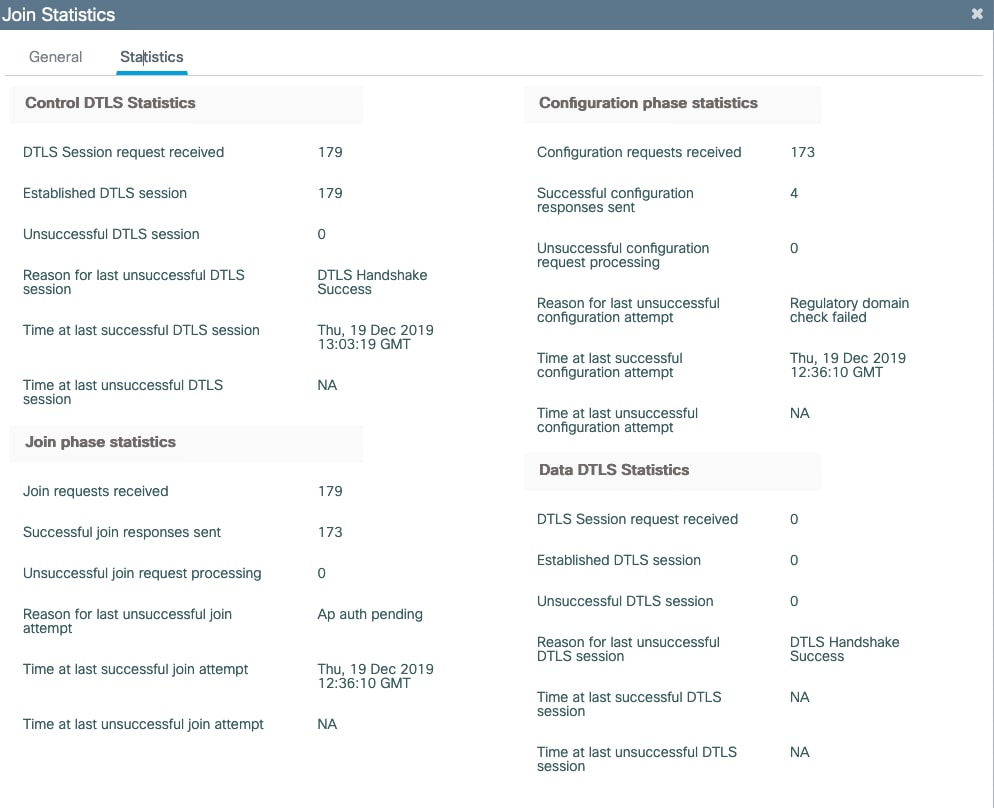
2019/11/28 13:08:38.288 {wncd_x_R0-0}{1}: [apmgr-capwap-join] [23388]: (info): 00a3.8e95.6c40 Ap auth pending
2019/11/28 13:08:38.288 {wncd_x_R0-0}{1}: [apmgr-capwap-join] [23388]: (ERR): Failed to initialize author request, Reason: Invalid argument
2019/11/28 13:08:38.288 {wncd_x_R0-0}{1}: [apmgr-capwap-join] [23388]: (ERR): 00a3.8e95.6c40 Auth request init failed
2019/11/28 13:08:38.288 {wncd_x_R0-0}{1}: [apmgr-db] [23388]: (ERR): 00a3.8e95.6c40 Failed to get wtp record: Get ap tag info
2019/11/28 13:08:38.288 {wncd_x_R0-0}{1}: [apmgr-db] [23388]: (ERR): 00a3.8e95.6c40 Failed to get ap tag info : Get ap join fail info
2019/11/28 13:08:38.288 {wncd_x_R0-0}{1}: [capwapac-smgr-sess-fsm] [23388]: (ERR): Session-IP: 192.168.88.48[5272] Mac: 00a3.8e95.6c40 Unmapped previous state in transition S_JOIN_PROCESS to S_END on E_AP_INTERFACE_DOWN
2019/11/28 13:08:38.288 {wncd_x_R0-0}{1}: [capwapac-smgr-sess-fsm] [23388]: (info): Session-IP: 192.168.88.48[5272] Mac: 00a3.8e95.6c40 Terminating AP CAPWAP session.
2019/11/28 13:08:38.288 {wncd_x_R0-0}{1}: [capwapac-smgr-sess-fsm] [23388]: (note): Session-IP: 192.168.88.48[5272] Mac: 00a3.8e95.6c40 Last Control Packet received 0 seconds ago.
2019/11/28 13:08:38.288 {wncd_x_R0-0}{1}: [capwapac-smgr-sess-fsm] [23388]: (note): Session-IP: 192.168.88.48[5272] Mac: 00a3.8e95.6c40 Last Data Keep Alive Packet information not available. Data session was not established
2019/11/28 13:08:38.288 {wncd_x_R0-0}{1}: [ewlc-dtls-sessmgr] [23388]: (info): Remote Host: 192.168.88.48[5272] Sending DTLS alert message, closing session..
2019/11/28 13:08:38.288 {wncd_x_R0-0}{1}: [ewlc-dtls-sessmgr] [23388]: (info): Remote Host: 192.168.88.48[5272] alert type:warning, description:close notify
2019/11/28 13:08:38.289 {wncmgrd_R0-0}{1}: [ewlc-infra-evq] [23038]: (debug): instance :0 port:38932MAC: 0062.ec80.b1ac
按一下「未加入的AP」後,在Web UI控制台中可更輕鬆地看到相同內容。Ap auth pending是指向AP自身身份驗證的提示:
案例分析2:Flex + Bridge
本部分重點介紹1542 AP在Flex+bridge模式下使用EAP身份驗證在WLC上本地進行的加入過程。
設定
- 步驟 1.導航到Configuration > Security > AAA > AAA Advanced > Device Authentication。

- 步驟 2.選擇Device Authentication並選擇Add。
- 步驟 3.鍵入要加入WLC的AP的基本乙太網MAC地址。將屬性清單名稱留空,然後選擇應用於裝置。
- 步驟 4.導航到Configuration > Security > AAA > AAA Method List > Authentication。
- 步驟 5.選擇Add。 系統將顯示AAA Authentication彈出窗口。
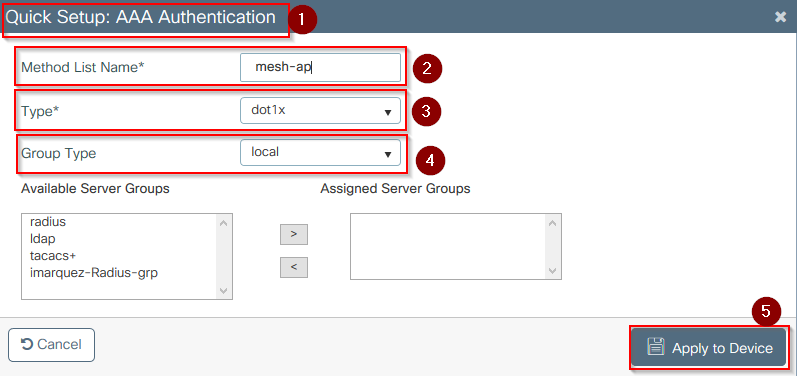
- 步驟 6.在方法清單名稱中鍵入名稱。 從Type*下拉選單中選擇802.1x,對於Group Type選擇local。 最後,選擇Apply to Device。

- 步驟6b.如果AP直接作為網橋模式加入,並且之前未分配站點和策略標籤,請重複步驟6,但使用預設方法。
- 配置指向本地的dot1x aaa身份驗證方法(CLI aaa authentication dot1x default local)。
- 步驟 7.導航到Configuration > Security > AAA > AAA Method List > Authorization。
- 步驟 8.選擇Add。 系統將顯示AAA Authorization 彈出窗口。
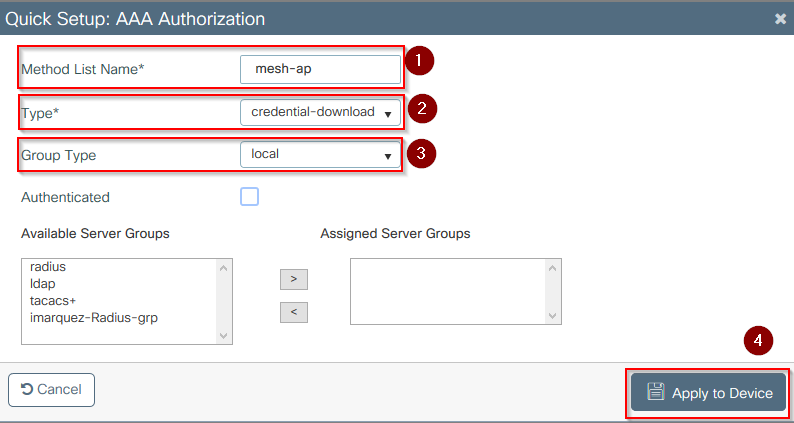
- 步驟 9.在「方法清單名稱」中鍵入名稱,然後從Type*下拉選單中選擇credential download,並為Group Type選擇local。 最後,選擇Apply to Device。
- 步驟9b.如果AP直接在網橋模式下加入(即它不會首先在本地模式下加入),請對預設憑證下載方法(CLI aaa authorization credential-download default local)重複步驟9。
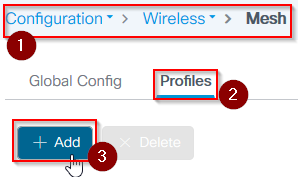
- 步驟 10.導航到配置>無線>網格>配置檔案。
- 步驟 11.選擇Add。 系統將顯示Add Mesh Profile彈出窗口。
- 步驟 12.在常規頁籤中,設定網格配置檔案的名稱和說明。
- 步驟 13.在Advanced頁籤下,在Method欄位中選擇EAP。
- 步驟 14.選擇第6步和第9步中定義的授權和身份驗證配置檔案,然後選擇應用於裝置。
- 步驟 15.導航到配置>標籤和配置檔案> AP加入>配置檔案。
- 步驟 16.選擇Add。 系統將顯示AP Join Profile彈出窗口。設定AP加入配置檔案的名稱和說明。
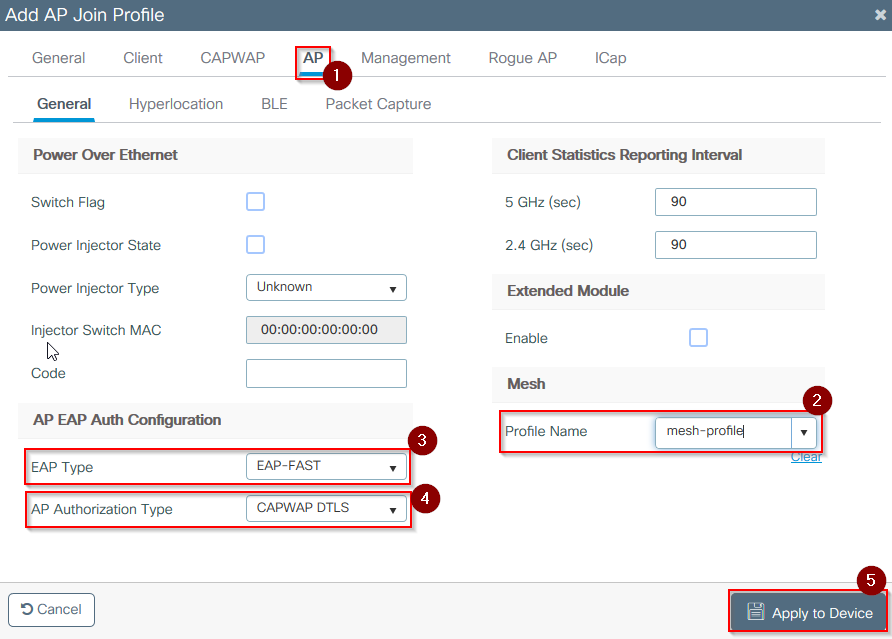
- 步驟 17.導航到AP頁籤,從Mesh Profile Name下拉選單中選擇第12步中建立的Mesh Profile。
- 步驟 18.確保分別針對EAP Type和AP Authorization Type欄位設定了EAP-FAST和CAPWAP DTLS。
- 步驟 19.選擇Apply to Device。
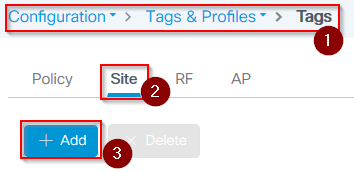
- 步驟 20.導航到配置>標籤和配置檔案>標籤>站點。
- 步驟 21.選擇Add。 系統將顯示Site Tag彈出窗口。
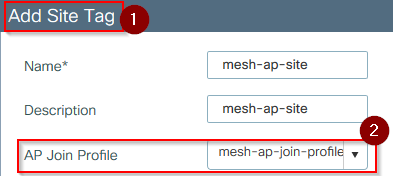
- 步驟 23.從AP Join Profile下拉選單中選擇第16步中建立的AP Join Profile。
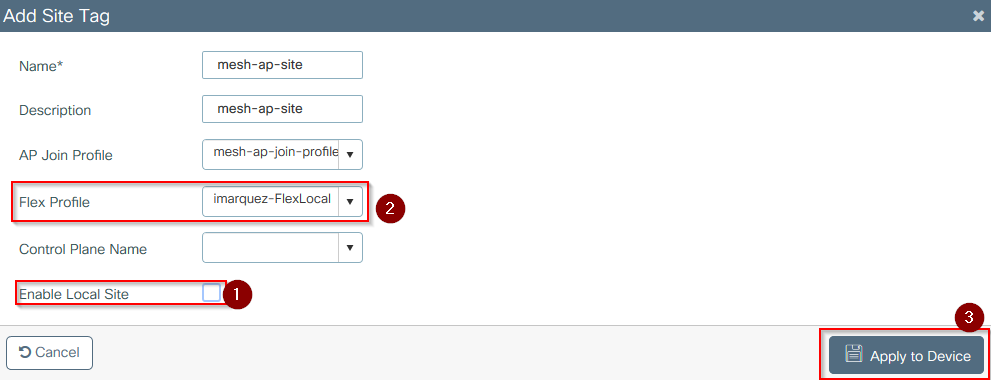
- 步驟 24.在Site Tag彈出窗口底部,取消選中Enable Local Site覈取方塊以啟用Flex Profile下拉選單。
- 步驟 35.從Flex Profile下拉選單中,選擇要用於AP的Flex Profile。
- 步驟 36.將AP連線到網路並確保AP處於本地模式。
- 步驟 37.要確保AP處於本地模式,請發出capwap ap mode local命令。
AP必須能夠找到控制器,可以是L2廣播、DHCP選項43、DNS解析或手動設定。
- 步驟 38.AP加入WLC。確保它列在AP清單下。導航到配置 >無線>存取點>所有存取點。
- 步驟 39.選擇AP。系統將顯示AP彈出窗口。
- 步驟 40.在AP彈出窗口內的General > Tags > Site頁籤下選擇第22步中建立的Site Tag,然後選擇Update and Apply to Device。
- 步驟 41.AP重新啟動,且必須在Flex +橋接模式中連線回WLC。
此方法首先在本地模式(不執行dot1x身份驗證)下加入AP,將站點標籤與網狀架構一起應用,然後將AP切換到網橋模式。
要加入處於網橋(或Flex+Bridge)模式的AP,請配置預設方法(aaa authentication dot1x default local和aaa authorization cred default local)。
然後AP即可進行身份驗證,您隨後可以分配標籤。
驗證
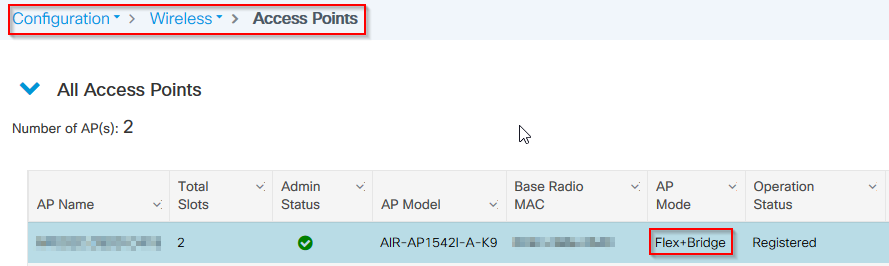
確保AP模式顯示為Flex+網橋,如下圖所示。
從WLC 9800 CLI運行這些命令並查詢AP Mode屬性。它必須列為Flex+Bridge。
aaa authorization credential-download mesh-ap local
aaa authentication dot1x mesh-ap local
wireless profile mesh default-mesh-profile
 description "default mesh profile"
wireless tag site meshsite
 ap-profile meshapjoin
 no local-site
ap profile meshapjoin
 hyperlocation ble-beacon 0
 hyperlocation ble-beacon 1
 hyperlocation ble-beacon 2
 hyperlocation ble-beacon 3
 hyperlocation ble-beacon 4
 mesh-profile mesh-profile
疑難排解
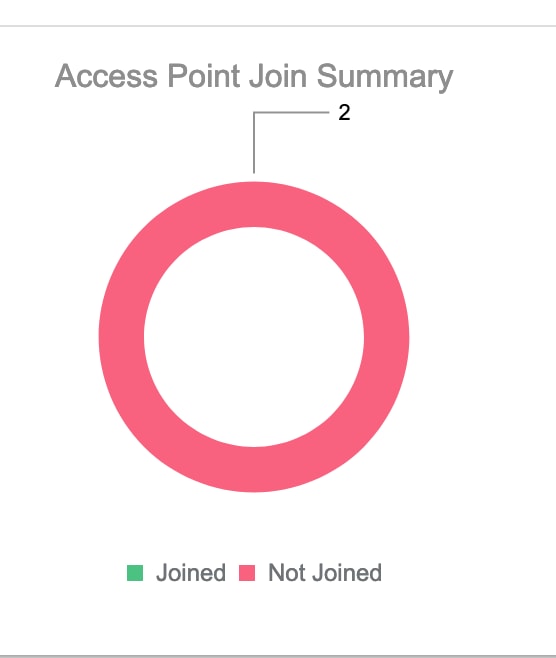
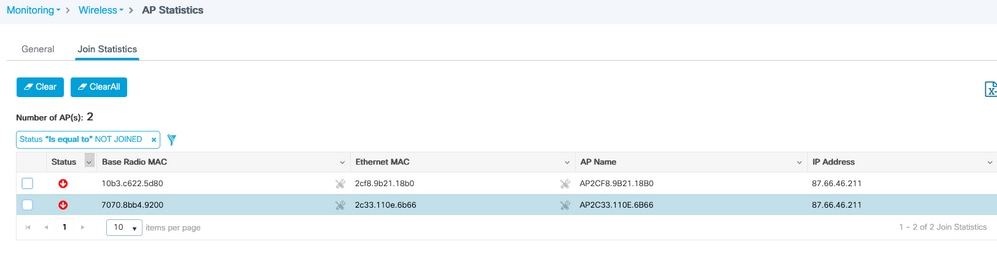
確儲存在aaa authentication dot1x default local和aaa authorization cred default local命令。如果您的AP未以本地模式預先加入,則需要這些引數。 主9800控制台有一個顯示無法加入的AP的小部件。按一下它可獲取無法加入的AP清單:

按一下特定AP以檢視其未加入的原因。在這種情況下,您會看到身份驗證問題(AP身份驗證掛起),因為未將站點標籤分配給AP。
因此,9800未選擇命名身份驗證/授權方法來對AP進行身份驗證:
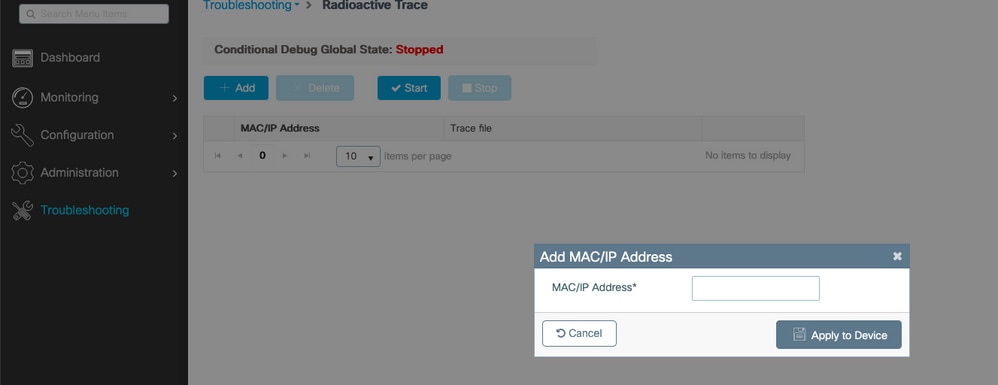
對於更高級的故障排除,請導航至Web UI上的故障排除>放射性跟蹤頁面。 如果輸入AP MAC地址,您可以立即生成一個檔案來獲取嘗試加入的AP的永遠線上日誌(在通知級別)。 按一下開始為該MAC地址啟用高級調試。下次生成日誌時,生成AP加入的調試級別日誌,如下所示。
 意見
意見