在通訊管理器上使用CA簽名證書配置SIP TLS中繼
下載選項
無偏見用語
本產品的文件集力求使用無偏見用語。針對本文件集的目的,無偏見係定義為未根據年齡、身心障礙、性別、種族身分、民族身分、性別傾向、社會經濟地位及交織性表示歧視的用語。由於本產品軟體使用者介面中硬式編碼的語言、根據 RFP 文件使用的語言,或引用第三方產品的語言,因此本文件中可能會出現例外狀況。深入瞭解思科如何使用包容性用語。
關於此翻譯
思科已使用電腦和人工技術翻譯本文件,讓全世界的使用者能夠以自己的語言理解支援內容。請注意,即使是最佳機器翻譯,也不如專業譯者翻譯的內容準確。Cisco Systems, Inc. 對這些翻譯的準確度概不負責,並建議一律查看原始英文文件(提供連結)。
目錄
簡介
本檔案介紹在通訊管理員上使用憑證授權單位(CA)簽署憑證設定作業階段啟始通訊協定(SIP)傳輸層安全(TLS)中繼的逐步程序。
完成本文檔後,將使用TLS加密兩個群集之間的SIP消息。
必要條件
需求
思科建議您瞭解:
- 思科整合通訊管理員(CUCM)
- SIP
採用元件
本檔案中的資訊是根據以下軟體版本:
- CUCM版本9.1(2)
- CUCM版本10.5(2)
- Microsoft Windows Server 2003 as CA
本文中的資訊是根據特定實驗室環境內的裝置所建立。文中使用到的所有裝置皆從已清除(預設)的組態來啟動。如果您的網路正在作用,請確保您已瞭解任何指令可能造成的影響。
背景資訊
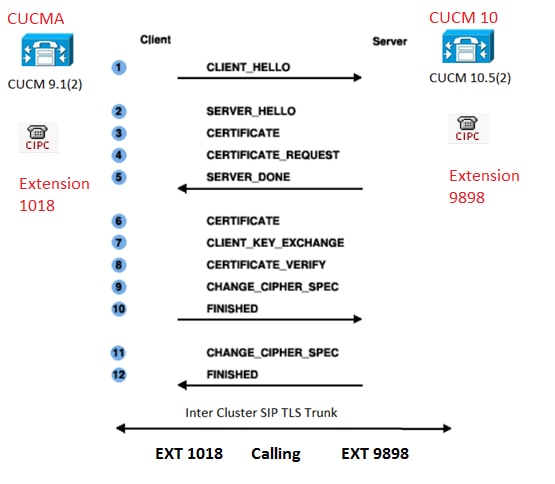
如下圖所示,SSL握手使用證書。
設定
步驟1.在Windows Server 2003上使用公共CA或設定CA
請參閱以下連結:在Windows 2003伺服器上設定CA
步驟2.檢驗主機名和設定
證書基於名稱。開始之前,請確保名稱正確。
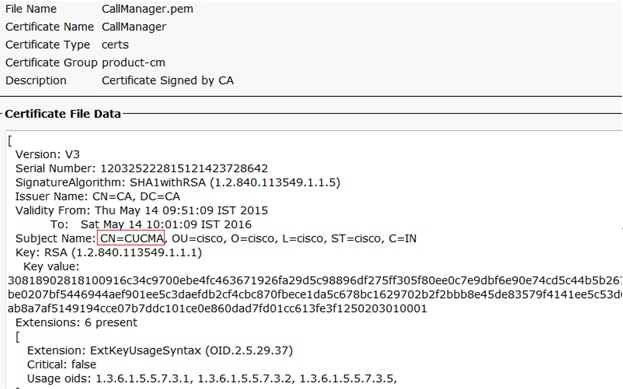
From SSH CLI
admin:show cert own CallManager
SignatureAlgorithm: SHA1withRSA (1.2.840.113549.1.1.5)
Issuer Name: CN=CUCMA, OU=cisco, O=cisco, L=cisco, ST=cisco, C=IN
Subject Name: CN=CUCMA, OU=cisco, O=cisco, L=cisco, ST=cisco, C=IN
要更改主機名,請參閱連結:更改CUCM上的主機名
步驟3.產生並下載憑證簽署請求(CSR)
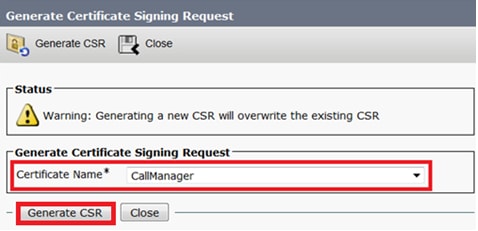
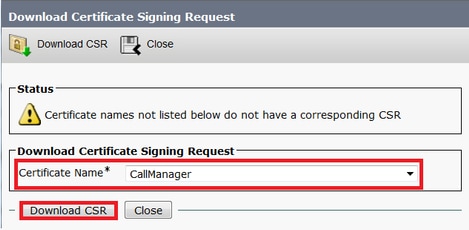
CUCM 9.1(2)
若要產生CSR,請導覽至OS Admin > Security > Certificate Management > Generate CSR
在「Certificate Name」欄位中,從下拉式清單中選擇CallManager選項。
若要下載CSR,請導覽至OS Admin > Security > Certificate Management > Download CSR
在「Certificate Name」欄位中,從下拉選單中選擇CallManager選項。
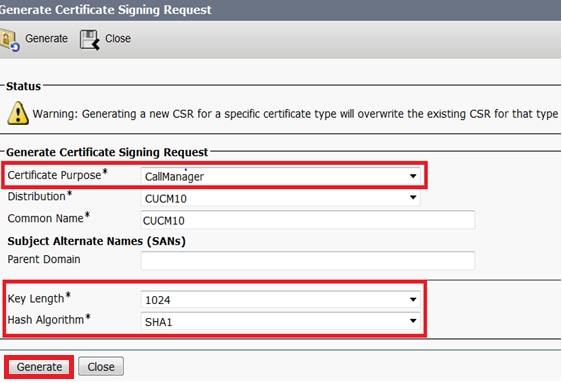
CUCM 10.5(2)
若要產生CSR,請導覽至OS Admin > Security > Certificate Management > Generate CSR
1.在「Certificate Purpose」欄位中,從下拉式清單中選擇CallManager。
2.在「Key Length」欄位中,從下拉式清單中選擇1024.
3.在Hash Algorithm 欄位中,從下拉式清單中選擇SHA1 。
若要下載CSR,請導覽至OS Admin > Security > Certificate Management > Download CSR
在「Certificate Purpose」欄位中,從下拉式清單中選擇「CallManager」選項。
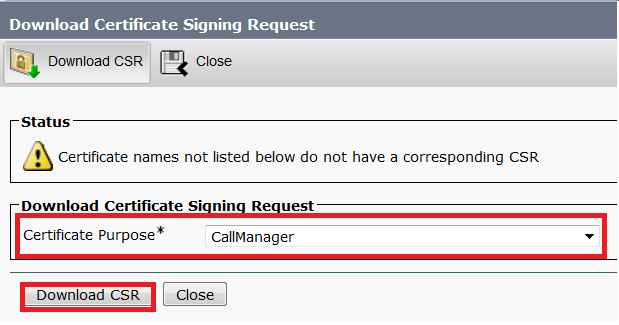
附註:CallManager CSR是使用1024位Rivest-Shamir-Addleman(RSA)金鑰生成的。
步驟4.使用Microsoft Windows 2003證書頒發機構簽署CSR
這是使用Microsoft Windows 2003 CA簽署CSR的可選資訊。
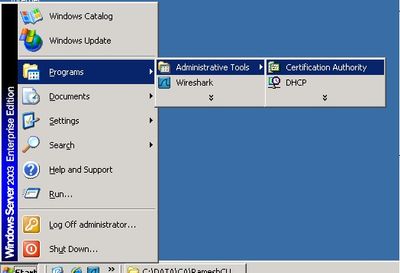
1.開啟證書頒發機構。
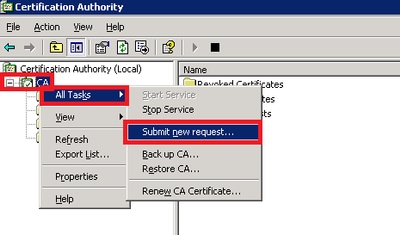
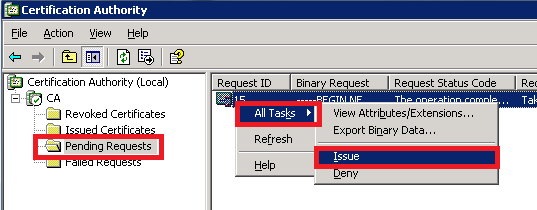
2.按一下右鍵CA圖標,然後導航至所有任務>提交新請求
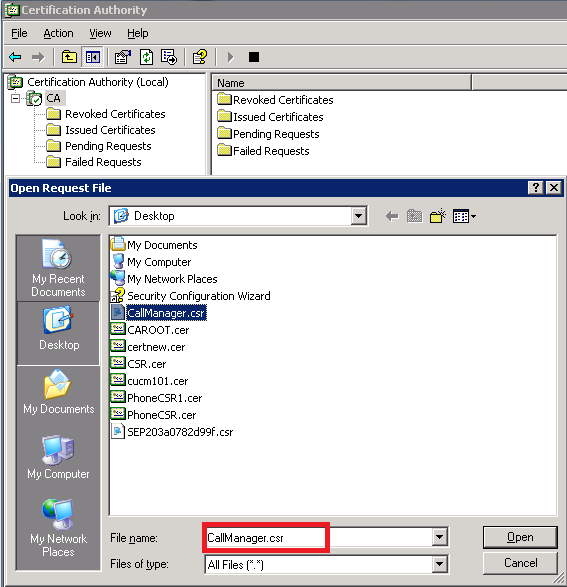
3.選擇CSR,然後按一下Open選項(適用於CSR(CUCM 9.1(2)和CUCM 10.5(2))
4.所有開啟的CSR都顯示在「暫掛請求」資料夾中。按一下右鍵每個CSR,然後導覽至All Tasks > Issue,以便發出憑證。(適用於CSR(CUCM 9.1(2)和CUCM 10.5(2))
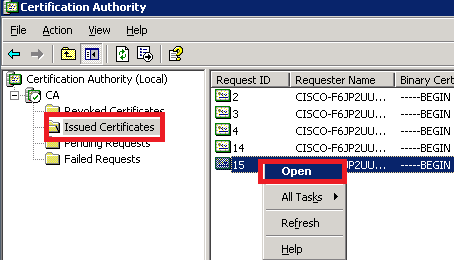
5.要下載證書,請選擇Issued Certificates資料夾。
按一下右鍵證書,然後按一下Open選項。
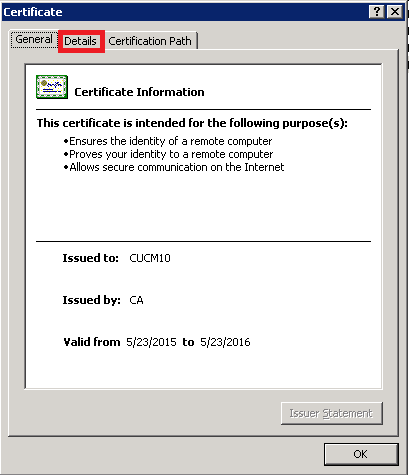
6.顯示證書詳細資訊。若要下載憑證,請選擇Details索引標籤,然後按一下Copy to File...按鈕
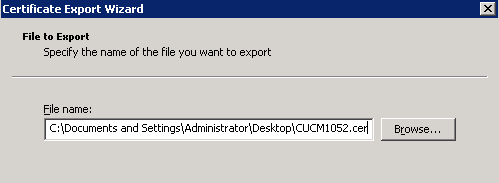
7.在「Certificate Export Wizard」視窗中,按一下Base-64 encoded X.509(.CER)單選按鈕。
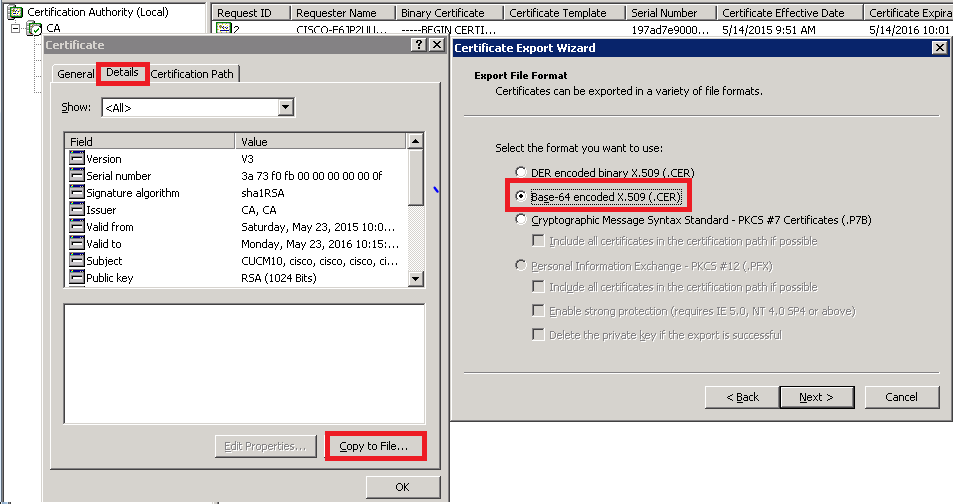
8.準確地命名檔案。此示例使用CUCM1052.cer格式。
對於CUCM 9.1(2),請遵循相同的步驟。
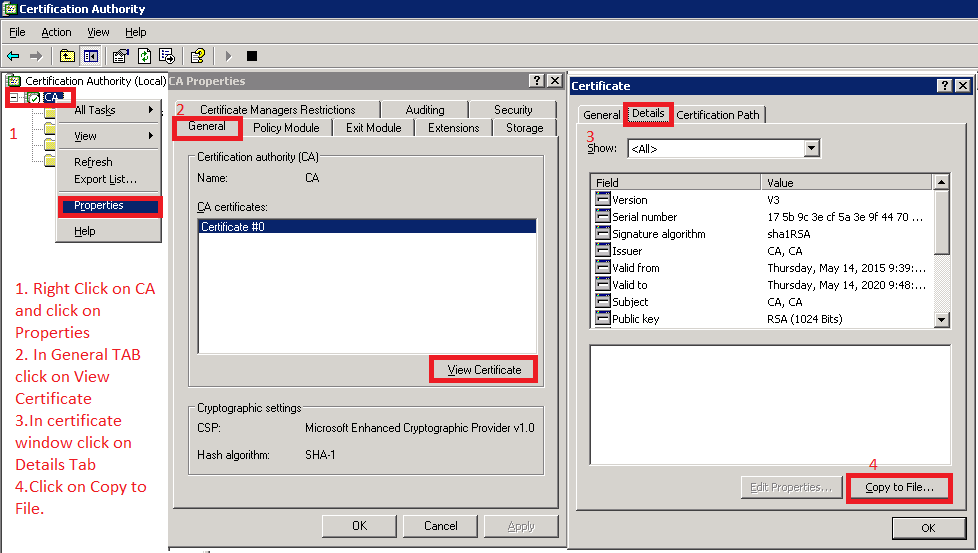
步驟5.從CA取得根憑證
開啟證書頒發機構視窗。
若要下載根CA,
1.按一下右鍵CA圖示,然後按一下Properties選項。
2.在「常規」頁籤中,按一下「檢視證書」。
3.在「證書」視窗中,按一下詳細資訊頁籤。
4.單擊「複製到檔案……」
步驟6.將CA根證書上傳為CallManager信任
若要上傳CA根憑證,請登入OS Admin > Security > Certificate Management > Upload Certificate/Certificate Chain
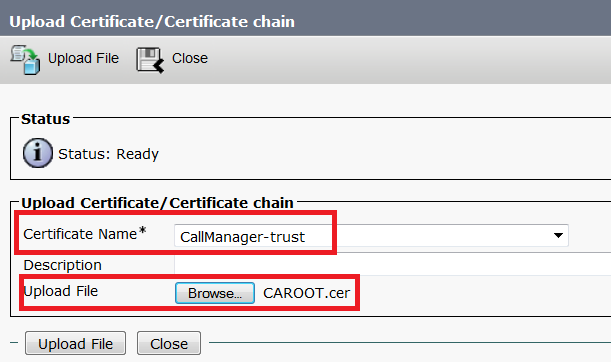
附註:在CUCM(CUCM 9.1(2)和CUCM 10.5(2))上執行這些步驟
步驟7.上傳CA簽署CallManager CSR證書作為CallManager證書。
若要上傳CA簽名CallManager CSR,請登入到OS Admin > Security > Certificate Management > Upload Certificate/Certificate Chain

附註:在CUCM(CUCM 9.1(2)和CUCM 10.5(2))上執行這些步驟
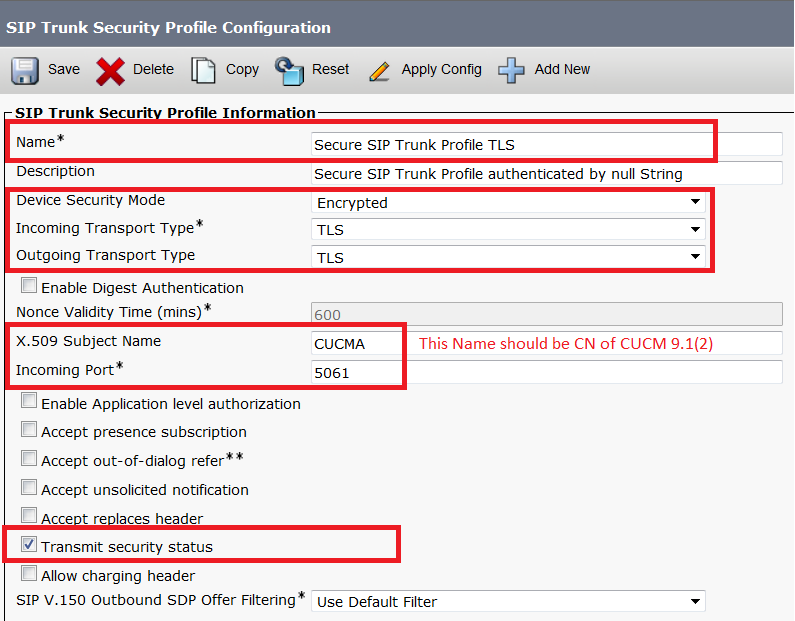
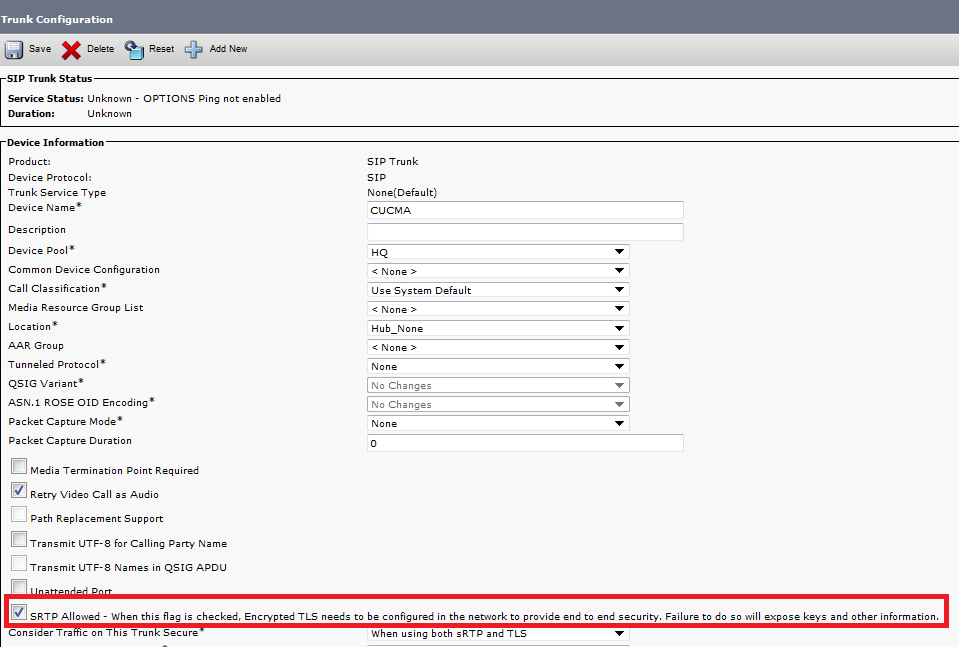
步驟8.建立SIP中繼安全配置檔案
CUCM 9.1(2)
要建立SIP中繼安全配置檔案,請導航到System > Security > SIP Trunk Security Profile。
複製現有的非安全SIP中繼配置檔案並為其指定新名稱。在本示例中,已使用安全SIP中繼配置檔案TLS重新命名了非安全SIP中繼配置檔案。
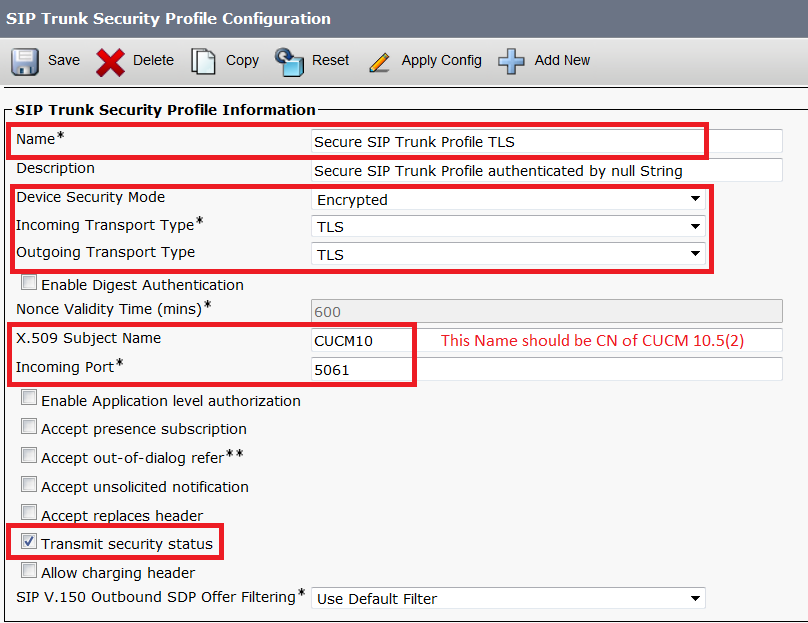
在X.509使用者名稱中,使用CUCM 10.5(2)(CA簽名的證書)的公用名稱(CN),如下圖所示。

CUCM 10.5(2)
導航至System > Security > SIP Trunk Security Profile。
複製現有的非安全SIP中繼配置檔案並為其指定新名稱。在本示例中,使用安全SIP中繼配置檔案TLS重新命名了非安全SIP中繼配置檔案。
在X.509使用者名稱中,使用CUCM 9.1(2)(CA簽名證書)的CN,突出顯示:
兩個SIP中繼安全配置檔案均將傳入埠設定為5061,其中每個集群在TCP埠5061上偵聽新的入站SIP TLS呼叫。
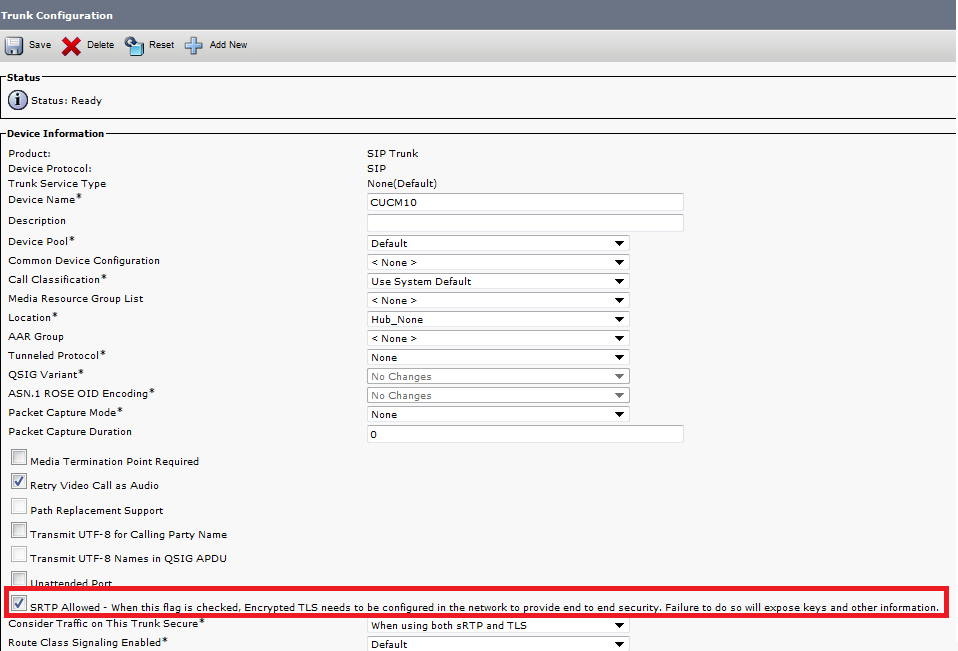
步驟9.建立SIP中繼
建立安全配置檔案後,建立SIP中繼並更改SIP中繼上的以下配置引數。
CUCM 9.1(2)
- 在SIP Trunk Configuration視窗上,選中配置引數SRTP Allowed覈取方塊。
這樣可以保護用於通過此中繼進行呼叫的即時傳輸協定(RTP)。只有當您使用SIP TLS時才能選中此框,因為安全即時傳輸協定(SRTP)的金鑰在SIP消息正文中交換。SIP信令必須由TLS提供安全,否則任何具有非安全SIP信令的人均可以通過中繼解密相應的SRTP流。
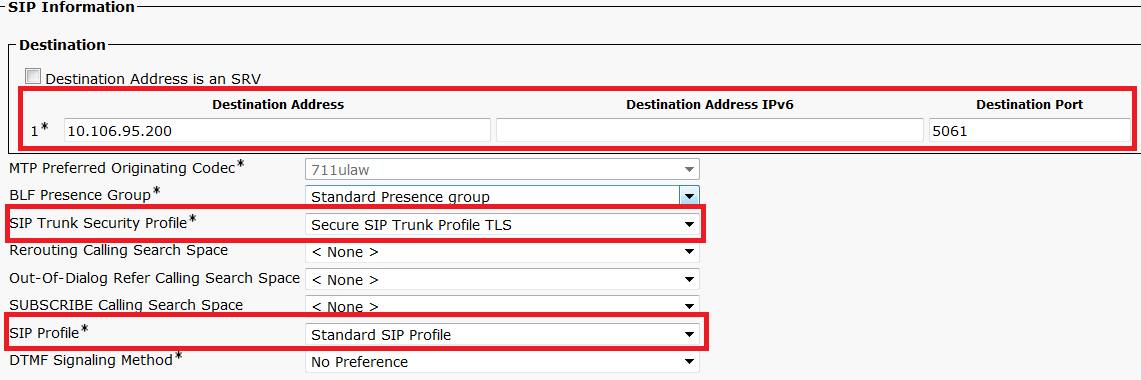
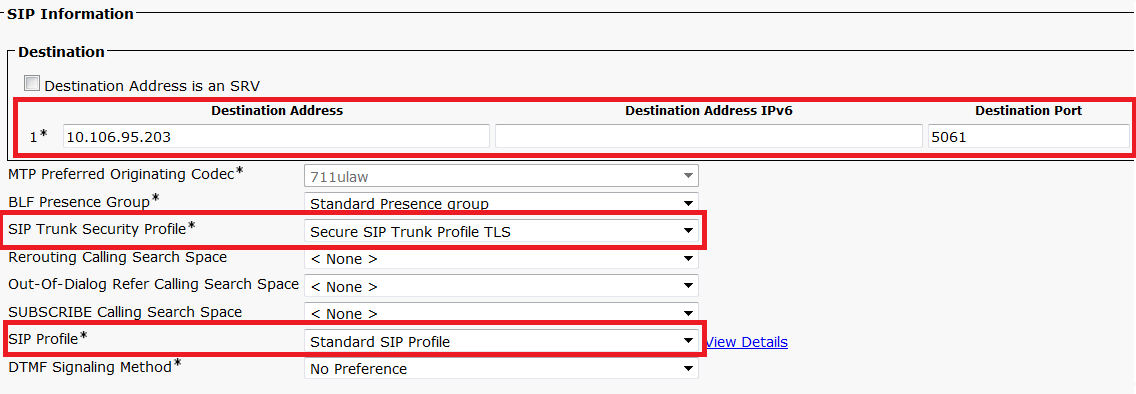
- 在SIP Trunk Configuration視窗的SIP Information部分中,新增Destination Address、Destination Port和SIP Trunk Security Profile。
CUCM 10.5(2)
- 在SIP Trunk Configuration視窗上,選中配置引數SRTP Allowed覈取方塊。
這樣,SRTP就可用於通過此中繼進行的呼叫。只有使用SIP TLS時才能選中此框,因為SRTP的金鑰在SIP消息正文中交換。SIP信令必須由TLS保護,因為具有非安全SIP信令的任何人都可以通過中繼解密相應的安全RTP流。
- 在SIP Trunk Configuration視窗的SIP Information部分中,新增Destination IP Address、Destination Port和Security Profile
步驟10.建立路由模式
最簡單的方法是在每個集群上建立直接指向SIP中繼的路由模式。也可以使用路由組和路由清單。
CUCM 9.1(2)通過TLS SIP中繼指向CUCM 10.5(2)的路由模式9898

CUCM 10.5(2)通過TLS SIP中繼指向CUCM 9.1(2)的路由模式1018

驗證
目前沒有適用於此組態的驗證程序。
疑難排解
可以使用以下步驟調試SIP TLS呼叫。
在CUCM上收集資料包捕獲
為了檢查CUCM 9.1(2)和CUCM 10.5(2)之間的連線,請在CUCM伺服器上捕獲資料包並觀察SIP TLS流量。
SIP TLS流量在TCP埠5061上傳輸,稱為sip-tls。
在以下示例中,存在到CUCM 9.1(2)的SSH CLI會話
1.螢幕上的CLI資料包捕獲
此CLI會在螢幕上顯示SIP TLS流量的輸出。
admin:utils network capture host ip 10.106.95.200
Executing command with options:
interface=eth0
ip=10.106.95.200
19:04:13.410944 IP CUCMA.42387 > 10.106.95.200.sip-tls: P 790302485:790303631(1146) ack 3661485150 win 182 <nop,nop,timestamp 2864697196 5629758>
19:04:13.450507 IP 10.106.95.200.sip-tls > CUCMA.42387: . ack 1146 win 249 <nop,nop,timestamp 6072188 2864697196>
19:04:13.465388 IP 10.106.95.200.sip-tls > CUCMA.42387: P 1:427(426) ack 1146 win 249 <nop,nop,timestamp 6072201 2864697196>
2. CLI捕獲到檔案
此CLI根據主機執行資料包捕獲,並建立名為packets的檔案。
admin:utils network capture eth0 file packets count 100000 size all host ip 10.106.95.200
重新啟動CUCM 9.1(2)上的SIP中繼,並從分機1018(CUCM 9.1(2))到分機9898(CUCM 10.5(2))進行呼叫
若要從CLI下載檔案,請執行以下命令:
admin:file get activelog platform/cli/packets.cap
捕獲以標準.cap格式完成。此示例使用Wireshark開啟packets.cap檔案,但可以使用任何資料包捕獲顯示工具。
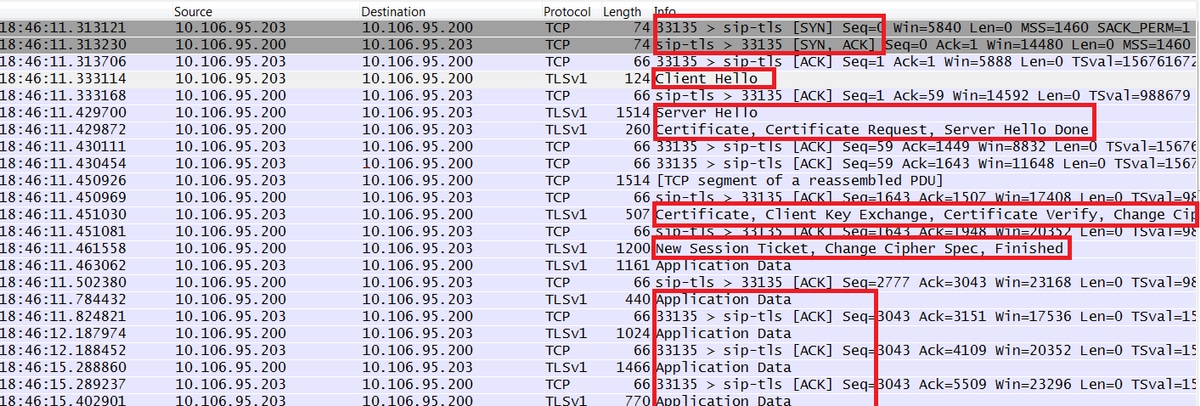
- 傳輸控制協定(TCP)同步(SYN),用於在CUCM 9.1(2)(客戶端)和CUCM 10.5(2)(伺服器)之間建立TCP通訊。
- CUCM 9.1(2)傳送Client Hello以啟動TLS會話。
- CUCM 10.5(2)傳送伺服器Hello、伺服器證書和證書請求以啟動證書交換過程。
- 客戶端CUCM 9.1(2)傳送的用於完成證書交換的證書。
- 經過加密的SIP信令的應用資料顯示TLS會話已建立。
進一步檢查是否交換了正確的證書。在Server Hello後,伺服器CUCM 10.5(2)將其證書傳送到客戶端CUCM 9.1(2)。
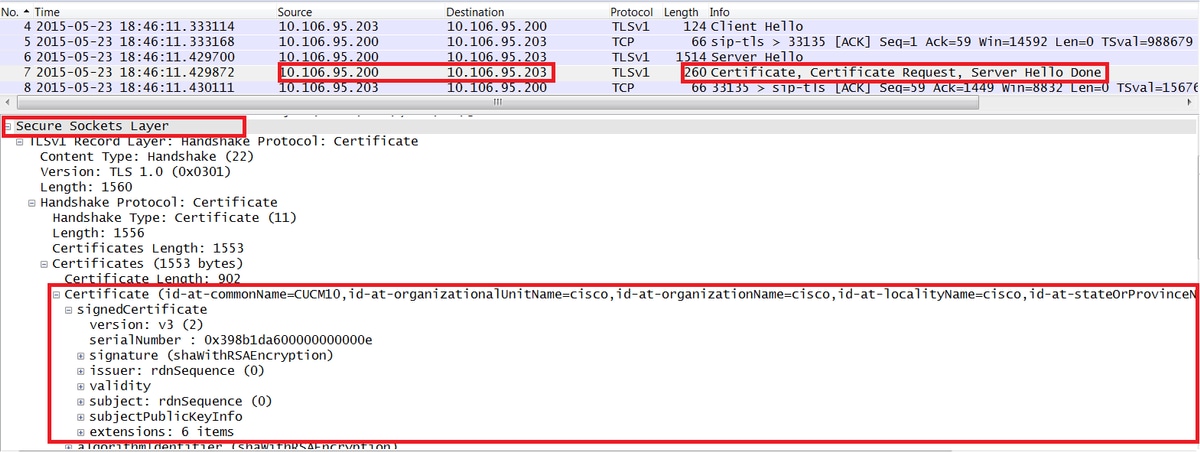
伺服器CUCM 10.5(2)的序列號和主題資訊提供給客戶端CUCM 9.1(2)。序列號、主題、頒發者和有效日期均與OS Admin Certificate Management頁面上的資訊進行比較。
伺服器CUCM 10.5(2)提供自己的證書以進行驗證,現在它檢查客戶端CUCM 9.1(2)的證書。 驗證是雙向進行的。

如果資料包捕獲中的證書與作業系統管理網頁中的證書不匹配,則不會上傳正確的證書。
必須將正確的證書上傳到OS Admin Cert頁面。
收集CUCM跟蹤
CUCM跟蹤也有助於確定CUCM 9.1(2)和CUCM 10.5(2)伺服器之間交換了哪些消息以及SSL會話是否正確建立。
在本示例中,已收集CUCM 9.1(2)中的蹤跡。
呼叫流:
Ext 1018 > CUCM 9.1(2)> SIP TLS TRUNK > CUCM 10.5(2)> Ext 9898
++位分析
04530161.009 |19:59:21.185 |AppInfo |Digit analysis: match(pi="2", fqcn="1018", cn="1018",plv="5", pss="", TodFilteredPss="", dd="9898",dac="0")
04530161.010 |19:59:21.185 |AppInfo |Digit analysis: analysis results
04530161.011 |19:59:21.185 |AppInfo ||PretransformCallingPartyNumber=1018
|CallingPartyNumber=1018
|DialingPartition=
|DialingPattern=9898
|FullyQualifiedCalledPartyNumber=9898
++埠5061上正在使用SIP TLS進行此呼叫。
04530191.034 |19:59:21.189 |AppInfo |//SIP/SIPHandler/ccbId=0/scbId=0/SIP_PROCESS_ENQUEUE: createConnMsg tls_security=3
04530204.002 |19:59:21.224 |AppInfo |//SIP/Stack/Transport/0x0/sipConnectionManagerProcessConnCreated: gConnTab=0xb444c150, addr=10.106.95.200, port=5061, connid=12, transport=TLS Over TCP
04530208.001 |19:59:21.224 |AppInfo |SIPTcp - wait_SdlSPISignal: Outgoing SIP TCP message to 10.106.95.200 on port 5061 index 12
[131,NET]
INVITE sip:9898@10.106.95.200:5061 SIP/2.0
Via: SIP/2.0/TLS 10.106.95.203:5061;branch=z9hG4bK144f49a43a
From: <sip:1018@10.106.95.203>;tag=34~4bd244e4-0988-4929-9df2-2824063695f5-19024196
To: <sip:9898@10.106.95.200>
Call-ID: 94fffc00-57415541-7-cb5f6a0a@10.106.95.203
User-Agent: Cisco-CUCM9.1
++ Signal Distribution Layer(SDL)消息SIPCcertificateInd提供有關主題CN和連線資訊的詳細資訊。
04530218.000 |19:59:21.323 |SdlSig   |SIPCertificateInd                     |wait                          |SIPHandler(1,100,72,1)           |SIPTcp(1,100,64,1)               |1,100,17,11.3^*^*                       |[T:N-H:0,N:1,L:0,V:0,Z:0,D:0] connIdx= 12 --remoteIP=10.106.95.200 --remotePort = 5061 --X509SubjectName /C=IN/ST=cisco/L=cisco/O=cisco/OU=cisco/CN=CUCM10 --Cipher AES128-SHA --SubjectAltname =
04530219.000 |19:59:21.324 |SdlSig   |SIPCertificateInd                     |restart0                       |SIPD(1,100,74,16)               |SIPHandler(1,100,72,1)           |1,100,17,11.3^*^*                       |[R:N-H:0,N:0,L:0,V:0,Z:0,D:0] connIdx= 12 --remoteIP=10.106.95.200 --remotePort = 5061 --X509SubjectName /C=IN/ST=cisco/L=cisco/O=cisco/OU=cisco/CN=CUCM10 --Cipher AES128-SHA --SubjectAltname =
由思科工程師貢獻
- Bharat P KondekarCisco TAC工程師
 意見
意見