簡介
本檔案介紹思科安全網路裝置(SWA)、電子郵件安全裝置(ESA)和安全管理裝置(SMA)上的封包擷取。
必要條件
需求
思科建議您瞭解以下主題:
思科建議您:
- 對SWA/ESA/SMA圖形使用者介面(GUI)的管理訪問。
- 對SWA/ESA/SMA命令列介面(CLI)的管理訪問
採用元件
本文件所述內容不限於特定軟體和硬體版本。
本文中的資訊是根據特定實驗室環境內的裝置所建立。文中使用到的所有裝置皆從已清除(預設)的組態來啟動。如果您的網路運作中,請確保您瞭解任何指令可能造成的影響。
從GUI執行資料包捕獲
要從GUI執行資料包捕獲,請執行以下步驟:
步驟1.登入GUI。
步驟2.從頁面右上角選擇「Support and Help(支援和幫助)」。
步驟3.選擇Packet Capture。
 影象 — 資料包捕獲
步驟4.(可選)要編輯當前過濾器,請選擇Edit Settings。(有關篩選器的詳細資訊,請檢查本文檔中的篩選條件部分)
步驟5.開始擷取。
 映像 — 封包擷取狀態和過濾器

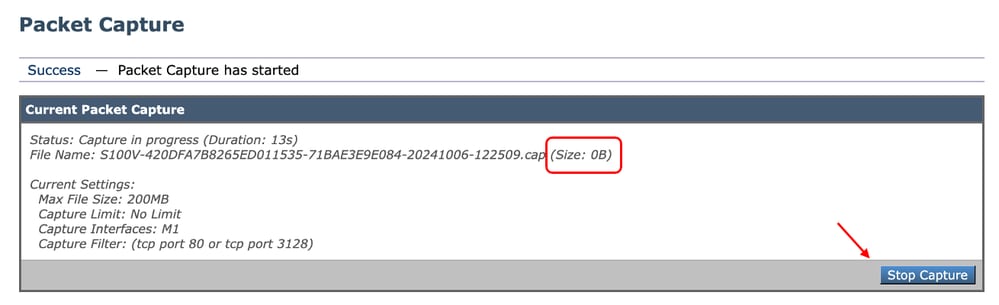
附註:資料包捕獲檔案大小限製為200MB。當檔案大小達到200MB時,資料包捕獲停止。
Current Packet Capture(當前資料包捕獲)部分顯示Packet Capture(資料包捕獲)狀態,包括檔案大小和應用過濾器。
 影象 — 資料包捕獲狀態
步驟6.要停止正在運行的資料包捕獲,請點選停止捕獲。
步驟7.要下載封包擷取檔案,請從Manage Packet Capture Files清單選擇檔案,然後按一下Download File。
 影象 — 下載資料包捕獲
步驟8.(可選)要刪除任何資料包捕獲檔案,請從Manage Packet Capture Files(管理資料包捕獲檔案)清單中選擇檔案,然後點選Delete Selected Files(刪除選定檔案)。
從CLI執行資料包捕獲
您也可以使用以下步驟從CLI啟動資料包捕獲:
步驟1.登入到CLI。
步驟2.鍵入packetcapture,然後按Enter。
步驟3.(可選)若要編輯目前的篩選條件型別SETUP。(如需篩選條件的詳細資訊,請檢查本檔案的「篩選條件」一節。)
步驟4.選擇START開始捕獲。
SWA_CLI> packetcapture
Status: No capture running

Current Settings:
 Max file size:      200 MB
 Capture Limit:      None (Run Indefinitely)
 Capture Interfaces: Management
 Capture Filter:     (tcp port 80 or tcp port 3128)

Choose the operation you want to perform:
- START - Start packet capture.
- SETUP - Change packet capture settings.
步驟5.(可選)您可以通過選擇STATUS:檢視資料包捕獲的狀態:
Choose the operation you want to perform:
- STOP - Stop packet capture.
- STATUS - Display current capture status.
- SETUP - Change packet capture settings.
[]> STATUS

Status: Capture in progress
File Name: S100V-420DFA7B8265ED011535-71BAE3E9E084-20241006-130426.cap
File Size: 0K
Duration:  45s

Current Settings:
 Max file size:      200 MB
 Capture Limit:      None (Run Indefinitely)
 Capture Interfaces: Management
 Capture Filter:     (tcp port 80 or tcp port 3128)
步驟6.要停止資料包捕獲,請鍵入STOP並按Enter鍵:
附註:要下載從CLI收集的資料包捕獲檔案,可以從GUI下載這些檔案,也可以通過檔案傳輸協定(FTP)連線到裝置並從Captures資料夾下載這些檔案。
篩選條件
以下是一些有關可在內容安全裝置中使用的過濾器的指南。
按主機IP地址篩選
在GUI中按主機IP篩選
要按主機IP地址進行過濾,在GUI中有兩個選項:
在GUI中使用預定義過濾器:
步驟1。在「封包擷取」頁中,選擇「編輯設定」。
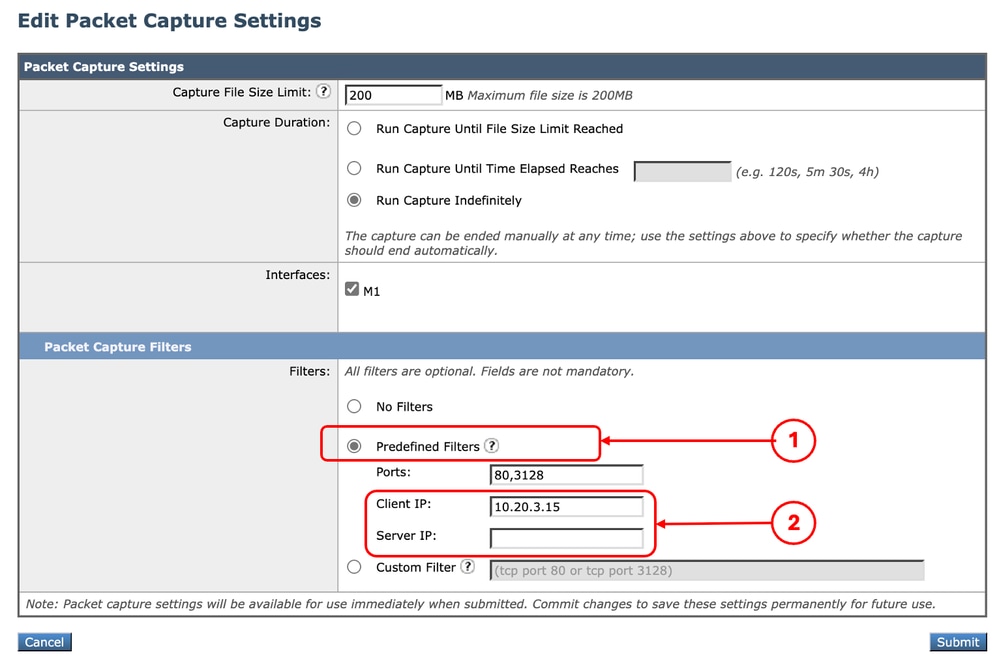
步驟2. 從Packet Capture Filters中選擇Predefined Filters。
步驟3.您可以在Client IP或Server IP部分中輸入IP地址。
附註:在客戶端IP或伺服器IP之間進行選擇不限於源地址或目標地址。此過濾器會擷取IP位址定義為來源或目的地的所有封包。
 影象 — 在GUI預定義過濾器中按主機IP過濾
步驟4.提交變更。
步驟5.開始擷取。

提示:無需提交更改,新新增的過濾器應用於當前捕獲。提交更改有助於儲存篩選器以供將來使用。
要在GUI中使用自定義過濾器和預定義過濾器:
步驟1。在「封包擷取」頁中,選擇「編輯設定」。
步驟2. 從Packet Capture Filters中選擇Custom Filter。
步驟3. 使用host 語法,後跟IP地址。
以下是過濾來源或目的地IP位址為10.20.3.15的所有流量的範例
host 10.20.3.15
提示:要按多個IP地址進行過濾,您可以使用邏輯運算元,如或和(僅限小寫字母)。
 影象 — 用於兩個IP地址的自定義過濾器
步驟4.提交變更。
步驟5.開始擷取
在CLI中按主機IP篩選
要通過CLI按主機IP地址進行過濾,請執行以下操作:
步驟1.登入到CLI。
步驟2.鍵入packetcapture 並按Enter鍵。
步驟3.編輯當前過濾器型別SETUP。
步驟4.回答問題直到達到輸入用於捕獲的過濾器
步驟5.您可以在GUI中使用與「自定義過濾器」相同的過濾器字串。
以下是過濾來源或目的地IP位址為10.20.3.15或10.0.0.60的所有流量的範例
SWA_CLI> packetcapture

Status: No capture running (Capture stopped by user)
File Name: S100V-420DFA7B8265ED011535-71BAE3E9E084-20241006-130426.cap
File Size: 4K
Duration:  2m 2s

Current Settings:
 Max file size:      200 MB
 Capture Limit:      None (Run Indefinitely)
 Capture Interfaces: Management
 Capture Filter:     (tcp port 80 or tcp port 3128)

Choose the operation you want to perform:
- START - Start packet capture.
- SETUP - Change packet capture settings.
[]> SETUP

Enter maximum allowable size for the capture file (in MB)
[200]>

Do you want to stop the capture when the file size is reached? (If not, a new file will be started and the older capture data will be discarded.)
[N]> y

The following interfaces are configured:
1. Management
Enter the name or number of one or more interfaces to capture packets from, separated by commas:
[1]>

Enter the filter to be used for the capture.
Enter the word "CLEAR" to clear the filter and capture all packets on the selected interfaces.
[(tcp port 80 or tcp port 3128)]> host 10.20.3.15 or host 10.0.0.60
按埠號篩選
在GUI中按埠號過濾
要按埠號進行過濾,在GUI中有兩個選項:
要在GUI中使用預定義過濾器,請執行以下操作:
步驟1。在「封包擷取」頁中,選擇「編輯設定」。
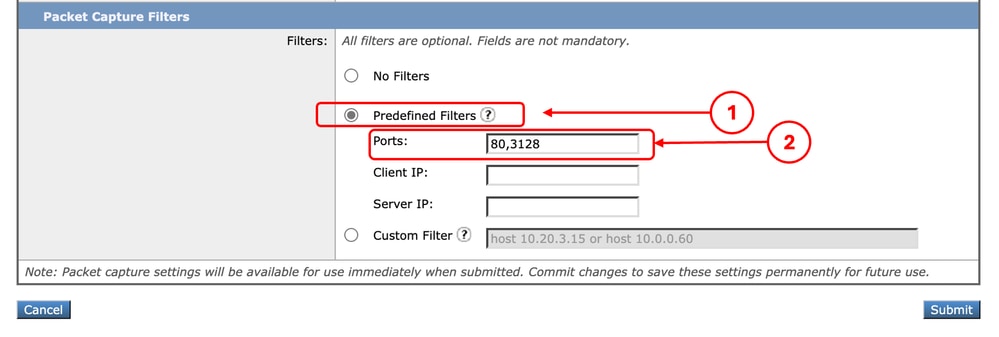
步驟2. 從Packet Capture Filters中選擇Predefined Filters。
步驟3.在Ports區段中,鍵入要過濾的埠號。
提示:您可以新增多個埠號,用逗號「, 」分隔它們。
 影象 — 按埠號過濾
步驟4.提交變更。
步驟5.開始擷取。

注意:此方法僅捕獲具有已定義埠號的TCP流量。要捕獲UDP流量,請使用自定義過濾器。
在GUI中使用Custom Filters:
步驟1。在「封包擷取」頁中,選擇「編輯設定」。
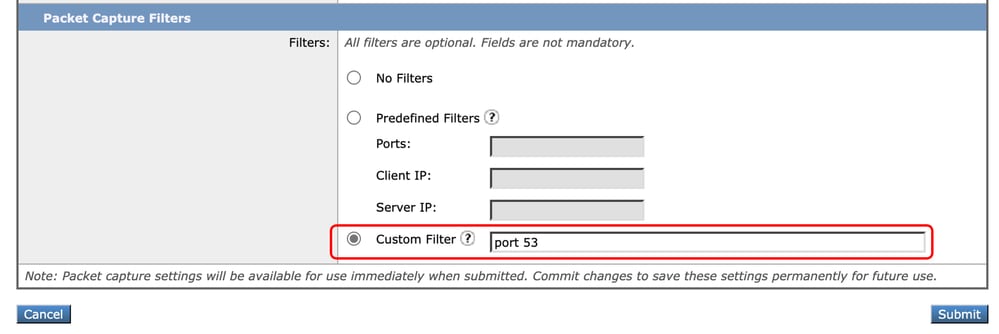
步驟2. 從Packet Capture Filters中選擇Custom Filter。
步驟3. 使用連線埠語法,後跟連線埠號碼。
 影象 — 按埠號自定義過濾器
附註:如果只使用port,則此篩選條件涵蓋TCP和UDP連線埠。
步驟4.提交變更。
步驟5.開始擷取。
在CLI中按埠號過濾
要通過CLI按埠號進行過濾,請執行以下操作:
步驟1.登入到CLI。
步驟2.鍵入packetcapture 並按Enter鍵。
步驟3.編輯當前過濾器型別SETUP。
步驟4.回答問題直到達到輸入用於捕獲的過濾器
步驟5.您可以在GUI中使用與「自定義過濾器」相同的過濾器字串。
以下示例針對TCP和UDP埠,過濾源埠號或目標埠號為53的所有流量:
SWA_CLI> packetcapture
Status: No capture running

Current Settings:
 Max file size:      200 MB
 Capture Limit:      None (Run Indefinitely)
 Capture Interfaces: Management
 Capture Filter:     (tcp port 80 or tcp port 3128)

Choose the operation you want to perform:
- START - Start packet capture.
- SETUP - Change packet capture settings.
[]> SETUP

Enter maximum allowable size for the capture file (in MB)
[200]>

Do you want to stop the capture when the file size is reached? (If not, a new file will be started and the older capture data will be discarded.)
[N]>

The following interfaces are configured:
1. Management
Enter the name or number of one or more interfaces to capture packets from, separated by commas:
[1]>

Enter the filter to be used for the capture.
Enter the word "CLEAR" to clear the filter and capture all packets on the selected interfaces.
[(tcp port 80 or tcp port 3128)]> port 53
使用透明部署的SWA中的篩選器
在透明部署的SWA中,雖然網路快取通訊協定(WCCP)連線是透過通用路由封裝(GRE)通道進行,但傳入或傳出SWA的封包中的來源和目的地IP位址是路由器IP位址和SWA IP位址。
為了能夠從GUI使用IP地址或埠號收集資料包捕獲,有兩種選擇:
在GUI中使用透明部署的SWA中過濾
步驟1。在「封包擷取」頁中,選擇「編輯設定」。
步驟2. 從Packet Capture Filters中選擇Predefined Filters。
步驟3.您可以在Client IP或Server IP部分中輸入IP地址。
 影象 — 在預定義過濾器中配置IP地址
步驟4.提交變更。
步驟5.開始擷取。
附註:您可以看到,提交過濾器後,SWA在「選定的過濾器」部分中新增了額外條件。
 映像 — SWA為收集GRE通道中的資料包而新增的額外過濾器
在GUI中使用Custom Filters:
步驟1。在「封包擷取」頁中,選擇「編輯設定」。
步驟2.在Packet Capture Filters中選擇Custom Filter
步驟3.先新增此字串,然後再新增計畫通過新增或在此字串之後實現的篩選器:
(proto gre && ip[40:4] = 0x0a14030f) or (proto gre && ip[44:4] = 0x0a14030f) or (proto gre && ip[40:4] = 0x0a00003c) or (proto gre && ip[44:4] = 0x0a00003c)
例如。如果要按主機IP等於10.20.3.15或埠號等於8080進行過濾,可以使用以下字串:
(proto gre && ip[40:4] = 0x0a14030f) or (proto gre && ip[44:4] = 0x0a14030f) or (proto gre && ip[40:4] = 0x0a00003c) or (proto gre && ip[44:4] = 0x0a00003c) or host 10.20.3.15 or port 8080
步驟4.提交變更。
步驟5.開始擷取。
使用CLI中的透明部署在SWA中篩選
要從CLI過濾透明代理部署,請執行以下操作:
步驟1.登入到CLI。
步驟2.鍵入packetcapture,然後按Enter。
步驟3.編輯當前過濾器型別SETUP。
步驟4.回答問題直到達到輸入用於捕獲的過濾器
步驟5.您可以在GUI中使用與「自定義過濾器」相同的過濾器字串。
以下示例按主機IP等於10.20.3.15或埠號等於8080進行過濾:
SWA_CLI> packetcapture
Status: No capture running

Current Settings:
 Max file size:      200 MB
 Capture Limit:      None (Run Indefinitely)
 Capture Interfaces: Management
 Capture Filter:     (tcp port 80 or tcp port 3128)

Choose the operation you want to perform:
- START - Start packet capture.
- SETUP - Change packet capture settings.
[]> SETUP

Enter maximum allowable size for the capture file (in MB)
[200]>

Do you want to stop the capture when the file size is reached? (If not, a new file will be started and the older capture data will be discarded.)
[N]>

The following interfaces are configured:
1. Management
Enter the name or number of one or more interfaces to capture packets from, separated by commas:
[1]>

Enter the filter to be used for the capture.
Enter the word "CLEAR" to clear the filter and capture all packets on the selected interfaces.
[(tcp port 80 or tcp port 3128)]> (proto gre && ip[40:4] = 0x0a14030f) or (proto gre && ip[44:4] = 0x0a14030f) or (proto gre && ip[40:4] = 0x0a00003c) or (proto gre && ip[44:4] = 0x0a00003c) or host 10.20.3.15 or port 8080
最常用的篩選條件
下表列出最常用的篩選條件:
|
說明
|
篩選條件
|
|
按源IP地址過濾等於10.20.3.15
|
src host 10.20.3.15
|
|
按目標IP地址等於10.20.3.15進行過濾
|
dst主機10.20.3.15
|
|
按源IP地址等於10.20.3.15和目標IP地址等於10.0.0.60進行過濾
|
(src host 10.20.3.15)和(dst host 10.0.0.60)
|
|
按源或目標IP地址等於10.20.3.15進行過濾
|
主機10.20.3.15
|
|
按源或目標IP地址過濾等於10.20.3.15或等於10.0.0.60
|
主機10.20.3.15或主機10.0.0.60
|
|
按等於8080的TCP埠號過濾
|
tcp埠8080
|
|
按UDP埠號等於53過濾
|
udp埠53
|
|
按埠號過濾等於514(TCP或UDP)
|
埠514
|
|
僅篩選UDP封包
|
udp
|
|
僅過濾ICMP資料包
|
icmp
|
|
用於透明部署中每個捕獲的主過濾器
|
(proto gre && ip[40:4] = 0x0a14030f)或(proto gre && ip[44:4] = 0x0a14030f)或(proto gre && ip[40:4] = 0x0a00003c)或(proto gre && ip[44:4] = 0x0a00003c)
|
疑難排解
「過濾器錯誤」是執行封包擷取時最常見的錯誤之一。
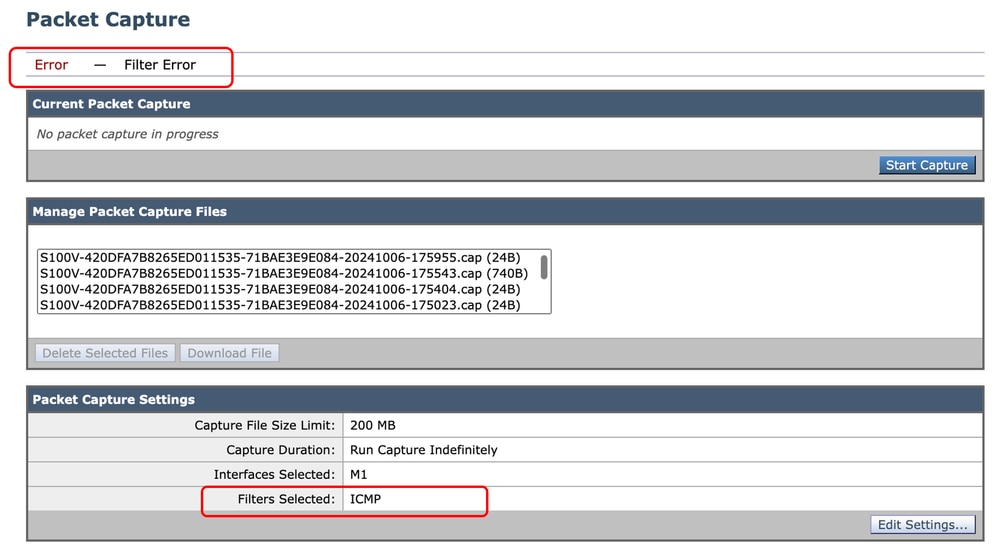 影象 — 過濾器錯誤
此錯誤通常與錯誤的過濾器實現有關。在上例中,ICMP過濾器使用大寫字元。這就是您接收Filter Error的原因。要解決此問題,您需要編輯過濾器並用icmp替換ICMP。
相關資訊
 意見
意見