簡介
本文檔介紹如何在Nexus 9K平台上使用策略(SLP)配置智慧許可。
必要條件
需求
思科建議您瞭解以下主題:
- Nexus NX-OS軟體
- Cisco NX-OS許可選項
- 網域名稱系統(DNS)
採用元件
本檔案中的資訊是根據搭載NXOS版本10.2(5)的Cisco Nexus 9000。
本文中的資訊是根據特定實驗室環境內的裝置所建立。文中使用到的所有裝置皆從已清除(預設)的組態來啟動。如果您的網路運作中,請確保您瞭解任何指令可能造成的影響。
設定
智慧軟體許可(SL)為您的所有思科產品提供單一的標準化許可解決方案。它是基於雲的許可端到端平台,由授權使用和報告思科產品的工具和流程組成。它可在產品例項上運行,並通過Smart Call Home傳輸介質與思科雲許可證服務進行通訊,以完成產品註冊和授權。
使用策略的智慧許可(SLP)是在Cisco NX-OS版本10.2(1)F中引入的,至今它仍然是唯一受支援的許可模式。
智慧許可使用策略是智慧軟體許可的增強版本,其首要目標是提供許可解決方案,該解決方案不會中斷網路的運行,而是支援合規性關係,從而考慮您購買和使用的硬體和軟體許可。
使用策略的智慧許可基於榮譽。但是,許可證使用合規性要求軟體報告。
思科智慧軟體管理員(CSSM)負責管理帳戶和授權例項。CSSM在思科站點上24/7運行。
方法
將Nexus交換機連線到CSSM的主要方法:
- 直接:您使用網際網路連線直接指向思科網站。
- 通過Cisco Smart Licensing Utility(CSLU):這是一個可以在電腦上運行的軟體應用程式。安裝指南。
- 通過本地許可證伺服器:運行思科提供的作業系統的專用伺服器。安裝指南。
- 離線:您在Nexus交換機上生成報告,並將檔案上傳到CSSM以生成確認檔案,然後需要將該檔案應用於Nexus交換機。

附註:無論使用哪種方法,在接下來的90天內,都必須向CSSM提交第一次報告。之後,每365天需要報告頻率,除非許可證使用發生更改,否則這要求您在接下來的90天內提交另一份報告。
組態
這些配置在Nexus 9K交換機上使用SLP的預設VRF管理VRF進行所有通訊。
方法1:直接連線
- 支援智慧和call-home傳輸模式。
- 在NXOS 10.2(2)F(啟動NXOS 10.2(3)F)之前,在呼叫總部傳輸模式下僅支援管理VRF,同時支援非管理VRF。
- 在NXOS 10.3(2)F之前,智慧傳輸模式僅支援管理VRF。從NXOS 10.3(2)F開始,也支援非管理VRF。
步驟1.配置DNS客戶端。
Nexus(config)# ip domain-lookup
Nexus(config)# vrf context management
Nexus(config-vrf)# ip name-server
步驟2.配置智慧傳輸模式。
Nexus(config)# license smart transport smart
步驟3.指示CSSM URL。
Nexus(config)# license smart url smart https://smartreceiver.cisco.com/licservice/license
步驟4.在思科網站上建立信任代碼(權杖)。
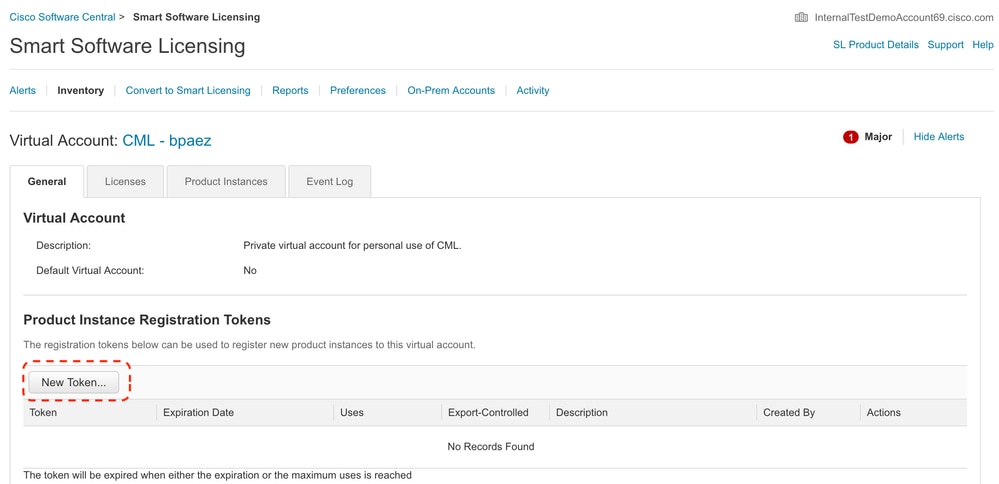
登入到思科軟體中心>智慧軟體許可>清單>常規。
按一下New Token..(新建令牌……).
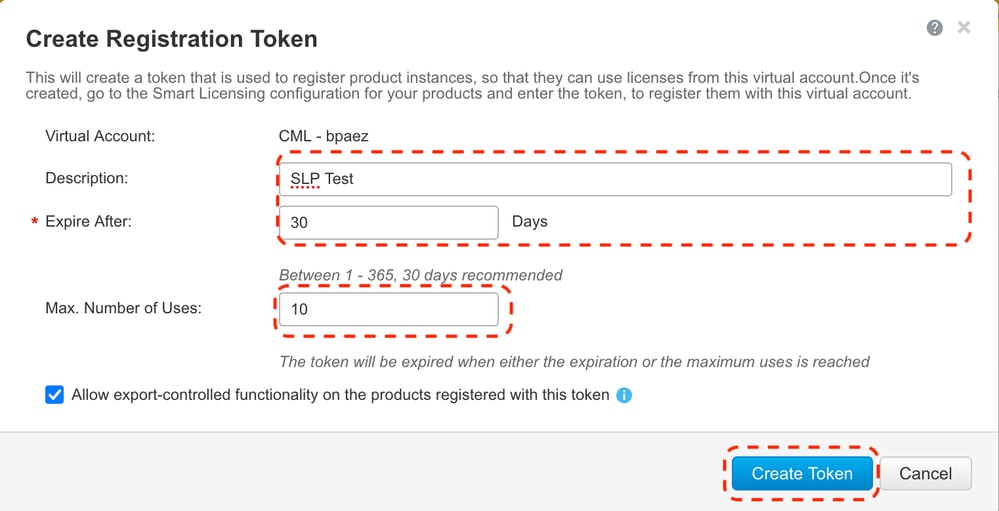
步驟4a.填寫所需資訊,然後按一下Create Token。
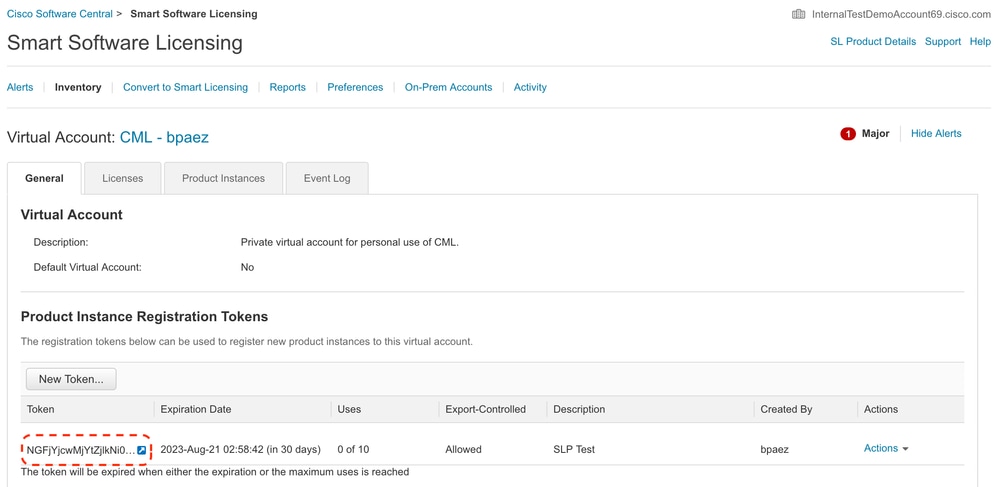
第4b步:按一下新建立的標籤。
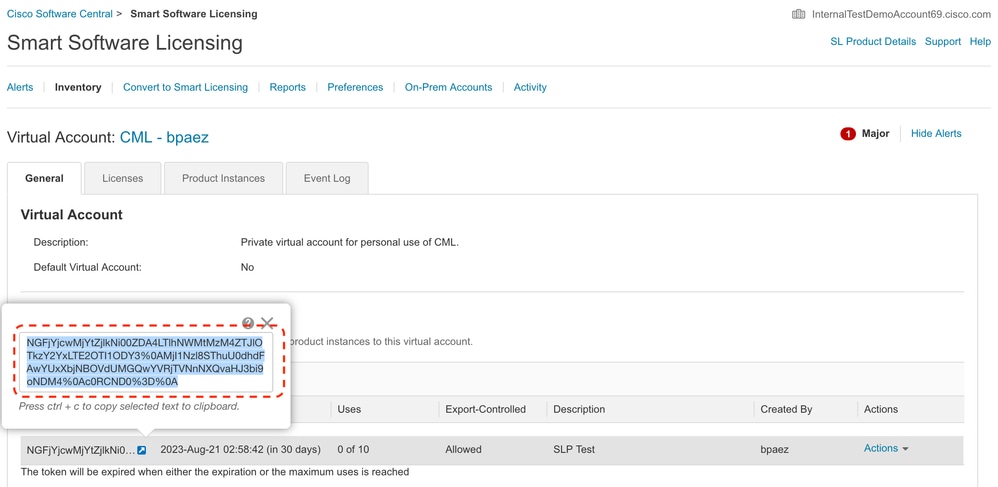
步驟4c.按ctrl + c將所選文字複製到剪貼簿。
步驟5.在Nexus交換機中安裝信任代碼。
Nexus# license smart trust idtoken  all force
Initiated trust establishment with backend. run show license status, for trust establishment status
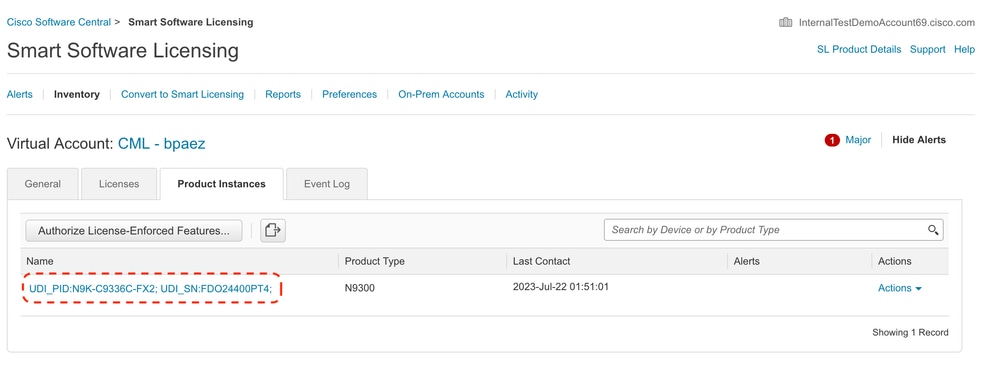
步驟6.確保CSSM上存在Nexus。
登入到思科軟體中心>智慧軟體許可>庫存>產品例項。
步驟7.啟用需要您所需許可證的任何功能。在本示例中,啟用了一個需要NX-OS LAN企業服務許可證的功能。
附註:NX-OS始終要求許可證層次結構中的枝葉節點。
NX-OS始終要求基於功能的許可證,而不是基於層的許可證。
Nexus(config)# feature eigrp
步驟8.確認您正在使用預期的許可證(基於功能)。
Nexus# show license summary
License Usage:
License                    Entitlement tag                 Count   Status
-------------------------------------------------------------------------
LAN license for Nexus 9... (LAN_ENTERPRISE_SERVICES_PKG)    1       IN USE
Nexus# show license usage LAN_ENTERPRISE_SERVICES_PKG

Feature List:
eigrp
步驟9.驗證預期許可證是否已在思科網站上使用。
登入到思科軟體中心>智慧軟體許可>清單>許可證。
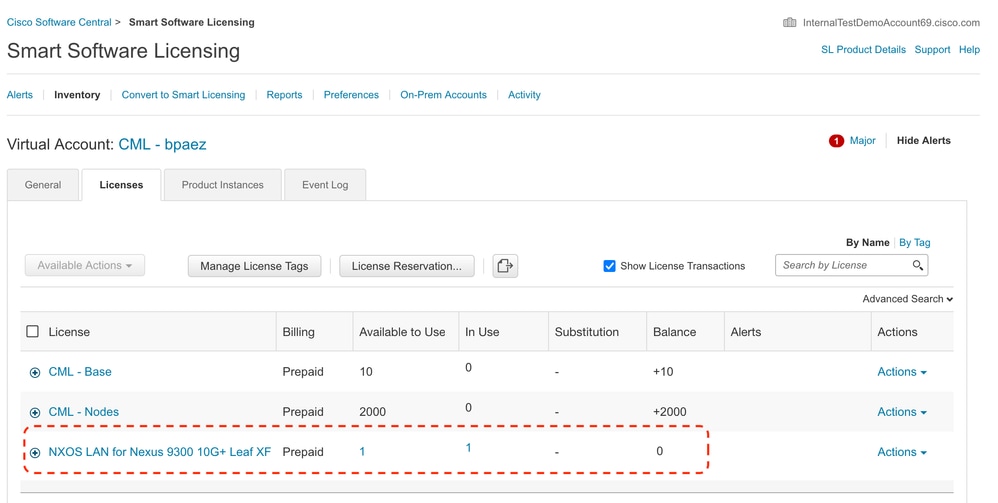
登入到思科軟體中心>智慧軟體許可>清單>許可證。 按一下清單中的預期許可證以檢視詳細資訊。

步驟10.驗證與思科站點的通訊是否成功。
Nexus# show license status
Utility:
    Status: DISABLED

Smart Licensing using Policy:
    Status: ENABLED

Data Privacy:
    Sending Hostname: yes
    Callhome Hostname Privacy: DISABLED
        Smart Licensing Hostname Privacy: DISABLED
    Version Privacy: DISABLED

Transport:
    Type: Smart
    URL: https://smartreceiver.cisco.com/licservice/license
    Proxy:
        Not configured

Policy:
    Policy in use: Merged from multiple sources
    Reporting ACK required: Yes
    Unenforced/Non-Export:
        First report requirement (days): 90 (CISCO default)
        Ongoing reporting frequency (days): 365 (CISCO default)
        On change reporting (days): 90 (CISCO default)
    Enforced (Perpetual/Subscription):
        First report requirement (days): 0 (CISCO default)
        Ongoing reporting frequency (days): 0 (CISCO default)
        On change reporting (days): 0 (CISCO default)
    Export (Perpetual/Subscription):
        First report requirement (days): 0 (CISCO default)
        Ongoing reporting frequency (days): 0 (CISCO default)
        On change reporting (days): 0 (CISCO default)

Miscellaneous:
    Custom Id:

Usage reporting:
    Last ACK received: Jul 21 19:28:32 2023 UTC
    Next ACK deadline: Jul 20 19:28:32 2024 UTC
    Reporting push interval: 30 days
    Next ACK push check:
    Next report push: Aug 20 19:23:33 2023 UTC
    Last report push: Jul 21 19:23:33 2023 UTC
    Last report file write:

Trust Code installed: Jul 21 19:18:04 2023 UTC
    Active: PID: N9K-C9336C-FX2, SN: FDO24400PT4
        Jul 21 19:18:04 2023 UTC


Nexus#
方法2:CSLU
在NXOS 10.3(2)F之前,CSLU傳輸模式僅支援管理VRF。從NXOS 10.3(2)F開始,也支援非管理VRF。
步驟1.配置DNS客戶端。
附註:如果在運行CSLU的主機上未使用完全限定域名(FQDN),可以跳到步驟3。
Nexus(config)# ip domain-lookup
Nexus(config)# vrf context management
Nexus(config-vrf)# ip name-server
步驟2.在DNS伺服器上為cslu-local新增條目。
附註:Nexus會自動發現主機名cslu-local和cslu-local。<domain>
步驟3.確保配置了cslu transport。這是預設的組態。
Nexus(config)# license smart transport cslu
步驟4.指示CSLU傳輸URL。
Nexus(config)# license smart url cslu http://:8182/cslu/v1/pi
步驟5.啟用需要您所需許可證的任何功能。在本示例中,您啟用需要NX-OS LAN企業服務許可證的功能。
附註:NX-OS始終要求許可證層次結構中的枝葉節點。
NX-OS始終要求基於功能的許可證,而不是基於層的許可證。
Nexus(config)# feature isis
步驟6.確認您正在使用預期的許可證(基於功能)。
Nexus# show license summary
License Usage:
License                    Entitlement tag                 Count   Status
-------------------------------------------------------------------------
LAN license for Nexus 9... (LAN_ENTERPRISE_SERVICES_PKG)    1       IN USE
Nexus# show license usage LAN_ENTERPRISE_SERVICES_PKG

Feature List:
isis
步驟7.將許可證使用情況報告(稱為RUM報告)傳送到CSSM。
Nexus# license smart sync all
Initiated sync with backend.
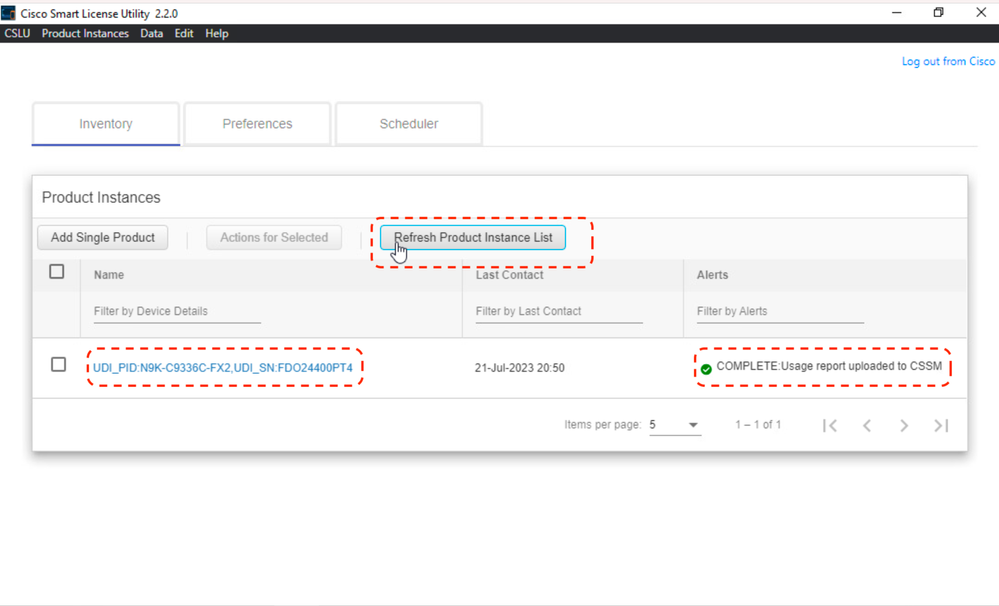
步驟8.按一下Refresh Product Instance List並驗證CSLU上是否存在產品例項,指示Complete:使用情況報告已上載到CSSM。
開啟CSLU >庫存>產品例項。
步驟9.確保CSSM上存在Nexus。這確認了CSLU和CSSM之間的通訊工作正常。
登入到Cisco Software Central > Smart Software Licensing > Inventory > Product Instance。

步驟10.驗證CSSM本地本地伺服器上的預期許可證已使用。
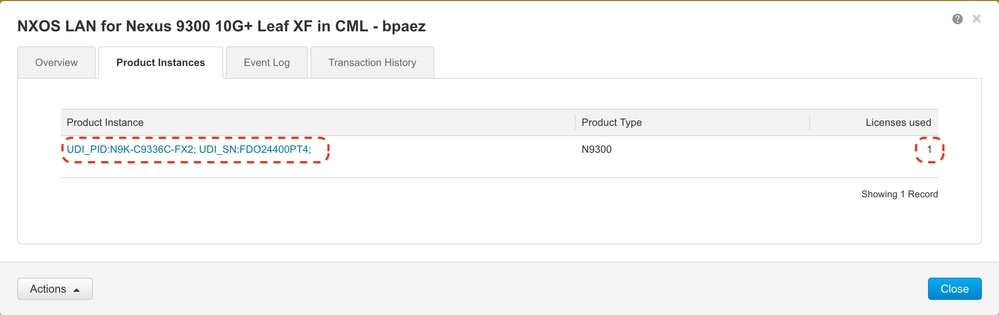
登入到思科軟體中心>智慧軟體許可>清單>許可證。

登入到Cisco Software Central > Smart Software Licensing > Inventory > Licenses > Click on License > Product Instances。
步驟11.驗證與思科站點的通訊是否成功。
Nexus# show license status
Utility:
    Status: DISABLED

Smart Licensing using Policy:
    Status: ENABLED

Data Privacy:
    Sending Hostname: yes
    Callhome Hostname Privacy: DISABLED
        Smart Licensing Hostname Privacy: DISABLED
    Version Privacy: DISABLED

Transport:
    Type: CSLU
    Cslu address: http://10.201.255.233:8182/cslu/v1/pi

Policy:
    Policy in use: Merged from multiple sources
    Reporting ACK required: Yes
    Unenforced/Non-Export:
        First report requirement (days): 90 (CISCO default)
        Ongoing reporting frequency (days): 365 (CISCO default)
        On change reporting (days): 90 (CISCO default)
    Enforced (Perpetual/Subscription):
        First report requirement (days): 0 (CISCO default)
        Ongoing reporting frequency (days): 0 (CISCO default)
        On change reporting (days): 0 (CISCO default)
    Export (Perpetual/Subscription):
        First report requirement (days): 0 (CISCO default)
        Ongoing reporting frequency (days): 0 (CISCO default)
        On change reporting (days): 0 (CISCO default)

Miscellaneous:
    Custom Id:

Usage reporting:
    Last ACK received:
    Next ACK deadline: Oct 20 01:09:12 2023 UTC
    Reporting push interval: 30 days
    Next ACK push check: Jul 22 01:18:02 2023 UTC
    Next report push: Aug 21 01:13:03 2023 UTC
    Last report push: Jul 22 01:13:03 2023 UTC
    Last report file write:

Trust Code installed:
附註:
希望使用此方法在show license status中看到「Trust Code Installed」(安裝信任代碼)。
當您第一次與CSSM本地同步時,預計會看到在show license status中接收到的Last ACK。在第一次推送下次報告後,會發生此變化。
方法3:內部許可證伺服器
- On-Prem僅支援CSLU傳輸模式。
-
在NXOS 10.3(2)F之前,CSLU傳輸模式僅支援管理VRF。從NXOS 10.3(2)F開始,也支援非管理VRF。
步驟1.配置DNS客戶端。
Nexus(config)# ip domain-lookup
Nexus(config)# vrf context management
Nexus(config-vrf)# ip name-server
步驟2.確保配置了CSLU傳輸。這是預設的組態。
Nexus(config)# license smart transport cslu
步驟3.識別CSLU傳輸URL。
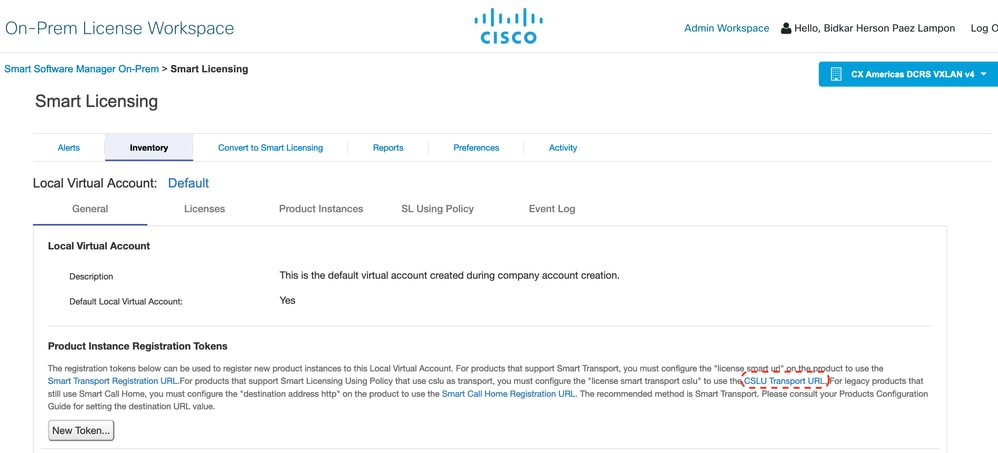
登入CSSM On-Prem > Smart Software Manager On-Prem > Select Local Virtual Account(右上角)。 從下拉選單中,選擇Inventory > General,然後按一下CSLU Transport URL進行復制。
步驟4.指示CSLU傳輸URL。
Nexus(config)# license smart url cslu https:///cslu/v1/pi/
步驟5.啟用需要您所需許可證的任何功能。在本示例中,啟用了一個需要NX-OS LAN企業服務許可證的功能。
附註:NX-OS始終要求許可證層次結構中的枝葉節點。
NX-OS始終要求基於功能的許可證,而不是基於層的許可證。
Nexus(config)# feature ospf
步驟6.確認您正在使用預期的許可證(基於功能)。
Nexus# show license summary
License Usage:
License                    Entitlement tag                 Count   Status
-------------------------------------------------------------------------
LAN license for Nexus 9... (LAN_ENTERPRISE_SERVICES_PKG)    1       IN USE
Nexus# show license usage LAN_ENTERPRISE_SERVICES_PKG

Feature List:
ospf
步驟7.將RUM報告傳送到CSSM。
Nexus# license smart sync all
Initiated sync with backend.
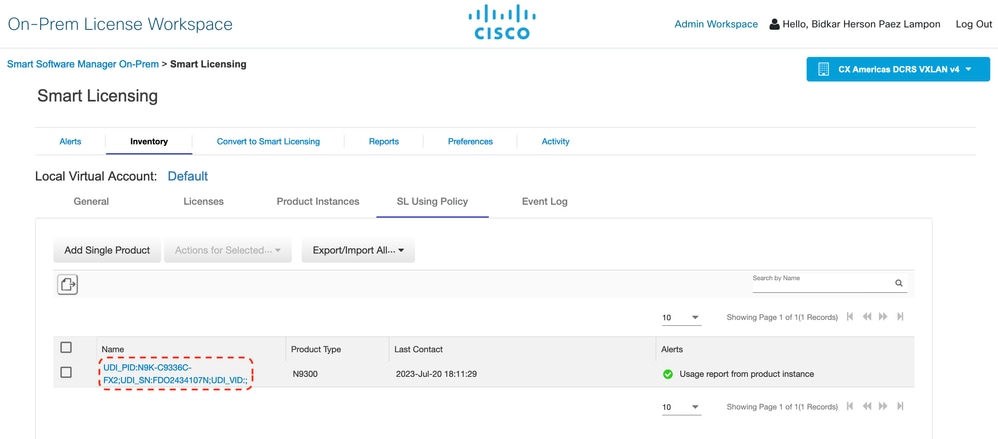
步驟8.確保CSSM內部版本上存在Nexus。
登入CSSM On-Prem > Smart Software Manager On-Prem > Select Local Virtual Account(右上角)。 從下拉選單中,選擇Inventory > SL Using Policy。
步驟9.驗證CSSM本地本地伺服器上的預期許可證已使用。
從下拉選單>清單>許可證(Inventory > Licenses)登入CSSM本地>智慧軟體管理器本地>選擇本地虛擬帳戶(右上角)。
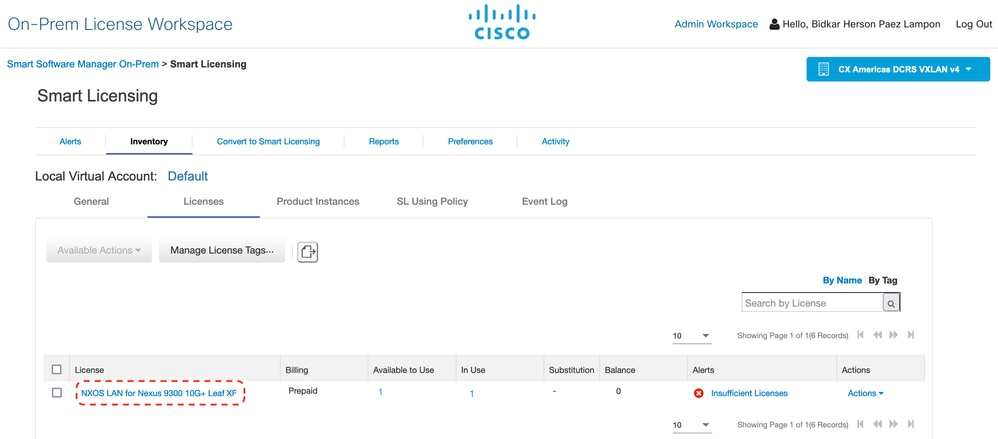
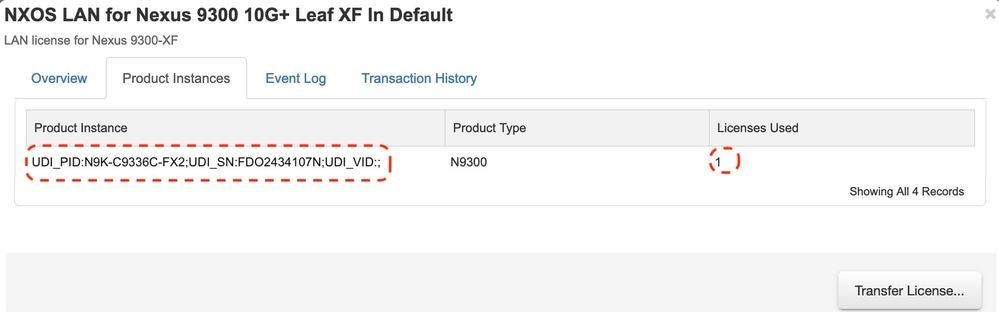
登入CSSM On-Prem > Smart Software Manager On-Prem > Select Local Virtual Account(右上角)。 從下拉選單中,選擇「資產」>「許可證」。按一下清單中的預期許可證以檢視詳細資訊。
附註:希望使用此方法在show license status中看到作為<none>安裝的信任代碼。
當您第一次與CSSM本地同步時,預計會看到最後收到的ACK顯示為顯示許可證狀態。在第一次推送下次報告後,會發生此變化。
方法4:離線
步驟1.禁用智慧傳輸模式。
Nexus(config)# license smart transport off
步驟2.啟用需要您所需許可證的任何功能。在本示例中,啟用了一個需要NX-OS LAN企業服務許可證的功能。
附註:NX-OS始終要求許可證層次結構中的枝葉節點。
NX-OS始終要求基於功能的許可證,而不是基於層的許可證。
如果沒有啟用許可功能,則無法儲存RUM報告。RUM報告捕獲裝置中的許可事務以供上傳。在綠地裝置上,沒有要報告的內容,因此它是空的,不會生成。
Nexus(config)# feature bgp
步驟3.確認您正在使用預期的許可證(基於功能)。
Nexus# show license summary
License Usage:
License                    Entitlement tag                 Count   Status
-------------------------------------------------------------------------
LAN license for Nexus 9... (LAN_ENTERPRISE_SERVICES_PKG)    1       IN USE
Nexus# show license usage LAN_ENTERPRISE_SERVICES_PKG
Feature List:
bgp
步驟4.生成並儲存RUM報告。
Nexus# license smart save usage all bootflash:all_rum.txt
Success: Saved in bootflash:/all_rum.txt.
步驟5.將檔案從步驟4複製到連線至Internet的裝置。
步驟6.將RUM報告(使用資料)上傳到CSSM。
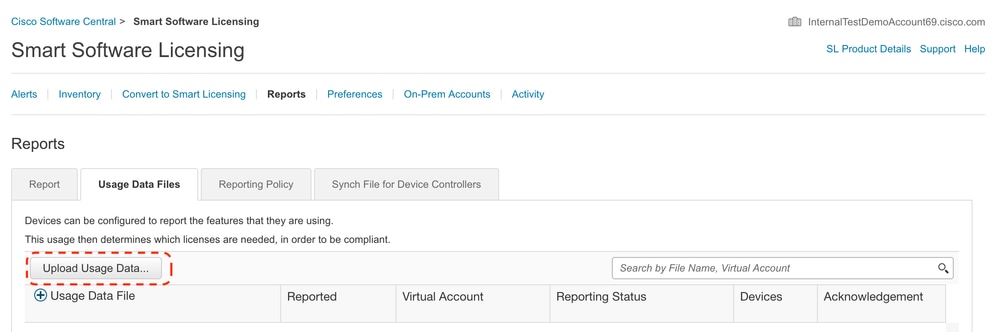
登入思科軟體中心>智慧軟體授權>。
步驟6a.按一下「Upload Usage Data」。
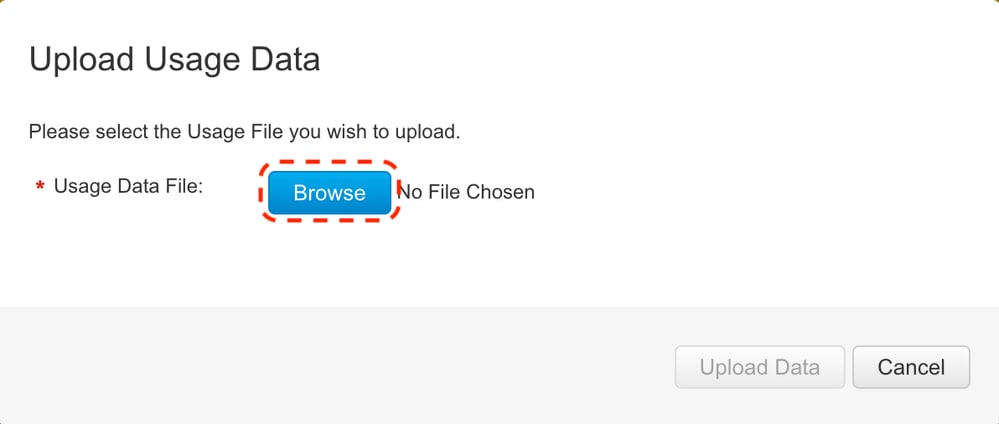
第6b步:按一下「Browse」。
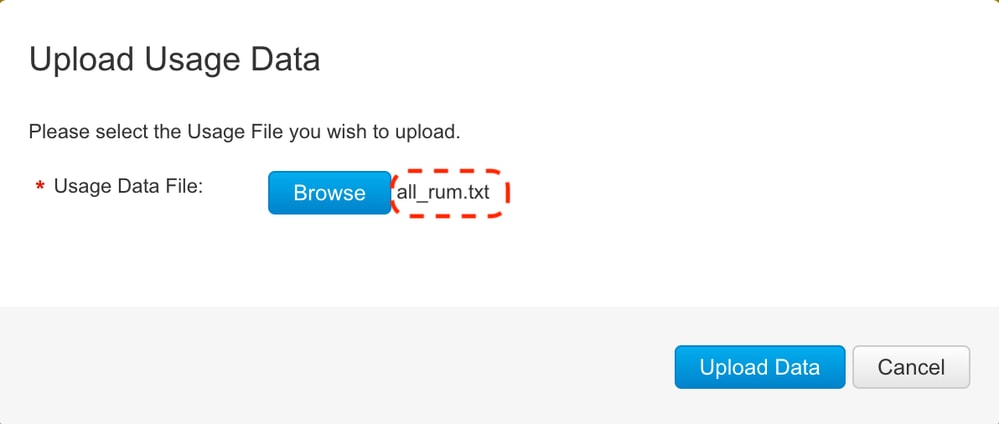
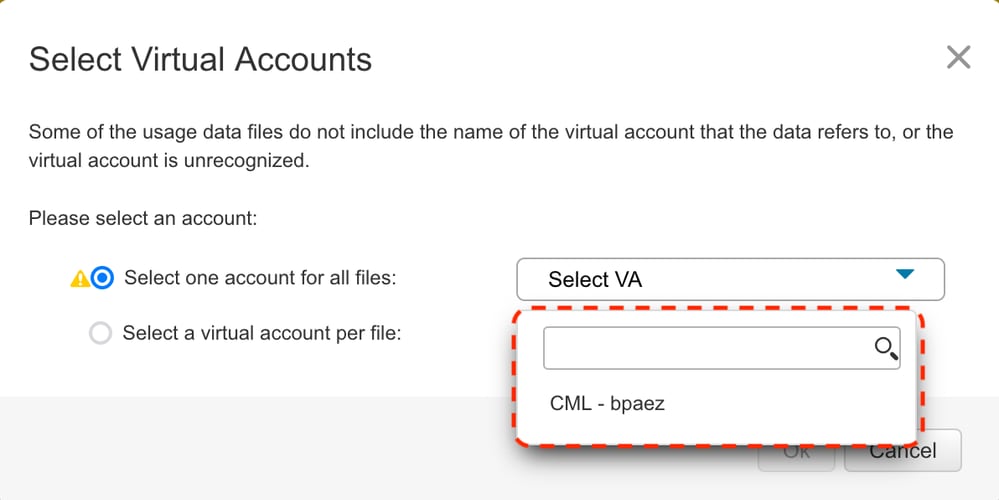
步驟6c.在彈出視窗中選擇all_rum.txt,然後按一下Upload Data。
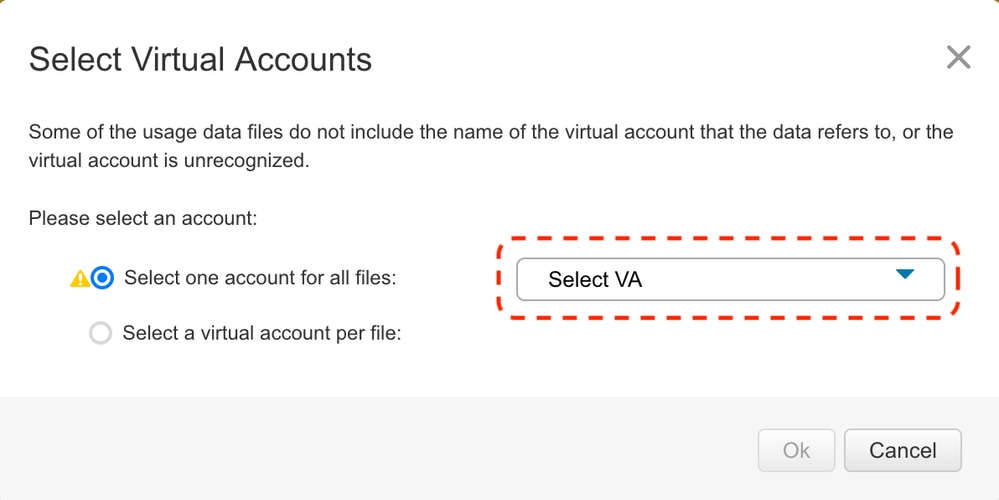
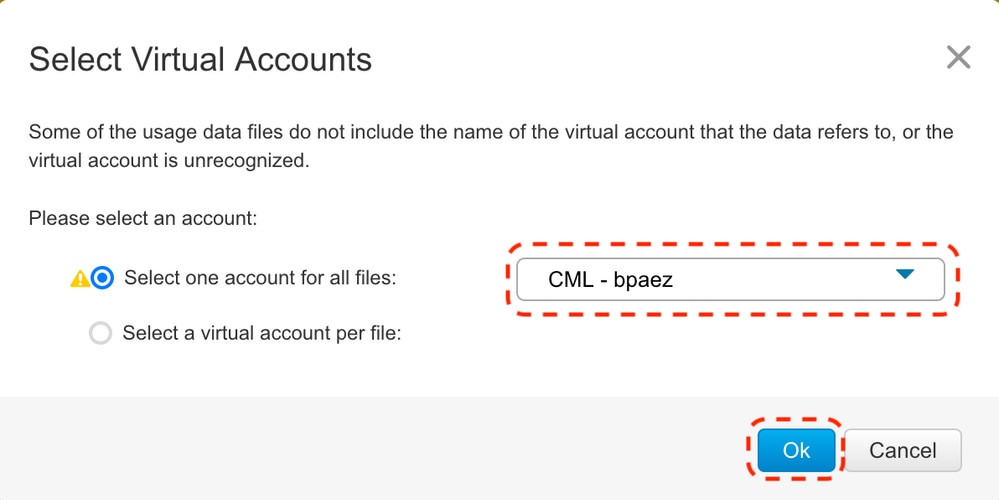
步驟6d。從下拉選單中選擇接收已上傳檔案的虛擬帳戶,然後按一下Ok。
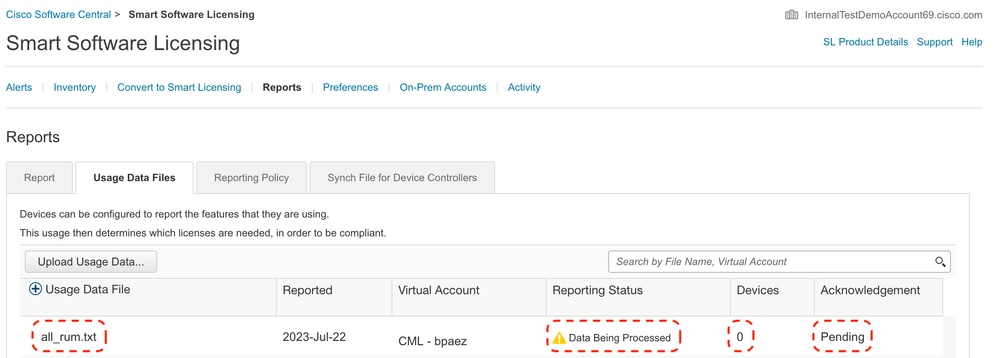
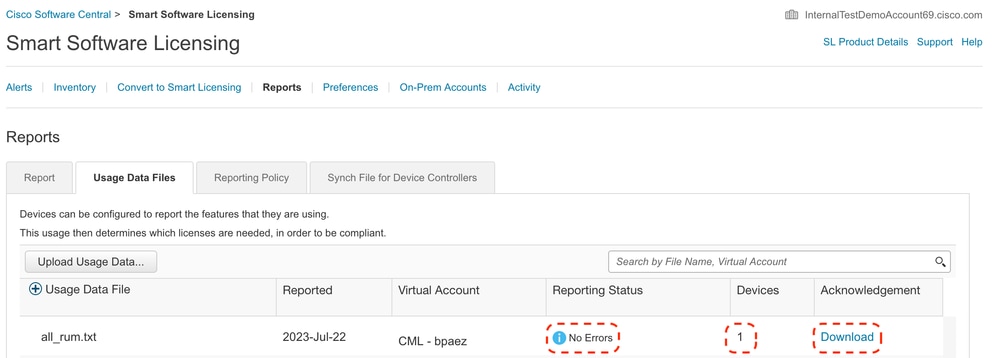
步驟7.等待Reporting Status更改為No errors,然後按一下Download獲取ACK檔案。
步驟8.確保CSSM上存在Nexus。

步驟9.驗證預期許可證是否已在思科網站上使用。
登入到Cisco Software Central > Smart Software Licensing > Inventory > Licenses。

登入到思科軟體中心>智慧軟體許可>清單>許可證。按一下清單中的預期許可證以檢視詳細資訊。

步驟10.將步驟7中的ACK檔案上傳到Nexus交換機。
步驟11.在Nexus交換機中安裝ACK檔案。
Nexus# license smart import bootflash:ACK_all_rum.txt
Done smart import.
步驟12.驗證ACK是否安裝成功。
附註:使用此方法時,在show license status輸出中應該會看到「Trust Code Installed as <none>」。
Nexus# show license status
Utility:
    Status: DISABLED

Smart Licensing using Policy:
    Status: ENABLED

Data Privacy:
    Sending Hostname: yes
    Callhome Hostname Privacy: DISABLED
        Smart Licensing Hostname Privacy: DISABLED
    Version Privacy: DISABLED

Transport:
    Type: Off

Policy:
    Policy in use: Merged from multiple sources
    Reporting ACK required: Yes
    Unenforced/Non-Export:
        First report requirement (days): 90 (CISCO default)
        Ongoing reporting frequency (days): 365 (CISCO default)
        On change reporting (days): 90 (CISCO default)
    Enforced (Perpetual/Subscription):
        First report requirement (days): 0 (CISCO default)
        Ongoing reporting frequency (days): 0 (CISCO default)
        On change reporting (days): 0 (CISCO default)
    Export (Perpetual/Subscription):
        First report requirement (days): 0 (CISCO default)
        Ongoing reporting frequency (days): 0 (CISCO default)
        On change reporting (days): 0 (CISCO default)

Miscellaneous:
    Custom Id:

Usage reporting:
    Last ACK received: Jul 21 20:29:40 2023 UTC
    Next ACK deadline: Oct 19 20:29:40 2023 UTC
    Reporting push interval: 30 days
    Next ACK push check:
    Next report push: Jul 21 20:02:40 2023 UTC
    Last report push:
    Last report file write:

Trust Code installed:
相關資訊
 意見
意見