簡介
本檔案介紹如何透過Ansible REST API模組設定思科整合式管理控制器(CIMC)。
必要條件
需求
思科建議您瞭解以下主題:
採用元件
-
UCS C220-M4,版本4.1(2f)
- 運行postman和ansible版本2.14.5的客戶端
本文中的資訊是根據特定實驗室環境內的裝置所建立。文中使用到的所有裝置皆從已清除(預設)的組態來啟動。如果您的網路運作中,請確保您瞭解任何指令可能造成的影響。
CIMC API概述
所有組成Cisco UCS的物理和邏輯元件都以分層管理資訊模型(MIM)(也稱為MIT)表示。樹中的每個節點都代表一個託管對象(MO)或包含其管理狀態和操作狀態的對象組。
分層結構從頂部(sys)開始,包含父節點和子節點。此樹中的每個節點都是託管對象,Cisco UCS中的每個對象都有一個唯一的可分辨名稱(DN),用於描述對象及其在樹中的位置。託管對象是Cisco UCS資源(如CPU、DIMM、介面卡卡、風扇和電源裝置)的抽象概念。
CIMC MIM結構圖示:
|——sys———————————––– (sys)
     |——rack-unit-1————————(sys/rack-unit-1)
          |——adaptor-1————————(sys/rack-unit-1/adaptor-1)
          |——psu-1————————(sys/rack-unit-1/psu-1)
          |——psu-2————————(sys/rack-unit-1/psu-2)
對象命名:
- DN:可分辨名稱使您能夠明確標識目標對象。
- RN:相對名稱標識其父對象上下文中的對象。
例如,此可分辨名稱:
<dn = "sys/rack-unit-1/adaptor-1/host-eth-eth2"/>
由4個相對名稱組成:
topSystem MO: rn="sys"
computeRackUnit MO: rn ="rack-unit-1"
adaptorUnit MO: rn="adaptor-<id>"
adaptorHostEthIf MO: rn="host-eth-<id>"
本文中使用的API:
-
驗證:aaaLogin。初始登入方法。使用aaaLogin方法獲取有效的cookie。
-
查詢: configResolveDn。按DN檢索對象。
-
組態:configConfMo。 configConfMo 方法用於配置受管對象(MO)中的一個或多個屬性。 要配置的MO由可分辨名稱(DN)唯一標識。

附註:
許多查詢方法包含一個inHierarchical引數,該引數接受布林值(true/yes或false/no)。 設定為true時,此引數導致方法返回層次結構中的所有子對象。
組態
1.查詢CIMC託管對象(MO)的類或DN
要通過CIMC的API自動配置CIMC,必須確定與要配置的託管對象(MO)關聯的特定類或唯一判別名(DN)資訊。
1a。使用API登入到CIMC並檢索cookie資訊
向https://{{apic_cimc_ip}}/nuova 傳送POST請求,並指定aaaLogin方法。輸入使用者名稱和密碼。
從API響應複製cookie。
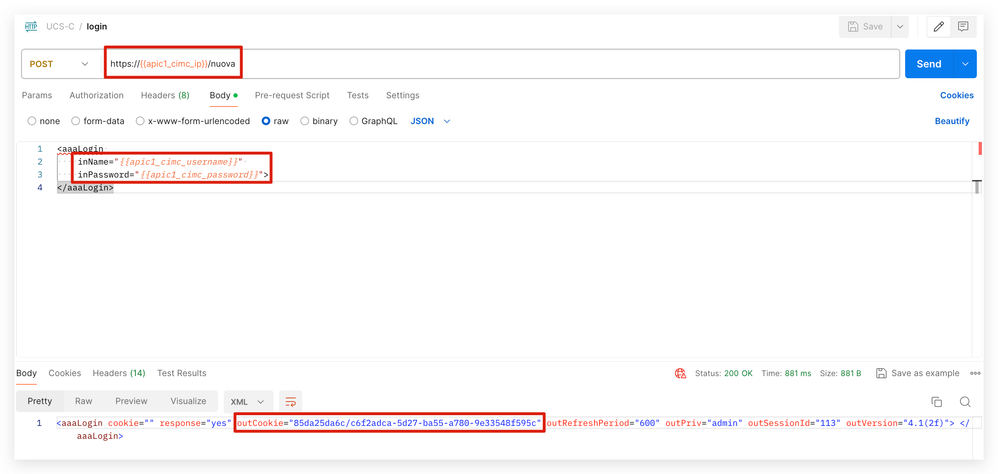
或者,您可以使用curl獲取cookie資訊。
curl -k -d "" https://apic_cimc_ip/nuova
1b。使用API查詢方法configResolveDn檢索所有託管對象(MO)資訊
將configResolveDn與inHierarchical="true"和dn="sys/"一起使用時,它會從CIMC檢索所有託管對象(MO)資訊。
configResolveDn:configResolveDn方法檢索指定DN的單個託管對象。
inHierarchical=true:如果設定為true,則返回所有子節點資訊。這種組合能夠從CIMC獲取所有節點和子節點的MO資訊。
dn="sys/":這是MIT的根目錄。
API響應:
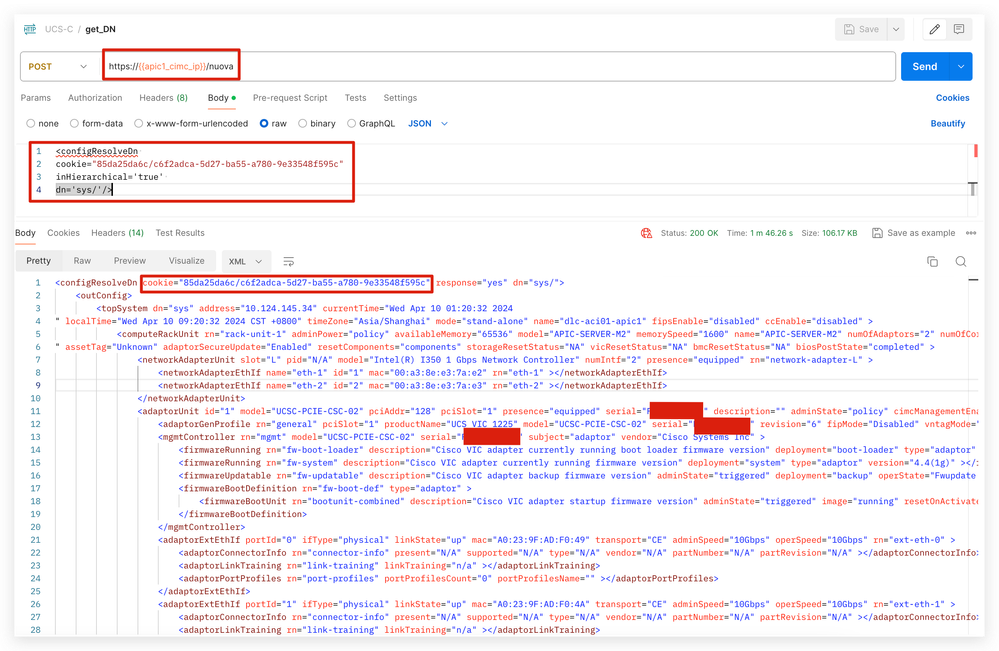
將Postman執行響應複製到文本編輯器(如Notepad、PyCharm或Visual Studio Code),以便以後根據MO搜尋類和DN。
範例 1:查詢時區的類和DN
當前CIMC GUI中配置的時區為「Asia/Shanghai」。
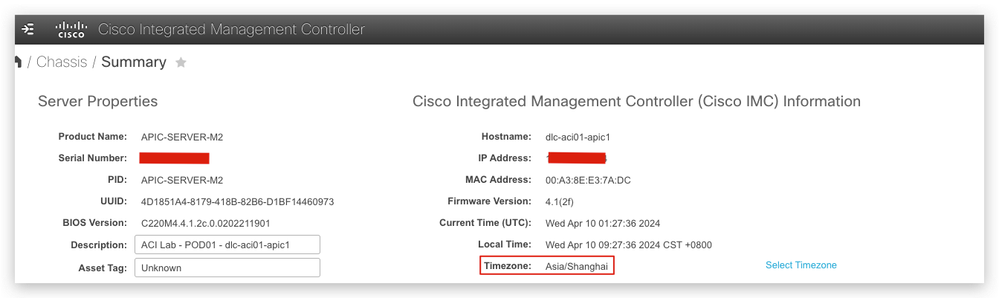
在步驟1b中,從Postman返回的結果中搜尋「Asia/Shanghai」。時區為「Asia/Shanghai」,類別為「topSystem」,DN為「sys/」。
<configResolveDn cookie="85da25da6c/c6f2adca-5d27-ba55-a780-9e33548f595c" response="yes" dn="sys/">
    <outConfig>
        <topSystem dn="sys" address="a.b.c.d" currentTime="Wed Apr 10 01:05:12 2024
" localTime="Wed Apr 10 09:05:12 2024 CST +0800" timeZone="Asia/Shanghai"mode="stand-alone" name="dlc-aci01-apic1" fipsEnable="disabled" ccEnable="disabled" >
範例 2:查詢主機名的類和DN
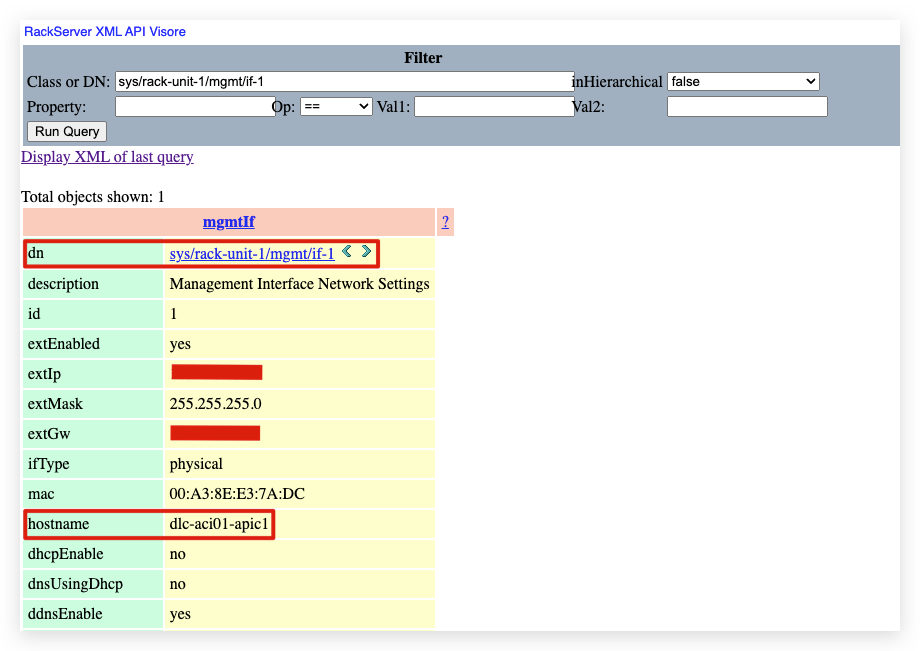
在當前CIMC GUI中配置的主機名為「dlc-aci01-apic1」。
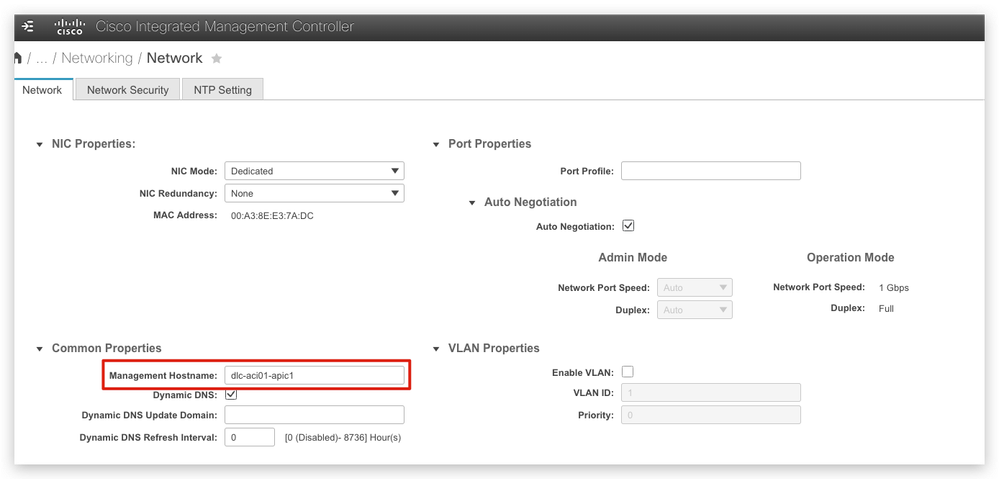
在Postman返回的結果中搜尋「dlc-aci01-apic1」。主機名為「dlc-aci01-apic1」,類為「mgmtIf」,rn為「if-1」。
<mgmtIf rn="if-1" description="Management Interface Network Settings" id="1" extEnabled="yes" extIp="a.b.c.d" extMask="255.255.255.0" extGw="a.b.c.z"
ifType="physical" mac="00:A3:8E:E3:7A:DC" hostname="dlc-aci01-apic1"dhcpEnable="no" dnsUsingDhcp="no" ddnsEnable="yes" ddnsDomain=""
dnsPreferred="a.b.c.z" dnsAlternate="0.0.0.0" ddnsRefreshInterval="0" nicMode="dedicated" vicSlot="0" nicRedundancy="none"
vlanEnable="no" vlanId="1" vlanPriority="0" portProfile="" v6extEnabled="no" v6extIp="::" v6extGw="::" v6prefix="64" v6linkLocal="::"
v6SlaacIp="::" v6dhcpEnable="no" v6dnsUsingDhcp="no" v6dnsPreferred="::" v6dnsAlternate="::" subject="blade" autoNeg="enabled"
adminNetSpeed="auto" adminDuplex="auto" operNetSpeed="1Gbps" operDuplex="full" >
然後,從https://CIMC_IP/visore.html查詢CIMC visore,主機名「dlc-aci01-apic1」對應於DN= 'sys/rack-unit-1/mgmt/if-1'。
2.通過REST API管理CIMC
使用API方法configResolveClass檢索信息
configResolveClass:該方法檢索給定類中的託管對象。如果inHierarchical=true,則結果包含子級。以查詢韌體版本為例,使用API方法configResolveClass並指定MO的classID。
可能的指令碼內容輸出:
- name: IMC login and check
  community.general.imc_rest:
    hostname: '{{ imc_hostname }}'
    username: '{{ imc_username }}'
    password: '{{ imc_password }}'
    validate_certs: false  # only do this when you trust the network!
    content: |

      <configResolveClassinHierarchical='false'classId='firmwareRunning'/>
使用API方法configConfMo修改配置
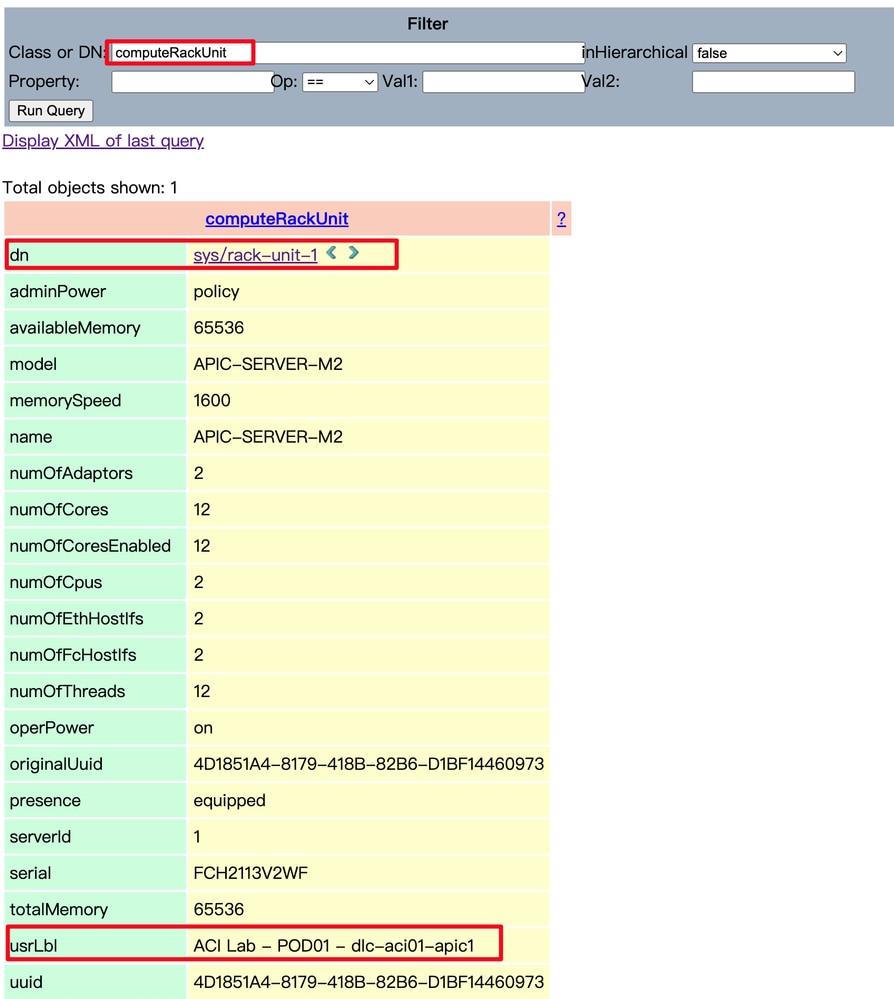
要使用CIMC API修改MO的配置,請使用configConfMo方法。此方法用於配置或修改特定MO的設定。呼叫configConfMo時,提供要修改的MO的準確類或DN資訊非常重要。
可能的指令碼內容輸出:
   - name: change CIMC description
     community.general.imc_rest:
       hostname: '{{ imc_hostname }}'
       username: '{{ imc_username }}'
       password: '{{ imc_password }}'
       validate_certs: false
       content: |

         <computeRackUnit dn="sys/rack-unit-1" usrLbl="new_lab_CIMC_description"/>
        examples:
3. CIMC自動化配置工作流示例
Cisco APIC是安裝在UCS C220系列上的Cisco ACI控制器軟體。該工作流程說明了對APIC軟體重新映像的自動化流程。
1. Login to CIMC with pre-check
  - Retrieve firmware version
  - Retrieve faults
  - Retrieve TPM status
2. Update CIMC configurations
  - Update management hostname
  - Update Description
  - Update Timezone
  - Update ntp
  - Enable SOL
  - Update CIMC mapping vmedia
  - Update CIMC boot order to CIMC-map
  - Reboot CIMC
3. Ansible run shell expect to monitor installation status and enter iso link for APIC installation speed up
4. Retrieve CIMC post installation status
  - Update CIMC boot order back to HDD
  - Power-on host
Ansible模組示例:
附註:示例僅包含內容資訊,full ansible module引用community.general.imc_rest module from Ansible official website
- name: Login to CIMC with pre-check
    content: |

      <configResolveClass inHierarchical='false' classId='firmwareRunning'/>


      <configResolveClass inHierarchical='false' classId='faultInst'/>


      <configResolveClass inHierarchical='false' classId='equipmentTpm'/>


- name: IMC update CIMC infra info
    content: |


        <mgmtIf dn="sys/rack-unit-1/mgmt/if-1" hostname="dlc-aci01-apic1"/>


        <computeRackUnit dn="sys/rack-unit-1" usrLbl="ACI Lab - POD01 - dlc-aci01-apic1"/>


        <topSystem dn="sys" timeZone="Asia/Shanghai"/>


        <commNtpProvider dn="sys/svc-ext/ntp-svc" ntpServer1="ntp.esl.cisco.com"/>


- name: Update CIMC configurations
    content: |


        <lsbootVMedia dn="sys/rack-unit-1/boot-precision/vm-CIMC-map" name="CIMC-map" type="VMEDIA" subtype="cimc-mapped-dvd"  order="1" state="Enabled" />


        <commVMediaMap volumeName="ACI-automation" map="www" remoteShare="http://a.b.c.d/Images/ACI/4/4.2/" remoteFile="aci-apic-dk9.4.2.6l.iso" dn="sys/svc-ext/vmedia-svc/vmmap-ACI-automation" >


        <computeRackUnit dn="sys/rack-unit-1" adminPower="hard-reset-immediate" />


# Ansible run shell expect to monitor installation status and enter iso link for APIC installation speed up
- name: copy apic init script to
  template:
    src: "init.sh"
    dest: /tmp/init.sh
  delegate_to: localhost

- name: Make script executable
  file:
    path: /tmp/init.sh
    mode: "+x"
  delegate_to: localhost
  tags:
    - render
    - init

- name: Run the generated script
  command: /tmp/init.sh
  delegate_to: localhost
  changed_when: no
  tags:
    - script

- name: Retrieve CIMC post installation status
    content: |


        <lsbootVMedia dn="sys/rack-unit-1/boot-precision/vm-CIMC-map" name="CIMC-map" status='removed'/>


        <commVMediaMap dn="sys/svc-ext/vmedia-svc/vmmap-ACI-automation" volumeName="ACI-automation" status='removed' >


        <lsbootStorage dn="sys/rack-unit-1/boot-policy/storage-read-write" access="read-write" order="1" type="storage"/>


        <computeRackUnit dn="sys/rack-unit-1" adminPower="up" />

  delegate_to: localhost
  tags:
    - retrieve_CIMC_status
相關資訊
Cisco UCS機架式伺服器Cisco IMC XML API程式設計師指南
community.general.imc_rest模組 — 通過其REST API管理Cisco IMC硬體
UCS Manager資訊模型參考
 意見
意見