為內建FMC上的動態O365對象部署CSDAC
下載選項
無偏見用語
本產品的文件集力求使用無偏見用語。針對本文件集的目的,無偏見係定義為未根據年齡、身心障礙、性別、種族身分、民族身分、性別傾向、社會經濟地位及交織性表示歧視的用語。由於本產品軟體使用者介面中硬式編碼的語言、根據 RFP 文件使用的語言,或引用第三方產品的語言,因此本文件中可能會出現例外狀況。深入瞭解思科如何使用包容性用語。
關於此翻譯
思科已使用電腦和人工技術翻譯本文件,讓全世界的使用者能夠以自己的語言理解支援內容。請注意,即使是最佳機器翻譯,也不如專業譯者翻譯的內容準確。Cisco Systems, Inc. 對這些翻譯的準確度概不負責,並建議一律查看原始英文文件(提供連結)。
簡介
本文檔介紹如何為本地FMC上的動態Microsoft 365對象部署並整合CSDAC,以及如何在Ubuntu 20.04上使用Ansible。
必要條件
需求
思科建議您瞭解以下主題:
- 基本Linux命令。
- 基本Python、Docker和Ansible知識。
- 基本Office 365知識。
採用元件
本文中的資訊係根據以下軟體和硬體版本:
- 運行7.2.5版的Cisco Firewall Management Center Virtual (FMCv) VWware。
- 思科安全動態屬性聯結器(CSDAC)版本2.2。
- Ubuntu 4vCPU/8GB 20.04版。
- Docker版本24.0.6
- Python 3.8.10。
- 2.12.10.
本文中的資訊是根據特定實驗室環境內的裝置所建立。文中使用到的所有裝置皆從已清除(預設)的組態來啟動。如果您的網路運作中,請確保您瞭解任何指令可能造成的影響。
背景資訊
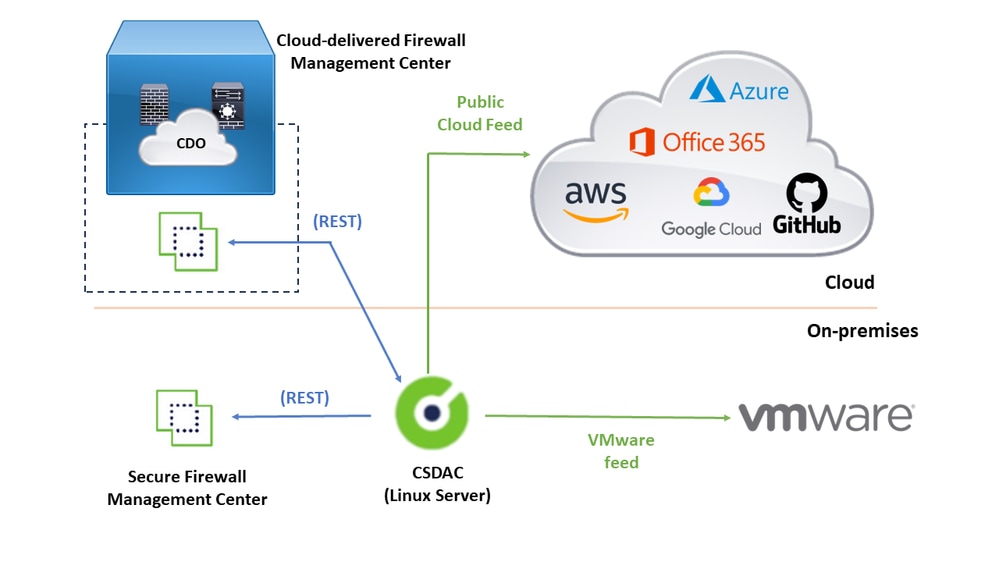
思科安全動態屬性(CSDAC)允許從雲提供商收集網路和IP地址等資料,並將其傳送到思科安全防火牆管理中心,以便在訪問控制策略規則中使用。
Cisco Secure Dynamic Attributes Connector允許使用各種雲服務平台(例如AWS、Github、Google Cloud、Azure、Azure服務標籤、Microsoft Office 365和vCenter)中的服務標籤和類別。
由於工作負載的動態性質和IP地址重疊的必然性,在虛擬、雲和容器環境中網路結構(如IP地址)不可靠。有時,必須在非網路結構(如虛擬機器(VM)名稱或安全組)上定義策略規則。因此,即使在IP地址或VLAN發生更改時,防火牆策略也具有永續性。這些標籤和屬性可以使用在Ubuntu、CentOs或Red Hat Enterprise Linux虛擬機器上運行的動態屬性聯結器Docker容器來收集。如果您希望在CentOS或Red Hat上安裝CSDAC,請參閱正式文檔指南。
Ubuntu主機上的動態屬性聯結器是使用Ansible Collection安裝的。Cisco Secure Dynamic Attributes支援2種型別的介面卡。
- 內部安全防火牆管理中心。
- 雲交付的防火牆管理中心。
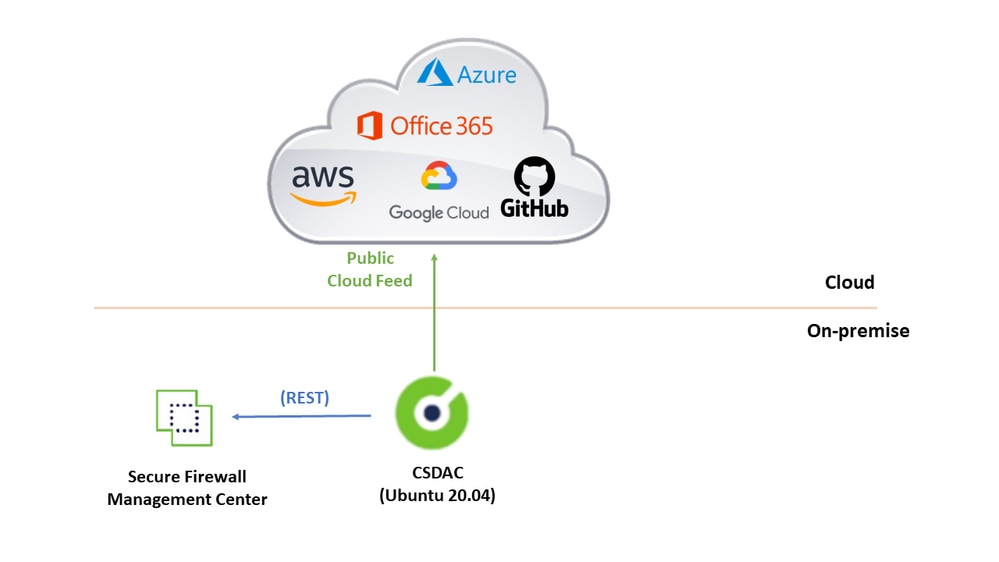
本文側重於使用內部安全防火牆管理中心在Ubuntu主機上部署Cisco安全動態屬性連線,以用於Microsoft Office 365雲服務。
設定
本節分為以下幾節:
- Ubuntu 20.04上的CSDAC部署。
- 建立Office 365聯結器。
- 建立vCenter聯結器。
網路圖表
Ubuntu 20.04上的CSDAC部署
本節介紹如何在Ubuntu上安裝必備軟體。
步驟1:未安裝Validate Docker。
root@tac:/home/tac# docker --version

Command 'docker' not found.
警告:如果已安裝Docker,請參閱Docker文檔將其解除安裝。
第2步:更新Ubuntu儲存庫。
root@tac:/home/tac# sudo apt -y update && sudo apt -y upgrade

Hit:1 http://security-ubuntu-site/ubuntu focal-security InRelease
Hit:2 http://ubuntu-repository-web-site/ubuntu focal InRelease
Hit:3 http://ubuntu-repository-web-site/ubuntu focal-updates InRelease
Hit:4 http://ubuntu-repository-web-site/ubuntu focal-backports InRelease
Reading package lists... Done
Building dependency tree
Reading state information... Done
334 packages can be upgraded. Run 'apt list --upgradable' to see them.
Reading package lists... Done
Building dependency tree
....
第3步:確認Python版本。
root@tac:/home/tac# /usr/bin/python3 --version
Python 3.8.10
警告:如果Python版本早於3.6,則必須安裝版本3.6或更高版本。
第4步:安裝通用庫。
root@tac:/home/tac# sudo apt -y install software-properties-common
Reading package lists... Done
Building dependency tree
Reading state information... Done
...
第5步:安裝Ansible。
root@tac:/home/tac# sudo apt-add-repository -y -u ppa:ansible/ansible && sudo apt -y install ansible
Hit:1 http://security-ubuntu-site/ubuntu focal-security InRelease
Get:2 http://personal-package-archive-site/ansible/ansible/ubuntu focal InRelease [18.0 kB]
Hit:3 http://ubuntu-repository-web-siteubuntu focal InRelease
Hit:4 http://ubuntu-repository-web-site/ubuntu focal-updates InRelease
Hit:5 http://ubuntu-repository-web-site/ubuntu focal-backports InRelease
Get:6 http://personal-package-archive-site/ansible/ansible/ubuntu focal/main amd64 Packages [1 132 B]
Get:7 http://personal-package-archive-site/ansible/ansible/ubuntu focal/main i386 Packages [1 132 B]
Get:8 http://personal-package-archive-site/ansible/ansible/ubuntu focal/main Translation-en [756 B]
Fetched 21.1 kB in 3s (7 526 B/s)
Reading package lists... Done
Reading package lists... Done
Building dependency tree
Reading state information... Done
...
第6步:驗證Ansible版本。
root@tac:/home/tac# ansible --version
ansible [core 2.12.10]
config file = /etc/ansible/ansible.cfg
configured module search path = ['/root/.ansible/plugins/modules', '/usr/share/ansible/plugins/modules']
ansible python module location = /usr/lib/python3/dist-packages/ansible
ansible collection location = /root/.ansible/collections:/usr/share/ansible/collections
executable location = /usr/bin/ansible
python version = 3.8.10 (default, May 26 2023, 14:05:08) [GCC 9.4.0]
jinja version = 2.10.1
libyaml = True
注意:Ansible引用Python 2.x是正常的。聯結器仍使用Python 3.6。
第7步:使用Ansible獲取動態屬性聯結器軟體。
root@tac:/home/tac# ansible-galaxy collection install cisco.csdac
Starting galaxy collection install process
Process install dependency map
Starting collection install process
Downloading https://galaxy-ansible-site/download/cisco-csdac-2.2.1.tar.gz to /root/.ansible/tmp/ansible-local-52406urwp91ou/tmpqabv89vb/cisco-csdac-2.2.1-fr29zaq5
Downloading https://galaxy-ansible-site/download/community-crypto-2.15.1.tar.gz to /root/.ansible/tmp/ansible-local-52406urwp91ou/tmpqabv89vb/community-crypto-2.15.1-dkc897hb
Installing 'cisco.csdac:2.2.1' to '/root/.ansible/collections/ansible_collections/cisco/csdac'
cisco.csdac:2.2.1 was installed successfully
Installing 'community.crypto:2.15.1' to '/root/.ansible/collections/ansible_collections/community/crypto'
Downloading https://galaxy-ansible-site/download/community-general-7.4.0.tar.gz to /root/.ansible/tmp/ansible-local-52406urwp91ou/tmpqabv89vb/community-general-7.4.0-cr9imbx3
community.crypto:2.15.1 was installed successfully
Installing 'community.general:7.4.0' to '/root/.ansible/collections/ansible_collections/community/general'
community.general:7.4.0 was installed successfully
第8步:轉到csdac目錄。
root@tac:/home/tac# cd ~/.ansible/collections/ansible_collections/cisco/csdac/
步驟9:安裝彙總服務。
root@tac:~/.ansible/collections/ansible_collections/cisco/csdac# ansible-playbook default_playbook.yml --ask-become-pass
BECOME password:
[WARNING]: provided hosts list is empty, only localhost is available. Note that
the implicit localhost does not match 'all'
[WARNING]: running playbook inside collection cisco.csdac

PLAY [localhost] ***************************************************************

TASK [Gathering Facts] *********************************************************
ok: [localhost]

TASK [cisco.csdac.csdac : Define Python Interpreter] ***************************
ok: [localhost]

...

TASK [cisco.csdac.csdac : verify that core services are started] ***************
ok: [localhost]

TASK [cisco.csdac.csdac : verify that core services are started] ***************
ok: [localhost]

TASK [cisco.csdac.csdac : verify that core services are started] ***************
ok: [localhost]

TASK [cisco.csdac.csdac : verify that core services are started] ***************
ok: [localhost]

TASK [cisco.csdac.csdac : Post task] *******************************************
ok: [localhost] => {}

MSG:

Please login in to https://172.16.1.53 to configure csdac application

PLAY RECAP *********************************************************************
localhost : ok=72 changed=8 unreachable=0 failed=0 skipped=35 rescued=0 ignored=0

警告:如果由於「使用Docker後台程式套接字拒絕許可權」導致安裝失敗,請考慮使用思科漏洞ID CSCwh58312或聯絡思科TAC。
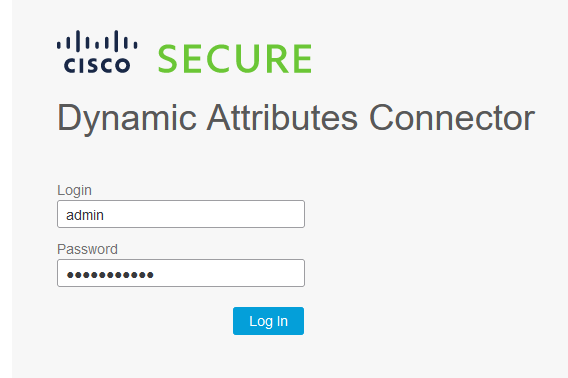
第10步:使用HTTPS協定使用CSDAC IP地址登入聯結器。

注意:初始登入名是使用者名稱「admin」,密碼「admin」。系統會在第一次成功登入後要求變更密碼。
建立Office 365聯結器
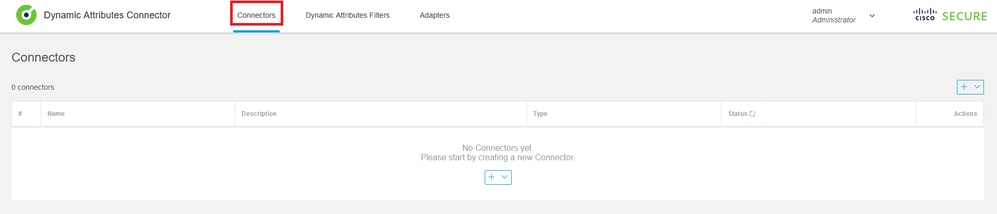
步驟1:登入動態屬性聯結器。

第2步:點選「Connectors」。
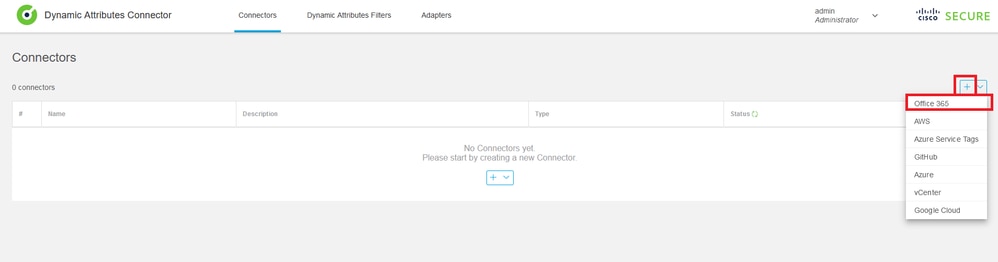
第3步:增加Office 365聯結器:點選增加圖示(+),然後點選「Office 365」。
第4步:使用名稱、基本API URL、例項名稱以及啟用或停用可選IP來配置聯結器。

考慮以下因素:
- 提取間隔預設值為30秒。
- 基本API URL是用於檢索Office 365資訊的URL。請參閱Microsoft文檔指南中的Office 365 IP地址和URL Web服務。
第5步:按一下「測試」並確保測試成功,然後儲存聯結器配置。
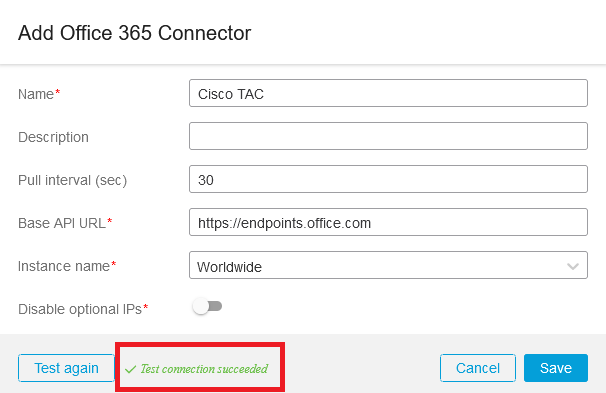
第6步:儲存並確保狀態為「OK」。

建立vCenter聯結器
步驟1:登入動態屬性聯結器。
步驟2:按一下「介面卡」。
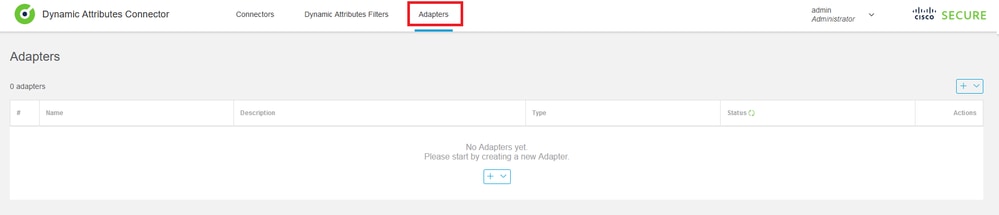
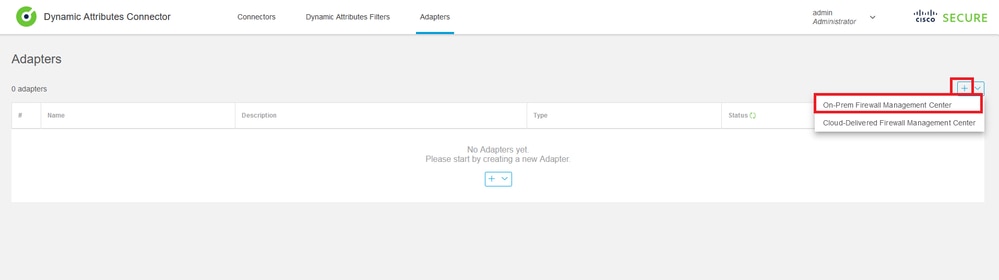
第3步:增加新介面卡:點選增加圖示(+),然後點選「內部防火牆管理中心」。
第4步:使用名稱、IP地址、埠和使用者/密碼配置介面卡。
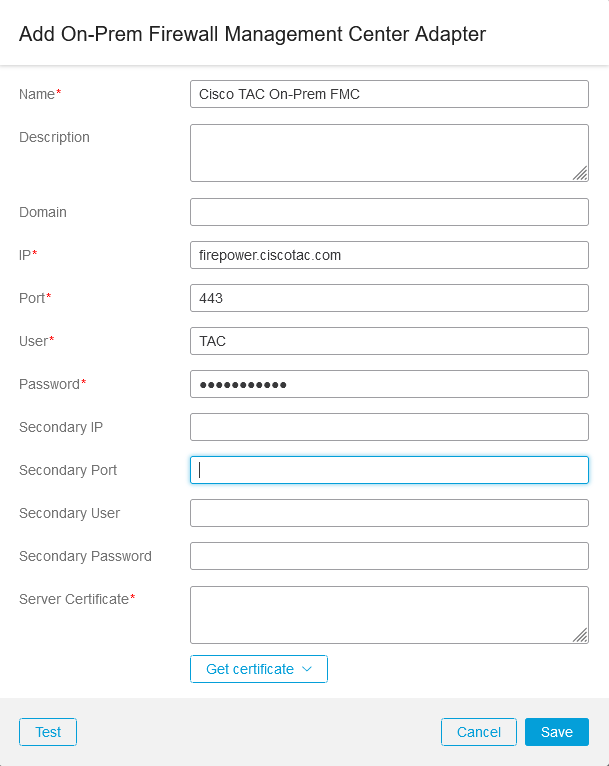
警告:在轉接器連線專用的UI上建立新的FMC使用者。使用現有使用者可能會在CSDAC或內部防火牆管理中心UI上建立未預期的登出。
注意:使用者角色配置必須具有「管理員」、「訪問管理員」或「網路管理員」角色。在「IP地址」欄位上使用內部防火牆管理中心FQDN。
第5步:打開內部防火牆安全管理中心UI。
第6步:從瀏覽器下載HTTPS PEM(鏈)證書:點選瀏覽器上顯示的HTTPS掛鎖、安全連線、更多資訊、檢視證書、PEM(鏈)。
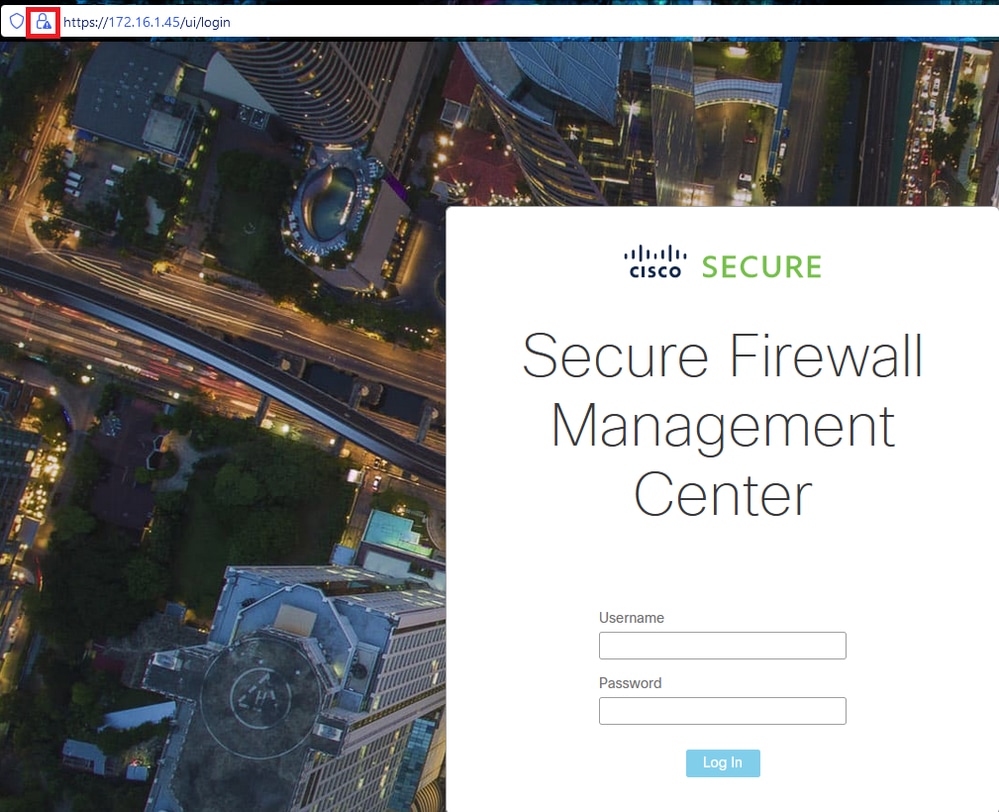

這會下載具有憑證鏈結的.pem檔案。
注意:收集HTTPS內部安全防火牆管理中心證書的步驟屬於Firefox瀏覽器。如果使用其他瀏覽器,請查詢類似的步驟。
第7步:打開動態屬性聯結器,然後點選「獲取證書」和「從檔案瀏覽……」。
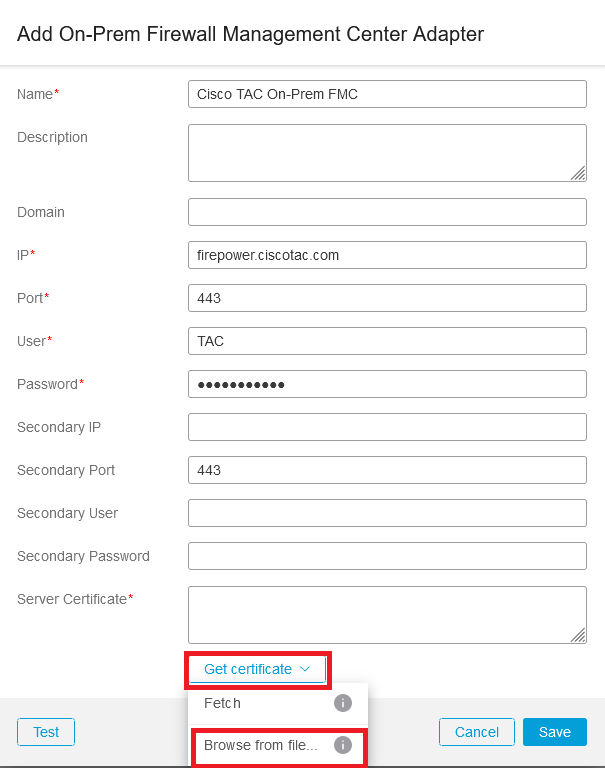
第8步:上傳.pem證書並按一下「測試」以確保測試成功。
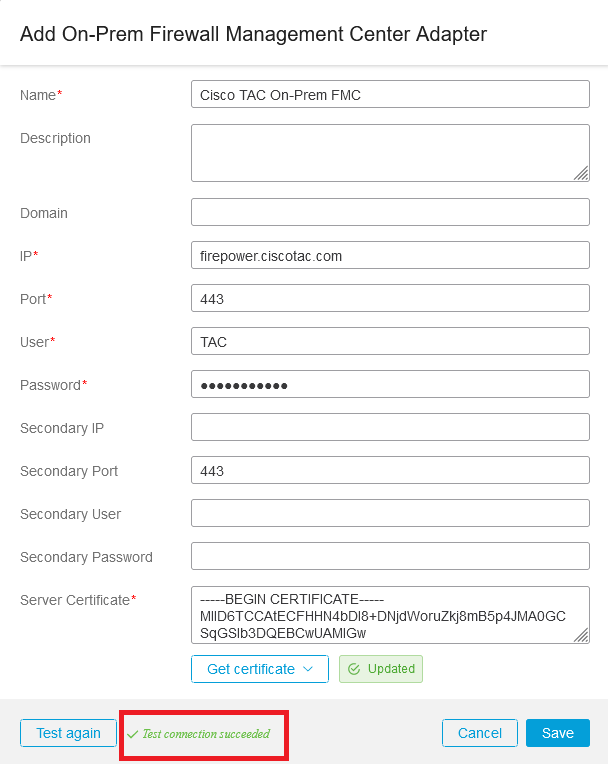
警告:確保Ubuntu電腦上配置的DNS伺服器可以解析內部防火牆管理中心FQDN,否則,測試可能失敗。
第9步:儲存並確保狀態為「OK」。

注意:無法為Office 365建立動態屬性篩選器。
第10步:開始在內部防火牆管理中心UI上使用動態Office 365屬性建立訪問控制策略規則。
驗證
驗證Ubuntu上核心服務、聯結器和介面卡的容器狀態。
root@tac://# docker ps -a
CONTAINER ID IMAGE                                                      COMMAND                CREATED      STATUS      PORTS                  NAMES
44f71f675ff1 public.ecr.aws/e6e4t5f5/muster_fmc_adapter:2.2.0-latest    "./docker-entrypoint…" 12 hours ago Up 12 hours 50070/tcp              muster-adapter-fmc.2.muster
88826cf0742f public.ecr.aws/e6e4t5f5/muster_o365_connector:2.2.0-latest "./docker-entrypoint…" 13 hours ago Up 13 hours 50070/tcp              muster-connector-o365.3.muster
4c2c73d351e2 public.ecr.aws/e6e4t5f5/muster_envoy:2.2.0-latest          "/docker-entrypoint.…" 2 days ago   Up 2 days   0.0.0.0:443->8443/tcp  muster-envoy
67f3afae2165 public.ecr.aws/e6e4t5f5/muster_ui:2.2.0-latest             "/docker-entrypoint.…" 2 days ago   Up 2 days   8080/tcp               muster-ui
722a764c54e9 public.ecr.aws/e6e4t5f5/muster_ui_backend:2.2.0-latest     "./docker-entrypoint…" 2 days ago   Up 2 days   50031/tcp              muster-ui-backend
038654545f30 public.ecr.aws/e6e4t5f5/muster_bee:2.2.0-latest            "/bin/sh -c /app/bee"  2 days ago   Up 2 days   50050/tcp, 50443/tcp   muster-bee
90cfd7e3a28b public.ecr.aws/e6e4t5f5/muster_etcd:2.2.0-latest           "etcd"                 2 days ago   Up 2 days   2379-2380/tcp          muster-etcd
從CSDAC UI驗證聯結器狀態。

從CSDAC UI驗證介面卡狀態。

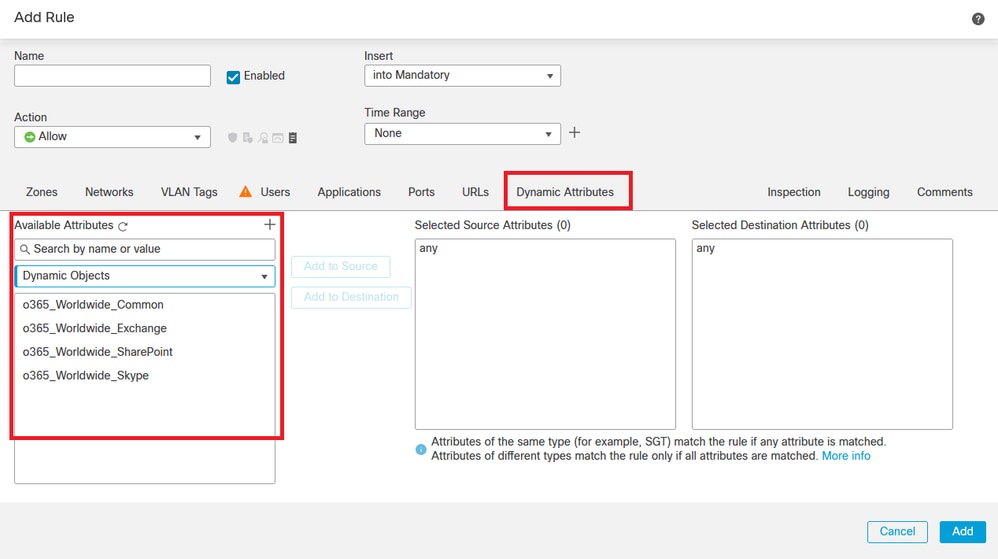
驗證防火牆管理中心上的Office 365動態屬性。
建立或編輯訪問控制策略規則,點選「動態屬性」,點選「可用屬性」,然後選擇「動態對象」。
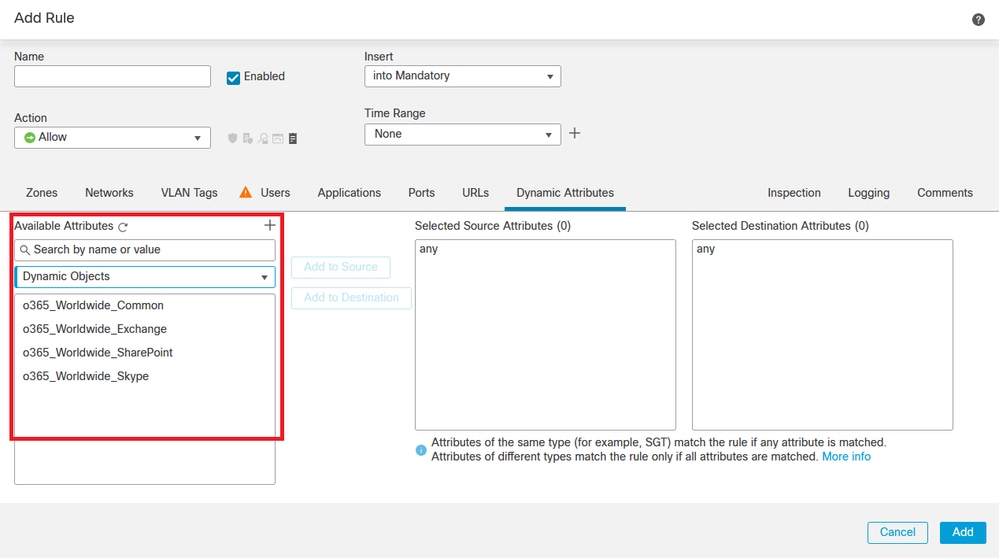
附註:如果未列出Office 365動態物件,則可能是整合發生問題。檢查故障排除部分或聯絡思科TAC。
疑難排解
如果Ansible存在Secure Dynamic Attributes Connector安裝問題,請收集'~/.ansible/collections/ansible_collection/cisco/csdac/logs/'目錄中的'csdac.log'。
root@tac://# cd ~/.ansible/collections/ansible_collections/cisco/logs/
root@tac:~/.ansible/collections/ansible_collections/cisco/csdac/logs# ls -lth
total 276K
-rw-r--r-- 1 root root 272K sep 14 15:37 csdac.log
在此檔案中找到安裝失敗記錄。使用「cat」或「less」Linux命令打開它,瀏覽故障日誌,或聯絡思科TAC並提供此檔案。
有時,由於「許可權被拒絕」,Ansible安裝失敗。瀏覽csdac.log檔案並查詢「許可權被拒絕」日誌。
TASK [cisco.csdac.csdac : print result of csdac command line start command (stderr)] ***
ok: [localhost] => {
"muster_cli_start_result.stderr_lines": [
"permission denied while trying to connect to the Docker daemon socket at unix:///var/run/docker.sock: Post \"http://%2Fvar%2Frun%2Fdocker.sock/v1.24/volumes/create\": dial unix /var/run/docker.sock: connect: permission denied",
"permission denied while trying to connect to the Docker daemon socket at unix:///var/run/docker.sock: Post \"http://%2Fvar%2Frun%2Fdocker.sock/v1.24/volumes/create\": dial unix /var/run/docker.sock: connect: permission denied",
"permission denied while trying to connect to the Docker daemon socket at unix:///var/run/docker.sock: Post \"http://%2Fvar%2Frun%2Fdocker.sock/v1.24/volumes/create\": dial unix /var/run/docker.sock: connect: permission denied",
"permission denied while trying to connect to the Docker daemon socket at unix:///var/run/docker.sock: Post \"http://%2Fvar%2Frun%2Fdocker.sock/v1.24/networks/create\": dial unix /var/run/docker.sock: connect: permission denied",
"docker: permission denied while trying to connect to the Docker daemon socket at unix:///var/run/docker.sock: Post \"http://%2Fvar%2Frun%2Fdocker.sock/v1.24/containers/create\": dial unix /var/run/docker.sock: connect: permission denied.",
"See 'docker run --help'.",
"docker: permission denied while trying to connect to the Docker daemon socket at unix:///var/run/docker.sock: Post \"http://%2Fvar%2Frun%2Fdocker.sock/v1.24/containers/create\": dial unix /var/run/docker.sock: connect: permission denied."
如果發現類似的日誌,請考慮思科漏洞ID CSCwh58312或聯絡思科TAC以獲取幫助。
如果「docker ps -a」指示容器已關閉或在出現問題時重新啟動容器,則可以使用「docker restart container-id」命令重新啟動容器。
範例:使用容器ID '88826cf0742f'重新啟動Office 365。
root@tac://# docker ps -a
CONTAINER ID IMAGE                                                      COMMAND                 CREATED       STATUS      PORTS     NAMES
44f71f675ff1 public.ecr.aws/e6e4t5f5/muster_fmc_adapter:2.2.0-latest     "./docker-entrypoint…" 12 hours ago  Up 12 hours 50070/tcp muster-adapter-fmc.2.muster
88826cf0742f public.ecr.aws/e6e4t5f5/muster_o365_connector:2.2.0-latest  "./docker-entrypoint…" 13 hours ago  Up 13 hours 50070/tcp muster-connector-o365.3.muster

root@tac://# docker restart 88826cf0742f

root@tac://# docker ps -a
CONTAINER ID IMAGE                                                       COMMAND                CREATED       STATUS       PORTS     NAMES
44f71f675ff1 public.ecr.aws/e6e4t5f5/muster_fmc_adapter:2.2.0-latest     "./docker-entrypoint…" 12 hours ago  Up 12 hours  50070/tcp muster-adapter-fmc.2.muster
88826cf0742f public.ecr.aws/e6e4t5f5/muster_o365_connector:2.2.0-latest  "./docker-entrypoint…" 13 hours ago  Up 2 seconds 50070/tcp muster-connector-o365.3.muster
驗證與CSDAC的連線,並驗證是否已在安全防火牆管理中心上建立對象。
> expert
sudoadmin@firepower:~$ sudo su -
Password:

root@firepower:/Volume/home/admin# cat /var/opt/CSCOpx/MDC/log/operation/usmsharedsvcs.log
17-Sep-2023 17:24:58.046,[INFO],(DefenseCenterServiceImpl.java:1462)
com.cisco.nm.vms.api.dc.DefenseCenterServiceImpl, ajp-nio-127.0.0.1-9009-exec-2
** REST Request [ CSM ]
** ID : ff3e6259-2417-48cc-8e5e-a41d0bd04b39
** URL: POST /audit
{
  "version":"7.2.5",
  "requestId":"ff3e6259-2417-48cc-8e5e-a41d0bd04b39",
  "data":{
     "userName":"TAC",
     "subsystem":"API",
     "message":"POST https://FMC-FQDN/api/fmc_config/v1/domain/e276abec-e0f2-11e3-8169-6d9ed49b625f
   /object/bulkdynamicobjects Created (201) - The request has been fulfilled and resulted in a new resource being created",
     "sourceIP":"172.16.1.53",
     "domainUuid":"e276abec-e0f2-11e3-8169-6d9ed49b625f",
     "time":"1694971497660"},"deleteList":[]
}
相關資訊
有關思科安全動態屬性(CSDAC)的其他文檔,請訪問以下網站:
關於思科動態屬性聯結器
安裝和升級Cisco Secure Dynamic Attributes聯結器
配置思科動態屬性聯結器
使用存取控制原則中的動態物件
動態屬性聯結器故障排除
CSDAC 2.2安裝在Ubuntu 20.04中失敗「Permission denied with Docker daemon socket」。
思科漏洞ID CSCwh58312。
修訂記錄
| 修訂 | 發佈日期 | 意見 |
|---|---|---|
1.0 |
04-Oct-2023
|
初始版本 |
由思科工程師貢獻
- Juan Carlos Carvente JuarezSecurity Consulting Engineer
 意見
意見