使用VMS IDS MC配置IDS TCP重置
目錄
簡介
本文檔通過VPN/安全管理解決方案(VMS)、IDS管理控制檯(IDS MC)提供思科入侵檢測系統(IDS)的配置示例。 在這種情況下,會配置從IDS感測器到Cisco路由器的TCP重置。
必要條件
需求
嘗試此組態之前,請確保符合以下要求:
-
感測器已安裝並配置為檢測必要的通訊量。
-
監聽介面跨越到路由器的外部介面。
採用元件
本文中的資訊係根據以下軟體和硬體版本:
-
VMS 2.2,帶IDS MC和安全監控器1.2.3
-
Cisco IDS感應器4.1.3S(63)
-
執行Cisco IOS®軟體版本12.3.5的Cisco路由器
本文中的資訊是根據特定實驗室環境內的裝置所建立。文中使用到的所有裝置皆從已清除(預設)的組態來啟動。如果您的網路正在作用,請確保您已瞭解任何指令可能造成的影響。
慣例
如需文件慣例的詳細資訊,請參閱思科技術提示慣例。
設定
本節提供用於設定本文件中所述功能的資訊。
註:使用Command Lookup Tool(僅供已註冊客戶使用)可獲取本節中使用的命令的詳細資訊。
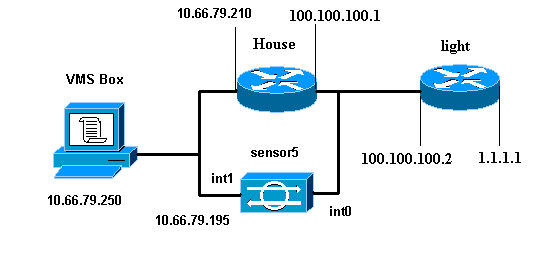
網路圖表
本檔案會使用以下網路設定:
組態
本檔案會使用這些設定。
| 路由器指示燈 |
|---|
Current configuration : 906 bytes ! version 12.3 service timestamps debug uptime service timestamps log uptime no service password-encryption ! hostname light ! enable password cisco ! username cisco password 0 cisco ip subnet-zero ! ! ! ip ssh time-out 120 ip ssh authentication-retries 3 ! call rsvp-sync ! ! ! fax interface-type modem mta receive maximum-recipients 0 ! controller E1 2/0 ! ! ! interface FastEthernet0/0 ip address 100.100.100.2 255.255.255.0 duplex auto speed auto ! interface FastEthernet0/1 ip address 1.1.1.1 255.255.255.0 duplex auto speed auto ! interface BRI4/0 no ip address shutdown ! interface BRI4/1 no ip address shutdown ! interface BRI4/2 no ip address shutdown ! interface BRI4/3 no ip address shutdown ! ip classless ip route 0.0.0.0 0.0.0.0 100.100.100.1 ip http server ip pim bidir-enable ! ! dial-peer cor custom ! ! line con 0 line 97 108 line aux 0 line vty 0 4 login ! end |
| 路由器外殼 |
|---|
Building configuration... Current configuration : 797 bytes ! version 12.3 no service pad service timestamps debug datetime msec service timestamps log datetime msec no service password-encryption ! hostname House ! logging queue-limit 100 enable password cisco ! ip subnet-zero no ip domain lookup ! ! interface Ethernet0 ip address 10.66.79.210 255.255.255.224 hold-queue 100 out ! interface Ethernet1 ip address 100.100.100.1 255.255.255.0 ip classless ip route 0.0.0.0 0.0.0.0 10.66.79.193 ip route 1.1.1.0 255.255.255.0 100.100.100.2 ip http server no ip http secure-server ! ! ! line con 0 stopbits 1 line vty 0 4 password cisco login ! scheduler max-task-time 5000 end |
初始感測器配置
註:如果您已執行感測器的初始設定,請繼續進入將感測器匯入IDS MC部分。
-
通過控制檯連線到感測器。
系統將提示您輸入使用者名稱和密碼。如果這是您第一次控制檯到感測器,則必須使用使用者名稱cisco和密碼cisco登入。
-
系統將提示您更改密碼並重新鍵入新密碼以進行確認。
-
在每次提示時鍵入setup並輸入適當的資訊,以便為感測器設定基本引數,如以下示例所示:
sensor5#setup

    --- System Configuration Dialog ---

At any point you may enter a question mark '?' for help.
User ctrl-c to abort configuration dialog at any prompt.
Default settings are in square brackets '[]'.

Current Configuration:

networkParams
ipAddress 10.66.79.195
netmask 255.255.255.224
defaultGateway 10.66.79.193
hostname sensor5
telnetOption enabled
accessList ipAddress 10.66.79.0 netmask 255.255.255.0
exit
timeParams
summerTimeParams
active-selection none
exit
exit
service webServer
general
ports 443
exit
exit

5 Save the config:   (It might take a few minutes for the sensor
                      saving the configuration)
[0] Go to the command prompt without saving this config.
[1] Return back to the setup without saving this config.
[2] Save this configuration and exit setup.

Enter your selection[2]: 2
將感測器匯入IDS MC
完成以下步驟,將感測器匯入IDS MC。
-
瀏覽到感測器。在這種情況下,請輸入http://10.66.79.250:1741或https://10.66.79.250:1742。
-
使用適當的使用者名稱和密碼登入。
在本例中,使用者名稱為admin,密碼為cisco。
-
選擇VPN/Security Management Solution > Management Center,然後按一下IDS Sensors。
-
按一下Devices(裝置)頁籤,然後選擇Sensor Group。
-
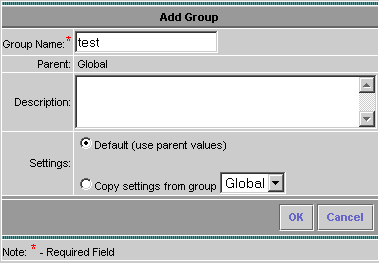
選中Global,然後按一下Create Subgroup。
-
輸入組名並確保已選擇Default,然後按一下OK以將子組新增到IDS MC中。
-
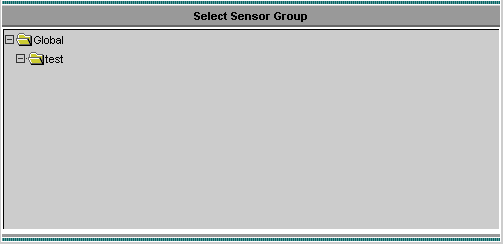
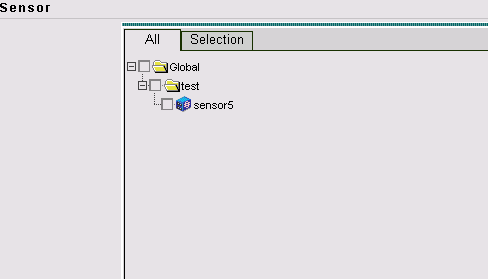
選擇Devices > Sensor,突出顯示在上一步驟中建立的子組(在本例中為test),然後按一下Add。
-
突出顯示子組,然後按一下下一步。
-
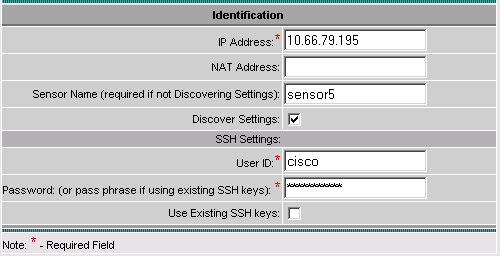
根據此示例輸入詳細資訊,然後按一下下一步以繼續。
-
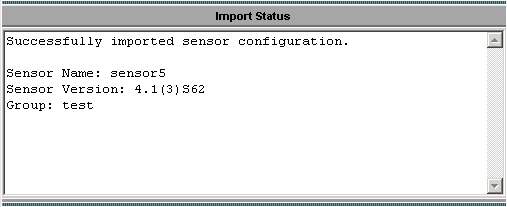
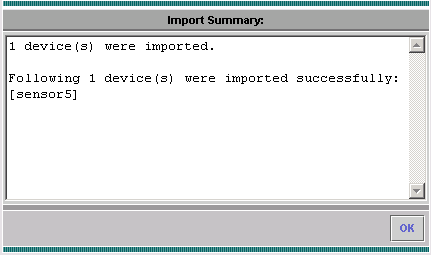
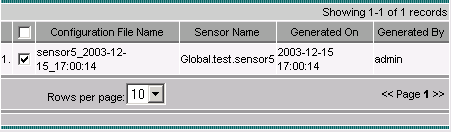
顯示消息Successfully imported sensor configuration時,請按一下Finish以繼續。
-
感測器被匯入到IDS MC中。在這種情況下,會匯入感測器5。
將感測器匯入安全監視器
完成這些步驟,將感測器匯入安全監控器。
-
在VMS Server選單中,選擇VPN/Security Management Solution > Monitoring Center > Security Monitor。
-
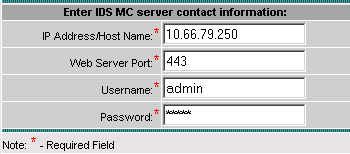
選擇Devices(裝置)頁籤,然後按一下Import,然後根據此示例輸入IDS MC Server Information(IDS MC伺服器資訊)。
-
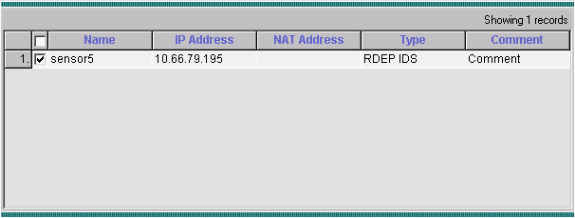
選擇感測器(本例中為sensor5),然後按一下Next以繼續。
-
如果需要,請更新感測器的NAT地址,然後按一下完成以繼續。

-
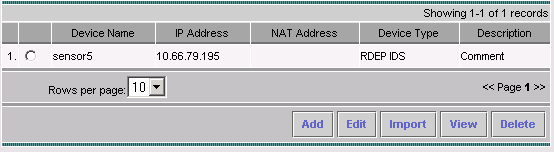
按一下OK以完成將感測器從IDS MC匯入到安全監控器。
-
現在您可以看到感測器已成功匯入
使用IDS MC進行特徵碼更新
以下步驟說明如何使用IDS MC進行特徵碼更新。
-
下載網路IDS簽名更新(僅供註冊客戶使用),並將其儲存在VMS伺服器上的C:\PROGRA~1\CSCOpx\MDC\etc\ids\updates\ 目錄中。
-
在VMS伺服器控制檯上,選擇VPN/Security Management Solution > Management Center > IDS Sensors。
-
選擇Configuration頁籤並按一下Updates。
-
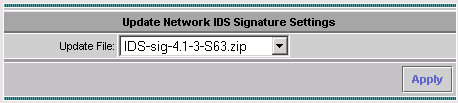
按一下Update Network IDS Signatures。
-
從下拉選單中選擇要升級的簽名,然後按一下Apply以繼續。
-
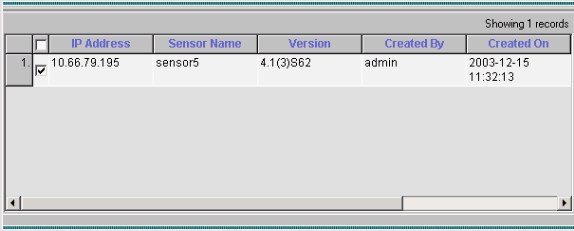
選擇要更新的感測器,然後按一下下一步以繼續。
-
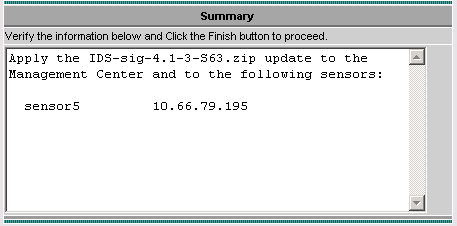
當系統提示您將更新應用到管理中心和感測器後,按一下完成以繼續。
-
通過Telnet或控制檯連線到感測器命令列介面。您會看到類似以下內容的資訊:
sensor5#
Broadcast message from root (Mon Dec 15 11:42:05 2003):
Applying update IDS-sig-4.1-3-S63.
This may take several minutes.
Please do not reboot the sensor during this update.
Broadcast message from root (Mon Dec 15 11:42:34 2003):
Update complete.
sensorApp is restarting
This may take several minutes.
-
請等待幾分鐘,以允許升級完成,然後輸入show version以進行驗證。
sensor5#show version
Application Partition:
Cisco Systems Intrusion Detection Sensor, Version 4.1(3)S63

Upgrade History:
* IDS-sig-4.1-3-S62           07:03:04 UTC Thu Dec 04 2003
   IDS-sig-4.1-3-S63.rpm.pkg   11:42:01 UTC Mon Dec 15 2003
為IOS路由器配置TCP重置
完成這些步驟,為IOS路由器設定TCP重設。
-
選擇VPN/Security Management Solution > Management Center > IDS Sensors。
-
選擇Configuration(配置)頁籤,從Object Selector(對象選擇器)中選擇Sensor(感測器),然後按一下Settings(設定)。
-
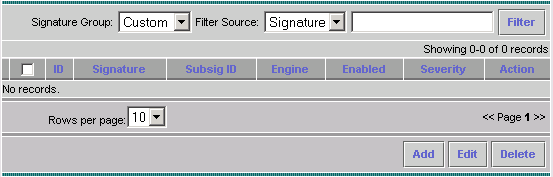
選擇Signatures,按一下Custom,然後按一下Add以新增新簽名。
-
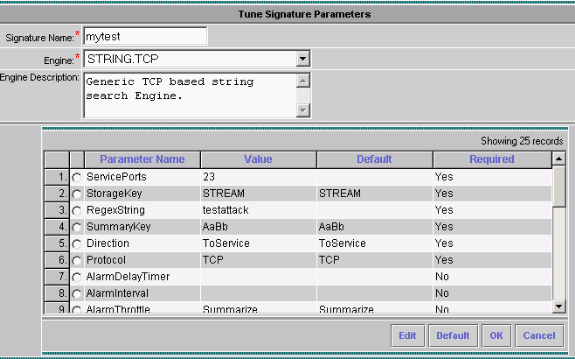
輸入新的簽名名稱,然後選擇引擎(在本例中為STRING.TCP)。
-
選中相應的單選按鈕以自定義可用引數,然後按一下Edit。
在本示例中,編輯ServicePorts引數以將其值更改為23(對於埠23)。 也會編輯RegexString引數以新增value testattack。完成此操作後,按一下OK繼續。
-
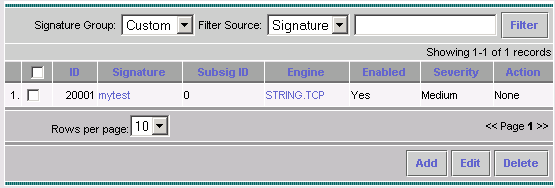
按一下特徵碼名稱可編輯特徵碼嚴重性和操作,或啟用/禁用特徵碼。
-
在這種情況下,嚴重性會更改為高,並會選擇Log & Reset操作。按一下「OK」以繼續。
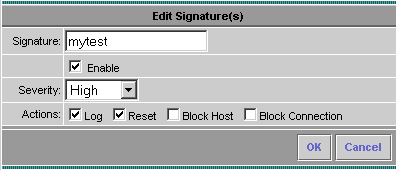
-
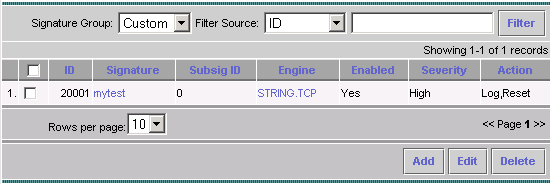
完整的簽名類似於以下內容:
-
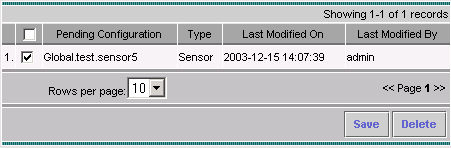
選擇Configuration > Pending,檢查掛起的配置以確保其正確,然後按一下Save。
-
選擇Deployment > Generate,然後按一下Apply將配置更改推送到感測器。
-
選擇Deployment > Deploy,然後按一下Submit。
-
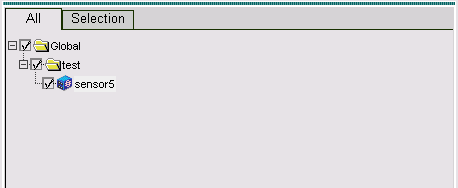
勾選感測器旁邊的覈取方塊,然後按一下Deploy。
-
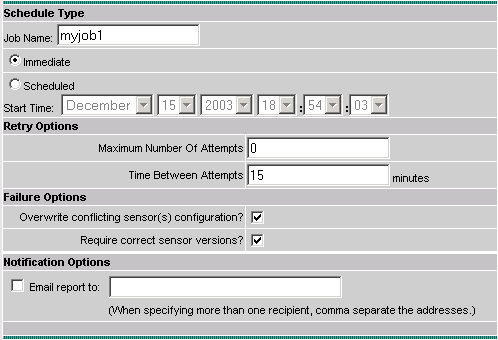
選中隊列中作業的覈取方塊,然後按一下下一步以繼續。
-
輸入作業名稱並將作業安排為立即,然後按一下完成。
-
選擇Deployment > Deploy > Pending。
請等待幾分鐘,直到完成所有掛起的作業。隊列應為空。
-
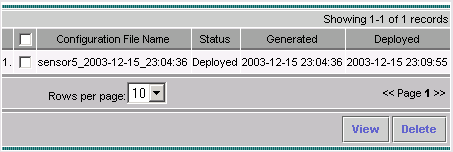
選擇Configuration > History以確認部署。
確保配置狀態顯示為Deployed。這意味著感測器配置已成功更新。
驗證
使用本節內容,確認您的組態是否正常運作。
啟動攻擊和TCP重置
啟動測試攻擊並檢查結果,以驗證阻止過程是否正常工作。
-
發起攻擊之前,選擇VPN/Security Management Solution > Monitoring Center > Security Monitor。
-
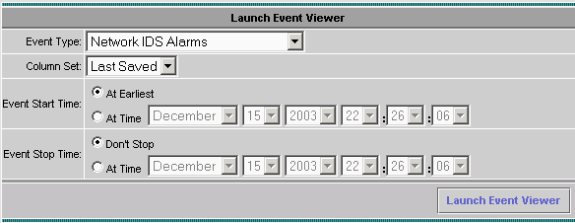
從主選單中選擇Monitor,然後按一下Events。
-
按一下啟動事件檢視器。
-
從一台路由器Telnet至另一台路由器,然後鍵入testattack以發起攻擊。
在本例中,我們從路由器Light遠端連線到路由器House。只要按下<space>或<enter>,在輸入testattack後,就應重設Telnet作業階段。
light#telnet 100.100.100.1
Trying 100.100.100.1 ... Open
User Access Verification
Password:
house>en
Password:
house#testattack


!--- The Telnet session is reset due to the !--- signature "testattack" being triggered.


[Connection to 100.100.100.1 lost]
-
在「事件檢視器」中,按一下Query Database立即檢視新事件。
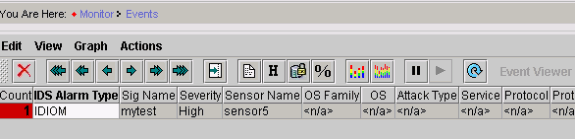
您會看到以前發起的攻擊的警報
-
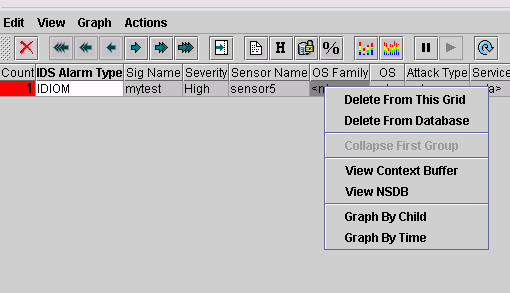
在事件檢視器中,突出顯示警報,按一下右鍵該警報,然後選擇View Context Buffer或View NSDB以檢視有關該警報的詳細資訊。
疑難排解
本節提供的資訊可用於對組態進行疑難排解。
疑難排解程序
完成以下步驟即可進行疑難排解。
-
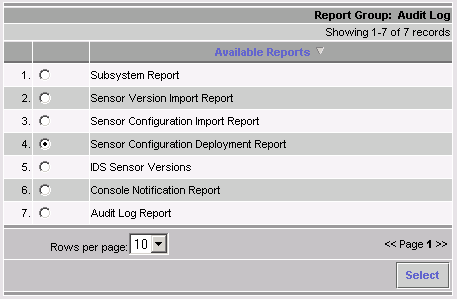
在IDS MC中,選擇Reports > Generate。
根據問題型別,應在七份可用報告中之一找到更多詳細資訊。
-
當阻塞利用命令和控制埠配置路由器訪問清單時,TCP重置從感測器的監聽介面傳送。在交換器上使用set span命令,確認您已跨過正確的連線埠,如下所示:
set spanboth inpkts enable -
如果TCP Reset不工作,請登入感測器並輸入show event命令。
發動攻擊,檢查警報是否觸發。如果觸發了警報,請檢查以確保已為操作型別TCP reset設定。
相關資訊
修訂記錄
| 修訂 | 發佈日期 | 意見 |
|---|---|---|
1.0 |
17-Oct-2008 |
初始版本 |
 意見
意見