使用IME配置IPS阻止
簡介
本文討論使用IPS Manager Express(IME)對入侵防禦系統(IPS)阻止的配置。IME和IPS感測器用於管理用於阻止的Cisco路由器。請考慮此組態時,請記住以下專案:
-
安裝感測器並確保感測器正常工作。
-
使監聽介面跨距介面以外的路由器。
必要條件
需求
本文件沒有特定需求。
採用元件
本文中的資訊係根據以下軟體和硬體版本:
-
Cisco IPS管理員Express版本7.0
-
Cisco IPS感應器7.0(0.88)E3
-
採用Cisco IOS軟體版本12.4的Cisco IOS®路由器
本文中的資訊是根據特定實驗室環境內的裝置所建立。文中使用到的所有裝置皆從已清除(預設)的組態來啟動。如果您的網路正在作用,請確保您已瞭解任何指令可能造成的影響。
慣例
設定
網路圖表
本檔案會使用此網路設定。

組態
本檔案會使用這些設定。
| 路由器指示燈 |
|---|
Current configuration : 906 bytes ! version 12.4 service timestamps debug uptime service timestamps log uptime no service password-encryption ! hostname light ! enable password cisco ! username cisco password 0 cisco ip subnet-zero ! ! ! ip ssh time-out 120 ip ssh authentication-retries 3 ! call rsvp-sync ! ! ! fax interface-type modem mta receive maximum-recipients 0 ! controller E1 2/0 ! ! ! interface FastEthernet0/0 ip address 10.100.100.2 255.255.255.0 duplex auto speed auto ! interface FastEthernet0/1 ip address 1.1.1.1 255.255.255.0 duplex auto speed auto ! interface BRI4/0 no ip address shutdown interface BRI4/1 no ip address shutdown ! interface BRI4/2 no ip address shutdown ! interface BRI4/3 no ip address shutdown ! ip classless ip route 0.0.0.0 0.0.0.0 10.100.100.1 ip http server ip pim bidir-enable ! ! dial-peer cor custom ! ! line con 0 line 97 108 line aux 0 line vty 0 4 login ! end |
| 路由器外殼 |
|---|
Current configuration : 939 bytes ! version 12.4 service timestamps debug uptime service timestamps log uptime no service password-encryption ! hostname house ! logging queue-limit 100 enable password cisco ! ip subnet-zero ! ! no ip cef no ip domain lookup ! ip audit notify log ip audit po max-events 100 ! ! no voice hpi capture buffer no voice hpi capture destination ! ! ! ! interface FastEthernet0/0 ip address 10.66.79.210 255.255.255.224 duplex auto speed auto ! interface FastEthernet0/1 ip address 10.100.100.1 255.255.255.0 ip access-group IDS_FastEthernet0/1_in_0 in !--- After you configure blocking, !--- IDS Sensor inserts this line. duplex auto speed auto ! interface ATM1/0 no ip address shutdown no atm ilmi-keepalive ! ip classless ip route 0.0.0.0 0.0.0.0 10.66.79.193 ip route 1.1.1.0 255.255.255.0 10.100.100.2 no ip http server no ip http secure-server ! ! ip access-list extended IDS_FastEthernet0/1_in_0 permit ip host 10.66.79.195 any permit ip any any !--- After you configure blocking, !--- IDS Sensor inserts this line. ! call rsvp-sync ! ! mgcp profile default ! ! line con 0 exec-timeout 0 0 line aux 0 line vty 0 4 exec-timeout 0 0 password cisco login line vty 5 15 login ! ! end |
啟動感測器配置
完成以下步驟以開始配置感測器。
-
如果這是您首次登入感測器,則必須輸入cisco作為使用者名稱,cisco作為密碼。
-
系統提示時,請更改密碼。
注意:Cisco123是一個詞典,系統不允許使用。
-
鍵入setup,然後按照系統提示設定感測器的基本引數。
-
輸入以下資訊:
sensor5#setup --- System Configuration Dialog --- !--- At any point you may enter a question mark '?' for help. !--- Use ctrl-c to abort the configuration dialog at any prompt. !--- Default settings are in square brackets '[]'. Current time: Thu Oct 22 21:19:51 2009 Setup Configuration last modified: Enter host name[sensor]: Enter IP interface[10.66.79.195/24,10.66.79.193]: Modify current access list?[no]: Current access list entries: !--- permit the ip address of workstation or network with IME Permit:10.66.79.0/24 Permit: Modify system clock settings?[no]: Modify summer time settings?[no]: Use USA SummerTime Defaults?[yes]: Recurring, Date or Disable?[Recurring]: Start Month[march]: Start Week[second]: Start Day[sunday]: Start Time[02:00:00]: End Month[november]: End Week[first]: End Day[sunday]: End Time[02:00:00]: DST Zone[]: Offset[60]: Modify system timezone?[no]: Timezone[UTC]: UTC Offset[0]: Use NTP?[no]: yes NTP Server IP Address[]: Use NTP Authentication?[no]: yes NTP Key ID[]: 1 NTP Key Value[]: 8675309 -
儲存組態。
感測器儲存配置可能需要幾分鐘時間。
[0] Go to the command prompt without saving this config.
[1] Return back to the setup without saving this config.
[2] Save this configuration and exit setup.

Enter your selection[2]: 2
將感測器新增到IME
完成這些步驟,將感測器新增到IME中。
-
轉到安裝了IPS Manager Express的Windows PC,然後開啟IPS Manager Express。
-
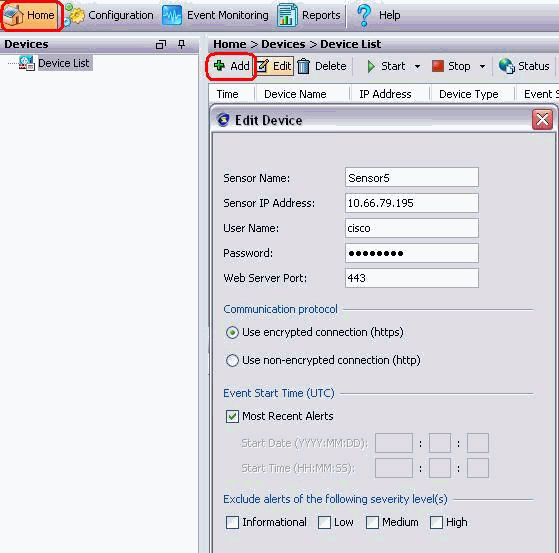
選擇Home > Add。
-
鍵入此資訊並按一下OK以完成配置。
-
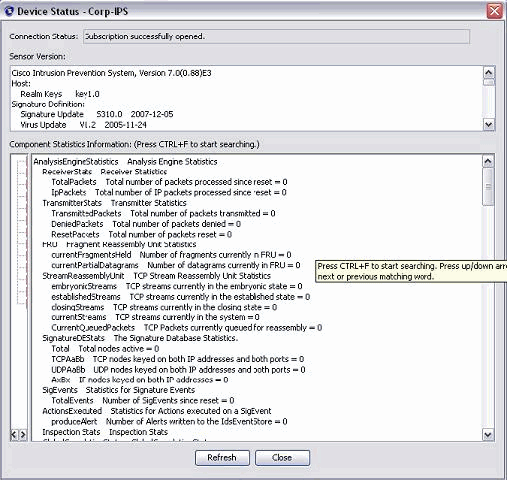
選擇Devices > sensor5以驗證感測器狀態,然後按一下右鍵以選擇Status。
確保可以看到已成功打開訂閱。消息。
配置Cisco IOS路由器的阻塞
完成以下步驟,以便為Cisco IOS路由配置阻止:。
-
在IME PC上,開啟Web瀏覽器,轉到https://10.66.79.195。
-
按一下「OK」以接受從感測器下載的HTTPS證書。
-
在「登入」視窗中,輸入cisco作為使用者名稱,123cisco123作為密碼。
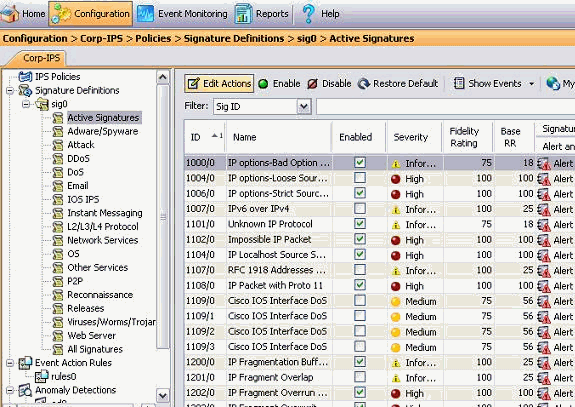
出現此IME管理介面:
-
在「配置」頁籤中,按一下活動簽名。
-
然後,按一下簽名嚮導。
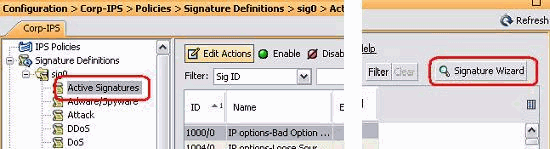
注意:由於空間限制,上一個螢幕截圖已被剪為兩個部分。
-
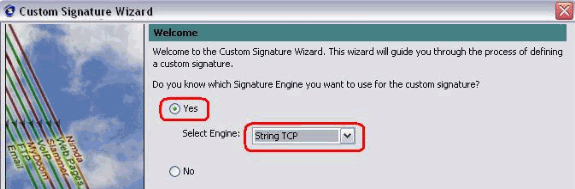
選擇Yes和String TCP作為Signature engine。按「Next」(下一步)。
-
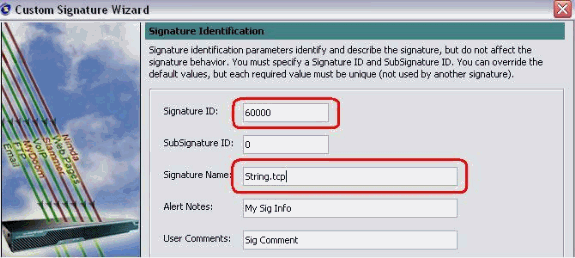
您可以將此資訊保留為預設值,或輸入自己的簽名ID、簽名名稱和使用者註釋。按「Next」(下一步)。
-
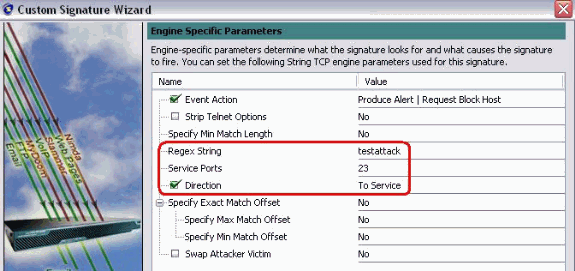
選擇Event Action,然後選擇Produce Alert和Request Block Host。按一下「Next」以繼續。

-
輸入正規表示式(在本例中為testattack),輸入23作為Service Ports,選擇To Service作為Direction,然後按一下Next以繼續。
-
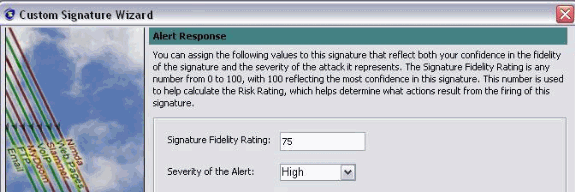
可以將此資訊保留為預設值。按「Next」(下一步)。
-
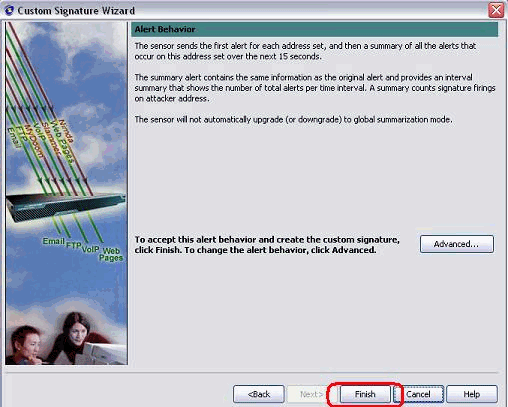
按一下完成以完成嚮導。
-
選擇Configuration > sig0 > Active Signatures,以便通過Sig ID或Sig Name找到新建立的簽名。按一下Edit以檢視簽名。
-
確認後按一下OK,然後按一下Apply按鈕將特徵碼應用到感測器。
-
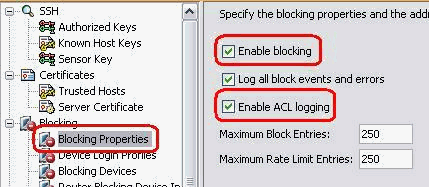
在Configuration(配置)頁籤的Sensor Management(感測器管理)下,按一下Blocking。在左窗格中,選擇Blocking Properties,然後選中Enable Blocking。
-
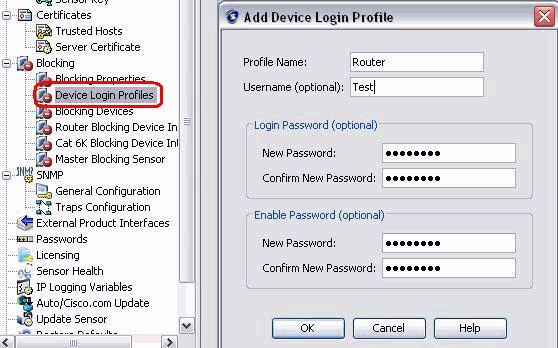
現在,從左窗格轉到Device Login Profile。若要建立新配置檔案,請按一下Add。建立後,按一下「OK」和「Apply」以感應器並繼續。
-
下一步是將路由器配置為阻塞裝置。在左窗格中,選擇Blocking Device,按一下Add以新增此資訊。然後按一下「OK」和「Apply」。

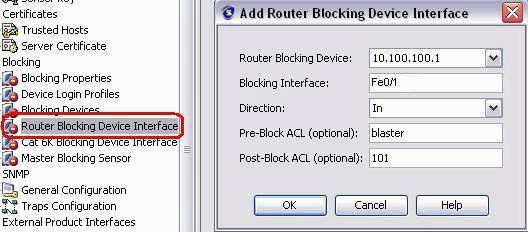
-
現在,從左窗格配置阻止裝置介面。新增資訊,按一下OK和Apply。
驗證
發動攻擊並阻止攻擊
完成以下步驟以發起攻擊並阻止攻擊:
-
發起攻擊之前,請轉到IME,選擇Event Monitoring > Dropped Attacks View,然後選擇右側的感測器。
-
Telnet至Router House並通過這些命令驗證來自伺服器的通訊。
house#show user

  Line     User      Host(s)          Idle        Location
* 0 con 0             idle          00:00:00
226 vty 0             idle          00:00:17     10.66.79.195


house#show access-list
Extended IP access list IDS_FastEthernet0/1_in_0
  permit ip host 10.66.79.195 any
  permit ip any any (12 matches)
house#
-
在Router Light上,Telnet至Router House並鍵入testattack。
按一下<space>或<enter>可重設Telnet作業階段。
light#telnet 10.100.100.1 Trying 10.100.100.1 ... Open User Access Verification Password: house>en Password: house#testattack [Connection to 10.100.100.1 lost] !--- Host 10.100.100.2 has been blocked due to the !--- signature "testattack" triggered. -
Telnet至Router House並使用show access-list命令,如下所示。
house#show access-list
Extended IP access list IDS_FastEthernet0/1_in_0
10 permit ip host 10.66.79.195 any
20 deny ip host 10.100.100.2 any (71 matches)
30 permit ip any any
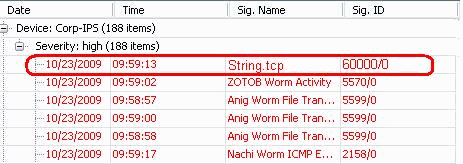
-
從IDS事件檢視器的控制面板中,一旦發起攻擊,就會出現紅色警報。
疑難排解
本節提供的資訊可用於對組態進行疑難排解。
提示
使用以下故障排除提示:
-
在感測器中,檢視show statistics network-access輸出,確保state"處於活動狀態。從控制檯或SSH到感測器,檢視以下資訊:
sensor5#show statistics network-access Current Configuration AllowSensorShun = false ShunMaxEntries = 100 NetDevice Type = Cisco IP = 10.66.79.210 NATAddr = 0.0.0.0 Communications = telnet ShunInterface InterfaceName = FastEthernet0/1 InterfaceDirection = in State ShunEnable = true NetDevice IP = 10.66.79.210 AclSupport = uses Named ACLs State = Active ShunnedAddr Host IP = 10.100.100.2 ShunMinutes = 15 MinutesRemaining = 12 sensor5# -
確保通訊引數顯示使用的協定正確,例如使用3DES的Telnet或SSH。您可以從PC上的SSH/Telnet客戶端嘗試手動SSH或Telnet,檢查使用者名稱和密碼憑據是否正確。然後嘗試從感測器本身到路由器的Telnet或SSH連線,並檢查您是否能夠成功登入到路由器。
相關資訊
修訂記錄
| 修訂 | 發佈日期 | 意見 |
|---|---|---|
1.0 |
17-Dec-2009 |
初始版本 |
 意見
意見