簡介
本文檔介紹使用openAPI管理思科身份服務引擎(ISE)部署的過程。
背景
在現代企業網路中,安全和管理變得越來越複雜和關鍵。為了應對這些挑戰,從Cisco ISE 3.1開始,OpenAPI格式提供較新的API,可提供強大的網路訪問控制和策略管理功能。管理員現在能夠通過OpenAPI更有效地檢查ISE部署,並主動採取行動,而不是等待來自終端使用者的問題報告。
必要條件
需求
思科建議您瞭解以下主題:
- 思科身分識別服務引擎(ISE)
- REST API
- Python
採用元件
本文中的資訊是根據特定實驗室環境內的裝置所建立。文中使用到的所有裝置皆從已清除(預設)的組態來啟動。如果您的網路運作中,請確保您瞭解任何指令可能造成的影響。
設定
網路圖表
 拓撲
拓撲
ISE上的配置
步驟 1:新增Open API管理帳戶
要新增API管理員,請導航到管理>系統>管理員訪問許可權>管理員>管理員使用者>新增。
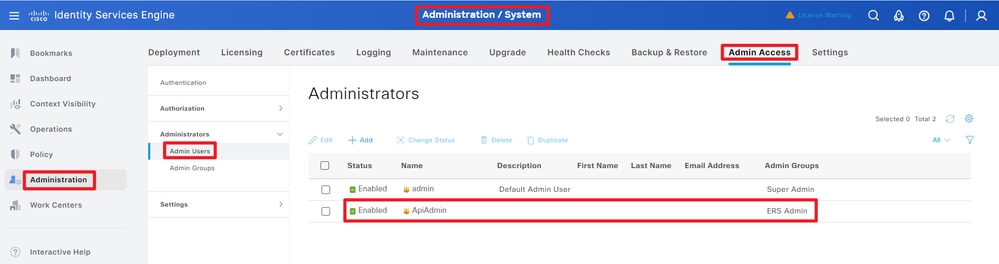 API管理員
步驟 2:在ISE上啟用開放式API
Open API在ISE上預設禁用。要啟用它,請導航到管理>系統>設定> API設定> API服務設定。切換開啟API選項。按一下「Save」。
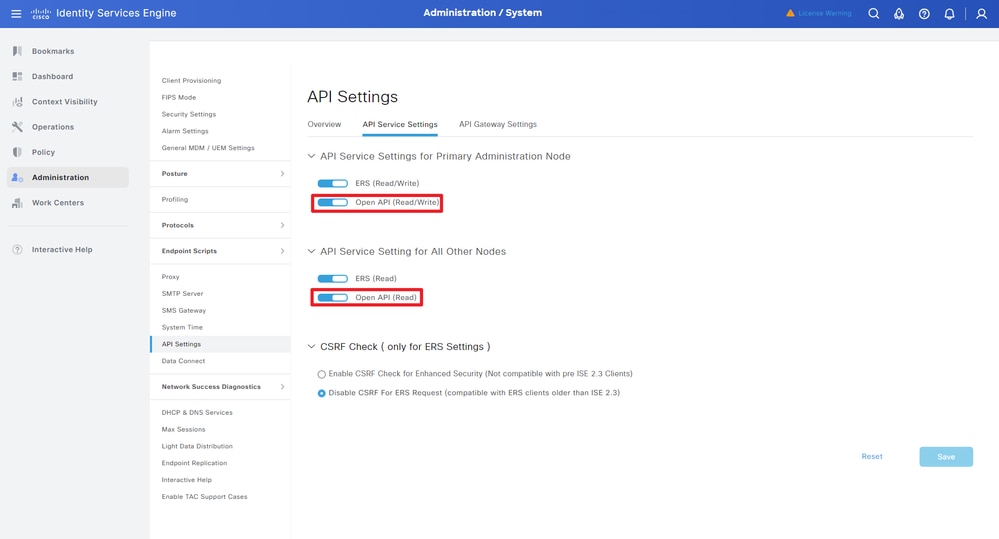 啟用OpenAPI
步驟 3:探索ISE開放式API
導航到Administration > System > Settings > API Settings > Overview。按一下開啟API訪問連結。
 訪問OpenAPI
Python示例
檢索在群集中部署的所有節點的清單
API列出在群集中部署的所有節點。
步驟 1:API呼叫所需的資訊。
步驟 2:查詢用於檢索部署資訊的URL。
 API URI
步驟 3:以下是Python Code的範例。複製並貼上內容。替換ISE IP、使用者名稱、密碼。另存為要執行的python檔案。
確保ISE與運行Python代碼示例的裝置之間的良好連線。
from requests.auth import HTTPBasicAuth
import requests

requests.packages.urllib3.disable_warnings()

if __name__ == "__main__":

    url = "https://10.106.33.92/api/v1/deployment/node"
    headers = {"Accept": "application/json", "Content-Type": "application/json"}
    basicAuth = HTTPBasicAuth("ApiAdmin", "Admin123")

    response = requests.get(url=url, auth=basicAuth, headers=headers, verify=False)
    print("Return Code:")
    print(response.status_code)
    print("Expected Outputs:")
    print(response.json())
以下是預期輸出的範例。
Return Code:
200
Expected Outputs:
{'response': [{'hostname': 'ISE-BGL-CFME01-PAN', 'fqdn': 'ISE-BGL-CFME01-PAN.cisco.com', 'ipAddress': '192.168.20.240', 'roles': ['PrimaryAdmin'], 'services': ['Session', 'Profiler', 'DeviceAdmin'], 'nodeStatus': 'Connected'}, {'hostname': 'ISE-BGL-CFME02-MNT', 'fqdn': 'ISE-BGL-CFME02-MNT.cisco.com', 'ipAddress': '192.168.21.240', 'roles': ['PrimaryMonitoring'], 'services': ['Session', 'Profiler', 'DeviceAdmin'], 'nodeStatus': 'Connected'}, {'hostname': 'ISE-DLC-CFME01-PSN', 'fqdn': 'ISE-DLC-CFME01-PSN.cisco.com', 'ipAddress': '192.168.40.240', 'roles': [], 'services': ['Session', 'Profiler', 'DeviceAdmin'], 'nodeStatus': 'Connected'}, {'hostname': 'ISE-DLC-CFME02-PSN', 'fqdn': 'ISE-DLC-CFME02-PSN.cisco.com', 'ipAddress': '192.168.41.240', 'roles': [], 'services': ['Session', 'Profiler', 'DeviceAdmin'], 'nodeStatus': 'Connected'}, {'hostname': 'ISE-RTP-CFME01-PAN', 'fqdn': 'ISE-RTP-CFME01-PAN.cisco.com', 'ipAddress': '192.168.10.240', 'roles': ['SecondaryAdmin'], 'services': ['Session', 'Profiler', 'DeviceAdmin'], 'nodeStatus': 'Connected'}, {'hostname': 'ISE-RTP-CFME02-MNT', 'fqdn': 'ISE-RTP-CFME02-MNT.cisco.com', 'ipAddress': '192.168.11.240', 'roles': ['SecondaryMonitoring'], 'services': ['Session', 'Profiler', 'DeviceAdmin'], 'nodeStatus': 'Connected'}], 'version': '1.0.0'}
檢索已部署節點的詳細資訊
此API檢索特定ISE節點的詳細資訊。
步驟 1:API呼叫所需的資訊。
| 方法 |
GET |
| URL |
https://<ISE-PAN-IP>/api/v1/deployment/node/<ISE-Node-Hostname> |
| 憑證 |
使用Open API帳戶憑據 |
| 標頭 |
接受:application/json
Content-Type:application/json
|
步驟 2:查詢用於檢索特定ISE節點資訊的URL。
 API URI
步驟3.以下是Python代碼範例。複製並貼上內容。替換ISE IP、使用者名稱、密碼。另存為要執行的python檔案。
確保ISE與運行Python代碼示例的裝置之間的良好連線。
from requests.auth import HTTPBasicAuth
import requests

requests.packages.urllib3.disable_warnings()

if __name__ == "__main__":

    url = "https://10.106.33.92/api/v1/deployment/node/ISE-DLC-CFME02-PSN"
    headers = {"Accept": "application/json", "Content-Type": "application/json"}
    basicAuth = HTTPBasicAuth("ApiAdmin", "Admin123")

    response = requests.get(url=url, auth=basicAuth, headers=headers, verify=False)
    print("Return Code:")
    print(response.status_code)
    print("Expected Outputs:")
    print(response.json())
以下是預期輸出的範例。
Return Code:
200
Expected Outputs:
{'response': {'hostname': 'ISE-DLC-CFME02-PSN', 'fqdn': 'ISE-DLC-CFME02-PSN.cisco.com', 'ipAddress': '192.168.41.240', 'roles': [], 'services': ['Session', 'Profiler', 'DeviceAdmin'], 'nodeStatus': 'Connected'}, 'version': '1.0.0'}
疑難排解
要排除與Open API相關的問題,請在Debug Log Configurationwindow中將theapiservicecomponent的Log級別設定為DEBUG。
要啟用調試,請導航到操作>故障排除>調試嚮導>調試日誌配置> ISE節點>裝置服務。
 API服務調試
要下載調試日誌,請導航至操作>故障排除>下載日誌> ISE PAN節點>調試日誌。
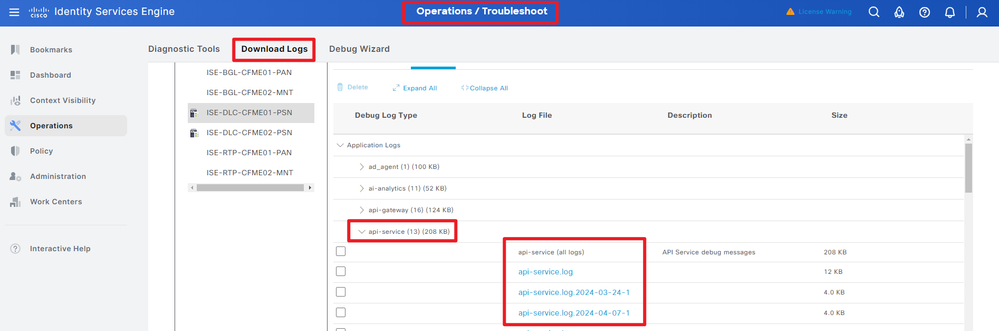 下載調試日誌
 意見
意見