使用非預設IP或多重VLAN配置來配置ASA 5506W-X
下載選項
無偏見用語
本產品的文件集力求使用無偏見用語。針對本文件集的目的,無偏見係定義為未根據年齡、身心障礙、性別、種族身分、民族身分、性別傾向、社會經濟地位及交織性表示歧視的用語。由於本產品軟體使用者介面中硬式編碼的語言、根據 RFP 文件使用的語言,或引用第三方產品的語言,因此本文件中可能會出現例外狀況。深入瞭解思科如何使用包容性用語。
關於此翻譯
思科已使用電腦和人工技術翻譯本文件,讓全世界的使用者能夠以自己的語言理解支援內容。請注意,即使是最佳機器翻譯,也不如專業譯者翻譯的內容準確。Cisco Systems, Inc. 對這些翻譯的準確度概不負責,並建議一律查看原始英文文件(提供連結)。
目錄
簡介
本文檔介紹在需要修改預設IP編址方案以適應現有網路或需要多個無線VLAN時,如何執行思科自適應安全裝置(ASA) 5506W-X裝置的初始安裝和配置。 修改預設IP地址以訪問無線存取點(WAP)並確保其他服務(例如DHCP)繼續按預期運作時,需要進行多項配置更改。 此外,本文檔還提供了整合無線存取點(WAP)的一些CLI配置示例,以便更容易地完成WAP的初始配置。本文檔旨在補充位於Cisco網站上的現有Cisco ASA 5506-X快速入門手冊。
必要條件
本文檔僅適用於包含無線存取點的Cisco ASA5506W-X裝置的初始配置,僅用於解決修改現有IP編址方案或增加其他無線VLAN時所需的各種更改。 對於預設配置安裝,必須參考現有的ASA 5506-X快速入門手冊。
需求
思科建議您瞭解以下主題:
- Cisco ASA 5506W-X裝置
- 具有終端模擬程式(如Putty、SecureCRT等)的客戶端電腦。
- 控制檯電纜和串列PC終端介面卡(DB-9到RJ-45)
採用元件
本文中的資訊係根據以下軟體和硬體版本:
- Cisco ASA 5506W-X裝置
- 具有終端模擬程式(如Putty、SecureCRT等)的客戶端電腦。
- 控制檯電纜和串列PC終端介面卡(DB-9到RJ-45)
- ASA FirePOWER模組
- 整合Cisco Aironet 702i無線存取點(內建WAP)
本文中的資訊是根據特定實驗室環境內的裝置所建立。文中使用到的所有裝置皆從已清除(預設)的組態來啟動。如果您的網路正在作用,請確保您已瞭解任何指令可能造成的影響。
網路圖表
如圖所示,IP編址的示例將應用於兩種不同的拓撲:
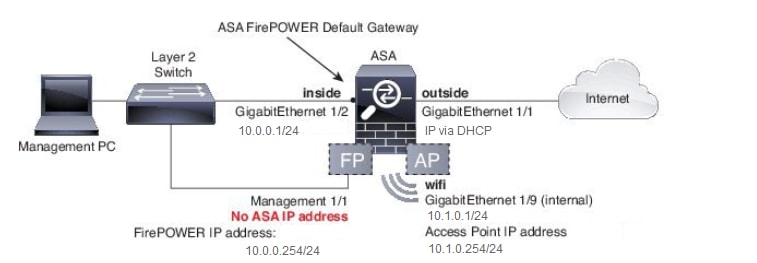
帶內部交換機的ASA + FirePOWER:
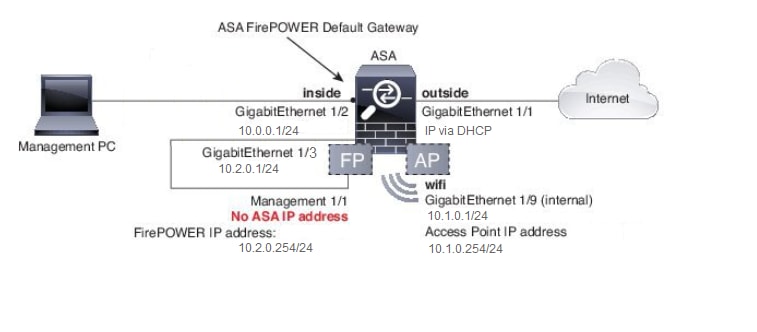
ASA + FirePOWER,無內部交換機:
設定
在打開電源並啟動ASA且控制檯電纜連線到客戶端後,必須按順序執行這些步驟。
步驟 1.修改ASA上的介面IP配置
配置內部(GigabitEthernet 1/2)和wifi (GigabitEthernet 1/9)介面,使其具有現有環境中所需的IP地址。 在本示例中,內部客戶端位於10.0.0.1/24網路上,WIFI客戶端位於10.1.0.1/24網路上。
asa(config)# interface gigabitEthernet 1/2
asa(config-if)# ip address 10.0.0.1 255.255.255.0

asa(config)# interface gigabitEthernet 1/9
asa(config-if)# ip address 10.1.0.1 255.255.255.0
[an error occurred while processing this directive]
注意:更改上述介面IP地址時,您將收到此警告。 這是預料之中的。
Interface address is not on same subnet as DHCP pool
WARNING: DHCPD bindings cleared on interface 'inside', address pool removed
[an error occurred while processing this directive]
步驟 2.修改內部介面和wifi介面上的DHCP池設定
如果要在環境中將ASA用作DHCP伺服器,則需要執行此步驟。 如果使用另一台DHCP伺服器向客戶端分配IP地址,則應在ASA上完全停用DHCP。 由於您現在已更改了我們的IP編址方案,因此需要更改ASA提供給客戶端的現有IP地址範圍。 這些命令將建立新池以匹配新的IP地址範圍:
asa(config)# dhcpd address 10.0.0.2-10.0.0.100 inside
asa(config)# dhcpd address 10.1.0.2-10.1.0.100 wifi
[an error occurred while processing this directive]
此外,修改DHCP池將停用ASA上以前的DHCP伺服器,您需要重新啟用該伺服器。
asa(config)# dhcpd enable inside[an error occurred while processing this directive]
asa(config)# dhcpd enable wifi
如果在更改DHCP之前未更改介面IP地址,則會收到以下錯誤:
asa(config)# dhcpd address 10.0.0.2-10.0.0.100 inside
Address range subnet 10.0.0.2 or 10.0.0.100 is not the same as inside interface subnet 192.168.1.1
[an error occurred while processing this directive]
步驟 3.指定要傳遞給內部和WiFI DHCP客戶端的DNS伺服器
當透過DHCP分配IP地址時,大多數客戶端還需要透過DHCP伺服器分配DNS伺服器。 這些命令會將ASA配置為包括位於所有客戶端的10.0.0.250處的DNS伺服器。 您需要將10.0.0.250替換為內部DNS伺服器或ISP提供的DNS伺服器。
asa(config)# dhcpd dns 10.0.0.250 interface inside
asa(config)# dhcpd dns 10.0.0.250 interface wifi
[an error occurred while processing this directive]
步驟 4.修改ASA上的HTTP訪問配置,以便自適應安全裝置管理器(ASDM)訪問:
由於IP編址已更改,因此還需要修改對ASA的HTTP訪問,以便內部和WiFI網路上的客戶端可以訪問ASDM來管理ASA。
asa(config)# no http 192.168.1.0 255.255.255.0 inside[an error occurred while processing this directive]
asa(config)# no http 192.168.10.0 255.255.255.0 wifi
asa(config)# http 0.0.0.0 0.0.0.0 inside asa(config)# http 0.0.0.0 0.0.0.0 wifi
注意:此配置允許內部或wifi介面上的任何客戶端透過ASDM訪問ASA。作為安全最佳做法,您必須將地址範圍限制為僅受信任的客戶端。
步驟 5.修改WLAN控制檯中存取點管理的介面IP(介面BVI1):
asa# session wlan console
ap>enable
Password: Cisco
ap#configure terminal
Enter configuration commands, one per line.  End with CNTL/Z.
ap(config)#interface BVI1
ap(config-if)#ip address 10.1.0.254 255.255.255.0
[an error occurred while processing this directive]
步驟 6.修改WAP上的預設網關
需要執行此步驟,WAP才能知道要將本地子網以外的所有流量傳送到何處。 這是從ASA內部介面上的客戶端透過HTTP訪問WAP GUI所必需的。
ap(config)#ip default-gateway 10.1.0.1[an error occurred while processing this directive]
步驟 7.修改FirePOWER模組管理IP地址(可選)
如果您還計畫部署Cisco FirePOWER(也稱為SFR)模組,則還需要更改其IP地址,以便從ASA的物理管理1/1介面訪問該模組。有兩種基本部署方案可確定如何配置ASA和SFR模組:
- ASA Management1/1介面連線到內部交換機的拓撲(根據一般快速入門手冊)
- 不存在內部交換機的拓撲。
根據您的案例,以下為適當的步驟:
如果ASA Management1/1介面連線到內部交換機:
您可以在將模組連線到內部交換機之前,先將其從ASA切換到模組中。 此配置允許您透過IP訪問SFR模組,方法是將其置於IP地址為10.0.0.254的ASA內部介面所在的同一子網上。
粗體行是本示例的特定行,是建立IP連線所必需的。
斜體行會隨環境而變化。
asa# session sfr console
Opening console session with module sfr.
Connected to module sfr. Escape character sequence is 'CTRL-^X'.

Cisco ASA5506W v5.4.1 (build 211)
Sourcefire3D login: admin
Password: Sourcefire

<<Output Truncated - you will see a large EULA>>

Please enter 'YES' or press <ENTER> to AGREE to the EULA: YES

System initialization in progress.  Please stand by.
You must change the password for 'admin' to continue.
Enter new password:
Confirm new password:
You must configure the network to continue.
You must configure at least one of IPv4 or IPv6.
Do you want to configure IPv4? (y/n) [y]: y
Do you want to configure IPv6? (y/n) [n]: n
Configure IPv4 via DHCP or manually? (dhcp/manual) [manual]:
Enter an IPv4 address for the management interface [192.168.45.45]: 10.0.0.254
Enter an IPv4 netmask for the management interface [255.255.255.0]: 255.255.255.0
Enter the IPv4 default gateway for the management interface []:
10.0.0.1
[an error occurred while processing this directive]
Enter a fully qualified hostname for this system [Sourcefire3D]: Cisco_SFR
Enter a comma-separated list of DNS servers or 'none' []: 10.0.0.250
Enter a comma-separated list of search domains or 'none' [example.net]: example.net
If your networking information has changed, you will need to reconnect.

For HTTP Proxy configuration, run 'configure network http-proxy'

Applying 'Default Allow All Traffic' access control policy.
注意:在SFR模組上應用預設訪問控制策略可能需要幾分鐘。 完成後,您可以透過按CTRL + SHIFT + 6 +X (CTRL ^ X)退出SFR模組CLI並返回ASA
如果ASA未連線到內部交換機:
某些小型部署中可能不存在內部交換機。 在這種型別的拓撲中,客戶端通常透過WiFi介面連線到ASA。 在此場景中,透過將Management1/1介面交叉連線到另一個物理ASA介面,可以無需使用外部交換機並透過單獨的ASA介面訪問SFR模組。
在本示例中,ASA GigabitEthernet1/3介面和Management1/1介面之間必須存在物理乙太網連線。 接下來,將ASA和SFR模組配置為位於單獨的子網上,然後您可以從ASA以及位於內部介面或wifi介面上的客戶端訪問SFR。
ASA介面配置:
asa(config)# interface gigabitEthernet 1/3
asa(config-if)# ip address 10.2.0.1 255.255.255.0
asa(config-if)# nameif sfr
INFO: Security level for "sfr" set to 0 by default.
asa(config-if)# security-level 100
asa(config-if)# no shut
[an error occurred while processing this directive]
SFR模組配置:
asa# session sfr console
Opening console session with module sfr.
Connected to module sfr. Escape character sequence is 'CTRL-^X'.

Cisco ASA5506W v5.4.1 (build 211)
Sourcefire3D login: admin
Password: Sourcefire

<<Output Truncated - you will see a large EULA>>

Please enter 'YES' or press <ENTER> to AGREE to the EULA: YES

System initialization in progress.  Please stand by.
You must change the password for 'admin' to continue.
Enter new password:
Confirm new password:
You must configure the network to continue.
You must configure at least one of IPv4 or IPv6.
Do you want to configure IPv4? (y/n) [y]: y
Do you want to configure IPv6? (y/n) [n]: n
Configure IPv4 via DHCP or manually? (dhcp/manual) [manual]:
Enter an IPv4 address for the management interface [192.168.45.45]: 10.2.0.254
Enter an IPv4 netmask for the management interface [255.255.255.0]: 255.255.255.0
Enter the IPv4 default gateway for the management interface []: 10.2.0.1
Enter a fully qualified hostname for this system [Sourcefire3D]: Cisco_SFR
Enter a comma-separated list of DNS servers or 'none' []: 10.0.0.250
Enter a comma-separated list of search domains or 'none' [example.net]: example.net
If your networking information has changed, you will need to reconnect.

For HTTP Proxy configuration, run 'configure network http-proxy'

Applying 'Default Allow All Traffic' access control policy.
[an error occurred while processing this directive]
注意:在SFR模組上應用預設訪問控制策略可能需要幾分鐘。 完成後,您可以透過按CTRL + SHIFT + 6 +X (CTRL ^ X)退出SFR模組CLI並返回ASA。
應用SFR配置後,您必須能夠從ASA ping SFR管理IP地址:
asa# ping 10.2.0.254
Type escape sequence to abort.
Sending 5, 100-byte ICMP Echos to 10.2.0.254, timeout is 2 seconds:
!!!!!
Success rate is 100 percent (5/5), round-trip min/avg/max = 1/1/1 ms
asa#
[an error occurred while processing this directive]
如果無法成功ping通介面,請驗證物理乙太網連線的配置和狀態。
步驟 8.連線到AP GUI以啟用無線電並設定其他WAP配置
此時,您應該具有連線,以便透過HTTP GUI管理WAP,如快速入門手冊中所述。 您需要從連線到5506W內部網路的客戶端的Web瀏覽器瀏覽WAP的BVI介面的IP地址,或者可以應用示例配置並連線到WAP的SSID。如果未使用下面的CLI,則需要將乙太網電纜從客戶端連線到ASA上的Gigabit1/2介面。
如果您希望使用CLI配置WAP,可以從ASA向其進行會話並使用以下示例配置。這將建立名稱為5506W和5506W_5Ghz的開放式SSID,以便您可以使用無線客戶端連線並進一步管理WAP。
注意:應用此配置後,您需要訪問GUI並應用SSID的安全性,以便加密無線流量。
使用修改的IP範圍配置單個無線VLAN的WAP CLI
dot11 ssid 5506W
   authentication open
   guest-mode
dot11 ssid 5506W_5Ghz
   authentication open
   guest-mode
!
interface Dot11Radio0
 !
 ssid 5506W
 !
interface Dot11Radio1
 !
 ssid 5506W_5Ghz
 !
interface BVI1
 ip address 10.1.0.254 255.255.255.0
ip default-gateway 10.1.0.1
!
interface Dot11Radio0
 no shut
!
interface Dot11Radio1
 no shut
[an error occurred while processing this directive]
從此時開始,您可以執行正常步驟完成WAP的配置,並且您必須能夠從連線到上面建立的SSID的客戶端的Web瀏覽器訪問它。存取點的預設使用者名稱是Cisco,口令為Cisco,大寫C。
Cisco ASA 5506-X系列快速入門手冊
您需要使用IP地址10.1.0.254,而不是快速入門手冊中所述的192.168.10.2。
組態
產生的配置必須與輸出匹配(假設您使用示例IP範圍,否則請相應地替換:
ASA配置
介面:
注意:只有當您沒有內部開關時,斜體行才適用:
asa# sh run interface gigabitEthernet 1/2
!
interface GigabitEthernet1/2
 nameif inside
 security-level 100
 ip address 10.0.0.1 255.255.255.0
asa# sh run interface gigabitEthernet 1/3
!
interface GigabitEthernet1/3
 nameif sfr
 security-level 100
 ip address 10.2.0.1 255.255.255.0
asa# sh run interface gigabitEthernet 1/9
!
interface GigabitEthernet1/9
 nameif wifi
 security-level 100
 ip address 10.1.0.1 255.255.255.0
asa#
[an error occurred while processing this directive]
DHCP:
asa# sh run dhcpd
[an error occurred while processing this directive]
dhcpd auto_config outside
**auto-config from interface 'outside'
**auto_config dns x.x.x.x x.x.x.x  <-- these lines will depend on your ISP
**auto_config domain isp.domain.com   <-- these lines will depend on your ISP
!
dhcpd address 10.0.0.2-10.0.0.100 inside
dhcpd dns 10.0.0.250 interface inside
dhcpd enable inside
!
dhcpd address 10.1.0.2-10.1.0.100 wifi
dhcpd dns 10.0.0.250 interface wifi
dhcpd enable wifi
!
asa#
HTTP:
asa# show run http
http server enable
http 0.0.0.0 0.0.0.0 outside
http 0.0.0.0 0.0.0.0 inside
asa#
[an error occurred while processing this directive]
Aironet WAP配置(不含示例SSID配置)
asa# session wlan console
ap>enable
Password: Cisco
ap#configure terminal
Enter configuration commands, one per line.  End with CNTL/Z.
ap#show configuration | include default-gateway
ip default-gateway 10.1.0.1
ap#show configuration | include ip route
ip route 0.0.0.0 0.0.0.0 10.1.0.1
ap#show configuration | i interface BVI|ip address 10
[an error occurred while processing this directive]
interface BVI1 ip address
 10.1.0.254 255.255.255.0
FirePOWER模組配置(帶內部交換機)
asa# session sfr console
Opening console session with module sfr.
Connected to module sfr. Escape character sequence is 'CTRL-^X'.
> show network
===============[ System Information ]===============
Hostname                  : Cisco_SFR
Domains                   : example.net
DNS Servers               : 10.0.0.250
Management port           : 8305
IPv4 Default route
  Gateway                 : 10.0.0.1
======================[ eth0 ]======================
State                    : Enabled
Channels                  : Management & Events
Mode                      :
MDI/MDIX                  : Auto/MDIX
MTU                       : 1500
MAC Address               : B0:AA:77:7C:84:10
----------------------[ IPv4 ]---------------------
Configuration             : Manual
Address                   : 10.0.0.254
Netmask                   : 255.255.255.0
Broadcast                 : 10.0.0.255
----------------------[ IPv6 ]----------------------
Configuration             : Disabled

===============[ Proxy Information ]================
State                     : Disabled
Authentication            : Disabled

>
[an error occurred while processing this directive]
FirePOWER模組配置(無內部交換機)
asa# session sfr console
Opening console session with module sfr.
Connected to module sfr. Escape character sequence is 'CTRL-^X'.
> show network
===============[ System Information ]===============
Hostname                  : Cisco_SFR
Domains                   : example.net
DNS Servers               : 10.0.0.250
Management port           : 8305
IPv4 Default route
  Gateway                 : 10.2.0.1
======================[ eth0 ]======================
State                    : Enabled
Channels                  : Management & Events
Mode                      :
MDI/MDIX                  : Auto/MDIX
MTU                       : 1500
MAC Address               : B0:AA:77:7C:84:10
----------------------[ IPv4 ]---------------------
Configuration             : Manual
Address                   : 10.2.0.254
Netmask                   : 255.255.255.0
Broadcast                 : 10.2.0.255
----------------------[ IPv6 ]----------------------
Configuration             : Disabled

===============[ Proxy Information ]================
State                     : Disabled
Authentication            : Disabled

>
[an error occurred while processing this directive]
驗證
為了驗證您與WAP的連線是否正確,以完成安裝程式:
- 將您的測試客戶端連線到ASA內部介面,並確保該客戶端透過DHCP從ASA接收所需IP範圍內的IP地址。
- 使用客戶端上的Web瀏覽器導航到https://10.1.0.254,並驗證現在是否可以訪問AP GUI。
- 從內部客戶端和ASA對SFR管理介面執行ping操作以檢驗連線是否正確。
使用多個無線VLAN配置DHCP
此組態假設您使用單一無線VLAN。無線AP上的網橋虛擬介面(BVI)可為多個VLAN提供網橋。由於ASA上DHCP的語法,如果要將5506W配置為多個VLAN的DHCP伺服器,需要在Gigabit1/9介面上建立子介面並為每個子介面命名。本部分指導您完成如何刪除預設配置並應用將ASA設定為多個VLAN的DHCP伺服器所需的配置。
步驟 1.刪除Gig1/9上的現有DHCP配置
首先,刪除Gig1/9 (wifi)介面上的現有DHCP配置:
ciscoasa# no dhcpd address 10.1.0.2-10.1.0.100 wifi[an error occurred while processing this directive]
ciscoasa# no dhcpd enable wifi
步驟 2.在Gig1/9上為每個VLAN建立子介面
對於已在存取點上配置的每個VLAN,您需要配置Gig1/9的子介面。在此示例配置中,增加兩個子介面:
-Gig1/9.5,將具有nameif vlan5,並將與VLAN 5和子網10.5.0.0/24對應。
-Gig1/9.30,其名稱為if vlan30,將對應於VLAN 30和子網10.3.0.0/24。
實際上,此處配置的VLAN和子網必須與存取點上指定的VLAN和子網匹配。nameif和子介面編號可以是您選擇的任何專案。 請參閱先前提及的快速入門手冊中的連結以使用Web GUI設定存取點。
ciscoasa(config)# interface g1/9.5[an error occurred while processing this directive]
ciscoasa(config-if)# vlan 5
ciscoasa(config-if)# nameif vlan5
ciscoasa(config-if)# security-level 100
ciscoasa(config-if)# ip address 10.5.0.1 255.255.255.0
ciscoasa(config-if)# interface g1/9.30
ciscoasa(config-if)# vlan 30
ciscoasa(config-if)# nameif vlan30
ciscoasa(config-if)# security-level 100
ciscoasa(config-if)# ip address 10.30.0.1 255.255.255.0
步驟 3.為每個VLAN指定一個DHCP池
為配置的每個VLAN建立單獨的DHCP池。此命令的語法要求您列出ASA將用於該池的nameif。如以下範例所示,使用VLAN 5和30:ciscoasa(config)# dhcpd address 10.5.0.2-10.5.0.254 vlan5 ciscoasa(config)# dhcpd address 10.30.0.2-10.30.0.254 vlan30 ciscoasa(config)# dhcpd enable vlan5 ciscoasa(config)# dhcpd enable vlan30[an error occurred while processing this directive]
步驟 4.配置存取點SSID、儲存配置並重置模組
最後,需要配置存取點以與ASA的配置相對應。存取點的GUI介面允許您透過連線到ASA內部(Gigabit1/2)介面的客戶端在AP上配置VLAN。但是,如果您希望使用CLI透過ASA控制檯會話配置AP,然後進行無線連線以管理AP,則可以將此配置用作在VLAN 5和30上建立兩個SSID的模板。必須在全局配置模式下在AP控制檯中輸入:
dot11 vlan-name VLAN30 vlan 30
dot11 vlan-name VLAN5 vlan 5
!
dot11 ssid SSID_VLAN30
   vlan 30
   authentication open
   mbssid guest-mode
!
dot11 ssid SSID_VLAN5
   vlan 5
   authentication open
   mbssid guest-mode
!
interface Dot11Radio0
 !
 ssid SSID_VLAN30
 !
 ssid SSID_VLAN5
 mbssid
!
interface Dot11Radio0.5
 encapsulation dot1Q 5
 bridge-group 5
 bridge-group 5 subscriber-loop-control
 bridge-group 5 spanning-disabled
 bridge-group 5 block-unknown-source
 no bridge-group 5 source-learning
 no bridge-group 5 unicast-flooding
!
interface Dot11Radio0.30
 encapsulation dot1Q 30
 bridge-group 30
 bridge-group 30 subscriber-loop-control
 bridge-group 30 spanning-disabled
 bridge-group 30 block-unknown-source
 no bridge-group 30 source-learning
 no bridge-group 30 unicast-flooding
!
interface Dot11Radio1
 !
 ssid SSID_VLAN30
 !
 ssid SSID_VLAN5
 mbssid
!
 interface Dot11Radio1.5
 encapsulation dot1Q 5
 bridge-group 5
 bridge-group 5 subscriber-loop-control
 bridge-group 5 spanning-disabled
 bridge-group 5 block-unknown-source
 no bridge-group 5 source-learning
 no bridge-group 5 unicast-flooding
!
interface Dot11Radio1.30
 encapsulation dot1Q 30
 bridge-group 30
 bridge-group 30 subscriber-loop-control
 bridge-group 30 spanning-disabled
 bridge-group 30 block-unknown-source
 no bridge-group 30 source-learning
 no bridge-group 30 unicast-flooding
!
interface GigabitEthernet0.5
 encapsulation dot1Q 5
 bridge-group 5
 bridge-group 5 spanning-disabled
 no bridge-group 5 source-learning
!
interface GigabitEthernet0.30
 encapsulation dot1Q 30
 bridge-group 30
 bridge-group 30 spanning-disabled
 no bridge-group 30 source-learning
!
interface BVI1
 ip address 10.1.0.254 255.255.255.0
ip default-gateway 10.1.0.1
!
interface Dot11Radio0
 no shut
!
interface Dot11Radio1
 no shut
[an error occurred while processing this directive] 此時,ASA和AP的管理配置必須完整,並且ASA用作VLAN 5和30的DHCP伺服器。在AP上使用 write memory命令儲存配置後,如果仍有連線問題,則必須從CLI使用reload命令重新載入AP。但是,如果在新建立的SSID上收到IP地址,則無需進一步操作。
ap#write memory
Building configuration...
[OK]
ap#reload
Proceed with reload? [confirm]
Writing out the event log to flash:/event.log ...
[an error occurred while processing this directive]
注意:您無需重新載入整個ASA裝置。您只能重新載入內建存取點。
AP完成重新載入後,您必須從wifi或內部網路上的客戶端電腦連線到AP GUI。 通常AP需要大約兩分鐘才能完全重新啟動。 從此時開始,您可以應用正常步驟完成WAP的配置。
Cisco ASA 5506-X系列快速入門手冊
疑難排解
排除ASA連線故障不在本文檔的討論範圍之內,因為這是用於初始配置。 請參閱驗證和配置兩節以確保所有步驟都已正確完成。
修訂記錄
| 修訂 | 發佈日期 | 意見 |
|---|---|---|
1.0 |
30-Mar-2016
|
初始版本 |
由思科工程師貢獻
- 凱文·克勞斯Cisco TAC工程師
- 史考特·魯Cisco TAC工程師
 意見
意見