ASA/PIX:使用CLI和ASDM配置IPSec VPN客戶端的靜態IP定址的示例
目錄
簡介
本文檔介紹如何配置Cisco 5500系列自適應安全裝置(ASA),以使用自適應安全裝置管理器(ASDM)或CLI向VPN客戶端提供靜態IP地址。ASDM透過一個直觀、易於使用的基於Web的管理介面,提供世界一流的安全管理和監控。Cisco ASA配置完成後,即可透過Cisco VPN客戶端進行驗證。
請參閱使用Windows 2003 IAS RADIUS(針對Active Directory)進行身份驗證的PIX/ASA 7.x和Cisco VPN客戶端4.x配置示例,以設定Cisco VPN客戶端(4.x for Windows)和PIX 500系列安全裝置7.x之間的遠端訪問VPN連線。遠端VPN客戶端使用者使用Microsoft Windows 2003 Internet身份驗證服務(IAS) RADIUS伺服器對Active Directory進行身份驗證。
請參閱PIX/ASA 7.x和Cisco VPN客戶端4.x for Cisco Secure ACS身份驗證配置示例以設定Cisco VPN客戶端(4.x for Windows)和PIX 500系列安全裝置7.x之間的遠端訪問VPN連線,並對擴展身份驗證(Xauth)使用Cisco安全訪問控制伺服器(ACS 3.2版)。
必要條件
需求
本文檔假設ASA完全正常運行且已配置為允許Cisco ASDM或CLI進行配置更改。
注意:請參閱允許ASDM進行HTTPS訪問或PIX/ASA 7.x:內部和外部介面上的SSH配置示例,以允許透過ASDM或Secure Shell (SSH)對裝置進行遠端配置。
採用元件
本文中的資訊係根據以下軟體和硬體版本:
-
思科自適應安全裝置軟體版本7.x及更高版本
-
自適應安全裝置管理器5.x版及更高版本
-
Cisco VPN Client版本4.x及更高版本
本文中的資訊是根據特定實驗室環境內的裝置所建立。文中使用到的所有裝置皆從已清除(預設)的組態來啟動。如果您的網路正在作用,請確保您已瞭解任何指令可能造成的影響。
相關產品
此配置還可用於Cisco PIX安全裝置版本7.x及更高版本。
慣例
如需文件慣例的詳細資訊,請參閱思科技術提示慣例。
設定
本節提供用於設定本文件中所述功能的資訊。
注意:使用命令查詢工具(僅限註冊客戶)可以獲取有關本部分使用的命令的更多資訊。
網路圖表
此文件使用以下網路設定:
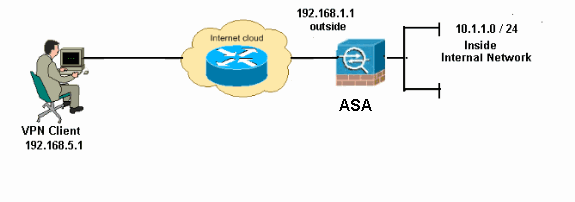
注意:此配置中使用的IP編址方案在Internet上無法合法路由。這些地址是在實驗室環境中使用的RFC 1918地址。
配置遠端訪問VPN (IPSec)
ASDM過程
完成以下步驟以配置遠端訪問VPN:
-
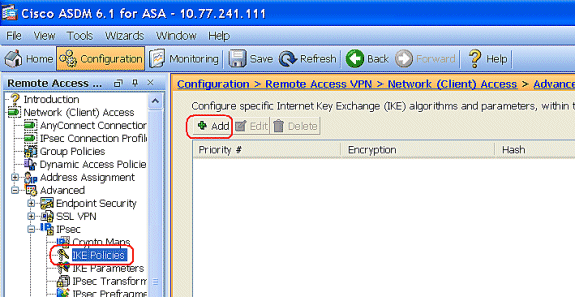
選擇Configuration > Remote Access VPN > Network (Client) Access > Advanced > IPSec > IKE Policies > Add以建立ISAKMP策略。
-
提供ISAKMP策略詳細資訊。
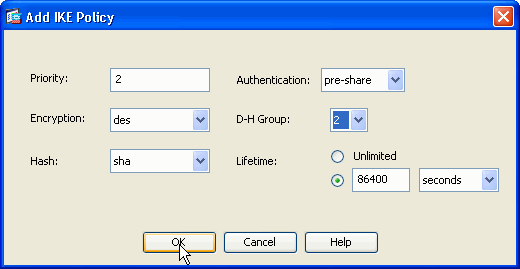
按一下OK和Apply。
-
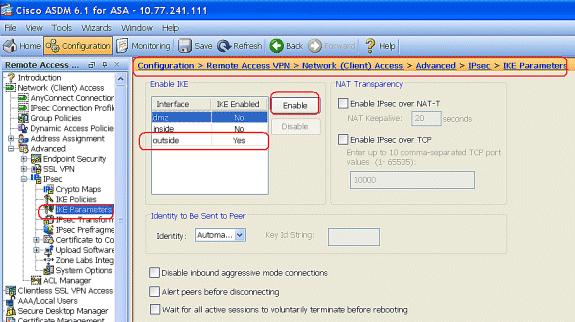
選擇Configuration > Remote Access VPN > Network (Client) Access > Advanced > IPSec > IKE Parameters以啟用外部介面上的IKE。
-
選擇Configuration > Remote Access VPN > Network (Client) Access > Advanced > IPSec > IPSec Transform Sets > Add以建立ESP-DES-SHA轉換集,如下所示。

按一下OK和Apply。
-
選擇Configuration > Remote Access VPN > Network (Client) Access > Advanced > IPSec > Crypto Maps > Add以使用優先順序為1的動態策略建立加密對映,如下所示。
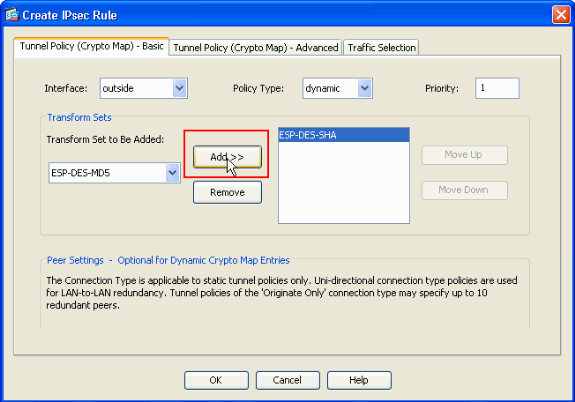
按一下OK和Apply。
-
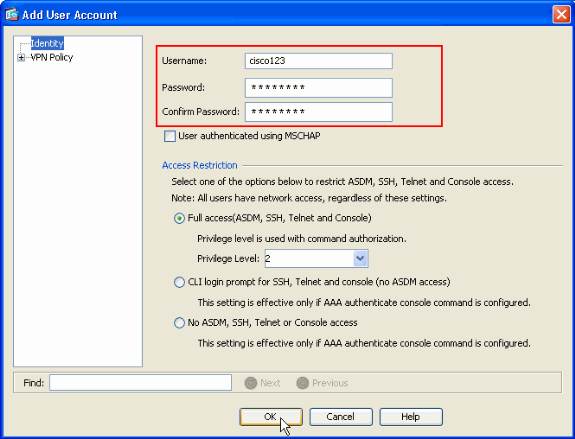
選擇Configuration > Remote Access VPN > AAA Setup > Local Users > Add以便為VPN Client訪問建立使用者帳戶(例如,使用者名稱- cisco123和口令- cisco123)。
-
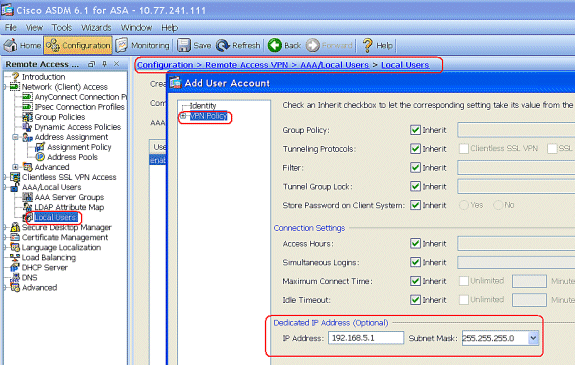
轉到VPN Policy並為使用者「cisco123」增加靜態/專用IP地址,如下所示。
-
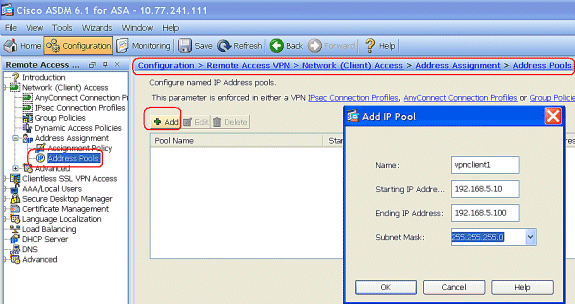
選擇Configuration > Remote Access VPN > Network (Client) Access > Address Assignment > Address Pools,然後按一下Add為VPN客戶端使用者增加VPN客戶端。
-
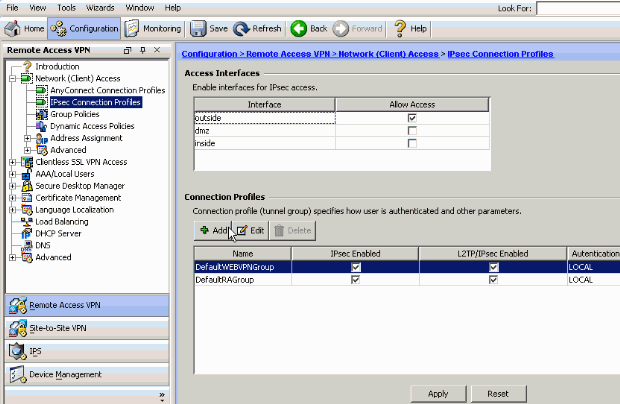
選擇Configuration > Remote Access VPN > Network (Client) Access > IPSec Connection Profiles > Add以增加隧道組(例如TunnelGroup1,Preshared Key為cisco123),如下所示。
-
在Basic頁籤中,為User Authentication欄位選擇LOCAL作為Server Group。
-
選擇vpnclient1作為VPN客戶端使用者的Client Address Pools。
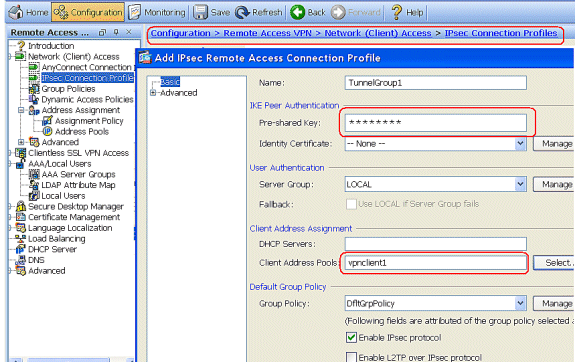
按一下「OK」(確定)。
-
-
選擇Advanced > Client Addressing,並選中Use address pool覈取方塊,以便將IP地址分配至VPN客戶端。
注意:確保取消選中Use authentication server和Use DHCP覈取方塊。
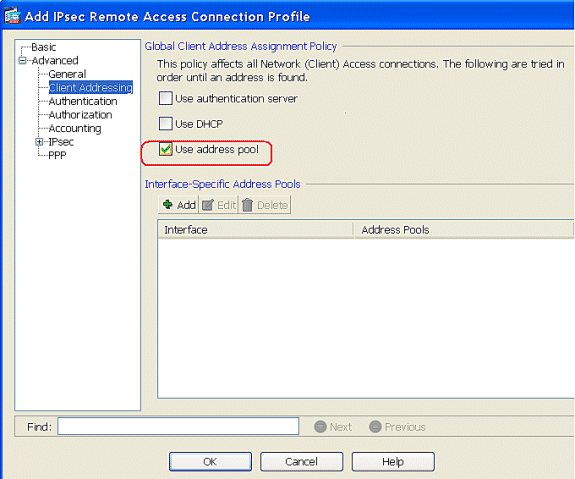
按一下「OK」(確定)。
-
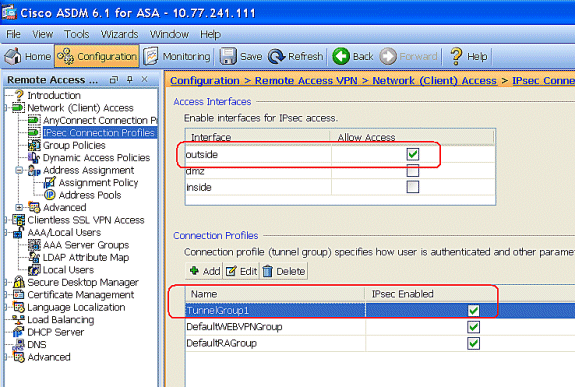
啟用Outside介面進行IPSec訪問。按一下Apply繼續。
使用CLI配置ASA/PIX
完成以下步驟,以便將DHCP伺服器配置為從命令列向VPN客戶端提供IP地址。有關所使用的每個命令的詳細資訊,請參閱配置遠端接入VPN或Cisco ASA 5500系列自適應安全裝置命令參考。
| 在ASA裝置上運行配置 |
|---|
ASA# sh run ASA Version 8.0(2) ! !--- Specify the hostname for the Security Appliance. hostname ASA enable password 8Ry2YjIyt7RRXU24 encrypted names ! !--- Configure the outside and inside interfaces. interface Ethernet0/0 nameif inside security-level 100 ip address 10.1.1.1 255.255.255.0 ! interface Ethernet0/1 nameif outside security-level 0 ip address 192.168.1.1 255.255.255.0 ! interface Ethernet0/2 nameif DMZ security-level 50 ip address 192.168.10.2 255.255.255.0 !--- Output is suppressed. passwd 2KFQnbNIdI.2KYOU encrypted boot system disk0:/asa802-k8.bin ftp mode passive access-list 101 extended permit ip 10.1.1.0 255.255.255.0 192.168.5.0 255.255.255.0 pager lines 24 logging enable logging asdm informational mtu inside 1500 mtu outside 1500 mtu dmz 1500 ip local pool vpnclient1 192.168.5.10-192.168.5.100 mask 255.255.255.0 no failover icmp unreachable rate-limit 1 burst-size 1 !--- Specify the location of the ASDM image for ASA to fetch the image for ASDM access. asdm image disk0:/asdm-613.bin no asdm history enable arp timeout 14400 global (outside) 1 192.168.1.5 nat (inside) 0 access-list 101 nat (inside) 1 0.0.0.0 0.0.0.0 route outside 0.0.0.0 0.0.0.0 192.168.1.2 1 timeout xlate 3:00:00 timeout conn 1:00:00 half-closed 0:10:00 udp 0:02:00 icmp 0:00:02 timeout sunrpc 0:10:00 h323 0:05:00 h225 1:00:00 mgcp 0:05:00 mgcp-pat 0:05:00 timeout sip 0:30:00 sip_media 0:02:00 sip-invite 0:03:00 sip-disconnect 0:02:00 timeout uauth 0:05:00 absolute dynamic-access-policy-record DfltAccessPolicy http server enable http 0.0.0.0 0.0.0.0 inside no snmp-server location no snmp-server contact snmp-server enable traps snmp authentication linkup linkdown coldstart crypto ipsec transform-set ESP-DES-SHA esp-des esp-sha-hmac crypto dynamic-map outside_dyn_map 1 set transform-set ESP-DES-SHA crypto map outside_map 1 ipsec-isakmp dynamic outside_dyn_map !--- Specifies the interface to be used with !--- the settings defined in this configuration. crypto map outside_map interface outside !--- PHASE 1 CONFIGURATION ---! !--- This configuration uses ISAKMP policy 2. !--- The configuration commands here define the Phase !--- 1 policy parameters that are used. crypto isakmp enable outside crypto isakmp policy 2 authentication pre-share encryption des hash sha group 2 lifetime 86400 no crypto isakmp nat-traversal !--- Specifies that the IP address to the vpn clients are assigned by the local and not by AAA or dhcp. The CLI vpn-addr-assign local for VPN address assignment through ASA is hidden in the CLI provided by show run command. no vpn-addr-assign aaa no vpn-addr-assign dhcp telnet timeout 5 ssh timeout 5 console timeout 0 threat-detection basic-threat threat-detection statistics access-list ! class-map inspection_default match default-inspection-traffic ! ! policy-map type inspect dns preset_dns_map parameters message-length maximum 512 policy-map global_policy class inspection_default inspect dns preset_dns_map inspect ftp inspect h323 h225 inspect h323 ras inspect netbios inspect rsh inspect rtsp inspect skinny inspect esmtp inspect sqlnet inspect sunrpc inspect tftp inspect sip inspect xdmcp ! service-policy global_policy global ! group-policy DfltGrpPolicy attributes vpn-tunnel-protocol IPSec webvpn group-policy GroupPolicy1 internal !--- In order to identify remote access users to the Security Appliance, !--- you can also configure usernames and passwords on the device. !--- specify the IP address to assign to a particular user, use the vpn-framed-ip-address command !--- in username mode username cisco123 password ffIRPGpDSOJh9YLq encrypted username cisco123 attributes vpn-framed-ip-address 192.168.5.1 255.255.255.0 !--- Create a new tunnel group and set the connection !--- type to remote-access. tunnel-group TunnelGroup1 type remote-access tunnel-group TunnelGroup1 general-attributes address-pool vpnclient1 !--- Enter the pre-shared-key to configure the authentication method. tunnel-group TunnelGroup1 ipsec-attributes pre-shared-key * prompt hostname context Cryptochecksum:e0725ca9ccc28af488ded9ee36b7822d : end ASA# |
Cisco VPN客戶端配置
嘗試使用Cisco VPN客戶端連線到Cisco ASA,以驗證是否成功配置了ASA。
-
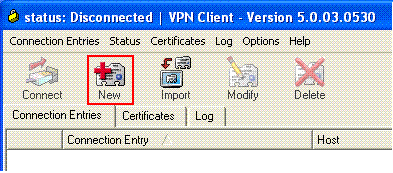
選擇開始>程式> Cisco Systems VPN客戶端> VPN客戶端。
-
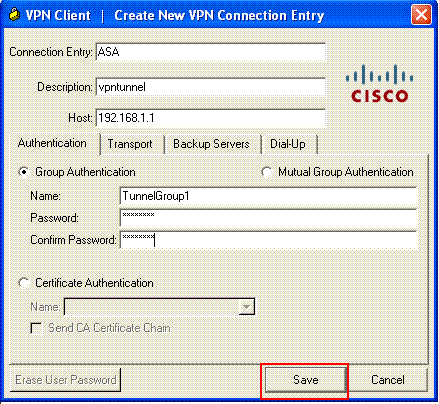
按一下New以啟動Create New VPN Connection Entry窗口。
-
填寫新連線的詳細資訊。
輸入連線條目的名稱和說明。在Host框中輸入ASA的外部IP地址。然後輸入VPN隧道組名稱(TunnelGroup1)和密碼(預共用金鑰- cisco123),如ASA中所配置。按一下Save。
-
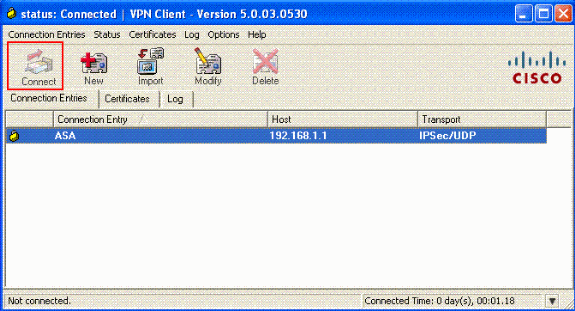
按一下要使用的連線,然後在VPN客戶端主窗口中按一下Connect。
-
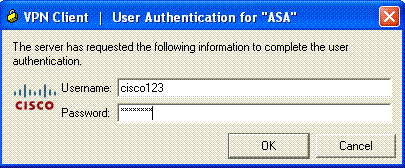
出現提示時,輸入在ASA中為Xauth配置的Username : cisco123和Password : cisco123,然後按一下OK連線到遠端網路。
-
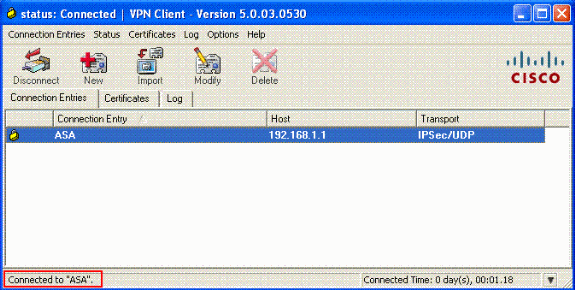
VPN客戶端與中心站點的ASA連線。
-
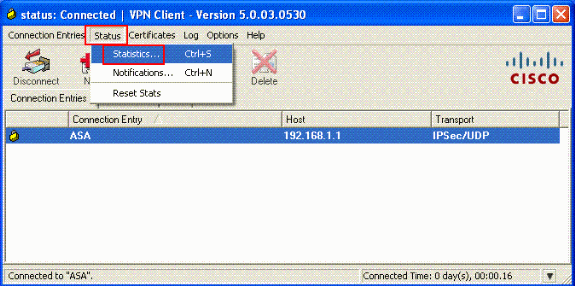
成功建立連線後,在Status選單中選擇Statistics以驗證隧道的詳細資訊。
驗證
顯示命令
使用本節內容,確認您的組態是否正常運作。
輸出直譯器工具(僅供註冊客戶使用) (OIT)支援某些show指令。使用OIT檢視對show命令輸出的分析。
-
show crypto isakmp sa -顯示對等體上的所有當前IKE安全關聯(SA)。
-
show crypto ipsec sa -顯示當前SA使用的設定。
疑難排解
本節提供的資訊可用於對組態進行疑難排解。還顯示了調試輸出示例。
注意:有關遠端訪問IPSec VPN故障排除的詳細資訊,請參閱最常用的L2L和遠端訪問IPSec VPN故障排除解決方案。
清除安全性關聯
進行故障排除時,請確保在進行更改後清除現有的安全關聯。在PIX的特權模式下,使用以下命令:
-
clear [crypto] ipsec sa -刪除活動的IPSec SA。關鍵字crypto是可選的。
-
clear [crypto] isakmp sa -刪除活動的IKE SA。關鍵字crypto是可選的。
疑難排解指令
輸出直譯器工具(僅供註冊客戶使用) (OIT)支援某些show指令。使用OIT檢視對show命令輸出的分析。
附註:使用 debug 指令之前,請先參閱有關 Debug 指令的重要資訊。
-
debug crypto ipsec 7 -顯示第2階段的IPSec協商。
-
debug crypto isakmp 7 -顯示第1階段的ISAKMP協商。
相關資訊
修訂記錄
| 修訂 | 發佈日期 | 意見 |
|---|---|---|
1.0 |
16-Feb-2009
|
初始版本 |
 意見
意見