
MX Cold Swap - Replacing an Existing MX with a Different MX
The MX security appliance can be configured to act as a warm spare, where a primary MX will 'gracefully' fail over to a pre-configured, online secondary appliance. However, if a primary MX fails before a secondary was pre-configured as a spare, or if the network is being upgraded to a different model of MX, the network admin must perform a 'cold swap' This article outlines the two different methods for performing an MX cold swap.
Apply Local Configurations to Replacement MX
Regardless of which method is used, any local settings such as static WAN IP addresses, proxies, and non-standard link speeds will need to be configured manually on the Local Status Page before the MX can connect to Dashboard. Generally, these should be copied from the original MX (if available).
Note: If the MX is performing DHCP and any downstream devices are configured to detect/contain rogue DHCP servers, be sure to whitelist the MAC address of the new MX.
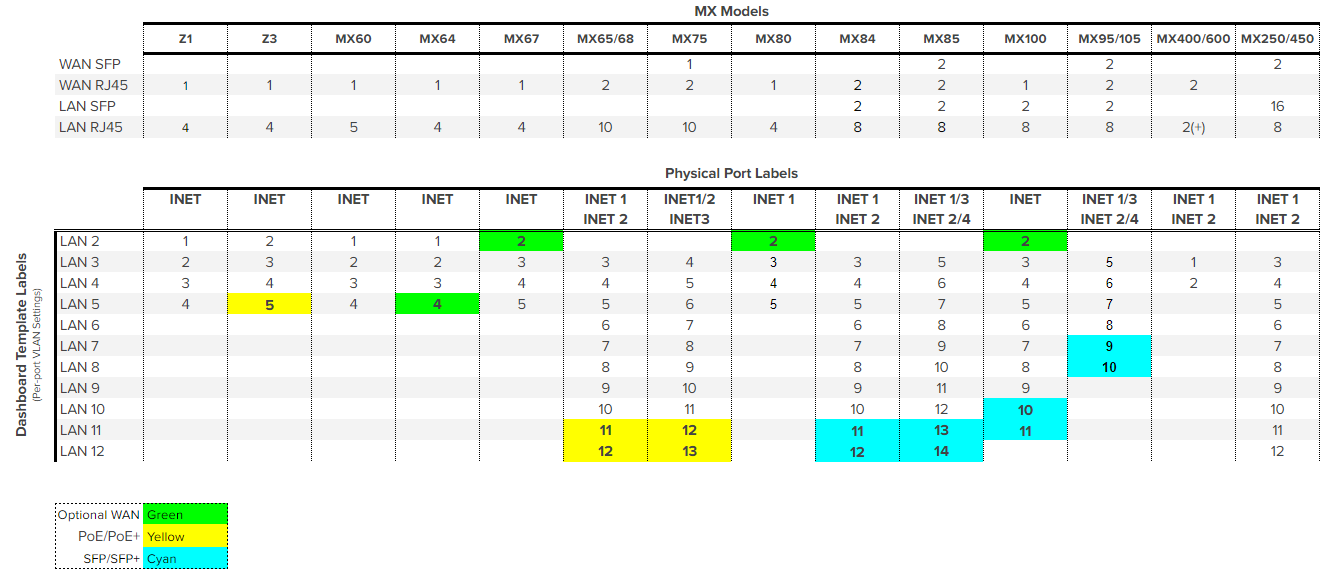
Port Mapping for different MX models
Please refer to the table below for an outline of which ports map to which other ports on different MXs. The top section outlines the port count and type total. The second section maps the physical port labels to representation on dashboard. Use the mapping below to calculate the offset between physical port labels and dashboard configurations. (e.g. MX85's first LAN port is physically labeled "5". It maps to LAN 3 on dashboard templates. For more information on template management please refer to the KB article Managing Multiple Networks with Configuration Templates and MX Templates Best Practices.)
Method 1 (Quick Swap)
Method 1 will result in the new MX remaining in the same Dashboard Network as the original MX. Following the steps for Method 1 will retain all previous client tracking data, does not require any Networks to be created or deleted, and allows for a simpler process when working with MX devices in a Combined Network. The primary disadvantage to performing a cold swap using Method 1 is that it may cause slightly more downtime than Method 2, as there will be a short period of time between removing the original MX (which will revert it to Factory Defaults) and when the new MX is able to check-in to Dashboard and re-apply the configuration from the original MX. However, if the original MX is already non-functional or causing network downtime then Method 1 may be the preferred method as it has fewer steps and is likely faster than Method 2 when starting with no preparation.
Remove the Old MX from the Current Network
A Dashboard Network can only contain one MX at a time. To make room for the new MX, the Network Administrator will have to remove the current MX. Please note that the network will retain the old MX's non-local configuration, so the replacement MX does not need to be reconfigured in Dashboard. To remove an MX from an existing network, follow the steps below.
- Select the network containing the device.

- Navigate to the Security & SD-WAN > Monitor > Appliance status page.
- Click Remove appliance from network.
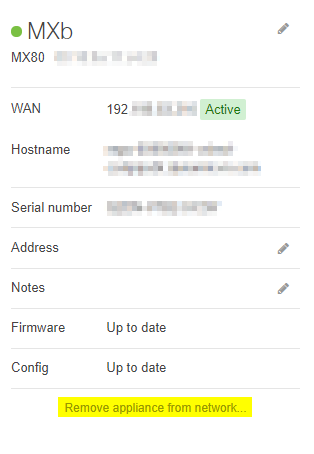
- Verify the serial number matches the device you wish to remove, then press Remove.

- The device will be removed from the network.
Note: You cannot remove the only security appliance from a network that is tracking by unique client identifier. The network will need to be changed to track by MAC address on the Security & SD-WAN > Configure > Addressing & VLANs page in order to remove the security appliance from the network. Making this change will clear all client usage data in the network.
Add the Replacement MX to the Same Network
Once the original MX is removed, there is now space in the network to add the replacement MX.
While there are multiple ways devices can be added to a network, this section will outline the process from a network's configuration. This is the simplest process that applies to all devices and network types.
For steps on how to add devices from the Inventory page (Organization > Configure > Inventory), please reference this article.
Learn more with these free online training courses on the Meraki Learning Hub:
Note: Only one MX or Z-series security appliance can be in a network unless two MXs are used in an HA pair. Adding more than one device type to a network will automatically convert that network to a combined network.
Before beginning, create a network if one doesn't already exist. (Organization > Configure > 'Create Network')
- Select the network that the devices should be added to.
Note: Only administrators with multiple organizations will see the organization drop-down.
- Navigate to Network-wide > Configure > Add devices.
- (Optional) Use the search box above the device list to find devices by model, serial number, etc.
- Check the boxes next to any devices that should be added.
If the desired devices are not listed, they may need to be claimed first.
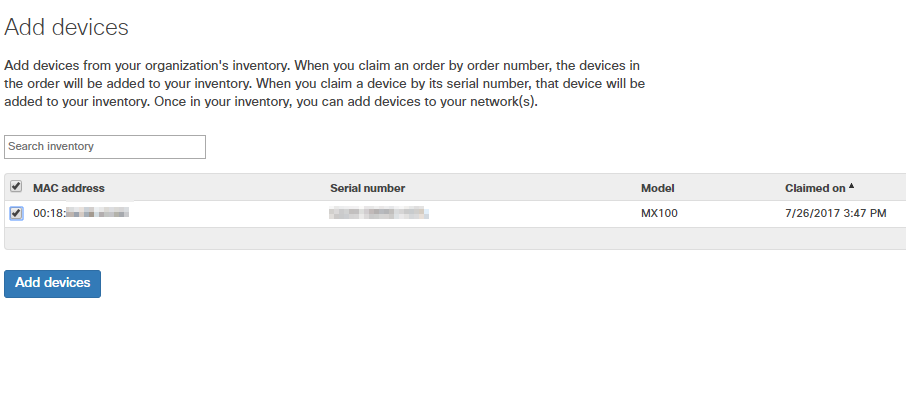
- Click Add <device_type>. In this case, Add devices.
- The device(s) will then be added to the network and become available for monitoring and configuration.
Adding a Second MX to Form a Warm Spare Configuration
- Select the network containing the device.
- Navigate to Security & SD-WAN > Monitor > Appliance Status.
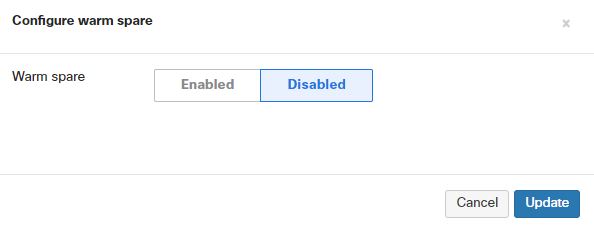
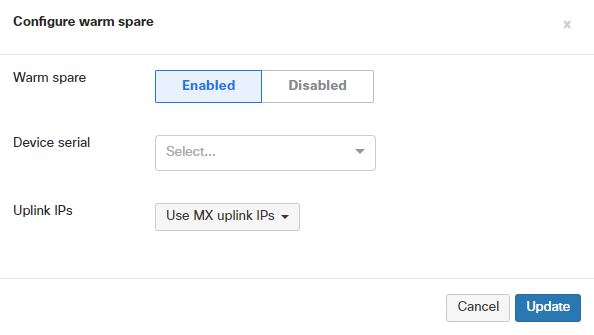
- Click on the Configure Warm Spare button located below the MX location address on the left.

- Set Warm Spare to Enabled.
5. Select the warm spare device serial number.
6. Select 'Use virtual uplink IPs' or 'Use the MX uplink IPs'.
7. Click Update.
Physically Swap the MX and Allow it to Check In
After the replacement MX has been added to the Network it still needs to properly check in to the Dashboard to pull a configuration and perform any initial firmware updates. Until the replacement MX is physically in place and has fully checked in and finished any necessary firmware upgrades it will not be able to properly service clients on the network. Typically this is done by moving the WAN Uplink(s) first, followed by any necessary LAN connections. Because the new MX will be running an exact copy of the original MX's configuration all cables should be moved to the same ports on the new MX as they were connected to on the original MX. For example, the cable from LAN port 4 of the original MX should only move to LAN port 4 of the new MX, or another port with an identical configuration.
Once this has been completed and the new MX has fully checked in and finished its upgrades it should now be in place and functioning on the network with the exact same configuration as the original MX.
Note: If the replacement MX is still not reporting in on Dashboard or 1:1 NAT is not working you may need to clear the upstream modem's ARP cache.
Re-Enable Site-to-site VPN (optional)
If this security appliance was previously configured to use Site-to-site VPN, that functionality will need to be re-enabled under Security & SD-WAN > Configure > Site-to-site VPN. Simply change the Mode to Full-tunnel or Split-tunnel, dependent on the desired mode of operation.
Re-generate AnyConnect custom certificate (optional)
If this security appliance was previously configured to use custom server certifications for AnyConnect VPN, that certificate will need to be re-added under Security & SD-WAN > Configure > Client VPN > AnyConnect. Additional reference: AnyConnect on the MX Appliance.
Method 2 (Clone and Replace)
Method 2 will result in the new MX being placed into a Clone of the original security appliance network. The advantage of this is that it allows a replacement MX to be pre-staged for deployment by allowing it to check-in and apply the configuration and firmware for a network that is identical to the original MX so that when the original MX is ready to be physically swapped with the replacement the only downtime will be during the physical swapping between MX devices.
The primary disadvantage of this method is that due to the cloning process, any historical client tracking data will be lost on the new clone network. It will still exist on the original network, but will not be pulled over during the cloning process. If the original MX was a part of AutoVPN acting as a Hub, the Cold Swap MX will be added as a new Hub requiring a configuration change on all of its Spoke networks. Additionally, if the original MX was part of a Combined Network, there are several additional steps that must be performed to integrate the new, cloned Network back in to the original Combined Network. It is also worth noting that the Cloned network will have a different DDNS hostname, therefore services that rely on DDNS hostname need to be updated (e.g., Client VPN users who connect using DDNS hostname).
Create a Clone of the Existing Network
To create a clone of an existing Network follow the directions outlined in our Creating and Deleting Dashboard Networks article. On Step 4, when selecting the Network configuration be sure to select 'Clone from existing network' and select the original security appliance network to clone from.
Add the Replacement MX to the Clone Network
While there are multiple ways devices can be added to a network, this section will outline the process from a network's configuration. This is the simplest process that applies to all devices and network types.
For steps on how to add devices from the Inventory page (Organization > Configure > Inventory), please reference this article.
Learn more with these free online training courses on the Meraki Learning Hub:
Note: Only one MX or Z-series security appliance can be in a network unless two MXs are used in an HA pair. Adding more than one device type to a network will automatically convert that network to a combined network.
Before beginning, create a network if one doesn't already exist. (Organization > Configure > 'Create Network')
- Select the network that the devices should be added to.
Note: Only administrators with multiple organizations will see the organization drop-down.
- Navigate to Network-wide > Configure > Add devices.
- (Optional) Use the search box above the device list to find devices by model, serial number, etc.
- Check the boxes next to any devices that should be added.
If the desired devices are not listed, they may need to be claimed first.
- Click Add <device_type>. In this case, Add devices.
- The device(s) will then be added to the network and become available for monitoring and configuration.
Adding a Second MX to Form a Warm Spare Configuration
- Select the network containing the device.
- Navigate to Security & SD-WAN > Monitor > Appliance Status.
- Click on the Configure Warm Spare button located below the MX location address on the left.
- Set Warm Spare to Enabled.
5. Select the warm spare device serial number.
6. Select 'Use virtual uplink IPs' or 'Use the MX uplink IPs'.
7. Click Update.
Bring the Replacement MX Online
After adding the replacement MX to the newly cloned network it needs to be brought online to pull its initial configuration and firmware update. This allows for the replacement MX to be pre-staged for deployment without removing the existing MX or changing any configurations. By default all MX devices will look for a DHCP WAN IP to use to pull their initial configuration, if DHCP is not available or if a Static IP is required the Local Status Page will need to be used to apply that configuration to the WAN interface of the replacement MX.
Physically Swap Devices
After the replacement MX has been added to the cloned network and allowed to pull its initial configuration and firmware update it should be ready to be physically swapped with the original MX. Typically this is done by moving the WAN Uplink(s) first, followed by any necessary LAN connections. Because the new MX is running an exact copy of the original MX's configuration all cables should be moved to the same ports on the new MX as they were connected to on the original MX. For example, the cable from LAN port 4 of the original MX should only move to LAN port 4 of the new MX, or another port with an identical configuration.
Once this has been completed the new MX should now be in place and functioning on the network with the exact same configuration as the original MX.
Note: If the replacement MX is still not reporting in on Dashboard or 1:1 NAT is not working you may need to clear the upstream modem's ARP cache.
Re-Enable Site-to-Site VPN (Optional)
If the original security appliance was previously configured to use Site-to-site VPN, that functionality will need to be re-enabled under Security & SD-WAN > Configure > Site-to-site VPN. Simply change the Mode to Full-tunnel or Split-tunnel, dependent on the desired mode of operation.
Re-generate AnyConnect custom certificate (optional)
If this security appliance was previously configured to use custom server certifications for AnyConnect VPN, that certificate will need to be re-added under Security & SD-WAN > Configure > Client VPN > AnyConnect. Additional reference: AnyConnect on the MX Appliance.
Delete the Original Network (Optional)
At this time the Dashboard Network that contains the old MX can be deleted or kept for historical client tracking purposes. To Delete the Network, first the original MX must be removed from the network by following the steps listed above for Removing the old MX from the Network in Method 1. Once the old MX has been removed from the network, follow the steps outlined in our Creating and Deleting Dashboard Networks page to finish deleting the Network.
Integrating the Cloned MX Network with an Existing Combined Network (Optional)
If the original MX was in a Combined Network then the newly cloned network can also be integrated back into the existing Combined Network with just a few extra steps.
Splitting the Combined Network
Before the new security appliance network can be added to the combined network, the combined network must first be uncombined. To do so, navigate to the Organization > Monitor > Overview page. Next, expand the Network List if it is not already expanded by default and select the checkbox for the Combined Network that should get split. Then, select Split Networks from the top of the Network list.
After selecting Split Networks the original Combined Network should now be split out into it's individual networks, with each Network listed individually as 'Network_Name-appliance,' 'Network_Name-switch,' and 'Network_Name-wireless.' If no devices of a certain type were ever added to the combined network then that respective network type will not exist after the split. For example if no wireless devices were ever added to 'Network_Name' when combined, then when it is split we will not see a '-wireless' network generated.
Re-combining with the New MX Network
After having split out the combined network we now need to re-combine it with the security appliance network that contains the replacement MX. To re-combine the Networks, first select the checkboxes for all the Networks that should be combined. This should include any '-switch' or '-wireless' networks that remain from the original combined Network in addition to the newly cloned MX network. After ensuring that the correct Networks are selected, click the 'Combine' button and choose a name for the newly combined Network to merge the selected networks together into a single Combined Network.