본 제품에 대한 문서 세트는 편견 없는 언어를 사용하기 위해 노력합니다. 본 설명서 세트의 목적상, 편견 없는 언어는 나이, 장애, 성별, 인종 정체성, 민족 정체성, 성적 지향성, 사회 경제적 지위 및 교차성에 기초한 차별을 의미하지 않는 언어로 정의됩니다. 제품 소프트웨어의 사용자 인터페이스에서 하드코딩된 언어, RFP 설명서에 기초한 언어 또는 참조된 서드파티 제품에서 사용하는 언어로 인해 설명서에 예외가 있을 수 있습니다. 시스코에서 어떤 방식으로 포용적인 언어를 사용하고 있는지 자세히 알아보세요.
이 번역에 관하여
Cisco는 전 세계 사용자에게 다양한 언어로 지원 콘텐츠를 제공하기 위해 기계 번역 기술과 수작업 번역을 병행하여 이 문서를 번역했습니다. 아무리 품질이 높은 기계 번역이라도 전문 번역가의 번역 결과물만큼 정확하지는 않습니다. Cisco Systems, Inc.는 이 같은 번역에 대해 어떠한 책임도 지지 않으며 항상 원본 영문 문서(링크 제공됨)를 참조할 것을 권장합니다.
이 문서의 정보는 특정 랩 환경의 디바이스를 토대로 작성되었습니다. 이 문서에 사용된 모든 디바이스는 초기화된(기본) 컨피그레이션으로 시작되었습니다. 현재 네트워크가 작동 중인 경우 모든 명령의 잠재적인 영향을 미리 숙지하시기 바랍니다.
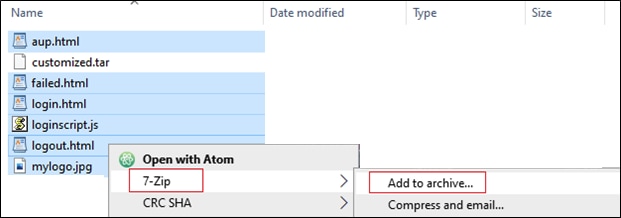
웹 포털 파일 사용자 지정
사용자 지정 웹 인증 포털을 구성하는 파일은 다음과 같습니다.
로그인.html
bootstrap.min.css
Jquery.min.js
style.css
animate.css
web_auth_logo.png
다음 파일만 편집하면 됩니다.
로그인.html
style.css
web_auth_logo.png
웹 인증 포털(log in.html)의 소스 코드입니다.
참고: 웹 인증 포털의 구조를 설명하는 HTML 코멘트가 포함되어 있으므로 코드를 자세히 읽으십시오.
<!DOCTYPE html>
<html lang="en">
<head>
<meta charset="utf-8">
<meta name="viewport" content="width=device-width, initial-scale=1">
<title>YOUR COMPANY TITLE HERE</title>
<script src="jquery.min.js"></script> <link rel="stylesheet" href="bootstrap.min.css"> <link rel="stylesheet" href="animate.css"> <link rel="stylesheet" href="style.css" >
<script>
function submitAction(){
var link = document.location.href;
var searchString = "redirect=";
var equalIndex = link.indexOf(searchString);
var redirectUrl = "";
if (document.forms[0].action == "") {
var url = window.location.href;
var args = new Object();
var query = location.search.substring(1);
var pairs = query.split("&");
for(var i=0;i<pairs.length;i++){
var pos = pairs[i].indexOf('=');
if(pos == -1) continue;
var argname = pairs[i].substring(0,pos);
var value = pairs[i].substring(pos+1);
args[argname] = unescape(value);
}
document.forms[0].action = args.switch_url;
}
if(equalIndex >= 0) {
equalIndex += searchString.length;
redirectUrl = "";
redirectUrl += link.substring(equalIndex);
}
if(redirectUrl.length > 255)
redirectUrl = redirectUrl.substring(0,255);
document.forms[0].redirect_url.value = redirectUrl;
document.forms[0].buttonClicked.value = 4;
document.forms[0].submit();
}
function loadAction(){
var url = window.location.href;
var args = new Object();
var query = location.search.substring(1);
var pairs = query.split("&");
for(var i=0;i<pairs.length;i++){
var pos = pairs[i].indexOf('=');
if(pos == -1) continue;
var argname = pairs[i].substring(0,pos);
var value = pairs[i].substring(pos+1);
args[argname] = unescape(value);
}
document.forms[0].action = args.switch_url;
// This is the status code returned from webauth log in action
// Any value of status code from 1 to 5 is error condition and user
// should be shown error as below or modify the message as it suits
// the customer
if(args.statusCode == 1){
alert("You are already logged in. No further action is required on your part.");
}
else if(args.statusCode == 2){
alert("You are not configured to authenticate against web portal. No further action is required on your part.");
}
else if(args.statusCode == 3){
alert("The username specified cannot be used at this time. Perhaps the user is already logged into the system?");
}
else if(args.statusCode == 4){
alert("Wrong username and password. Please try again.");
}
else if(args.statusCode == 5){
alert("The User Name and Password combination you have entered is invalid. Please try again.");
}
}
</script>
</head>
<body class="animated fadeInUp">
<!-- TOP BAR -->
<nav class="navbar navbar-expand-md sticky-top navbar-light bg-dark ">
<img src="web_auth_logo.png" style="width: 70px; height: 70px;">
<div class="container">
<h4 class="align-middle text-white">Your Company Name Here</h4>
</div>
</nav>
<!-- END TOP BAR -->
<div class="bg"> <!---Background color -->
<div class="container-fluid padding "><!--- page content -->
<div class="row padding">
<div class="col-md-12 col-lg-6">
<br>
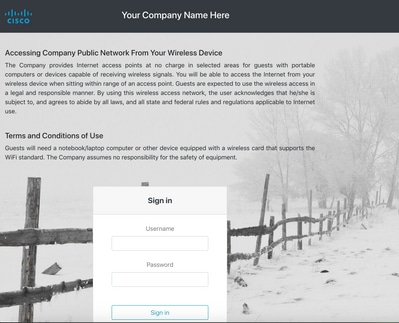
<h5>Accessing Company Public Network From Your Wireless Device</h5>
<p class="text-justify">The Company provides Internet access points at no charge in selected areas for guests with portable
computers or devices capable of receiving wireless signals.
You can access the Internet from your wireless device when sitting within range of an access point.
Guests are expected to use the wireless access in a legal and responsible manner. By using this wireless access network, the
user acknowledges that he/she is subject to, and agrees to abide by all laws, and all state and federal rules and regulations
applicable to Internet use.
</p>
<br>
<h5>Terms and Conditions of Use</h5>
<p class="text-justify">Guests need a notebook/laptop computer or other device equipped with a wireless card that supports the WiFi standard.
The Company assumes no responsibility for the safety of equipment.</p>
<br>
<br>
<div class="card mx-auto" style="width: 350px;"> <!--Form container-->
<h5 class="card-header info-color white-text text-center py-4">
<strong>Sign in</strong>
</h5>
<div class="card-body px-lg-5 pt-0"><!--Form content-->
<!-- Form -->
<form class="text-center" style="color: #757575;" method="post">
<input TYPE="hidden" NAME="buttonClicked" SIZE="16" MAXLENGTH="15" value="0">
<input TYPE="hidden" NAME="redirect_url" SIZE="255" MAXLENGTH="255" VALUE="">
<input TYPE="hidden" NAME="err_flag" SIZE="16" MAXLENGTH="15" value="0">
<!-- Username input -->
<div class="md-form"><br>
<label for="materiallog inFormEmail">Username</label>
<input type="TEXT" name="username" SIZE="25" MAXLENGTH="63" VALUE="" class="form-control" required>
</div><br><!-- End Username input -->
<!-- Password input-->
<div class="md-form">
<label for="materiallog inFormPassword">Password</label>
<input type="password" name="password" SIZE="25" MAXLENGTH="63" VALUE="" class="form-control" required>
</div><br><!-- End password input -->
<!-- Sign in button -->
<button class="btn btn-outline-info btn-rounded btn-block my-4 waves-effect z-depth-0" type="button" onclick="submitAction();">Sign in</button>
</form> <!-- End FORM -->
</div><!-- End Form content-->
</div><!--Form container-->
</div>
</div>
</div><!--- End page content -->
</div><!---End background color -->
</body>
</html>
페이지를 변경하려면 이 섹션의 제목을 수정하십시오.
...
  <title>YOUR COMPANY TITLE HERE</title>
...
회사 로고를 변경하려면 img 태그를 편집하고 .png 또는 .svg 이미지를 사용합니다. 로고 크기를 조정하려면 너비 및 높이 매개변수를 변경합니다.
참고: 더 나은 모양과 느낌을 위해 투명한 배경이 있는 .svg 이미지를 사용하는 것이 좋습니다.
페이지 제목 배경색을 변경하려면 style.css 파일에 고유한 클래스를 만들고 bg-dark를 사용자 지정 클래스로 바꿉니다.
페이지의 배경과 텍스트 색을 변경하려면 bg 클래스를 변경합니다.
사용 가능한 클래스는 다음과 같습니다. 배경색과 텍스트 색이 그에 따라 변경됩니다.
bg
bg2
bg3
bg4
bg5
bg6
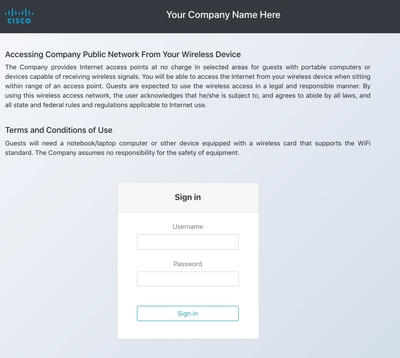
이미지를 style.css 파일에서 배경 또는 다른 색상으로 사용하려면 CSS 클래스 bg-img를 편집하여 사용합니다.
주의: 배경 이미지는 크기 때문에 모바일 기기에서 제대로 볼 수 없으며 이미지 색상 때문에 텍스트를 읽기 어려울 수 있습니다.
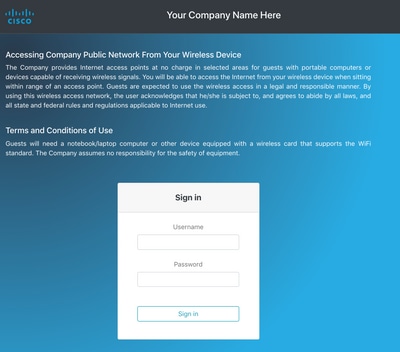
    <h5>Accessing Company Public Network From Your Wireless Device</h5>
    <p class="text-justify">The Company provides Internet access points at no charge in selected areas for guests with portable
    computers or devices capable of receiving wireless signals.
    You are able to access the Internet from your wireless device when sitting within range of an access point.
    Guests are expected to use the wireless access in a legal and responsible manner. By using this wireless access network, the
    user  acknowledges that he/she is subject to, and agrees to abide by all laws, and all state and federal rules and regulations
    applicable to Internet use.
    </p>
    <br>
    <h5>Terms and Conditions of Use</h5>
    <p class="text-justify">Guests need a notebook/laptop computer or other device equipped with a wireless card that supports the WiFi standard.
    The Company assumes no responsibility for the safety of equipment.</p>
    <br>
인증 포털의 수준을 높이기 위해, 복잡성 없이 애니메이션을 추가 할 수 있습니다. 애니메이션 클래스 다음에 animation-name을 편집합니다. 이 예제에서는 두 개의 애니메이션을 사용했습니다. 사용 가능한 애니메이션을 보려면 animate.css를 방문하십시오.
...
<body class="animated fadeInUp">
...
<h4 class="align-middle text-white animated fadeInLeft slow">Your Company Name Here</h4>
...
애니메이션이 있는 사용자 지정 웹 인증 포털의 최종 모양입니다. 실제 예제를 보려면 결과 탭을 선택합니다.
팁: 배경색과 글꼴을 원하는 대로 쉽게 편집할 수 있습니다. style.css 파일에 새 클래스를 만들어 사용합니다.
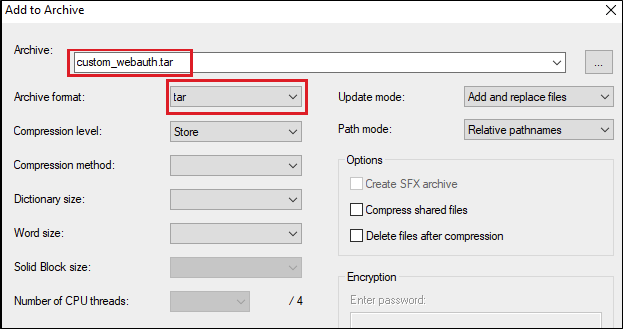
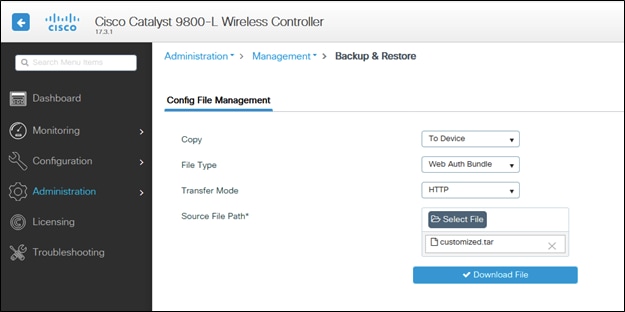
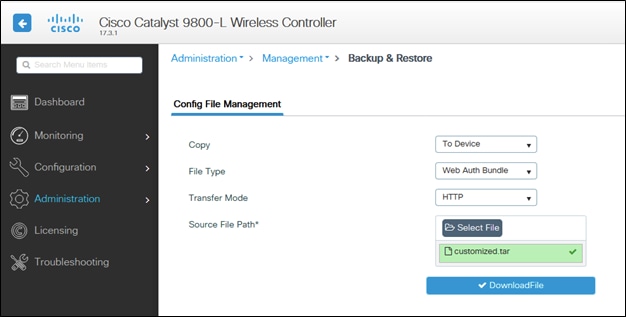
사용자 지정 웹 인증 포털을 9800 WLC에 업로드하고 구성합니다
이 섹션에서는 Cat 9800에서 사용자 지정 WebAuth 번들을 설치하고 구성하는 방법에 대한 단계별 프로세스를 다룹니다.
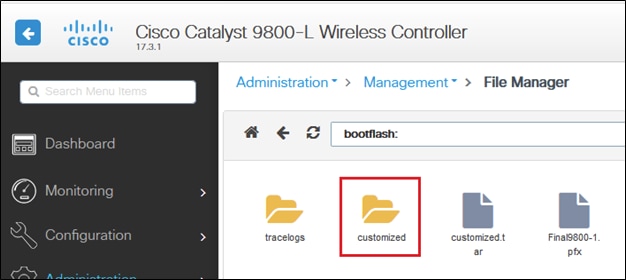
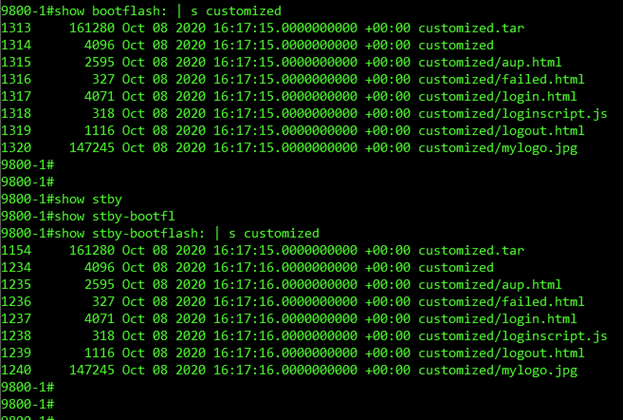
HA(Active 및 Standby)를 모두 확인하려면 customized.tar라는 파일이 업로드된 경우
9800-1#show bootflash: | 사용자 지정 9800-1#show stby-bootflash: | 사용자 지정
참고: 수동으로 업로드된 파일은 HA 대기 로 동기화되지 않습니다.
참고: 사용자 지정 webauth 작업을 만드는 데 success.html 파일이 필요하지 않습니다. 필요한 경우, 간단히 하나를 생성하여 .tar 파일에 추가하고, 해당 tar 파일을 9800 WLC에 업로드할 수 있습니다.
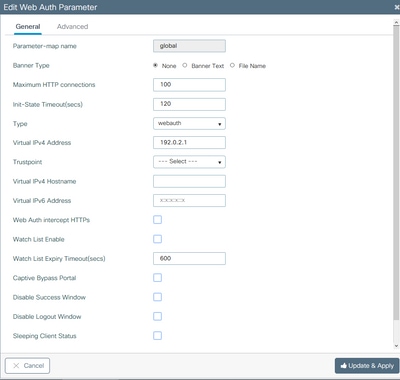
4. WebAuth 전역 매개변수 맵을 편집하고 가상 IP 주소를 설정합니다. 가상 IP 주소가 누락되면 포털 페이지에 이미지가 제대로 표시되지 않을 수 있습니다.
참고: 가상 IP 주소가 설정되면 컨트롤러 가상 인터페이스가 HTTPS를 통해 URL을 전송하므로 무선 클라이언트는 브라우저에 웹 사이트 경고를 표시합니다. 첨부된 서명된 인증서가 없어 신뢰되지 않습니다. 이 경우 절차를 사용하여 CSR을 생성하고 유효한 인증서를 설치합니다.
HTTPS가 필요하지 않은 경우에만 URL이 HTTP를 통해서만 전송되도록 다음 두 명령을 실행할 수 있습니다(이러한 명령은 17.3.1 이상에만 있음).
#configure terminal
(config)#parameter-map type webauth global
(config-params-parameter-map)#secure-webauth-disable
(config-params-parameter-map)#webauth-http-enable
(config-params-parameter-map)#end
#write
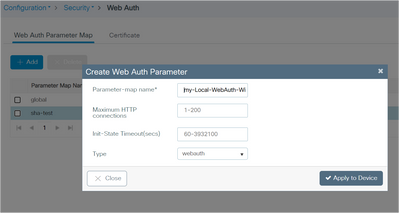
5. 다음 단계는 새 매개변수 맵을 생성하는 것입니다. 9800 GUI > Security(보안) > Web-Auth(웹 인증) > Add(추가)에서 이동합니다.
생성되면 편집할 매개변수 맵 이름을 클릭합니다.
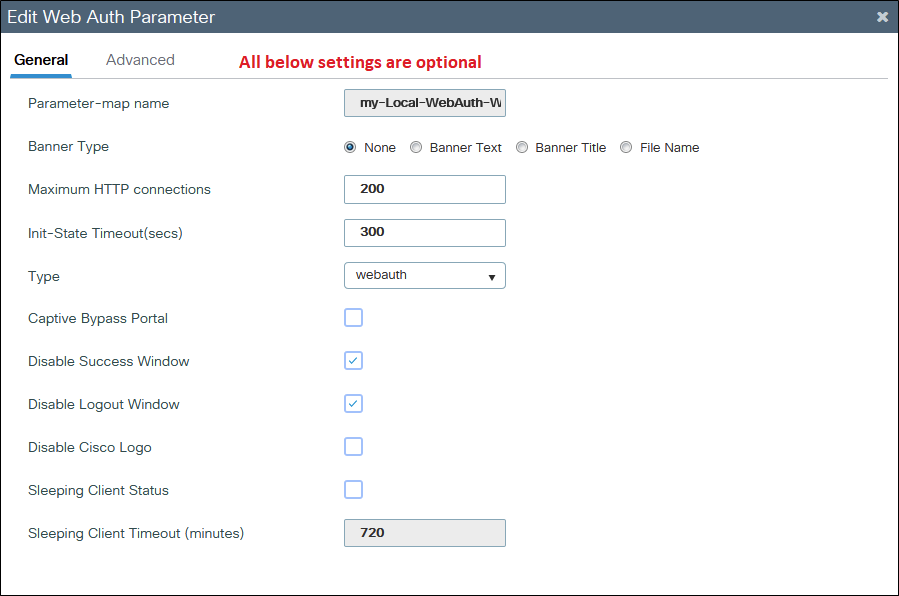
Disable Success Window(성공 창 비활성화)를 선택하여 success.html이 아닌 9800 기본 성공 페이지를 비활성화합니다. 둘 다 사용하는 경우 게스트는 이중 성공 페이지를 볼 수 있습니다. 하나는 9800 기본 성공 페이지이고 다른 하나는 사용자 지정 success.html입니다.
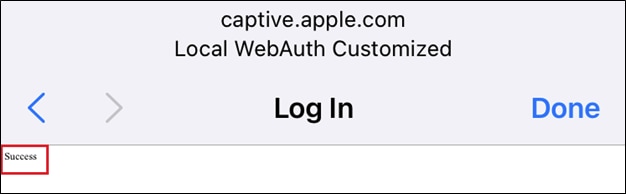
모든 성공 페이지를 비활성화하더라도(Disable Success Window and no success.html used) 모바일 디바이스에는 표시된 성공 페이지가 표시되며, PC에서는 이를 잠시 확인한 다음 사라집니다.
iPhone의 예:
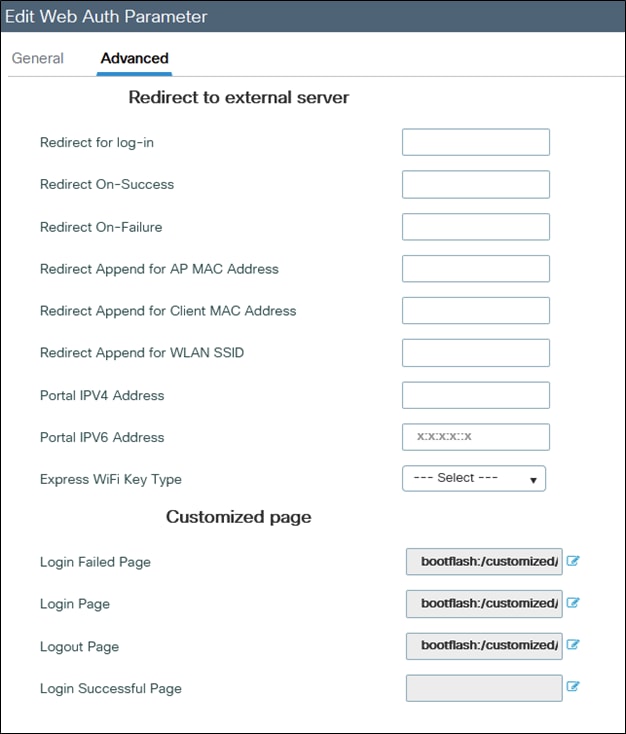
웹 인증 로그인
페이지 옆에 있는 파란색 아이콘을 클릭하면 9800에서 해당 아이콘을 로드하려고 하며, 그림과 같이 페이지를 선택할 수 있습니다.
6. 다음 단계는 매개변수 맵을 WLAN에 태깅하는 것입니다(Cat9800 GUI > 태그 및 프로파일 > WLAN). 이 예에서 WLAN은 먼저 로컬 9800 게스트 계정에서, 그 다음에는 ISE(RADIUS 서버)에서 게스트를 인증합니다.
참고: AAA 및 사전 인증 ACL 컨피그레이션은 이 단계에서 추가할 수 있습니다(선택 사항).
ISE 또는 RADIUS 서버의 샘플 컨피그레이션:
radius server ISE
address ipv4 x.x.x.x auth-port 1812 acct-port 1813
timeout 5
retransmit 3
automate-tester username dummy probe-on
key XXXXXXXXXXX
exit
aaa group server radius RADIUS-GROUP
server name ISE
exit
aaa authentication dot1x ISE-Method group RADIUS-GROUP
aaa authorization network ISE-Method group RADIUS-GROUP
aaa accounting identity default start-stop group RADIUS-GROUP
aaa authentication webauth default local group RADIUS-GROUP
end
참고: 마지막 CLI 명령에서 알 수 있듯이, 로컬 사용자 인증 확인이 먼저 발생하고 ISE/RADIUS가 수행됩니다. 로컬 전용, ISE/RADIUS 전용 또는 둘 다로 인증을 제한할 수 있습니다. 예를 들어, 사용자가 먼저 로컬에서 선택된 다음, 존재하지 않는 경우 RADIUS를 기준으로 선택됩니다.


 피드백
피드백