소개
이 문서에서는 NK9에서 CLI를 통해 TACACS용 사용자 지정 Nexus 역할을 구성하는 방법에 대해 설명합니다.
사전 요구 사항
요구 사항
다음 주제에 대한 지식을 보유하고 있으면 유용합니다.
사용되는 구성 요소
이 문서의 정보는 다음 소프트웨어 및 하드웨어 버전을 기반으로 합니다.
- Cisco Nexus 9000, NXOS 이미지 파일: bootflash:///nxos.9.3.5.bin
- Identity Service Engine 버전 3.2
이 문서의 정보는 특정 랩 환경의 디바이스를 토대로 작성되었습니다. 이 문서에 사용된 모든 디바이스는 초기화된(기본) 컨피그레이션으로 시작되었습니다. 현재 네트워크가 작동 중인 경우 모든 명령의 잠재적인 영향을 미리 숙지하시기 바랍니다.
배경 정보
라이센싱 요구 사항
Cisco NX-OS - TACACS+에는 라이센스가 필요하지 않습니다.
Cisco Identity Service Engine
신규 ISE 설치의 경우 모든 ISE 기능에 액세스할 수 있는 90일 평가 기간 라이센스가 있으며, 평가 라이센스가 없는 경우 ISE TACACS 기능을 사용하려면 인증을 수행하는 정책 서버 노드에 대해 디바이스 관리자 라이센스가 필요합니다.
관리/헬프 데스크 사용자가 Nexus 디바이스에서 인증하면 ISE는 원하는 Nexus 셸 역할을 반환합니다.
이 역할이 할당된 사용자는 기본 문제 해결을 수행하고 특정 포트를 바운스할 수 있습니다.
Nexus 역할을 가져오는 TACACS 세션은 다음 명령과 작업만 사용하고 실행할 수 있어야 합니다.
- 1/1-1/21 및 1/25-1/30에서 종료 및 no shut-on 인터페이스만 실행하도록 터미널을 구성하는 액세스
- ssh
- ssh6
- 텔넷
- 텔넷6
- 트레이스라우트
- 트레이스라우트6
- 핑
- Ping6
- Enable
구성
네트워크 다이어그램
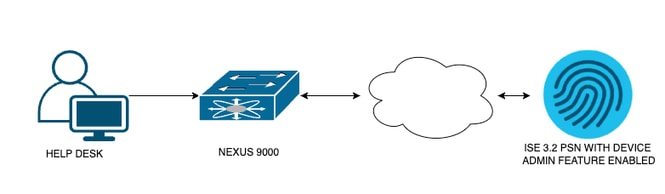 플로우 구성 요소 다이어그램
1단계: Nexus 9000 구성
1. AAA 구성

경고: TACACS 인증을 활성화하면 Nexus 디바이스는 로컬 인증 사용을 중지하고 AAA 서버 기반 인증 사용을 시작합니다.
Nexus9000(config)# feature tacacs+
Nexus9000(config)# tacacs-server host <Your ISE IP> key 0 Nexus3xample
Nexus9000(config)# tacacs-server key 0 "Nexus3xample"
Nexus9000(config)# aaa group server tacacs+ IsePsnServers
Nexus9000(config-tacacs+)# server <Your ISE IP>
Nexus9000(config)# aaa authentication login default group IsePsnServers local
2. 지정된 요구사항에 따라 사용자 정의된 역할을 구성합니다.
Nexus9000(config)# role name helpdesk
Nexus9000(config-role)#   description Can perform basic Toubleshooting and bounce certain  ports
Nexus9000(config-role)# rule 1 permit read
Nexus9000(config-role)# rule 2 permit command enable *
Nexus9000(config-role)# rule 3 permit command ssh *
Nexus9000(config-role)# rule 4 permit command ssh6 *
Nexus9000(config-role)# rule 5 permit command ping *
Nexus9000(config-role)# rule 6 permit command ping6 *
Nexus9000(config-role)# rule 7 permit command telnet *
Nexus9000(config-role)# rule 8 permit command traceroute *
Nexus9000(config-role)# rule 9 permit command traceroute6 *
Nexus9000(config-role)# rule 10 permit command telnet6 *
Nexus9000(config-role)# rule 11 permit command config t ; interface * ; shutdown
Nexus9000(config-role)# rule 12 permit command config t ; interface * ; no shutdown

vlan policy deny
interface policy deny

Nexus9000(config-role-interface)#     permit interface Ethernet1/1
Nexus9000(config-role-interface)#     permit interface Ethernet1/2
Nexus9000(config-role-interface)#     permit interface Ethernet1/3
Nexus9000(config-role-interface)#     permit interface Ethernet1/4
Nexus9000(config-role-interface)#     permit interface Ethernet1/5
Nexus9000(config-role-interface)#     permit interface Ethernet1/6
Nexus9000(config-role-interface)#     permit interface Ethernet1/7
Nexus9000(config-role-interface)#     permit interface Ethernet1/8
Nexus9000(config-role-interface)#     permit interface Ethernet1/8
Nexus9000(config-role-interface)#     permit interface Ethernet1/9
Nexus9000(config-role-interface)#     permit interface Ethernet1/10
Nexus9000(config-role-interface)#     permit interface Ethernet1/11
Nexus9000(config-role-interface)#     permit interface Ethernet1/12
Nexus9000(config-role-interface)#     permit interface Ethernet1/13
Nexus9000(config-role-interface)#     permit interface Ethernet1/14
Nexus9000(config-role-interface)#     permit interface Ethernet1/15
Nexus9000(config-role-interface)#     permit interface Ethernet1/16
Nexus9000(config-role-interface)#     permit interface Ethernet1/17
Nexus9000(config-role-interface)#     permit interface Ethernet1/18
Nexus9000(config-role-interface)#     permit interface Ethernet1/19
Nexus9000(config-role-interface)#     permit interface Ethernet1/20
Nexus9000(config-role-interface)#     permit interface Ethernet1/21
Nexus9000(config-role-interface)#     permit interface Ethernet1/22
Nexus9000(config-role-interface)#     permit interface Ethernet1/25
Nexus9000(config-role-interface)#     permit interface Ethernet1/26
Nexus9000(config-role-interface)#     permit interface Ethernet1/27
Nexus9000(config-role-interface)#     permit interface Ethernet1/28
Nexus9000(config-role-interface)#     permit interface Ethernet1/29
Nexus9000(config-role-interface)#     permit interface Ethernet1/30

Nexus9000# copy running-config startup-config
[########################################] 100%
Copy complete, now saving to disk (please wait)...

Copy complete.
2단계. Identity Service Engine 3.2 구성
1. Nexus TACACS 세션 중에 사용되는 ID를 구성합니다.
ISE 로컬 인증이 사용됩니다.
Administration > Identity Management > Groups 탭으로 이동하여 사용자가 속해야 하는 그룹을 생성합니다. 이 데모에 대해 생성된 ID 그룹은 iseUsers입니다.
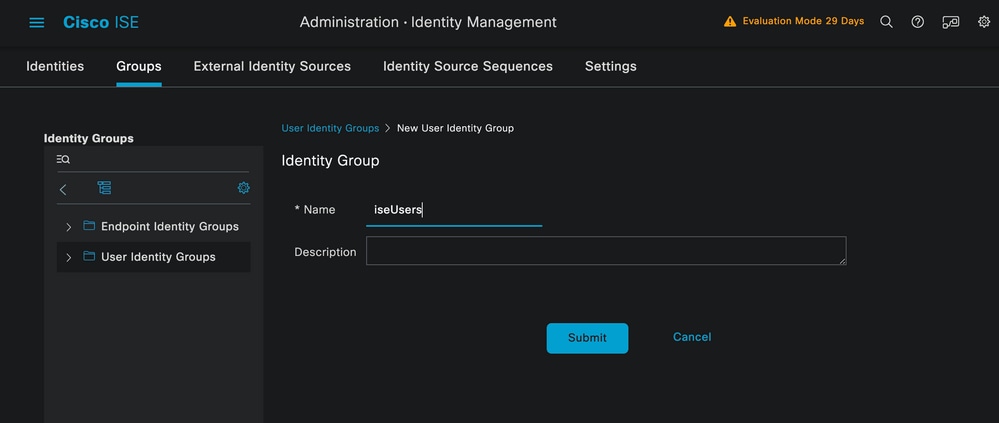 사용자 그룹 생성
Submit(제출) 버튼을 클릭합니다.
다음으로 Administration(관리) > Identity Management(ID 관리) > Identity(ID) 탭으로 이동합니다.
Add(추가) 버튼을 클릭합니다.
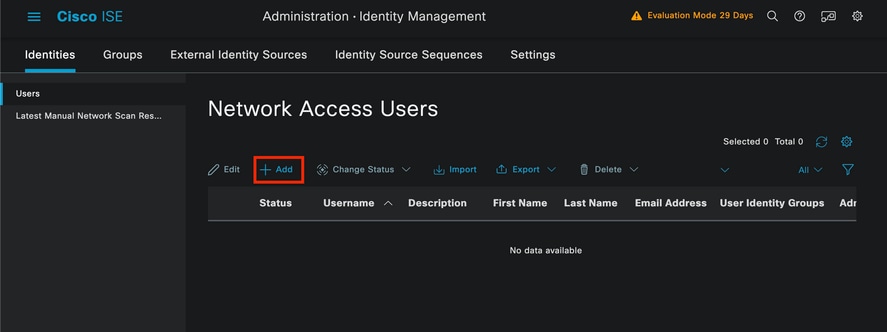 사용자 생성
필수 필드의 일부로서 사용자 이름으로 시작합니다. 이 예에서는 사용자 이름 iseiscool이 사용됩니다.
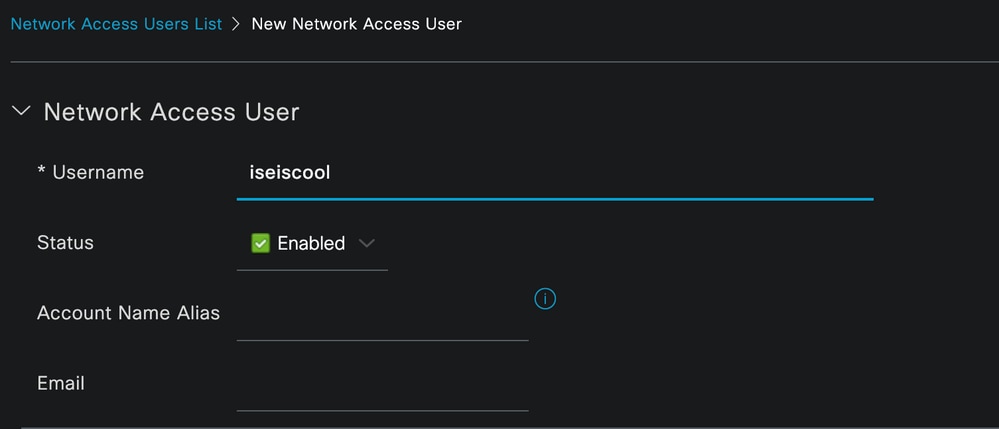 사용자 이름 지정 및 생성
다음 단계는 생성된 사용자 이름에 비밀번호를 할당하는 것입니다. VainillaISE97은 이 데모에서 사용되는 비밀번호입니다.
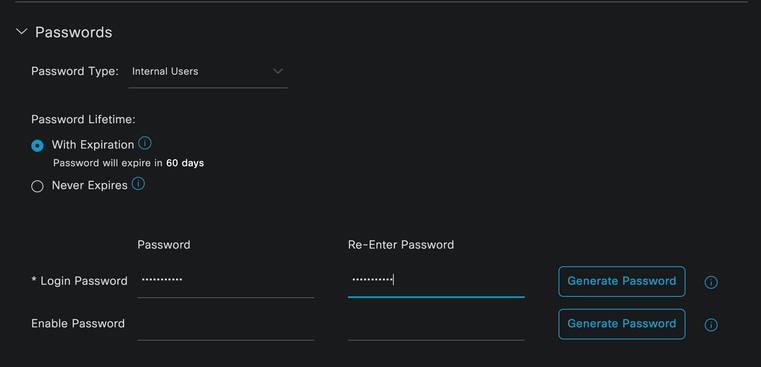 비밀번호 할당
마지막으로, 이전에 생성한 그룹(이 경우에는 iseUsers)에 사용자를 할당합니다.
 그룹 할당
그룹 할당
2. 네트워크 장치를 구성하고 추가합니다.
NEXUS 9000 디바이스를 ISE Administration(ISE 관리) > Network Resources(네트워크 리소스) > Network Devices(네트워크 디바이스)에 추가합니다
시작하려면 Add(추가) 버튼을 클릭합니다.
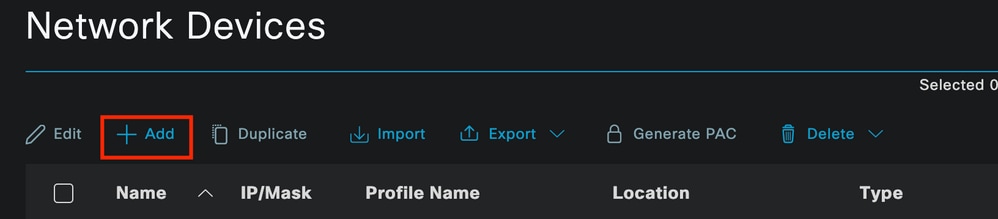 네트워크 액세스 디바이스 페이지
양식에 값을 입력하고, 생성 중인 NAD에 이름을 지정하고, NAD가 TACACS 대화를 위해 ISE에 연결하는 IP를 지정합니다.
 네트워크 디바이스 구성
드롭다운 옵션은 비워 두고 생략할 수 있습니다. 이러한 옵션은 위치, 디바이스 유형, 버전별로 NAD를 분류한 다음 이러한 필터를 기반으로 인증 흐름을 변경하기 위한 것입니다.
Administration(관리) > Network Resources(네트워크 리소스) > Network Devices(네트워크 디바이스) > Your NAD(NAD) > TACACS Authentication Settings(TACACS 인증 설정)에서 NAD 컨피그레이션에서 사용한 공유 암호를 추가합니다. 이 데모에서는 Nexus3xample을 사용합니다.
 TACACS 컨피그레이션 섹션
Submit(제출) 버튼을 클릭하여 변경 사항을 저장합니다.
3. ISE에서 TACACS를 구성합니다.
Nexus 9k에서 구성한 PSN에 Device Admin(디바이스 관리) 옵션이 활성화되어 있는지 다시 확인합니다.

참고: Device Admin Service를 활성화해도 ISE가 다시 시작되지 않습니다.
 PSN 장치 관리 기능 확인
이는 ISE 메뉴 Administration(관리) > System(시스템) > Deployment(구축) > Your PSN(PSN) > Policy Server(정책 서버) 섹션 > Enable Device Admin Services(디바이스 관리 서비스 활성화)에서 확인할 수 있습니다.
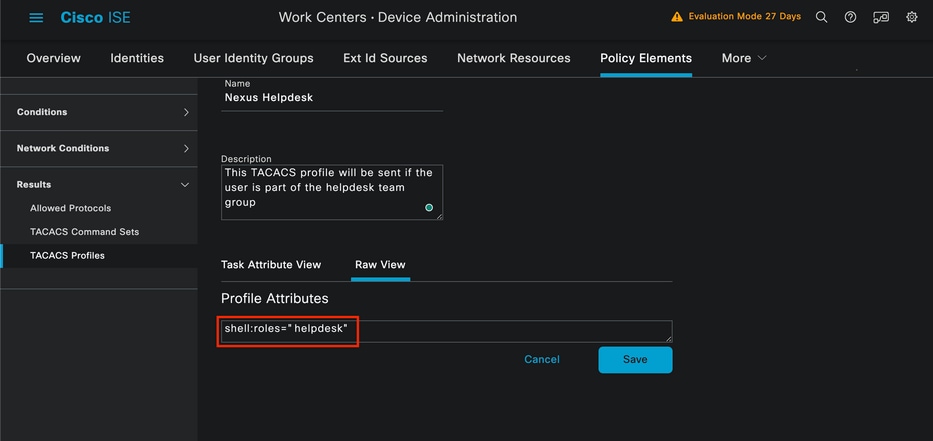
- 인증에 성공하면 Nexus 디바이스에 헬프데스크 역할을 반환하는 TACACS 프로필을 생성합니다.
ISE 메뉴에서 Workcenters(작업 센터) > Device Administration(디바이스 관리) > Policy Elements(정책 요소) > Results(결과) > TACACS Profiles(TACACS 프로파일)로 이동하고 Add(추가) 버튼을 클릭합니다.
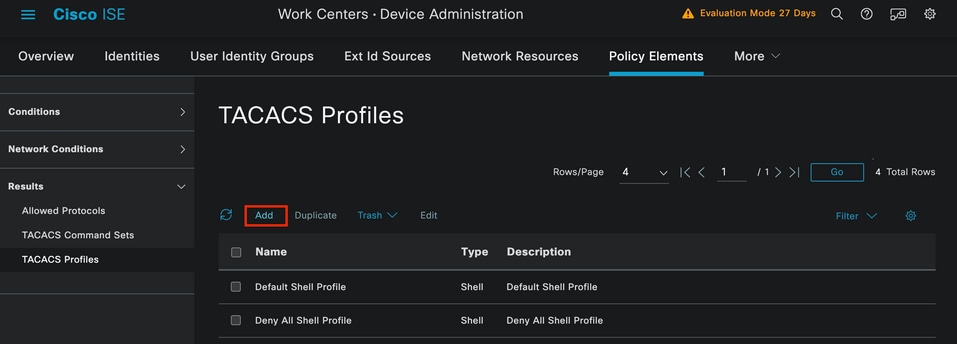 TACACS 프로파일
이름과 설명(선택 사항)을 할당합니다.
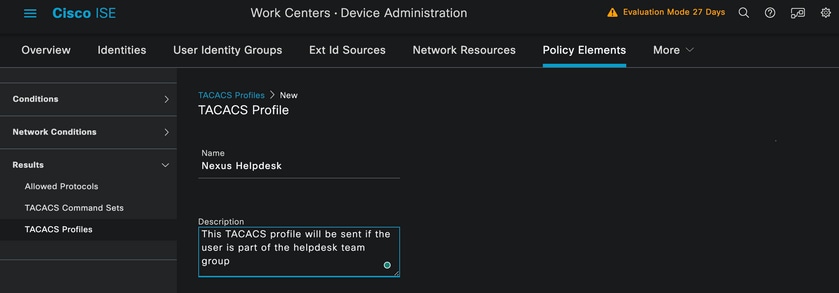 Tacacs 프로필 이름 지정
Task Attribute View 섹션을 무시하고 Raw View 섹션으로 이동합니다.
shell:roles="helpdesk" 값을 입력합니다.
 프로필 특성 추가
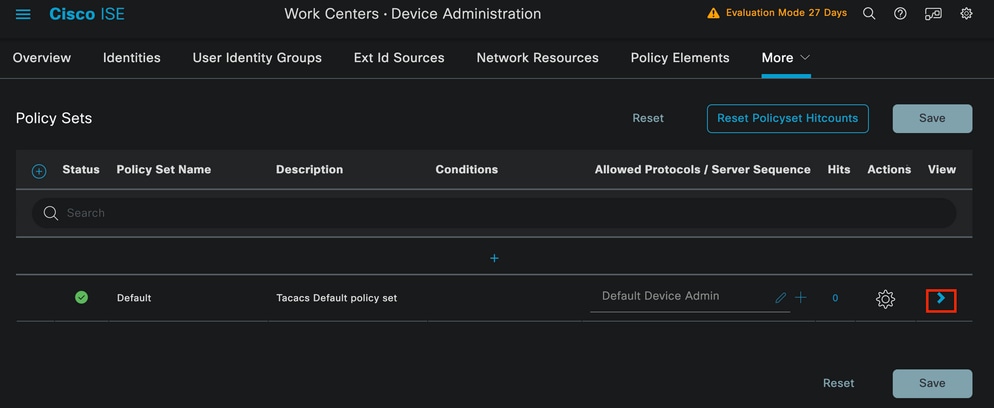
인증 정책 및 권한 부여 정책을 포함하는 정책 집합을 구성합니다.
ISE 메뉴에서 Work Centers(작업 센터) > Device Administration(디바이스 관리) > Device Admin Policy Sets(디바이스 관리 정책 집합)에 액세스합니다.
데모용으로 Default Policy(기본 정책) 집합이 사용됩니다. 그러나 특정 시나리오와 일치하는 조건을 사용하여 다른 정책 집합을 만들 수 있습니다.
행 끝에 있는 화살표를 클릭합니다.
 Device Admin Policy Sets 페이지
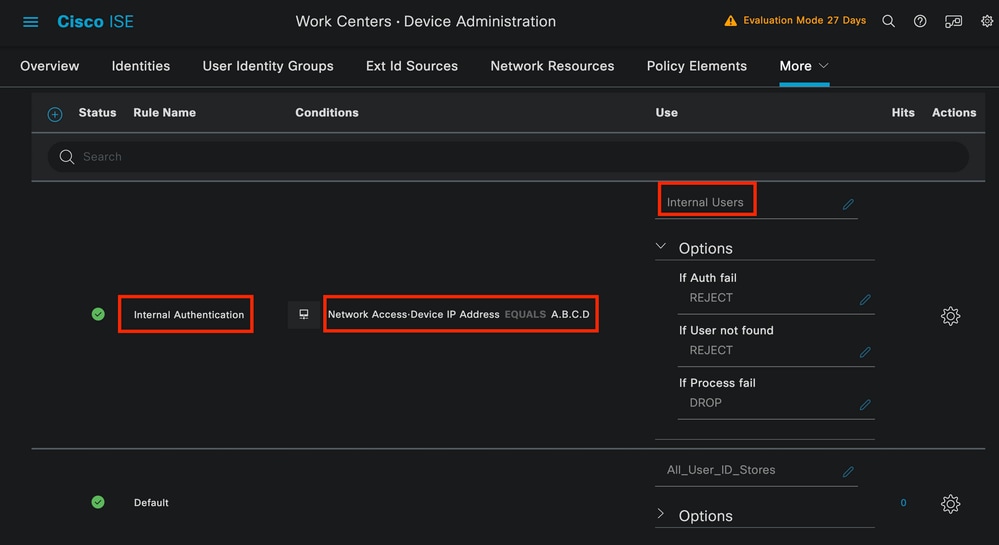
정책 집합 구성 내에서 아래로 스크롤하고 Authentication Policy(인증 정책) 섹션을 확장합니다.
Add(추가) 아이콘을 클릭합니다.
이 컨피그레이션 예에서 Name 값은 Internal Authentication이고 선택한 조건은 Network Device(Nexus) IP(A.B.C.D. 대체)입니다. 이 인증 정책은 내부 사용자 ID 저장소를 사용 합니다.
 인증 정책
인증 정책
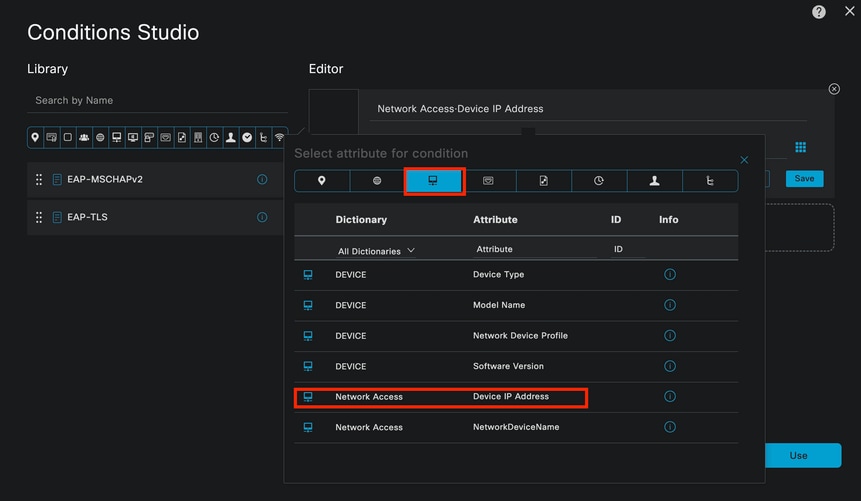
다음은 조건이 구성된 방법입니다.
Network Access(네트워크 액세스) > Device IP address Dictionary Attribute(디바이스 IP 주소 사전 특성)를 선택합니다.
 인증 정책에 대한 조건 스튜디오
<Nexus IP address> 주석을 올바른 IP로 바꿉니다.
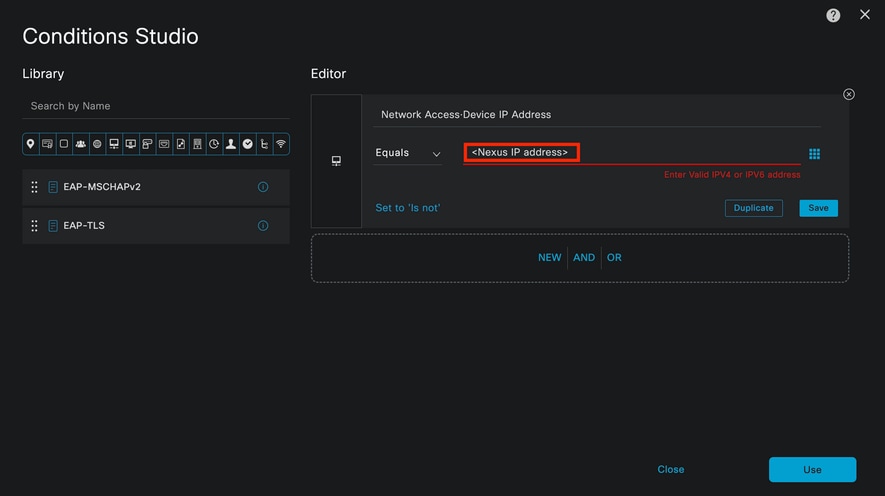 IP 필터 추가
Use(사용) 버튼을 클릭합니다.
이 조건은 구성한 Nexus 디바이스에서만 발생합니다. 그러나 대량의 디바이스에서 이 조건을 활성화하는 데 목적이 있는 경우 다른 조건을 고려하십시오.
그런 다음 Authorization Policy(권한 부여 정책) 섹션으로 이동하여 확장합니다.
+(더하기) 아이콘을 클릭합니다.
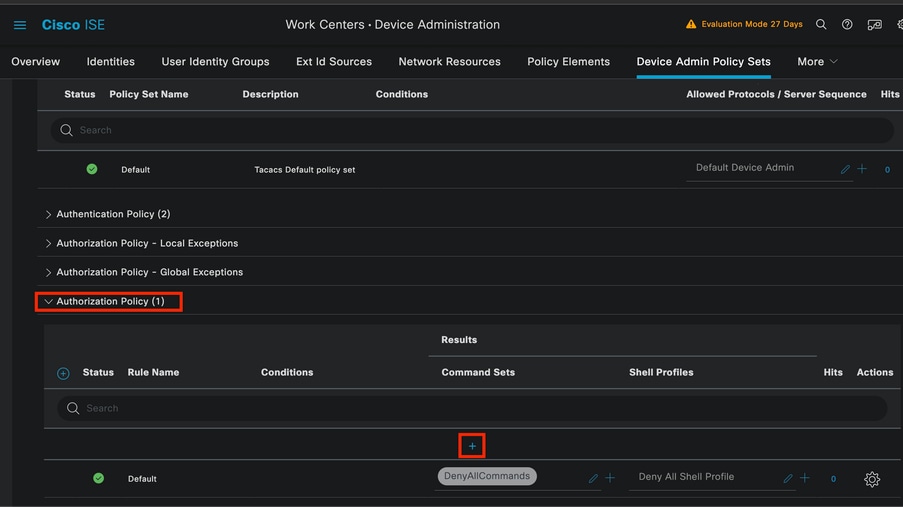 권한 부여 정책 섹션
이 예에서는 권한 부여 정책의 이름으로 NEXUS HELP DESK를 사용했습니다.
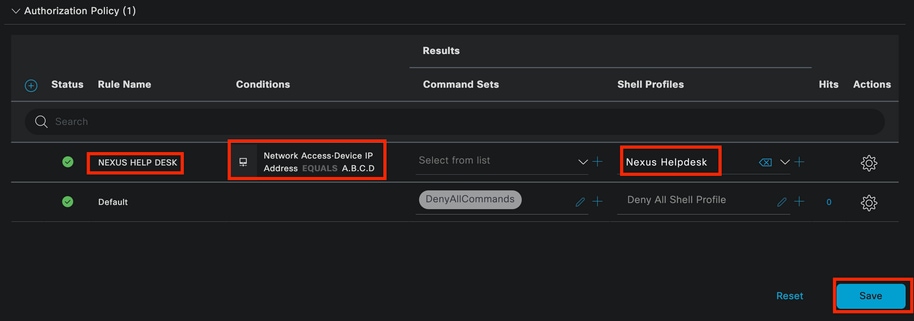 권한 부여 정책에 대한 조건 스튜디오
인증 정책에서 구성 된 동일 한 상태가 권한 부여 정책에 사용 됩니다.
Shell Profiles(셸 프로필) 열에서 Nexus Helpdesk가 선택되기 전에 구성된 프로필을 선택합니다.
마지막으로 Save(저장) 버튼을 클릭합니다.
다음을 확인합니다.
구성이 올바르게 작동하는지 확인하려면 이 섹션을 활용하십시오.
ISE GUI에서 Operations(운영) > TACACS > Live Logs(라이브 로그)로 이동합니다. 사용된 사용자 이름과 일치하는 레코드를 식별하고 권한 부여 이벤트의 Live Log Detail(라이브 로그 세부 정보)을 클릭합니다.
 TACACS 라이브 로그
이 보고서에 포함된 세부사항의 일부로서, ISE가 shell:roles="helpdesk" 값을 반환한 방법을 볼 수 있는 Response 섹션을 찾을 수 있습니다.
 라이브 로그 세부 정보 응답
Nexus 디바이스에서:
Nexus9000 login: iseiscool
Password: VainillaISE97

Nexus9000# conf t
Enter configuration commands, one per line. End with CNTL/Z.
Nexus9000(config)# interface ethernet 1/23
% Interface permission denied

Nexus9000(config)# ?
  interface  Configure interfaces
  show       Show running system information
  end        Go to exec mode
  exit       Exit from command interpreter

Nexus9000(config)# role name test
% Permission denied for the role

Nexus9000(config)#

Nexus9000(config)# interface loopback 0
% Interface permission denied

Nexus9000(config)#
Nexus9000# conf t

Nexus9000(config)# interface ethernet 1/5
Notice that only the commands allowed are listed.
Nexus9000(config-if)# ?

  no        Negate a command or set its defaults
  show      Show running system information
  shutdown  Enable/disable an interface
  end       Go to exec mode
  exit      Exit from command interpreter

Nexus9000(config-if)# cdp
Nexus9000(config-if)# cdp enable
% Permission denied for the role
Nexus9000(config-if)#
문제 해결
- Nexus 디바이스에서 ISE에 연결할 수 있는지 확인합니다.
Nexus9000# ping <Your ISE IP>
<Your ISE IP>(<Your ISE IP>)😞 56데이터 바이트
<Your ISE IP>에서 64바이트: icmp_seq=0 ttl=59 시간=1.22ms
<Your ISE IP>에서 64바이트: icmp_seq=1 ttl=59 시간=0.739ms
<Your ISE IP>에서 64바이트: icmp_seq=2 ttl=59 시간=0.686ms
<Your ISE IP>에서 64바이트: icmp_seq=3 ttl=59 시간=0.71ms
<Your ISE IP>에서 64바이트: icmp_seq=4 ttl=59 시간=0.72ms
- ISE와 Nexus 디바이스 간에 포트 49가 열려 있는지 확인합니다.
Nexus9000# 텔넷 <Your ISE IP> 49
<Your ISE IP> 시도 중...
<Your ISE IP>에 연결됨
이스케이프 문자는 '^]'입니다.
- 다음 디버그를 사용합니다.
tacacs+ 모두 디버그
Nexus9000#
Nexus9000# 2024 4월 19일 22:50:44.199329 tacacs: event_loop(): process_rd_fd_set 호출
2024년 4월 19일 22:50:44.199355 tacacs: process_rd_fd_set: fd 6에 대한 통화 콜백
2024년 4월 19일 22:50:44.199392 tacacs: fsrv에서 8421 opcode를 사용하지 않음
2024년 4월 19일 22:50:44.199406 tacacs: process_implicit_cfs_session_start: 입력 중...
2024년 4월 19일 22:50:44.199414 tacacs: process_implicit_cfs_session_start: 종료; 배포 사용 안 함 상태입니다.
2024년 4월 19일 22:50:44.199424 tacacs: process_aaa_tplus_request: aaa 세션 id 0에 입력
2024년 4월 19일 22:50:44.199438 tacacs: process_aaa_tplus_request: 서버 그룹 IsePsnServers를 사용하여 mgmt0 포트의 상태 확인
2024년 4월 19일 22:50:44.199451 tacacs: tacacs_global_config(4220): 입력 중...
2024년 4월 19일 22:50:44.199466 tacacs: tacacs_global_config(4577): 가져오기_요청...
2024년 4월 19일 22:50:44.208027 tacacs: tacacs_global_config(4701): 전역 프로토콜 컨피그레이션 작업의 반환 값을 다시 가져왔습니다.SUCCESS
2024년 4월 19일 22:50:44.208045 tacacs: tacacs_global_config(4716): REQ:num server 0
2024년 4월 19일 22:50:44.208054 tacacs: tacacs_global_config: REQ:num group 1
2024년 4월 19일 22:50:44.208062 tacacs: tacacs_global_config: REQ:num timeout 5
2024년 4월 19일 22:50:44.208070 tacacs: tacacs_global_config: REQ:num deadtime 0
2024년 4월 19일 22:50:44.208078 tacacs: tacacs_global_config: REQ:num encryption_type 7
2024년 4월 19일 22:50:44.208086 tacacs: tacacs_global_config: 반환 간격 0
2024년 4월 19일 22:50:44.208098 tacacs: process_aaa_tplus_request:group_info는 aaa_req에 채워지므로 servergroup IsePsnServers를 사용합니다.
2024년 4월 19일 22:50:44.208108 tacacs: tacacs_servergroup_config: 서버 그룹, 인덱스 0 입력
2024년 4월 19일 22:50:44.208117 tacacs: tacacs_servergroup_config: 프로토콜 서버 그룹 인덱스에 대한 GETNEXT_REQ:0 이름:
2024년 4월 19일 22:50:44.208148 tacacs: tacacs_pss2_move2key: rcode = 40480003 syserr2str = 해당 pss 키 없음
2024년 4월 19일 22:50:44.208160 tacacs: tacacs_pss2_move2key: pss2_getkey 호출
2024년 4월 19일 22:50:44.208171 tacacs: tacacs_servergroup_config: GETNEXT_REQ가 프로토콜 서버 그룹 인덱스를 가져옴: 2 이름: IsePsnServers
2024년 4월 19일 22:50:44.208184 tacacs: tacacs_servergroup_config: 프로토콜 그룹 작업: SUCCESS의 반환 값을 다시 가져왔습니다.
2024년 4월 19일 22:50:44.208194 tacacs: tacacs_servergroup_config: 프로토콜 서버 그룹: IsePsnServers에 대해 retval 0 반환
2024년 4월 19일 22:50:44.208210 tacacs: process_aaa_tplus_request: 그룹 IsePsnServers를 찾았습니다. 해당 vrf는 기본값이고 source-intf는 0입니다.
2024년 4월 19일 22:50:44.208224 tacacs: process_aaa_tplus_request: 요청된 그룹의 vrf:default에 대한 mgmt0 vrf:management 확인
2024년 4월 19일 22:50:44.208256 tacacs: process_aaa_tplus_request:mgmt_if 83886080
2024년 4월 19일 22:50:44.208272 tacacs: process_aaa_tplus_request:global_src_intf : 0, 로컬 src_intf는 0이고 vrf_name은 기본값입니다.
2024년 4월 19일 22:50:44.208286 tacacs: create_tplus_req_state_machine(902): aaa 세션 id 0에 입력
2024년 4월 19일 22:50:44.208295 tacacs: 상태 시스템 수 0
2024년 4월 19일 22:50:44.208307 tacacs: init_tplus_req_state_machine: aaa 세션 id 0에 입력
2024년 4월 19일 22:50:44.208317 tacacs: init_tplus_req_state_machine(1298):tplus_ctx가 NULL이므로 작성자와 테스트해야 합니다.
2024년 4월 19일 22:50:44.208327 tacacs: tacacs_servergroup_config: 서버 그룹 IsePsnServers, 인덱스 0에 대해 입력
2024년 4월 19일 22:50:44.208339 tacacs: tacacs_servergroup_config: 프로토콜 서버 그룹 인덱스에 대한 GET_REQ:0 이름:IsePsnServers
2024년 4월 19일 22:50:44.208357 tacacs: find_tacacs_servergroup: 서버 그룹 IsePsnServers에 입력
2024년 4월 19일 22:50:44.208372 tacacs: tacacs_pss2_move2key: rcode = 0 syserr2str = 성공
2024년 4월 19일 22:50:44.208382 tacacs: find_tacacs_servergroup: 서버 그룹 IsePsnServers 인덱스에 대한 종료는 2입니다.
2024년 4월 19일 22:50:44.208401 tacacs: tacacs_servergroup_config: 가져오기(_R): 프로토콜 서버 그룹 IsePsnServers에 대한 find_tacacs_servergroup 오류 0
2024년 4월 19일 22:50:44.208420 tacacs: tacacs_pss2_move2key: rcode = 0 syserr2str = 성공
2024년 4월 19일 22:50:44.208433 tacacs: tacacs_servergroup_config: GET_REQ가 프로토콜 서버 그룹 인덱스를 가져옴: 2 이름: IsePsnServers
2024년 4월 19일 22:52024 4월 19일 22:52024 4월 19일 22:5
Nexus9000#
- 패킷 캡처를 수행합니다. (패킷 세부사항을 보려면 Wireshark TACACS+ 기본 설정을 변경하고 Nexus 및 ISE에서 사용하는 공유 키를 업데이트해야 합니다.)
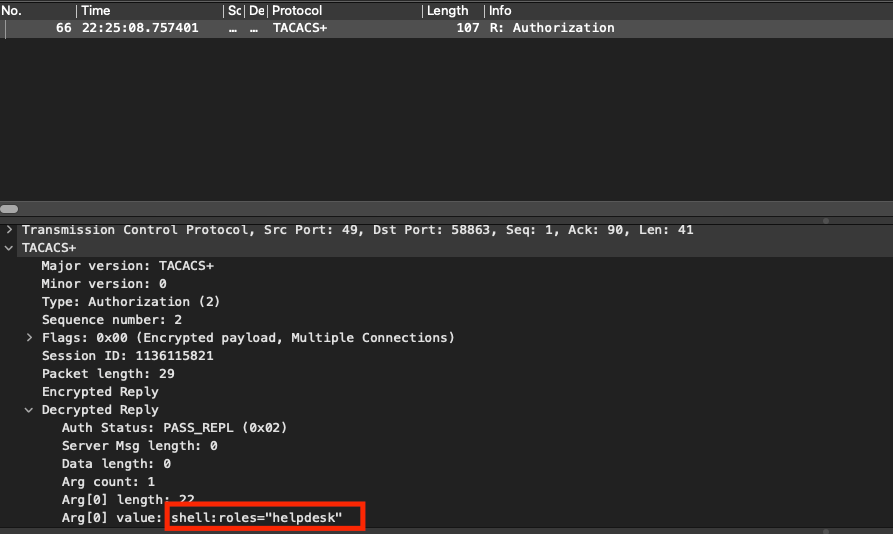 TACACS 권한 부여 패킷
- 공유 키가 ISE와 Nexus 측에서 동일한지 확인합니다. Wireshark에서도 확인할 수 있습니다.
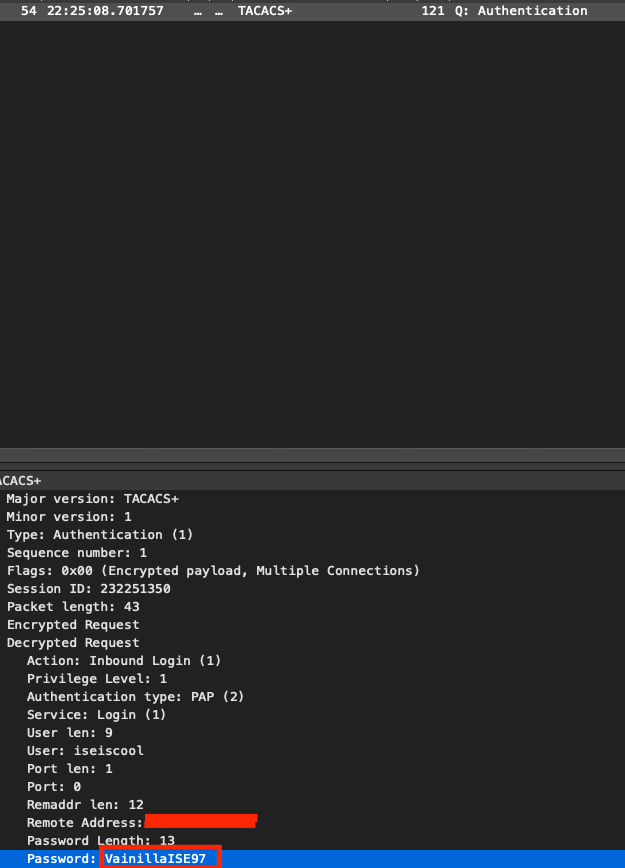 인증 패킷
인증 패킷
 피드백
피드백