300 Series Managed Switch의 SNMP(Simple Network Management Protocol) 그룹 구성
목표
이 문서에서는 300 Series 관리 스위치에 SNMP(Simple Network Management Protocol) 그룹을 생성하는 방법에 대해 설명합니다.
소개
SNMP는 IP 네트워크에서 디바이스를 관리하는 데 사용됩니다. MIB(Management Information Base)는 SNMP를 통해 액세스할 수 있는 스위치에 대한 정보를 저장합니다. SNMP 보기는 MIB에 대한 액세스를 제한합니다. 전체 MIB 대신 MIB의 일부만 표시됩니다. SNMP 그룹은 다른 보기에 대한 사용자의 읽기/쓰기 권한을 정의하는 데 사용됩니다.
사전 요구 사항
이 컨피그레이션을 구현하기 전에 몇 가지 다른 컨피그레이션을 수행해야 합니다.
- SNMP는 기본적으로 비활성화되어 있으며 그룹을 만들려면 먼저 켜야 합니다. 자세한 내용을 보려면 여기를 클릭하십시오.
- 기본값 이외의 보기를 만들려면 여기를 클릭합니다.
- 그룹을 만든 후 그룹에 사용자를 할당할 수 있습니다. 그룹에 사용자를 추가하는 방법에 대한 자세한 내용을 보려면 여기를 클릭하십시오.
적용 가능한 디바이스
- SF/SG 300 Series Managed Switch
소프트웨어 버전
- v1.2.7.76
SNMP 그룹 컨피그레이션
1단계. 300 시리즈 스위치의 웹 구성 유틸리티에 로그인하고 SNMP > 그룹을 선택합니다. 그룹 페이지가 열립니다.

2단계. 추가를 클릭합니다. Add Group 창이 열립니다.
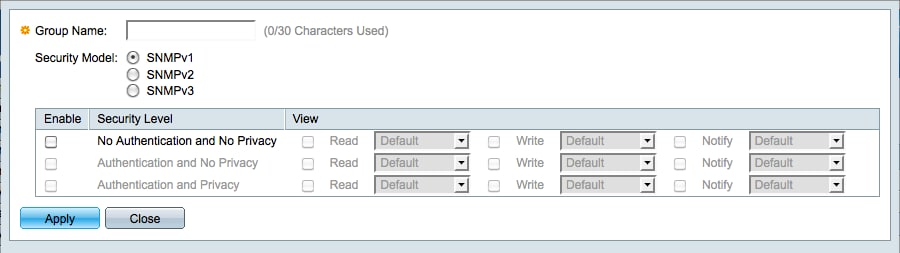
3단계. Group Name 필드에서 SNMP 그룹을 식별할 이름을 입력합니다.
4단계. Security Model 필드에서 적절한 SNMP 버전 라디오 버튼을 클릭합니다.
- SNMPv1 및 SNMPv2 - 커뮤니티 문자열을 사용하여 패킷을 인증합니다. 커뮤니티 문자열이 암호화되지 않았으므로 어떤 버전도 안전하지 않습니다.
- SNMPv3 - 사용자 이름 및 비밀번호를 사용하여 버전 1 또는 2에서 찾을 수 없는 다른 보안 조치의 호스트와 함께 패킷을 인증합니다. SNMPv3는 보안을 강화하기 위해 권장됩니다.
참고: 사용자는 SNMPv3 그룹에만 할당할 수 있습니다. 나중에 사용자를 그룹에 할당하려면 SNMPv3을 선택합니다.
5단계. SNMP 그룹에 대한 적절한 보안 수준 확인란을 선택합니다.
참고: SNMPv1 및 SNMPv2의 경우 No Authentication 및 No Privacy만 선택할 수 있습니다. SNMPv3의 경우 다음 세 가지 옵션을 모두 사용할 수 있습니다.
- No Authentication and No Privacy(인증 없음 및 프라이버시 없음) - 스위치가 데이터 프레임을 인증하거나 암호화하지 않습니다.
- Authentication and No Privacy(인증 및 프라이버시 없음) - 이 스위치는 SNMP 메시지를 인증하고 SNMP 사용자가 인증된 시스템 관리자임을 확인합니다. 메시지에 대해 암호화를 수행하지 않습니다.
- Authentication and Privacy(인증 및 프라이버시) - 스위치가 SNMP 메시지의 출처를 인증하고 SNMP 메시지를 암호화합니다.
6단계. 뷰와 연결할 제한을 선택합니다. 이러한 제한은 확인란 옆의 드롭다운 목록에 표시되는 보기(MIB의 일부)에 적용됩니다. 사용 가능한 세 가지 옵션은 다음과 같습니다.
- 읽기 - 그룹의 구성원은 선택한 보기만 읽을 수 있습니다.
- Write(쓰기) - 그룹의 구성원은 선택한 보기를 쓰기/편집할 수 있습니다.
- 알림 - 선택한 보기에서 이벤트가 발생하면 SNMP 사용자에게 메시지가 전송됩니다. 알림은 SNMPv3에만 사용할 수 있습니다.
7단계. 6단계에서 선택한 제한 상자 옆의 드롭다운 목록에서 보기를 선택합니다.
- 기본값 - 읽기 및 읽기/쓰기 보기의 기본값.
- DefaultSuper - 관리자 보기의 기본값.
참고: 추가 뷰를 생성한 경우 사용할 수 있습니다. 보기를 만들려면 300 Series Managed Switch의 SNMP(Simple Network Management Protocol) Views Configuration(SNMP) 문서를 참조하십시오.
8단계. Apply(적용)를 클릭하여 실행 중인 컨피그레이션 파일을 업데이트하고 새 SNMP 그룹을 정의합니다. Close(닫기)를 클릭하여 Add Group 창을 종료합니다.
9단계(선택 사항) 그룹을 편집하려면 해당 확인란을 선택하고 편집을 클릭합니다.
10단계(선택 사항) 그룹을 삭제하려면 해당 확인란을 선택하고 삭제를 클릭합니다.
결론
이제 300 시리즈 관리 스위치에 SNMP 그룹을 생성했습니다.
개정 이력
| 개정 | 게시 날짜 | 의견 |
|---|---|---|
1.0 |
13-Dec-2018 |
최초 릴리스 |
 피드백
피드백