Cisco IDS UNIX Director를 사용한 IDS PIX 차단
목차
소개
이 문서에서는 Cisco IDS UNIX Director(이전의 Netranger Director) 및 Sensor의 도움을 받아 PIX에서 차단을 구성하는 방법을 설명합니다. 이 문서에서는 센서 및 디렉터가 작동하며 센서의 스니핑 인터페이스가 PIX 외부 인터페이스에 확장되도록 설정된 것으로 가정합니다.
사전 요구 사항
요구 사항
이 문서에 대한 특정 요건이 없습니다.
사용되는 구성 요소
이 문서의 정보는 다음 소프트웨어 및 하드웨어 버전을 기반으로 합니다.
-
Cisco IDS UNIX Director 2.2.3
-
Cisco IDS UNIX Sensor 3.0.5
-
Cisco Secure PIX with 6.1.1
참고: 6.2.x 버전을 사용하는 경우 텔넷이 아닌 SSH(Secure Shell Protocol) 관리를 사용할 수 있습니다. 자세한 내용은 Cisco 버그 ID CSCdx55215(등록된 고객만 해당)를 참조하십시오.
이 문서의 정보는 특정 랩 환경의 디바이스를 토대로 작성되었습니다. 이 문서에 사용된 모든 디바이스는 초기화된(기본) 컨피그레이션으로 시작되었습니다. 현재 네트워크가 작동 중인 경우, 모든 명령어의 잠재적인 영향을 미리 숙지하시기 바랍니다.
표기 규칙
문서 규칙에 대한 자세한 내용은 Cisco 기술 팁 표기 규칙을 참조하십시오.
구성
이 섹션에서는 이 문서에 설명된 기능을 구성하는 데 사용되는 정보를 제공합니다.
Cisco IDS UNIX Director 및 Sensor는 차단을 위해 Cisco Secure PIX를 관리하는 데 사용됩니다. 이 컨피그레이션을 고려할 때 다음 개념을 기억하십시오.
-
센서를 설치하고 센서가 제대로 작동하는지 확인합니다.
-
스니핑 인터페이스가 PIX의 외부 인터페이스로 확장되는지 확인합니다.
참고: 이 문서에 사용된 명령에 대한 추가 정보를 보려면 명령 조회 툴(등록된 고객만 해당)을 참조하십시오.
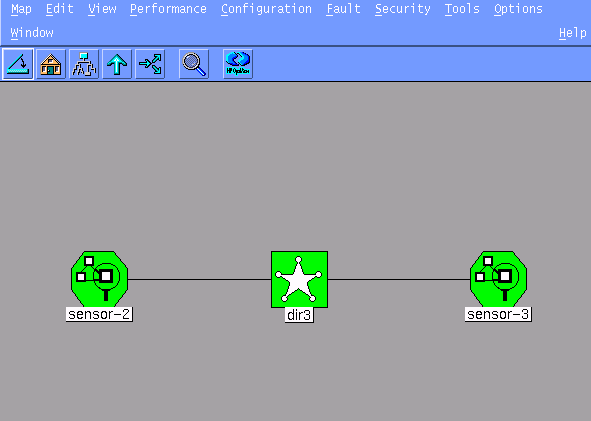
네트워크 다이어그램
이 문서에서는 이 네트워크 설정을 사용합니다.
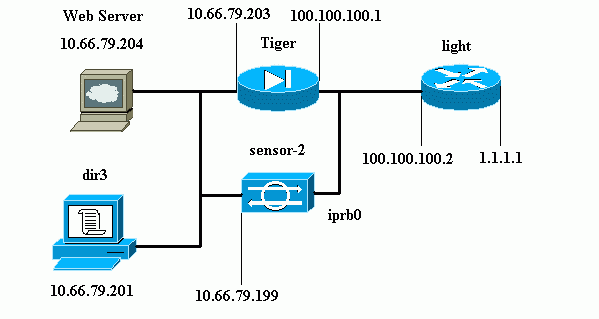
설정
이 문서에서는 이러한 구성을 사용합니다.
| 라우터 표시등 |
|---|
Current configuration : 906 bytes ! version 12.2 service timestamps debug uptime service timestamps log uptime no service password-encryption ! hostname light ! enable password cisco ! username cisco password 0 cisco ip subnet-zero ! ! ! ip ssh time-out 120 ip ssh authentication-retries 3 ! call rsvp-sync ! ! ! fax interface-type modem mta receive maximum-recipients 0 ! controller E1 2/0 ! ! ! interface FastEthernet0/0 ip address 100.100.100.2 255.255.255.0 duplex auto speed auto ! interface FastEthernet0/1 ip address 1.1.1.1 255.255.255.0 duplex auto speed auto ! interface BRI4/0 no ip address shutdown ! interface BRI4/1 no ip address shutdown ! interface BRI4/2 no ip address shutdown ! interface BRI4/3 no ip address shutdown ! ip classless ip route 0.0.0.0 0.0.0.0 100.100.100.1 ip http server ip pim bidir-enable ! ! dial-peer cor custom ! ! line con 0 line 97 108 line aux 0 line vty 0 4 login ! end |
| PIX 타이거 |
|---|
PIX Version 6.1(1) nameif gb-ethernet0 intf2 security10 nameif gb-ethernet1 intf3 security15 nameif ethernet0 outside security0 nameif ethernet1 inside security100 enable password 2KFQnbNIdI.2KYOU encrypted passwd 9jNfZuG3TC5tCVH0 encrypted hostname Tiger fixup protocol ftp 21 fixup protocol http 80 fixup protocol h323 1720 fixup protocol rsh 514 fixup protocol rtsp 554 fixup protocol smtp 25 fixup protocol sqlnet 1521 fixup protocol sip 5060 fixup protocol skinny 2000 names !--- Allows ICMP traffic and HTTP to pass through the PIX !--- to the Web Server. access-list 101 permit icmp any host 100.100.100.100 access-list 101 permit tcp any host 100.100.100.100 eq www pager lines 24 logging on logging buffered debugging interface gb-ethernet0 1000auto shutdown interface gb-ethernet1 1000auto shutdown interface ethernet0 auto interface ethernet1 auto mtu intf2 1500 mtu intf3 1500 mtu outside 1500 mtu inside 1500 ip address intf2 127.0.0.1 255.255.255.255 ip address intf3 127.0.0.1 255.255.255.255 ip address outside 100.100.100.1 255.255.255.0 ip address inside 10.66.79.203 255.255.255.224 ip audit info action alarm ip audit attack action alarm no failover failover timeout 0:00:00 failover poll 15 failover ip address intf2 0.0.0.0 failover ip address intf3 0.0.0.0 failover ip address outside 0.0.0.0 failover ip address inside 0.0.0.0 pdm history enable arp timeout 14400 global (outside) 1 interface nat (inside) 1 0.0.0.0 0.0.0.0 0 0 !--- Static NAT for the Web Server. static (inside,outside) 100.100.100.100 10.66.79.204 netmask 255.255.255.255 0 0 access-group 101 in interface outside route outside 0.0.0.0 0.0.0.0 100.100.100.2 1 route inside 10.66.0.0 255.255.0.0 10.66.79.193 1 timeout xlate 3:00:00 timeout conn 1:00:00 half-closed 0:10:00 udp 0:02:00 rpc 0:10:00 h323 0:05:00 s0 timeout uauth 0:05:00 absolute aaa-server TACACS+ protocol tacacs+ aaa-server RADIUS protocol radius aaa-server LOCAL protocol tacacs+ no snmp-server location no snmp-server contact snmp-server community public no snmp-server enable traps floodguard enable no sysopt route dnat !--- Allows Sensor Telnet to the PIX from the inside interface. telnet 10.66.79.199 255.255.255.255 inside telnet timeout 5 ssh timeout 5 terminal width 80 Cryptochecksum:b4c820ba31fbb3996ca8891503ebacbc : end |
센서 구성
이 단계에서는 센서를 구성하는 방법에 대해 설명합니다.
-
사용자 이름 루트 및 비밀번호 공격을 사용하여 10.66.79.199에 텔넷 연결합니다.
-
sysconfig-sensor를 입력합니다.
-
다음 정보를 입력합니다.
-
IP 주소: 10.66.79.199
-
IP 넷마스크: 255.255.255.224
-
IP 호스트 이름: sensor-2
-
기본 경로: 10.66.79.193
-
네트워크 액세스 제어
10.
-
통신 인프라
센서 호스트 ID: 49
센서 조직 ID: 900
센서 호스트 이름: sensor-2
Sensor Organization Name(센서 조직 이름): cisco
센서 IP 주소: 10.66.79.199
IDS Manager 호스트 ID: 50
IDS Manager 조직 ID: 900
IDS Manager 호스트 이름: dir3
IDS Manager 조직 이름: cisco
IDS Manager IP 주소: 10.66.79.201
-
-
설정 저장. 그러면 센서가 재부팅됩니다.
Director에 센서 추가
Director에 센서를 추가하려면 다음 단계를 완료하십시오.
-
사용자 이름 netrangr 및 비밀번호 공격을 사용하여 10.66.79.201에 텔넷을 연결합니다.
-
HP OpenView를 시작하려면 ovf&를 입력하십시오.
-
Main Menu(기본 메뉴)에서 Security(보안) > Configure(구성)를 선택합니다.
-
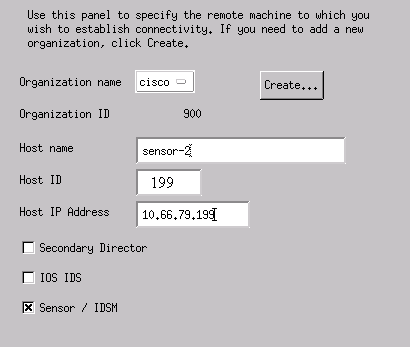
Netranger Configuration 메뉴에서 File > Add Host를 선택하고 Next를 클릭합니다.
-
이 정보를 입력하고 다음을 클릭합니다.
-
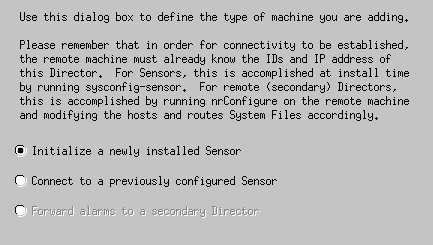
기본 설정을 그대로 두고 다음을 클릭합니다.
-
값을 사용할 수 있는 경우 로그를 변경하고 분을 건너뛰거나 기본값으로 둡니다. 네트워크 인터페이스 이름을 스니핑 인터페이스의 이름으로 변경합니다. 이 예에서는 "iprb0"입니다. 센서 유형 및 센서 연결 방법에 따라 "spwr0" 또는 다른 모든 항목이 될 수 있습니다.
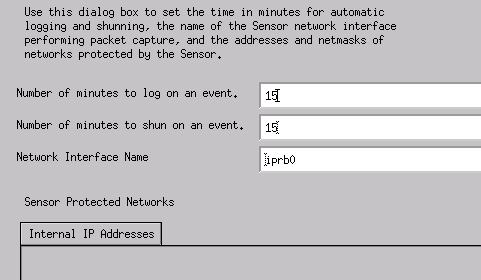
-
마침을 클릭할 수 있을 때까지 다음 을 클릭합니다.
이제 센서가 디렉터에 성공적으로 추가되었습니다. 이 예에 표시된 것처럼 주 메뉴에서 sensor-2가 표시됩니다.
PIX에 대한 차단 구성
PIX에 대한 차단을 구성하려면 다음 단계를 완료합니다.
-
Main Menu(기본 메뉴)에서 Security(보안) > Configure(구성)를 선택합니다.
-
Netranger Configuration 메뉴에서 sensor-2를 강조 표시하고 두 번 클릭합니다.
-
디바이스 관리를 엽니다.
-
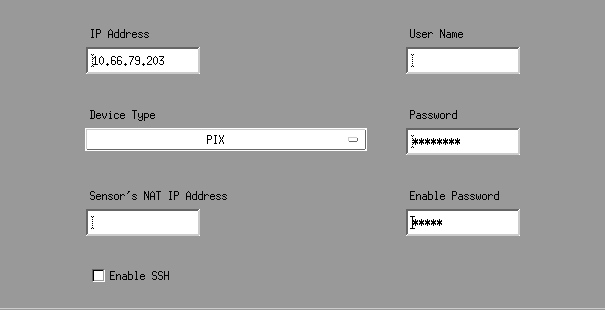
Devices(디바이스) > Add(추가)를 클릭하고 이 예에 표시된 정보를 입력합니다. 계속하려면 OK(확인)를 클릭합니다. 텔넷과 enable 비밀번호는 모두 "Cisco"입니다.
-
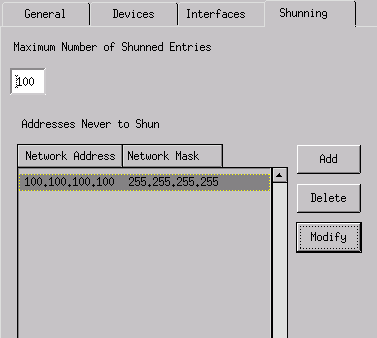
Shunning > Add를 클릭합니다. "Addresses Never to Shun"에 호스트 100.100.100.100을 추가합니다. 계속하려면 OK(확인)를 클릭합니다.
-
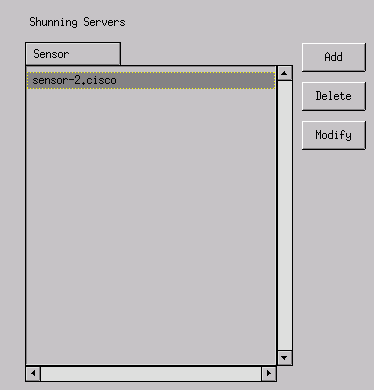
Shunning(차단) > Add(추가)를 클릭하고 센서-2.cisco를 차단 서버로 선택합니다. 이 부분의 컨피그레이션이 완료되었습니다. Device Management(디바이스 관리) 창을 닫습니다.
-
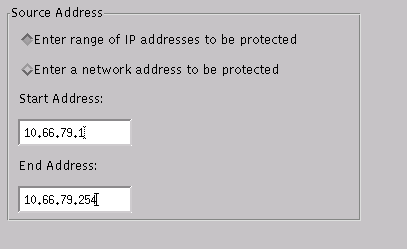
Intrusion Detection(침입 탐지) 창을 열고 Protected Networks(보호되는 네트워크)를 클릭합니다. 보호된 네트워크에 10.66.79.1을 10.66.79.254에 추가합니다.
-
Profile(프로필)을 클릭하고 Manual Configuration(수동 컨피그레이션) > Modify Signatures(시그니처 수정)를 선택합니다. Large ICMP Traffic and ID: 2151을 선택하고 Modify를 클릭한 다음 Action(작업)을 None(없음)에서 Shun and Log(차단 및 로그)로 변경합니다. 계속하려면 OK(확인)를 클릭합니다.

-
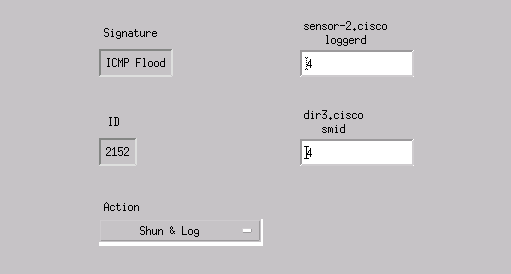
ICMP Flood and ID: 2152를 선택하고 Modify를 클릭한 다음 Action(작업)을 None(없음)에서 Shun and Log(차단 및 로그)로 변경합니다. 계속하려면 OK(확인)를 클릭합니다.
-
이 부분의 구성은 완료되었습니다. Intrusion Detection(침입 탐지) 창을 닫으려면 OK(확인)를 클릭합니다.
-
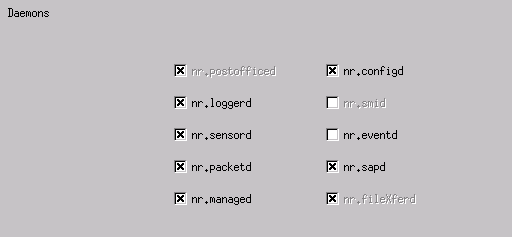
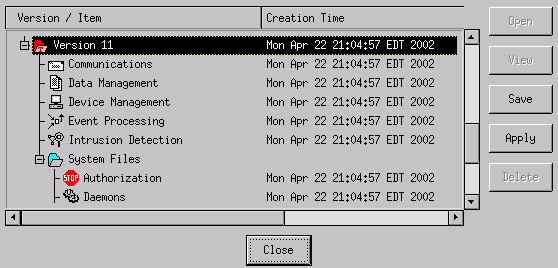
System Files(시스템 파일) 폴더를 열고 Daemons(데몬) 창을 엽니다. 다음 데몬을 활성화했는지 확인합니다.
-
계속하려면 OK(확인)를 클릭하고 방금 수정한 버전을 선택합니다. Save(저장) > Apply(적용)를 클릭합니다. 센서가 완료되었다는 메시지가 표시될 때까지 기다렸다가 서비스를 다시 시작하고 Netranger 구성에 대한 모든 창을 닫습니다.
다음을 확인합니다.
이 섹션에서는 컨피그레이션이 제대로 작동하는지 확인하는 데 도움이 되는 정보를 제공합니다.
공격을 시작하기 전에
Tiger(config)# show telnet
10.66.79.199 255.255.255.255 inside
Tiger(config)# who
        0: 10.66.79.199

Tiger(config)# show xlate
1 in use, 1 most used
Global 100.100.100.100 Local 10.66.79.204 static

Light#ping 100.100.100.100

Type escape sequence to abort.
Sending 5, 100-byte ICMP Echos to 100.100.100.100, timeout is 2 seconds:
!!!!!
Success rate is 100 percent (5/5), round-trip min/avg/max = 112/195/217 ms

Light#telnet 100.100.100.100 80
Trying 100.100.100.100, 80 ... Open
공격 실행 및 차단
Light#ping
Protocol [ip]:
Target IP address: 100.100.100.100
Repeat count [5]: 100000
Datagram size [100]: 18000
Timeout in seconds [2]:
Extended commands [n]:
Sweep range of sizes [n]:
Type escape sequence to abort.
Sending 100000, 18000-byte ICMP Echos to 100.100.100.100, timeout is 2 seconds:
!....................
Success rate is 4 percent (1/21), round-trip min/avg/max = 281/281/281 ms

Light#telnet 100.100.100.100 80
Trying 100.100.100.100, 80 ...
% Connection timed out; remote host not responding

Tiger(config)# show shun
Shun 100.100.100.2 0.0.0

Tiger(config)# show shun stat
intf2=OFF, cnt=0
intf3=OFF, cnt=0
outside=ON, cnt=2604
inside=OFF, cnt=0
intf4=OFF, cnt=0
intf5=OFF, cnt=0
intf6=OFF, cnt=0
intf7=OFF, cnt=0
intf8=OFF, cnt=0
intf9=OFF, cnt=0
Shun 100.100.100.2 cnt=403, time=(0:01:00).0 0 0
15분 후에 차단이 15분으로 설정되어 있기 때문에 정상으로 돌아갑니다
Tiger(config)# show shun

Tiger(config)# show shun stat
intf2=OFF, cnt=0
intf3=OFF, cnt=0
outside=OFF, cnt=4437
inside=OFF, cnt=0
intf4=OFF, cnt=0
intf5=OFF, cnt=0
intf6=OFF, cnt=0
intf7=OFF, cnt=0
intf8=OFF, cnt=0
intf9=OFF, cnt=0

Light#ping 100.100.100.100

Type escape sequence to abort.
Sending 5, 100-byte ICMP Echos to 100.100.100.100, timeout is 2 seconds:
!!!!!
Success rate is 100 percent (5/5), round-trip min/avg/max = 1/3/4 ms

Light#telnet 100.100.100.100 80
Trying 100.100.100.100, 80 ... Open
문제 해결
현재 이 설정에 사용할 수 있는 특정 문제 해결 정보가 없습니다.
관련 정보
개정 이력
| 개정 | 게시 날짜 | 의견 |
|---|---|---|
1.0 |
23-Jul-2002 |
최초 릴리스 |
 피드백
피드백