SecureX와 Firepower 위협 방어(FTD) 통합 및 문제 해결
다운로드 옵션
편견 없는 언어
본 제품에 대한 문서 세트는 편견 없는 언어를 사용하기 위해 노력합니다. 본 설명서 세트의 목적상, 편견 없는 언어는 나이, 장애, 성별, 인종 정체성, 민족 정체성, 성적 지향성, 사회 경제적 지위 및 교차성에 기초한 차별을 의미하지 않는 언어로 정의됩니다. 제품 소프트웨어의 사용자 인터페이스에서 하드코딩된 언어, RFP 설명서에 기초한 언어 또는 참조된 서드파티 제품에서 사용하는 언어로 인해 설명서에 예외가 있을 수 있습니다. 시스코에서 어떤 방식으로 포용적인 언어를 사용하고 있는지 자세히 알아보세요.
이 번역에 관하여
Cisco는 전 세계 사용자에게 다양한 언어로 지원 콘텐츠를 제공하기 위해 기계 번역 기술과 수작업 번역을 병행하여 이 문서를 번역했습니다. 아무리 품질이 높은 기계 번역이라도 전문 번역가의 번역 결과물만큼 정확하지는 않습니다. Cisco Systems, Inc.는 이 같은 번역에 대해 어떠한 책임도 지지 않으며 항상 원본 영문 문서(링크 제공됨)를 참조할 것을 권장합니다.
소개
이 문서에서는 SecureX를 Firepower FTD(Firepower Threat Defense)와 통합, 확인 및 트러블슈팅하는 데 필요한 단계에 대해 설명합니다.
사전 요구 사항
요구 사항
다음 주제에 대한 지식을 보유하고 있으면 유용합니다.
- FMC(Firepower Management Center)
- FTD(Firepower Threat Defense)
- 이미지 가상화 옵션
사용되는 구성 요소
- Firepower 위협 방어(FTD) - 6.5
- FMC(firepower 관리 센터) - 6.5
- SSE(Security Services Exchange)
- SecureX
- Smart License 포털
이 문서의 정보는 특정 랩 환경의 디바이스를 토대로 작성되었습니다. 이 문서에 사용된 모든 디바이스는 초기화된(기본) 컨피그레이션으로 시작되었습니다. 현재 네트워크가 작동 중인 경우 모든 명령의 잠재적인 영향을 미리 숙지하시기 바랍니다.
구성
라이센싱
가상 어카운트 역할:
Virtual Account Admin 또는 Smart Account Admin에게만 Smart Account를 SSE 어카운트와 연결할 수 있는 권한이 있습니다.
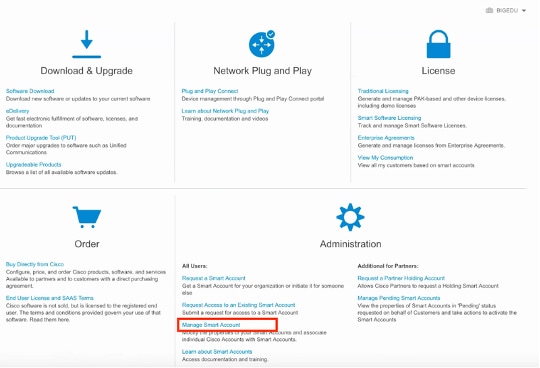
1단계. Smart Account 역할을 검증하려면 software.cisco.com으로 이동한 후 Administration(관리) 메뉴에서 Manage Smart Account(Smart Account 관리)를 선택합니다.
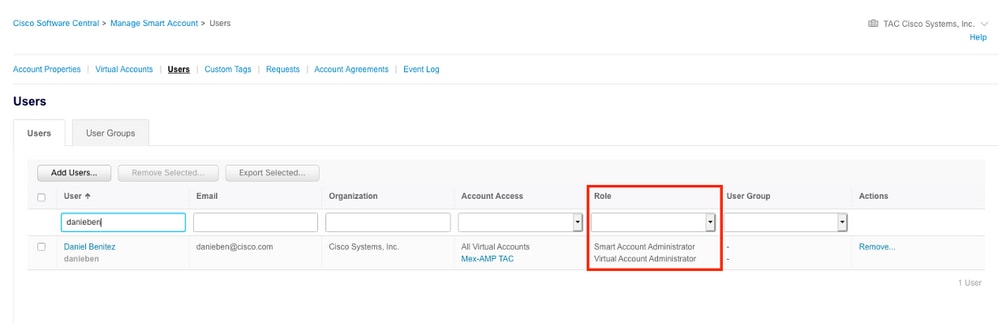
2단계. 사용자 역할의 유효성을 검사하려면 Users(사용자)로 이동하여, 그림과 같이 Roles(역할)에서 계정이 Virtual Account Administrator(가상 어카운트 관리자)를 갖도록 설정되어 있는지 확인합니다.
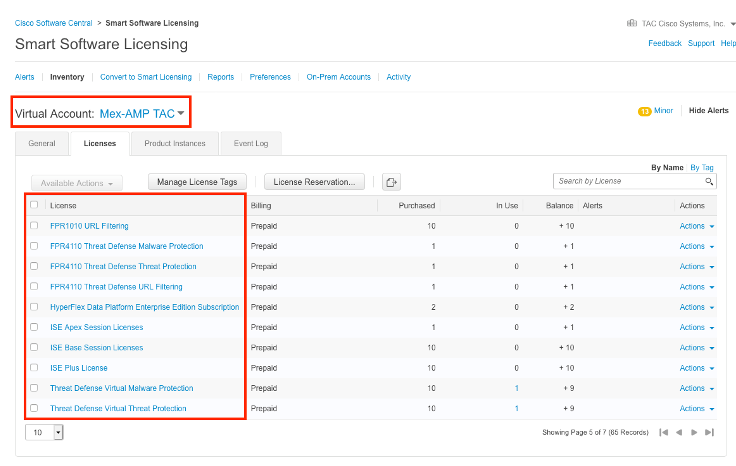
3단계. 보안 라이센스가 없는 계정이 SSE에 연결되어 있고 보안 디바이스 및 이벤트가 SSE 포털에 나타나지 않을 경우 SSE에서 연결하도록 선택한 가상 계정에 보안 디바이스에 대한 라이센스가 포함되어 있는지 확인합니다.
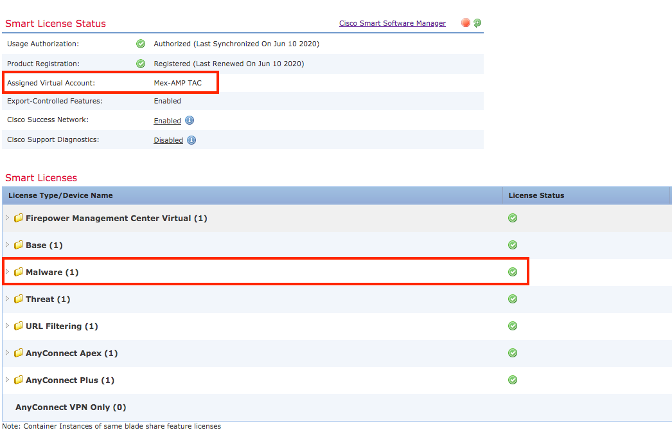
4단계. FMC가 올바른 Virtual Account에 등록되었는지 확인하려면 System>Licenses>Smart License로 이동합니다.
계정을 SSE에 연결하고 디바이스를 등록합니다.
1단계. SSE 어카운트에 로그온할 때 스마트 어카운트를 SSE 어카운트에 연결해야 합니다. 도구 아이콘을 클릭하고 어카운트 연결을 선택해야 합니다.
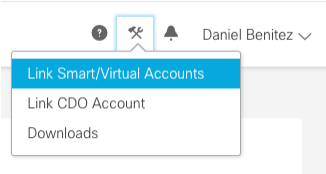
어카운트가 연결되면 Smart Account가 모든 Virtual Account와 함께 표시됩니다.
SSE에 디바이스 등록
1단계. 사용자 환경에서 다음 URL이 허용되는지 확인합니다.
미국 지역
- api-sse.cisco.com
- eventing-ingest.sse.itd.cisco.com
EU 지역
- api.eu.sse.itd.cisco.com을 참조하십시오.
- eventing-ingest.eu.sse.itd.cisco.com을 참조하십시오.
APJ 지역
- api.apj.sse.itd.cisco.com
- eventing-ingest.apj.sse.itd.cisco.com
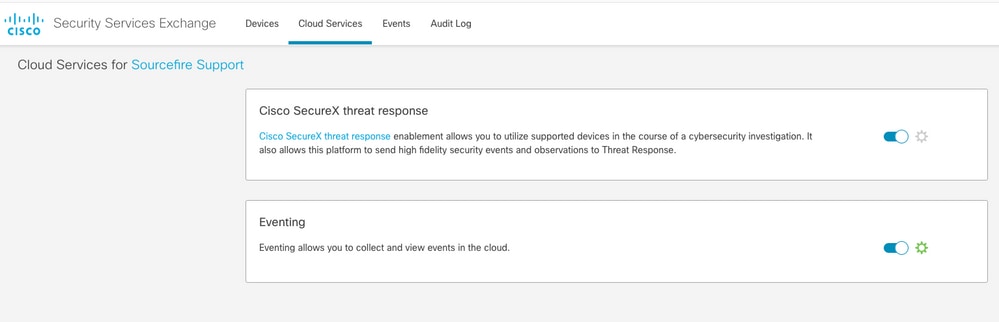
2단계. 다음 이미지에 표시된 대로 이 URL https://admin.sse.itd.cisco.com을 사용하여 SSE 포털에 로그인하고 Cloud Services(클라우드 서비스)로 이동한 다음 Eventing 및 Cisco SecureX threat response(Eventing 및 Cisco SecureX 위협 응답) 옵션을 모두 활성화합니다.
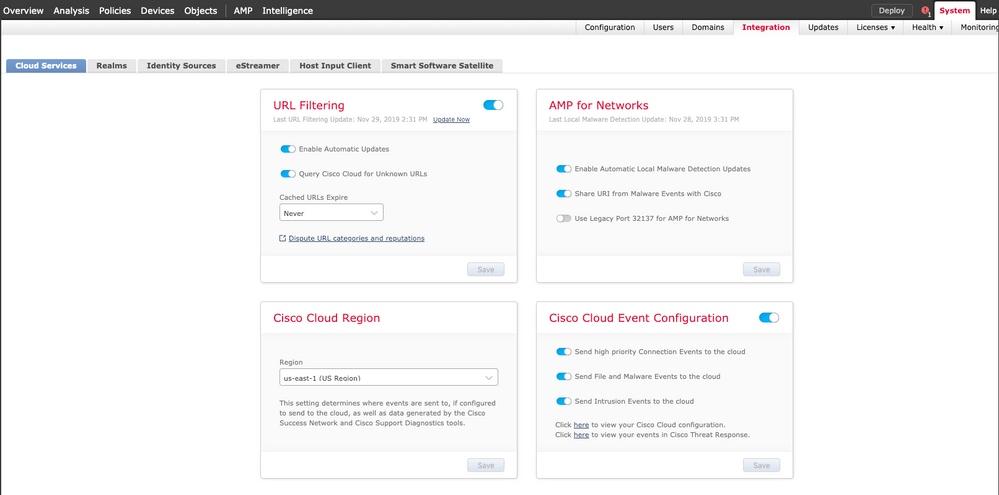
3단계. Firepower Management Center에 로그인하고 System>Integration>Cloud Services로 이동하여 Cisco Cloud Event Configuration을 활성화하고 클라우드로 전송할 이벤트를 선택합니다.
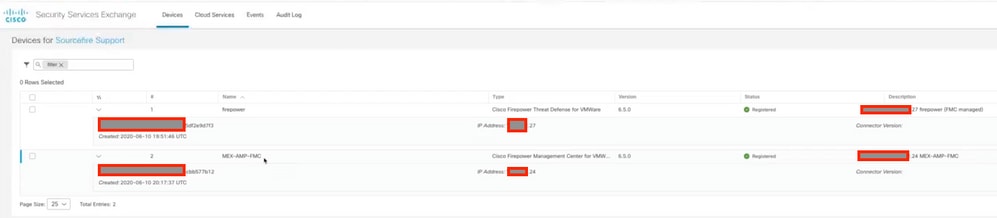
4단계. SSE 포털로 돌아가 이제 SSE에 등록된 디바이스를 확인할 수 있습니다.
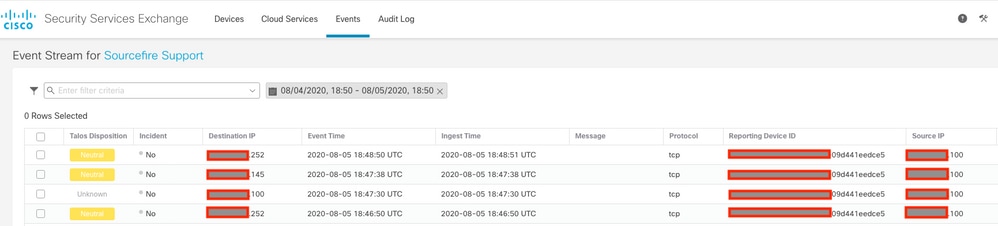
FTD 디바이스에서 이벤트를 전송하고, SSE 포털의 Events로 이동하여 이미지에 표시된 대로 디바이스에서 SSE로 전송한 이벤트를 확인합니다.
SecureX에서 사용자 지정 대시보드 구성
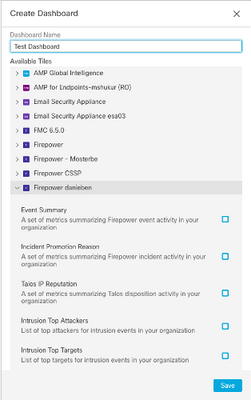
1단계. 대시보드를 생성하려면 + New Dashboard(새 대시보드) 아이콘에서 를 클릭하고, 그림과 같이 대시보드에 사용할 이름 및 타일을 선택합니다.
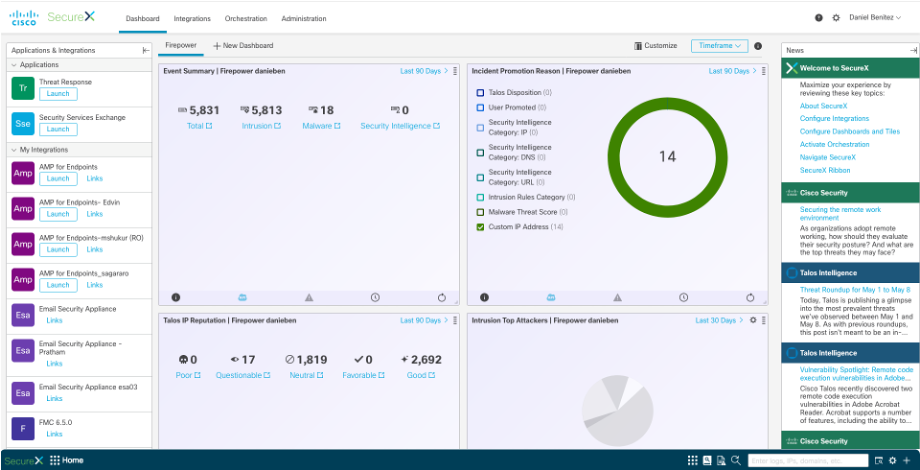
2단계. 그런 다음 SSE에서 채운 Dashboard(대시보드) 정보를 볼 수 있습니다. 탐지된 위협 중 하나를 선택할 수 있으며 SSE 포털은 Event Type(이벤트 유형) 필터를 사용하여 시작됩니다.
다음을 확인합니다.
FTD가 이벤트(악성코드 또는 침입)를 생성하는지 검증하고, 침입 이벤트의 경우 Analysis>Files>Malware Events로, 침입 이벤트의 경우 Analysis>Intrusion>Events로 이동합니다.
이벤트가 SSE 포털에 등록되었는지 확인합니다(SSE에 디바이스 등록 섹션 4단계 참조).
SecureX 대시보드에 정보가 표시되는지 확인하거나 API 로그를 확인하여 API 실패의 원인을 확인할 수 있습니다.
문제 해결
연결 문제 탐지
action_queue.log 파일에서 일반 연결 문제를 탐지할 수 있습니다. 오류가 발생할 경우 파일에 해당 로그가 있는 것을 볼 수 있습니다.
ActionQueueScrape.pl[19094]: [SF::SSE::Enrollment] canConnect: System (/usr/bin/curl -s --connect-timeout 10 -m 20 -L --max-redirs 5 --max-filesize 104857600 --capath /ngfw/etc/sf/keys/fireamp/thawte_roots -f https://api.eu.sse.itd.cisco.com/providers/sse/api/v1/regions) Failed, curl returned 28 at /ngfw/usr/local/sf/lib/perl/5.10.1/SF/System.pmline 10477.
이 경우 종료 코드 28은 작업 시간이 초과되었음을 의미하며 인터넷 연결을 확인해야 합니다. DNS 확인 문제를 의미하는 종료 코드 6도 표시될 수 있습니다
DNS 확인으로 인한 연결 문제
1단계. 연결이 제대로 작동하는지 확인합니다.
root@ftd01:~# curl -v -k https://api-sse.cisco.com
* Rebuilt URL to: https://api-sse.cisco.com/
* getaddrinfo(3) failed for api-sse.cisco.com:443
* Couldn't resolve host 'api-sse.cisco.com'
* Closing connection 0
curl: (6) Couldn't resolve host 'api-sse.cisco.com'
위의 출력은 디바이스가 URL https://api-sse.cisco.com을 확인할 수 없음을 보여줍니다. 이 경우 올바른 DNS 서버가 구성되어 있는지 검증해야 합니다. 전문 CLI의 nslookup으로 검증할 수 있습니다.
root@ftd01:~# nslookup api-sse.cisco.com
;; connection timed out; no servers could be reached
위 출력은 구성된 DNS에 도달하지 않았음을 보여주며, DNS 설정을 확인하려면 show network 명령을 사용합니다.
> show network
===============[ System Information ]===============
Hostname                  : ftd01
DNS Servers               : x.x.x.10
Management port           : 8305
IPv4 Default route
Gateway                   : x.x.x.1

======================[ eth0 ]======================
State                     : Enabled
Link                      : Up
Channels                  : Management & Events
Mode                      : Non-Autonegotiation
MDI/MDIX                  : Auto/MDIX
MTU                       : 1500
MAC Address               : x:x:x:x:9D:A5
----------------------[ IPv4 ]----------------------
Configuration             : Manual
Address                   : x.x.x.27
Netmask                   : 255.255.255.0
Broadcast                 : x.x.x.255
----------------------[ IPv6 ]----------------------
Configuration             : Disabled

===============[ Proxy Information ]================
State                     : Disabled
Authentication            : Disabled
이 예에서는 잘못된 DNS 서버가 사용되었습니다. 다음 명령을 사용하여 DNS 설정을 변경할 수 있습니다.
> configure network dns x.x.x.11
이 연결을 다시 테스트할 수 있으며, 이 경우 연결에 성공합니다.
root@ftd01:~# curl -v -k https://api-sse.cisco.com
* Rebuilt URL to: https://api-sse.cisco.com/
* Trying x.x.x.66...
* Connected to api-sse.cisco.com (x.x.x.66) port 443 (#0)
* ALPN, offering http/1.1
* Cipher selection: ALL:!EXPORT:!EXPORT40:!EXPORT56:!aNULL:!LOW:!RC4:@STRENGTH
* successfully set certificate verify locations:
* CAfile: none
CApath: /etc/ssl/certs
* TLSv1.2 (OUT), TLS header, Certificate Status (22):
* TLSv1.2 (OUT), TLS handshake, Client hello (1):
* TLSv1.2 (IN), TLS handshake, Server hello (2):
* TLSv1.2 (IN), TLS handshake, Certificate (11):
* TLSv1.2 (IN), TLS handshake, Server key exchange (12):
* TLSv1.2 (IN), TLS handshake, Request CERT (13):
* TLSv1.2 (IN), TLS handshake, Server finished (14):
* TLSv1.2 (OUT), TLS handshake, Certificate (11):
* TLSv1.2 (OUT), TLS handshake, Client key exchange (16):
* TLSv1.2 (OUT), TLS change cipher, Client hello (1):
* TLSv1.2 (OUT), TLS handshake, Finished (20):
* TLSv1.2 (IN), TLS change cipher, Client hello (1):
* TLSv1.2 (IN), TLS handshake, Finished (20):
* SSL connection using TLSv1.2 / ECDHE-RSA-AES128-GCM-SHA256
* ALPN, server accepted to use http/1.1
* Server certificate:
* subject: C=US; ST=California; L=San Jose; O=Cisco Systems, Inc.; CN=api -sse.cisco.com
* start date: 2019-12-03 20:57:56 GMT
* expire date: 2021-12-03 21:07:00 GMT
* issuer: C=US; O=HydrantID (Avalanche Cloud Corporation); CN=HydrantID S SL ICA G2
* SSL certificate verify result: self signed certificate in certificate c hain (19), continuing anyway.
> GET / HTTP/1.1
> Host: api-sse.cisco.com
> User-Agent: curl/7.44.0
> Accept: */*
>
< HTTP/1.1 403 Forbidden
< Date: Wed, 08 Apr 2020 01:27:55 GMT
< Content-Type: text/plain; charset=utf-8
< Content-Length: 9
< Connection: keep-alive
< Keep-Alive: timeout=5
< ETag: "5e17b3f8-9"
< Cache-Control: no-store
< Pragma: no-cache
< Content-Security-Policy: default-src 'self'
< X-Content-Type-Options: nosniff
< X-XSS-Protection: 1; mode=block
< Strict-Transport-Security: max-age=31536000; includeSubdomains;
SSE 포털에 등록 문제
FMC와 FTD 모두 관리 인터페이스의 SSE URL에 연결해야 합니다. 연결을 테스트하려면 루트 액세스로 Firepower CLI에 다음 명령을 입력합니다.
curl -v https://api-sse.cisco.com/providers/sse/services/registration/api/v2/clients --cacert /ngfw/etc/ssl/connectorCA.pem
curl -v https://est.sco.cisco.com --cacert /ngfw/etc/ssl/connectorCA.pem

curl -v https://eventing-ingest.sse.itd.cisco.com --cacert /ngfw/etc/ssl/connectorCA.pem
curl -v https://mx01.sse.itd.cisco.com --cacert /ngfw/etc/ssl/connectorCA.pem
인증서 검사는 다음 명령으로 우회할 수 있습니다.
root@ftd01:~# curl -v -k https://api-sse.cisco.com
* Rebuilt URL to: https://api-sse.cisco.com/
* Trying x.x.x.66...
* Connected to api-sse.cisco.com (x.x.x.66) port 443 (#0)
* ALPN, offering http/1.1
* Cipher selection: ALL:!EXPORT:!EXPORT40:!EXPORT56:!aNULL:!LOW:!RC4:@STRENGTH
* successfully set certificate verify locations:
* CAfile: none
CApath: /etc/ssl/certs
* TLSv1.2 (OUT), TLS header, Certificate Status (22):
* TLSv1.2 (OUT), TLS handshake, Client hello (1):
* TLSv1.2 (IN), TLS handshake, Server hello (2):
* TLSv1.2 (IN), TLS handshake, Certificate (11):
* TLSv1.2 (IN), TLS handshake, Server key exchange (12):
* TLSv1.2 (IN), TLS handshake, Request CERT (13):
* TLSv1.2 (IN), TLS handshake, Server finished (14):
* TLSv1.2 (OUT), TLS handshake, Certificate (11):
* TLSv1.2 (OUT), TLS handshake, Client key exchange (16):
* TLSv1.2 (OUT), TLS change cipher, Client hello (1):
* TLSv1.2 (OUT), TLS handshake, Finished (20):
* TLSv1.2 (IN), TLS change cipher, Client hello (1):
* TLSv1.2 (IN), TLS handshake, Finished (20):
* SSL connection using TLSv1.2 / ECDHE-RSA-AES128-GCM-SHA256
* ALPN, server accepted to use http/1.1
* Server certificate:
* subject: C=US; ST=California; L=San Jose; O=Cisco Systems, Inc.; CN=api -sse.cisco.com
* start date: 2019-12-03 20:57:56 GMT
* expire date: 2021-12-03 21:07:00 GMT
* issuer: C=US; O=HydrantID (Avalanche Cloud Corporation); CN=HydrantID S SL ICA G2
* SSL certificate verify result: self signed certificate in certificate c hain (19), continuing anyway.
> GET / HTTP/1.1
> Host: api-sse.cisco.com
> User-Agent: curl/7.44.0
> Accept: */*
>
< HTTP/1.1 403 Forbidden
< Date: Wed, 08 Apr 2020 01:27:55 GMT
< Content-Type: text/plain; charset=utf-8
< Content-Length: 9
< Connection: keep-alive
< Keep-Alive: timeout=5
< ETag: "5e17b3f8-9"
< Cache-Control: no-store
< Pragma: no-cache
< Content-Security-Policy: default-src 'self'
< X-Content-Type-Options: nosniff
< X-XSS-Protection: 1; mode=block
< Strict-Transport-Security: max-age=31536000; includeSubdomains;
참고: 테스트에서 전송된 매개변수가 SSE의 예상과 다르지만 연결을 검증하기에 충분하므로 403 Forbidden 메시지가 표시됩니다.
SSEConnector 상태 확인
표시된 대로 커넥터 속성을 확인할 수 있습니다.
# more /ngfw/etc/sf/connector.properties
registration_interval=180
connector_port=8989
connector_fqdn=api-sse.cisco.com
SSConnector와 EventHandler 간의 연결을 확인하기 위해 이 명령을 사용할 수 있습니다. 이 예는 잘못된 연결의 예입니다.
root@firepower:/etc/sf# netstat -anlp | grep EventHandler_SSEConnector.sock
unix 2 [ ACC ] STREAM LISTENING 3022791165 11204/EventHandler /ngfw/var/sf/run/EventHandler_SSEConnector.sock
설정된 연결의 예에서는 스트림 상태가 connected임을 확인할 수 있습니다.
root@firepower:/etc/sf# netstat -anlp | grep EventHandler_SSEConnector.sock
unix 2 [ ACC ] STREAM LISTENING 382276 7741/EventHandler /ngfw/var/sf/run/EventHandler_SSEConnector.sock
unix 3 [ ] STREAM CONNECTED 378537 7741/EventHandler /ngfw/var/sf/run/EventHandler_SSEConnector.soc
SSE 포털 및 CTR으로 전송된 데이터 확인
FTD 디바이스에서 이벤트를 전송하여 https://eventing-ingest.sse.itd.cisco.com으로 TCP 연결을 설정해야 하는지 확인하려면 SSE 포털과 FTD 사이에 설정되지 않은 연결의 예입니다.
root@firepower:/ngfw/var/log/connector# lsof -i | grep conn
connector 60815 www 10u IPv4 3022789647 0t0 TCP localhost:8989 (LISTEN)
connector 60815 www 12u IPv4 110237499 0t0 TCP firepower.cisco.com:53426->ec2-100-25-93-234.compute-1.amazonaws.com:https (SYN_SENT)
connector.log 로그에서:
time="2020-04-13T14:34:02.88472046-05:00" level=error msg="[firepower.cisco.com][events.go:90 events:connectWebSocket] dial tcp x.x.x.246:443: getsockopt: connection timed out"
time="2020-04-13T14:38:18.244707779-05:00" level=error msg="[firepower.cisco.com][events.go:90 events:connectWebSocket] dial tcp x.x.x.234:443: getsockopt: connection timed out"
time="2020-04-13T14:42:42.564695622-05:00" level=error msg="[firepower.cisco.com][events.go:90 events:connectWebSocket] dial tcp x.x.x.246:443: getsockopt: connection timed out"
time="2020-04-13T14:47:48.484762429-05:00" level=error msg="[firepower.cisco.com][events.go:90 events:connectWebSocket] dial tcp x.x.x.234:443: getsockopt: connection timed out"
time="2020-04-13T14:52:38.404700083-05:00" level=error msg="[firepower.cisco.com][events.go:90 events:connectWebSocket] dial tcp x.x.x.234:443: getsockopt: connection timed out"
참고: 표시된 x.x.x.246 및 1x.x.x.246이 https://eventing-ingest.sse.itd.cisco.com에 속하는 IP 주소가 변경될 수 있으므로 IP 주소 대신 URL을 기준으로 SSE 포털에 트래픽을 허용하는 것이 좋습니다.
이 연결이 설정되지 않으면 이벤트가 SSE 포털로 전송되지 않습니다. 다음은 FTD와 SSE 포털 간에 설정된 연결의 예입니다.
root@firepower:# lsof -i | grep conn
connector 13277   www   10u  IPv4 26077573      0t0  TCP localhost:8989 (LISTEN)
connector 13277   www   19u  IPv4 26077679      0t0  TCP x.x.x.200:56495->ec2-35-172-147-246.compute-1.amazonaws.com:https (ESTABLISHED)
비디오
개정 이력
| 개정 | 게시 날짜 | 의견 |
|---|---|---|
1.0 |
05-Aug-2020 |
최초 릴리스 |
Cisco 엔지니어가 작성
- 다니엘 베니테스Cisco TAC 엔지니어
- 호르헤 나바레테Cisco TAC 엔지니어
- 닉 케일Cisco TAC 기술 리더
 피드백
피드백지원 문의
- 지원 케이스 접수

- (시스코 서비스 계약 필요)