Cisco IDS Unix Directorを使用するIDS PIX遮断
内容
はじめに
このドキュメントでは、Cisco IDS UNIX Director(旧称Netranger Director)およびセンサーを使用したPIXでのシャニングの設定方法について説明します。このドキュメントでは、SensorおよびDirectorが動作可能であり、SensorのスニフィングインターフェイスがPIX外部インターフェイスまで広がるように設定されていることを前提としています。
前提条件
要件
このドキュメントに関しては個別の前提条件はありません。
使用するコンポーネント
このドキュメントの情報は、次のソフトウェアとハードウェアのバージョンに基づいています。
-
Cisco IDS UNIX Director 2.2.3
-
Cisco IDS UNIXセンサー3.0.5
-
Cisco Secure PIX(バージョン6.1.1)
注:6.2.xバージョンを使用している場合は、Secure Shell Protocol(SSH)管理は使用できますが、Telnetは使用できません。詳細は、Cisco Bug ID CSCdx55215(登録ユーザ専用)を参照してください。
このドキュメントの情報は、特定のラボ環境にあるデバイスに基づいて作成されました。このドキュメントで使用するすべてのデバイスは、クリアな(デフォルト)設定で作業を開始しています。対象のネットワークが実稼働中である場合には、どのようなコマンドについても、その潜在的な影響について確実に理解しておく必要があります。
表記法
表記法の詳細については、『シスコ テクニカル ティップスの表記法』を参照してください。
設定
このセクションでは、このドキュメントで説明する機能を設定するための情報を提供します。
Cisco IDS UNIX DirectorおよびSensorは、シャニング用のCisco Secure PIXを管理するために使用されます。この設定を検討する際には、次の概念に留意してください。
-
センサーを設置し、センサーが正しく動作することを確認します。
-
スニフィングインターフェイスがPIXの外部インターフェイスに及ぶことを確認します。
注:このドキュメントで使用されているコマンドの詳細を調べるには、Command Lookup Tool(登録ユーザ専用)を参照してください。
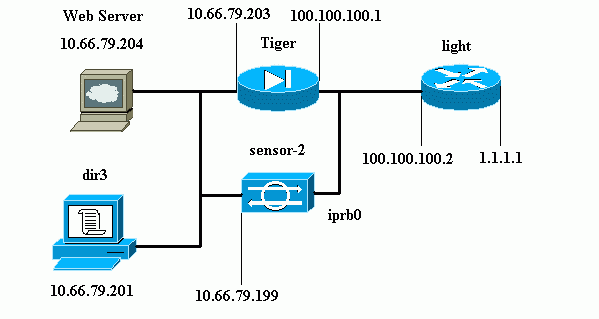
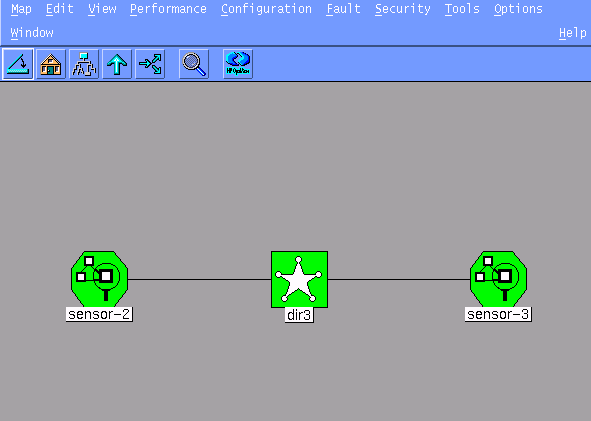
ネットワーク図
このドキュメントでは、次のネットワーク設定を使用します。
コンフィギュレーション
このドキュメントでは次の設定を使用します。
| Router Light |
|---|
Current configuration : 906 bytes ! version 12.2 service timestamps debug uptime service timestamps log uptime no service password-encryption ! hostname light ! enable password cisco ! username cisco password 0 cisco ip subnet-zero ! ! ! ip ssh time-out 120 ip ssh authentication-retries 3 ! call rsvp-sync ! ! ! fax interface-type modem mta receive maximum-recipients 0 ! controller E1 2/0 ! ! ! interface FastEthernet0/0 ip address 100.100.100.2 255.255.255.0 duplex auto speed auto ! interface FastEthernet0/1 ip address 1.1.1.1 255.255.255.0 duplex auto speed auto ! interface BRI4/0 no ip address shutdown ! interface BRI4/1 no ip address shutdown ! interface BRI4/2 no ip address shutdown ! interface BRI4/3 no ip address shutdown ! ip classless ip route 0.0.0.0 0.0.0.0 100.100.100.1 ip http server ip pim bidir-enable ! ! dial-peer cor custom ! ! line con 0 line 97 108 line aux 0 line vty 0 4 login ! end |
| PIX Tiger |
|---|
PIX Version 6.1(1) nameif gb-ethernet0 intf2 security10 nameif gb-ethernet1 intf3 security15 nameif ethernet0 outside security0 nameif ethernet1 inside security100 enable password 2KFQnbNIdI.2KYOU encrypted passwd 9jNfZuG3TC5tCVH0 encrypted hostname Tiger fixup protocol ftp 21 fixup protocol http 80 fixup protocol h323 1720 fixup protocol rsh 514 fixup protocol rtsp 554 fixup protocol smtp 25 fixup protocol sqlnet 1521 fixup protocol sip 5060 fixup protocol skinny 2000 names !--- Allows ICMP traffic and HTTP to pass through the PIX !--- to the Web Server. access-list 101 permit icmp any host 100.100.100.100 access-list 101 permit tcp any host 100.100.100.100 eq www pager lines 24 logging on logging buffered debugging interface gb-ethernet0 1000auto shutdown interface gb-ethernet1 1000auto shutdown interface ethernet0 auto interface ethernet1 auto mtu intf2 1500 mtu intf3 1500 mtu outside 1500 mtu inside 1500 ip address intf2 127.0.0.1 255.255.255.255 ip address intf3 127.0.0.1 255.255.255.255 ip address outside 100.100.100.1 255.255.255.0 ip address inside 10.66.79.203 255.255.255.224 ip audit info action alarm ip audit attack action alarm no failover failover timeout 0:00:00 failover poll 15 failover ip address intf2 0.0.0.0 failover ip address intf3 0.0.0.0 failover ip address outside 0.0.0.0 failover ip address inside 0.0.0.0 pdm history enable arp timeout 14400 global (outside) 1 interface nat (inside) 1 0.0.0.0 0.0.0.0 0 0 !--- Static NAT for the Web Server. static (inside,outside) 100.100.100.100 10.66.79.204 netmask 255.255.255.255 0 0 access-group 101 in interface outside route outside 0.0.0.0 0.0.0.0 100.100.100.2 1 route inside 10.66.0.0 255.255.0.0 10.66.79.193 1 timeout xlate 3:00:00 timeout conn 1:00:00 half-closed 0:10:00 udp 0:02:00 rpc 0:10:00 h323 0:05:00 s0 timeout uauth 0:05:00 absolute aaa-server TACACS+ protocol tacacs+ aaa-server RADIUS protocol radius aaa-server LOCAL protocol tacacs+ no snmp-server location no snmp-server contact snmp-server community public no snmp-server enable traps floodguard enable no sysopt route dnat !--- Allows Sensor Telnet to the PIX from the inside interface. telnet 10.66.79.199 255.255.255.255 inside telnet timeout 5 ssh timeout 5 terminal width 80 Cryptochecksum:b4c820ba31fbb3996ca8891503ebacbc : end |
Sensor の設定
次の手順では、センサーの設定方法について説明します。
-
ユーザ名root、パスワードattackを使用し、10.66.79.199にTelnetで接続します。
-
「sysconfig-sensor」と入力します。
-
次の情報を入力します。
-
IPアドレス:10.66.79.199
-
IPネットマスク:255.255.255.224
-
IPホスト名:sensor-2
-
デフォルトルート:10.66.79.193
-
ネットワークアクセス制御
10.
-
コミュニケーション インフラストラクチャ
Sensor Host ID:49
センサー組織ID:900
Sensor Host Name(センサーホスト名):sensor-2
Sensor Organization Name(センサー組織名):cisco
センサーIPアドレス:10.66.79.199
IDSマネージャホストID:50
IDSマネージャ組織ID:900
IDSマネージャホスト名:dir3
IDS Manager組織名:cisco
IDSマネージャIPアドレス:10.66.79.201
-
-
設定を保存します。その後、センサーがリブートします。
Director への Sensor の追加
Directorにセンサーを追加するには、次の手順を実行します。
-
ユーザ名netrangr、パスワードattackを使用し、10.66.79.201にTelnetで接続します。
-
ovw&と入力してHP OpenViewを起動します。
-
メインメニューで、Security > Configureの順に選択します。
-
Netranger Configurationメニューで、File > Add Hostの順に選択し、Nextをクリックします。
-
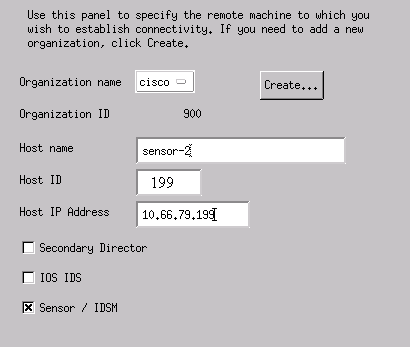
この情報を入力して、Nextをクリックします。
-
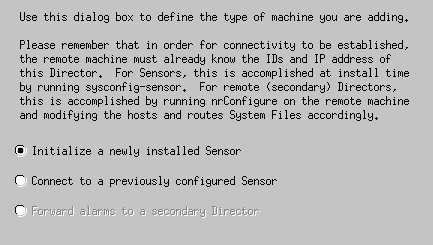
デフォルト設定のままにして、Nextをクリックします。
-
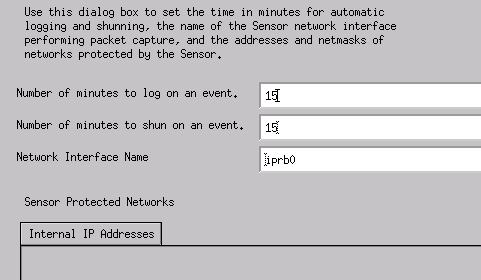
値が受け入れ可能な場合は、ログと回避の時間(分)を変更するか、デフォルトのままにしておきます。ネットワークインターフェイス名をスニフィングインターフェイスの名前に変更します。この例では「iprb0」です。「spwr0」または、センサーのタイプとセンサーの接続方法に基づくその他の任意の値を指定できます。
-
Finishをクリックするオプションが表示されるまで、Nextをクリックします。
センサーがDirectorに正常に追加されました。次の例に示すように、メインメニューにsensor-2と表示されます。
PIXのシャニングの設定
PIXのシャニングを設定するには、次の手順を実行します。
-
メインメニューで、Security > Configureの順に選択します。
-
Netranger Configuration Menuでsensor-2を強調表示してダブルクリックします。
-
Device Management を開きます。
-
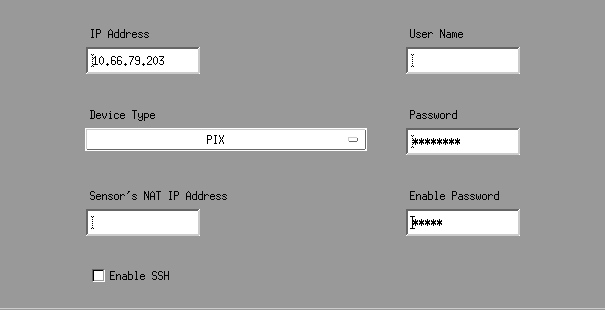
Devices > Addの順にクリックし、次の例に示すように情報を入力します。[OK] をクリックして続行します。Telnetとイネーブルパスワードはどちらも「Cisco」です。
-
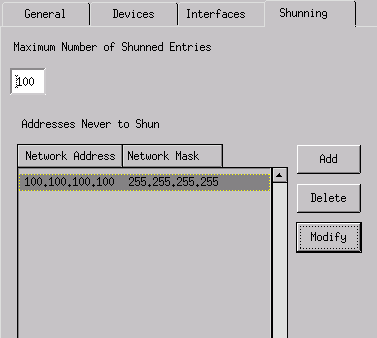
Shunning > Addの順にクリックします。「Addresses Never to Shun」の下にホスト100.100.100.100を追加します。 [OK] をクリックして続行します。
-
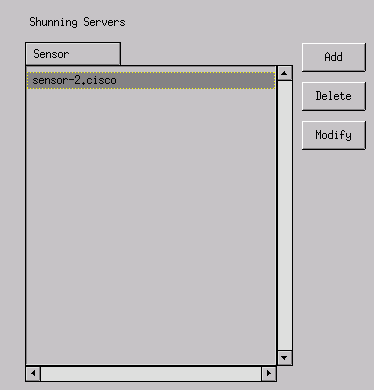
Shunning > Addの順にクリックし、回避サーバとしてsensor-2.ciscoを選択します。設定のこの部分は完了です。Device Managementウィンドウを閉じます。
-
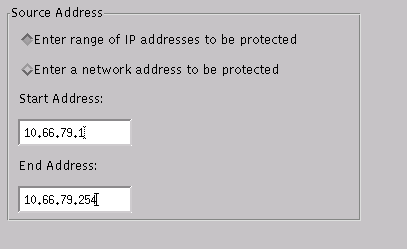
[Intrusion Detection] ウィンドウを開き、[Protected Networks] をクリックします。保護されたネットワークに、10.66.79.254に10.66.79.1を追加します。
-
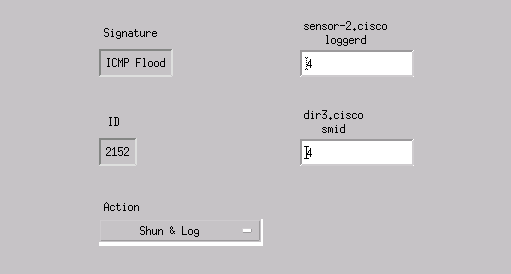
Profileをクリックし、Manual Configuration > Modify Signaturesの順に選択します。Large ICMP Traffic and ID: 2151を選択してModifyをクリックし、ActionをNoneからShun and Logに変更します。[OK] をクリックして続行します。

-
ICMP Flood and ID: 2152を選択してModifyをクリックし、ActionをNoneからShun and Logに変更します。[OK] をクリックして続行します。
-
設定のこの部分は完了です。OKをクリックして、Intrusion Detectionウィンドウを閉じます。
-
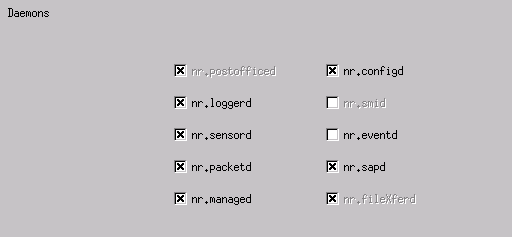
System Filesフォルダを開いて、Daemonsウィンドウを開きます。次のデーモンが有効になっていることを確認します。
-
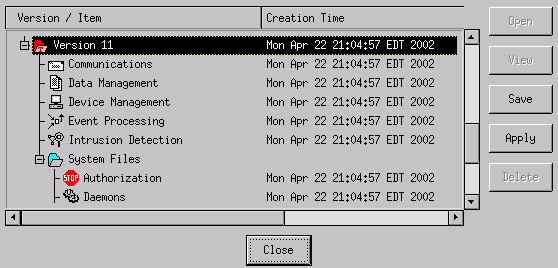
続行するにはOKをクリックし、変更したバージョンを選択します。Save > Applyの順にクリックします。センサーが終了したことをシステムが通知するまで待ち、サービスを再起動し、Netranger設定のすべてのウィンドウを閉じます。
確認
このセクションでは、設定が正しく動作していることを確認する際に役立つ情報を提供しています。
攻撃を開始する前に
Tiger(config)# show telnet
10.66.79.199 255.255.255.255 inside
Tiger(config)# who
        0: 10.66.79.199

Tiger(config)# show xlate
1 in use, 1 most used
Global 100.100.100.100 Local 10.66.79.204 static

Light#ping 100.100.100.100

Type escape sequence to abort.
Sending 5, 100-byte ICMP Echos to 100.100.100.100, timeout is 2 seconds:
!!!!!
Success rate is 100 percent (5/5), round-trip min/avg/max = 112/195/217 ms

Light#telnet 100.100.100.100 80
Trying 100.100.100.100, 80 ... Open
攻撃とシャニングの開始
Light#ping
Protocol [ip]:
Target IP address: 100.100.100.100
Repeat count [5]: 100000
Datagram size [100]: 18000
Timeout in seconds [2]:
Extended commands [n]:
Sweep range of sizes [n]:
Type escape sequence to abort.
Sending 100000, 18000-byte ICMP Echos to 100.100.100.100, timeout is 2 seconds:
!....................
Success rate is 4 percent (1/21), round-trip min/avg/max = 281/281/281 ms

Light#telnet 100.100.100.100 80
Trying 100.100.100.100, 80 ...
% Connection timed out; remote host not responding

Tiger(config)# show shun
Shun 100.100.100.2 0.0.0

Tiger(config)# show shun stat
intf2=OFF, cnt=0
intf3=OFF, cnt=0
outside=ON, cnt=2604
inside=OFF, cnt=0
intf4=OFF, cnt=0
intf5=OFF, cnt=0
intf6=OFF, cnt=0
intf7=OFF, cnt=0
intf8=OFF, cnt=0
intf9=OFF, cnt=0
Shun 100.100.100.2 cnt=403, time=(0:01:00).0 0 0
15分後、回避が15分に設定されているため、通常の状態に戻ります。
Tiger(config)# show shun

Tiger(config)# show shun stat
intf2=OFF, cnt=0
intf3=OFF, cnt=0
outside=OFF, cnt=4437
inside=OFF, cnt=0
intf4=OFF, cnt=0
intf5=OFF, cnt=0
intf6=OFF, cnt=0
intf7=OFF, cnt=0
intf8=OFF, cnt=0
intf9=OFF, cnt=0

Light#ping 100.100.100.100

Type escape sequence to abort.
Sending 5, 100-byte ICMP Echos to 100.100.100.100, timeout is 2 seconds:
!!!!!
Success rate is 100 percent (5/5), round-trip min/avg/max = 1/3/4 ms

Light#telnet 100.100.100.100 80
Trying 100.100.100.100, 80 ... Open
トラブルシュート
現在、この設定に関する特定のトラブルシューティング情報はありません。
関連情報
更新履歴
| 改定 | 発行日 | コメント |
|---|---|---|
1.0 |
23-Jul-2002 |
初版 |
 フィードバック