IDS ディレクターを使用した TCP Reset 設定
内容
概要
このドキュメントでは、送信された文字列が「testattack」である場合に、試行された Telnet に対する TCP リセットを管理されたルータを含むアドレスの範囲に送信するように、シスコ侵入検知システム(IDS、旧称 NetRanger)のダイレクタとセンサーを設定する方法について説明します。
前提条件
要件
この設定を検討するときは、次のことに注意してください。
-
Sensor をインストールし、適切に動作することを確認してから、この設定を行います。
-
スニフィング インターフェイスが管理対象ルータの外部インターフェイスに及ぶことを確認します。
使用するコンポーネント
このドキュメントの情報は、次のソフトウェアとハードウェアのバージョンに基づいています。
-
Cisco IDS Director 2.2.3
-
Cisco IDS Sensor 3.0.5
-
ソフトウェア リリース 12.2.6 が稼働する Cisco IOS® ルータ
このドキュメントの情報は、特定のラボ環境にあるデバイスに基づいて作成されました。このドキュメントで使用するすべてのデバイスは、初期(デフォルト)設定の状態から起動しています。対象のネットワークが実稼働中である場合には、どのようなコマンドについても、その潜在的な影響について確実に理解しておく必要があります。
表記法
ドキュメント表記の詳細は、「シスコ テクニカル ティップスの表記法」を参照してください。
設定
このセクションでは、このドキュメントで説明する機能を設定するために必要な情報を提供しています。
注:この文書で使用されているコマンドの詳細を調べるには、「Command Lookup ツール」を使用してください(登録ユーザのみ)。
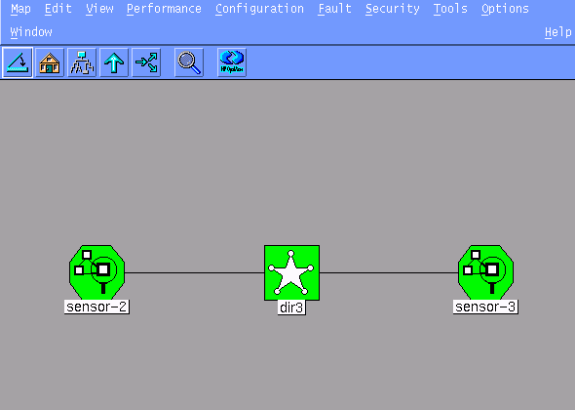
ネットワーク図
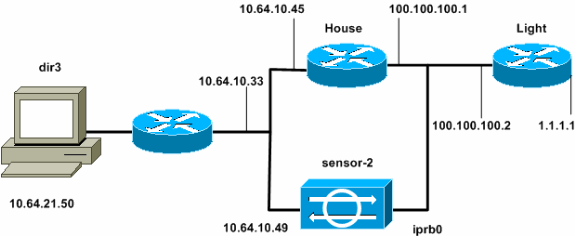
このドキュメントでは、次の図で示されるネットワーク設定を使用しています。
設定
このドキュメントでは次の設定を使用します。
| Router Light |
|---|
Current configuration : 906 bytes ! version 12.2 service timestamps debug uptime service timestamps log uptime no service password-encryption ! hostname light ! enable password cisco ! username cisco password 0 cisco ip subnet-zero ! ! ! ip ssh time-out 120 ip ssh authentication-retries 3 ! call rsvp-sync ! ! ! fax interface-type modem mta receive maximum-recipients 0 ! controller E1 2/0 ! ! ! interface FastEthernet0/0 ip address 100.100.100.2 255.255.255.0 duplex auto speed auto ! interface FastEthernet0/1 ip address 1.1.1.1 255.255.255.0 duplex auto speed auto ! interface BRI4/0 no ip address shutdown ! interface BRI4/1 no ip address shutdown ! interface BRI4/2 no ip address shutdown ! interface BRI4/3 no ip address shutdown ! ip classless ip route 0.0.0.0 0.0.0.0 100.100.100.1 ip http server ip pim bidir-enable ! ! dial-peer cor custom ! ! line con 0 line 97 108 line aux 0 line vty 0 4 login ! end |
| Router House |
|---|
Current configuration : 2187 bytes ! version 12.2 service timestamps debug uptime service timestamps log uptime no service password-encryption ! hostname house ! enable password cisco ! ! ! ip subnet-zero ! ! fax interface-type modem mta receive maximum-recipients 0 ! ! ! ! interface FastEthernet0/0 ip address 100.100.100.1 255.255.255.0 duplex auto speed auto ! interface FastEthernet0/1 ip address 10.64.10.45 255.255.255.224 duplex auto speed auto ! ! ! interface FastEthernet4/0 no ip address shutdown duplex auto speed auto ! ip classless ip route 0.0.0.0 0.0.0.0 10.64.10.33 ip route 1.1.1.0 255.255.255.0 100.100.100.2 ip http server ip pim bidir-enable ! ! ! snmp-server manager ! call rsvp-sync ! ! mgcp profile default ! dial-peer cor custom ! ! ! ! line con 0 line aux 0 line vty 0 4 password cisco login ! ! end house# |
Sensor の設定
Sensor を設定するには、次の手順を実行します。
-
ユーザ名 root、パスワード attack を使用し、10.64.10.49(IDS Sensor)に Telnet で接続します。
-
「sysconfig-sensor」と入力します。
-
要求されたら、次の例のように設定情報を入力します。
1 - IP Address: 10.64.10.49 2 - IP Netmask: 255.255.255.224 3 - IP Host Name: sensor-2 4 - Default Route: 10.64.10.33 5 - Network Access Control 64. 10. 6 - Communications Infrastructure Sensor Host ID: 49 Sensor Organization ID: 900 Sensor Host Name: sensor-2 Sensor Organization Name: cisco Sensor IP Address: 10.64.10.49 IDS Manager Host ID: 50 IDS Manager Organization ID: 900 IDS Manager Host Name: dir3 IDS Manager Organization Name: cisco IDS Manager IP Address: 10.64.21.50 -
要求されたら、設定を保存して Sensor をリブートします。
Director への Sensor の追加
Director に Sensor を追加するには、次の手順を実行します。
-
ユーザ名 netrangr、パスワード attack を使用し、10.64.21.50(IDS Director)に Telnet で接続します。
-
「ovw&」と入力し、HP OpenView を起動します。
-
メイン メニューから、[Security] > [Configure] に移動します。
-
Configuration File Management Utility で [file] > [Add Host] に移動し、[Next] をクリックします。
-
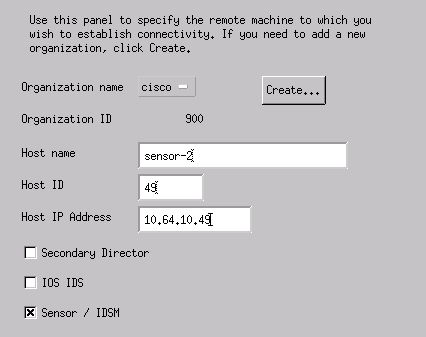
次の例のように Sensor ホスト情報を入力します。[next] をクリックします。
-
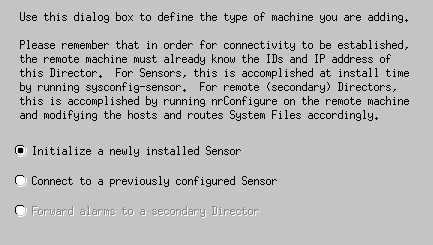
次の例のように、マシンの種類ではデフォルト設定を受け入れて [Next] をクリックします。
-
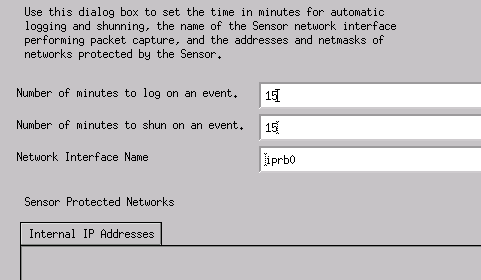
ログと回避の時間(分)を変更するか、デフォルト値を受け入れます。ただし、ネットワーク インターフェイス名は、スニフィング インターフェイスの名前に変更する必要があります。この例では「iprb0」です。 Sensor のタイプおよび Sensor への接続方法により、「spwr0」や他のものに変更できます。
-
[Next] をクリックして作業を続けて、[Finish] をクリックします。Sensor が Director に追加されます。次の例のように、メイン メニューに sensor-2 が表示されます。
Cisco IOS ルータのための TCP Reset の設定
Cisco IOS ルータの TCP Reset を設定するには、次の手順を実行します。
-
メイン メニューから、[Security] > [Configure] に移動します。
-
Configuration File Management Utility で [sensor-2] を強調表示してダブルクリックします。
-
Device Management を開きます。
-
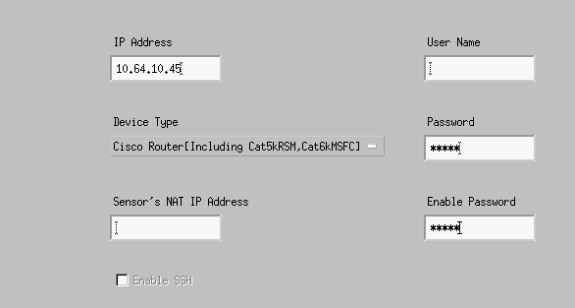
[Devices] > [Add] の順にクリックします。次の例に示すように、デバイス情報を入力します。[OK] をクリックして、次に進みます。Telnet パスワードとイネーブル パスワードは両方とも Cisco です。
-
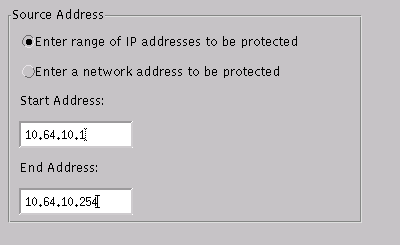
[Intrusion Detection] ウィンドウを開き、[Protected Networks] をクリックします。10.64.10.1 から 10.64.10.254 までのアドレスの範囲を保護ネットワークに追加します。
-
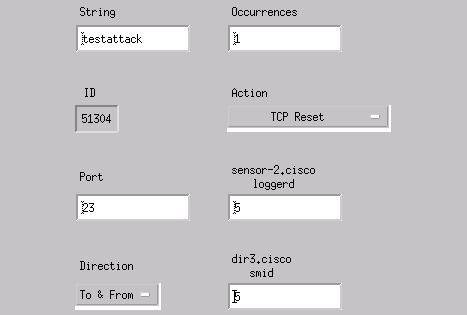
[Profile] をクリックし、[Manual Configuration] を選択します。次に [Modify Signatures] をクリックします。8000 という ID で [Matched Strings] を選択します。[Expand] > [Add] の順にクリックし、「testattack」という新しい文字列を追加します。次の例のように文字列情報を入力し、[OK] をクリックして次に進みます。
-
設定のこの部分は終了です。[OK] をクリックし、[Intrusion Detection] ウィンドウを閉じます。
-
System Files フォルダを開いてから [Daemons] ウィンドウを開きます。次のデーモンが有効になっていることを確認します。
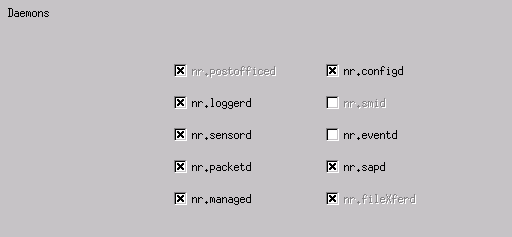
-
[OK] をクリックして、次に進みます。
-
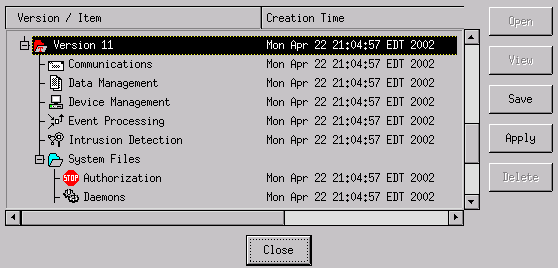
変更したバージョンを選択し、[Save]、[Apply] の順にクリックします。Sensor がサービスの再起動を終了したことをシステムから通知されるまで待機し、Director 設定のすべてのウィンドウを閉じます。
不正侵入および TCP Reset の起動
Router Light から Router House に Telnet で接続し、「testattack」と入力します。スペース バーか Enter キーを押すとすぐに、Telnet セッションはリセットします。Router House に接続されます。
light#telnet 10.64.10.45
Trying 10.64.10.45 ... Open

User Access Verification
Password:
house>en
Password:
house#testattack
[Connection to 10.64.10.45 closed by foreign host]

!--- Telnet session has been reset because the !--- signature testattack was triggered.
確認
現在、この設定に使用できる確認手順はありません。
トラブルシュート
ここでは、設定のトラブルシューティングに使用できる情報を示します。
ユーザ名 root、パスワード attack を使用し、10.64.10.49(Sensor)に Telnet で接続します。「cd /usr/nr/etc」と入力します。「cat packetd.conf」と入力します。testattack の TCP Reset を正しく設定した場合は、[Action Codes] フィールドに 4 と表示されます。これは、この例のように TCP がリセットしたことを示します。
netrangr@sensor-2:/usr/nr/etc
>cat packetd.conf | grep "testattack"
RecordOfStringName 51304 23 3 1 "testattack"
SigOfStringMatch 51304 4 5 5 # "testattack"
シグニチャでアクションを誤って「none」に設定した場合は、[Action Codes] フィールドに 0 が表示されます。これは、この例のようにアクションがないことを示します。
netrangr@sensor-2:/usr/nr/etc
>cat packetd.conf | grep "testattack"
RecordOfStringName 51304 23 3 1 "testattack"
SigOfStringMatch 51304 0 5 5 # "testattack"
TCP Reset は、Sensor のスニフィング インターフェイスから送信されます。Sensor インターフェイスを管理対象ルータの外部インターフェイスに接続するスイッチがある場合は、スイッチで set span コマンドを使用して設定するとき、次の構文を使用します。
set span


         both inpkts enable
banana (enable) set span 2/12 3/6 both inpkts enable
Overwrote Port 3/6 to monitor transmit/receive traffic of Port 2/12
Incoming Packets enabled. Learning enabled. Multicast enabled.
banana (enable)
banana (enable)
banana (enable) show span

Destination     : Port 3/6

!--- Connect to sniffing interface of the Sensor.

Admin Source    : Port 2/12

!--- Connect to FastEthernet0/0 of Router House.

Oper Source     : Port 2/12
Direction       : transmit/receive
Incoming Packets: enabled
Learning        : enabled
Multicast       : enabled
関連情報
更新履歴
| 改定 | 発行日 | コメント |
|---|---|---|
1.0 |
08-Oct-2018 |
初版 |
 フィードバック