Introduzione
In questo documento viene descritto come aggiungere l'accesso HTTP (HyperText Transfer Protocol) a Firepower Thread Defense (FTD) quando la porta di gestione ha esito negativo.
Prerequisiti
Requisiti
Cisco raccomanda la conoscenza dei seguenti argomenti:
- Accesso console al dispositivo
Componenti usati
Le informazioni fornite in questo documento si basano sulle seguenti versioni software e hardware:
- Cisco Firepower 1120 Thread Defense versione 7.4.2
Le informazioni discusse in questo documento fanno riferimento a dispositivi usati in uno specifico ambiente di emulazione. Su tutti i dispositivi menzionati nel documento la configurazione è stata ripristinata ai valori predefiniti. Se la rete è operativa, valutare attentamente eventuali conseguenze derivanti dall'uso dei comandi.
Configurazione
Configurazioni
Passaggio 1. Dalla sessione della console del dispositivo, connettersi alla cella CLI (Command Line Interface) FTD (CLISH):
Cisco Firepower Extensible Operating System (FX-OS) Software
TAC support: http://www.cisco.com/tac
Copyright (c) 2009-2019, Cisco Systems, Inc. All rights reserved.

The copyrights to certain works contained in this software are
owned by other third parties and used and distributed under
license.

Certain components of this software are licensed under the "GNU General Public
License, version 3" provided with ABSOLUTELY NO WARRANTY under the terms of
"GNU General Public License, Version 3", available here:
http://www.gnu.org/licenses/gpl.html. See User Manual (''Licensing'') for
details.

Certain components of this software are licensed under the "GNU General Public
License, version 2" provided with ABSOLUTELY NO WARRANTY under the terms of
"GNU General Public License, version 2", available here:
http://www.gnu.org/licenses/old-licenses/gpl-2.0.html. See User Manual
(''Licensing'') for details.

Certain components of this software are licensed under the "GNU LESSER GENERAL
PUBLIC LICENSE, version 3" provided with ABSOLUTELY NO WARRANTY under the terms
of "GNU LESSER GENERAL PUBLIC LICENSE" Version 3", available here:
http://www.gnu.org/licenses/lgpl.html. See User Manual (''Licensing'') for
details.

Certain components of this software are licensed under the "GNU Lesser General
Public License, version 2.1" provided with ABSOLUTELY NO WARRANTY under the
terms of "GNU Lesser General Public License, version 2", available here:
http://www.gnu.org/licenses/old-licenses/lgpl-2.1.html. See User Manual
(''Licensing'') for details.

Certain components of this software are licensed under the "GNU Library General
Public License, version 2" provided with ABSOLUTELY NO WARRANTY under the terms
of "GNU Library General Public License, version 2", available here:
http://www.gnu.org/licenses/old-licenses/lgpl-2.0.html. See User Manual
(''Licensing'') for details.

KSEC-FPR1140-1# connect ftd
Passaggio 2. Dalla CLISH FTD, accedere alla shell Linux con il comando expert ed elevare ai privilegi di amministratore:
>
> expert
admin@KSEC-FPR1140-1:/$ sudo su
Password:
root@KSEC-FPR1140-1:/#
Passaggio 3. Spostare le voci del comando HTTP nella configurazione Lina utilizzando lo strumento LinaConfigTool e creare una route statica per inviare il traffico dal server Web in esecuzione sul lato Linux all'interfaccia nlp_int_tap sul lato Lina:
root@KSEC-FPR1140-1:/# LinaConfigTool "http 192.168.1.0 255.255.255.0 inside"
root@KSEC-FPR1140-1:/#
root@KSEC-FPR1140-1:/# ip route add 192.168.1.0/24 via 169.254.1.1
root@KSEC-FPR1140-1:/#
root@KSEC-FPR1140-1:/#
Passaggio 4. Tornare al CLISH FTD e verificare che la regola NAT (Network Address Translation) sia stata creata automaticamente:
root@KSEC-FPR1140-1:/#
root@KSEC-FPR1140-1:/#
root@KSEC-FPR1140-1:/# exit
exit
admin@KSEC-FPR1140-1:/$ exit
logout
> show nat detail
Manual NAT Policies Implicit (Section 0)
1 (nlp_int_tap) to (inside) source static nlp_server__http_192.168.1.0_intf4 interface  destination static 0_192.168.1.0_3 0_192.168.1.0_3 service tcp https https
    translate_hits = 0, untranslate_hits = 0
    Source - Origin: 169.254.1.3/32, Translated: 10.10.105.87/24
    Destination - Origin: 192.168.1.0/24, Translated: 192.168.1.0/24
    Service - Protocol: tcp Real: https Mapped: https
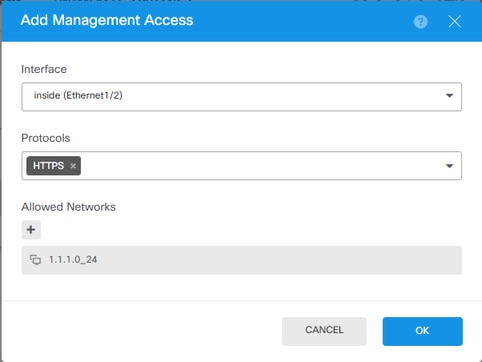
Passaggio 5. Accedere all'interfaccia utente di FDM sull'interfaccia dati e creare l'accesso di gestione sull'interfaccia dati dall'interfaccia utente per mantenere permanenti le modifiche:

Verifica
Aprire un browser e tentare di raggiungere FDM utilizzando l'indirizzo IP dell'interfaccia dati.
Risoluzione dei problemi
Eseguire l'acquisizione di un pacchetto e verificare che:
- Il traffico sta raggiungendo l'interfaccia dati.
- Il traffico viene inoltrato all'interfaccia nlp_int_tap.
 Feedback