Configuration des notifications de messagerie avec les scripts pour les alertes IDS avec le CiscoWorks Monitoring Center for Security
Contenu
Introduction
Le Moniteur de sécurité peut envoyer des notifications par e-mail lorsqu'une règle d'événement est déclenchée. Les variables intégrées qui peuvent être utilisées dans la notification par e-mail pour chaque événement n'incluent pas des éléments tels que l'ID de signature, la source et la destination de l'alerte, etc. Ce document fournit des instructions que vous pouvez utiliser pour configurer Security Monitor afin d'inclure ces variables (et bien d'autres) dans le message de notification par e-mail.
Conditions préalables
Conditions requises
Aucune spécification déterminée n'est requise pour ce document.
Components Used
Ce document n'est pas limité à des versions de matériel et de logiciel spécifiques. Cependant, assurez-vous d'utiliser le script Perl approprié en fonction des versions du capteur exécutées dans votre environnement.
Conventions
Pour plus d'informations sur les conventions utilisées dans ce document, reportez-vous à Conventions relatives aux conseils techniques Cisco.
Procédure de configuration de la notification par courrier électronique
Utilisez cette procédure pour configurer les notifications par e-mail.
Note: Afin d'envoyer un e-mail à l'adresse e-mail correcte, veillez à modifier l'adresse e-mail dans le script.
-
Copiez l'un de ces scripts dans le serveur $BASE\CSCOpx\MDC\etc\ids\scripts directory on the VPN/Security Management Solution (VMS). Cela vous permet de le sélectionner ultérieurement dans le processus lorsque vous définissez une règle d'événement. Enregistrez le script en tant que email alert.pl.
Remarque : Si vous utilisez un autre nom, assurez-vous de le référencer dans la règle d'événement définie dans ces étapes.
-
Pour la version 3.x des capteurs, utilisez le script 3.x des capteurs
-
Pour la version 4.x des capteurs, utilisez le script 4.x des capteurs
-
Pour la version 5.x des capteurs, utilisez le script 5.x des capteurs
-
Si vous disposez d'une combinaison de versions Sensor, Cisco vous recommande de procéder à une mise à niveau afin qu'elles soient toutes au même niveau de version. En effet, un seul de ces scripts peut être exécuté à la fois.
-
-
Le script contient des commentaires qui expliquent chaque partie et toute entrée requise. En particulier, modifiez la variable $EmailRcpt (près du début du fichier) pour qu'elle soit l'adresse de messagerie de la personne qui doit recevoir les alertes.
-
Définissez une règle d'événement dans Security Monitor pour appeler un nouveau script Perl. Dans la page principale de Security Monitor, sélectionnez Admin > Event Rules et ajoutez un nouvel événement.
-
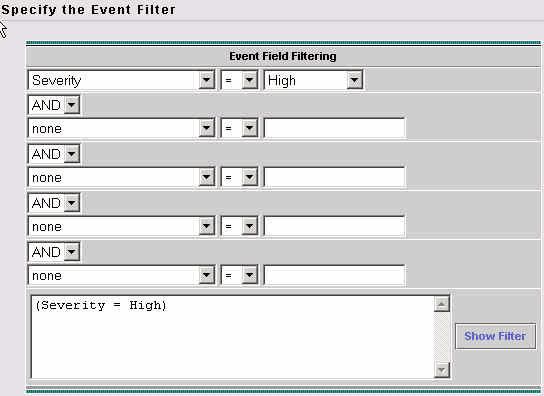
Dans la fenêtre Spécifier le filtre d'événements, ajoutez les filtres que vous voulez déclencher l'alerte par e-mail (dans l'exemple ci-dessous, un e-mail est envoyé pour toute alerte de gravité élevée).
-
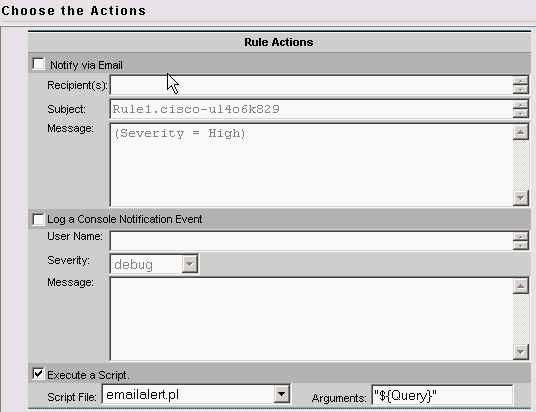
Dans la fenêtre Choisir l'action, cochez la case pour exécuter un script et sélectionnez le nom du script dans la liste déroulante.
-
Dans la section Arguments, saisissez "${Query}" comme indiqué ici.
Note : Il faut entrer exactement comme ici, y compris les guillemets doubles. Il est également sensible à la casse.
-
Lorsqu'une alerte, telle que définie dans vos filtres d'événements (dans cet exemple, une alerte de gravité élevée) est reçue, le script appelé emailalert.pl est appelé avec un argument de ${Query}. Ce champ contient des informations supplémentaires sur l'alerte. Le script analyse tous les champs séparés et utilise un programme appelé « blat » pour envoyer un e-mail à l'utilisateur final.
-
Blat est un programme de messagerie gratuit utilisé sur les systèmes Windows pour envoyer des courriels à partir de fichiers de commandes ou de scripts Perl. Il est inclus dans l'installation de VMS dans le fichier $BASE\CSCOpx\bin directory. Afin de vérifier vos paramètres de chemin, ouvrez une fenêtre d'invite de commandes sur le serveur VMS et tapez blat.
Si vous recevez l'erreur Fichier introuvable, copiez le fichier blat.exe dans le répertoire winnt\system32 ou recherchez-le et ouvrez-le à partir du répertoire dans lequel il se trouve. Pour installer ceci, exécutez :
blat -installUne fois ce programme installé, vous avez terminé.
Scripts
Voici les scripts mentionnés à l'étape 1 de la procédure de configuration :
Script de capteur 3.x
Utilisez ce script pour la version 3.x des capteurs.
| 3.x Capteurs |
|---|
#!/usr/bin/perl
#***********************************************************************
#
# FILE NAME : emailalert.pl
#
# DESCRIPTION : This file is a perl script that will be executed as an
# action when an IDS-MC Event Rule triggers, and will send an
# email to $EmailRcpt with additional alert parameters (similar to
# the functionality available with CSPM notifications)
#
# NOTE:   this script only works with 3.x sensors, alarms from 4.0
#         sensors are stored differently and cannot be represented
#         in a similar format.
#
# NOTE:   check the "system" command in the script for the correct
#         format depending on whether you're using IDSMC/SecMon
#         v1.0 or v1.1, you may need the "-on" command-line option.
#
# NOTE :  This script takes the ${Query} keyword from the
#         triggered rule, extracts the set of alarms that caused
#         the rule to trigger. It then reads the last alarm of
#         this set, parses the individual alarm fields, and
#         calls the legacy script with the same set of command
#         line arguments as CSPM.
#
# The calling sequence of this script must be of the form:
#
#         emailalert.pl "${Query}"
#
# Where:
#
#         "${Query}" - this is the query keyword dynamically
#         output by the rule when it triggers.
#         It MUST be wrapped in double quotes when specifying it in the Arguments
#         box on the Rule Actions panel.
#
#
#***********************************************************************
##
## The following are the only two variables that need changing. $TempIDSFile can be any
## filename (doesn't have to exist), just make sure the directory that you specify
## exists. Make sure to use 2 backslashes for each directory, the first backslash is
## so the Perl interpretor doesn't error on the pathname.
##
## $EmailRcpt is the person that is going to receive the email notifications. Also
## make sure you escape the @ symbol by putting a backslash in front of it, otherwise
## you'll get a Perl syntax error.
##
$TempIDSFile = "c:\\temp\\idsalert.txt";
$EmailRcpt = "nobody\@cisco.com";

##
## pull out command line arg
##

$whereClause = $ARGV[0];

##
## extract all the alarms matching search expression
##

$tmpFile = "alarms.out";

## The following line will extract alarms from 1.0 IDSMC/SecMon database, if
## using 1.1 comment out the line below and un-comment the other system line
## below it.

## V1.0 IDSMC/SecMon version
system("IdsAlarms -s\"$whereClause\" -f\"$tmpFile\"");

## V1.1 IDSMC/SecMon version.
## system("IdsAlarms -on -s\"$whereClause\" -f\"$tmpFile\"");
##

# open matching alarm output

if (!open(ALARM_FILE, $tmpFile)) {
    print "Could not open ", $tmpFile, "\n";
    exit -1;
}

# read to last line

while (<ALARM_FILE>) {
    $line = $_;
}

# clean up

close(ALARM_FILE);
unlink($tmpFile);

##
## split last line into fields
##

@fields = split(/,/, $line);

$eventType = @fields[0];
$recordId = @fields[1];
$gmtTimestamp = 0; # need gmt time_t
$localTimestamp = 0; # need local time_t
$localDate = @fields[4];
$localTime = @fields[5];
$appId = @fields[6];
$hostId = @fields[7];
$orgId = @fields[8];
$srcDirection = @fields[9];
$destDirection = @fields[10];
$severity = @fields[11];
$sigId = @fields[12];
$subSigId = @fields[13];
$protocol = "TCP/IP";
$srcAddr = @fields[15];
$destAddr = @fields[16];
$srcPort = @fields[17];
$destPort = @fields[18];
$routerAddr = @fields[19];
$contextString = @fields[20];


## Open temp file to write alert data into,

open(OUT,">$TempIDSFile") || warn "Unable to open output file!\n";

## Now write your email notification message. You're writing the following into
## the temporary file for the moment, but this will then be emailed. Use the format:
##
## print (OUT "Your text with any variable name from the list above \n");
##
## Again, make sure you escape special characters with a backslash (note the : in between $sigId
## and $subSigId has a backslash in front of it)

print(OUT "\n");
print(OUT "Received severity $severity alert at $localDate $localTime\n");
print(OUT "Signature ID $sigId\:$subSigId from $srcAddr to $destAddr\n");
print(OUT "$contextString");
close(OUT);

## then call "blat" to send contents of that file in the body of an email message.
## Blat is a freeware email program for WinNT/95, it comes with VMS in the
## $BASE\CSCOpx\bin directory, make sure you install it first by running:
##
## blat -install <SMTP server address> <source email address>
##
## For more help on blat, just type "blat" at the command prompt on your VMS system (make
## sure it's in your path (feel free to move the executable to c:\winnt\system32 BEFORE
## you run the install, that'll make sure your system can always find it).

system ("blat \"$TempIDSFile\" -t \"$EmailRcpt\" -s \"Received IDS alert\""); |
Script de capteur 4.x
Utilisez ce script pour la version 4.x des capteurs.
| 4.x capteurs |
|---|
#!/usr/bin/perluse Time::Local;#***********************************************************************
#
# FILE NAME : emailalert.pl
#
# DESCRIPTION : This file is a perl script that will be executed as an
# action when an IDS-MC Event Rule triggers, and will send an
# email to $EmailRcpt with additional alert parameters (similar to
# the functionality available with CSPM notifications)
#
# NOTE: this script only works with 4.x sensors. It will
# not work with 3.x sensors.
#
# NOTES : This script takes the ${Query} keyword from the
# triggered rule, extracts the set of alarms that caused
# the rule to trigger. It then reads the last alarm of
# this set, parses the individual alarm fields, and
# calls the legacy script with the same set of command
# line arguments as CSPM.
#
# The calling sequence of this script must be of the form:
#
# emailalert.pl "${Query}"
#
# Where:
#
# "${Query}" - this is the query keyword dynamically
# output by the rule when it triggers.
# It MUST be wrapped in double quotes
# when specifying it in the Arguments
# box on the Rule Actions panel.
#
#
#***********************************************************************
##
## The following are the only two variables that need changing. $TempIDSFile can be any
## filename (doesn't have to exist), just make sure the directory that you specify
## exists. Make sure to use 2 backslashes for each directory, the first backslash is
## so the Perl interpretor doesn't error on the pathname.
##
## $EmailRcpt is the person that is going to receive the email notifications. Also
## make sure you escape the @ symbol by putting a backslash in front of it, otherwise
## you'll get a Perl syntax error.
##

$TempIDSFile = "c:\\temp\\idsalert.txt";
$EmailRcpt = "yourname\@yourcompany.com";

# subroutine to add leading 0's to any date variable that's less than 10.
sub add_zero {
my ($var) = @_;
if ($var < 10) {
$var = "0" .$var
}
return $var;
}

# subroutine to find one or more IP addresses within an XML tag (we can have multiple
# victims and/or attackers in one alert now).
sub find_addresses {
my ($var) = @_;
my @addresses = ();
if (m/$var/) {
$raw = $&;
while ($raw =~ m/(\d{1,3}\.){3}\d{1,3}/) {
push @addresses,$&;
$raw = $';
}
$var = join(', ',@addresses);
return $var;
}
}

# pull out command line arg

$whereClause = $ARGV[0];

# extract all the alarms matching search expression

$tmpFile = "alarms.out";

# Extract the XML alert/event out of the database.

system("IdsAlarms -s\"$whereClause\" -f\"$tmpFile\"");

# open matching alarm output

if (!open(ALARM_FILE, $tmpFile)) {
print "Could not open $tmpFile\n";
exit -1;
}

# read to last line

while (<ALARM_FILE>) {
chomp $_;
push @logfile,$_;
}

# clean up

close(ALARM_FILE);
unlink($tmpFile);

# Open temp file to write alert data into,

open(OUT,">$TempIDSFile");

# split XML output into fields

$oneline = join('',@logfile);
$oneline =~ s/\<\/events\>//g;
$oneline =~ s/\<\/evAlert\>/\<\/evAlert\>,/g;
@items = split(/,/,$oneline);

# If you want to see the actual database query result in the email, un-comment out the
# line below (useful for troubleshooting):
# print(OUT "$oneline\n");

# Loop until there's no more alerts

foreach (@items) {

if (m/\<hostId\>(.*)\<\/hostId\>/) {
$hostid = $1;
}

if (m/severity="(.*?)"/) {
$sev = $1;
}

if (m/Zone\=".*"\>(.*)\<\/time\>/) {
$t = $1;
if ($t =~ m/(.*)(\d{9})/) {
($sec,$min,$hour,$mday,$mon,$year,$wday,$yday,$isdst) = localtime($1);

# Year is reported from 1900 onwards (eg. 2003 is 103).
$year = $year + 1900;

# Months start at 0 (January = 0, February = 1, etc), so add 1.
$mon = $mon + 1;

$mon = add_zero ($mon);
$mday = add_zero ($mday);
$hour = add_zero ($hour);
$min = add_zero ($min);
$sec = add_zero ($sec);
}
}

if (m/sigName="(.*?)"/) {
$SigName = $1;
}

if (m/sigId="(.*?)"/) {
$SigID = $1;
}

if (m/subSigId="(.*?)"/) {
$SubSig = $1;
}

$attackerstring = "\<attacker.*\<\/attacker";
if ($attackerstring = find_addresses ($attackerstring)) {
}

$victimstring = "\<victim.*\<\/victim";
if ($victimstring = find_addresses ($victimstring)) {
}

if (m/\<alertDetails\>(.*)\<\/alertDetails\>/) {
$AlertDetails = $1;
}

@actions = ();
if (m/\<actions\>(.*)\<\/actions\>/) {
$rawaction = $1;
while ($rawaction =~ m/\<(\w*?)\>(.*?)\</) {
$rawaction = $';
if ($2 eq "true") {
push @actions,$1;
}
}
if (@actions) {
$actiontaken = join(', ',@actions);
}
}
else {
$actiontaken = "None";
}

## Now write your email notification message. You're writing the following into
## the temporary file for the moment, but this will then be emailed.
##
## Again, make sure you escape special characters with a backslash (note the : between
## the SigID and the SubSig).
##
## Put your VMS servers IP address in the NSDB: line below to get a direct link
## to the signature details within the email.

print(OUT "\n$hostid reported a $sev severity alert at $hour:$min:$sec on $mon/$mday/$year\n");
print(OUT "Signature: $SigName \($SigID\:$SubSig\)\n");
print(OUT "Attacker: $attackerstring ---> Victim: $victimstring\n");
print(OUT "Alert details: $AlertDetails \n");
print(OUT "Actions taken: $actiontaken \n");
print(OUT "NSDB: https\://<your VMS server IP address>/vms/nsdb/html/expsig_$SigID.html\n\n");
print(OUT "----------------------------------------------------\n");

}

close(OUT);

## Now call "blat" to send contents of the file in the body of an email message.
## Blat is a freeware email program for WinNT/95, it comes with VMS in the
## $BASE\CSCOpx\bin directory, make sure you install it first by running:
##
## blat -install <SMTP server address> <source email address>
##
## For more help on blat, just type "blat" at the command prompt on your VMS system (make
## sure it's in your path (feel free to move the executable to c:\winnt\system32 BEFORE
## you run the install, that'll make sure your system can always find it).

system ("blat \"$TempIDSFile\" -t \"$EmailRcpt\" -s \"Received IDS alert\""); |
Script de capteur 5.x
Utilisez ce script pour la version 5.x des capteurs.
| Capteurs 5.x |
|---|
#!/usr/bin/perl
use Time::Local;

#***********************************************************************
#
#  FILE NAME   : emailalertv5.pl
#
#  DESCRIPTION : This file is a perl script that will be executed as an
#                action when an IDS-MC Event Rule triggers, and will send an
#                email to $EmailRcpt with additional alert parameters (similar to
#                the functionality available with CSPM notifications)
#
#                NOTE: this script only works with 5.x sensors.
#
#  NOTES       : This script takes the ${Query} keyword from the
#                triggered rule, extracts the set of alarms that caused
#                the rule to trigger.  It then reads the last alarm of
#                this set, parses the individual alarm fields, and
#                calls the legacy script with the same set of command
#                line arguments as CSPM.
#
#                The calling sequence of this script must be of the form:
#
#                emailalert.pl "${Query}"
#
#                Where:
#
#                   "${Query}"  - this is the query keyword dynamically
#                                 output by the rule when it triggers.
#                                 It MUST be wrapped in double quotes
#                                 when specifying it in the Arguments
#                                 box on the Rule Actions panel.
#
#
#***********************************************************************
##
## The following are the only two variables that need changing.  $TempIDSFile can be any
## filename (doesn't have to exist), just make sure the directory that you specify
## exists.  Make sure to use 2 backslashes for each directory, the first backslash is
## so the Perl interpretor doesn't error on the pathname.
##
## $EmailRcpt is the person that is going to receive the email notifications.  Also
## make sure you escape the @ symbol by putting a backslash in front of it, otherwise
## you'll get a Perl syntax error.
##

$TempIDSFile = "c:\\temp\\idsalert.txt";
$EmailRcpt = "gfullage\@cisco.com";

# subroutine to add leading 0's to any date variable that's less than 10.
sub add_zero {
  my ($var) = @_;
  if ($var < 10) {
      $var = "0" .$var
  }
  return $var;
}

# subroutine to find one or more IP addresses within an XML tag (we can have multiple
# victims and/or attackers in one alert now).
sub find_addresses {
  my ($var) = @_;
  my @addresses = ();
  if (m/$var/) {
      $raw = $&;
      while ($raw =~ m/(\d{1,3}\.){3}\d{1,3}/) {
          push @addresses,$&;
          $raw = $';
      }
      $var = join(', ',@addresses);
      return $var;
  }
}

# pull out command line arg

$whereClause = $ARGV[0];

# extract all the alarms matching search expression

$tmpFile = "alarms.out";

# Extract the XML alert/event  out of the database.

system("IdsAlarms -os -s\"$whereClause\" -f\"$tmpFile\"");

# open matching alarm output

if (!open(ALARM_FILE, $tmpFile)) {
  print "Could not open $tmpFile\n";
  exit -1;
}

# read to last line

while (<ALARM_FILE>) {
   chomp $_;
   push @logfile,$_;
}

# clean up

close(ALARM_FILE);
unlink($tmpFile);

# Open temp file to write alert data into,

open(OUT,">$TempIDSFile");

# split XML output into fields

$oneline = join('',@logfile);
$oneline =~ s/\<\/sd\:events\>//g;
$oneline =~ s/\<\/sd\:evIdsAlert\>/\<\/sd\:evIdsAlert\>,/g;
@items = split(/,/,$oneline);

# If you want to see the actual database query result in the email, un-comment out the
# line below (useful for troubleshooting):
# print(OUT "$oneline\n");

# Loop until there's no more alerts

foreach (@items) {
  unless ($_ =~ /\<\/env\:Body\>/) {

    if (m/\<sd\:hostId\>(.*)\<\/sd\:hostId\>/) {
      $hostid = $1;
    }

    if (m/severity="(.*?)"/) {
      $sev = $1;
    }

    if (m/Zone\=".*"\>(.*)\<\/sd\:time\>/) {
      $t = $1;
      if ($t =~ m/(.*)(\d{9})/) {
        ($sec,$min,$hour,$mday,$mon,$year,$wday,$yday,$isdst) = localtime($1);

        # Year is reported from 1900 onwards (eg. 2003 is 103).
        $year = $year + 1900;

        # Months start at 0 (January = 0, February = 1, etc), so add 1.
        $mon = $mon + 1;

        $mon = add_zero ($mon);
	  $mday = add_zero ($mday);
	  $hour = add_zero ($hour);
	  $min = add_zero ($min);
	  $sec = add_zero ($sec);
      }
    }

    if (m/description="(.*?)"/) {
      $SigName = $1;
    }

    if (m/\ id="(.*?)"/) {
      $SigID = $1;
    }

    if (m/\<cid\:subsigId\>(.*)\<\/cid\:subsigId\>/) {
      $SubSig = $1;
    }

    if (m/\<cid\:riskRatingValue\>(.*)\<\/cid\:riskRatingValue\>/) {
      $RR = $1;
    }

    if (m/\<cid\:interface\>(.*)\<\/cid\:interface\>/) {
      $Intf = $1;
    }

    $attackerstring = "\<sd\:attacker.*\<\/sd\:attacker";
    if ($attackerstring = find_addresses ($attackerstring)) {
    }

    $victimstring = "\<sd\:target.*\<\/sd\:target";
    if ($victimstring = find_addresses ($victimstring)) {
    }

    if (m/\<cid\:alertDetails\>(.*)\<\/cid\:alertDetails\>/) {
      $AlertDetails = $1;
    }

    @actions = ();
    if (m/\<sd\:actions\>(.*)\<\/sd\:actions\>/) {
      $rawaction = $1;
      while ($rawaction =~ m/\<\w*?:(\w*?)\>(.*?)\</) {
         $rawaction = $';

         if ($2 eq "true") {
            push @actions,$1;
         }
      }
      if (@actions) {
        $actiontaken = join(', ',@actions);
      }
    }
    else {
        $actiontaken = "None";
      }

## Now write your email notification message. You're writing the following into
## the temporary file for the moment, but this will then be emailed.
##
## Again, make sure you escape special characters with a backslash (note the : between
## the SigID and the SubSig).
##
## Put your VMS servers IP address in the NSDB: line below to get a direct link
## to the signature details within the email.

    print(OUT "\n$hostid reported a $sev severity alert at $hour:$min:$sec on $mon/$mday/$year\n");
    print(OUT "Signature: $SigName \($SigID\:$SubSig\)\n");
    print(OUT "Attacker: $attackerstring  --->  Victim: $victimstring\n");
    print(OUT "Alert details: $AlertDetails \n");
    print(OUT "Risk Rating: $RR,  Interface: $Intf \n");
    print(OUT "Actions taken: $actiontaken \n");
    print(OUT "NSDB: https\://sec-srv/vms/nsdb/html/expsig_$SigID.html\n\n");
    print(OUT "----------------------------------------------------\n");

   }
}

close(OUT);

## Now call "blat" to send contents of the file in the body of an email message.
## Blat is a freeware email program for WinNT/95, it comes with VMS in the
## $BASE\CSCOpx\bin directory, make sure you install it first by running:
##
##     blat -install <SMTP server address> <source email address>
##
## For more help on blat, just type "blat" at the command prompt on your VMS system (make
## sure it's in your path (feel free to move the executable to c:\winnt\system32 BEFORE
## you run the install, that'll make sure your system can always find it).

system ("blat \"$TempIDSFile\" -t \"$EmailRcpt\" -s \"Received IDS alert\""); |
Vérification
Aucune procédure de vérification n'est disponible pour cette configuration.
Dépannage
Suivez ces instructions pour dépanner votre configuration.
-
Exécutez cette commande à partir d'une invite de commandes afin de vérifier que le blat fonctionne correctement :
blat-t <filename> est le chemin complet vers n'importe quel fichier texte du système VMS. Si l'utilisateur auquel le script de messagerie est dirigé reçoit ce fichier dans le corps d'un message électronique, alors vous savez que le blat fonctionne.
-
Si aucun e-mail n'est reçu après le déclenchement d'une alerte, essayez d'exécuter le script Perl à partir d'une fenêtre d'invite de commandes.
Ceci met en évidence tous les problèmes de Perl ou de type de chemin. Pour ce faire, ouvrez une invite de commandes et entrez :
>cd Program Files/CSCOpx/MDC/etc/ids/scripts
>emailalert.pl ${Query}
Vous pouvez potentiellement recevoir une erreur Sybase, similaire à cet exemple. Ceci est dû au fait que le paramètre ${Query} que vous passez ne contient pas d'informations, contrairement à ce qui se passe dans le Moniteur de sécurité.
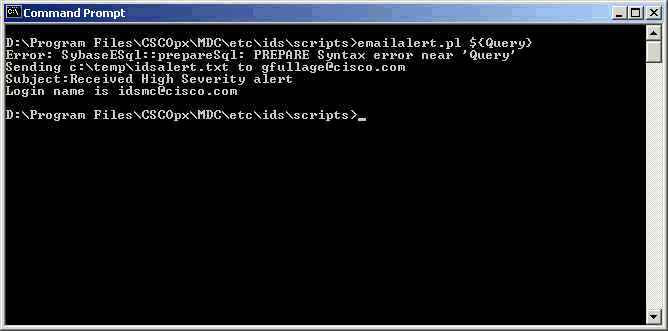
Outre cette erreur, le script s'exécute correctement et envoie un e-mail. Tous les paramètres d'alerte du corps du courrier électronique sont vides. Si vous recevez des erreurs Perl ou de chemin, elles doivent être corrigées avant l'envoi d'un e-mail.
Informations connexes
Historique de révision
| Révision | Date de publication | Commentaires |
|---|---|---|
1.0 |
12-Jul-2006 |
Première publication |
 Commentaires
Contacter Cisco
- Ouvrir un dossier d’assistance

- (Un contrat de service de Cisco est requis)