Introducción
Este documento describe cómo agregar acceso al Protocolo de transferencia de hipertexto (HTTP) a Firepower Thread Defense (FTD) cuando falla el puerto de administración.
Prerequisites
Requirements
Cisco recomienda que tenga conocimiento sobre estos temas:
- Acceso de consola al dispositivo
Componentes Utilizados
La información que contiene este documento se basa en las siguientes versiones de software y hardware.
- Cisco Firepower 1120 Thread Defense versión 7.4.2
La información que contiene este documento se creó a partir de los dispositivos en un ambiente de laboratorio específico. Todos los dispositivos que se utilizan en este documento se pusieron en funcionamiento con una configuración verificada (predeterminada). Si tiene una red en vivo, asegúrese de entender el posible impacto de cualquier comando.
Configurar
Configuraciones
Paso 1. Desde la sesión de consola del dispositivo, conéctese a la celda de interfaz de línea de comandos (CLISH) de FTD:
Cisco Firepower Extensible Operating System (FX-OS) Software
TAC support: http://www.cisco.com/tac
Copyright (c) 2009-2019, Cisco Systems, Inc. All rights reserved.

The copyrights to certain works contained in this software are
owned by other third parties and used and distributed under
license.

Certain components of this software are licensed under the "GNU General Public
License, version 3" provided with ABSOLUTELY NO WARRANTY under the terms of
"GNU General Public License, Version 3", available here:
http://www.gnu.org/licenses/gpl.html. See User Manual (''Licensing'') for
details.

Certain components of this software are licensed under the "GNU General Public
License, version 2" provided with ABSOLUTELY NO WARRANTY under the terms of
"GNU General Public License, version 2", available here:
http://www.gnu.org/licenses/old-licenses/gpl-2.0.html. See User Manual
(''Licensing'') for details.

Certain components of this software are licensed under the "GNU LESSER GENERAL
PUBLIC LICENSE, version 3" provided with ABSOLUTELY NO WARRANTY under the terms
of "GNU LESSER GENERAL PUBLIC LICENSE" Version 3", available here:
http://www.gnu.org/licenses/lgpl.html. See User Manual (''Licensing'') for
details.

Certain components of this software are licensed under the "GNU Lesser General
Public License, version 2.1" provided with ABSOLUTELY NO WARRANTY under the
terms of "GNU Lesser General Public License, version 2", available here:
http://www.gnu.org/licenses/old-licenses/lgpl-2.1.html. See User Manual
(''Licensing'') for details.

Certain components of this software are licensed under the "GNU Library General
Public License, version 2" provided with ABSOLUTELY NO WARRANTY under the terms
of "GNU Library General Public License, version 2", available here:
http://www.gnu.org/licenses/old-licenses/lgpl-2.0.html. See User Manual
(''Licensing'') for details.

KSEC-FPR1140-1# connect ftd
Paso 2. Desde FTD CLISH, acceda al shell de Linux a través del comando expert y elévelo a privilegios de administrador:
>
> expert
admin@KSEC-FPR1140-1:/$ sudo su
Password:
root@KSEC-FPR1140-1:/#
Paso 3. Presione las entradas del comando HTTP a la configuración de Line mediante LinaConfigTool y cree una ruta estática para enviar el tráfico desde el servidor web que se ejecuta en el lado de Linux a la interfaz nlp_int_tap en el lado de Line:
root@KSEC-FPR1140-1:/# LinaConfigTool "http 192.168.1.0 255.255.255.0 inside"
root@KSEC-FPR1140-1:/#
root@KSEC-FPR1140-1:/# ip route add 192.168.1.0/24 via 169.254.1.1
root@KSEC-FPR1140-1:/#
root@KSEC-FPR1140-1:/#
Paso 4. Vuelva a CLISH de FTD y confirme que la regla de traducción de direcciones de red (NAT) se crea automáticamente:
root@KSEC-FPR1140-1:/#
root@KSEC-FPR1140-1:/#
root@KSEC-FPR1140-1:/# exit
exit
admin@KSEC-FPR1140-1:/$ exit
logout
> show nat detail
Manual NAT Policies Implicit (Section 0)
1 (nlp_int_tap) to (inside) source static nlp_server__http_192.168.1.0_intf4 interface  destination static 0_192.168.1.0_3 0_192.168.1.0_3 service tcp https https
    translate_hits = 0, untranslate_hits = 0
    Source - Origin: 169.254.1.3/32, Translated: 10.10.105.87/24
    Destination - Origin: 192.168.1.0/24, Translated: 192.168.1.0/24
    Service - Protocol: tcp Real: https Mapped: https
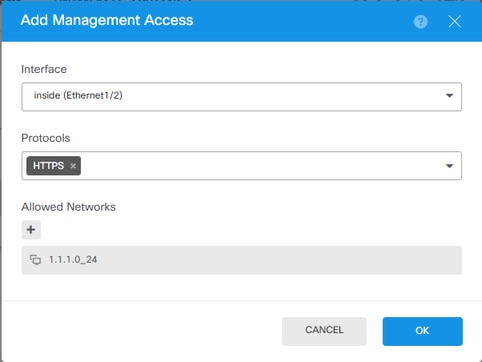
Paso 5. Acceder a la interfaz de usuario de FDM en la interfaz de datos y crear el acceso de administración en la interfaz de datos desde la interfaz de usuario para mantener los cambios permanentes:

Verificación
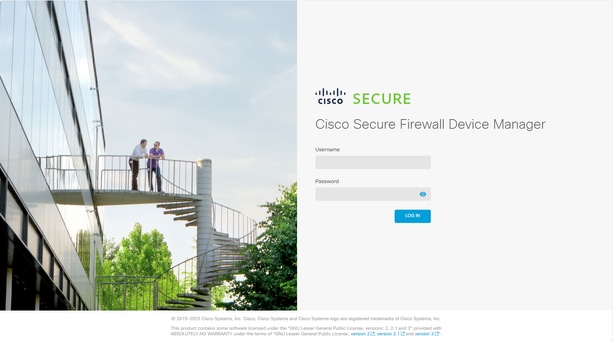
Abra un navegador e intente acceder a FDM mediante la dirección IP de la interfaz de datos.
Troubleshoot
Realice una captura de paquetes y confirme que:
- El tráfico está llegando a la interfaz de datos.
- El tráfico se reenvía a la interfaz nlp_int_tap.
 Comentarios