Cisco Secure Services Client Administrator Guide, Release 5.1
Bias-Free Language
The documentation set for this product strives to use bias-free language. For the purposes of this documentation set, bias-free is defined as language that does not imply discrimination based on age, disability, gender, racial identity, ethnic identity, sexual orientation, socioeconomic status, and intersectionality. Exceptions may be present in the documentation due to language that is hardcoded in the user interfaces of the product software, language used based on RFP documentation, or language that is used by a referenced third-party product. Learn more about how Cisco is using Inclusive Language.
- Updated:
- October 15, 2008
Chapter: Using Cisco SSC
Using Cisco SSC
This chapter provides an overview of SSC and the main SSC GUI features available to the user. The chapter contains these sections:
•![]() Using the Main SSC GUI Window
Using the Main SSC GUI Window

Note ![]() The illustration colors might be different in some of the figures.
The illustration colors might be different in some of the figures.
Overview
SSC runs from two logical interfaces:
•![]() SSC tray icon—A minimal user interface designed for quick access to primary SSC functions and information.
SSC tray icon—A minimal user interface designed for quick access to primary SSC functions and information.
•![]() Main SSC GUI window—The primary user interface designed to provide complete SSC functionality.
Main SSC GUI window—The primary user interface designed to provide complete SSC functionality.
The SSC tray icon interface simplifies the user interface similarly to a Windows wired connection icon. The SSC tray icon allows the user to manage wireless connections using a few simple clicks.
The main SSC GUI interface adds functionality for configuring networks, enabling or disabling the client, configuring VPN, and viewing network information such as signal strength and the complete network scan list.
Using the Main SSC GUI Window
The main SSC GUI window contains three main areas to help the user configure, control, and manage networks (see Figure 4-1):
•![]() Menu area—Enables and disables SSC and the Wi-Fi radio, views and configures groups, and obtains helpful information.
Menu area—Enables and disables SSC and the Wi-Fi radio, views and configures groups, and obtains helpful information.
•![]() Graphical area—Displays a listing of configured network connections and a list of detected neighboring networks.
Graphical area—Displays a listing of configured network connections and a list of detected neighboring networks.
•![]() Button area—Allows the user to add, edit, delete, and connect to network connections. The user can also view connection status information and connect using a VPN tunnel.
Button area—Allows the user to add, edit, delete, and connect to network connections. The user can also view connection status information and connect using a VPN tunnel.
Figure 4-1 Main SSC GUI Window
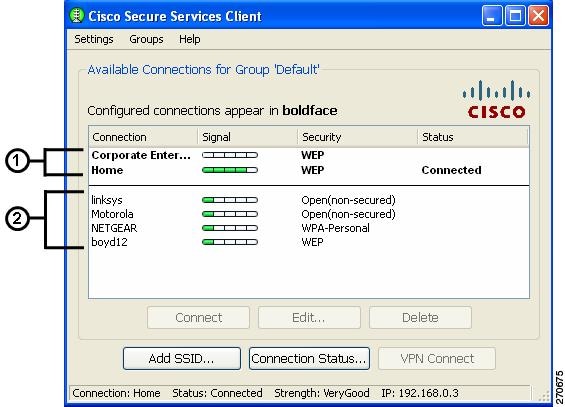
Table 4-1 describes the main SSC GUI window components.
Connecting with Configured Connections
The main SSC GUI window contains a list of network administrator-deployed pre-configured connection profiles and a list of user-created configured connection profiles. SSC supports two modes for making connections:
•![]() Automatic connection mode
Automatic connection mode
•![]() Exclusive connection mode
Exclusive connection mode
Automatic Connections
In the normally preferred automatic connection mode, SSC automatically chooses the best available configured connection. If the group contains both wired and wireless connections, the wired connection has higher priority.
Note ![]() SSC allows only one connection at a time.
SSC allows only one connection at a time.
The SSC automatic connection mode is described in the following operating system sections.
Windows 2000 or Windows XP
In automatic connection mode, SSC starts at the top of the configured connection list and attempts to associate with the first network. When a connection is unsuccessful or broken, SSC attempts to associate with the next entry in the list. This operation (sometimes called walking-the-list) continues until a successful connection is established.
These conditions cause SSC to restart at the top of the configured network connection list:
•![]() The user restarts the PC or a power interruption occurs.
The user restarts the PC or a power interruption occurs.
•![]() The user switching to a different connection group.
The user switching to a different connection group.
•![]() The user clicks the Repair option to restart SSC.
The user clicks the Repair option to restart SSC.
In automatic connection mode, the user can override the SSC connection criteria by performing one of these operations:
•![]() Highlighting a configured connection and clicking the Connect button.
Highlighting a configured connection and clicking the Connect button.
•![]() Right-clicking a configured connection and choosing the Connect option.
Right-clicking a configured connection and choosing the Connect option.
•![]() Double-clicking a configured connection.
Double-clicking a configured connection.
These operations cause SSC to break the current connection and attempt to initiate a connection with the selected configured connection. SSC remains in the automatic connection mode. If the connection attempt is unsuccessful, SSC attempts to connect to the first configured connection in the configured network connection list.
Windows Vista
In automatic connection mode, SSC starts scanning for available networks and attempts to connect to the first configured network that matches a network found in the scan list.. When a connection is unsuccessful, SSC attempts to connect to the next configured network connection found in the scan list. SSC continues moving through the configured network connections found in the scan list until a successful connection is established or an SSC timer expires. When the SSC timer expires, SSC begins scanning for active networks again.
When SSC is scanning for active configured networks, SSC displays Scanning for a Network in the main SSC GUI window and the Connection Status window.
These conditions cause SSC to restart scanning for active networks:
•![]() The user restarts the PC or a power interruption occurs.
The user restarts the PC or a power interruption occurs.
•![]() The user switches to a different connection group.
The user switches to a different connection group.
•![]() The user clicks the Repair option to restart SSC.
The user clicks the Repair option to restart SSC.
•![]() The current network connection fails and cannot be reactivated.
The current network connection fails and cannot be reactivated.
In automatic connection mode, the user can override the SSC connection criteria by performing one of these operations:
•![]() Highlighting a configured connection and clicking the Connect button.
Highlighting a configured connection and clicking the Connect button.
•![]() Right-clicking a configured connection and choosing the Connect option.
Right-clicking a configured connection and choosing the Connect option.
•![]() Double-clicking a configured connection.
Double-clicking a configured connection.
These operations cause SSC to break the current connection and attempt to initiate a new connection with the selected configured connection. SSC remains in the automatic connection mode.
If the connection attempt is unsuccessful, SSC starts scanning for an active networks.
Exclusive Connections Mode
SSC allows the user to specify an exclusive connection (see Figure 4-2). This causes SSC to break an existing connection and forces SSC to exclusively attempt to connect to the new specified selection. If the connection fails or is broken, SSC does not attempt to switch to an alternate connection.
Figure 4-2 Connect Exclusively Option
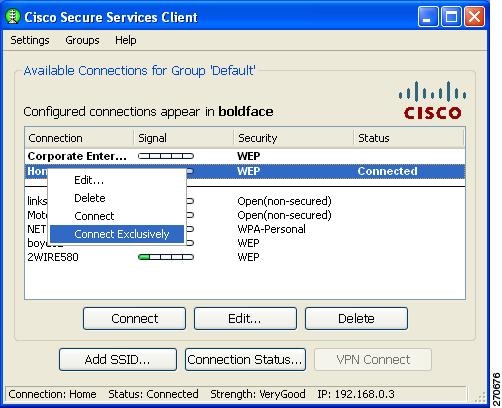
The user can activate the exclusive connection option by right-clicking a configured connection and choosing the Connect Exclusively option.
To exit the exclusive connection mode and revert to automatic connection mode, the user must right-click the connection and choose the Connect Exclusively option again.
The typical reason for using the exclusive connection mode is to force SSC to drop an existing wired connection and to connect only to the specified wireless connection.
Creating New Connections
The user can manually configure a new connection several ways:
•![]() Double-clicking a detected network from the scan-list.
Double-clicking a detected network from the scan-list.
•![]() Right-clicking a detected network from the scan-list and choose the Connect option.
Right-clicking a detected network from the scan-list and choose the Connect option.
•![]() Highlighting a detected network from the scan-list and click the Connect button.
Highlighting a detected network from the scan-list and click the Connect button.
•![]() Clicking the Add SSID button. The Add SSID button should be used in these wireless situations:
Clicking the Add SSID button. The Add SSID button should be used in these wireless situations:
–![]() Scanable access point—Transmits beacons or responses to active probes to allow detection but is known not to be available (not physically within detection range).
Scanable access point—Transmits beacons or responses to active probes to allow detection but is known not to be available (not physically within detection range).
–![]() Non Scanable access point—Not configured to be detectable in a wireless scan (not-beaconing or hidden) and might not be physically within detection range.
Non Scanable access point—Not configured to be detectable in a wireless scan (not-beaconing or hidden) and might not be physically within detection range.
SSC Security Options
Using the SSC GUI, the user can create new connection profiles using these security options:
•![]() Open(non-secured)
Open(non-secured)
•![]() WEP
WEP
•![]() Shared WEP
Shared WEP
•![]() WPA Personal AES
WPA Personal AES
•![]() WPA Personal TKIP
WPA Personal TKIP
•![]() WPA2 Personal AES
WPA2 Personal AES
•![]() WPA2 Personal TKIP
WPA2 Personal TKIP
•![]() WPA Enterprise AES
WPA Enterprise AES
•![]() WPA Enterprise TKIP
WPA Enterprise TKIP
•![]() WPA2 Enterprise AES
WPA2 Enterprise AES
•![]() WPA2 Enterprise TKIP
WPA2 Enterprise TKIP
•![]() CCKM Enterprise AES
CCKM Enterprise AES
•![]() CCKM Enterprise TKIP
CCKM Enterprise TKIP
Note ![]() The security options that are available to a user depend upon the administrator-enabled options in the deployed SSC configuration file.
The security options that are available to a user depend upon the administrator-enabled options in the deployed SSC configuration file.
Configuring VPN Connection Options
The bottom section of all the connection security configuration windows allows the user to configure VPN connection options. To configure the VPN options, the user performs these operations:
•![]() Check the Automatically connect to VPN option.
Check the Automatically connect to VPN option.
•![]() Click the drop-down arrow and choose one of the VPN authentication options.
Click the drop-down arrow and choose one of the VPN authentication options.
Note ![]() The VPN connection option is only available when Cisco IPSec VPN is installed on the user's PC.
The VPN connection option is only available when Cisco IPSec VPN is installed on the user's PC.
•![]() For Windows 2000 and Windows XP, Cisco IPSec VPN must be version 4.8 or later.
For Windows 2000 and Windows XP, Cisco IPSec VPN must be version 4.8 or later.
•![]() For Windows Vista, Cisco IPSec VPN must be version 5.0.03.0560 or later.
For Windows Vista, Cisco IPSec VPN must be version 5.0.03.0560 or later.
Note ![]() For Windows 2000 and Windows XP, when using VPN with SofToken-II and SSC prompts for the username and PIN, the user must provide to SSC the PIN normally intended for the SofToken application. The user must not enter the one-time password that is generated by the SofToken-II application rather than the username and pin.
For Windows 2000 and Windows XP, when using VPN with SofToken-II and SSC prompts for the username and PIN, the user must provide to SSC the PIN normally intended for the SofToken application. The user must not enter the one-time password that is generated by the SofToken-II application rather than the username and pin.
Note ![]() For Windows Vista, Secure Computing SofToken II is not supported. When SofToken II authentication is specified in the network configuration, SSC prompts for the username and the actual one-time password rather than the username and password for the soft token account.
For Windows Vista, Secure Computing SofToken II is not supported. When SofToken II authentication is specified in the network configuration, SSC prompts for the username and the actual one-time password rather than the username and password for the soft token account.
Note ![]() SSC maintains the user's VPN credentials only until the user logs off or SSC shuts down.
SSC maintains the user's VPN credentials only until the user logs off or SSC shuts down.
Using an Open Non-Secured Network Connection
When the user selects an Open(non-secured) network from the scan-list, SSC automatically reassigns the connection as a configured connection, moves the connection to the bottom of the configured connections list, and initiates the connection (unless a higher priority wired connection is available).
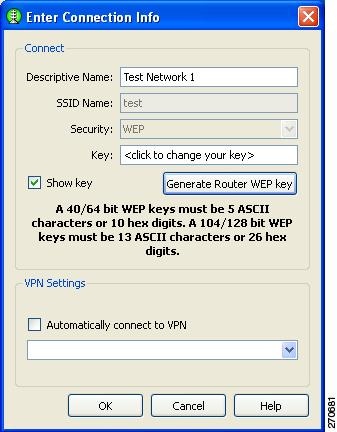
Configuring a WEP or Shared WEP Connection
When a user selects a WEP or Shared-WEP network from the scan-list, the Enter Connection Info window appears (Figure 4-3). The user needs to enter a descriptive name for the profile, the SSID name, and the WEP key information. When the Show key option is checked, the actual characters entered are displayed to allow the user to visually verify the key information.
Figure 4-3 WEP or Shared WEP Information
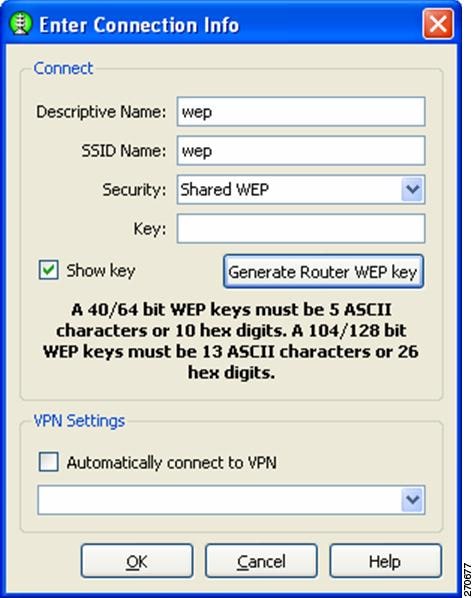
Some routers use a pass-phrase to create a unique WEP key. The Generate Router WEP key button can be used to enter a router pass-phrase of 64 bits (10 hexadecimal digits) or 126 bits (26 hexadecimal digits) that SSC uses to create a WEP key.
The VPN Settings option enables the user to choose if an automatic VPN connection is used and to choose the VPN server location by clicking the drop down arrows.
When complete, the user clicks the OK button.
Configuring a WPA Personal or a WPA2 Personal Connection
When the user selects a network with WPA Personal or WPA2-Personal security options, Figure 4-4 appears. The user needs to enter a descriptive name and the SSID name for the profile.,and the key information. When the Show key option is checked, the actual characters entered are displayed to allow the user to visually verify the key information.
SSC supports these WPA Personal and WPA2 Personal security types:
•![]() WPA Personal AES or WPA Personal TKIP
WPA Personal AES or WPA Personal TKIP
•![]() WPA2 Personal AES or WPA2 Personal TKIP
WPA2 Personal AES or WPA2 Personal TKIP
Figure 4-4 WPA Personal or WPA2 Personal Information
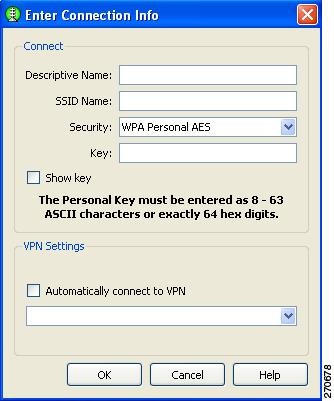
The VPN Settings option enables the user to choose if an automatic VPN connection is used and to choose the VPN server location by clicking the drop down arrow.
When complete, the user clicks the OK button.
Configuring an 802.1X Connection
When the user selects a network with 802.1X security from the scan list, the user needs to enter a descriptive name for the profile, the SSID name, and choose the EAP method and credential type that are used (see Figure 4-5).
Figure 4-5 802.1X Security Information
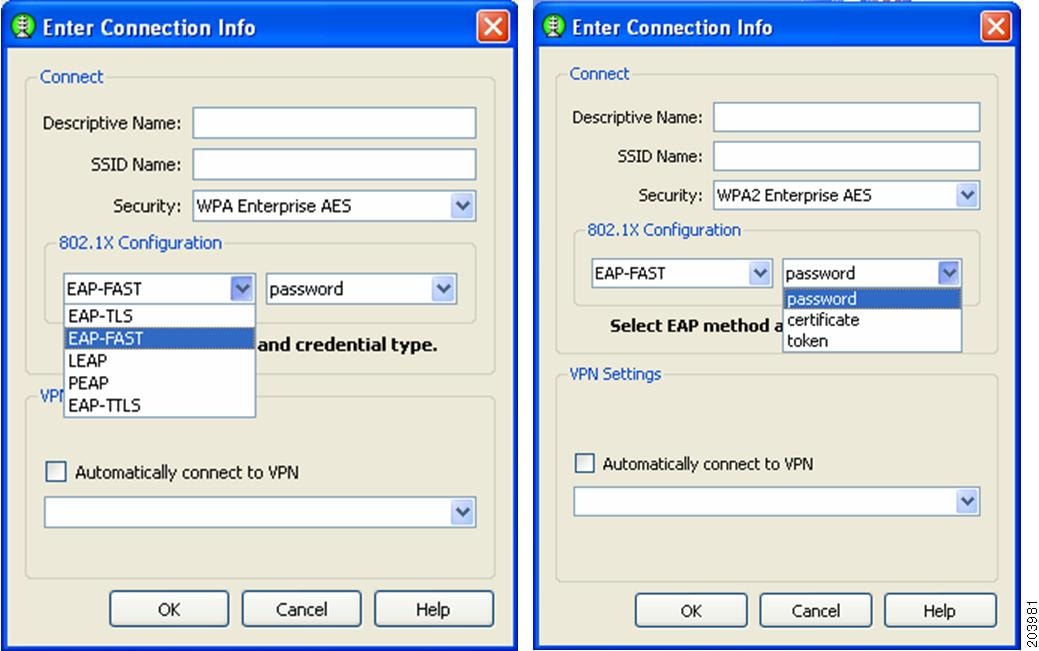
Note ![]() The SSC GUI provides a limited subset of 802.1X options. For deployment purposes, 802.1X profiles should be created by the network administrator using the SSC management utility.
The SSC GUI provides a limited subset of 802.1X options. For deployment purposes, 802.1X profiles should be created by the network administrator using the SSC management utility.
SSC supports these 802.1X security types:
•![]() WPA Enterprise AES
WPA Enterprise AES
•![]() WPA Enterprise TKIP
WPA Enterprise TKIP
•![]() WPA2 Enterprise AES
WPA2 Enterprise AES
•![]() WPA2 Enterprise TKIP
WPA2 Enterprise TKIP
•![]() CCKM Enterprise AES
CCKM Enterprise AES
•![]() CCKM Enterprise TKIP
CCKM Enterprise TKIP
Note ![]() The specific options available to a user depends upon the administrator-enabled options in the deployed SSC configuration file.
The specific options available to a user depends upon the administrator-enabled options in the deployed SSC configuration file.
The user clicks the EAP method drop-down arrow and chooses one of these SSC supported EAP methods:
•![]() LEAP
LEAP
•![]() PEAP
PEAP
•![]() EAP-TLS
EAP-TLS
•![]() EAP-TTLS
EAP-TTLS
•![]() EAP-FAST
EAP-FAST
Note ![]() The Windows Vista version of SSC does not support EAP-TLS, and EAP-TTLS. These options are not available on the EAP method drop-down list.
The Windows Vista version of SSC does not support EAP-TLS, and EAP-TTLS. These options are not available on the EAP method drop-down list.
The user clicks the certificate type drop-down arrow and chooses one of these SSC supported certificate types:
•![]() Static password, Certificate, or Token
Static password, Certificate, or Token
The VPN Settings option enables the user to choose if an automatic VPN connection is used and to choose the VPN server location by clicking the drop down arrow.
When complete, the user clicks the OK button.
Configuring a New Connection Using the Add SSID Button
When the user clicks the Add SSID button, Figure 4-6 appears.
Figure 4-6 New Connection Information
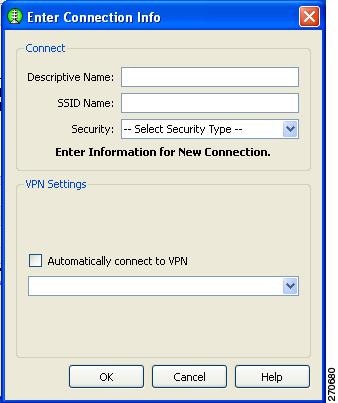
The user needs to configure these connection options:
1. ![]() Descriptive Name—A name that is displayed to identify the connection.
Descriptive Name—A name that is displayed to identify the connection.
2. ![]() SSID Name—The network name that is used to establish the connection and is broadcast by the access point in its beacon.
SSID Name—The network name that is used to establish the connection and is broadcast by the access point in its beacon.
3. ![]() Security—Specifies the type of security authentication used by the connection (see the "SSC Security Options" section).
Security—Specifies the type of security authentication used by the connection (see the "SSC Security Options" section).
4. ![]() VPN Settings—Enables the user to choose if an automatic VPN connection is used and to choose the VPN server location by clicking the drop down arrow.
VPN Settings—Enables the user to choose if an automatic VPN connection is used and to choose the VPN server location by clicking the drop down arrow.
5. ![]() When complete, the user clicks the OK button.
When complete, the user clicks the OK button.
Managing Configured Connections
From the main SSC GUI window, the user can edit or delete user-created configured connections.
Note ![]() Administrator-deployed pre-configured connections cannot be edited or deleted by the user, but the settings can be viewed.
Administrator-deployed pre-configured connections cannot be edited or deleted by the user, but the settings can be viewed.
To delete a user-created configuration connection, the user needs to right-click the desired configuration connection and choose the Delete option.
Editing a User-Created Configured Connection
The main SSC GUI window provides these edit options for user-created configured connections:
•![]() Right-click the desired configured connection and choose the Edit option. Figure 4-7 appears.
Right-click the desired configured connection and choose the Edit option. Figure 4-7 appears.
•![]() Highlight the desired configured connection and click the Edit button. Figure 4-7 appears.
Highlight the desired configured connection and click the Edit button. Figure 4-7 appears.
Figure 4-7 Configured Connection Profile Fields
The user can edit these connection profile fields:
•![]() Descriptive Name
Descriptive Name
•![]() Key (when applicable)
Key (when applicable)
•![]() VPN Settings
VPN Settings
Note ![]() To change the security mode of the connection, the user must first delete the connection and then recreate the connection using a new security option.
To change the security mode of the connection, the user must first delete the connection and then recreate the connection using a new security option.
When complete, the user clicks the OK button.
Obtaining Connection Status Information
You can obtain current connection status information by performing one of these operations:
•![]() On the SSC GUI window, click Connection Status and Figure 4-8 appears.
On the SSC GUI window, click Connection Status and Figure 4-8 appears.
•![]() Right-click the SSC tray icon and choose Connection Status. Figure 4-8 appears.
Right-click the SSC tray icon and choose Connection Status. Figure 4-8 appears.
Figure 4-8 SSC Connection Status Window
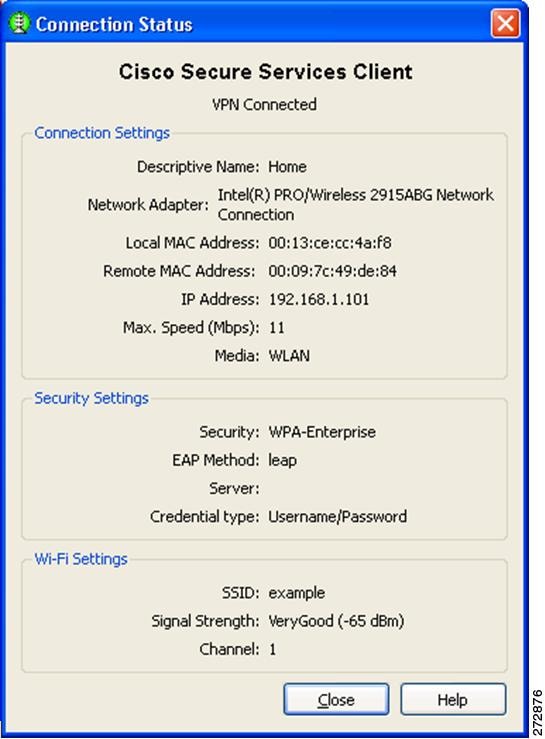
The Connection Status window contains these informational sections:
•![]() Connection status
Connection status
•![]() Connection Settings
Connection Settings
•![]() Security Settings
Security Settings
•![]() Wi-Fi Settings
Wi-Fi Settings
Connection Status
The connection status area indicates the state of the active connection (same as the Status field of the main SSC window). These are the supported connection states:
•![]() Searching for adapter—SSC is searching for an active adapter. An active adapter is not currently available or the adapter is disabled.
Searching for adapter—SSC is searching for an active adapter. An active adapter is not currently available or the adapter is disabled.
•![]() Associating—SSC is performing the 802.11 association protocol.
Associating—SSC is performing the 802.11 association protocol.
•![]() Authenticating—SSC is performing the 802.1X authentication protocol.
Authenticating—SSC is performing the 802.1X authentication protocol.
•![]() Acquiring IP address—SSC is attempting to obtain your IP assignment from a DHCP server.
Acquiring IP address—SSC is attempting to obtain your IP assignment from a DHCP server.
•![]() Connected—The adapter is successfully connected to an access point.
Connected—The adapter is successfully connected to an access point.
•![]() Scanning for a Network—SSC is currently searching for an available network.
Scanning for a Network—SSC is currently searching for an available network.
•![]() VPN Connecting—SSC is attempting to establish a VPN connection.
VPN Connecting—SSC is attempting to establish a VPN connection.
•![]() VPN Connected—The VPN connection has been successfully established.
VPN Connected—The VPN connection has been successfully established.
Connection Settings
This section indicates the current connection settings. These are the fields supported:
•![]() Network Adapter—Identifies the friendly name for the associated network adapter used for the network connection.
Network Adapter—Identifies the friendly name for the associated network adapter used for the network connection.
•![]() Local MAC Address—The local MAC address of the network adapter.
Local MAC Address—The local MAC address of the network adapter.
•![]() Remote MAC Address—Identifies the MAC address of the access point.
Remote MAC Address—Identifies the MAC address of the access point.
•![]() IP Address—Identifies the address currently assigned to the adapter (shown in standard x.x.x.x format).
IP Address—Identifies the address currently assigned to the adapter (shown in standard x.x.x.x format).
•![]() Max. Speed (Mbps)—Indicates the maxumum data rate supported by the adapter.
Max. Speed (Mbps)—Indicates the maxumum data rate supported by the adapter.
•![]() Media—Identifies the physical type of the connection as follows:
Media—Identifies the physical type of the connection as follows:
–![]() WLAN— Indicates a wireless Wi-Fi connection.
WLAN— Indicates a wireless Wi-Fi connection.
–![]() Ethernet—Indicates a wired connection.
Ethernet—Indicates a wired connection.
Security Settings
This section indicates the current security settings for the connection. These are the supported fields:
•![]() Security—Indicates the current security type being used on the connection. These are the supported options:
Security—Indicates the current security type being used on the connection. These are the supported options:
–![]() Open—No authentication and no encryption is being used.
Open—No authentication and no encryption is being used.
–![]() WEP—Legacy open association with static WEP encryption (staticWep) or shared association with WEP shared keys (shared)
WEP—Legacy open association with static WEP encryption (staticWep) or shared association with WEP shared keys (shared)
–![]() WPA-Personal or WPA2-Personal—This security type uses a pass-phase preshared key (PSK). WPA2 is a recent upgrade to WPA based on the full IEEE 802.11i standard.
WPA-Personal or WPA2-Personal—This security type uses a pass-phase preshared key (PSK). WPA2 is a recent upgrade to WPA based on the full IEEE 802.11i standard.
–![]() WPA-Enterprise or WPA2-Enterprise—This security type uses an authentication server. WPA2 is a recent upgrade to WPA based on the full IEEE 802.11i standard.
WPA-Enterprise or WPA2-Enterprise—This security type uses an authentication server. WPA2 is a recent upgrade to WPA based on the full IEEE 802.11i standard.
–![]() CCKM-Enterprise—Cisco's Centralized Key Management (CCKM) is the basis of Cisco Fast reassociation and reauthentication solution, which utilizes an access point, as the key distributor to enable protected communications between the access point and the wireless clients.
CCKM-Enterprise—Cisco's Centralized Key Management (CCKM) is the basis of Cisco Fast reassociation and reauthentication solution, which utilizes an access point, as the key distributor to enable protected communications between the access point and the wireless clients.
•![]() EAP Method—For an authenticating connection, this field indicates the outer EAP method used for authentication.
EAP Method—For an authenticating connection, this field indicates the outer EAP method used for authentication.
•![]() Server—For an authenticating connection, indicates the following:
Server—For an authenticating connection, indicates the following:
–![]() The server certificate's name (for mutually authenticating EAP methods)
The server certificate's name (for mutually authenticating EAP methods)
–![]() The server's FAST A-ID (for EAP-FAST)
The server's FAST A-ID (for EAP-FAST)
–![]() Unknown (for non-mutually authenticating EAP methods)
Unknown (for non-mutually authenticating EAP methods)
–![]() Blank when not performing 802.1x authentication
Blank when not performing 802.1x authentication
•![]() Credential type—For an authenticating connection, indicates the type of user credentials used for authentication:
Credential type—For an authenticating connection, indicates the type of user credentials used for authentication:
–![]() Username/Password
Username/Password
–![]() Client Certificate
Client Certificate
–![]() Token
Token
–![]() Key
Key
WiFi Settings
This section indicates the connections Wi-Fi settings and contains these fields:
–![]() SSID—The service set identifier for the WiFi connection.
SSID—The service set identifier for the WiFi connection.
–![]() Friendly Name—The name assigned to a connection for display purposes
Friendly Name—The name assigned to a connection for display purposes
–![]() Signal Strength—For wireless connections, five relative received radio signal levels are supported: very poor, poor, good, very good, excellent
Signal Strength—For wireless connections, five relative received radio signal levels are supported: very poor, poor, good, very good, excellent
–![]() Channel—The 802.11 radio channel on which the network is communicating
Channel—The 802.11 radio channel on which the network is communicating
Selecting Network Groups
SSC supports a group feature that allows the user to partition network connections into convenient groups. SSC provides two ways for the user to select and activate a configured connection group:
•![]() Use the SSC tray icon (see Figure 4-9).
Use the SSC tray icon (see Figure 4-9).
–![]() Right-click the SSC tray icon, scroll to Groups, and choose the desired group from the list.
Right-click the SSC tray icon, scroll to Groups, and choose the desired group from the list.
•![]() Use the Group menu on the main SSC GUI window (see Figure 4-10).
Use the Group menu on the main SSC GUI window (see Figure 4-10).
–![]() On the main SSC GUI window, click Groups and choose the desired group.
On the main SSC GUI window, click Groups and choose the desired group.
Figure 4-9 SSC Tray Icon Right-Click Menu
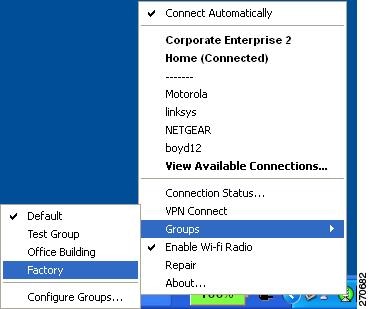
Changing the active group causes SSC to perform these operations:
•![]() Drops any active connection from the current group.
Drops any active connection from the current group.
•![]() Cancels exclusive connect mode if active.
Cancels exclusive connect mode if active.
•![]() Starts the automatic connection process from the top of new group's connection list.
Starts the automatic connection process from the top of new group's connection list.
Managing Network Connection Groups
The user can manage network connection groups by using the Connection Groups window. To open the Connection Groups window, the user can perform one of these operations:
•![]() From the main SSC GUI window, click Groups > Configure Groups and Figure 4-10 appears.
From the main SSC GUI window, click Groups > Configure Groups and Figure 4-10 appears.
•![]() Right-click the SSC tray icon, scroll to Groups, and choose Configure Groups. Figure 4-10 appears.
Right-click the SSC tray icon, scroll to Groups, and choose Configure Groups. Figure 4-10 appears.
Figure 4-10 Connection Groups Window
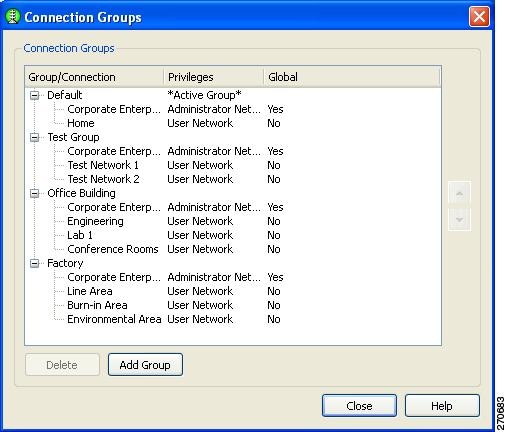
From the Connection Groups window, the user can add new groups or delete user-created network connections or groups.
Note ![]() Pre-configured connections cannot be deleted by the user.
Pre-configured connections cannot be deleted by the user.

Tip ![]() Groups should be limited to a maximum of 8-10 profiles. Creating large groups can result in connection delays due to the time used scanning for unavailable network connections.
Groups should be limited to a maximum of 8-10 profiles. Creating large groups can result in connection delays due to the time used scanning for unavailable network connections.
When complete, the user clicks the Close button.
Menu Controls
The main SSC GUI menu contains three menu selections:
•![]() Settings—Used to enable or disable SSC or the radio.
Settings—Used to enable or disable SSC or the radio.
•![]() Group—Used to select, add, or delete groups.
Group—Used to select, add, or delete groups.
•![]() Help—Used to obtain helpful information, repair SSC, enable packet capture, or obtain SSC version information.
Help—Used to obtain helpful information, repair SSC, enable packet capture, or obtain SSC version information.
Settings Menu
When the user clicks Settings, a drop-down list appears (see Figure 4-11).
Figure 4-11 Settings Menu Options

The Settings menu contains these options:
•![]() Enable Client—Controls whether SSC is managing the network adapters.
Enable Client—Controls whether SSC is managing the network adapters.
–![]() When checked, the SSC is managing all wired and wireless adapters according to the allowed media policy setting of the deployed configuration file.
When checked, the SSC is managing all wired and wireless adapters according to the allowed media policy setting of the deployed configuration file.
–![]() When unchecked, SSC is disabled and has relinquished control of all network adapters.
When unchecked, SSC is disabled and has relinquished control of all network adapters.
•![]() Enable Wi-Fi Radio—Controls the state of the radio in all managed wireless adapters.
Enable Wi-Fi Radio—Controls the state of the radio in all managed wireless adapters.
–![]() When checked, all wireless adapters radios are enabled and active.
When checked, all wireless adapters radios are enabled and active.
–![]() When unchecked, all wireless adapter radios are disable and turned off.
When unchecked, all wireless adapter radios are disable and turned off.
Groups Menu
When the user clicks Groups, a drop-down list appears (see Figure 4-12).
Figure 4-12 Main SSC GUI Groups
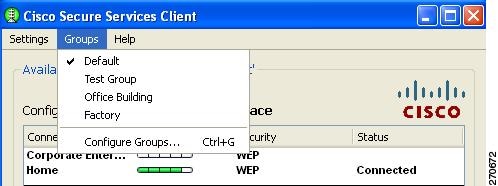
The Groups menu provides these features:
•![]() Displays a list of configured groups.
Displays a list of configured groups.
–![]() A checkmark indicates the active group.
A checkmark indicates the active group.
–![]() The user can click on a listed group to activate the selected group.
The user can click on a listed group to activate the selected group.
•![]() Configure Groups—Allows the user to create new groups and to delete user-created groups and configured connections. For additional information, see the "Managing Network Connection Groups" section.
Configure Groups—Allows the user to create new groups and to delete user-created groups and configured connections. For additional information, see the "Managing Network Connection Groups" section.
Help Menu
When the user clicks Help, a drop-down menu appears with these options:
•![]() Help—Opens the Help interface and provides helpful information.
Help—Opens the Help interface and provides helpful information.
•![]() Repair—Forces a restart of the SSC service and causes the following actions:
Repair—Forces a restart of the SSC service and causes the following actions:
–![]() The SSC tray icon displays a red x while the SSC service is restarting.
The SSC tray icon displays a red x while the SSC service is restarting.
–![]() SSC detects and processes any new configuration settings.
SSC detects and processes any new configuration settings.
–![]() SSC restarts in automatic connection mode from the top of the connection list for the previously active group.
SSC restarts in automatic connection mode from the top of the connection list for the previously active group.
•![]() About—Displays the product name and version number.
About—Displays the product name and version number.
Using the SSC Tray Icon
The SSC tray icon provides two convenient ways for the user to activate a desired connection:
•![]() Double-click the SSC tray icon to activate the main SSC GUI window (see Figure 4-1).
Double-click the SSC tray icon to activate the main SSC GUI window (see Figure 4-1).
•![]() Right-click the SSC tray icon to activate the icon menu (see Figure 4-13).
Right-click the SSC tray icon to activate the icon menu (see Figure 4-13).
Figure 4-13 SSC Icon Right-Click Menu
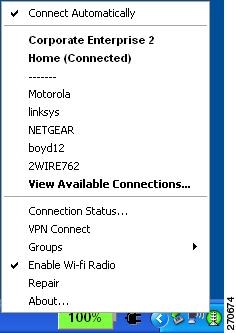
The SSC icon right-click menu provides shortcuts to many of the controls available on the main SSC GUI window:
•![]() Connect Automatically—Indicates the operating mode of SSC.
Connect Automatically—Indicates the operating mode of SSC.
–![]() When checked, SSC automatically chooses the best available configured connection.
When checked, SSC automatically chooses the best available configured connection.
–![]() When unchecked, SSC will only connect to the checked configured connection in the list below.
When unchecked, SSC will only connect to the checked configured connection in the list below.
•![]() Configured connections are indicated in bold.
Configured connections are indicated in bold.
–![]() When a connection in this list is checked, the SSC Connect Automatically feature is turned off and an exclusive connection is being attempted on this connection.
When a connection in this list is checked, the SSC Connect Automatically feature is turned off and an exclusive connection is being attempted on this connection.
–![]() When a connection in this list is followed by (connected), SSC is currently connected to the indicated configured connection.
When a connection in this list is followed by (connected), SSC is currently connected to the indicated configured connection.
–![]() When the user clicks a connection in this list, SSC attempts to connect to the specified configured connection. If the connection fails, SSC continues to search for the next best connection from the configured connections list.
When the user clicks a connection in this list, SSC attempts to connect to the specified configured connection. If the connection fails, SSC continues to search for the next best connection from the configured connections list.
•![]() Detected scan-list networks are listed directly below the dotted line.
Detected scan-list networks are listed directly below the dotted line.
–![]() When the user clicks a network in the scan-list, SSC attempts to connect to the specified network. If the network has security enabled, SSC prompts the user to enter the needed Key information.
When the user clicks a network in the scan-list, SSC attempts to connect to the specified network. If the network has security enabled, SSC prompts the user to enter the needed Key information.
After the user enters the needed security information, if the connection attempt fails, SSC continues to search for the next best connection from the configured connection list. The new network connection remains in the configured connection list.
•![]() Connection Status—Provides the user with valuable connection information.
Connection Status—Provides the user with valuable connection information.
–![]() When Connection Status is clicked, the Connection Status window appears and provides connection, security, and Wi-Fi setting information.The user can click the Help button on the Connection Status window to obtain information about the window elements and values.
When Connection Status is clicked, the Connection Status window appears and provides connection, security, and Wi-Fi setting information.The user can click the Help button on the Connection Status window to obtain information about the window elements and values.
•![]() Connect VPN—Allows the user to enable an automatic VPN connection.
Connect VPN—Allows the user to enable an automatic VPN connection.
–![]() When Connect VPN is clicked, the VPN Settings window appears and allows the user to enable automatic VPN connection on the currently active connection and to select a VPN connection entry.
When Connect VPN is clicked, the VPN Settings window appears and allows the user to enable automatic VPN connection on the currently active connection and to select a VPN connection entry.
•![]() Groups—Displays a list of configured connection groups and allows the user to add or delete connection groups.
Groups—Displays a list of configured connection groups and allows the user to add or delete connection groups.
–![]() Configure Groups—When Configure Groups is clicked, the Connection Groups window appears and displays a list of configured connection groups. The user can click the Help button on the Connection Groups window to obtain information about the window elements and values.
Configure Groups—When Configure Groups is clicked, the Connection Groups window appears and displays a list of configured connection groups. The user can click the Help button on the Connection Groups window to obtain information about the window elements and values.
•![]() Enable Wi-Fi Radio—Allows the user to turn the radio on and off.
Enable Wi-Fi Radio—Allows the user to turn the radio on and off.
•![]() Repair—Allows the user to restart SSC and enable its repair procedure.
Repair—Allows the user to restart SSC and enable its repair procedure.
•![]() About—Displays the product name and version information.
About—Displays the product name and version information.
SSC Tray Icon
The SSC system notification tray icons are explained in Table 4-2.


Note ![]() A blue background with a dashed line indicates an unsecured, open connection. A green background with a solid border indicates a secured connection. The lock indicates a VPN connected state. An animated state (pulsing lines radiating out from center) indicates SSC is trying to make a connection.
A blue background with a dashed line indicates an unsecured, open connection. A green background with a solid border indicates a secured connection. The lock indicates a VPN connected state. An animated state (pulsing lines radiating out from center) indicates SSC is trying to make a connection.
 Feedback