- Preface
- Chapter 1 - Product Overview
- Chapter 2 - Preparing for Installation
- Chapter 3 - Installing the Client Adapter
- Chapter 4 - Using the Profile Manager
- Chapter 5 - Configuring the Client Adapter
- Chapter 6 - Using EAP Authentication
- Chapter 7 - Viewing Status and Statistics
- Chapter 8 - Using the Aironet System Tray Utility (ASTU)
- Chapter 9 - Routine Procedures
- Chapter 10 - Troubleshooting
- Appendix A - Technical Specifications
- Appendix B - Translated Safety Warnings
- Appendix C - Declarations of Conformity and Regulatory Information
- Appendix D - Channels, Power Levels, and Antenna Gains
- Appendix E - Configuring the Client Adapter through the Windows XP Operating System
- Glossary
- Index
Cisco Aironet 802.11a/b/g Wireless LAN Client Adapters (CB21AG and PI21AG) Installation and Configuration Guide, OL-4211-02
Bias-Free Language
The documentation set for this product strives to use bias-free language. For the purposes of this documentation set, bias-free is defined as language that does not imply discrimination based on age, disability, gender, racial identity, ethnic identity, sexual orientation, socioeconomic status, and intersectionality. Exceptions may be present in the documentation due to language that is hardcoded in the user interfaces of the product software, language used based on RFP documentation, or language that is used by a referenced third-party product. Learn more about how Cisco is using Inclusive Language.
- Updated:
- June 29, 2007
Chapter: Chapter 6 - Using EAP Authentication
Using EAP Authentication
This chapter explains the sequence of events that occurs and the actions you must take when a profile that is set for EAP authentication is selected for use.
The following topics are covered in this chapter:
•![]() Using LEAP with the Windows Username and Password
Using LEAP with the Windows Username and Password
•![]() Using LEAP with a Manually Prompted Login
Using LEAP with a Manually Prompted Login
•![]() Using LEAP with a Saved Username and Password
Using LEAP with a Saved Username and Password
Overview
This chapter explains the sequence of events that occurs after you (or auto profile selection) select a profile that uses EAP authentication or you eject and reinsert the client adapter, reboot the computer, or log on while this profile is selected. The chapter contains six sections based on the profile's authentication type and its username and password settings:
•![]() LEAP with the Windows username and password, page 3
LEAP with the Windows username and password, page 3
•![]() LEAP with a manually prompted login, page 4
LEAP with a manually prompted login, page 4
•![]() LEAP with a saved username and password, page 7
LEAP with a saved username and password, page 7
•![]() EAP-TLS, page 8
EAP-TLS, page 8
•![]() PEAP (EAP-GTC), page 8
PEAP (EAP-GTC), page 8
•![]() PEAP (EAP-MSCHAP V2), page 9
PEAP (EAP-MSCHAP V2), page 9
Also provided are an overview of LEAP authentication and instructions for restarting the LEAP authentication process when necessary (see the "Using LEAP" section below).
Follow the instructions for your profile's authentication type and credential settings to successfully authenticate.

Note ![]() If any error messages appear during authentication, refer to Chapter 10 for explanations and recommended actions.
If any error messages appear during authentication, refer to Chapter 10 for explanations and recommended actions.
Using LEAP
When LEAP authentication begins, the LEAP Authentication Status window appears (see Figure 6-1).
Figure 6-1 LEAP Authentication Status Window
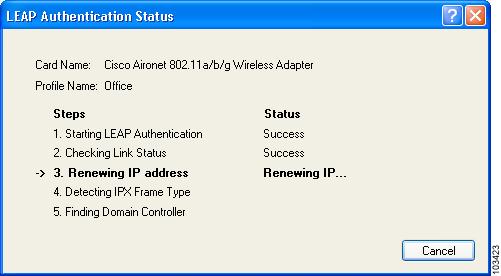
This window provides information about the status of LEAP authentication. Table 6-1 lists and explains the stages of LEAP authentication. As each stage is completed, a status message (such as Success) appears in the Status field. If any error messages appear, refer to the "Error Messages" section for an explanation and the recommended action to take.
To force your client adapter to try to reauthenticate using the username and password of the current profile, choose Reauthenticate from the ASTU pop-up menu or the ADU Action drop-down menu. When you choose this option, the LEAP Authentication Status window appears, and the authentication process begins.
If your client adapter is unable to authenticate using the specified username and password, you are prompted to re-enter them. If you click Cancel, a message appears indicating that the current profile will be disabled until you choose the Reauthenticate option, reboot your computer, or eject and reinsert the client adapter.
Using LEAP with the Windows Username and Password
After Profile Selection or Card Insertion
After you (or auto profile selection) select a profile that uses your Windows username and password for LEAP authentication or you eject and reinsert the client adapter while this profile is selected, the following events occur:
1. ![]() The LEAP Authentication Status window appears.
The LEAP Authentication Status window appears.
2. ![]() If your client adapter authenticates, the window shows that each stage was successful and then disappears. ASTU and the Link Status field on the ADU Current Status window show Authenticated.
If your client adapter authenticates, the window shows that each stage was successful and then disappears. ASTU and the Link Status field on the ADU Current Status window show Authenticated.
If the authentication attempt fails, ASTU and ADU show Authentication Failed, and an error message appears after the LEAP timeout period has expired. Refer to the "Error Messages" section for the necessary action to take.
After a Reboot or Logon
After your computer reboots or you log on, follow these steps to LEAP authenticate.
Step 1 ![]() When the Windows login window appears, enter your Windows username and password and click OK. The domain name is optional.
When the Windows login window appears, enter your Windows username and password and click OK. The domain name is optional.
Note ![]() If your computer has Novell Client 32 software installed, a separate LEAP login window appears before the Novell login window. If this occurs, enter your Windows and Novell username and password in the login windows and click OK.
If your computer has Novell Client 32 software installed, a separate LEAP login window appears before the Novell login window. If this occurs, enter your Windows and Novell username and password in the login windows and click OK.
The LEAP Authentication Status window appears.
Step 2 ![]() If your client adapter authenticates, the window shows that each stage was successful and then disappears. ASTU and the Link Status field on the ADU Current Status window show Authenticated.
If your client adapter authenticates, the window shows that each stage was successful and then disappears. ASTU and the Link Status field on the ADU Current Status window show Authenticated.
If the authentication attempt fails, ASTU and ADU show Authentication Failed, and an error message appears after the LEAP timeout period has expired. Refer to the "Error Messages" section for the necessary action to take.
Step 3 ![]() Windows continues to log you onto the system.
Windows continues to log you onto the system.
Using LEAP with a Manually Prompted Login
After Profile Selection
After you (or auto profile selection) select a profile that uses LEAP authentication with a manually prompted login, follow these steps to LEAP authenticate.
Note ![]() This procedure is applicable the first time a manual LEAP profile is selected. After you follow these steps to enter your LEAP credentials, you can switch profiles without having to re-enter your credentials until you reboot your computer, eject and reinsert your client adapter, or change the profile in any way (including its priority in auto profile selection).
This procedure is applicable the first time a manual LEAP profile is selected. After you follow these steps to enter your LEAP credentials, you can switch profiles without having to re-enter your credentials until you reboot your computer, eject and reinsert your client adapter, or change the profile in any way (including its priority in auto profile selection).
Step 1 ![]() Perform one of the following:
Perform one of the following:
•![]() If you activate a manual LEAP profile, the Enter Wireless Network Password window appears (see Figure 6-2).
If you activate a manual LEAP profile, the Enter Wireless Network Password window appears (see Figure 6-2).
Figure 6-2 Enter Wireless Network Password Window
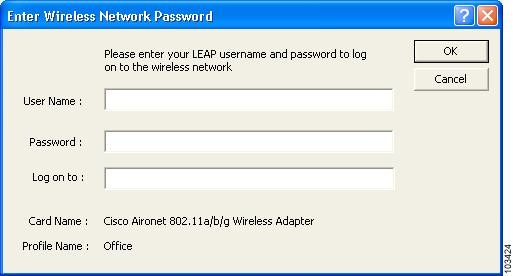
Enter your LEAP username and password and click OK. The domain name can be entered in the Log On To field; it is optional.
•![]() If auto profile selection selects a manual LEAP profile, you must choose the Manual LEAP Login option from ASTU or the ADU Action drop-down menu (see Figure 6-3).
If auto profile selection selects a manual LEAP profile, you must choose the Manual LEAP Login option from ASTU or the ADU Action drop-down menu (see Figure 6-3).
Figure 6-3 Action Drop-Down Menu

When the Enter Wireless Network Password window appears (see Figure 6-2), enter your LEAP username and password and click OK. The domain name is optional.
Step 2 ![]() The LEAP Authentication Status window appears. If your client adapter authenticates, the window shows that each stage was successful and then disappears. ASTU and the Link Status field on the ADU Current Status window show Authenticated.
The LEAP Authentication Status window appears. If your client adapter authenticates, the window shows that each stage was successful and then disappears. ASTU and the Link Status field on the ADU Current Status window show Authenticated.
If the authentication attempt fails, ASTU and ADU show Authentication Failed, and an error message appears after the LEAP timeout period has expired. Refer to the "Error Messages" section for the necessary action to take.
After a Reboot, Logon, or Card Insertion
After your computer reboots, you log on, or you eject and reinsert the client adapter, the adapter does not automatically attempt to authenticate. You must manually invoke the authentication process. To do so, follow these steps.
Step 1 ![]() If you rebooted your computer or logged on, complete your standard Windows login.
If you rebooted your computer or logged on, complete your standard Windows login.
Step 2 ![]() Open ASTU or ADU.
Open ASTU or ADU.
Step 3 ![]() Choose the Manual LEAP Login option from the ASTU pop-up menu or the ADU Action drop-down menu.
Choose the Manual LEAP Login option from the ASTU pop-up menu or the ADU Action drop-down menu.
Step 4 ![]() When the Enter Wireless Network Password window appears (see Figure 6-4), enter your LEAP username and password and click OK. The domain name can be entered in the Log On To field; it is optional.
When the Enter Wireless Network Password window appears (see Figure 6-4), enter your LEAP username and password and click OK. The domain name can be entered in the Log On To field; it is optional.
Figure 6-4 Enter Wireless Network Password Window
The LEAP Authentication Status window appears.
Step 5 ![]() If your client adapter authenticates, the window shows that each stage was successful and then disappears. ASTU and the Link Status field on the ADU Current Status window show Authenticated.
If your client adapter authenticates, the window shows that each stage was successful and then disappears. ASTU and the Link Status field on the ADU Current Status window show Authenticated.
If the authentication attempt fails, ASTU and ADU show Authentication Failed, and an error message appears after the LEAP timeout period has expired. Refer to the "Error Messages" section for the necessary action to take.
Using LEAP with a Saved Username and Password
After Profile Selection or Card Insertion
After you (or auto profile selection) select a profile that uses LEAP authentication with a saved LEAP username and password or you eject and reinsert the client adapter while this profile is selected, the following events occur:
1. ![]() The LEAP Authentication Status window appears.
The LEAP Authentication Status window appears.
2. ![]() If your client adapter authenticates, the window shows that each stage was successful and then disappears. ASTU and the Link Status field on the ADU Current Status window show Authenticated.
If your client adapter authenticates, the window shows that each stage was successful and then disappears. ASTU and the Link Status field on the ADU Current Status window show Authenticated.
If the authentication attempt fails, ASTU and ADU show Authentication Failed, and an error message appears after the LEAP timeout period has expired. Refer to the "Error Messages" section for the necessary action to take.
After a Reboot or Logon
After your computer reboots or you log on, the following events occur:
1. ![]() After you enter your Windows username and password, the LEAP authentication process begins automatically using your saved LEAP username and password.
After you enter your Windows username and password, the LEAP authentication process begins automatically using your saved LEAP username and password.
Note ![]() If you unchecked the No Network Connection Unless User Is Logged In check box on the LEAP Settings window, the LEAP authentication process begins before the Windows login window appears.
If you unchecked the No Network Connection Unless User Is Logged In check box on the LEAP Settings window, the LEAP authentication process begins before the Windows login window appears.
2. ![]() If your client adapter authenticates, the LEAP Authentication Status window shows that each stage was successful and then disappears. ASTU and the Link Status field on the ADU Current Status window show Authenticated.
If your client adapter authenticates, the LEAP Authentication Status window shows that each stage was successful and then disappears. ASTU and the Link Status field on the ADU Current Status window show Authenticated.
If the authentication attempt fails, ASTU and ADU show Authentication Failed, and an error message appears after the LEAP timeout period has expired. Refer to the "Error Messages" section for the necessary action to take.
3. ![]() Windows continues to log you onto the system.
Windows continues to log you onto the system.
Using EAP-TLS
After you (or auto profile selection) select a profile that uses EAP-TLS authentication or you eject and reinsert the client adapter, reboot the computer, or log on while this profile is selected, the EAP authentication process begins automatically, and the client adapter should EAP authenticate.
If your client adapter authenticates, ASTU and the Link Status field on the ADU Current Status window show Authenticated. If the authentication attempt fails, ASTU and ADU show Authentication Failed.
Using PEAP (EAP-GTC)
After you (or auto profile selection) select a profile that uses PEAP (EAP-GTC) authentication or you eject and reinsert the client adapter, reboot the computer, or log on while this profile is selected, follow the steps in one of the sections below to EAP authenticate. Choose the section appropriate for your user database.
Windows NT or 2000 Domain Databases or LDAP Databases Only
The EAP authentication process begins automatically. The client adapter should EAP authenticate using either your Windows credentials or the username and password entered in the Define PEAP (EAP-GTC) Configuration window. If your client adapter authenticates, ASTU and the Link Status field on the ADU Current Status window show Authenticated. If the authentication attempt fails, ASTU and ADU show Authentication Failed.
OTP Databases Only
Step 1 ![]() Use your hardware token device or SofToken program to obtain the one-time password.
Use your hardware token device or SofToken program to obtain the one-time password.
Step 2 ![]() When the Token Configuration window appears (see Figure 6-5), enter the one-time password.
When the Token Configuration window appears (see Figure 6-5), enter the one-time password.
Figure 6-5 Token Configuration Window

Note ![]() The username is filled in automatically.
The username is filled in automatically.
Step 3 ![]() Click OK to begin the authentication process.
Click OK to begin the authentication process.
Note ![]() If the password is invalid or entered incorrectly, the Token Configuration window reappears, enabling you to re-enter it.
If the password is invalid or entered incorrectly, the Token Configuration window reappears, enabling you to re-enter it.
If your client adapter authenticates, ASTU and the Link Status field on the ADU Current Status window show Authenticated. If the authentication attempt fails, ASTU and ADU show Authentication Failed.
Using PEAP (EAP-MSCHAP V2)
After you (or auto profile selection) select a profile that uses PEAP (EAP-MSCHAP V2) authentication or you eject and reinsert the client adapter, reboot the computer, or log on while this profile is selected, the EAP authentication process begins automatically. The client adapter should EAP authenticate using either your Windows credentials or the username and password entered in the Define PEAP (EAP-MSCHAP V2) Configuration window.
If your client adapter authenticates, ASTU and the Link Status field on the ADU Current Status window show Authenticated. If the authentication attempt fails, ASTU and ADU show Authentication Failed.
 Feedback