- Preface
- Chapter 1 - Product Overview
- Chapter 2 - Preparing for Installation
- Chapter 3 - Installing the Client Adapter
- Chapter 4 - Using the Profile Manager
- Chapter 5 - Configuring the Client Adapter
- Chapter 6 - Using EAP Authentication
- Chapter 7 - Performing Diagnostics
- Chapter 8 - Routine Procedures
- Chapter 9 - Troubleshooting
- Appendix A - Technical Specifications
- Appendix B - Translated Safety Warnings
- Appendix C - Declarations of Conformity and Regulatory Information
- Appendix D - Channels, Power Levels, and Antenna Gains
- Appendix E - Configuring the Client Adapter through Windows CE .NET
- Appendix F - Performing a Site Survey
- Glossary
- Index
Cisco Aironet Wireless LAN Client Adapters Installation and Configuration Guide for Windows CE, OL-1375-04
Bias-Free Language
The documentation set for this product strives to use bias-free language. For the purposes of this documentation set, bias-free is defined as language that does not imply discrimination based on age, disability, gender, racial identity, ethnic identity, sexual orientation, socioeconomic status, and intersectionality. Exceptions may be present in the documentation due to language that is hardcoded in the user interfaces of the product software, language used based on RFP documentation, or language that is used by a referenced third-party product. Learn more about how Cisco is using Inclusive Language.
- Updated:
- May 4, 2007
Chapter: Appendix E - Configuring the Client Adapter through Windows CE .NET
Configuring the Client Adapter through
Windows CE .NET
This appendix explains how to configure and use the client adapter with Windows CE .NET.
The following topics are covered in this appendix:
•![]() Preparing for Configuration (EAP-TLS and PEAP Only)
Preparing for Configuration (EAP-TLS and PEAP Only)
•![]() Configuring the Client Adapter
Configuring the Client Adapter
•![]() Associating to an Access Point Using Windows CE .NET
Associating to an Access Point Using Windows CE .NET
Overview
This appendix provides instructions for configuring the client adapter through Windows CE .NET (instead of through ACU). The "Overview of Security Features" section below describes the security options that are available for use with this operating system so that you can make an informed decision before you begin the configuration process. In addition, the appendix also provides basic information on using Windows CE .NET to specify the networks to which the client adapter associates.

Note ![]() The instructions in this appendix are specific to PPC 2003 devices. The same configuration parameters must be set on other Windows CE .NET devices; however, the procedure used to set those parameters may differ. If you require more information on configuring or using your client adapter with Windows CE .NET, refer to the documentation that came with your device and Microsoft's documentation for Windows CE .NET.
The instructions in this appendix are specific to PPC 2003 devices. The same configuration parameters must be set on other Windows CE .NET devices; however, the procedure used to set those parameters may differ. If you require more information on configuring or using your client adapter with Windows CE .NET, refer to the documentation that came with your device and Microsoft's documentation for Windows CE .NET.
Overview of Security Features
When you use your client adapter with Windows CE .NET, you can protect your data as it is transmitted through your wireless network by encrypting it through the use of wired equivalent privacy (WEP) encryption keys. With WEP encryption, the transmitting device encrypts each packet with a WEP key, and the receiving device uses that same key to decrypt each packet.
The WEP keys used to encrypt and decrypt transmitted data can be statically associated with your adapter or dynamically created as part of the EAP authentication process. The information in the "Static WEP Keys" and "Dynamic WEP Keys with EAP" sections below can help you to decide which type of WEP keys you want to use. Dynamic WEP keys with EAP offer a higher degree of security than static WEP keys.
WEP keys, whether static or dynamic, are either 40 or 128 bits in length. 128-bit WEP keys offer a greater level of security than 40-bit WEP keys.
Static WEP Keys
Each device (or profile) within your wireless network can be assigned up to four static WEP keys. If a device receives a packet that is not encrypted with the appropriate key (as the WEP keys of all devices that are to communicate with each other must match), the device discards the packet and never delivers it to the intended receiver.
Static WEP keys are write-only and temporary; however, you do not need to re-enter them each time the client adapter is inserted or the Windows CE .NET device is reset. This is because the keys are stored (in an encrypted format for security reasons) in the registry of the device. When the driver loads and reads the client adapter's registry parameters, it also finds the static WEP keys, unencrypts them, and stores them in volatile memory on the adapter.
Dynamic WEP Keys with EAP
The new standard for wireless LAN security, as defined by IEEE, is called 802.1X for 802.11, or simply 802.1X. An access point that supports 802.1X and its protocol, Extensible Authentication Protocol (EAP), acts as the interface between a wireless client and an authentication server, such as a RADIUS server, to which the access point communicates over the wired network.
Two 802.1X authentication types are available for PPC 2003 and other Windows CE .NET 4.2 devices when you configure your client adapter through Windows CE .NET:
•![]() EAP-TLS—This authentication type is enabled or disabled through the operating system and uses a dynamic session-based WEP key, which is derived from the client adapter and RADIUS server, to encrypt data. EAP-TLS requires the use of certificates for authentication.
EAP-TLS—This authentication type is enabled or disabled through the operating system and uses a dynamic session-based WEP key, which is derived from the client adapter and RADIUS server, to encrypt data. EAP-TLS requires the use of certificates for authentication.
RADIUS servers that support EAP-TLS include Cisco Secure ACS version 3.0 or later and Cisco Access Registrar version 1.8 or later.
•![]() Cisco PEAP—Cisco PEAP authentication (also known as PEAP-GTC) is designed to support One-Time Password (OTP), Windows NT or 2000 domain, and LDAP user databases over a wireless LAN. It is based on EAP-TLS authentication but uses a password instead of a client certificate for authentication. Cisco PEAP is enabled or disabled through the operating system and uses a dynamic session-based WEP key, which is derived from the client adapter and RADIUS server, to encrypt data. Cisco PEAP requires you to enter your username and password in order to start the authentication process and gain access to the network. RADIUS servers that support Cisco PEAP authentication include Cisco Secure ACS version 3.1 or later.
Cisco PEAP—Cisco PEAP authentication (also known as PEAP-GTC) is designed to support One-Time Password (OTP), Windows NT or 2000 domain, and LDAP user databases over a wireless LAN. It is based on EAP-TLS authentication but uses a password instead of a client certificate for authentication. Cisco PEAP is enabled or disabled through the operating system and uses a dynamic session-based WEP key, which is derived from the client adapter and RADIUS server, to encrypt data. Cisco PEAP requires you to enter your username and password in order to start the authentication process and gain access to the network. RADIUS servers that support Cisco PEAP authentication include Cisco Secure ACS version 3.1 or later.
Note ![]() To use Cisco PEAP authentication, you must have checked the Install Cisco PEAP Support check box during installation.
To use Cisco PEAP authentication, you must have checked the Install Cisco PEAP Support check box during installation.
When you enable Require EAP on your access point and configure your client adapter for EAP-TLS or PEAP using Windows CE .NET, authentication to the network occurs in the following sequence:
1. ![]() The client associates to an access point and begins the authentication process.
The client associates to an access point and begins the authentication process.
Note ![]() The client does not gain access to the network until authentication between the client and the RADIUS server is successful.
The client does not gain access to the network until authentication between the client and the RADIUS server is successful.
2. ![]() Communicating through the access point, the client and RADIUS server complete the authentication process, with the password (PEAP) or certificate (EAP-TLS) being the shared secret for authentication. The password is never transmitted during the process.
Communicating through the access point, the client and RADIUS server complete the authentication process, with the password (PEAP) or certificate (EAP-TLS) being the shared secret for authentication. The password is never transmitted during the process.
3. ![]() If authentication is successful, the client and RADIUS server derive a dynamic, session-based WEP key that is unique to the client.
If authentication is successful, the client and RADIUS server derive a dynamic, session-based WEP key that is unique to the client.
4. ![]() The RADIUS server transmits the key to the access point using a secure channel on the wired LAN.
The RADIUS server transmits the key to the access point using a secure channel on the wired LAN.
5. ![]() For the length of a session, or time period, the access point and the client use this key to encrypt or decrypt all unicast packets (and broadcast packets if the access point is set up to do so) that travel between them.
For the length of a session, or time period, the access point and the client use this key to encrypt or decrypt all unicast packets (and broadcast packets if the access point is set up to do so) that travel between them.
Note ![]() Refer to the IEEE 802.11 Standard for more information on 802.1X authentication and to the following URL for additional information on RADIUS servers: http://www.cisco.com/univercd/cc/td/doc/product/software/ios120/12cgcr/secur_c/scprt2/scrad.htm
Refer to the IEEE 802.11 Standard for more information on 802.1X authentication and to the following URL for additional information on RADIUS servers: http://www.cisco.com/univercd/cc/td/doc/product/software/ios120/12cgcr/secur_c/scprt2/scrad.htm
Preparing for Configuration (EAP-TLS and PEAP Only)
If you are planning to use EAP-TLS or PEAP authentication with your Windows CE .NET device, you must make sure that your system meets certain requirements and obtain any necessary certificates before you can configure your client adapter. If you are not planning to use EAP-TLS or PEAP authentication, go to the "Configuring the Client Adapter" section.
System Requirements
Before you can enable EAP-TLS or PEAP authentication, your network devices must meet the following requirements:
•![]() The Windows CE device must be a PPC 2003 or other Windows CE .NET 4.2 device.
The Windows CE device must be a PPC 2003 or other Windows CE .NET 4.2 device.
•![]() Client adapters must support WEP and use firmware version 5.40.10 or later.
Client adapters must support WEP and use firmware version 5.40.10 or later.
•![]() Access points to which your client adapter will attempt to authenticate must use the following firmware versions or later: 11.23T (340 and 350 series access points), 12.2(4)JA (1100 series access points), or 11.54T (1200 series access points).
Access points to which your client adapter will attempt to authenticate must use the following firmware versions or later: 11.23T (340 and 350 series access points), 12.2(4)JA (1100 series access points), or 11.54T (1200 series access points).
•![]() All necessary infrastructure devices (for example, access points, servers, gateways, user databases, etc.) must be properly configured for the authentication type you plan to enable on the client.
All necessary infrastructure devices (for example, access points, servers, gateways, user databases, etc.) must be properly configured for the authentication type you plan to enable on the client.
Obtaining and Importing CA and User Certificates
EAP-TLS and PEAP authentication require the use of certificates. EAP-TLS requires both a Certificate Authority (CA) certificate and a user certificate while PEAP requires only a CA certificate. Contact your system administrator to obtain the necessary certificate(s). Then import the certificate(s) on your Windows CE .NET device. Once you import the necessary certificates, you should not have to repeat this procedure until the certificates expire (at a time that is predetermined by the server).
Note ![]() Refer to your Microsoft documentation for instructions on importing certificate files on your Windows CE .NET device.
Refer to your Microsoft documentation for instructions on importing certificate files on your Windows CE .NET device.
Configuring the Client Adapter
Follow these steps to configure your client adapter using Windows CE .NET.
Step 1 ![]() Make sure the client adapter is inserted in the Windows CE .NET device.
Make sure the client adapter is inserted in the Windows CE .NET device.
Step 2 ![]() Double-tap the ACU icon on your desktop or select Start > Programs > Cisco > ACU.
Double-tap the ACU icon on your desktop or select Start > Programs > Cisco > ACU.
Step 3 ![]() On the Profiles screen, select <External Settings> from the Select Active Profile drop-down menu.
On the Profiles screen, select <External Settings> from the Select Active Profile drop-down menu.
Step 4 ![]() When prompted, tap OK. Then reset your Windows CE .NET device or eject and reinsert the client adapter.
When prompted, tap OK. Then reset your Windows CE .NET device or eject and reinsert the client adapter.
Step 5 ![]() Tap OK to save your settings.
Tap OK to save your settings.
Step 6 ![]() Select Start > Settings > the Connections tab > Connections > the Advanced tab > Network Card. The Configure Wireless Networks screen (Wireless tab) appears (see Figure E-1).
Select Start > Settings > the Connections tab > Connections > the Advanced tab > Network Card. The Configure Wireless Networks screen (Wireless tab) appears (see Figure E-1).
Figure E-1 Configure Wireless Networks Screen (Wireless Tab)
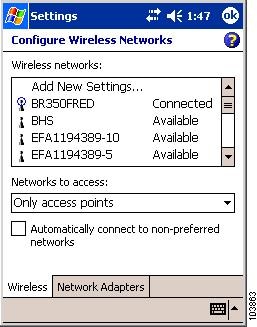
Step 7 ![]() Tap the SSID of the access point to which you want the client adapter to associate from the list of wireless networks. If the SSID of the access point you want to use is not listed or you are planning to operate the client adapter in an ad hoc network (a computer-to-computer network without access points), tap Add New Settings.
Tap the SSID of the access point to which you want the client adapter to associate from the list of wireless networks. If the SSID of the access point you want to use is not listed or you are planning to operate the client adapter in an ad hoc network (a computer-to-computer network without access points), tap Add New Settings.
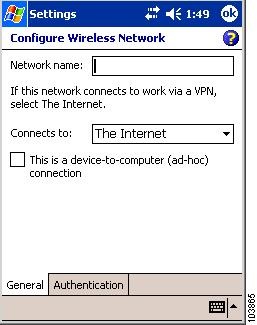
The Configure Wireless Network screen (General tab) appears (see Figure E-2).
Figure E-2 Configure Wireless Network Screen (General Tab)
Step 8 ![]() Perform one of the following:
Perform one of the following:
•![]() If you selected an SSID from the list of wireless networks, make sure the SSID appears in the Network name field.
If you selected an SSID from the list of wireless networks, make sure the SSID appears in the Network name field.
•![]() If you selected Add New Settings, enter the case-sensitive SSID of the access point to which you want the client adapter to associate or the name of the ad hoc network in the Network name field.
If you selected Add New Settings, enter the case-sensitive SSID of the access point to which you want the client adapter to associate or the name of the ad hoc network in the Network name field.
Step 9 ![]() Check the This is a device-to-computer (ad-hoc) connection check box if you are planning to operate the client adapter in an ad hoc network.
Check the This is a device-to-computer (ad-hoc) connection check box if you are planning to operate the client adapter in an ad hoc network.
Step 10 ![]() Tap the Authentication tab. The Configure Network Authentication screen appears (see Figure E-3).
Tap the Authentication tab. The Configure Network Authentication screen appears (see Figure E-3).
Figure E-3 Configure Network Authentication Screen
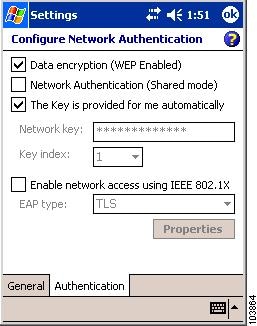
Step 11 ![]() Check the Data encryption (WEP Enabled) check box if you are planning to use static or dynamic WEP.
Check the Data encryption (WEP Enabled) check box if you are planning to use static or dynamic WEP.
Step 12 ![]() Check the Network Authentication (Shared mode) check box if you want to use shared key (rather than open) authentication with the access point.
Check the Network Authentication (Shared mode) check box if you want to use shared key (rather than open) authentication with the access point.
Open authentication enables your client adapter, regardless of its WEP settings, to authenticate and attempt to communicate with an access point.
Shared key authentication enables your client adapter to communicate only with access points that have the same WEP key. Cisco recommends that shared key authentication not be used because it presents a security risk.
Note ![]() If you are planning to use EAP-TLS authentication, do not select this check box. EAP-TLS does not work with shared key authentication because shared key authentication requires the use of a WEP key, and a WEP key is not set for EAP-TLS until after the completion of EAP authentication.
If you are planning to use EAP-TLS authentication, do not select this check box. EAP-TLS does not work with shared key authentication because shared key authentication requires the use of a WEP key, and a WEP key is not set for EAP-TLS until after the completion of EAP authentication.
Step 13 ![]() Perform one of the following:
Perform one of the following:
•![]() If you are planning to use EAP-TLS or PEAP, which uses dynamic WEP keys, check the The Key is provided for me automatically check box.
If you are planning to use EAP-TLS or PEAP, which uses dynamic WEP keys, check the The Key is provided for me automatically check box.
•![]() If you are planning to use static WEP, follow these steps to enter up to four WEP keys.
If you are planning to use static WEP, follow these steps to enter up to four WEP keys.
Note ![]() The WEP key must be assigned to the same number on both the client adapter and the access point (in an infrastructure network) or other clients (in an ad hoc network).
The WEP key must be assigned to the same number on both the client adapter and the access point (in an infrastructure network) or other clients (in an ad hoc network).
Step 14 ![]() Perform one of the following:
Perform one of the following:
•![]() If you are not planning to use EAP authentication, tap OK to save your settings and to add this SSID to the list of wireless networks (see Figure E-1). The client adapter automatically attempts to associate to the network(s) in the order in which they are listed. When the client adapter is associated to an access point, the word Connected appears to the right of the network name in the list of wireless networks.
If you are not planning to use EAP authentication, tap OK to save your settings and to add this SSID to the list of wireless networks (see Figure E-1). The client adapter automatically attempts to associate to the network(s) in the order in which they are listed. When the client adapter is associated to an access point, the word Connected appears to the right of the network name in the list of wireless networks.
•![]() If you are planning to use EAP-TLS authentication, follow the instructions in the "Enabling EAP-TLS Authentication" section below.
If you are planning to use EAP-TLS authentication, follow the instructions in the "Enabling EAP-TLS Authentication" section below.
•![]() If you are planning to use PEAP authentication, follow the instructions in the "Enabling PEAP Authentication" section.
If you are planning to use PEAP authentication, follow the instructions in the "Enabling PEAP Authentication" section.
Enabling EAP-TLS Authentication
Follow these steps to prepare the client adapter to use EAP-TLS authentication, provided you have completed the initial configuration.
Step 1 ![]() Check the Enable network access using IEEE 802.1X check box.
Check the Enable network access using IEEE 802.1X check box.
Step 2 ![]() Select TLS in the EAP type drop-down box.
Select TLS in the EAP type drop-down box.
Step 3 ![]() If your Windows CE .NET device has more than one user certificate, tap the Properties button. On the Select Certificate screen, select the user certificate that you want to use and tap OK.
If your Windows CE .NET device has more than one user certificate, tap the Properties button. On the Select Certificate screen, select the user certificate that you want to use and tap OK.
Step 4 ![]() Tap OK to save your settings. The configuration is complete. The client adapter automatically attempts to associate to the network(s) in the order in which they are listed. When the client adapter is associated to an access point, the word Connected appears to the right of the network name in the list of wireless networks.
Tap OK to save your settings. The configuration is complete. The client adapter automatically attempts to associate to the network(s) in the order in which they are listed. When the client adapter is associated to an access point, the word Connected appears to the right of the network name in the list of wireless networks.
Step 5 ![]() Refer to the "Using EAP-TLS" section on page 6-4 for instructions on authenticating using EAP-TLS.
Refer to the "Using EAP-TLS" section on page 6-4 for instructions on authenticating using EAP-TLS.
Enabling PEAP Authentication
Follow these steps to prepare the client adapter to use PEAP authentication, provided you have completed the initial configuration.
Step 1 ![]() Check the Enable network access using IEEE 802.1X check box.
Check the Enable network access using IEEE 802.1X check box.
Step 2 ![]() Select Cisco PEAP in the EAP type drop-down box.
Select Cisco PEAP in the EAP type drop-down box.
Note ![]() If the Microsoft PEAP supplicant is installed (rather than the Cisco PEAP supplicant), PEAP (rather than Cisco PEAP) appears in the EAP type drop-down box. Follow the instructions in your Microsoft documentation to configure your client adapter to use Microsoft PEAP.
If the Microsoft PEAP supplicant is installed (rather than the Cisco PEAP supplicant), PEAP (rather than Cisco PEAP) appears in the EAP type drop-down box. Follow the instructions in your Microsoft documentation to configure your client adapter to use Microsoft PEAP.
Step 3 ![]() Tap the Properties button. The PEAP Properties screen appears (see Figure E-4).
Tap the Properties button. The PEAP Properties screen appears (see Figure E-4).
Figure E-4 PEAP Properties Screen
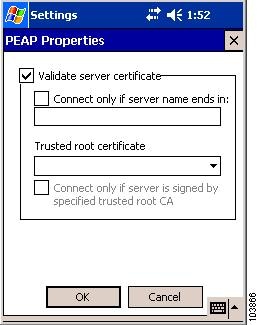
Step 4 ![]() Make sure the Validate server certificate check box is checked if server certificate validation is required (recommended).
Make sure the Validate server certificate check box is checked if server certificate validation is required (recommended).
Step 5 ![]() Check the Connect only if server name ends in check box and enter the appropriate server name suffix in the text box below.
Check the Connect only if server name ends in check box and enter the appropriate server name suffix in the text box below.
Note ![]() If you leave this field blank, you are prompted to accept a connection to the server to which your client adapter is connected during the authentication process.
If you leave this field blank, you are prompted to accept a connection to the server to which your client adapter is connected during the authentication process.
Step 6 ![]() Make sure that the name of the certificate authority from which the server certificate was downloaded appears in the Trusted root certificate field. If necessary, tap the arrow on the drop-down box and select the appropriate name.
Make sure that the name of the certificate authority from which the server certificate was downloaded appears in the Trusted root certificate field. If necessary, tap the arrow on the drop-down box and select the appropriate name.
Note ![]() If you leave this field blank, you are prompted to accept a connection to the root certification authority during the authentication process.
If you leave this field blank, you are prompted to accept a connection to the root certification authority during the authentication process.
Step 7 ![]() Check the Connect only if server is signed by specified trusted root CA check box if you want to ensure that the certificate server uses the trusted root certificate specified in the field above. This prevents the client from establishing connections to rogue access points.
Check the Connect only if server is signed by specified trusted root CA check box if you want to ensure that the certificate server uses the trusted root certificate specified in the field above. This prevents the client from establishing connections to rogue access points.
Step 8 ![]() Tap OK on each open screen to save your settings. The configuration is complete. The client adapter automatically attempts to associate to the network(s) in the order in which they are listed. When the client adapter is associated to an access point, the word Connected appears to the right of the network name in the list of wireless networks.
Tap OK on each open screen to save your settings. The configuration is complete. The client adapter automatically attempts to associate to the network(s) in the order in which they are listed. When the client adapter is associated to an access point, the word Connected appears to the right of the network name in the list of wireless networks.
Step 9 ![]() Refer to the "Using PEAP" section on page 6-5 for instructions on authenticating using PEAP.
Refer to the "Using PEAP" section on page 6-5 for instructions on authenticating using PEAP.
Associating to an Access Point Using Windows CE .NET
Windows CE .NET causes the client adapter's driver to automatically attempt to associate to the first network in the list of wireless networks (see Figure E-1). If the adapter fails to associate or loses association, it automatically switches to the next network in the list of wireless networks. The adapter does not switch networks as long as it remains associated to the access point. To force the client adapter to associate to a different access point, you must select a different network from the list of available networks and tap OK.
 Feedback