Cisco Aironet Configuration Administration Tool (ACAT), 1.3 Administrator Guide for Windows
Bias-Free Language
The documentation set for this product strives to use bias-free language. For the purposes of this documentation set, bias-free is defined as language that does not imply discrimination based on age, disability, gender, racial identity, ethnic identity, sexual orientation, socioeconomic status, and intersectionality. Exceptions may be present in the documentation due to language that is hardcoded in the user interfaces of the product software, language used based on RFP documentation, or language that is used by a referenced third-party product. Learn more about how Cisco is using Inclusive Language.
- Updated:
- May 4, 2007
Chapter: Installed Components Tab
Installed Components Tab
This chapter describes the Installed Components tab options. The following topics are covered in this section:
•![]() Installed Components Tab Window
Installed Components Tab Window
•![]() ACU
ACU
•![]() ACM
ACM
Installed Components Tab Window
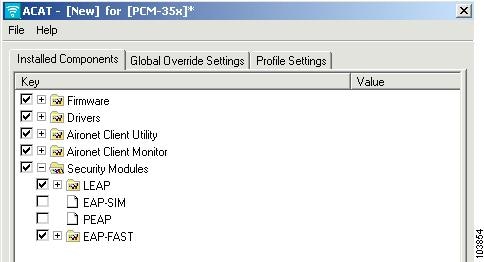
The Installed Components tab enables you to select the software components to be installed by the Install Wizard. All software components are bundled in the Install Wizard software package. Figure 2-1 shows software components on the Installed Components tab.
Figure 2-1 Installed Components Tab Window
To view software component installation parameters, you must expand the selection by clicking the plus/minus box next to the component (see Figure 2-2).
Figure 2-2 Software Component Installation Parameters

The software component check box specifies whether or not the component is installed by the Install Wizard. A check indicates that the component is installed. Check the check box to change the selection.

Note ![]() Some components cannot be installed separately. Therefore, when you select or deselect these components, the settings of other components may change. A Dependency Notice window appears when you select or deselect components that cannot be installed separately.
Some components cannot be installed separately. Therefore, when you select or deselect these components, the settings of other components may change. A Dependency Notice window appears when you select or deselect components that cannot be installed separately.
To view the entire component parameter line, use the scroll bar on the bottom of the window or resize the component and value fields.
To change the value of a component parameter, click the parameter value, such as No. An option value window appears that enables you to change the value using a drop-down menu. Click OK when you have completed your selection.
Firmware
The client adapter uses the installed firmware to control the radio. Table 2-1 describes the firmware component installation parameters.
Drivers
The client adapter requires a specific driver that interfaces with the operating system and supports the radio firmware functionality. Table 2-2 describes the driver installation parameter.
ACU
The ACU enables you to configure and change client adapter profile parameters. Table 2-3 describes the ACU installation parameters.
ACM
The ACM operates as an icon in the Window's system tray to quickly monitor and control the client adapter's connection. Table 2-4 describes the ACM parameters.
Security Modules
The security module software components enable you to install special security modules to support LEAP, EAP-SIM, PEAP, and EAP-FAST with your client adapter. Table 2-5 describes the security module parameters.
|
|
|
|
|---|---|---|
LEAP |
Enables you to create a profile that uses LEAP authentication. If this option is not selected now and you later want to use LEAP, you must run ACAT again, select this option, create a new configuration file, and run the Install Wizard again. Default: Selected Note |
|
Allow Saved LEAP User Name and Password |
Enables you to create a profile in ACU that uses a saved (rather than temporary) username and password for LEAP authentication. When such a profile is used, the saved username and password are used to start the LEAP authentication process, and you are not prompted to enter them. Options: Yes or No Default: Yes |
|
EAP-SIM |
Installs the EAP-SIM supplicant, which enables the client adapter to support EAP-SIM authentication. If this option is not selected now and you later want to use EAP-SIM, you must run ACAT again, select this option, create a new configuration file, and run the Install Wizard again. Note Default: Deselected Note |
|
PEAP |
Installs the PEAP supplicant, which enables the client to support PEAP authentication. If this option is not initially selected and you later want to use PEAP, you must run this installation program again and select this option. Note Default: Deselected Note |
|
EAP-FAST |
Installs the EAP-FAST supplicant, which enables the client to support EAP-FAST authentication. If this option is not initially selected and you later want to use EAP-FAST, you must run this installation program again and select this option. Note Note Default: Selected Refer to Chapter 4 and Chapter 5 for information on EAP-FAST. |
|
Allow Saved EAP-FAST User Name and Password |
Enables you to create a profile in ACU that uses a saved (rather than temporary) username and password for EAP-FAST authentication. When such a profile is used, the saved username and password are used to start the EAP-FAST authentication process, and you are not prompted to enter them. Note Options: Yes or No Default: Yes |
|
Allow Auto Provisioning |
Enables you to create a profile that automatically acquires a Protected Authentication Credential (PAC) from the EAP-FAST server by sending the username and password. Note Options: Yes or No Default: Yes |
|
 Feedback