CPS Installation Guide for VMware, Release 18.1.0 (Restricted Release)
Bias-Free Language
The documentation set for this product strives to use bias-free language. For the purposes of this documentation set, bias-free is defined as language that does not imply discrimination based on age, disability, gender, racial identity, ethnic identity, sexual orientation, socioeconomic status, and intersectionality. Exceptions may be present in the documentation due to language that is hardcoded in the user interfaces of the product software, language used based on RFP documentation, or language that is used by a referenced third-party product. Learn more about how Cisco is using Inclusive Language.
- Updated:
- March 16, 2018
Chapter: CPS Installation
CPS
Installation
- Obtain the CPS Software
- Cluster Manager VM
- Configure System Parameters for Deployment
- Import the Excel Information into the Cluster Manager VM
- Customize Features in the Deployment
- License Generation and Installation
- SSL Certificates
- Enable Custom Puppet to Configure Deployment
Obtain the CPS Software
Obtain the CPS software from the download link provided in the CPS Release Notes for this release.
-
The CPS_x.x.x.release.iso file which serves as a temporary virtual CD driver containing the installation software.
-
A compressed tar file that contains a base.vmdk which serves as the virtual hard drive in building the Cluster Manager virtual machine (VM).
-
An Excel spreadsheet included in the *.iso which you manually edit to contain the IP addresses, virtual topology, and cluster settings for a High Availability (HA) deployment.
Instructions are provided later in this document on how to obtain this Excel spreadsheet.
Note: This spreadsheet is not required for an All-in-One (AIO) CPS deployment.
A VMware OVF tool is also needed to install CPS. This utility can be downloaded as described later in this guide.
Cluster Manager VM
Overview
Cluster Manager is the main virtual machine that manages the deployment, installation, upgrade, configuration and patching of the CPS cluster. The Cluster Manager stages artifacts such as Configuration, Puppet scripts, Shell script tools and CPS application software. The artifacts are applied to the CPS virtual machines (VMs) during initial CPS installation, CPS upgrades, and application of patches to the CPS.
There are four categories of artifacts:
-
Cluster Deployment Configuration
All the cluster deployment configuration files used for full deployment as well as individual VM deployment are stored in /var/qps/config/deploy. These files are created by exporting the CSV files from the CPS Deployment Template Excel spreadsheet and contains the cluster deployment configuration. For more information related to deployment template and CSV files, refer to the section Configure System Parameters for Deployment.
These configuration files are used by the deployment scripts (deploy.sh and deploy_all.py) during VM deployment.
-
CPS Software Configuration
All the CPS software configuration files which includes the configuration files in /etc/broadhop such as features file, qns.conf, jvm.conf and policy files (such as charging rules policy) are stored in /var/qps/current_config/. These configurations are applied to CPS VMs after CPS software is installed. The configuration files are copied to Cluster Manager’s /var/www/html directory. After a VM is deployed, the puppet script in the VM downloads the configuration files and applies the configuration to the CPS software in the VM.
The iomanager configuration file (/etc/broadhop/iomanager/qns.conf) is controlled by puppet. So in case you want to modify iomanager configuration file, you must modify /etc/puppet/modules/qps/templates/etc/broadhop/iomanager/qns.conf.erb file.

Note
When you are upgrading/migrating from one release to another, you need to modify the iomanager configuration files again with the changes.
-
Puppet
Puppet (http://puppetlabs.com/) is the tool utilized for installing, deploying, and upgrading cluster virtual machines and configurations. Refer to Puppet Overview for more information.
-
Tools
-
Various tools used for operation and maintenance in Cluster Manager.
/var/qps/bin -> /var/qps/install/current/scripts/bin (-> is a Linux softlink)
-
Deployment Scripts: Scripts used for VM deployment.
-
Build Scripts: Scripts that are used to tar the configuration, puppet scripts and software into the /var/www/html directory on the Cluster Manager for download by each VM during deployment.
-
Control Scripts: Scripts that are used on Cluster Manager to perform tasks such as start/stop of the CPS processes running on the VM nodes.
-
Directory Structure
-
All the artifacts for a release are stored in:
/var/qps/install/current -> /var/qps/install/CurrentRelease (-> is a Linux softlink)
-
Tools: /var/qps/bin -> /var/qps/install/current/scripts/bin (-> is a Linux softlink)
-
Deployment scripts are used to deploy VMs.
-
Build scripts that zips the configuration, puppet and CPS software to /var/www/html directory in Cluster Manager.
-
Control scripts
-
Configurations includes the configuration files in /etc/broadhop such as features file, qns.conf, jvm,conf and policy files. All the configurations in this directory are pushed to the VMs during deployment.
-
Files unchanged after upgrade: All the files in /etc/broadhop after upgrade remain unchanged.
Puppet Overview
Puppet (http://puppetlabs.com/) is a tool utilized for installing, deploying, and upgrading CPS virtual machines and configurations.
Puppet operations are initiated automatically when CPS installation or upgrade scripts are run. These scripts in turn utilize numerous utility scripts to configure system modules.
For example: reinit.sh (used for upgrades) triggers /etc/init.d/vm-init.
-
When the Cluster Manager VM is deployed, puppet scripts are copied from the CPS ISO to /etc/puppet.
-
The build_puppet.sh moves them to /var/www/html/images/puppet.tar.gz.
-
vm-init downloads the puppet.tar.gz from cluster manager and populates them to the /etc/puppet directory in the VM nodes. Figure 1. Installation Flow 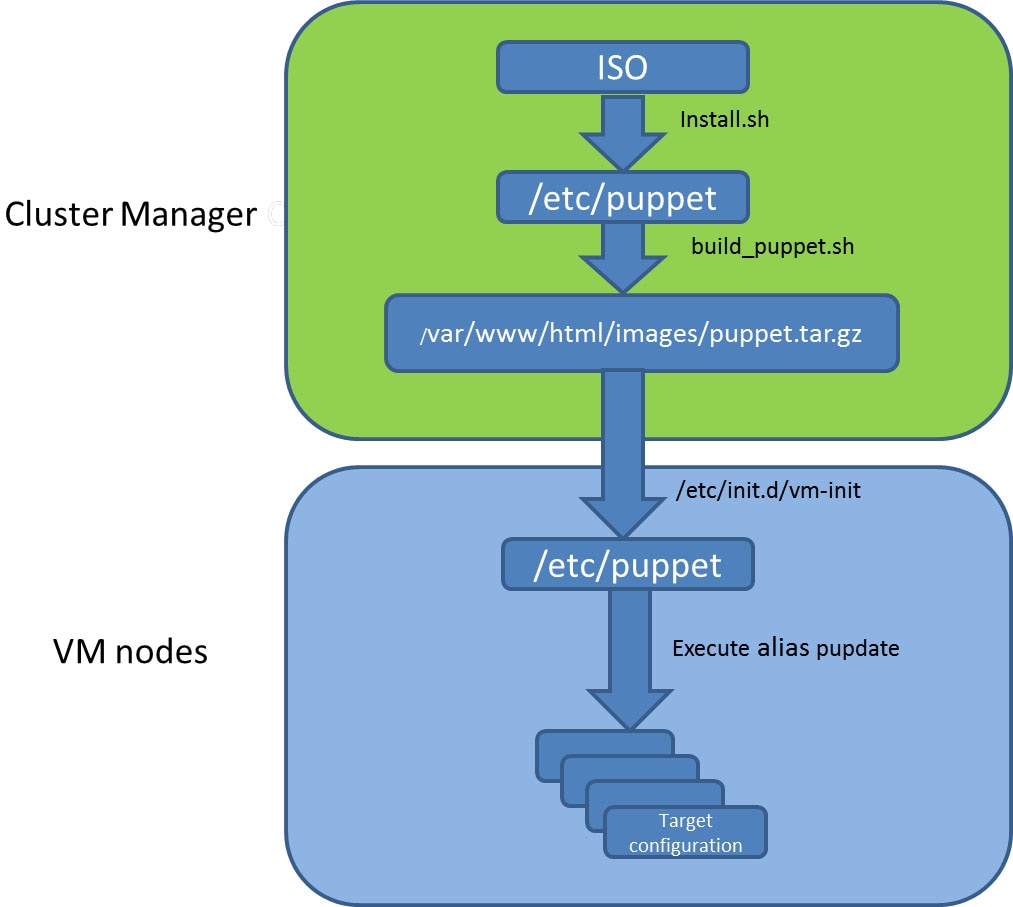
Many CPS modules are managed by Puppet, including: java, ntp, zero mq, haproxy, mongo, socat, memcache, diameter, elasticsearch, monit, iomanager, unifiedapi, license manager, policybuilder, collectd, logserver, snmp, grafana.
Puppet files are stored centrally in /etc/puppet on the Cluster Manager.
CPS VM nodes and their software and configurations are staged in the /var/www/html/ directory in zip files. When a VM is rebooted, the VM downloads and runs the appropriate puppet scripts to update the configuration.
Once puppet files are downloaded to each VM node, they reside in /etc/puppet/ directory on the each VM node.
-
/etc/puppet/puppet.conf: Basic configuration of puppet.
-
/etc/puppet/classfyNode.sh: Determines the node type and the appropriate puppet script from /etc/broadhop.profile.
-
/etc/puppet/modules/qps/manifests/roles/*.pp: These are the corresponding scripts for a node to run. For example: pcrfclient01.pp, pcrfclient02.pp, lb01.pp, qns.pp, sessionmgr.pp, etc.
-
/etc/puppet/modules/: Contains all the puppet code.
-
env_config -> /var/qps/env_config: Contains custom puppet files.
-
Puppet scripts can be started manually using the pupdate command, however this should be reserved for troubleshooting, reconfiguration, or recovery of CPS systems with assistance from a Cisco representative.
Modification or execution of puppet scripts should only be performed under the direction of a Cisco Advanced Services representative. Puppet scripts require root level permissions to be modified.
Additional information about custom deployments is provided in Enable Custom Puppet to Configure Deployment.
For more information about Puppet, refer also to the Puppet documentation available at: https://docs.puppetlabs.com/puppet/.
Deploy the Cluster Manager VM
The Cluster Manager is a server that maintains the system (Operating System) and application artifacts such as software and CPS and Linux configuration for the CPS cluster. It also is responsible for deploying, installing/upgrading the software for the Virtual Machines in the CPS cluster.
To deploy the cluster manager VM, perform the following steps:
| Step 1 | Login to the vSphere Web Client and select the blade where you want to create a new VM to install the cluster manager VM. | ||
| Step 2 | Right-click on the blade and select . New Virtual Machine window opens up. | ||
| Step 3 | Select Create a new virtual machine and click Next to open Select a name and folder. | ||
| Step 4 | Enter a name for the virtual machine (e.g., CPS Cluster Manager) and select the location for the virtual machine. Click Next. | ||
| Step 5 | Select blade IP address from Select a compute resource window and click Next to open Select storage window. | ||
| Step 6 | From Select storage window, select datastorename and click Next to open Select compatibility window. | ||
| Step 7 | From Compatible with: drop-down list, select ESXi 5.0 and later and click Next to open Select a guest OS window. | ||
| Step 8 | From Guest OS Family: drop-down list, select Linux and from Guest OS Version: drop-down list, select CentOS 4/5 or later (64-bit). | ||
| Step 9 | Click Next to open Customize hardware window. | ||
| Step 10 | In
Virtual Hardware tab:
| ||
| Step 11 | Review the settings displayed on Ready to complete window and click Finish. | ||
| Step 12 | Select the ESXi host (not the new VM just created) and select Datastores tab from right pane. | ||
| Step 13 | Right-click on the datastorename and select Browse Files to open datastorename window. | ||
| Step 14 | To upload the
CPS software to the datastore, select the new directory created for your VM,
and click
| ||
| Step 15 | Navigate to the location of the CPS_*.tar.gz file which you downloaded earlier. Select it and click Open. | ||
| Step 16 | To upload CPS ISO, repeat Step 14. | ||
| Step 17 | Navigate to the location of the CPS_*.release.iso, select it and click Open. | ||
| Step 18 | Open a secure shell (ssh) connection to the blade ESXi host. | ||
| Step 19 | Cd to the
directory with the data store.
cd
/vmfs/volumes/<datastore name>/foldername
For example: cd /vmfs/volumes/datastore5/CPS Cluster Manager | ||
| Step 20 | Untar the
file:
For example: tar -xvzf CPS_13.0.0_Base.vmdk.release.tar.gz
| ||
| Step 21 | Convert the
vmdk file to ESX format:
cd base vmkfstools --diskformat thin -i base.vmdk newbase.vmdk
| ||
| Step 22 | Press
Ctrl +
Alt +2 to go back to
Hosts
and Clusters and select the VM created above (CPS Cluster
Manager).
| ||
| Step 23 | Mount ISO on CD/DVD: | ||
| Step 24 | Mount Cluster
Manager seed ISO on CD/DVD:
| ||
| Step 25 | Power on the
CPS
Cluster Manager VM.
Probing EDD (edd=off to disable) |
Configure Cluster Manager VM
To configure cluster manager VM, perform the following steps:
Common Steps
HA Installation
To proceed with a new High Availability (HA) installation:
| Step 1 | Run the
install.sh script from the ISO directory.
cd /mnt/iso ./install.sh | ||
| Step 2 | When prompted
for the install type, enter the required type based on your CPS deployment
requirements.
Please
enter install type [mobile|wifi|mog|pats|arbiter|dra|andsf|escef]:
Enter mobile to install Diameter, arbiter to install Arbiter, andsf to install ANDSF module.
| ||
| Step 3 | When prompted to initialize the environment, enter y. Would you like to initialize the environment... [y|n]: | ||
| Step 4 | When prompted
for the type of installation, enter
1 (New Deployment).
Please select the type of installation to complete:
1) New Deployment
2) Upgrade to different build within same release (eg: 1.0 build 310 to 1.0 build 311)
   or Offline upgrade from one major release to another (eg: 1.0 to 2.0)
3) In-Service Upgrade from one major release to another (eg: 1.0 to 2.0)
| ||
| Step 5 | When prompted to
change the Cluster Manger default root password, enter the new password.
Need to change the default root password for security reasons.. Changing password for user root. New password: XXXXX Retype new password: | ||
| Step 6 | After finishing
the installation (or upgrade) process, unmount the ISO image using the
following commands. This prevents any “device is busy” errors when a subsequent
upgrade/new installation is performed.
cd /root umount /mnt/iso
| ||
| Step 7 | (Optional) After
unmounting the ISO, delete the ISO image to free system space.
rm -rf /dev/sr0/xxxx.iso where, xxxx.iso is the name of the ISO image. | ||
| Step 8 | (Optional) Change the host name of the Cluster Manager. | ||
| Step 9 | Run
change_passwd.sh script on Cluster Manager to change
the password of root user across the system.
For more information, refer to Update Default Credentials. |
AIO Installation
| Step 1 | To install an
All-in-One (AIO) deployment where all CPS components are installed on a single
VM, configure this node to be an 'aio':
echo NODE_TYPE=aio > /etc/broadhop.profile | ||
| Step 2 | Run the
install.sh script from the ISO directory.
cd /mnt/iso ./install.sh | ||
| Step 3 | When prompted
for the install type, enter the required type based on your CPS deployment
requirements.
Please
enter install type [mobile|wifi|mog|pats|arbiter|dra|andsf|escef]:
Enter mobile to install Diameter, wifi to install RADIUS, mog to install MOG module, pats to install PATS, arbiter to install Arbiter, dra to install DRA module, andsf to install ANDSF module or escef to install eSCEF module.
| ||
| Step 4 | When prompted to
initialize the environment, enter
y.
Would you like to initialize the environment... [y|n]: | ||
| Step 5 | When prompted
for the type of installation, enter
1 (New Deployment).
Please select the type of installation to complete:
1) New Deployment
2) Upgrade to different build within same release (eg: 1.0 build 310 to 1.0 build 311)
   or Offline upgrade from one major release to another (eg: 1.0 to 2.0)
3) In-Service Upgrade from one major release to another (eg: 1.0 to 2.0)
| ||
| Step 6 | When prompted to
change the Cluster Manger default root password, enter the new password.
Need to change the default root password for security reasons.. Changing password for user root. New password: XXXXX Retype new password: | ||
| Step 7 | When
install.sh finishes, execute the following command to
reinitialize CPS.
/var/qps/install/current/scripts/upgrade/reinit.sh reinit.sh executes puppet on AIO and also checks if it is executed successfully. | ||
| Step 8 | Open Policy Builder and modify the Local Host Name of Diameter Stack to 'localhost'. | ||
| Step 9 | Save and Publish the configuration. | ||
| Step 10 | After finishing
the installation (or upgrade) process, unmount the ISO image using the
following commands. This prevents any “device is busy” errors when a subsequent
upgrade/new installation is performed.
cd /root umount /mnt/iso
| ||
| Step 11 | (Optional) After
unmounting the ISO, delete the ISO image to free system space.
rm -rf /dev/sr0/xxxx.iso where, xxxx.iso is the name of the ISO image. | ||
| Step 12 | (Optional)
Change the host name of the Cluster Manager.
|
What to Do Next
After completing the steps in this section, refer to Step 4 in Convert the Cluster Manager VM to an All-in-One to continue the AIO conversion.
Configure System Parameters for Deployment
Note | This section applies only for High Availability CPS deployments. For All-in-One deployments, proceed to section Convert the Cluster Manager VM to an All-in-One. |
The following section guides you through the steps needed to properly configure a new installation of CPS. The Deployment Template file is a spreadsheet used for populating deployment parameters.
This file is available on the Cluster Manager VM at the following location:
/var/qps/install/current/scripts/deployer/templates/QPS_deployment_config_template.xlsm
After entering your parameters into the spreadsheet (as described in the following sections), the information from the spreadsheet is loaded onto the Cluster Manager VM. The Cluster Manager uses the information to configure the other CPS VMs in the cluster.
Note | All alphabet characters used in virtual IPv6 addresses configured in csv files must be in small case letters. |
To add values to the corresponding sheets in the template file, refer to the following sections:
- Definitions Configuration
- VMSpecifications Configuration
- VLANs Configuration
- Hosts Configuration
- Additional Hosts Configuration
- General Configuration
- VIP Proxy Configuration
- Secure Configuration
- Finish and Save
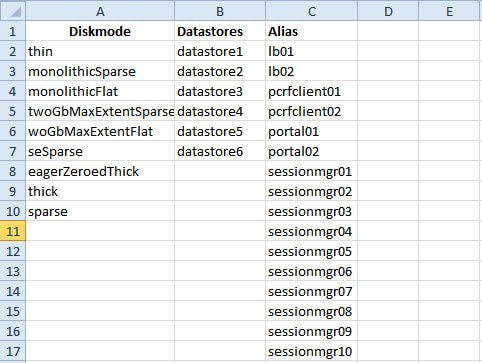
Definitions Configuration
The Definitions sheet defines default parameters used by other sheets.
Select the Definitions sheet.
|
Parameter |
Description |
|---|---|
|
Diskmode |
Do not modify this column. The Diskmode column defines the disk mode for VMware. This is used by the VMSpecification sheet. |
|
Datastores |
The Datastore column defines all the storages in the virtualization environment. It is used by the datastore column in the Hosts sheet. Add an entry here for each datastore in the virtualization environment. The datastore name must not contain spaces. |
|
Alias |
Be cautious modifying the values of the column. Add new names only if the number of session manager node names exceed 20, Policy Server (QNS) node names exceed 20. Use the naming convention: |
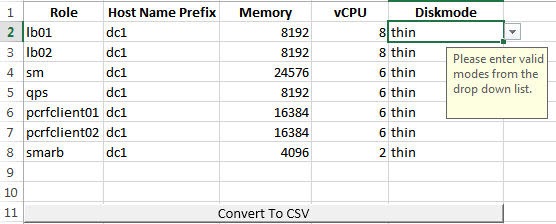
VMSpecifications Configuration
In a CPS cluster, there are few types of nodes: Policy Director (LB), sessionmgr, Policy Server (QNS), and OAM (PCRFCLIENT). Each VM is assigned with a particular type of node. The following sheet defines the attributes for each type of node.
Select the VMSpecification sheet.
|
Parameter |
Description |
|---|---|
|
Role |
Do not change the value of this column. The Role column defines different types of VMs: lb01, lb02, sm, qps, pcrfclient01, pcrfclient02. |
|
Host Name Prefix |
The Host Name Prefix is prepended to the Guest Name (the host name of the VM in the Hosts sheet), which is used as the VM name in the ESX server, i.e dc1-sessionmgr01 is the VM name in VCenter and sessionmgr01 is the host name in the VM's Linux OS. |
|
Memory |
The Memory column is the size of memory needed for the type of the VMs in Megabytes (MB). |
|
vCPU |
The vCPU column is the number of CPU needed for the VM. |
|
Diskmode |
The Diskmode is how the Hypervisor should keep the disk of the VM in the storage. See VMware documentation for the meaning of different modes. Our recommendation is to keep it as thin mode unless specific needs arise in your Hypervisor environment. |
VLANs Configuration
The VLAN Configuration sheet defines different subnets in the virtual infrastructure.
Select the VLANs sheet.

Contact your Cisco Technical Representative for further information on VLANs.
The following parameters can be configured in this sheet:
|
Parameter |
Description |
|---|---|
|
VLAN Name |
The VLAN Name column defines the name for a particular VLAN. It is recommended to use a name representing the network for certain traffic. For additional networks, add more as needed. The "Internal" VLAN Name is always needed. Names must consist only of alphanumeric characters and underscores, and must not start with a number. |
|
Network Target Name |
The Network Target Name column is the name of the networks defined in the Hypervisor (VMware), for example the network in vSphere for a blade server. |
|
Netmask |
The Netmask column is the network mask for the network. If the VLAN supports IPv6, the network mask can be IPv6 mask. If the VLAN interface supports both IPV4 and IPv6, add both netmasks in the cell, separated by space. |
|
Gateway |
The Gateway column is the gateway for the network, If the VLAN supports IPv6, the gateway can be IPv6 gateway address. If the VLAN interface supports both IPv4 and IPv6, add both gateways in the cell, separated by space. An example is provided in the table. |
|
VIP Alias |
Enter the alias name for the virtual interfaces in Policy Director (lb). The virtual addresses are used to distribute the traffic between two Policy Directors (LBs). |
|
Pcrfclient VIP Alias |
Enter the alias name for the virtual interfaces between OAM (PCRFCLIENTS) whenever you want VIP between pcrfclient01 and pcrfclient02 (for example, lbvip02 is VIP between lb01 and lb02). This virtual IP is used to support redundancy for arbiter member of replica set. |
|
guestNic |
This field is optional and it supports custom NIC/interface name other than default one i.e. eth0/1/2, which can support SR-IOV enabled interfaces. If guestNic field is empty, it takes the value eth0, eth1, eth2 in order of its appearance. |
|
VLAN Name |
Network Target Name |
Netmask |
Gateway |
VIP Alias |
Pcrfclient VIP Alias |
|---|---|---|---|---|---|
|
Internal |
VLAN_2017 |
255.255.255.0 |
NA |
lbvip02 |
arbitervip |
|
Management |
VLAN_2025 |
255.255.255.0 |
172.20.25.1 |
lbvip01 |
- |
|
Gx |
VLAN_3041 |
64 |
2003:3041::22:1 |
lbvip03 |
- |
|
Rx |
VLAN_3043 |
64 |
2003:3043::22:1 |
lbvip05 |
- |
|
Syp |
VLAN_3042 |
64 |
2003:3042::22:1 |
lbvip04 |
- |
Hosts Configuration
In this sheet, all the VM/nodes are defined. The deployment uses the information here to deploy the VMs.
Note | The host addresses used in the examples may be different from those in your deployment. |
Select the Hosts sheet.
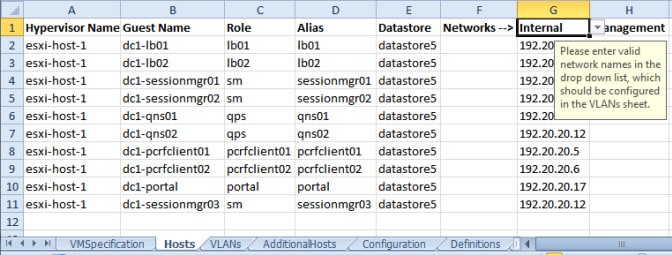
The following parameters can be configured in this sheet:
|
Parameter |
Description |
||
|---|---|---|---|
|
Hypervisor Name |
The Hypervisor Name column specifies the host names for the blade servers. The names should be routable by the Cluster Manager VM. |
||
|
Guest Name |
The Guest Name column is the host name of the VMs resolvable in the enterprise DNS environment.
|
||
|
Role |
The role defines the type of VM within the CPS cluster. The Role column is a drop-down entry from a list specified in VMSpecification sheet.
|
||
|
Alias |
The Alias is the internal host name used by CPS nodes for internal communication, such as qns01. |
||
|
Datastore |
The Datastore column is the datastore name used by the Hypervisor for the physical storage of the VM. The datastore is a drop-down list from column data in the Definition sheet. |
||
|
Networks --> |
The Networks --> column is a read only column. Do not write anything to it. |
||
|
Internal/Management |
The columns following the Networks --> specifies all the IP addresses for the VMs. For each VLAN Name in the VLANS sheet for the VM, a new column should be added for that network. The title of the column should come from the VLAN name in the VLANS sheet. The content should be the IP address. If the network is IPv6, add IP v6 address. If the interface has both IPv4 and IPv6 addresses, add both addresses in the cell, separated by space. The “Internal” network name is reserved and should always be present. The IP address for the internal network can only be either IPv4 or IPv6, but not both. |
Verify that all VM IP addresses and host names (Guest Name) are configured properly in the Hosts sheet. You cannot modify the IP addresses or host names manually on the VMs (excluding Cluster Manager) after deploying the VMs. Instead, you must correct the IP addresses and host names in the Hosts sheet, then import the file to the Cluster Manager and re-deploy the VMs with the updated IP address or host names.
Additional Hosts Configuration
There are many hosts in the environment that CPS needs to interact with, for example: NTP server, NMS server, etc. The AdditionalHosts sheet contains all these hosts and IP addresses. The host entries are copied to the /etc/hosts file of the Cluster Manager during the deployment.
Note | Each line in the /etc/hosts file must start with an IP Address. |
For additional information about /etc/hosts, refer to http://unixhelp.ed.ac.uk/CGI/man-cgi?hosts.
Select the AdditionalHosts sheet.
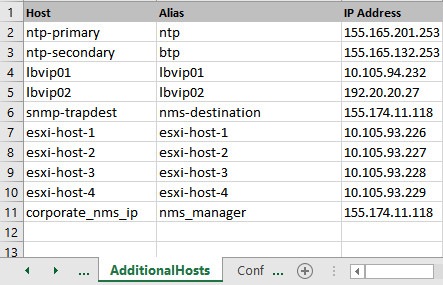
The following parameters can be configured in this sheet:
|
Parameter |
Description |
|---|---|
|
Host |
The Host column is the arbitrary value that can be added by user as the name of the virtual machines added to the Hypervisor. |
|
Alias |
The Alias is the internal host name used by CPS nodes for internal communication, such as qns01. |
|
IP Address |
IP address of the host. Currently, IPv6 is supported only for policy director (lb) external interfaces. An example is provided in the Table 2. |
|
Host |
Alias |
IP Address |
|---|---|---|
|
lbvip04 |
lbvip04 |
2003:3042::22:22 |
|
lbvip05 |
lbvip05 |
2003:3043::22:22 |
NTP Configuration
For HA, add a row for each NTP server in the AdditionalHosts sheet. The Alias for the primary has to be ntp and the Alias for the secondary has to be btp. The NTP servers are configured in the /etc/ntp.conf of lb01/lb02.
For AIO, add the NTP server information manually in /etc/hosts file.
Configuration based on Diameter Endpoints Interface
If the CPS platform is acting as a Diameter Server and using HAProxy, then you can configure AdditionalHosts and VipProxyConfiguration with interface hostname in the CPS Deployment Configuration Template (Excel Worksheet) based on the following table:
|
Traffic on Interface |
Description |
|---|---|
|
Only on LBvips |
Configuration can be done using VipProxyConfiguration.csv file or AdditionalHosts.csv file.
|
|
Only on Policy Director (lb) interface For example, eth1 |
All entries should be present in AdditionalHosts.csv file. Remove VipProxyconfiguration.csv file. |
|
On both the interfaces. For example, eth1 and eth1:1 |
All entries should be present in AdditionalHosts.csv file. Remove VipProxyconfiguration.csv file. |
Diameter Related Configuration
If the CPS platform is acting as a Diameter Server and using HAProxy, then configure the AdditionalHosts tab with interface hostname in the CPS Deployment Configuration Template (Excel Worksheet) using the format and naming standard as described below. For a proper diameter stack configuration, the Policy Builder configuration must match ports defined in this tab (see the mapping table below for the port mapping in the Additional Notes: section).
The Cluster Manager supports the following scenarios for HAProxy Diameter:
-
Single Endpoint:
All diameter traffic comes into one NIC and same port. This is defined by adding an entry to AdditionalHosts tab of the Excel spreadsheet. The HAProxy binds to port 3868 on the defined IP for each host. Format of the hostname is diam-int1-{hostname}.
Note
The format of the Hostname is diam-int1-{hostname}, where {hostname} is the guest name of a Policy Director (LB) VM. There will be one {hostname} for each Policy Director (LB) node (lb01, lb02...). Refer to your Hosts.csv file to get the required {hostname} values. An example is provided in the above screen shot.
For example: Table 9 Single Endpoint Hostname
IP Address
diam-int1-lb01
XXX.XXX.XXX.XXX
diam-int1-lb02
YYY.YYY.YYY.YYY
where, XXX.XXX.XXX.XXX is the IP address of diam-int1-lb01 and YYY.YYY.YYY.YYY is the IP address of diam-int1-lb02.
-
Multiple VIP Endpoints:
Diameter traffic for different interfaces (Gx, Rx and so on) can come into different NICs either on lb01 or lb02. This is defined by adding multiple 'diam-intx-vip' entries to AdditionalHosts tab of the deployment template spreadsheet. The HAProxy binds to port 3868 on the defined VIP on each host (that is, lb01 and lb02). Format of the hostname is diam-intx-vip.
Note
For each VIP Endpoint, you must add the respective entry in VLANs tab.
For example,
Hostname IP Address
diam-intx-vip XXX.XXX.XXX.XXX
where,
x can have value from 1 to 4.
and XXX.XXX.XXX.XXX is the VIP address of the respective diameter interface.
If using VipProxyConfiguration.csv file, no need to configure the diam-int* entries in AdditionalHosts.csv file. Configure all your VIPs in VipProxyConfiguration.csv file. For more information, refer to VIP Proxy Configuration.
-
Multiple Endpoint/Multiple Interfaces:
Multiple Interface/Endpoints are used when different diameters are coming from different networks and ports to provide more isolation of traffic. Diameter traffic comes into multiple NICs in Load Balancer, but all other traffic comes into the same interface and shares the same port. This is defined by adding multiple entries to AdditionalHosts tab of the Excel spreadsheet. The HAProxy binds to port 3868 on the defined IP for each host. Format of the hostname is diam-int[1-4]-{hostname}.
For example: Table 10 Multiple Endpoint/Multiple Interfaces Hostname
IP Address
diam-int1-lb01
XXX.XXX.XXX.XXX
diam-int1-lb02
YYY.YYY.YYY.YYY
diam-int2-lb01
AAA.AAA.AAA.AAA
diam-int2-lb02
BBB.BBB.BBB.BBB
where, AAA.AAA.AAA.AAA is the IP address of diam-int2-lb01 and BBB.BBB.BBB.BBB is the IP address of diam-int2-lb02.
-
Multiple Endpoint/Single Interface/Multiple Ports:
Diameter traffic comes into Load Balancer via the multiple NIC, and also through different ports such as 3868, 3869,etc. This is defined by adding multiple entries to AdditionalHosts tab of the Excel spreadsheet. The HAProxy binds to port 3868 through 3871 on the defined IP for each host. Format of the hostname is diam-int1-{hostname} for port 3868 and diam-int1-{hostname}-[69|70|71] for ports 3869, 3870 and 3871.
For example: Table 11 Multiple Endpoint/Single Interface/Multiple Ports Hostname
IP Address
diam-int1-lb01
XXX.XXX.XXX.XXX
diam-int1-lb01-69
XXX.XXX.XXX.XXX
diam-int1-lb01-70
XXX.XXX.XXX.XXX
diam-int1-lb01-71
XXX.XXX.XXX.XXX
diam-int1-lb02
YYY.YYY.YYY.YYY
diam-int1-lb02-69
YYY.YYY.YYY.YYY
diam-int1-lb02-70
YYY.YYY.YYY.YYY
diam-int1-lb02-71
YYY.YYY.YYY.YYY
Additional Notes:
diam-int1-lb01(3868) - base port defined in stack as 3868, 3869, 3870
diam-int2-lb01 (3868)- base port defined in stack as 3878, 3879, 3880
diam-int3-lb01(3868) - base port defined in stack as 3888, 3889, 3890
diam-int4-lb01(3868) - base port defined in stack as 3898, 3899, 3900
diam-int1-lb01-69(3869) - base port defined in stack as 3878, 3879, 3880
diam-int1-lb01-70(3870) - base port defined in stack as 3888, 3889, 3890
diam-int1-lb01-71(3871)- base port defined in stack as 3898, 3899, 3900
HAProxy is used to perform least connection load balancing within a VM in CPS implementation and does not load balance across a VM.
In a CPS cluster which is configured with more than 2 Policy Directors (LBs), HAproxy and the VIPs are hosted only on LB01 and LB02. The additional LBs serve only as diameter endpoints to route diameter traffic.
Add Diameter Endpoints
To add diameter endpoints manually, modify the /var/qps/current_config/image-map file as follows.
In CPS 10.0.0 and higher releases, the lb01 and lb02 entries are replaced with a single lb entry, as shown in the following example:
lb=iomanager
lb=diameter_endpoint
lb=diameter_endpoint
lb=diameter_endpoint
lb=diameter_endpoint
lb=diameter_endpoint
lb=diameter_endpoint
lb=diameter_endpoint
lb=diameter_endpoint
qns=pcrf
pcrfclient=controlcenter
pcrfclient=pb
aio=pcrf
aio=pb
In releases prior to CPS 10.0.0:
lb01=iomanager01
lb02=iomanager02
lb=diameter_endpoint
lb=diameter_endpoint
lb=diameter_endpoint
lb=diameter_endpoint
lb=diameter_endpoint
lb=diameter_endpoint
lb=diameter_endpoint
lb=diameter_endpoint
qns=pcrf
pcrfclient=controlcenter
pcrfclient=pb
aio=pcrf
aio=pb
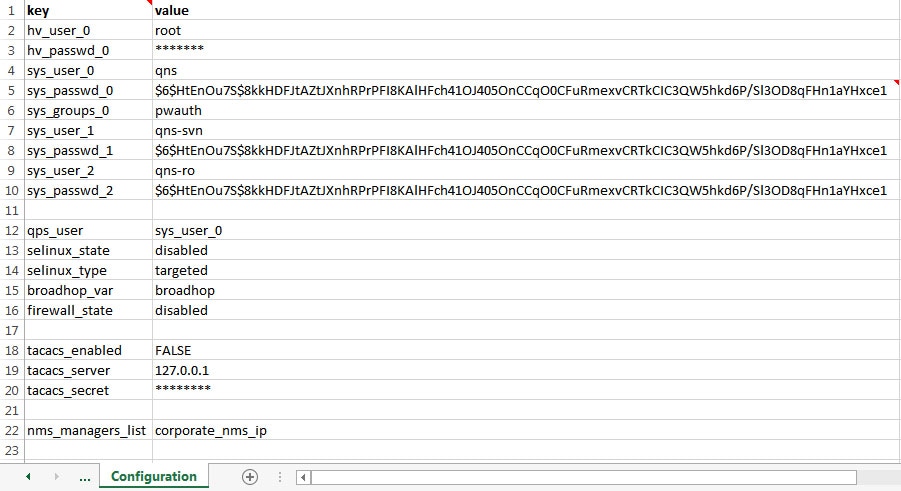
General Configuration
The Configuration sheet contains values for ESXi Users and the default CPS users, and some global variables that the puppet scripts use to generate the VMs.
To change the values on this tab, contact your Cisco Technical Representative.
For users specified in this Configuration sheet, such as qns-admin, qns-svn, qns-ro, the password entered in the sheet is used. Any changes done manually to the system passwords after deployment would be overwritten by the password in the csv file after upgrade.
The following parameters can be configured in this sheet:
|
Parameter |
Description |
||||
|---|---|---|---|---|---|
|
hv_user_0 |
Hypervisor username. This is the username of a user with root access to the VMware host/blade. If installing CPS to multiple blade servers, it is assumed that the same username and password can be used for all blades. This parameter is optional1. |
||||
|
hv_passwd_0 |
Hypervisor Password for Hypervisor User. User can also use special (non-alpha numeric) characters in the password. This parameter is optional.
|
||||
|
sys_user_0 |
The CPS System user (qns) is the main user set up on the VMs. By default, this is qns. |
||||
|
sys_passwd_0 |
Encrypted System Password for System User 0. Refer to Password Encryption to generate an encrypted password. For High Availability (HA) environments or Geographic Redundancy (GR) environments, the password entered here in the spreadsheet is not used even if you specify one. You must set the password for the user prior to first access by connecting to the Cluster Manager after deployment and running the change_passwd.sh command. |
||||
|
sys_group |
Group for the previous System User.
|
||||
|
sys_user_1 |
The qns-svn system user is the default user that has access to the Policy Builder subversion repository. Default: qns-svn |
||||
|
sys_passwd_1 |
By default, the encrypted password for qns-svn is already added in Configuration.csv spreadsheet. If you want to change the password for qns-svn user after CPS is deployed, you can use change_passwd.sh script. You also need to generate an encrypted password. Refer to Password Encryption to generate an encrypted password. The encrypted password must be added in the Configuration.csv spreadsheet. If the encrypted password is not added in the spreadsheet, then after running reinit.sh script, the qns-svn user takes the existing default password from Configuration.csv spreadsheet. |
||||
|
qps_user |
- |
||||
|
selinux_state selinux_type |
Security Enhanced Linux (SELinux) support is disabled by default. Refer to Security Enhanced Linux for more information about enabling this functionality.
|
||||
|
firewall_state |
Enables or disables the linux firewall on all VMs (IPtables). Valid Options: enabled/disabled Default: enabled (This field is case sensitive) In AIO deployments, IPtables is disabled by default.
|
||||
|
broadhop_var |
Default: broadhop |
||||
|
tacacs_enabled |
Enter true to enable TACACS+ authentication. For more information related to TACACS+, refer to TACACS+. |
||||
|
tacacs_server |
Enter the IP address of the TACACS+ server. |
||||
|
tacacs_secret |
Enter the password/secret of the TACACS+ server. |
||||
|
nms_managers_list |
Define the SNMP Network Management Station (NMS) address or hostname by replacing corporate_nms_ip with the hostname or IP address of your NMS. To add Multiple SNMP NMS destinations, replace corporate_nms_ip with a space separated list of hostnames or IP addresses of your NMS managers. For example: 10.105.10.10 10.202.10.10 or 10.105.10.10 10.202.10.10 2003:3041::22:22 or nms_main nms_bck To change the NMS trap receiver port, update nms_managers_list <nms_manager_list:port_num> For example, nms_managers_list corporate_nms_ip:6100
|
||||
|
free_mem_per_alert |
By default, a low memory alert is generated when the available memory of any CPS VM drops below 10% of the total memory. To change the default threshold, enter a new value (0.0-1.0) for the alert threshold. The system generates an alert trap whenever the available memory falls below this percentage of total memory for any given VM. Default: 0.10 (10% free). |
||||
|
free_mem_per_clear |
Enter a value (0.0-1.0) for the clear threshold. The system generates a low memory clear trap whenever available memory for any given VM is more than 30% of total memory. Default: 0.3 (30% of the total memory). |
||||
|
syslog_managers _list |
Entries are space separated tuples consisting of protocol:hostname:port. Currently, only UDP is supported. Default: 514 For example: udp:corporate_syslog_ip:514 udp:corporate_syslog_ip2:514 |
||||
|
syslog_managers _ports |
A comma separated list of port values. This must match values in the syslog_managers_list. |
||||
|
logback_syslog_ daemon_port |
Port value for the rsyslog proxy server to listen for incoming connections, used in the rsyslog configuration on the Policy Director (LB) and in the logback.xml on the OAM (PCRFCLIENT). Default: 6515 |
||||
|
logback_syslog_ daemon_addr |
IP address value used in the /etc/broadhop/controlcenter/logback.xml on the OAM (PCRFCLIENT). Default: lbvip02 |
||||
|
cpu_usage_alert_ threshold |
The following cpu_usage settings are related to the High CPU Usage Alert and High CPU Usage Clear traps that can be generated for CPS VMs. Refer to CPS SNMP and Alarms Guide, Release 9.1.0 and prior releases or CPS SNMP, Alarms and Clearing Procedures Guide, Release 10.0.0 and later releases for more details about these SNMP traps. Set the higher threshold value for CPU usage. System generates an Alert trap whenever the CPU usage is higher than this value. |
||||
|
cpu_usage_clear_ threshold |
Set the lower threshold value for CPU usage. System generates a Clear trap whenever the CPU usage is lower than this value and alert trap already generated. |
||||
|
cpu_usage_trap_ interval_cycle |
This value is used as an interval period to execute the CPU usage trap script. The interval value is calculated by multiplying 5 with the given value. For example, if set to 1 then the script is executed every 5 sec. The default value is 12, which means the script is executed every 60 seconds. |
||||
|
snmp_trap_community |
This value is the SNMP trap community string. Default: broadhop |
||||
|
snmp_ro_community |
This value is the SNMP read-only community string. Default: broadhop |
||||
|
monitor_replica_timeout |
This value is used to configure timeout value. The default value is 540 sec considering four replica sets. The customer can set timeout value according to the number of replica sets in their network. To recover single session replica-set, it takes approx 120 sec and adding 20% buffer to it; we are using 540 sec for default (for four replica sets). Without any latency between sessionmgr VMs, one replica-set recovers in ~135 sec. If latency (40 -100 ms) is present between sessionmgr VMs we can add 10% buffer to 135 sec and set the timeout value for the required number of replica sets in customer’s network. |
||||
|
snmpv3_enable |
This value is used to enable/disable the SNMPv3 support on CPS. To disable the SNMPv3 support, set this value to FALSE. Default: TRUE |
||||
|
v3User |
User name to be used for SNMPv3 request/response and trap. Default: cisco_snmpv3 |
||||
|
engineID |
This value is used for SNMPv3 request/response and on which NMS manager can receive the trap. It should be a hex value. Default: 0x0102030405060708 |
||||
|
authProto |
This value specifies the authentication protocol to be used for SNMPv3. User can use MD5/SHA as the authentication protocol. Default: SHA |
||||
|
authPass |
This value specifies the authentication password to be used for SNMPv3 requests. It should have minimum length as 8 characters. Default: cisco_12345 |
||||
|
privProto |
This value specifies Privacy/Encryption protocol to be used in SNMPv3 request/response and SNMP trap. User can use AES/DES protocol. Default: AES |
||||
|
privPass |
This value specifies Privacy/Encryption password to be used in SNMPv3. It is an optional field. If it is blank then value specified in authPass is used as privPass. Default: <blank> |
||||
|
sctp_enabled |
By default, SCTP support is enabled. For more information about enabling/disabling this functionality, refer to SCTP Configuration. Default: TRUE |
||||
|
corosync_ping_hosts |
Moving corosync resources (like VIPs) when the connectivity is lost between lb01 or lb02 (or pcrfclient01/02) to hosts configured in this field. So if lb01 cannot connect to sessionmgr01 and sessionmgr02 then corosync resources (like VIPs) are moved from lb01 to lb02. Example: key = corosync_ping_hosts and Value = sessionmgr01 sessionmgr02 |
||||
|
avoid_corosync_split_brain |
If this field is not defined or value is 0, and when both nodes fail to connect to the configured corosync_ping_hosts, then the resources stay on the last active node. If value is 1, and both nodes fail to connect to configured corosync_ping_hosts, then the resources are not available on any nodes. |
||||
|
rsyslog_tls |
This field is used to enable or disable encryption for rsyslog. Default: TRUE |
||||
|
rsyslog_cert |
This field is used to define the path for trusted Certificate of server. |
||||
|
rsyslog_ca |
This field is used to define the Path of certifying authority (CA). Default: /etc/ssl/cert/quantum.pem |
||||
|
rsyslog_key |
This field is used to define the path of private key. |
||||
|
haproxy_stats_tls |
This field is used to enable or disable the encryption for HAproxy statistics (including diameter statistics). Default: TRUE |
||||
|
redis_server_count |
This value specifies the number of redis server instances running on each policy director (lb) VM. For more information on redis functionality, refer to Configure Multiple Redis Instances. Redis can be enabled with the number of instances as defined in redis_server_count. If the value for redis server count is not provided, default value of 3 for redis_server_count is considered. To disable redis explicitly, redis server count should have value 0. Default: 3 Value range: 0 to 64 |
||||
|
remote_redis_server_count |
This value can be added for Geographic Redundancy (GR) deployments only. This value specifies the number of redis server instances running on each remote policy director (lb) VM. If this value is not configured, remote redis server instances are not added for GR deployments. |
||||
|
snmpRouteLan |
This field contains the value of a VLAN name which can be used to access the KPIs value provided by SNMP. Default: Oam |
||||
|
redis_for_ldap_required |
This parameter is used only when dedicated LDAP instance is required. Default: false Possible values: true, false If you configure LDAP instance explicitly, first redis instance on policy director (lb) VMs running on port 6379 is used for LDAP and the remaining are used for diameter.
|
||||
|
andsf_ip |
|
||||
|
andsf_port |
Default: 443 |
||||
|
andsf_nic |
Specifies the interface name. This value is required when the firewall is enabled. This is an optional parameter. Possible values: eth2, eth3 |
||||
|
enable_tlsv1.0_andsf |
Enables TLSv1.0 for the Policy Builder interface. This is an optional parameter. Default: Disabled Possible values: Enabled, Disabled |
||||
|
min_tls_andsf |
Defines the minimum TLS version supported by the ANDSF interface. This is an optional parameter. Default: 1.1 Possible values: 1.1, 1.2 |
||||
|
max_tls_andsf |
Defines the maximum TLS version supported by the ANDSF interface. This is an optional parameter. Default: 1.2 Possible values: 1.1, 1.2 |
||||
|
default_tls_andsf |
Defines the default TLS version used by the ANDSF interface. This is an optional parameter. Default: 1.2 Possible values: 1.1, 1.2 |
||||
|
database_nics |
This parameter allows user to provide interface names on which firewall must be opened for replica-set on a VM. If database_nics is not configured, firewall is opened only for internal interface for a replica-set. If database_nics is configured, then firewall is opened for configured interfaces and internal interface as well (even if it is not mentioned in database_nics). This field has semicolon (;) separated interface names for firewall ports to be opened for a replica-set on a VM.
|
||||
|
db_authentication_ enabled |
This field is used to enable or disable MongoDB authentication. Default: FALSE Possible value: TRUE or FALSE For more information, refer to MongoDB Authentication. |
||||
|
db_authentication_ admin_passwd |
This parameter is the encrypted password for admin user and is applicable only when db_authentication_enabled is set to TRUE. The following command is used to generate encrypted password from Cluster Manager: /var/qps/bin/support/mongo/encrypt_passwd.sh <Password> For more information, refer to MongoDB Authentication. |
||||
|
db_authentication_ readonly_passwd |
This parameter is the encrypted password for readonly user. The following command is used to generate encrypted password from Cluster Manager: /var/qps/bin/support/mongo/encrypt_passwd.sh <Password> For more information, refer to MongoDB Authentication. |
||||
|
enable_ssh_login_security |
This parameter allows user to enable or disable SSH login security. Default: disabled Possible values: enabled, disabled |
||||
|
cps_admin_user_cluman |
This parameter is used to configure Cluster Manager administrator user. |
||||
|
cps_admin_password_ cluman |
This parameter is the encrypted password for administrator user. |
||||
|
whitelisted_hosts_for_ssh |
Valid values are colon separated host names/IP addresses of the machine for which SSH access needs to be allowed. This configuration is effective only when the SSH login security is enabled. If the hostname is mentioned then it should be resolvable by CPS VM's. No validation on hostname/IP addresses is provided. You can specify both IPv4/IPv6 address.
|
||||
|
LDAP SSSD Configuration |
For more information, refer to LDAP SSSD Configuration. |
In CPS 11.0.0 and later releases, these two parameters (hv_user_0 and hv_password_0) are optional in /var/qps/config/deploy/csv/Configuration.csv file and the user is prompted for the parameters at runtime while executing deploy_all.py and deploy.sh scripts if not configured in Configuration.csv file. Now during installation on VMware, hypervisor password is not displayed on terminal by any scripts. Also, hypervisor password is not logged into any of the log files.
-
If andsf_ip and andsf_port are configured, URL for the ANDSF API is https://<andsf_ip>:<andsf_port>/qps/rest/andsf.
-
If ANDSF VLAN (/var/qps/config/deploy/csv/VLANs.csv) and VIP (/var/qps/config/deploy/csv/AdditionalHosts.csv) are configured, URL for the ANDSF API is https://andsfvip:443/qps/rest/andsf.
-
If no parameter is configured, default URL for the ANDSF API is https://lbvip01:443/qps/rest/andsf.
-
If andsf_ip and andsf_port are configured, URL for the ANDSF API is https://<andsf_ip>:<andsf_port>/qps/rest/andsf.
-
If ANDSF VLAN (/var/qps/config/deploy/csv/VLANs.csv) and VIP (/var/qps/config/deploy/csv/AdditionalHosts.csv) are configured, URL for the ANDSF API is https://andsfvip:443/qps/rest/andsf.
-
If no parameter is configured, default URL for the ANDSF API is https://lbvip01:443/qps/rest/andsf.
Password Encryption
By default, CPS passwords are encrypted. Execute the following command from Cluster Manager on CentOS to generate a valid password hash:
/sbin/grub-crypt --sha-512
For example:
/sbin/grub-crypt --sha-512
Password: >>> enter desired password here
Retype password: >>> re-enter same password.
After this system will encrypt the password and print encrypted string for further use.

$6$ka9eqxpIDyODhWZG$5xisazDZWumDDl1eQ63h7krUbmfkm06.HajqleHr1MvVp7/KfaKKfu4K8bzC/yThDLftX/htLtE..3H5iRRDW/
SCTP Configuration
CPS also support Stream Control Transmission Protocol (SCTP). By default, SCTP support is enabled.
To disable or enable SCTP on an existing deployment:
| Step 1 | Update the field
sctp_enabled to FALSE or TRUE in
/var/qps/config/deploy/csv/Configuration.csv file
with the following information:
sctp_enabled,FALSE, or sctp_enabled,TRUE, | ||
| Step 2 | Import the new configuration by executing the following command: /var/qps/install/current/scripts/import/import_deploy.sh | ||
| Step 3 | For an existing
deployed lb0X VM, after changing
sctp_enabled (like TRUE to FALSE or FALSE to TRUE),
re-initialize lb0X VM by executing the following command:
ssh lb0X /etc/init.d/vm-init-client.sh
|
MongoDB Authentication
For upgrades/migration, /var/qps/install/current/scripts/import/import_deploy.sh updates dbPassword parameter in /etc/broadhop/qns.conf file based on db_authentication_enabled and db_authentication_admin_passwd fields. It also creates <user-home-directory>/.dbadmin and <user-home-directory>/.dbreadonly files, which store the encrypted password for admin and readonly users respectively.
-
<user-home-directory>/.dbadmin file is created for root, qns, qns-su and qns-admin users.
-
<user-home-directory>/.dbreadonly file is created for root, qns, qns-su, qns-admin and qns-ro users.
Use Cases
-
Disable authentication (Fresh install):
db_authentication_enabled=FALSE (or do not configure this field)
Output: dbPassword field is not present in /etc/broadhop/qns.conf file and there is no <user-home-directory>/.dbadmin and <user-home-directory>/.dbreadonly files.
-
Enable authentication (Fresh install):
db_authentication_enabled,TRUE
db_authentication_admin_passwd,XXXX
db_authentication_readonly_passwd,YYYY
Output: dbPassword field is added in /etc/broadhop/qns.conf file and <user-home-directory>/.dbadmin and <user-home-directory>/.dbreadonly files are created for users with permission 400 set to (read only to that user).
-
Enabling or disabling authentication on an existing system:
This requires database and application downtime, use the following script to do that:
/var/qps/install/current/scripts/modules/mongo_auth_upgrade.py Example of /var/qps/install/current/scripts/modules/mongo_auth_upgrade.py: INFO ===== mongo upgrade ===== INFO Parsing Mongo Config file INFO Mongo authentication is enabled on this system INFO Following replica sets need to enable authentication: ['set01', 'set02'] Do you want to enable mongo auth on these sets? (y/n):
MongoDB Authentication Process
-
Change mongo user password (Application downtime is involved):
-
Modify password in Configuration.csv file.
-
After modifying the password, update the configuration using /var/qps/install/current/scripts/import/import_deploy.sh and /var/qps/install/current/scripts/upgrade/reinit.sh scripts.
-
Execute change password script (/var/qps/install/current/scripts/modules/mongo_change_password.py) and enter the old password.
Syntax:
/var/qps/install/current/scripts/modules/mongo_change_password.py <old password>
-
Restart all the JAVA processes.
-
-
Disable mongo authentication (No application downtime is involved):
-
Modify mongo authentication configuration in Configuration.csv file.
-
Update the configuration using /var/qps/install/current/scripts/import/import_deploy.sh and /var/qps/install/current/scripts/upgrade/reinit.sh scripts.
-
Execute disable mongo authentication script: /var/qps/install/current/scripts/modules/mongo_auth_upgrade.py
-
Restart all the JAVA processes.
-
-
Enable mongo authentication (Mongo and application downtime is involved).
-
Modify mongo authentication configuration in Configuration.csv file.
-
Update the configuration using /var/qps/install/current/scripts/import/import_deploy.sh and /var/qps/install/current/scripts/upgrade/reinit.sh scripts.
-
Execute enable mongo authentication script: /var/qps/install/current/scripts/modules/mongo_auth_upgrade.py
-
Restart all the JAVA processes.
-
LDAP SSSD Configuration
Note | For LDAP SSSD routable IP is required. LDAP server must be accessible from CPS VMs (LDAP client). |
For information on Policy Builder and Grafana configuration, refer to LDAP SSSD section in CPS Operations Guide.
Note | Add the LDAP server IP address and server name in AdditionalHost.csv file. For more information, refer to Additional Hosts Configuration. |
HA Setup
For LDAP SSSD configuration, the following parameters can be configured in Configuration.csv sheet:
Note | Change the parameter values as per your deployment. |
|
Parameter |
Description |
||
|---|---|---|---|
|
ldap_on_all |
When set to true, it installs the LDAP SSSD on all CPS VMs. When set to false, it install the LDAP SSSD only on pcrfclient/policy directors (lb) VMs.
|
||
|
ldap_enabled |
When set to true, applies the SSSD configuration as per input provided by user. When set to false, use the default configuration.
|
||
|
ldap_server |
Contains server IP:port to configure LDAP. Format: ldaps://<serverip>:<port> |
||
|
ldap_search_base |
This is required for SSSD configuration. The default base DN to use for performing LDAP user operations. Format: ou=users,dc=cisco,dc=com |
||
|
ldap_default_bind_dn |
The default bind DN to use for performing LDAP operations. Format: uid=admin,ou=system |
||
|
ldap_secret |
The authentication token for the default bind DN. Currently, only clear text passwords are supported. For example, secret |
||
|
ldap_default_user |
The default LDAP user to be configured in LDAP server. For example, admin |
||
|
ldap_ou_user |
The default LDAP user OU. For example, users |
||
|
ldap_ou_group |
The default LDAP group user OU. For example, groups |
||
|
ldap_default_group |
The LDAP attribute that corresponds to the group name. For example, Admin |
||
|
ldap_default_group_editor |
This is a user group which has the editor access to Grafana. For example, User |
||
|
ldap_dc_name |
This is a single entity of all domains. Format: dc=cisco,dc=com |
Here is an example configuration:
ldap_on_all,true
ldap_enabled,true
ldap_server,"ldaps://<serverip>:10648"
ldap_search_base,"ou=users,dc=cisco,dc=com"
ldap_default_bind_dn,"uid=admin,ou=system"
ldap_secret,secret,
ldap_default_user,admin,
ldap_ou_user,users,
ldap_ou_group,groups,
ldap_default_group,Admin,
ldap_default_group_editor,User,
ldap_dc_name,"dc=cisco,dc=com"
Run /var/qps/install/current/scripts/bin/support/enable_ldap clustermgr to install the LDAP SSSD configuration on Cluster Manager.
Run puppet apply --logdest /var/log/cluman/puppet-run.log --modulepath=/opt/cluman/puppet/modules --config /opt/cluman/puppet/puppet.conf /opt/cluman/puppet/nodes/node_repo.pp from Cluster Manager to update the puppet.
AIO/Arbiter Setup
You need to create ldapconf file to add the required parameters to configure LDAP SSSD.
Here is an example configuration:
# /var/qps/config/deploy/ldapconf
ldap_on_all,true
ldap_enabled=true
ldap_server="ldaps://<serverip>:<port>"
ldap_search_base="ou=users,dc=cisco,dc=com"
ldap_default_bind_dn="uid=admin,ou=system"
ldap_secret=secret,
ldap_default_user=admin,
ldap_ou_user=users,
ldap_ou_group=groups,
ldap_default_group=Admin,
ldap_default_group_editor=User,
ldap_dc_name="dc=cisco,dc=com",
NODE_TYPE=aio/arbiter
Run /var/qps/install/current/scripts/bin/support/enable_ldap clustermgr to install the LDAP SSSD configuration on AIO or arbiter.
Run puppet apply --logdest /var/log/cluman/puppet-run.log --modulepath=/opt/cluman/puppet/modules --config /opt/cluman/puppet/puppet.conf /opt/cluman/puppet/nodes/node_repo.pp from Cluster Manager to update the puppet.
LDAP SSSD Certificate Authentication
LDAP certificate needs to copied to /etc/openldap/certs/on all VMs.
After copying the certificate, run the following commands on pcrfclient01 and pcrfclient02:
Note | LDAP certificate must be provided by the customer. |
export CLASSPATH=/usr/java/default/bin
keytool -import -noprompt -trustcacerts -alias ldap_l -file /etc/openldap/certs/ldap_local.cer -keystore /usr/lib/jvm/zulu-8/jre/lib/security/cacerts
This prompts for the password and the keytool password is "changeit".
Once the certificate authentication is complete, /var/broadhop/scripts/update-uaf.sh script runs every hour in crontab. This updates the user information in the /var/www/svn/users-access-file file on pcrfclient01 and pcrfclient02.
After pcrfclient VM is rebooted/re-deployed or vm-init script is executed, check whether the class path (CLASSPATH=/usr/java/default/bin) has been set on pcrfclient01 and pcrflcient02 by running echo $CLASSPATH command.
Also check whether the certificate (/etc/openldap/certs/ldap_local.cer) is present or not, run ls - l command.
If the class path or certificate path is missing, run the following commands:
export CLASSPATH=/usr/java/default/bin
keytool -import -noprompt -trustcacerts -alias ldap_l -file /etc/openldap/certs/ldap_local.cer -keystore /usr/lib/jvm/zulu-8/jre/lib/security/cacerts
Note | After installing LDAP SSSD on all VMs if you want to remove from LDAP SSSD from policy server (qns) and sessionmgr, then you need to run reinit.sh script twice or run /etc/init.d/vm-init on individual policy servers (qns) and sessionmgr VMs. |
Upgrade Consideration
After upgrading from CPS 13.x.x or CPS 14.x.x to CPS 18.0.0 release, LDAP SSSD configuration is installed on default VM (pcrfclient/lb) and not on all VMs. You need to configure LDAP SSSD on all the other VMs.
Once LDAP SSSD configuration is complete, you need to authenticate the LDAP certificate. For more information, refer to LDAP SSSD Certificate Authentication.
Note | If upgrading from a lower version such as CPS 13.x.x to CPS 18.x.x and do not want the LDAP SSSD package, modify the LDAP parameters as follows in Configuration.csv: ldap_on_all=false ldap_enable=false After the modification, run import_deploy.sh so that LDAP SSSD is not installed by default. |
Troubleshooting
-
Monitor the following important log files to debug grafana and httpd service:
-
Restart the httpd service and grafana-server in case grafana status is Not Running in monit summary after configuring LDAP SSSD.
-
If any error is found for AIO/HA deployments after configuring LDAP SSSD, restart the http/grafana-server.
-
If LDAP SSSD user information is not automatically added in /var/www/svn/users-access-file on pcrfclient01/02, then check /var/log/broadhop/scripts/ldap*.log for error information.
VIP Proxy Configuration
This file is used to specify the listen port for each VIP in HAProxy diameter configuration and the port range for the backend diameter endpoints to which the requests are load balanced. Values in this file are used to generate the HAProxy diameter configuration (/etc/haproxy/haproxy-diameter.cfg file) on Policy Director 01/02 VMs. Here is an example:
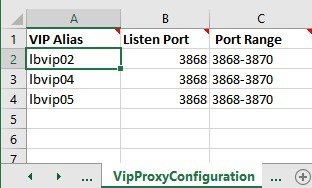
The following parameters can be configured in this sheet:
|
Parameter |
Description |
|---|---|
|
VIP Alias |
Name of the VIP supporting multiple diameter endpoints. |
|
Listen Port |
Front facing diameter endpoint port in HAProxy configuration. |
|
Port Range |
List of backend ports for each front end port in HAProxy configuration. |
The following restriction applies to the haproxy-diameter.cfg file for all the installation types:
-
You should not use the following list of VIP Aliases in VipProxyConfiguration.csv file. The VIP aliases in AdditionalHosts.csv invokes the legacy method of haproxy-diameter configuration. Hence, Cisco does not recommend the use of legacy VIP aliases listed below:
diam_int1, diam_int1_vip, diam_int2, diam_int1_69, diam_int2_vip, diam_int1_69_vip, diam_int3, diam_int3_vip, diam_int1_70_vip, diam_int4, diam_int4_vip, diam_int1_71_vip
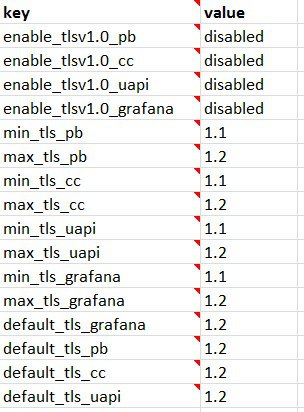
Secure Configuration
The SecureConfig sheet defines the Transport Layer Security (TLS) related configuration for secure services in CPS.
Select the SecureConfig sheet.
|
Parameter |
Description |
Possible Values |
Default Value |
|---|---|---|---|
|
enable_tlsv1.0_pb |
Enables TLSv1.0 for the Policy Builder interface. |
Enabled Disabled |
Disabled |
|
enable_tlsv1.0_cc |
Enables TLSv1.0 for the Control Center interface. |
Enabled Disabled |
Disabled |
|
enable_tlsv1.0_uapi |
Enables TLSv1.0 for the Unified API interface. |
Enabled Disabled |
Disabled |
|
enable_tlsv1.0_grafana |
Enables TLSv1.0 for the Grafana interface. |
Enabled Disabled |
Disabled |
|
min_tls_pb |
Defines the minimum TLS version supported by the Policy Builder interface. |
1.1 1.2 |
1.1 |
|
max_tls_pb |
Defines the maximum TLS version supported by the Policy Builder interface. |
1.1 1.2 |
1.2 |
|
min_tls_cc |
Defines the minimum TLS version supported by the Control Center interface. |
1.1 1.2 |
1.1 |
|
max_tls_cc |
Defines the maximum TLS version supported by the Control Center interface. |
1.1 1.2 |
1.2 |
|
min_tls_uapi |
Defines the minimum TLS version supported by the Unified API interface. |
1.1 1.2 |
1.1 |
|
max_tls_uapi |
Defines the maximum TLS version supported by the Unified API interface. |
1.1 1.2 |
1.2 |
|
min_tls_grafana |
Defines the minimum TLS version supported by the Grafana interface. |
1.1 1.2 |
1.1 |
|
max_tls_grafana |
Defines the maximum TLS version supported by the Grafana interface. |
1.1 1.2 |
1.2 |
|
default_tls_grafana |
Defines the default TLS version to use for Grafana. |
1.1 1.2 |
1.2 |
|
default_tls_pb |
Defines the Default TLS version to use for Policy Builder. |
1.1 1.2 |
1.2 |
|
default_tls_cc |
Defines the default TLS version to use for Control Center. |
1.1 1.2 |
1.2 |
|
default_tls_uapi |
Defines the default TLS version to use for Unified API. |
1.1 1.2 |
1.2 |
Note |
|
Finish and Save
After entering your deployment information, save the Deployment Template file in Excel format.
Import the Excel Information into the Cluster Manager VM
The settings in the excel sheet must be converted to a csv file and imported into CPS.
- Save the csv Files
- Copy the csv Files into Cluster Manager VM
- Import the csv Files into the Cluster Manager VM
- Validate Imported Data
- Update System Parameters
Save the csv Files
Click the Convert to CSV button on the VMSpecification sheet.
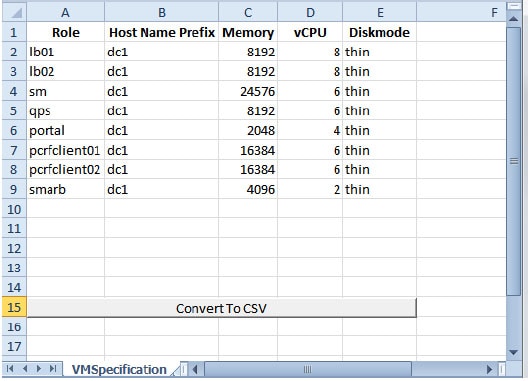
The Convert to CSV button exports each individual sheet into a separate CSV file in a new folder (csv_files) where the source file is located. Each csv file is named as the sheet name. Make sure the Host names, Alias, datastore, network names are all correct and created in VMware. Any mismatch of the attribute can cause the deployment to fail and restart the deployment process.
It is strongly recommended to go through this list with Cisco AS and Virtualization system administrator, network administrator to make sure all the settings are correct.
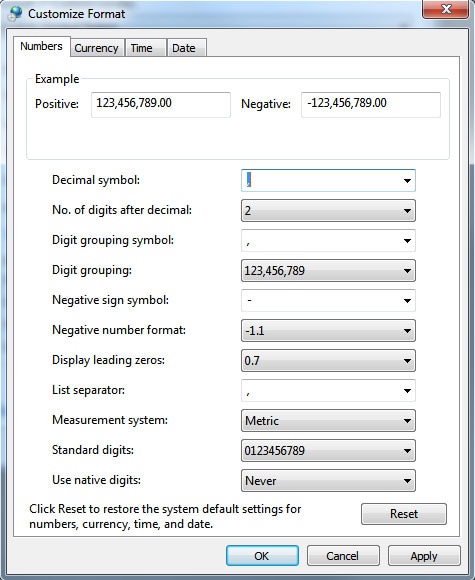
Verify that the generated csv files are separated with commas. If needed, modify the regional settings. For reference, see the following image.
Copy the csv Files into Cluster Manager VM
Use a tool such as Secure Copy (scp) to copy all the csv files to the Cluster Manager VM to the following directory:
/var/qps/config/deploy/csv/
Import the csv Files into the Cluster Manager VM
Execute the following command to import csv files into the Cluster Manager VM:
/var/qps/install/current/scripts/import/import_deploy.sh
This script converts the data to JSON format and outputs it to /var/qps/config/deploy/json/.
Validate Imported Data
Execute the following command to validate the imported data:
cd /var/qps/install/current/scripts/deployer/support/
python jvalidate.py
This script validates the parameters against the ESX servers to make sure ESX server can support the configuration and deploy the VMs.
Continue with Customize Features in the Deployment.
Update System Parameters
Refer to section Update the VM Configuration without Re-deploying VMs if you need to update any of the parameters you defined in the spreadsheet after deploying the CPS VMs.
Customize Features in the Deployment
Certain deployments require additional features to be installed. To add or remove features, perform the following steps on Cluster Manager VM:
| Step 1 | Determine which features are needed with the assistance of your Cisco Technical Representative. | ||
| Step 2 | If this is HA
environment, edit the corresponding features files in Cluster Manager VM:
Modify the features file for the corresponding server types. Here are some examples: # The server and infrastructure features do not need to be specified. # IO Manager Features com.broadhop.controlcenter.feature com.broadhop.server.runtime.product com.broadhop.infrastructure.feature com.broadhop.snmp.feature com.broadhop.faultmanagement.service.feature com.broadhop.server.runtime.product com.broadhop.snmp.feature com.broadhop.diameter2.service.feature # IO Manager Features com.broadhop.iomanager.feature com.broadhop.server.runtime.product com.broadhop.snmp.feature iomanager02
com.broadhop.client.product com.broadhop.client.feature.ws com.broadhop.client.feature.isg com.broadhop.client.feature.balance com.broadhop.client.feature.spr com.broadhop.client.feature.unifiedapi #com.broadhop.client.feature.pop3auth com.broadhop.client.feature.vouchers com.broadhop.client.feature.isg.prepaid com.broadhop.client.feature.notifications com.broadhop.client.feature.diameter2 com.broadhop.client.feature.ldap com.broadhop.client.feature.relianceutil #com.broadhop.client.feature.policyintel com.broadhop.client.feature.custrefdata #com.broadhop.client.feature.congestionrefdata #com.broadhop.client.feature.audit com.broadhop.balance.crdbalance.feature # The server and infrastructure features do not need to be specified. # PCRF Features com.broadhop.server.runtime.product com.broadhop.policy.feature com.broadhop.externaldatacache.memcache.feature com.broadhop.snmp.feature com.broadhop.ws.service.feature com.broadhop.unifiedapi.ws.service.feature com.broadhop.spr.dao.mongo.feature com.broadhop.spr.feature com.broadhop.unifiedapi.interface.feature com.broadhop.balance.service.feature com.broadhop.vouchers.service.feature com.broadhop.ui.controlcenter.feature com.broadhop.diameter2.local.feature com.broadhop.custrefdata.service.feature com.broadhop.policyintel.service.feature com.broadhop.balance.crdbalance.feature If VMs are already deployed, after modifying the feature files, execute the following commands: /var/qps/install/current/scripts/build_all.sh /var/qps/install/current/scripts/upgrade/reinit.sh | ||
| Step 3 | If this is AIO
environment, edit the following features files in Cluster Manager VM:
For an AIO environment, after modifying the feature files, execute the following commands: /var/qps/install/current/scripts/build_all.sh
|
Feature Installation
By default, ANDSF functionality is not enabled in CPS deployments. You must perform the following steps to manually add the ANDSF features.
To verify whether the ANDSF features is enabled, from the Cluster Manager VM, execute the following command:
list_installed_features.sh
For ANDSF, if com.broadhop.client.feature.andsf is included in the output, the ANDSF feature is enabled.
LDAP Feature Installation
Enable LDAP on HA Deployment
To enable the LDAP feature on an High Availability (HA) deployment:
| Step 1 | Edit the features files in Cluster Manager VM:
In the /var/qps/current_config/etc/broadhop/pb/features file, add the following line: com.broadhop.client.feature.ldap In the /var/qps/current_config/etc/broadhop/pcrf/features file, add the following line: com.broadhop.ldap.interface.feature In the /var/qps/current_config/etc/broadhop/iomanager0X/features file, add the following line: com.broadhop.ldap.service.feature |
| Step 2 | After modifying the feature files, execute the following commands
from Cluster Manager:
/var/qps/install/current/scripts/build_all.sh /var/qps/install/current/scripts/upgrade/reinit.sh |
Enable LDAP on AIO Deployment
To enable the LDAP feature on an All-In-One (AIO) deployment:
| Step 1 | Edit the features files in Cluster Manager VM:
In the /var/qps/current_config/etc/broadhop/pb/features file, add the following line: com.broadhop.client.feature.ldap In the /var/qps/current_config/etc/broadhop/pcrf/features file, add the following line: com.broadhop.ldap.service.feature | ||
| Step 2 | After modifying the feature files, execute the following commands:
/var/qps/install/current/scripts/build_all.sh /var/qps/install/current/scripts/upgrade/reinit.sh
/var/qps/bin/control/restartall.sh restartall.sh process will prompt for either Y/N to restart process. Enter Y to restart the process. |
Subscriber Lookup Feature Installation
Enable Subscriber Lookup on HA Deployment
To enable the Subscriber Lookup feature on an High Availability (HA) deployment:
| Step 1 | Edit the
features files in Cluster Manager VM:
In the /var/qps/current_config/etc/broadhop/pb/features file, add the following line: com.broadhop.client.feature.ldapserver In the /var/qps/current_config/etc/broadhop/pcrf/features file, add the following line: com.broadhop.ldapserver.local.feature In the /var/qps/current_config/etc/broadhop/iomanager0X/features file, add the following line: com.broadhop.ldapserver.service.feature |
| Step 2 | After modifying
the feature files, execute the following commands from Cluster Manager:
/var/qps/install/current/scripts/build_all.sh /var/qps/install/current/scripts/upgrade/reinit.sh |
Enable Subscriber Lookup on AIO Deployment
To enable the Subscriber Lookup feature on an All-In-One (AIO) deployment:
| Step 1 | Edit the
features files in Cluster Manager VM:
In the /var/qps/current_config/etc/broadhop/pb/features file, add the following line: com.broadhop.client.feature.ldapserver In the /var/qps/current_config/etc/broadhop/pcrf/features file, add the following line: com.broadhop.ldapserver.local.feature com.broadhop.ldapserver.service.feature | ||
| Step 2 | After modifying
the feature files, execute the following commands:
/var/qps/install/current/scripts/build_all.sh /var/qps/install/current/scripts/upgrade/reinit.sh
/var/qps/bin/control/restartall.sh restartall.sh process will prompt for either Y/N to restart process. Enter Y to restart the process. |
License Generation and Installation
License Generation
For HA or GR systems, contact your Cisco Technical support representative to generate a license. You must provide the MAC addresses and hostnames for your pcrfclient01 and pcrfclient02 VMs.
For AIO system, license is not required. You can use the DeveloperMode to work on AIO system. For more information, contact your Cisco Technical support representative.
Note | Cisco Smart Licensing is supported for CPS 10.0.0 and later releases. For information about what Smart Licensing is and how to enable it for CPS, refer to the CPS Operations Guide. |
| Step 1 | To generate a
unique MAC address, execute the following command on the Cluster Manager once
for pcrfclient01 and again for pcrfclient02:
python /var/qps/install/current/scripts/deployer/support/genmac.py The MAC address generated by this script is applied to pcrfclient01/02. |
| Step 2 | To get the hostname, refer to the Hosts.csv file, and use the Guest Name that corresponds to pcrfclient01 and pcrfclient02 roles. |
| Step 3 | Submit this information to your Cisco Technical support representative. After you receive the license, continue with License Installation. |
License Installation
The following section describes:
-
how to install the license files prior to deploying all of the CPS VMs, as described in the Deploy the VMs.
-
the steps you perform to preserve the license files during an upgrade of CPS to the current release.
To install the licenses:
| Step 1 | Copy the license files you received to the Cluster Manager VM. | ||
| Step 2 | Create
pcrfclient01 and pcrfclient02 directories in the Cluster Manager VM in
/etc/broadhop/license/.
mkdir -p /etc/broadhop/license/pcrfclient01 mkdir -p /etc/broadhop/license/pcrfclient02 | ||
| Step 3 | Copy the
pcrfclient01 license to the
/etc/broadhop/license/pcrfclient01 directory, and the
pcrfclient02 license to the
/etc/broadhop/license/pcrfclient02 directory on the
Cluster Manager VM:
cp <filename1> /etc/broadhop/license/pcrfclient01 cp <filename2> /etc/broadhop/license/pcrfclient02 where, <filename1> is the license filename generated for pcrfclient01. <filename2> is the license filename generated for pcrfclient02. | ||
| Step 4 | If you are
performing an upgrade of the system from an earlier version to the current
release:
| ||
| Step 5 | Create a
features.properties file in the
/etc/broadhop/license directory on the Cluster
Manager with the following content from the license file. For example:
LicenseFeature=MOBILE_CORE,FIXED_CORE,SP_CORE
| ||
| Step 6 | Execute the
following command to rebuild the
/etc/broadhop/license directory in the Cluster
Manager VM.
/var/qps/install/current/scripts/build/build_etc.sh This script makes a zip file with the new license file and copies it to the /var/www/html/images directory. Later the file is pushed to the target VMs when the reinit.sh script is executed. | ||
| Step 7 | If
pcrfclient01/pcrflient02 is already deployed, the license must be pushed to the
pcrfclient01/02 VMs. For this, execute the following commands:
ssh pcrfclient01 /etc/init.d/vm-init and ssh pcrfclient02 /etc/init.d/vm-init
| ||
| Step 8 | If
pcrfclient01/pcrflient02 is already deployed and are being updated, you must
restart the LMGRD process by executing the following commands:
killall -9 lmgrd service lmgrd start |
Validate Installed License
Use the lmutil lmstat command on pcrfclient01/02 to check the status of license and list all the licenses available (Change XXXX to valid license file name).
Command Syntax:
/opt/broadhop/lmgr/x64_lsb/lmutil lmstat -a -c /etc/broadhop/license/XXXX.lic
Note | Users of Feature-name shown is 0 in the below example (i.e. Total of 0 licenses in use). This is due to limited support for lmgrd from CPS side. |
Example:
/opt/broadhop/lmgr/x64_lsb/lmutil lmstat  -a -c /etc/broadhop/license/XXXX.lic
lmutil - Copyright (c) 1989-2013 Flexera Software LLC. All Rights Reserved.
Flexible License Manager status on Fri 7/24/2015 16:11
License server status: 27000@pcrfclient01
License file(s) on pcrfclient01: /etc/broadhop/license/XXXX.lic:
pcrfclient01: license server UP (MASTER) v11.11
Vendor daemon status (on pcrfclient01):
cisco: UP v11.11
Feature usage info:
Users of SPR:  (Total of 0 licenses issued;  Total of 0 licenses in use)
Users of SP_CORE:  (Total of 0 licenses issued;  Total of 0 licenses in use)
Users of POLICY_REPORT:  (Total of 2000 licenses issued;  Total of 0 licenses in use)
Users of QUOTA:  (Total of 0 licenses issued;  Total of 0 licenses in use)
Users of Diameter_UD:  (Total of 0 licenses issued;  Total of 0 licenses in use)
Users of Diameter_SH:  (Total of 0 licenses issued;  Total of 0 licenses in use)
Users of SCE_PRPC:  (Total of 2000 licenses issued;  Total of 0 licenses in use)
Users of SCE_GY:  (Total of 2000 licenses issued;  Total of 0 licenses in use)
Users of DIAMETER_SD:  (Total of 2000 licenses issued;  Total of 0 licenses in use)
Upgrade License
User needs to upgrade license if the current licenses have expired or if you need to increase the session capacity of the system.
| Step 1 | Contact your Cisco Technical representative to generate a license. You must provide the MAC addresses and hostnames for your pcrfclient01 and pcrfclient02 VMs. | ||
| Step 2 | Copy the license files you received to the Cluster Manager VM. | ||
| Step 3 | Delete the
existing license files from the Cluster Manager VM.
rm -fr /etc/broadhop/license/pcrfclient01/<filename1> rm -fr /etc/broadhop/license/pcrfclient02/<filename2> where, <filename1> is the existing license filename of pcrfclient01. <filename2> is the existing license filename of pcrfclient02.
| ||
| Step 4 | Copy the
pcrfclient01 license to the
/etc/broadhop/license/pcrfclient01 directory, and the
pcrfclient02 license to the
/etc/broadhop/license/pcrfclient02 directory on the
Cluster Manager VM:
cp <filename1> /etc/broadhop/license/pcrfclient01 cp <filename2> /etc/broadhop/license/pcrfclient02 where, <filename1> is the license filename generated for pcrfclient01. <filename2> is the license filename generated for pcrfclient02. | ||
| Step 5 | Execute the
following command to rebuild the
/etc/broadhop/license directory in the Cluster
Manager VM.
/var/qps/install/current/scripts/build/build_etc.sh This script makes a zip file with the new license file and copies it to the /var/www/html/images directory. Later the file is pushed to the target VMs when the vm-init.sh script is executed. | ||
| Step 6 | Push new license
to the pcrfclient01/02 VMs. For this, execute the following commands:
ssh pcrfclient01 /etc/init.d/vm-init and ssh pcrfclient02 /etc/init.d/vm-init | ||
| Step 7 | Restart the
LMGRD process by executing the following commands:
ssh pcrfclient01 "killall -9 lmgrd; service lmgrd start" ssh pcrfclient02 "killall -9 lmgrd; service lmgrd start" | ||
| Step 8 | Validate installed license, refer to Validate Installed License. | ||
| Step 9 | Rolling restart
of all Policy Server (QNS) nodes (no need to restart Policy Directors (LBs) or
OAM (PCRFCLIENT).
|
SSL Certificates
Default SSL cipher supported:
ciphers ECDH+AESGCM:DH+AESGCM:ECDH+AES256:DH+AES256:ECDH+AES128:DH+AES:RSA+AESGCM:RSA+AES:
For more information, refer to https://www.openssl.org/docs/man1.0.2/apps/x509.html.
Create SSL Certificates
Certain deployments have customized certificates (for example, *.der and *.cer files) installed in their systems. To create Self-Signed certificates (SSL) that can be used in CPS, perform the following steps on Cluster Manager VM:
| Step 1 | Convert the user
provided files to pem files. Consider the user has provided *.der and *.cer
files.
For example, if the user has provided the following files: openssl x509 -inform der -in x.der -out x.pem openssl x509 -inform der -in y.cer -out y.pem openssl x509 -inform der -in z.cer -out z.pem
| ||
| Step 2 | Generate your
chain crt file in the following order: server > intermediate > root.
cat x.pem z.pem y.pem > server.crt | ||
| Step 3 | Remove
passphrase from KEY file (You will be asked to supply the passphrase of the KEY
file).
openssl rsa -in server.key -out server.nopass.key | ||
| Step 4 | Combine the key
without pass and certificate chain to create pem file.
cat server.nopass.key server.crt > server.pem | ||
| Step 5 | Copy the
server.pem, server.crt and server.nopass.key to
/var/qps/install/current/puppet/modules/qps/templates/certs/.
cp server.crt /var/qps/install/current/puppet/modules/qps/templates/certs/quantum.crt cp server.nopass.key /var/qps/install/current/puppet/modules/qps/templates/certs/quantum.key cp server.pem /var/qps/install/current/puppet/modules/qps/templates/certs/quantum.pem | ||
| Step 6 | Execute the
following commands from Cluster Manager:
/var/qps/install/current/scripts/build_all.sh /var/qps/install/current/scripts/upgrade/reinit.sh |
Replace SSL Certificates
To replace the default Self-Signed certificates (SSL) during installation process, replace the crt, key and pem (contains both the crt/key) in /var/qps/install/current/puppet/modules/qps/templates/certs directory on the Cluster Manager VM with the new certificates.
The custom certificates are replaced with the default CPS certificates after the migration or upgrade. In this case, you need to apply the custom certificates again on Cluster Manager once the upgrade or migration is complete.
Consider the user has the following new SSL certificates and wants to replace the default SSL certificates in the system:
The new certificates can be stored anywhere on the Cluster Manager. In the following steps the new certificates are stored in /root. To replace the old keys/certs/pem with the new ones, perform the following steps:
| Step 1 | Execute the
following commands from Cluster Manager to replace the old certificates with
the new certificates:
mv /root/SSL_new.crt /var/qps/install/current/puppet/modules/qps/templates/certs/quantum.crt mv /root/SSL_new.key /var/qps/install/current/puppet/modules/qps/templates/certs/quantum.key Retain the permissions of the old files. |
| Step 2 | Execute the
following command from Cluster Manager to rebuild puppet:
build_puppet.sh |
| Step 3 | Execute the
following command from each VM to replace the certs/keys:
/etc/init.d/vm-init OR Execute the following command from Cluster Manager to replace the puppet on all VMs. /var/qps/install/current/scripts/upgrade/reinit.sh |
Enable Custom Puppet to Configure Deployment
Some customers may need to customize the configuration for their deployment. When customizing the CPS configuration, it is important to make the customization in a way that does not impact the normal behavior for VM deployment and redeployment, upgrades/migration, and rollbacks.
For this reason, customizations should be placed in the /etc/puppet/env_config directory. Files within this directory are given special treatment for VM deployment, upgrade, migrations, and rollback operations.
Note | If system configurations are manually changed in the VM itself after the VM has been deployed, these configurations will be overridden if that VM is redeployed. |
The following section describes the steps necessary to make changes to the puppet installer.
Customizations of the CPS deployment are dependent on the requirements of the change. Examples of customizations include:
To explain the process, let us consider that we modify all VMs built from an installer, so we use the Policy Server (QNS) node definition.
For the above mentioned example, add custom routes via the examples42-network Puppet module. (For more information on the module, refer to https://forge.puppetlabs.com/example42/network).
| Step 1 | Make sure that
the proper paths are available:
mkdir -p /etc/puppet/env_config/nodes | ||
| Step 2 | Install the
necessary Puppet module. For example:
puppet module install \
--modulepath=/etc/puppet/env_config/modules:/etc/puppet/modules \
example42-network
Notice: Preparing to install into /etc/puppet/env_config/modules ...
Notice: Downloading from https://forge.puppetlabs.com ...
Notice: Installing -- do not interrupt ...
/etc/puppet/env_config/modules
example42-network (v3.1.13)
| ||
| Step 3 | Copy the
existing node definition into the env_config nodes:
cp /etc/puppet/modules/qps/nodes/qps.yaml \ /etc/puppet/env_config/nodes | ||
| Step 4 | Add a reference
to your custom Puppet manifest:
echo ' custom::static_routes:' >> \ /etc/puppet/env_config/nodes/qps.yaml | ||
| Step 5 | Create your new
manifest for static routes:
cat
 >/etc/puppet/env_config/modules/custom/manifests/static_routes.pp <<EOF class custom::static_routes {
   network::route {'eth0':
     ipaddress => ['192.168.1.0',],
     netmask   => ['255.255.255.0',],
     gateway   => ['10.105.94.1',],
   }
}
EOF
| ||
| Step 6 | Validate the
syntax of your newly created puppet script(s):
puppet parser validate /etc/puppet/env_config/modules/custom/manifests/static_routes.pp | ||
| Step 7 | Rebuild your
Environment Configuration:
/var/qps/install/current/scripts/build/build_env_config.sh | ||
| Step 8 | Reinitialize
your environment:
/var/qps/install/current/scripts/upgrade/reinit.sh At this point your new manifest is applied across the deployment. For more details, refer to the installer image in the /etc/puppet/env_config/README. |
What to Do Next
It is recommended that version control is used to track changes to these Puppet customizations.
For example, to use 'git', perform the following steps:
-
Initialize the directory as a repository:
# git init
Initialized empty Git repository in /var/qps/env_config/.git/.
-
Add everything:
# git add .
-
Commit your initial check-in:
# git commit -m 'initial commit of env_config'
-
If you are making more changes and customizations, make sure you create new revisions for those:
# git add .
# git commit -m 'updated static routes'
 Feedback