CPS CCI Guide for Full Privilege Administrators, Release 18.1.0 (Restricted Release)
Bias-Free Language
The documentation set for this product strives to use bias-free language. For the purposes of this documentation set, bias-free is defined as language that does not imply discrimination based on age, disability, gender, racial identity, ethnic identity, sexual orientation, socioeconomic status, and intersectionality. Exceptions may be present in the documentation due to language that is hardcoded in the user interfaces of the product software, language used based on RFP documentation, or language that is used by a referenced third-party product. Learn more about how Cisco is using Inclusive Language.
- Updated:
- March 16, 2018
Chapter: Custom Reference Data Tables
Custom Reference
Data Tables
Custom Reference Data Tables Overview
In Cisco Policy Suite, reference data is considered information that is needed to operate the policy engine, but not used for evaluating policies. For example, under the Reference Data tab in Policy Builder, are the forms used to define systems, clusters, and instances, and to set times and dates used for tariff switching. The policy engine needs to refer to these data only to process policies correctly, but they do not define the policy itself.
Custom reference data is considered reference data that is specific to a service provider, perhaps the names and characteristics of their networks or cell sites.
Such custom reference data is stored in the data structure of a table, with the columns and field attributes defined by the service provider for their specific use. The Policy Builder interface does not provide screens for such customized information because it would be so limiting.
Rather, in Cisco Policy Suite, custom reference data tables provide a way for service providers to create their own data tables and to populate them.
The resulting custom reference data tables can then be used within Policy Builder as criteria to use when escalating policy decisions.
Two interfaces are used to construct and populate custom reference data tables:
-
Policy Builder 8.0.0 or greater
Data table structures are managed in Policy Builder.
-
Control Center 3.6 or greater, either the full admin or read only privileges
Data table content is managed in Control Center.
The information in custom reference data tables handles special considerations such as these:
-
Specialty area codes.
-
A list of device parameters.
-
Location data mapping, to map network sites and cell sites into the subscriber’s home network, roaming network, or preferred roaming network.
-
IMEI data tagging for smart phone, Apple, or Android device, and then use of that in policies.
Custom reference data tables allow the service provider to create their own data structures and populate them with your own proprietary data.
The data in the tables is then used during policy evaluation.
You can construct your reference data tables yourself, or Cisco may build them for you after installation. If you need any help with custom reference data tables, call your Cisco technical representative.
Concepts for Custom Reference Data Tables
-
The Policy Builder interface creates and edits the custom reference data table structure, defines its columns, and defines the data type, ranges and size of the fields.
-
Control Center reflects the custom reference data tables constructed in Policy Builder.
-
You provide data content to the custom reference data tables in Control Center.
-
Spreadsheets can be imported into a custom reference data table structure. Log in to the Control Center interface to do so.
-
A key icon is displayed before the column name of the selected CRD tables. This provides the following information:
When constructing the custom reference data table in the Policy Builder, look at the spreadsheet you want to import later and use the same column names, data types and other attributes.
Steps and Procedures
Policy Builder: Constructing Custom Reference Data Tables
There are two tasks needed to create custom reference data tables:
- Set Up the System Plug-in Configuration
- Create or Edit a Custom Reference Data Table
- Delete Reference Data Tables
- Last Tasks
Set Up the System Plug-in Configuration
You only have to do this one time for each system, cluster, or instance. Then you can create as many tables as needed. The steps below configure an example system.
Before you can create a custom reference data table, configure your system to use the Custom Reference Data Table plug-in configuration.
| Step 1 | Log in to Policy Builder and click . | ||||||||
| Step 2 | Click
Custom
Reference Data Configuration in the main pane.
The tree on the left is populated with the configuration. | ||||||||
| Step 3 | Fill in the
Custom Reference Data Configuration screen that appears.
| ||||||||
| Step 4 | Go on to create data table structures as described at Create or Edit a Custom Reference Data Table. |
Create or Edit a Custom Reference Data Table
Before you begin, be sure that you have configured the plug-in as described in Setting Up the System Plug-in Configuration. Click and make sure you see the Custom Reference Data Config in the tree.
Delete Reference Data Tables
Contact your Cisco technical representative for these delete tasks:
-
Delete a custom reference data table
-
Delete columns in a table
-
To change the name of a table without using the copy link
Changing a table name has the same result as creating a new table. The first named table does not appear to the admin in Control Center. The New table name has no data in it. this is because Policy Builder does not write to the database and change the table name.
Last Tasks
Now populate or edit the contents of these table columns. provide them with rows and rows of data.
See Control Center: Populating a Custom Reference Data Table.
Control Center: Populating a Custom Reference Data Table
The custom reference data table structures are created and edited in the Policy Builder interface. See Policy Builder: Constructing Custom Reference Data Tables for those procedures.
- Import Data from a Spreadsheet
- Enter Data Manually
- Add a Row
- Edit a Row
- Fix Errors in a Row
- Delete a Single Row
- Create a Snapshot
- Revert a Snapshot
- Export All
- Import All
Import Data from a Spreadsheet
If you have a spreadsheet that already has data rows, you can import the spreadsheet into a custom reference data tables. Of course, the data table itself must be created in Policy Builder. However, importing the data occurs in Control Center.
 Note | When the tables are created in Policy Builder, have your spreadsheet open to make sure you match the data type, for example string, date, or number. |
| Step 1 | Log in to Control Center. | ||
| Step 2 | . | ||
| Step 3 | Select the table that receives data from the spreadsheet. | ||
| Step 4 | Click the
import link.
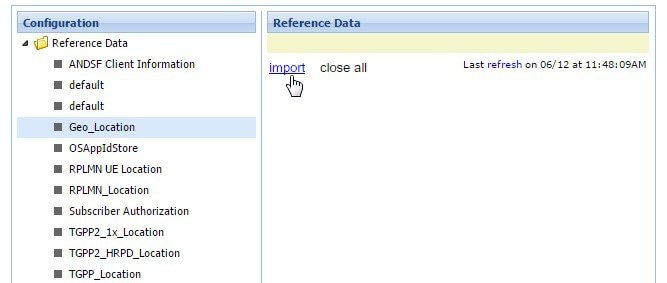
| ||
| Step 5 | The table you selected under the Reference Data tree appears in the Import into Table field. You do not have to type it in. Make sure this is the table that is to receive data from the spreadsheet. | ||
| Step 6 | Either name or
browse for the .xls or .xlsx file you want to import, the one that populates
the table.
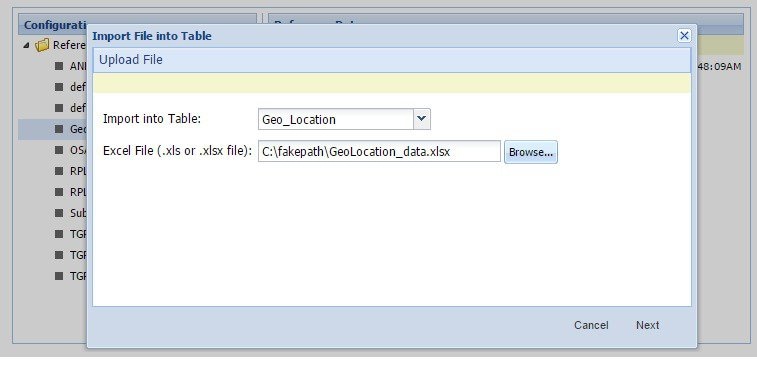 | ||
| Step 7 | Click the Next
button in the lower corner.
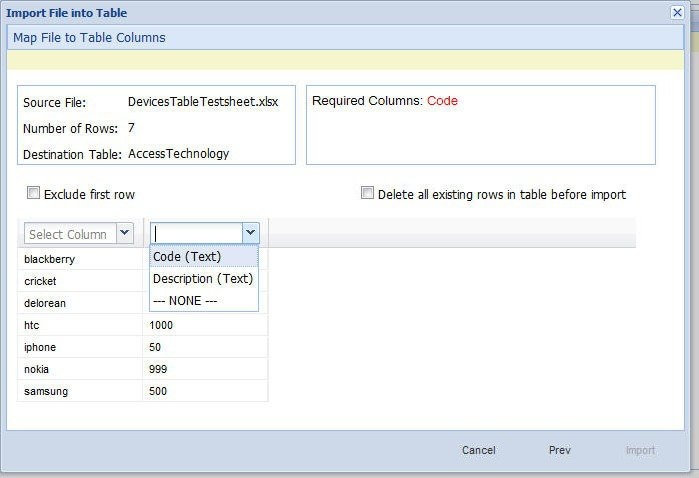
The Map file to Table Columns screen lets you select the columns in the spreadsheet that you want to use in the Access Technology table. | ||
| Step 8 | Check Exclude first row if your .xls spreadsheet has headers. | ||
| Step 9 | Check Delete all rows if you want to completely empty the Access Technology table and bring in all new rows. | ||
| Step 10 | In the Select
Column drop-down lists, specify what column of the Access Technology table you
want to place your spreadsheet columns in.
In our example, we want to place the device names in the Code column and the numeric values in the Description column. | ||
| Step 11 | In the lower right, click the Import link to proceed, or the Prev link to go back. | ||
| Step 12 | Notice the Import Successful screen. | ||
| Step 13 | Select Open
AccessTechnology in the lower left to check your import, then click Done.
The newly populated table appears for you to check. 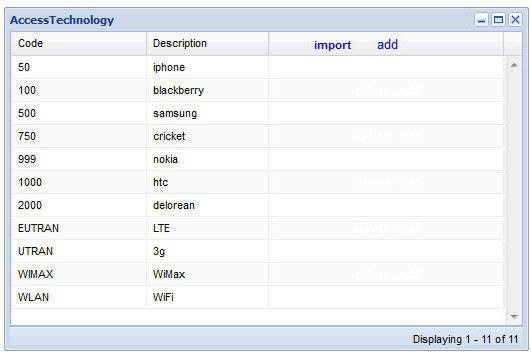 The AccessTechnology table has the new rows added, in the proper columns. |
Enter Data Manually
For data tables that are small, or are not derived from a spreadsheet, use the Control Center interface to enter data manually into the rows of custom reference data tables.
| Step 1 | Log in to Control Center. | ||
| Step 2 | Click
and open the
Reference Data folder.
The items under the Reference Data folder are the table names created in Policy Builder.
| ||
| Step 3 | In the tree,
click a table name to open it.
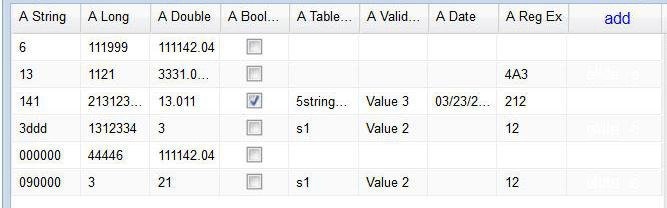
The table window shows the table structures and columns. Our example uses AccessTechnology, which has several rows of data already in it.
|
Add a Row
| Step 1 | Open a table. | ||||
| Step 2 | Click the add link in the upper right corner. | ||||
| Step 3 | Note that the new rows is added to the bottom of the table for you to fill in. You cannot insert a row at a specific place. | ||||
| Step 4 | Notice row count
in lower right corner.
| ||||
| Step 5 | Use any of the save methods mentioned above to save the row. However, you cannot save a row that has errors. |
Edit a Row
There are several ways to save row data and so prevent data loss.
-
Click the save link in the column on the far right.
-
Press Enter after you have finished in a field.
-
Tab over from one field to another until the row is saved.
-
Finish in your field and click on another row.
Note
There is no way to promote or demote rows. -
There is no way to sort on columns.
-
There is no filter or search feature at this time.
Fix Errors in a Row
Errors are denoted as the field margined in red. Help text displays to the far left or far right. Only the cancel link is available until you make a correction.
Delete a Single Row
Create a Snapshot
You can create a snapshot of CRD tables on the system. The created snapshot will contain CRD table data, policy configuration and checksum information for all CRD tables.
Perform the following steps to create a snapshot
| Step 1 | Log in to Control Center. |
| Step 2 | Navigate to Configuration tab. |
| Step 3 | Click Reference Data. |
| Step 4 | Click
create snapshot.
A Create a Snapshot dialog box is displayed. |
| Step 5 | Enter snapshot details. |
| Step 6 | Click
Create.
The snapshot is created displaying the following details: To view the checksum information, click Checksum Details. If the snapshot creation fails an error message is displayed. If there are Svn CRD tables in the database while creating a snapshot, they are skipped and the following warning message is displayed: Datasource for tables [svnTable-1 is subversion]. Skipping these tables to be a part of created snapshot as create snapshot is not allowed for subversion tables. |
Revert a Snapshot
You can revert the CRD data to a specific snapshot.
Preform the following steps to revert a snapshot:
| Step 1 | Log in to Control Center. | ||
| Step 2 | Navigate to Configuration tab. | ||
| Step 3 | Click Reference Data. | ||
| Step 4 | Click
revert
snapshot.
A Revert a Snapshot dialog box is displayed. | ||
| Step 5 | Select a
specific snapshot from the
Snapshot
Name drop down list.
| ||
| Step 6 | Click
Revert.
A Confirmation Required dialog box is displayed. | ||
| Step 7 | Click
Yes.
The specific snapshot is reverted displaying the following details: If the snapshot revert fails an error message is displayed. If there are SVN CRD tables in the database while reverting a snapshot, they are skipped and the following warning message is displayed: Datasource for tables [table_with_date_time] is subversion. Data for these tables will be reverted using svn datasource not from datasource (mongodb) |
Export All
You can export contents of all CRD tables to Microsoft Excel. The data is exported in CSV format in a zip file.
Perform the following steps to export CRD table data:
| Step 1 | Log in to Control Center. |
| Step 2 | Navigate to the Configuration tab. |
| Step 3 | Click Reference Data. |
| Step 4 | Click
Export
All.
The contents of the CRD table is generated in a csv format in a zip file. |
| Step 5 | Click Save File. |
| Step 6 | Click
OK.
|
Import All
You can import contents of all CRD tables in bulk from Control Center. The data is imported in CSV format in a zip file.
When Import All operation is performed the tables whose CSV files are present in the archive zip file will be updated with the corresponding content without affecting other CRD tables existing in Control Center.
Perform the following steps to import CRD tables data in bulk:
| Step 1 | Log in to Control Center. |
| Step 2 | Navigate to Configuration tab. |
| Step 3 | Click Reference Data. |
| Step 4 | Click
Import
All.
An Import All Tables dialog box is displayed. |
| Step 5 | Click Browse and select the file to be imported. |
| Step 6 | Click
Import.
The following warning message is displayed for Svn Crd tables which are skipped under the Import All option: Datasource for tables [table_1, table_2, ...] is subversion. Skipping these tables to be a part of import operation. Import operation is not allowed for subversion tables. |
Typical Tasks for Everyday
These navigation tasks and activities are specific to the custom reference data tables in Control Center.
Refresh the Screen
-
The refresh link in the upper right corner.
-
Click the refresh link to force a refresh.
-
A successful refresh message appears on the right.
-
The usual refresh time is every 5 minutes, and is refreshed from the server.
-
In the middle of updating, refresh is deferred.
-
Upon close and reopen a table, the refreshed table is displayed.
-
The refresh interval for these tables cannot be changed.
Navigate the Table Screens
-
Multiple tables can be open at one time.
-
Icons in the tree to show the open and active focus. -
Icons in the upper right corner of a table minimize, maximize, or close the table. When minimized, the table heading displays at the bottom of the screen in the tray.
-
To restore a table to view, -
Resize a table for viewing by dragging the edges.
-
Narrow or widen a column by dragging the margin of the column head.
Navigate in a Row
-
If you have many columns, they cannot all display in the browser. You must scroll to the far right to get to the delete, edit, save, cancel links.
-
Notice that in the bottom right corner, there is a indicator of how may rows you are viewing at the moment, and how many rows there are total in the table.
 Feedback