Cisco Wireless Controller Configuration Guide, Release 8.1
Bias-Free Language
The documentation set for this product strives to use bias-free language. For the purposes of this documentation set, bias-free is defined as language that does not imply discrimination based on age, disability, gender, racial identity, ethnic identity, sexual orientation, socioeconomic status, and intersectionality. Exceptions may be present in the documentation due to language that is hardcoded in the user interfaces of the product software, language used based on RFP documentation, or language that is used by a referenced third-party product. Learn more about how Cisco is using Inclusive Language.
- Updated:
- April 20, 2015
Chapter: Managing Certificates
Managing
Certificates
Loading an Externally Generated SSL Certificate
This section describes how to load an externally generated SSL certificate.
- Information About Externally Generated SSL Certificates
- Loading an SSL Certificate (GUI)
- Loading an SSL Certificate (CLI)
Information About Externally Generated SSL Certificates
You can use a TFTP server to download an externally generated SSL certificate to the controller. Follow these guidelines for using TFTP:
If you load the certificate through the service port, the TFTP server must be on the same subnet as the controller because the service port is not routable, or you must create static routes on the controller. Also, if you load the certificate through the distribution system network port, the TFTP server can be on any subnet.
A third-party TFTP server cannot run on the same PC as the Cisco Prime Infrastructure because the Prime Infrastructure built-in TFTP server and the third-party TFTP server require the same communication port.

NoteChained certificates are supported for web authentication only and not for the management certificate.
Loading an SSL Certificate (GUI)
Loading an SSL Certificate (CLI)
Downloading Device Certificates
Each wireless device (controller, access point, and client) has its own device certificate. For example, the controller is shipped with a Cisco-installed device certificate. This certificate is used by EAP-FAST (when not using PACs), EAP-TLS, PEAP-GTC, and PEAP-MSCHAPv2 to authenticate wireless clients during local EAP authentication. However, if you want to use your own vendor-specific device certificate, it must be downloaded to the controller.
Note | For more information about configuring local EAP, see the Configuring Local EAP section. |
Follow the instructions in this section to download a vendor-specific device certificate to the controller through the GUI or CLI. However, before you begin, make sure you have a TFTP or FTP server available for the certificate download. Follow these guidelines when setting up a TFTP or FTP server:
If you are downloading through the service port, the TFTP or FTP server must be on the same subnet as the service port because the service port is not routable, or you must create static routes on the controller.
If you are downloading through the distribution system network port, the TFTP or FTP server can be on the same or a different subnet because the distribution system port is routable.
-
A third-party TFTP or FTP server cannot run on the same computer as Cisco Prime Infrastructure because the Prime Infrastructure built-in TFTP or FTP server and the third-party TFTP or FTP server require the same communication port.
Note
All certificates downloaded to the controller must be in PEM format.
Note | Clients using Microsoft Windows 10 with default (zero-touch config) supplicant fail to connect to Cisco WLC when there is no CA certificate to validate the server certificate. This is because the supplicant does not pop up a window to accept the server certificate and silently rejects the 802.1X authentication. Therefore, we recommend that you do either of the following:
|
Downloading Device Certificates (GUI)
Downloading Device Certificates (CLI)
Uploading Device Certificates
Uploading Device Certificates (GUI)
| Step 1 | Choose to open the Upload File from Controller page. |
| Step 2 | From the File Type drop-down list, choose IPSec Device Certificate. |
| Step 3 | From the Transfer Mode drop-down list, choose from the following options: |
| Step 4 | In the IP Address text box, enter the IP address of the server. |
| Step 5 | In the File Path text box, enter the directory path of the certificate. |
| Step 6 | In the File Name text box, enter the name of the certificate. |
| Step 7 | If you are using an FTP
server, follow these steps:
|
| Step 8 | Click Upload to upload the CA certificate from the controller. A message appears indicating the status of the upload. |
| Step 9 | After the upload is complete, choose . |
| Step 10 | If prompted to save your changes, click Save and Reboot. |
| Step 11 | Click OK to confirm your decision to reboot the controller. |
Uploading Device Certificates (CLI)
| Step 1 | Log on to the controller CLI. |
| Step 2 | Specify the type of the file to be uploaded by entering this command: transfer upload datatype ipsecdevcert |
| Step 3 | Specify the transfer mode used to upload the file by entering this command: |
| Step 4 | Specify the IP address of the TFTP or FTP server by entering this command: |
| Step 5 | Specify the directory path of the file by entering this command: |
| Step 6 | Specify the name of the file to be uploaded by entering this command: |
| Step 7 | If you are using an FTP server, enter these commands: |
| Step 8 | View the updated settings by entering the transfer upload start command. Answer y when prompted to confirm the current settings and start the upload process. |
| Step 9 | Reboot the controller by entering the reset system command. |
Downloading CA Certificates
Note | For more information about configuring local EAP, see the Configuring Local EAP section. |
Follow the instructions in this section to download CA certificates to the controller through the GUI or CLI. However, before you begin, make sure that you have a TFTP or FTP server available for the certificate download. Follow these guidelines when setting up a TFTP or FTP server:
If you are downloading through the service port, the TFTP or FTP server must be on the same subnet as the service port because the service port is not routable, or you must create static routes on the controller.
If you are downloading through the distribution system network port, the TFTP or FTP server can be on the same or a different subnet because the distribution system port is routable.
A third-party TFTP or FTP server cannot run on the same computer as Cisco Prime Infrastructure because the Prime Infrastructure built-in TFTP or FTP server and the third-party TFTP or FTP server require the same communication port.
NoteAll certificates downloaded to the controller must be in PEM format.
Download CA Certificates (GUI)
| Step 1 | Copy the CA certificate to the default directory on your server. |
| Step 2 | Choose to open the Download File to Controller page. |
| Step 3 | From the File Type drop-down list, choose Vendor CA Certificate. |
| Step 4 | From the Transfer Mode drop-down list, choose from the following options: |
| Step 5 | In the IP Address text box, enter the IP address of the server. If you are using a TFTP server, the default values of 10 retries and 6 seconds for the Maximum Retries and Timeout text boxes should work correctly without any adjustment. However, you can change these values. |
| Step 6 | Enter the maximum number of times that the TFTP server attempts to download the certificate in the Maximum Retries text box and the amount of time (in seconds) that the TFTP server attempts to download the certificate in the Timeout text box. |
| Step 7 | In the File Path text box, enter the directory path of the certificate. |
| Step 8 | In the File Name text box, enter the name of the certificate. |
| Step 9 | If you are using an FTP server, follow these steps:
|
| Step 10 | Click Download to download the CA certificate to the controller. A message appears indicating the status of the download. |
| Step 11 | After the download is complete, choose . |
| Step 12 | If prompted to save your changes, click Save and Reboot. |
| Step 13 | Click OK to confirm your decision to reboot the controller. |
Downloading CA Certificates (CLI)
| Step 1 | Log on to the controller CLI. | ||
| Step 2 | Specify the transfer mode used to download the config file by entering this command: | ||
| Step 3 | Specify the type of the file to be downloaded by entering this command: transfer download datatype eapdevcert | ||
| Step 4 | Specify the IP address of the TFTP or FTP server by entering this command: | ||
| Step 5 | Specify the directory path of the config file by entering this command: | ||
| Step 6 | Specify the name of the config file to be downloaded by entering this command: | ||
| Step 7 | If you are using a TFTP
server, enter these commands:
| ||
| Step 8 | If you are using an FTP server, enter these commands: | ||
| Step 9 | View the updated settings by entering the transfer download start command. Answer y when prompted to confirm the current settings and start the download process. | ||
| Step 10 | Reboot the controller by entering the reset system command. |
Uploading CA Certificates
Uploading CA Certificates (GUI)
| Step 1 | Choose to open the Upload File from Controller page. |
| Step 2 | From the File Type drop-down list, choose IPSec CA Certificate. |
| Step 3 | From the Transfer Mode drop-down list, choose from the following options: |
| Step 4 | In the IP Address text box, enter the IP address of the server. |
| Step 5 | In the File Path text box, enter the directory path of the certificate. |
| Step 6 | In the File Name text box, enter the name of the certificate. |
| Step 7 | If you are using an FTP
server, follow these steps:
|
| Step 8 | Click Upload to upload the CA certificate from the controller. A message appears indicating the status of the upload. |
| Step 9 | After the upload is complete, choose . |
| Step 10 | If prompted to save your changes, click Save and Reboot. |
| Step 11 | Click OK to confirm your decision to reboot the controller. |
Uploading CA Certificates (CLI)
| Step 1 | Log on to the controller CLI. |
| Step 2 | Specify the type of the file to be uploaded by entering this command: transfer upload datatype ipseccacert |
| Step 3 | Specify the transfer mode used to upload the file by entering this command: |
| Step 4 | Specify the IP address of the TFTP or FTP server by entering this command: |
| Step 5 | Specify the directory path of the file by entering this command: |
| Step 6 | Specify the name of the file to be uploaded by entering this command: |
| Step 7 | If you are using an FTP server, enter these commands: |
| Step 8 | View the updated settings by entering the transfer upload start command. Answer y when prompted to confirm the current settings and start the upload process. |
| Step 9 | Reboot the controller by entering the reset system command. |
Generating a Certificate Signing Request
| Step 1 | Install and open the OpenSSL application. | ||
| Step 2 | Enter the
command:
OpenSSL> req -new -newkey rsa:1024 -nodes -keyout mykey.pem -out myreq.pem Controllers support a maximum key size of 2048 bits.
After you issue the command, you are prompted to enter information such as country name, state, city, and so on. Information similar to the following appears: OpenSSL> req -new -newkey rsa:1024 -nodes -keyout mykey.pem -out myreq.pem Loading 'screen' into random state - done Generating a 1024 bit RSA private key ................................................................++++++ ...................................................++++++ writing new private key to 'mykey.pem' ----- You are about to be asked to enter information that will be incorporated into your certificate request. What you are about to enter is what is called a Distinguished Name or a DN. There are quite a few fields but you can leave some blank For some fields there will be a default value, If you enter '.', the field will be left blank. ----- Country Name (2 letter code) [AU]:US State or Province Name (full name) [Some-State]:CA Locality Name (eg, city) []:San Jose Organization Name (eg, company) [Internet Widgits Pty Ltd]:ABC Organizational Unit Name (eg, section) []:CDE Common Name (eg, YOUR name) []:XYZ.ABC Email Address []:Test@abc.com Please enter the following 'extra' attributes to be sent with your certificate request A challenge password []:Test123 An optional company name []: OpenSSL> After you provide all the required details two files are generated: | ||
| Step 3 | Copy and paste
the Certificate Signing Request (CSR) information into any CA enrollment tool.
After you submit the CSR to a third party CA, the third party CA digitally
signs the certificate and sends back the signed certificate chain through
e-mail. In case of chained certificates, you receive the entire chain of
certificates from the CA. If you only have one intermediate certificate similar
to the example above, you will receive the following three certificates from
the CA:
| ||
| Step 4 | Once you have
all the three certificates, copy and paste into another file the contents of
each .pem file in this order:
------BEGIN CERTIFICATE------ *Device cert* ------END CERTIFICATE------ ------BEGIN CERTIFICATE------ *Intermediate CA cert * ------END CERTIFICATE-------- ------BEGIN CERTIFICATE------ *Root CA cert * ------END CERTIFICATE------ | ||
| Step 5 | Save the file as All-certs.pem. | ||
| Step 6 | Combine the All-certs.pem certificate with the private key that you generated along with the CSR (the private key of the device certificate, which is mykey.pem in this example), and save the file as final.pem. | ||
| Step 7 | Create the
All-certs.pem and final.pem files by entering these commands:
openssl> pkcs12 -export -in All-certs.pem -inkey mykey.pem
       -out All-certs.p12 -clcerts -passin pass:check123
       -passout pass:check123

openssl> pkcs12 -in All-certs.p12 -out final.pem
       -passin pass:check123 -passout pass:check123
final.pem is
the file that we need to download to the controller.
|
What to Do Next
Download the final.pem file to the controller either using CLI or GUI.
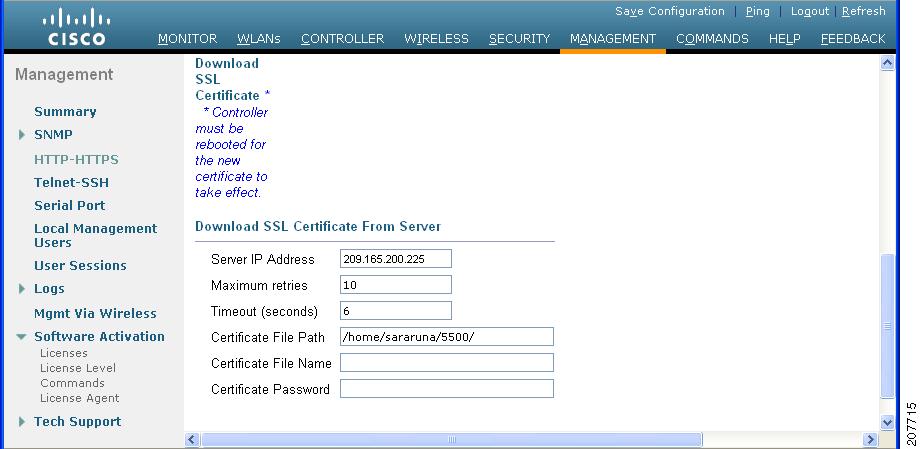
Downloading Third-Party Certificate (GUI)
| Step 1 | Copy the device certificate final.pem to the default directory on your TFTP server. |
| Step 2 | Choose Security > Web Auth > Certificate to open the Web Authentication Certificate page. |
| Step 3 | Check the Download SSL Certificate check box to view the Download SSL Certificate From Server parameters. |
| Step 4 | In the Server IP Address text box, enter the IP address of the TFTP server. |
| Step 5 | In the File Path text box, enter the directory path of the certificate. |
| Step 6 | In the File Name text box, enter the name of the certificate. |
| Step 7 | In the Certificate Password text box, enter the password to protect the certificate. |
| Step 8 | Click Apply. |
| Step 9 | After the download is complete, choose Commands > Reboot and click Save and Reboot. |
| Step 10 | Click OK in order to confirm your decision to reboot the controller. |
Downloading Third-Party Certificate (CLI)
| Step 1 | Move the
final.pem
file to the default directory on your TFTP server. Change the download settings
by entering the following commands:
(Cisco Controller) > transfer download mode tftp (Cisco Controller) > transfer download datatype webauthcert (Cisco Controller) > transfer download serverip <TFTP server IP address> (Cisco Controller) > transfer download path <absolute TFTP server path to the update file> (Cisco Controller) > transfer download filename final.pem | ||
| Step 2 | Enter the
password for the .pem file so that the operating system can decrypt the SSL key
and certificate.
(Cisco Controller) > transfer download certpassword password
| ||
| Step 3 | Start the
certificate and key download by entering the this command:
transfer download start
Example:
(Cisco Controller) > transfer download start

Mode............................................. TFTP
Data Type........................................ Site Cert
TFTP Server IP................................... 10.77.244.196
TFTP Packet Timeout.............................. 6
TFTP Max Retries................................. 10
TFTP Path........................................./
TFTP Filename.................................... final.pem

This may take some time.
Are you sure you want to start? (y/N) y

TFTP EAP Dev cert transfer starting.

Certificate installed.
Reboot the switch to use new certificate.
| ||
| Step 4 | Reboot the controller. |
 Feedback