User Guide for Cisco Virtualization Experience Client 6215 Firmware Release 9.0
Bias-Free Language
The documentation set for this product strives to use bias-free language. For the purposes of this documentation set, bias-free is defined as language that does not imply discrimination based on age, disability, gender, racial identity, ethnic identity, sexual orientation, socioeconomic status, and intersectionality. Exceptions may be present in the documentation due to language that is hardcoded in the user interfaces of the product software, language used based on RFP documentation, or language that is used by a referenced third-party product. Learn more about how Cisco is using Inclusive Language.
- Updated:
- April 4, 2014
Chapter: Accessories
Accessories
- Cisco Approved Audio and Video Accessories
- Device Selector
- Audio
- Video Resolution
- Screen Lock Call Control
Cisco Approved Audio and Video Accessories
For a complete listing of supported audio and video accessories, see the Cisco Approved Audio and Video Accessories Data Sheet, at http://www.cisco.com/c/en/us/products/collateral/collaboration-endpoints/virtualization-experience-media-engine/data_sheet_c78-702849.html.
 Note | Cisco does not provide technical support for these accessories. For more information about, or technical assistance with your
|
Logitech UC Keyboard K725-C
Logitech Mouse M525-C
Logitech Webcam C920-C
Jabra Handset 450 for Cisco
Jabra Speak 450 for Cisco
Note | If you use supported accessories other than those made for Cisco, the behavior of these devices may be different than described in this document. |
- Logitech UC Keyboard K725-C
- Logitech Mouse M525-C
- Logitech WebCam C920-C
- Jabra Handset 450 for Cisco
- Jabra Speak 450 for Cisco
Logitech UC Keyboard K725-C
The Logitech UC Keyboard K725-C is designed for Cisco for use in Cisco Unified Communications (UC) environments. The Logitech UC Keyboard features Cisco UC integration with Cisco Jabber.
Logitech UC Keyboard Features

Note | Enhanced functions (items 2 through 11) are available only in Cisco Unified Communications environments. To use these functions, you must be signed in to your Unified Communications program (for example, Cisco Jabber.) |
1 |
See the table Function Keys, which follows this legend. |
||
| 2 |
Call your voicemail service. Follow the audio prompts. The key lights up red when you have a new voice message.
|
||
3 |
Press to use your default handset for audio. The name of your default handset device appears briefly on the LCD display. |
||
4 |
Press to use your default headset for audio. The name of your default headset device appears briefly on the LCD display. |
||
5 |
Press to use your default hands-free (speakerphone) device for audio. The name of your default hands-free device appears briefly on the LCD display. |
||
6 |
See the LCD display for status information. If your phone is registered, your user name and number appear. If your phone is not registered, the message "Phone is not registered" appears. For active calls, the display shows the same information available from the Cisco Jabber call window, such as caller ID and call timer. The icons that appear depend on the status of the call: active, on hold, or microphone muted. You can adjust the brightness and the contrast for the LCD display. Press FN and the Volume + or Volume - key to adjust the brightness for the LCD display. Press FN, Alt, and the Volume + or Volume - key to adjust the contrast for the LCD display. |
||
7 |
Press to place a call on hold, or to resume a held call. |
||
8 |
Press to answer an incoming call or to end your current active call. If you do not have any incoming, active, or held calls, you can press this key to bring make Cisco Jabber the active window. Your active device plays a beep to indicate that it is ready. The Cisco Virtualization Experience Client speaker plays the beep, if your active device is a headset. Cisco Jabber must be running. |
||
9 |
Press to toggle your video: add or remove video for a call in progress. |
||
10 |
Press to toggle audio: mute and unmute audio for a call in progress.
|
||
11 |
Press the Volume + or Volume - key to increase or decrease Cisco Jabber audio volume.
|
F1 |
Start your default web browser. |
F2 |
Start your default e-mail application. |
F3 |
Search for files and folders (desktop search). |
F4 |
Start the calculator. |
F5 |
Switch between open applications. |
F6 |
Bring the file browser to the front. |
F7 |
Lock your Microsoft Windows desktop session. |
F8 |
Toggle system audio: mute and unmute. |
F9 |
Start your default media player application. |
F10 |
Play the previous track (Media control). |
F11 |
Toggle playback: play and pause (Media control). |
F12 |
Play the next track (Media control). |
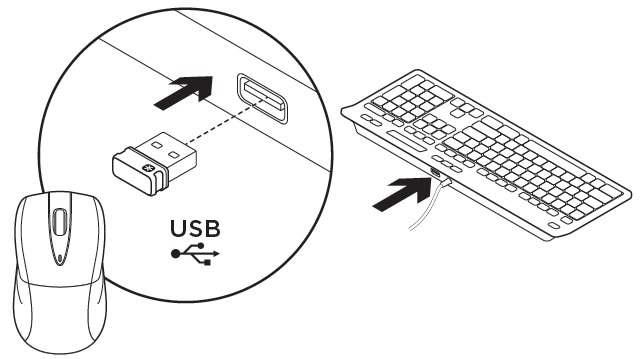
Set Up Your Keyboard
What to Do Next
If you experience issues with the keyboard, plug it into a different USB port and restart the Cisco Virtualization Experience Client.
Use the USB port on the back side of the Logitech UC Keyboard K725-C only for the Logitech Mouse M525-C unifying receiver.
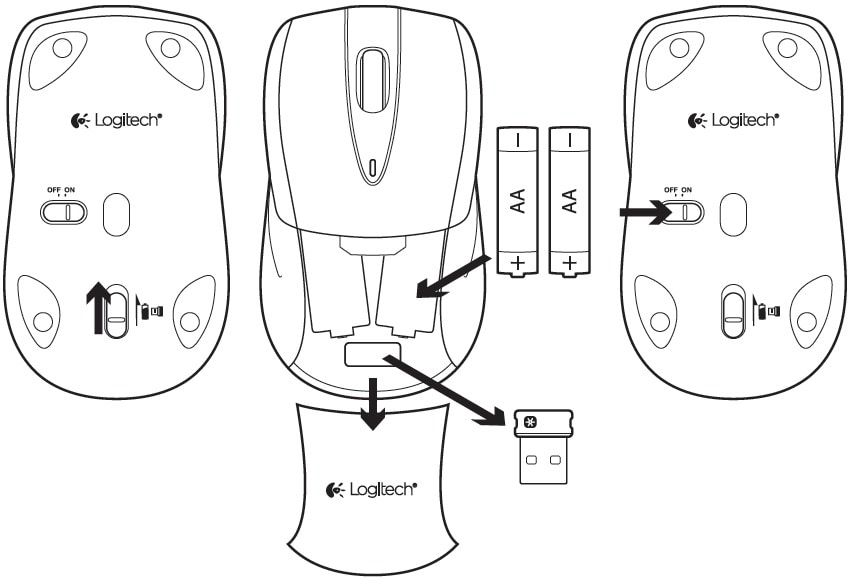
Logitech Mouse M525-C
The wireless Logitech Mouse M525-C is designed for use with your Logitech UC Keyboard K725-C in Cisco Unified Communications environments.
Logitech Wireless Mouse Features
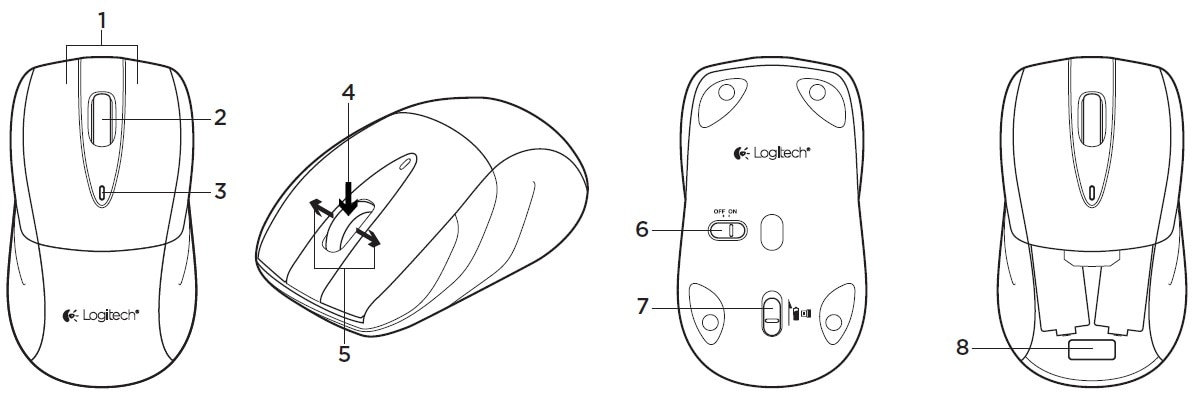
1 |
Left and right mouse buttons. |
2 |
Scroll wheel. |
3 |
Battery LED: Flashes green when mouse is powered on, and flashes red when the battery power is low. |
4 |
Middle button: The function of this button depends on your operating system and the application being used. For example, if you browse the Internet in Microsoft Windows and use the Middle button to click a link, typically the link opens in a new tab. |
5 |
Internet back and forward: Tilt the scroll wheel right to move forward one page. Tilt the scroll wheel left to move back one page. |
6 |
OFF ON slider switch. |
7 |
Lid release for the storage and battery compartment lid. |
8 |
Unifying receiver storage—When the mouse is not in use, you can store the Unifying receiver inside the mouse. |
Set Up Your Mouse
Logitech WebCam C920-C
The Logitech WebCam C920-C features hardware encoding and is designed for Cisco for use in Cisco Unified Communications environments. With the Logitech WebCam C920-C, Cisco Jabber with Cisco Virtualization Experience Media Engine can support video resolutions up to 720p (720 horizontal lines and an aspect ratio of 16:9) at 30 frames per second, in the virtual environment.
Note | Other variables, such as network traffic or far-endpoint video capability can affect video quality. |
Logitech Webcam Features
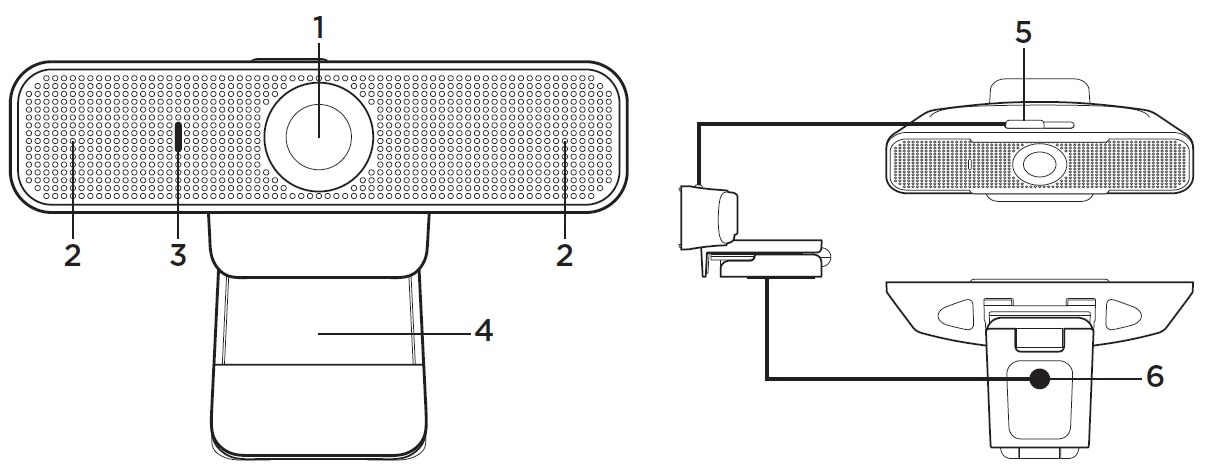
1 |
Autofocus HD 1080p lens |
||
2 |
Omni directional microphones
|
||
3 |
Activity light |
||
4 |
Flexible clip/base |
||
5 |
Privacy shutter |
||
6 |
Tripod attachment |
Set Up Your Webcam
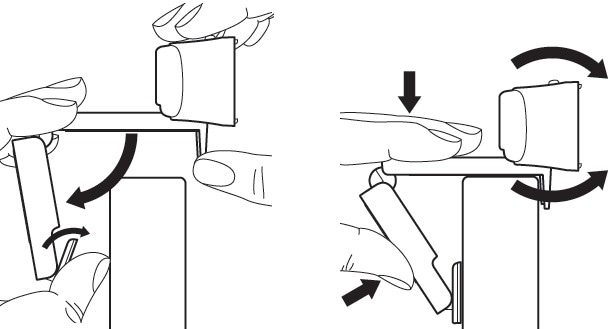
Mount Your Webcam on a Monitor
Jabra Handset 450 for Cisco
The Jabra Handset 450 for Cisco was designed for Cisco, for use in Cisco Unified Communications environments.
Jabra Handset 450 Features
Set Up Your Handset
The Jabra Handset 450 for Cisco and the handset cradle are factory paired.
Note | You can pair only one handset with the cradle at a time. |
Power Your Handset Off and On
The Jabra Handset 450 for Cisco is always powered on when it is in the handset cradle.
Note | The handset powers off automatically if it is out of range of the cradle, for four minutes or longer. |
Jabra Speak 450 for Cisco
The Jabra Speak 450 for Cisco is a hands-free speakerphone. The Jabra Speak 450 was designed for Cisco to work in Cisco Unified Communications environments.
- Jabra Speak 450 Features
- Set Up Your Hands-Free Speakerphone USB Connection
- Set Up Your Hands-Free Speakerphone Bluetooth Connection
Jabra Speak 450 Features
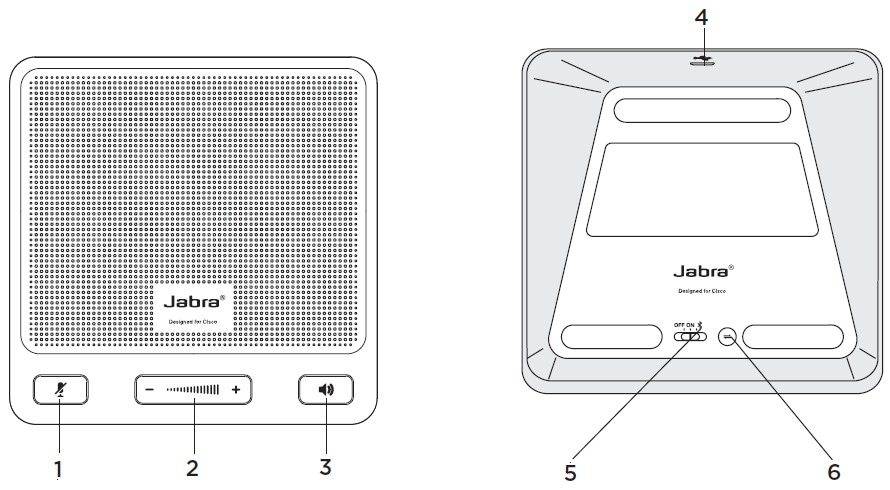
1 |
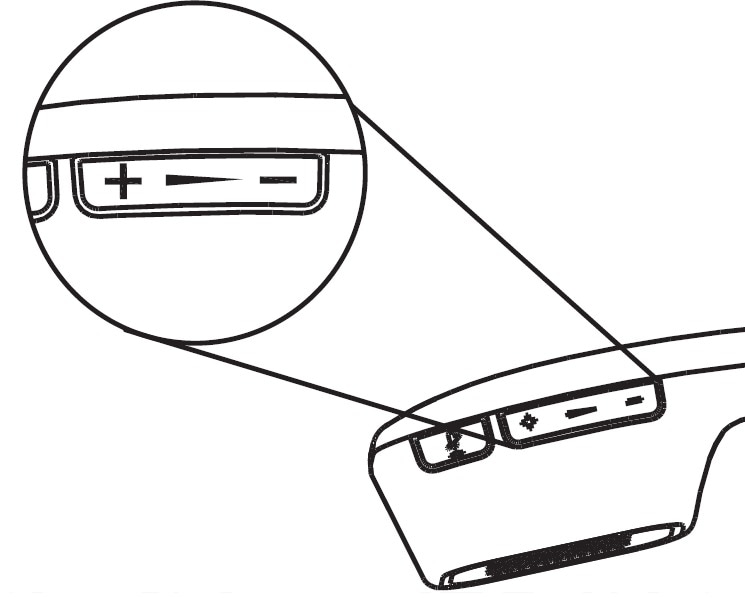
Press the Mute button to toggle mute. |
2 |
Press the Volume + or Volume - button to adjust the speaker volume up or down. |
3 |
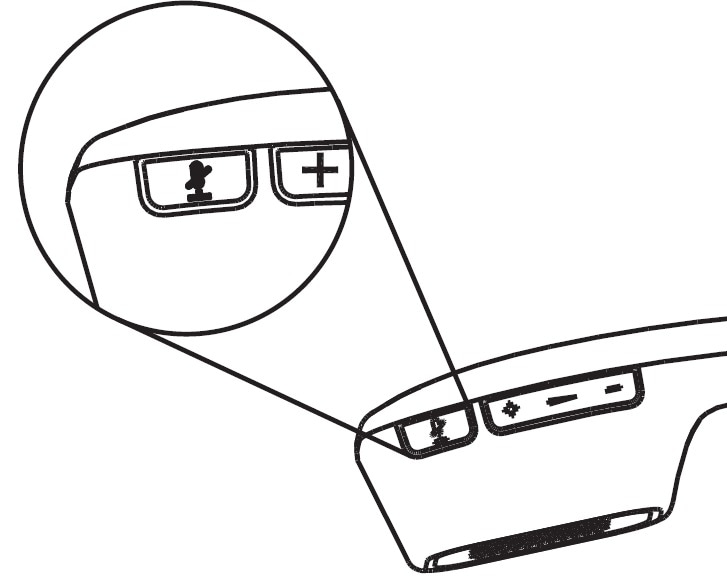
Press the Speaker button to answer a call, or to end a call. To end an active call and answer an incoming call, press the Speaker button twice. To reject an incoming call, press the Speaker button twice. To put a call on hold and answer an incoming call, press and hold the Speaker button for two seconds. To switch between an active call and a call on hold, press and hold the Speaker button for two seconds. If Cisco Jabber is running and you have no incoming, active, or held calls, you can press the button to make the speakerphone your active device. The speakerphone plays a beep tone to let you know that it is ready and Cisco Jabber becomes the active window. |
4 |
Plug the USB cable into this USB port. (USB connections only) |
5 |
Set the OFF/ON/Bluetooth switch to ON for a USB connection. Set the OFF/ON/Bluetooth switch to Bluetooth for Bluetooth connections. |
6 |
Press the Connect button to reconnect with, or to disconnect from a Bluetooth device. |
Set Up Your Hands-Free Speakerphone USB Connection
Set Up Your Hands-Free Speakerphone Bluetooth Connection
With the Jabra Link 360, you can connect the Jabra Speak 450 to your Cisco Virtualization Experience Client over Bluetooth.
Note | You can pair up to eight devices with the Jabra Link 360; however, only one active audio path is supported at a time. For more information about the Jabra Link 360, visit http://www.jabra.com. |
Power off all devices that previously connected to (paired with) the Jabra Link 360.
| Step 1 | On the base of the speakerphone, set the OFF/ON/Bluetooth switch to the Bluetooth position. |
| Step 2 | On the base of the speakerphone, press Connect. |
| Step 3 |
Plug the Jabra Link 360 into an available USB port.
The LED indicator flashes blue to indicate that the Jabra Link 360 is in pairing mode. It can take up to a minute to establish the connection. The LED turns solid blue when pairing is complete. |
Device Selector
The Device Selector is part of Cisco Virtualization Experience Media Engine (VXME). Device Selector is a menu that you use to manage your cameras and audio devices. You can view your currently active cameras and audio devices or change them. A list of audio devices appears first in the menu, followed by a list of cameras. The list of audio devices includes the thin client built-in audio device. Your active camera and audio device selections apply to all applications.
The icon for the Device Selector (![]() ) appears in the notification area in the bottom right corner of the screen. Some icons, including the Device Selector, can be hidden. Click the up arrow in the notification area to show hidden icons.
) appears in the notification area in the bottom right corner of the screen. Some icons, including the Device Selector, can be hidden. Click the up arrow in the notification area to show hidden icons.
You can also open Device Selector from Cisco Jabber by clicking Show on one of the following tabs:
View Your Active Camera or Audio Device
Check marks indicate the selected devices. |
Change Your Active Camera or Audio Device
Use the Device Selector menu to select a different active camera or audio device. You must have multiple devices connected.
Audio
All audio from your Cisco Virtualization Experience Client and your hosted virtual desktop plays through your selected audio device. You can adjust the volume on the Cisco Virtualization Experience Client; however, each time you log in to your hosted virtual desktop, the volume setting synchronizes with the setting on your hosted virtual desktop.
- Adjust Settings for Jabra Bluetooth Devices
- Adjust Virtual Experience Client volume
- Adjust Jabber volume
- Default Audio Device Selection
- Ringtone
- Device Ready Indicator
Adjust Settings for Jabra Bluetooth Devices
Jabra PC Suite must be installed.
| Step 1 | Open the Jabra Control Center. |
| Step 2 | Click the Jabra device for which you want to modify the settings. |
| Step 3 | Click Softphone (PC). |
| Step 4 | Check the Open phone line on undock check box. |
| Step 5 | Under PC audio control, click Automatic. |
| Step 6 | From the Softphone Vendor list, select Other. |
| Step 7 | Click Apply. |
Adjust Virtual Experience Client volume
You can adjust the volume for the Cisco Virtualization Experience Client when you are not signed into your hosted virtual desktop (HVD).
After you sign into your HVD, the volume setting on the Cisco Virtualization Experience Client synchronizes with the volume setting for Cisco Jabber on the HVD.
Adjust Jabber volume
You can adjust the volume settings for certain applications on your hosted virtual desktop (HVD), including Cisco Jabber.
Default Audio Device Selection
When you start your Cisco Virtualization Experience Client for the first time, the default audio device is the first device in the following order:
Hands-free—If multiple hands-free devices are connected, the default is the first device in alphabetical order.
Headset—If multiple headsets are connected, the default is the first headset in alphabetical order.
Handset—If multiple handsets are connected, the default is the first handset in alphabetical order.
No devices connected—The default audio device is the Cisco Virtualization Experience Client built-in speaker.
The next time that you start your Cisco Virtualization Experience Client the default audio device is the last selected active device, provided that the device is still connected. Otherwise, Device Selector makes the first available device active (subject to the preceding order of selection.)
After you connect a new device, a "New device found" message appears in the notification area and the new device becomes the active device.
When you disconnect a device, a "Device disconnected message" appears in the notification area and the next device in the Device Selector list becomes active.
Ringtone
When you have an incoming call, an incoming call notification appears on your screen and your active audio device plays the ringtone. Depending on your active device, the Cisco Virtualization Experience Client built-in speaker also plays the ringtone to ensure that you can hear it. If the hands-free speakerphone is the active device, the ringtone plays on the speakerphone. If the hands-free speakerphone is not the active device, or it is not connected, both the active device and the Cisco Virtualization Experience Client built-in speaker play the ringtone.
Note | With some wireless headsets, you may not hear the ringtone. Some headsets play their own internal tone. |
Device Ready Indicator
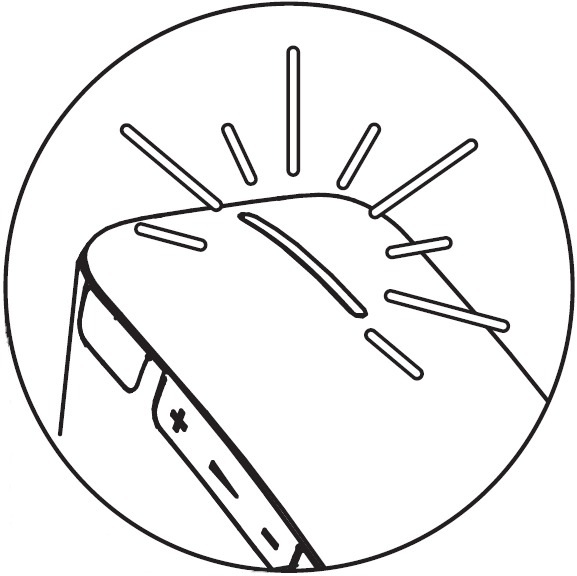
If you perform one of the following off hook actions and you have no incoming or in-progress calls, the active device plays a beep tone to indicate that the device is ready. The device becomes the active device if it was not already.
Press the Call key on the Logitech UC Keyboard. If the headset is the active device, the beep plays on the Cisco Virtualization Experience Client built-in speaker.
Press the Call key on a headset.
Press the Speaker button on the Jabra Speak 450.
Lift the Jabra Handset 450 from its cradle.
For example, if your current active device is your headset and you lift the handset from the cradle, the handset becomes the active device and plays the beep tone to indicate that it is ready. The UC Keyboard indicates your new selection.
Note | You must be signed in to Cisco Jabber. |
Video Resolution
The only supported camera that features hardware encoding is the Logitech WebCam C920-C.
You must use this model camera with Cisco Jabber and Cisco Virtualization Experience Media Engine to support video resolutions up to 720p (720 horizontal lines and an aspect ratio of 16:9) at 30 frames per second in the virtual environment. Other supported cameras only support video resolution up to 360p.
Numerous other variables, such as network traffic or far-endpoint video capability, can affect video quality.
Note | Do not switch from a high definition (HD) camera with hardware encoding to a standard definition (SD) camera during a call. Video calls use the settings that are established at the start of the call. The higher setting for the HD camera causes video performance issues with an SD camera. If you want to switch to an SD camera, do so between calls. |
Screen Lock Call Control
While your hosted virtual desktop is in screen lock, you cannot make calls, but you can receive them. If you have an incoming call while your hosted virtual desktop is in screen lock, you can use one of your accessories to answer the call. With supported accessories, the following call control features are available during screen lock:
 Feedback