- Home
- /
- Article

 In this article
Welcome to Webex Contact Center. The following topics provide a brief insight about Webex Contact Center.
Webex Contact Center Overview
Contact centers of multisourcing enterprises leverage a combination of sourcing solutions, including captive, outsourced, and offshore. The typical multisource contact-center environment is organizationally complex, consisting of sites located all over the world, and staffed by direct company employees and/or outsourced agents.
In this environment, most locations operate independently and use disparate contact center technologies, including routing, administrative solutions, and reporting tools. This combination of tools and technologies makes both management and quality monitoring across different locations extremely challenging.
Cisco’s Webex Contact Center offers a unique solution that combines contact center and IP technologies in a global call management service. The Webex Contact Center solution is built on the Cisco Midpoint Call Management ® technology, a centralized control point for managing and monitoring calls and contacts across a heterogeneous contact center environment.
Offered as a cloud service, Webex Contact Center provides enterprises with full control over their global contact center queues and creates the appearance of a single, unified contact center environment. Calls, chats, and emails are distributed to the contact center sites where agents are available. When agents are occupied, contacts are queued centrally so they can be serviced by the next available agent irrespective of the physical location of the agent.
In the voice context, by queuing calls centrally, enterprises can offload the queuing function from their premises-based equipment, thus achieving substantial cost savings in telecom hardware, toll charges, and bandwidth use. More importantly, a call can be directed to the next available agent at any site because the endpoint of the call can be anywhere around the globe, Webex Contact Center seamlessly integrates remote agents and at-home agents into the enterprise’s multisource contact center environment.
About Sites, Teams, Entry Points, and Queues
A Webex Contact Center tenant is an enterprise that has contact centers at one or more sites. The enterprise also has entry points for incoming contacts that are associated with queues. Incoming contacts can be toll-free numbers for voice calls, designated email addresses for emails, or chats with agents. For example, an enterprise that is named Acme might have an entry point that is named Welcome. Welcome classifies contacts into AcmeBilling and distributes to teams of agents in Chicago, Manila, and Bangalore.
Each Webex Contact Center tenant profile consists of sites, teams, entry points, and queues.
-
A site is a physical contact center location under the control of the enterprise or an outsourcer. For example, Acme might have sites in Chicago, Manila, and Bangalore.
-
A team is a group of agents at a specific site who handle a particular type of contact. For example, Acme might have teams at their Chicago site that are named Chi_Billing, Chi_Sales, and Chi_GoldCustomerService, and teams at their Bangalore site named Bgl_Billing, Bgl_GoldCustomerService, and Bgl_Experts. Agents can be assigned to more than one team, but an agent can service only one team at a time.
-
An entry point is the initial landing place for the customer contacts on the Webex Contact Center system. For the voice contacts, typically one or more toll-free or dial numbers are associated with an entry point. IVR call treatment is performed while a call is in the entry point.
-
A queue is where active contacts are kept while they await handling by an agent. Contacts are moved from the entry point into a queue and are distributed to agents.
Tenants that use the outdial feature are also configured with at least one outdial entry point and one outdial queue.
Telecom managers, contact center managers, and other representatives of the enterprise who are authorized to access the Webex Contact Center service have a view of contact center activity at their enterprise through the Webex Contact Center Management Portal.
In addition to sites, teams, entry points, and queues, the Provisioning module of the Webex Contact Center Management Portal provides an interface to add agents and assign them to teams. Each agent is configured with a desktop profile , a value that determines the agent’s permission levels and Agent Desktop behaviors, including which wrap-up and idle codes are available to the agent. Thus, you should add wrap-up and idle codes before you define desktop profiles and define desktop profiles before you define agents. If your enterprise is provisioned with the optional skills-based routing feature, you should also add skills and skill profiles before you define teams and agents.
Webex Contact Center Management Portal
You can access the Webex Contact Center Management Portal through a web browser. The Portal provides access to Webex Contact Center modules that enable authorized users to perform various tasks such as:
-
View real-time and historical contact center data
-
Silently monitor interactions directed to destination sites
-
Create agent accounts and other contact center resources
-
Create and edit scheduled contact routing strategies and team capacity strategies to control contact treatment and distribution
In addition, the Webex Contact Center Management Portal landing page displays graphs of real-time and historical call activity and current agent status.
Your assigned user profile determines your access to Webex Contact Center modules and functionality.
For information about how to access and work with the Webex Contact Center Management Portal, see Supported Browsers for Management Portal.
Webex Contact Center Modules
After you sign in to the Management Portal, click the module on the navigation bar that you want to access. If the navigation bar is collapsed, click the navigation button on the top-left corner of the Management Portal landing page to expand it. If you can't see a module in your interface, then either you don’t have the appropriate permissions to access the module, or it’s an optional module that your enterprise doesn’t have license to.
The following table describes the modules that authorized users can access through the Webex Contact Center Management Portal.
|
Module |
Description |
|---|---|
|
Provisioning |
Allows authorized users to create, view, and edit the settings that are provisioned for the enterprise. The module provides access to the Audit Trail, Agent Skills Report, Provisioned Items Report, and Provisioned Skills Report. |
|
Reporting and Analytics |
Allows authorized users to segment, profile, and visualize the data in contact center systems. The module also helps to identify the key variables that impact productivity and desired business outcomes. For more information, see Webex Contact Center Analyzer User Guide. |
|
Business Rules |
Allows authorized users of the Analyzer module to incorporate customer data into the Webex Contact Center environment for custom routing. |
|
Agent Desktop |
Allows authorized users to access the Desktop interface for handling customer contacts and supervisor capabilities. For more information, see Webex Contact Center Agent Desktop User Guide and Webex Contact Center Supervisor Desktop User Guide. |
|
Routing Strategy |
Provides a web-based user interface to manage and configure contact handling strategies. Authorized users can create and schedule global routing and team capacity strategies, and alter them in real time in response to changes in business dynamics. For more information, see Contact Routing. |
|
Web Callback Request Report |
Allows authorized users to view information about Web callback requests. For more information, see View a Web Callback Request Report. |
|
Call Monitoring |
Allows authorized users to silently monitor the quality of service being delivered across their multisource contact centers. The power of the Webex Contact Center service lies in the unique ability to monitor any call across any site. Through a simplified web interface, users can select the queue, team, site, or agent that they want to silently monitor. Authorized users can provide instructions to the monitored agent without being heard by the caller, and can join a call being monitored and participate in the conversation. For more information, see Monitor Calls. |
|
Call Recording |
Optional module that allows authorized users to record calls. |
|
Recording Management |
Optional module that allows authorized users to search for and play calls recorded through the Webex Contact Center Call Recording feature. For more information, see Recording Management. |
|
Audit Trail |
Allows authorized users to view details about provisioning changes made for their enterprise and export the data to a data analysis tool, such as Microsoft Excel. For more information, see Access Audit Trail Reports. |
|
Release Notes |
Allows authorized users to view and download release notes. For more information, see Access Release Notes. |
About Time Zones
All dates and times displayed on the Webex Contact Center Management Portal and in the Webex Contact Center modules reflect the time zone that is provisioned for the enterprise with the following exceptions:
-
Dates and times displayed on the main pages of the Real-Time Reports and Call Monitoring modules reflect the browser time.
-
Time values in routing strategies are based on the time zone that is provisioned for the entry point or queue. If no time zone is specified, the time zone is provisioned for the enterprise.
Dates are converted to UTC time when they are saved to the database, so the system behavior, such as time-of-day routing, is applied universally across the multi-site contact center network, regardless of which time zones the sites are located in. The system filters the historical reports based on the enterprise time zone.
To specify a different time zone for displaying the time values in routing strategies, see View routing strategies by time zone.
When you edit a tenant time zone, you must relogin to see the changes. |
PCI compliance
Webex Contact Center is fully Payment Card Industry (PCI) compliant to protect customer organizations from data loss while using voice and digital channels. We protect and secure PCI data and related information in strict adherence to the Payment Card Industry Data Security Standard (PCI DSS). This compliance enables you to:
-
Prevent logging and storing of any sensitive information that is related to PCI data.
-
Mask and encrypt customer sensitive information such as debit or credit card details.
-
Drop attachments if PCI data is detected.
-
Restrict attachments in the email and chat services if it contains cardholder information.
-
Allow administrators to configure either to reject or drop the email or chat content if it has PCI data in the email subject line or email or chat body.
For more information, see Webex Contact Center Privacy Data Sheet from Cisco Trust Portal.
In Webex Contact Center, PCI is enabled by default.
Embedded images aren’t supported in attachments. |
This chapter describes the tasks that you need to do the first time you login to the Webex Contact Center .
System Requirements
This section details system requirements for various contact center applications.
Supported Browsers for Management Portal
The following table lists the supported operating systems and browsers for various client devices to access the Webex Contact Center Management Portal:
|
Browser |
Microsoft Windows 10 |
Microsoft Windows 11 |
Mac OS X |
Chromebook |
|---|---|---|---|---|
|
Google Chrome |
76.0.3809 |
103.0.5060.114 |
76.0.3809 or higher |
76.0.3809 or higher |
|
Mozilla Firefox |
ESR 68 or higher ESRs |
ESR V102.0 or higher ESRs |
ESR 68 and higher ESRs |
NA |
|
Microsoft Edge |
42.17134 or higher |
103.0.1264.44 or higher |
NA |
NA |
|
Chromium |
NA |
NA |
NA |
79 or higher |
Domain Access Required for Desktop
To ensure that the Desktop responds as expected on your network, add the following domains to the Firewall/VPN (Virtual Private Network) allowed list:
An * shown at the beginning of a URL (e.g., *.webex.com) indicates that services in the top level domain and all subdomains must be accessible. |
| Domain / URL | Description |
|---|---|
| Webex Contact Center Services URLs | |
|
cdn.jsdelivr.net cdnjs.cloudflare.com unpkg.com:443 jquery.com:443 *.jquery.com:443 *.broadcloudpbx.net:443 |
Content Delivery Network (CDN) services to efficiently deliver static files. |
|
*.cisco.com:443 *.ciscoccservice.com:443 ciscoccservice.com:443 |
Contact Center micro-services. |
|
*.ciscospark.com:443 *.wbx2.com:443 *.webex.com:443 |
Webex micro-services. |
| Additional services related to Webex Contact Center—Third Party domains | |
|
*.cloudcherry.com:443 cloudcherry.com:443 |
Webex Experience Management platform (Formerly known as Cloud Cherry). |
|
*.imiengage.io:443 imiengage.io:443 |
Digital channels. |
|
*.mixpanel.com:443 mixpanel.com:443 *.split.io:443 *.lr-ingest.com:443 *.pendo.io:443 |
Performance tracking, error and crash capture, and session metrics. |
System Limits in Webex Contact Center
This section on system limits contains all the configurations and visualization limits that apply to the Webex Contact Center Management Portal.
The table lists the maximum system limits for configuration object types and configuration object attributes. For details of attributes within each entity, see Provisioning. Some values of system limits may vary based on specific platforms. The Service Details section on your Control Hub organization will show the voice channel service as Classic or Next Generation.
|
Configuration Object Type |
Configuration Object Attribute |
Maximum Allowed Limit for Tenants based on Classic |
Maximum Allowed Limit for Tenants based on Next Generation |
|---|---|---|---|
|
Sites | Active |
150 |
300 |
|
Sites |
Inactive |
100 |
100 |
|
Teams |
Agent based |
750 |
3000 |
|
Teams |
Agent based - Users |
100 |
100 |
|
Teams |
Agent based - Inactive Users |
50 | 100 |
|
Teams |
Capacity based |
40 | 40 |
|
Teams | Capacity based - Active |
100 |
100 |
|
Teams |
Capacity based - Inactive |
100 |
100 |
|
Auxiliary code |
Idle |
1000 |
1000 |
|
Auxiliary codes |
Wrapup |
1000 |
1000 |
|
Work type |
Idle |
1000 |
1000 |
|
Work type |
Wrapup |
1000 |
1000 |
| Auxiliary Codes |
Idle - Inactive |
100 |
100 |
|
Auxiliary Codes |
Wrapup - Inactive |
100 |
100 |
|
Work type |
Idle - Inactive |
100 |
100 |
|
Work type |
Wrapup - Inactive |
100 |
100 |
|
Entry points | Active |
1000 |
6000 |
|
Entry points |
Inactive |
100 |
100 |
|
Oudial entry points | Active |
500 |
1000 |
|
Oudial entry points |
Inactive |
100 |
100 |
|
Users | Active |
7500 | 20000 |
|
Users |
Inactive |
5000 | 5000 |
|
Users |
Agents |
2500 |
5000 |
|
Users |
Supervisors |
750 |
3000 |
|
Users |
Teams | 50 |
50 |
|
Multimedia profiles | Active |
100 |
150 |
|
Multimedia profiles |
Inactive |
100 |
100 |
|
Desktop layouts | Active |
100 |
200 |
|
Desktop layouts |
Inactive |
100 |
100 |
|
Skills | Active |
1000 | 1000 |
|
Skills |
Inactive |
1000 | 1000 |
|
Skills |
Text |
200 | 200 |
|
Skills |
Text length |
50 |
50 |
|
Skills |
Enum limits |
200 |
200 |
|
Skills |
Enum length |
50 |
50 |
|
Skill profiles |
9000 |
9000 | |
|
Skill profiles | Skills |
50 |
50 |
|
Global variables | Active |
5000 |
5000 |
|
Global variables |
Inactive |
100 |
100 |
|
Threshold rule |
Active |
500 |
1000 |
|
Threshold rule |
Inactive |
100 |
100 |
|
Desktop profiles |
Active |
300 |
1500 |
|
Desktop profiles |
Inactive |
100 |
100 |
|
Desktop profiles |
Maximum autowrapup timeout |
600000 miliseconds |
600000 miliseconds |
|
Desktop profiles |
Auxiliary codes - wrapup codes |
50 |
50 |
|
Desktop profiles |
Auxiliary codes - idle codes |
50 |
50 |
|
Desktop profiles |
Transfer targets |
150 |
150 |
|
Desktop profiles |
Buddy teams |
150 |
150 |
|
Desktop profiles |
Dial plans |
10 |
10 |
|
Desktop profiles |
Agent Dial number validation criteria |
10 |
10 |
|
Desktop profiles |
Viewable statistics queues |
100 |
100 |
|
Desktop profiles |
Viewable statistics teams |
100 |
100 |
|
User profiles |
Active |
750 |
1500 |
|
User profiles |
Inactive |
100 |
100 |
|
User profiles |
Access rights - sites |
20 |
20 |
|
User profiles |
Access rights - teams |
100 |
100 |
|
User profiles |
Access rights - entry points |
50 |
50 |
|
User profiles |
Access rights - queues |
250 |
250 |
|
Routing Strategy |
Global |
100 |
200 |
|
Routing Strategy |
Global entry points |
500 |
500 |
|
Routing Strategy |
Per entry point |
20 |
20 |
|
Dialled numbers |
Entry Point |
15000 |
15000 |
|
Dialled numbers |
Per entry point |
100 |
500 |
|
Contact service queue |
Inbound |
5000 |
11000 |
|
Contact service queue |
Inbound - inactive |
100 |
100 |
|
Contact service queue |
Outbound |
2500 |
5000 |
|
Contact service queue |
Outbound - Inactive |
100 |
100 |
|
Contact service queue |
Distribution groups |
20 |
20 |
|
Contact service queue |
Distribution groups - teams |
50 |
50 |
|
Contact service queue |
Distribution groups - total teams |
250 |
250 |
|
Contact service queue |
Service level threshold - telephony |
86400 seconds |
86400 seconds |
|
Contact service queue |
Service level threshold - chat |
86400 seconds |
86400 seconds |
|
Contact service queue |
Service level threshold - digital |
604800 seconds |
604800 seconds |
|
Contact service queue |
Service level threshold - email |
1209600 seconds |
1209600 seconds |
|
Contact service queue |
Maximum time in queue - telephony |
86400 seconds |
86400 seconds |
|
Contact service queue |
Maximum time in queue - chats |
86400 seconds |
86400 seconds |
|
Contact service queue |
Maximum time in queue - digital |
604800 seconds |
604800 seconds |
|
Contact service queue |
Maximum time in queue - email |
1209600 seconds |
1209600 seconds |
| Call recording schedule |
Per queue |
20 |
20 |
|
Call monitoring Schedule |
1000 |
2000 | |
|
Call monitoring Schedule |
Queues |
250 |
250 |
|
Call monitoring Schedule |
Sites |
20 |
20 |
|
Call monitoring Schedule |
Teams |
100 |
100 |
|
Call monitoring Schedule |
Agents |
500 |
500 |
|
Call recording Schedule |
Sites |
20 |
20 |
|
Call recording Schedule |
Teams |
100 |
100 |
|
Call recording Schedule |
Agents |
500 |
500 |
|
Address Book |
3000 |
3000 | |
|
Address Book |
Entries |
6000 |
6000 |
|
Address Book |
Total entries |
100000 |
100000 |
|
Outdial ANI |
300 |
400 | |
|
Outdial ANI |
Entry |
500 |
200 |
|
Outdial ANI |
Total entries |
2000 |
2000 |
|
Audio file |
17250 |
17250 | |
|
Audio file | Size in bytes |
5242880 |
5242880 |
|
Audio file |
Total size in bytes |
2097152000 |
2097152000 |
|
Call monitoring |
Dashboard - queues |
250 |
250 |
|
Call monitoring |
Dashboard - sites |
20 |
20 |
|
Call monitoring |
Dashboard - teams |
100 |
100 |
|
Call monitoring |
Dashboard - agents |
500 |
500 |
|
Recording management |
Queues |
250 |
250 |
|
Recording management |
Sites |
20 |
20 |
|
Recording management |
Teams |
100 |
100 |
|
Recording management |
Agents |
500 |
500 |
|
Recording management |
Wrapup codes |
50 |
50 |
|
Recording management |
Tags |
50 |
50 |
|
Call monitoring |
Maximum concurrent sessions |
500 |
500 |
|
Maximum concurrent supervisor sessions |
Maximum concurrent supervisor sessions |
500 |
500 |
|
Business Hours |
5000 |
5000 | |
|
Overrides |
Overrides |
5000 |
5000 |
|
Holiday list |
5000 |
5000 | |
|
Business Hours |
Working hours |
50 |
50 |
|
Overrides |
Overrides |
100 |
100 |
|
Holiday list |
150 |
150 | |
|
Number of Connectors |
Per connector Type |
30 | |
|
CCAI Config |
100 |
The table lists the system limits for visualization of filters on the UI of the Management Portal for recording management, call recording and call monitoring schedules features:
|
Application/Feature |
Object Types with Filters |
Description |
Maximum Allowed Limit |
|---|---|---|---|
|
Recording Management |
Queues |
The maximum number of filters for queues. |
250 |
|
Sites |
The maximum number of filters for sites. |
20 | |
|
Teams |
The maximum number of filters for teams. |
100 | |
|
Agents |
The maximum number of filters for agents. |
500 | |
|
Wrap-Up Codes |
The maximum number of filters for wrap-up codes. |
50 | |
|
Tags |
The maximum number of filters for tags. |
50 | |
|
Call Recording Schedules |
Sites |
The maximum number of filters for sites. |
20 |
|
Teams |
The maximum number of filters for teams. |
100 | |
|
Agents |
The maximum number of filters for agents. |
500 | |
|
Call Monitoring Dashboard |
Queues |
The maximum number of filters for queues. |
250 |
|
Sites |
The maximum number of filters for sites. |
20 | |
|
Teams |
The maximum number of filters for teams. |
100 | |
|
Agents |
The maximum number of filters for agents. |
500 | |
|
Call Monitoring Schedules |
Queues |
The maximum number of filters for queues. |
250 |
|
Sites |
The maximum number of filters for sites. |
20 | |
|
Teams |
The maximum number of filters for teams. |
100 | |
|
Agents |
The maximum number of filters for agents. |
500 |
The listed entities have a maximum limit on the number of characters that can be used for the Name field.
|
|
|
The Name cannot exceed 80 characters. It can contain alphanumeric characters, underscores, and hyphens. |
The table lists the supported configuration limits for routing and queuing. Active limits are the operable limits for configurations to work optimally. Maximum limits are the threshold limits for configurations to work at maximum capacity. We recommend that you use configuration values that are within the parameters mentioned in the Maximum Limits column of this table.
|
Configurations |
Active Limits |
Maximum Limits |
|---|---|---|
|
Maximum number of agents for a team |
50 |
100 |
|
Maximum number of teams for a Call Distribution Group |
50 |
50 |
|
Maximum Call Distribution Groups in a queue |
20 |
20 |
|
Maximum number of teams in a queue, across all Call Distribution Groups |
250 |
250 |
|
Maximum number of agents for a queue (maximum agents in a team x maximum teams for a Call Distribution Group x maximum Call Distribution Groups in the queue) |
500 |
NA |
|
Maximum time in a queue (voice) |
1 day |
1 day |
|
Maximum skills for a skill profile |
50 |
50 |
|
Maximum number for a Capacity-Based Team |
100 |
100 |
|
Maximum Capacity-Based Teams for an organization |
20 |
40 |
|
Maximum number of concurrent calls for Capacity-Based Teams (maximum number for a Capacity-Based Team x maximum number of Capacity-Based Teams for an organization) |
2000 |
NA |
|
Maximum skill requirements for a contact |
10 |
10 |
|
Maximum number of queues for an organization |
1000 |
2000 |
|
Maximum number of concurrent calls for call monitoring |
500 |
NA |
|
Maximum number of agents in a campaign |
500 |
500 |
|
Maximum number of configured agents for a campaign |
NA |
NA |
|
Maximum number of Preview campaigns for an organization |
NA |
NA |
|
Maximum number of configured Preview campaigns for an organization |
NA |
NA |
|
Maximum number of Progressive campaigns for an organization |
100 |
100 |
|
Maximum number of configured Progressive campaigns for an organization |
NA |
NA |
Sign in to Management Portal
Sign in to the Webex Contact Center Management Portal through a web browser with your sign in credentials. You can access the modules and functionalities that your administrator grants access to.
To sign in to the Management Portal:
| 1 |
Sign in to https://admin.webex.com. | ||
| 2 |
Click Services from the left pane. | ||
| 3 |
On the Contact Center card, click Settings. | ||
| 4 |
Under the Advance Configuration section, click the Management Portal link. You can bookmark this link and access the portal directly with this link. The Management Portal landing page appears. For more information, see About Management Portal Components.
|
About Management Portal Components
The Webex Contact Center Management Portal landing page has multiple components that you can access based on your authorization.
The following table describes the components of the Management Portal landing page:
|
Component |
Description |
|---|---|
|
Navigation bar |
Displays the modules that you are authorized to access. For more information, see Webex Contact Center Modules You can see either the name of the module or, if the navigation bar is collapsed, an icon that represents the module. Hover the mouse pointer over an icon to display the module name. To expand or collapse the navigation bar, click the button on the upper-left side of the landing page. |
|
Dashboard |
Displays the number of calls that are currently in IVR, in queue, connected, and the number of currently available agents. The rest of this panel displays four charts. Three of them provide real-time statistics for the current call activity, interval call activity, and site-level agent activity. The fourth chart provides historical statistics. You can click the icon at the top of a chart to display the corresponding report in the Reporting and Analytics module window. To change the size of a chart, point to a corner or edge and when the mouse pointer changes to a two-headed arrow, drag the corner or edge to shrink or enlarge the chart. To restore the original size of resized charts, click Reset Widgets. |
|
Settings button |
Expands and collapses a panel where you can do the following:
|
|
Your name button |
Displays the following options in a drop-down list:
|
About Dashboards
The Webex Contact Center Management Portal landing page provides the following dashboards:
-
Entry Point - Site level Dashboard (default)
-
Contact Center Overview - Realtime
-
Contact Center Overview - Historical
-
Agent State Data - Realtime
For detailed information about the visualizations available in each dashboard, see the section Visualization in the Cisco Webex Contact Center Analyzer User Guide.
You can access the dashboards from the drop-down list at the top-left corner of the Dashboard tab.
|
Entry Point - Site Level Dashboard
Displays information about the number of contacts that are in IVR and Queues.
-
Snapshot Entry Point IVR Realtime - Chart: Indicates the number of calls that are in the IVR.
-
Entry Point Interval Realtime - Chart: Indicates the number of contacts (voice, email, and chat) per entry point in real time for a specific interval. By default, the interval is 30 minutes and the duration is from the start of the day.
-
Site Interval Realtime - Chart: Indicates the number of connected contacts (voice, email, and chat) per site in real time since the start of the day.
-
Entry Point Contact Volume - Chart: Indicates the number of connected contacts per entry point on a daily interval, for the last seven days.
Contact Center Overview - Historical
Displays information about contacts handled, contacts abandoned, and contacts in queues for a specified duration and time interval. You can use the Interval and Duration drop-down lists in the dashboard to filter the data based on the selected time interval and duration. To refresh the data, use the Refresh icon.
The following information is available:
-
Average Service Level: Indicates the percentage of contacts that are handled within the configured service level for the queue.
-
Total Contacts Handled: Indicates the total number of contacts (voice, email, social, and chat) handled.
-
Total Contacts Abandoned: Indicates the total number of contacts (voice, email, social, and chat) abandoned.
-
Average Handled Time: Indicates the average time that is taken to handle a contact (voice, email, social, and chat).
-
Longest Contact in Queue: Indicates the time in queue for the contact (voice, email, social, or chat) with the longest waiting time.
-
Contact Details in Queue: Shows the details of contacts (voice, email, social, and chat) that are currently in queue.
In addition, the Team Details - Historical dashboard displays the following information in a specified duration and time interval:
-
Teams
-
Agents in Teams
-
Agent Login
-
Contacts handled by the agents
You can filter the data using the following filters available in the dashboard:
-
Agent Name
-
Team Name
-
Interval
-
Duration
Agent State Data - Realtime
As an administrator or supervisor, you can monitor the agent state data using the Agent State Data - Realtime dashboard. The dashboard displays the following information:
-
The name of the agent.
-
The site and team to which the agent is assigned.
-
The login time of the agent.
-
The most recent known state of the agent.
-
The duration for which the agent has been in the most recent state.
-
The idle code, if the agent is in the Idle state.
The filters at the top of the dashboard enable you to display the agent state data for selected sites, teams, or agents. The list of sites, teams, or agents available in the filters depends on the teams or sites to which the administrator or supervisor has access rights. For more information, see Access Rights.
Agent State Data - Realtime dashboard provides you the ability to sign out agents based on the agent state. The most recent agent states and descriptions are available in the following table.
|
Most Recent State |
Indicates that |
|---|---|
|
Connected |
The agent is connected to at least one channel. This state includes Ringing and Wrap-Up also. An icon indicates the most recently connected channel in the State Duration field. |
|
Available |
The agent is available on the desktop, but hasn’t received an active contact. |
|
Idle |
The agent has set an Idle state. Check the Idle Code field for more information. |
An option to forcefully sign out an agent is available, if a regular sign out is not possible. The administrator or supervisor should exercise caution while forcefully signing out the agent, as the agent's current contacts are cleared. |
For Chat and Email channels, when the supervisor tries to forcefully sign out an agent from the Management Portal, the agent gets signed out; but the chat session remains open. The contact clean up functionality is not available for these channels. |
To sign out an agent, click Sign Out in the Action field. You receive a notification that the agent is successfully signed out.
You can access the Agent State Data - Realtime dashboard only if you have View or Edit permissions to the Logout Agents module. To sign out agents, you must have Edit permissions to the module. For more information, see Module Settings. |
|
For more information about reports, see the Types of Records Available in Each Repository section in Webex Contact Center Analyzer User Guide.
Change User Interface Colors
You can set colors or skins in the selection panel and in the banner on the pages:
| 1 |
Click the Gears icon at the top-right corner of the Management Portal. |
| 2 |
Click the tab displaying the Wrench icon, and select a skin. The colors change immediately.
|
| 3 |
(Optional) Click the Reset icon to restore the default color. |
Create a Custom Theme
You can customize the banner color and images for the Management Portal user interface by creating a custom theme. You must have proper authorization to customize the user interface.
To create a custom theme:
| 1 |
Click the Gears icon at the top-right corner of the Management Portal. |
| 2 |
Click the tab displaying the Custom Theme icon. |
| 3 |
In Banner Color, enter the HTML (hexadecimal) code for a color or click the small box on the right and select a color. |
| 4 |
(Optional) Click the folder button for each listed image type, navigate to the image file in your system that you want to use, and click Open. The supported file types are PNG, JPG, JPEG, and GIF. |
| 5 |
Click Save. The user interface updates with the new theme.
|
| 6 |
(Optional) Click Reset to revert your changes. |
View and Regenerate Your API Key
To view or regenerate your API key:
| 1 |
Click the Gears icon at the top-right corner of the Management Portal. |
| 2 |
Click the tab displaying the API Key icon. |
| 3 |
(Optional) Click the link to view the API key. |
| 4 |
Click Regenerate Key to regenerate your API key. |
Access Audit Trail Reports
The Audit Trail page provides an interface where you can view details about the provisioning module changes to your account in last three years. However, you can fetch data for a seven-day period only. You can also download the details in a Microsoft Excel or an Adobe PDF file. Ensure that you have permission to view the reports.
To display an audit trail report:
| 1 |
From the Management Portal navigation bar, choose Audit Trail. | ||||||||
| 2 |
Select the filters:
| ||||||||
| 3 |
Click Apply Filters. | ||||||||
| 4 |
(optional) Click Download PDF or Download EXCEL to download the report. |
Provisioning your Webex Contact Center is an important step that includes various tasks for setting up the Webex Contact Center. Refer to the following sections for details.
Tenant Settings
You can now access tenant settings directly from the Control Hub of newly enhanced Webex Contact Center. For more information, visit Tenant Settings help on Webex Help Center. If you are still accessing tenant settings through Webex Contact Center Management Portal, you can continue with the following instructions. |
You can use the Webex Contact Center Management Portal to configure the tenants that your administrator provisions for your enterprise. To view the tenant settings for your enterprise, click your enterprise name under the Provisioning module in the navigation bar.
Click the following tabs to configure the tenant settings:
General Settings
The General Settings tab displays the following settings.
In the following table, the check mark (✓) at the Tenant column indicates the settings that the authorized users of your enterprise specify. Similarly the ✓ mark in the Partner column identifies the settings that the partner administrator specifies. The ✓ in the Webex Contact Center column identifies the settings that the Webex Contact Center administrator specifies.
To modify the settings, click Edit at the bottom of the page.
|
Setting |
Description |
Tenant |
Partner |
Webex Contact Center |
|---|---|---|---|---|
|
Tenant Details |
||||
|
Name |
The name of your enterprise. |
✓ |
✓ |
✓ |
|
Description |
(Optional) The description for your enterprise. |
✓ |
✓ |
✓ |
|
Time Zone |
The time zone that you provision for your enterprise. For more information, see About Time Zones. |
✓ |
✓ |
✓ |
|
Status |
The status of the tenant. You cannot change the status of the tenant. |
Desktop settings
The Desktop section displays the following settings.
-
Agent experience: Set the inactivity timeout and auto wrap-up interval.
-
Voice features: Enable or disable force default DN, end call, and end consult.
-
RONA timeouts: Configure RONA (Redirection on No Answer) timeouts for unanswered calls.
-
System settings: Set lost connection recovery timeouts.
Manage RONA timeouts
The contact center administrators can manage the Redirection on No Answer (RONA) timeout settings for agents and customers.
To configure the RONA timeout settings for both inbound and outbound call scenarios:
| 1 |
Log in to the customer organization on Control Hub. | ||||||||||||||||||||||
| 2 |
Navigate to . | ||||||||||||||||||||||
| 3 |
In the RONA timeouts section, enter the timeout values in seconds, for the channels. The table shows the default value and the allowed range for the RONA timeout settings.
| ||||||||||||||||||||||
| 4 |
Click Save. |
Provisioning
The Provisioning tab displays the following settings. The partner administrator and the Webex Contact Center administrator specify these settings.
To modify the settings, click Edit at the bottom of the page.
|
Setting |
Description |
|---|---|
|
System Profile |
|
|
Workforce Options |
Allows the supervisors to manage the human resources. Supervisors can proactively analyze and adjust for daily realities and make smarter decisions to manage resources to optimize service levels. Workforce Options enable one or more of the following Workforce Optimization options for your enterprise:
The availability of these features depends on your license. Contact your organization administrator for more information. |
|
Campaign Management |
Enables the third-party software List and the Campaign Manager (LCM) module for a tenant. LCM manages the upload, selection, and rescheduling of contacts. It also provides campaign manager reports. The availability of this feature depends on your license. Contact your organization administrator for more information. |
|
Speech Enabled IVR |
If this setting is Yes, your enterprise allows customers to post questions or concerns in plain language to the system. The availability of this feature depends on your license. Contact your organization administrator for more information. |
Settings
The Settings tab displays the following settings. An asterisk (*) indicates that the settings are not available to tenants with standard licenses.
In the table below, the ✓ mark in the Tenant column indicates the settings that authorized users of your enterprise specify. Similarly, the ✓ mark in the Partner column identifies the settings that the partner administrator specifies. The ✓ in the Webex Contact Center column identifies the settings that the Webex Contact Center administrator specifies.
To modify the settings, click Edit at the bottom of the page.
|
Setting |
Description |
Tenant |
Partner |
Webex Contact Center | ||
|---|---|---|---|---|---|---|
|
Call Settings |
||||||
|
Short Call Threshold |
The time interval, in seconds, to determine whether the call is short or abandoned. |
✓ |
✓ |
✓ |
||
|
Sudden Disconnect Threshold |
The time interval in seconds to determine whether the agent handles the call or the call ends. The time determines if there is an issue with the connectivity or with the behavior of the agent. You can consider a call as disconnected, if the call terminates within this time interval after it reaches a destination site. |
✓ |
✓ |
✓ |
||
|
Default Outdial ANI |
The default dial number for the tenant to make outdial calls. The default dial number is displayed in the customer's caller ID, if an agent does not select a specific outdial ANI (Automatic Number Identification) for an outdial call.
|
✓ |
||||
|
Timeout Settings |
||||||
|
Desktop Inactivity Timeout |
Desktop Inactivity Timeout enables you to automatically sign out an agent from the desktop after being inactive for the specified time. An agent is considered inactive for not performing any activity on the Agent Desktop while in the Idle state. Agent activity includes handling contacts, working on custom widgets, or performing any task on the Agent Desktop. The default setting is set to No. If the setting remains at No, then the agents who are signed in will be charged for agent license usage until their session is explicitly signed out. If the setting is Yes, system automatically signs out an agent after being idle for the provided timeout duration. You can provide an idle timeout value from 3 to 10,000 minutes. |
✓ |
✓ |
✓ |
||
|
Concurrent Voice Contact Settings |
||||||
|
Concurrent Voice Contact Entitlements |
The number of concurrent voice contact sessions that the tenant is entitled to. This entitlement is based on the following formula: ((Number of committed Standard Agent licenses + Number of committed Premium Agent licenses) x 3) + Number of Add-on IVR port licenses One session (interaction) in surge protection includes all the inbound and outbound calls related to that session.
|
|||||
|
Voice Contact Surge Percentage |
The percentage of voice contact sessions that the tenant can have, over and above the Concurrent Voice Contact Entitlements. The default surge percentage is 30%. |
|||||
|
Maximum Concurrent Voice Contact Threshold |
The maximum number of concurrent voice contact sessions that are allowed for the tenant. The contact center drops any inbound or outbound voice contacts after reaching this threshold. This value is derived from the Concurrent Voice Contact Entitlements and the Voice Contact Surge Percentage fields. For example, if the concurrent voice contact entitlements is 300 and the surge percentage is 30% (default value), the Maximum Concurrent Voice Contact Threshold is calculated as: 300 x 1.3 = 390
|
|||||
|
Concurrent Digital Contact Settings |
||||||
|
Concurrent Digital Contact Entitlements |
The number of concurrent digital contact sessions that the tenant is entitled to. This entitlement is based on the following formula: (Number of committed Standard Agent licenses + Number of committed Premium Agent licenses) x 2 x 15
|
|||||
|
Digital Contact Surge Percentage |
The percentage of digital contact sessions that the tenant can have, over and above the concurrent digital contact entitlements. The default surge percentage is 30%. |
|||||
|
Maximum Concurrent Digital Contact Threshold |
The maximum number of concurrent digital contact sessions that are allowed for the tenant. The contact center drops any new digital contacts after reaching this threshold. The value of Maximum Concurrent Digital Contact Threshold is set to 30% higher than the concurrent digital contact entitlements. Maximum Concurrent Digital Threshold = Concurrent Digital Contact Entitlements * 1.3. This value is derived from the Concurrent Digital Contact Entitlements and the Digital Contact Surge Percentage fields: Maximum Concurrent Digital Threshold = (Number of committed Standard Agent licenses + Number of committed Premium Agent licenses) x 2 x 15 x 1.3 For example, if the concurrent digital contact entitlements is 300 and the surge percentage is 30% (default value), the maximum concurrent digital contact threshold is calculated as: 300*1.3 = 390
|
|||||
|
Other Settings |
||||||
|
Maximum Callback Attempts |
The number of times the system attempts a requested callback if the initial callback attempt fails. |
✓ |
✓ |
✓ |
||
|
Retry Callback Interval |
The number of seconds between the callback attempts in case the initial callback attempt fails. |
✓ |
✓ |
✓ |
||
|
Pause/Resume Enabled |
If this setting is Yes, agents can pause and resume recording a call. For example, the agent can pause a call recording while obtaining sensitive information from the customer, such as credit card information. If this setting is No, you can enable this feature for individual queues at another time.
|
✓ |
✓ |
✓ |
||
|
Recording Pause Duration |
This setting specifies the amount of time for which the system pauses the call recording. After the time has elapsed, the system automatically starts recording the call. |
✓ |
✓ |
✓ |
||
|
Check Agent Availability |
If this setting is Yes, the system does not route any contacts to the teams with no logged-in agents. If this setting is No, you can enable this setting for individual queues. For more information, see Adding an Entry Point or Queue. |
✓ |
✓ |
✓ |
||
|
Record All Calls |
If this setting is Yes, the system records all inbound and outdial calls. If this setting is No, the system records calls based on the settings for each queue. |
✓ |
✓ |
✓ |
Entry Points and Queues
Entry points and queues are types of virtual teams. A virtual team is a holding place for incoming customer requests.
You can create entry points and queues depending on how the Webex Contact Center administrator has configured your profile.
Entry Point
The inbound entry point is the initial landing place for a customer contact in the Webex Contact Center system. For the customer calls, you can associate one or more toll-free or dial numbers with a given entry point. The system performs IVR call treatment for a call while the call is in the entry point.
You can assign a flow to an entry point. Moreover, if you want to implement the business hours to define the working and nonworking hours for your contact center, you can choose a flow that has the business hours activity configured, and assign it to the entry point.
We strongly recommend you to assign new flows directly to an entry point using the business hours activity. For the existing flows, you should also plan to migrate the routing strategy flow configurations to entry point using business hours.
If a flow is associated to an entry point and uses business hours, it will take precedence over the same flow that is associated with a routing strategy as well.
For more information on how to configure Business Hours in a flow, see Business Hours.
To use entry points for the telephony channel type, ensure that you do the following:
-
Map a dial number (DN) to the entry point. For more information, see Entry Point Mappings.
-
Assign a flow to an entry point. For more information, see Create an Entry Point.
-
Contact your Webex Contact Center administrator for other Provisioning configurations.
Queue
An inbound queue is where the customer contact waits before the system assigns the customer to an agent or DN.
The inbound queue that represents a third-party Automatic Call Distributor (ACD) is known as a proxy queue. Calls that are sent to an external ACD are distributed to agents by the external ACD. Webex Contact Center uses proxy queues to track the call activity that occurs on the external ACD queues. There are two types of proxy queues: dedicated and shared. Agents signed in to a dedicated proxy queue serve only the Webex Contact Center customer; agents signed in to a shared queue serve multiple customers.
Outdial Entry Point
The outdial entry point is provisioned for outbound (outdial) customer calls in the Webex Contact Center system.
In the Outdial Entry Point list, a system-generated Outdial Transfer to Queue entry point is automatically created. If the outdial calls need to be transferred to the queue, map the DN to the Outdial Transfer to Queue entry point. For more information on mapping an outdial entry point, see Map an Entry Point.
You can’t edit the system-generated Outdial Transfer to Queue entry point. |
Outdial Queue
The outdial queue where the customer contact waits for the system to assign the customer to an agent or DN.
Create an Entry Point
To create an entry point:
| 1 |
From the Management Portal navigation bar, choose . | ||||||||||||||||||||
| 2 |
Choose Entry Point. | ||||||||||||||||||||
| 3 |
Click + New Entry Point. | ||||||||||||||||||||
| 4 |
In the General Settings area, enter the following settings:
| ||||||||||||||||||||
| 5 |
In the Advanced Settings area, enter the following settings:
| ||||||||||||||||||||
| 6 |
Click Save. |
View the Details of an Entry Point
| 1 |
From the Management Portal navigation bar, choose . | ||||||||||||||
| 2 |
Choose Entry Point . | ||||||||||||||
| 3 |
Click the ellipsis icon beside an entry point and click View. You can view the following details:
|
Edit an Entry Point
To edit an entry point or an outdial entry point:
| 1 |
From the Management Portal navigation bar, choose . | ||||||||||||||||
| 2 |
Choose Entry Point. | ||||||||||||||||
| 3 |
Click the ellipsis icon beside an entry point and click Edit. | ||||||||||||||||
| 4 |
You can edit the following fields:
If you are viewing a proxy queue, you can click the search button in the DNIS Pool Data field to open a pop-up window displaying the list of DNIS entries for the queue. You can click a button bottom of the pop-up window to print the list or download the data as a .csv file. If you are editing a proxy queue configured to use the blocked area codes feature, you can click the edit button to edit the list of blocked area codes. For more information, see Block an Area Code |
Copy an Entry Point
| 1 |
From the Management Portal navigation bar, choose . | ||||||||||||||||
| 2 |
Choose Entry Point. | ||||||||||||||||
| 3 |
Click the ellipsis icon beside an entry point and click Copy. A copy of the selected entry point appears. The fields have the same values as the original entry point.
You can save the same entry point with a different name or edit and save the entry point. | ||||||||||||||||
| 4 |
You can edit the following details:
|
Create an Outdial Entry Point
To create an outdial entry point:
| 1 |
From the Management Portal navigation bar, choose . | ||||||||||||||||||||||||||
| 2 |
Choose Outdial Entry Point. | ||||||||||||||||||||||||||
| 3 |
Click + Outdial Entry Point. | ||||||||||||||||||||||||||
| 4 |
In the General Settings area, enter the following settings:
| ||||||||||||||||||||||||||
| 5 |
In the Advanced Settings area, enter the following settings:
| ||||||||||||||||||||||||||
| 6 |
Click Save. |
View the Details of an Outdial Entry Point
| 1 |
From the Management Portal navigation bar, choose . | ||||||||||||||
| 2 |
Choose Outdial Entry Point. | ||||||||||||||
| 3 |
Click the ellipsis icon beside an entry point and click View. You can view the following details:
|
Edit an Outdial Entry Point
To edit an outdial entry point:
| 1 |
From the Management Portal navigation bar, choose . | ||||||||||||||||
| 2 |
Choose Outdial Entry Point. | ||||||||||||||||
| 3 |
Click the ellipsis icon beside an outdial entry point and click Edit. | ||||||||||||||||
| 4 |
You can edit the following fields:
|
Copy an Outdial Entry Point
| 1 |
From the Management Portal navigation bar, choose . | ||||||||||||||||
| 2 |
Choose Outdial Entry Point. | ||||||||||||||||
| 3 |
Click the ellipsis icon beside an entry point and click Copy. A copy of the selected outdial entry point appears. The fields have the same values as the original outdial entry point.
You can save the same outdial entry point with a different name or edit and save the outdial entry point. You can edit the following details:
|
Create a Queue or an Outdial Queue
To create a queue or an outdial queue:
Currently this feature is not supported. |
| 1 |
From the Management Portal navigation bar, choose . | ||||||||||||||||||||||||||||||||||||||||||||||||||||||||||||||
| 2 |
Choose Queue or Outdial Queue. | ||||||||||||||||||||||||||||||||||||||||||||||||||||||||||||||
| 3 |
Click the + New Queue or + New Outdial Queue. | ||||||||||||||||||||||||||||||||||||||||||||||||||||||||||||||
| 4 |
Enter the following settings for the queue and click Save:
|
View the Details of a Queue or an Outdial Queue
| 1 |
From the Management Portal navigation bar, choose . | ||||||||||||||||||||||||||||||||||||||||||||||||||||||||||||||
| 2 |
Choose Queue or Outdial Queue. | ||||||||||||||||||||||||||||||||||||||||||||||||||||||||||||||
| 3 |
Click the ellipsis icon beside a queue and click View. You can view the following details:
|
Edit a Queue or an Outdial Queue
To edit a Queue or Outdial Queue queue:
| 1 |
From the Management Portal navigation bar, choose . | ||||||||||||||||||||||||||||||||||||||||||||||||||||||||||||||||
| 2 |
Choose Queue or Outdial Queue. | ||||||||||||||||||||||||||||||||||||||||||||||||||||||||||||||||
| 3 |
Click the ellipsis icon beside a queue and click Edit. | ||||||||||||||||||||||||||||||||||||||||||||||||||||||||||||||||
| 4 |
You can edit the following fields:
|
Copy a Queue or an Outdial Queue
To copy a Queue or Outdial Queue:
| 1 |
From the Management Portal navigation bar, choose . | ||||||||||||||||||||||||||||||||||||||||||||||||||||||||||||||||
| 2 |
Choose Queue or Outdial Queue. | ||||||||||||||||||||||||||||||||||||||||||||||||||||||||||||||||
| 3 |
Click the ellipsis icon beside a queue and click Copy. A copy of the Queue or
Outdial Queue page appears. The fields have the same values as the original queue.
You can save the same queue with a different name or edit the queue. | ||||||||||||||||||||||||||||||||||||||||||||||||||||||||||||||||
| 4 |
You can edit the following details and click Save:
|
Deactivate an Entry Point or a Queue
You cannot deactivate an entry point or queue if you associate it with any other entities such as dial numbers or other routing strategy. When you try to deactivate these entry points or queues, you get an error message. Click the information icon at the end of the message to view the list of all the associated entities.
After you deactivate an entry point or queue, you can still see it in the Entry Points/Queues page as Not Active. Historical reports also display details of the deactivated entry points or queues.
In the Entry Points/Queues page, you can click the ellipsis icon and then the restore icon to reactivate an entry point or queue.
To deactivate an entry point or queue:
| 1 |
From the Management Portal navigation bar, choose . | ||
| 2 |
Choose the type of entry point or queue that you want to deactivate. | ||
| 3 |
Click the ellipsis icon beside an entry point or queue and click Mark Inactive. | ||
| 4 |
Click Yes to confirm.
|
Activate an Entry Point or a Queue
| 1 |
From the Management Portal navigation bar, choose . |
| 2 |
Choose the type of entry point or queue that you want to activate. |
| 3 |
Click the ellipsis icon beside the entry point or queue with the status Not Active and click Restore. |
| 4 |
Click Yes to confirm. The status of the entry point or queue changes to Active.
|
Sites
A site is a physical contact center location under the control of your enterprise. For example, enterprise Acme can have sites in Chicago, Manila, and Bangalore with agents to handle customer contacts.
When you create a site, the system automatically adds a team and a multimedia profile to the new site. You can change the team name and other settings, but cannot change the team type from Capacity based to Agent based. Do not delete the team without adding another team for the new site.
Create a Site
| 1 |
From the Management Portal navigation bar, choose . | ||||||||||
| 2 |
Click + New Site. | ||||||||||
| 3 |
Enter the following details and click Save:
| ||||||||||
View the Details of a Site
To view the details of a site:
| 1 |
From the Management Portal navigation bar, choose . |
| 2 |
Click the ellipsis icon beside the site that you want to view, and click View. |
| 3 |
You can view the following settings: |
Edit a Site
To edit a site:
| 1 |
From the Management Portal navigation bar, choose . | ||||||||||||
| 2 |
Click the ellipsis icon beside the site that you want to edit, and click Edit. | ||||||||||||
| 3 |
You can edit the following settings. Click Save after you have made the changes:
|
Deactivate a Site
You cannot deactivate a site if agents or active teams are associated with the site. If you try to deactivate such a site, a message informs you that you cannot deactivate the site. You can click the information icon in the message to view the list of entities that are associated with this site.
If you deactivate a site, you can still see it in the Sites page as Not Active. Historical reports also display details of the deactivated sites.
To deactivate a site:
| 1 |
From the Management Portal navigation bar, choose . | ||
| 2 |
Click the ellipsis icon beside the site you want to deactivate, and click Mark Inactive. | ||
| 3 |
Click Yes to confirm. The status of the site changes to Not Active.
|
Activate a Site
To activate a site:
| 1 |
From the Management Portal navigation bar, choose . |
| 2 |
Click the ellipsis icon beside the site that you want to activate and click Restore. |
| 3 |
Click Yes to confirm. The status of the site changes to Active.
|
Teams
A team is a group of people who support a specific group of functions. For example, supporting the Gold customers or managing billing, and so on. A team consists of agents and is associated with a specific site.
Create a team
| 1 |
From the Management Portal navigation bar, choose . | ||||||||||||||||||||||||||||||||||
| 2 |
Click + New Team. | ||||||||||||||||||||||||||||||||||
| 3 |
Enter the following details:
| ||||||||||||||||||||||||||||||||||
| 4 |
Click Save. |
View a team
| 1 |
From the Management Portal navigation bar, choose . |
| 2 |
Click the ellipsis icon beside the team that you want to view, and click View. You can view all of the configured details. |
Edit a team
| 1 |
From the Management Portal navigation bar, choose . | ||||||||||||||||||||||||||||||||
| 2 |
Click the ellipsis icon beside the team that you want to edit, and click Edit. You can edit the following settings:
| ||||||||||||||||||||||||||||||||
| 3 |
Click Save. |
Deactivate a team
You cannot deactivate teams associated with agents or active routing strategies. When you try to deactivate such teams, Management Portal displays a message that the team cannot be deactivated. You can click the information icon in the message to view the list of entities associated with a team.
If you deactivate a team, you still see the Teams page as Not Active. Historical reports also display details of deactivated teams.
| 1 |
From the Management Portal navigation bar, choose . | ||
| 2 |
Click the ellipsis icon beside the team that you want to deactivate, and click Mark Inactive. | ||
| 3 |
Click Yes to confirm. The status of the team changes to Not Active.
|
Activate a Team
| 1 |
From the Management Portal navigation bar, choose . |
| 2 |
Click the ellipsis icon beside the team that you want to activate and click Restore. |
| 3 |
Click Yes to confirm. The status of the team changes to Active.
|
Users
Users of a contact center are agents, supervisors, and managers. A user profile defines a user's access privileges for the Management Portal. Management Portal modules provide users with real-time visibility and control over resources for which they are responsible.
An agent user account must include a user profile granting access to the Agent Desktop module, and must include a desktop profile, as described in Desktop Profiles. Agents use the Webex Contact Center Desktop to manage customer interactions and supervisors to manage supervisor capabilities.
You can create and delete users through Control Hub. Management Portal synchronizes users with contact center licenses from Control Hub, irrespective of their status. |
By default, you are shown only active users. To view inactive users, check the Show Inactive Users check box.
View the Details of a User
| 1 |
From the Management Portal navigation bar, choose . | ||||||||||||||||||||||||||||||||||||||||||
| 2 |
To view the details of a user, click the ellipsis icon beside the first name, and then click View. | ||||||||||||||||||||||||||||||||||||||||||
| 3 |
You can search users using one of the following parameters:
The search results display 20 users per page. Enter any three characters in the Search box. The search results display the users that match the search criteria. Follow one of these steps to navigate the user list page:
You can view the following details of the user:
|
Edit a User
| 1 |
From the Management Portal navigation bar, choose . | ||||||||||||||||||||||||||||||||||||||||||||||||||||||||||||||||||||||||||
| 2 |
To edit the details of a user, click the ellipsis button next to the first name of the user and then click Edit. You can edit the following settings:
You can edit the following settings from Cisco Webex Control Hub:
| ||||||||||||||||||||||||||||||||||||||||||||||||||||||||||||||||||||||||||
Export Items Provisioned for a User
| 1 |
From the Management Portal navigation bar, choose . | ||||||||||||||||
| 2 |
Click the ellipsis icon beside a username and click Excel or PDF. The report contains details of the following items:
|
Revoke API Key for a User
| 1 |
From the Management Portal navigation bar, choose . |
| 2 |
Click the ellipsis icon beside the required user and click Revoke API Key. A message appears that you have successfully revoked the API Key for the user.
If you do not map an API key to the profile of that user, an error message appears that the user does not have an API key. |
Update and Upload Agent Template
To upload the details of multiple agents simultaneously:
| 1 |
From the Management Portal navigation bar, choose . |
| 2 |
To download the template, click the Export as CSV ( |
| 3 |
Click Bulk Update ( |
| 4 |
Browse the Agent Update template from your local system and choose the template. |
| 5 |
Click Upload. |
| 6 |
(Optional) Check the status of the upload from Bulk Operations Status in Provisioning. |
User Profiles
User profiles determine the features accessible to a user in Cisco Contact Center.
Manage a User Profile
To create a user profile:
| 1 |
From the Management Portal navigation bar, choose . |
| 2 |
Click the + New User Profile. |
| 3 |
Enter the details in the following tabs and click Save in each tab. |
| 4 |
From the User Profiles page, you can also do the following:
|
General Settings
When you configure a new user profile or edit an existing user profile, you can change the following settings in the General Settings tab.
|
Parameter |
Description | ||
|---|---|---|---|
|
Name |
Enter a name for the user profile. When you copy a user profile, the system appends the words copy_of before the name of the original user profile. You can keep the same name or edit it as per your requirement. |
||
|
Description |
(Optional) Enter a description for the profile. |
||
|
Profile Type |
Choose a type to determine the privilege level for this profile. For Management Portal, generic profile and module mapping are:
You can’t edit the profile type later. |
||
|
Status |
You can view and change this setting only when you edit or copy a user profile. |
Module Settings
You can use user profiles to control access to Management Portal. The Module Settings tab allows you to specify permissions to the Management Portal modules. You can set module access when you create a new user profile, or edit or copy an existing user profile.
The Module Access has the following options:
If you click All for Module Access, then the user profile can access all of the modules. Click Specific if you want to provide the user access to selected modules only.
You can specify access to the following specific modules.
|
Setting |
Description | ||
|---|---|---|---|
|
Additional Supervisory Features |
Allows the administrator to manage additional supervisory features for the agents. To enable the following setting, click the toggle button:
|
||
|
Agent Desktop |
Allows the user to access the Desktop. |
||
|
Call Monitoring |
Allows the user to silently monitor the quality of service that is delivered to customers across multisource contact centers. The user can silently monitor a selected queue, team, site, or agent if you enable Call Monitoring for the user. To enable the following settings, click the toggle button:
|
||
|
Call Recording |
Allows the user to record any active Webex Contact Center call. The user can select the call from a queue, team, site, or agent, and specify the duration for which to record the call. |
||
|
Multimedia |
Allows authorized users to choose a multimedia profile for the user, that includes all types of media such as voice, chat, email, and social. If Multimedia is not enabled, when you edit the user's details via Provisioning > Users, the Multimedia Profile drop-down list displays only the default telephony profile. Users who have subscribed to Flex 3.0 plan can access the following: • Digital Channels - Access to chat and email only • Social Channels - Access to social integrations
|
||
|
Provisioning |
Provides the user access to the Provisioning module. The user can perform provisioning activities for the enterprise only if you select Edit in the Provisioning drop-down list. You can control access for an administrator user to perform the following provisioning activities for the enterprise:
|
||
|
Recording Management |
Provides access to the Recording Management module, which allows the user to search for and play audio files recorded through the Webex Contact Center Call Recording feature. You can enable the following permissions to the Recording Management module:
This setting allows Supervisors to access Quality Management widget through Desktop. |
||
|
Reporting and Analytics |
Provides access to the Reporting and Analytics module. The Reporting and Analytics module allows the user to segment, profile, and visualize the data in contact center systems. This module also helps to identify the key variables that impact productivity and desired business outcomes. Users can configure and modify the Analyzer schemas using this module. You can provide the user access to Business Rules if you have enabled View or Edit permissions for the Reporting and Analytics module. Business Rules enable the user to incorporate customer data into the Webex Contact Center environment for custom routing and other generic implementation. |
||
|
Routing Resources |
Provides you access to the web-based user interface for managing and configuring call handling strategies. You can create and schedule global call routing and team capacity strategies and alter them in real-time in response to changes in business dynamics. You can enable the following permissions to the Routing Strategy module:
|
||
|
Provides you access to the Flow Control module based on the option selected such as None, View, and Edit. You can provide the user access to Manage Call Flow Scripts and if you have enabled the View or Edit permission for the Routing Strategy module.
|
|||
|
Workforce Optimization |
Allows supervisor to access the workforce optimization features to manage human resources. Supervisors can proactively analyze and manage resources for optimizing service levels.
|
Access Rights
You can configure the following settings from the Access Rights tab when you configure a new user profile or edit an existing user profile:
-
Entry Points
-
Queues
-
Sites
-
Teams
From the drop-down list, choose the specific entities that the user can access. You can choose All to provide access to all entities of that type.
View the Details of a User Profile
| 1 |
From the Management Portal navigation bar, choose . |
| 2 |
Click the ellipsis icon beside a user profile and click View. |
| 3 |
You can view the following details: |
Edit a User Profile
| 1 |
From the Management Portal navigation bar, choose . |
| 2 |
Click the ellipsis icon beside a user profile that you want to edit and click Edit. |
| 3 |
You can edit the details in the following tabs and click Save in each tab: |
Deactivate a User Profile
Before you begin
To deactivate a user profile:
| 1 |
From the Management Portal navigation bar, choose . | ||
| 2 |
Click the ellipsis icon beside a user profile and click Mark Inactive. | ||
| 3 |
Click Yes to confirm. The status of the user profile changes to Not Active.
|
Activate a User Profile
| 1 |
From the Management Portal navigation bar, choose . |
| 2 |
Click the ellipsis icon beside the user profile that you want to activate and click Restore. |
| 3 |
Click Yes to confirm. The status of the user profile changes to Active.
|
Copy a User Profile
To copy a user profile:
| 1 |
From the Management Portal navigation bar, choose . |
| 2 |
Click the ellipsis icon beside a user profile that you want to copy, and click Copy. |
| 3 |
Enter the details in the following tabs and click Save in each tab. |
Work Types
When you create an idle or wrap-up code, you associate it with a work type. Work types group idle and wrap-up codes in auxiliary reports.
Create a Work Type
To create a work type:
| 1 |
From the Management Portal navigation bar, choose . | ||||||||
| 2 |
Click + New Work Type. | ||||||||
| 3 |
Enter the following details and click Save:
|
Edit a Work Type
To edit a work type:
| 1 |
From the Management Portal navigation bar, choose . | ||||||||||
| 2 |
Click the ellipsis icon beside the work type that you want to edit and click Edit. Except the Type, you can edit the following settings:
|
Deactivate a Work Type
You cannot deactivate a work type if there are any auxiliary codes that are associated with the work type. When you try to deactivate such a work type, a message informs you that you cannot deactivate the work type. You can click the information icon in the message to view the list of entities that you have associated with this work type.
After you deactivate a work type, you can still see it in the Work Types page as Not Active work types. Historical reports also display details of the deactivated work types.
To deactivate a work type:
| 1 |
From the Management Portal navigation bar, choose . | ||
| 2 |
Click the ellipsis icon beside the work type that you want to deactivate and click Mark Inactive. | ||
| 3 |
Click Yes to confirm. The status of the work type changes to Not Active.
|
Activate a Work Type
To activate a work type:
| 1 |
From the Management Portal navigation bar, choose . |
| 2 |
Click the ellipsis icon beside the work type that you want to activate and click Restore. |
| 3 |
Click Yes to confirm. The status of the work type changes to Active.
|
Auxiliary Codes
Idle or wrap up codes are two types of Auxiliary codes. Agents select Idle or Wrap-Up codes in Webex Contact Center Agent Desktop to indicate their unavailability or status of the customer contacts. Idle codes typically indicate why an agent is not available to take customer contacts, such as during a lunch break or meeting. Wrap-up codes indicate the result of the customer contacts, for example, the agent escalated the contact, or sold a service.
You associate each idle or wrap-up code with a work type. Work types are values that the system uses to group idle and wrap-up codes in auxiliary reports. For more information, see Create a Work Type.
Agents can use an idle or wrap-up code if you assign the code to their profile.You must add at least one idle code and one wrap-up code in a desktop profile. For more information, see Desktop Profiles.
If your enterprise uses the outdial feature, it is recommended that you create a wrap-up code such as |
Create Idle or Wrap-Up Codes
To create an idle or wrap-up code:
| 1 |
From the Management Portal navigation bar, choose . The Aux Codes Idle Codes page appears. To view the list of wrap-up codes, click Wrap Up Codes at the top of the page.
| ||||||||||||||
| 2 |
Click + New Idle Code or + New Wrap Up Code. | ||||||||||||||
| 3 |
Enter the following details and click Save.
|
Edit Idle or Wrap-Up Codes
| 1 |
From the Management Portal navigation bar, choose . | ||||||||||||
| 2 |
Click the ellipsis icon beside the idle or wrap-up code that you want to edit and click Edit. | ||||||||||||
| 3 |
Enter the following details and click Save.
|
Delete Idle or Wrap-up Codes
You cannot delete the idle or wrap-up code that is set as default. A message informs you that you cannot suspend or delete the default aux-code if you try to delete it. You must set another idle or wrap-up code to default before deleting the chosen wrap-up or idle code. See Edit Idle or Wrap-Up Codes to change the default setting.
| 1 |
From the Management Portal navigation bar, choose . | ||
| 2 |
Click the ellipsis icon beside the idle or wrap-up code and click Mark Inactive. | ||
| 3 |
Click Yes to confirm. The status of the idle or wrap-up code changes to Not Active.
|
Desktop Profiles
Desktop Profile is a group of permissions and Desktop behaviors that you assign to agents and supervisors. Each desktop profile specifies the following permissions and settings:
-
Queue Transfer
-
Agent Consult and Transfer
-
Wrap-up and Idle Codes
-
Wrap-up Timeout Values
-
Agent Auto Available
-
Dialing Capabilities
-
Dial Number Capabilities
-
Access to the agent personal statistics
-
Auto Answer
For reports in the Agent Personal Statistics (APS) pane on Agent Desktop, desktop profile settings are applied.
Create a Desktop Profile
To create a desktop profile:
| 1 |
From the Management Portal navigation bar, choose Desktop Profiles . |
| 2 |
Click the + New Desktop Profile and enter the following settings: |
General Information
The General Information tab displays the following settings.
|
Setting |
Description | ||
|---|---|---|---|
|
Name |
Enter a name for the desktop profile. You can create a desktop profile from a copy of another desktop profile. When you copy a profile, the system renames the copy. The copy name consists of the name of the profile from which the copy is made and the words copy_of appended as a prefix. You can retain the name the system assigned to the file or rename it. |
||
|
Description |
(Optional) Enter a description for the profile. |
||
|
Status |
This setting appears only on the Edit page to indicate if the profile is active.
|
||
|
Parent Type |
Choose a parent type:
|
||
|
Parent Name |
This setting is available if you choose Parent Type as Site. Choose the site for which this desktop profile is available. |
||
|
Screen Popups |
Click On or Off to specify whether you want to allow external pop-up screens. |
||
|
Auto Answer |
Click Yes or No to specify whether incoming and outgoing calls on the Agent Desktop must automatically answer for an agent. If you choose Yes, Auto Answer works in both the following scenarios: Scenario 1: On Next Generation voice media platform, the agent uses Desktop as the voice channel option. Scenario 2: All the following conditions are met: If you choose Yes, Auto Answer works when all of the following conditions exist:
When all the preceding conditions exist, calls are automatically answered for agents with only one device. Agents with more than one device must answer calls manually. Incoming calls to an agent are automatically answered and appear on the Agent Desktop. With outdial calls, the branch to the agent is automatically answered. The system doesn't invoke Auto Answer for simultaneous ring destinations, or if the agent forwards or redirects the call.
|
Auxiliary Codes
The Desktop Profile > Auxiliary Codes page displays settings for the wrap up and idle codes and permissions that are related to wrap up and agent availability.
|
Setting |
Description |
|
Wrap Up Settings |
When you click Auto Wrap Up with Time Out Of and enter the time, the system automatically enters the default wrap-up code after an agent completes a conversation. The agent, however, can select a different code within the time period that you specify here. Click Manual Wrap Up if you want the agent to select a wrap-up code after completing a call. No timeout is associated with manual wrap-up. |
|
Agent Available After Outdial |
Click On if you want the agent to go into the Available state after completing and wrapping up an outdial call. By default, an agent becomes available after the outdial call. However, if the agent does not want to be available after the outdial call, He/she can select an idle state from the Agent Availability State drop down list on the Desktop before the call is wrapped up. Click Off if you want the agent to go into the Idle state after completing and wrapping up an outdial call. |
|
Allow Auto Wrap Up Extension |
Click On if you want agents to cancel the auto wrap-up time and extend the wrap-up time. When this option set to On, the system displays the Cancel Auto Wrap Up option when the agent is in auto wrap-up mode. |
|
Wrap Up Codes |
Specify the wrap-up codes that the agents can select when they wrap up a contact:
You must add the default wrap-up code in the Selected Codes list. The system uses the default code when you have enabled Auto Wrap Up in the profile of the agent. These agents do not enter wrap-up codes. |
|
Idle Codes |
Specify the Idle codes that the agents can select in Agent Desktop:
You must add the default idle code in the Selected list. The system uses default codes in the following scenarios:
|
Collaboration
The Desktop Profile > Collaboration page displays the following settings:
|
Setting |
Description | ||
|---|---|---|---|
|
Entry Point/Queue Transfer Targets |
Specify the entry points or queues that the agents can choose from the Queue drop-down list on the Agent Desktop:
|
||
|
Buddy Teams |
Specify the teams that the agents can choose from the Agent drop-down list on the Agent Desktop. Agents can consult with, conference with, and transfer calls to the agents from the teams that they choose.
|
||
|
Consult To Queue |
Click On if you want the agent to be able to select a queue in the Queue drop-down list as a target for a consultation. The target must be an inbound Webex Contact Center queue.
|
Dial Plan
The Desktop Profile page allows you to configure settings related to agent outdialing. The following table describes these settings.
|
Setting |
Description | ||
|---|---|---|---|
|
Outdial Enabled |
If you want the agent to be able to make outdial calls, click the Outdial Enabled field to toggle to Yes. If you don't want the agent to make outdial calls, click the Outdial Enabled field to toggle to No. This setting prevents the dial pad from appearing on the Agent Desktop.
|
||
|
Outdial Entry Points |
If you set Outdial Enabled to Yes, choose an entry point that the agent can use to make outdial calls from the drop-down list in the Outdial Entry Point field. |
||
|
Address Book |
Choose an address book from the drop-down list in the Address Book field. An address book includes the speed-dial numbers that the agent can choose from to make outdial and consult calls. If you set Outdial Enabled to No and you choose an address book, the agent can select a name from the address book for consults and transfers, but can't make outdial calls. Choose None if you don't want to make an address book available to the agent. See Create an Address Book for more information. |
||
|
Dial Plan Enabled |
If you want the agent to be able to make ad-hoc outdial calls, click the Dial Plan Enabled field to toggle to Yes. If you don't want the agent to be able to make ad-hoc outdial calls, click the Dial Plan Enabled field to toggle to No. When the Dial Plan Enabled setting is No, and the Outdial Enabled setting is Yes, the agent can make an outdial call, but only by either selecting an entry from the address book or typing a name from the address book in the Enter number to call field on the dial pad. |
||
|
Select Dial Plan |
This setting appears only if you set Dial Plan Enabled to Yes. Choose one or more dial plans for the system to use to validate the Dial Numbers (DN) that the agent enters in the Enter number to call field. Two default dial plans are available. You can also create custom dial plans for your enterprise. The default dial plans are:
|
||
|
Outdial ANI |
This setting appears only if you set Outdial Enabled to Yes. Optionally, from the drop-down list in the Outdial ANI field, choose the name associated with the list of phone numbers that the agent can use to make an outdial call. The system uses the number that the agent uses as the caller ID for the call. For more information, see Create an Outdial ANI. |
Agent DN validation
The Desktop Profile > Voice Channel options page displays the following settings.
|
Setting |
Description | ||
|---|---|---|---|
| Voice Channel options |
Agent DN — Allows agents to sign in using a DN Extension — Allows agents to sign in through a specific extension number |
||
|
Validation for Agent DN |
Click Unrestricted to allow agents to use any DN to sign in through the Station Credentials prompt on the Agent Desktop.
To restrict the DN that the agent can enter, click one of the following:
|
||
|
Validation Criteria |
This setting appears only if you set Validation for Agent DN to Validation Criteria. Select the dial plan to use for the DN validation:
|
Agent Statistics
The Desktop Profile > Agent Statistics page displays the following settings.
|
Setting |
Description | ||
|---|---|---|---|
|
Agent Statistics |
Click On or Off to specify whether you want the agents to view their personal statistics in Agent Desktop. |
||
|
Queue Statistics |
This setting controls whether the agent can display statistics for all or some queues in the Agent Personal Statistics tab. Do one of the following:
|
||
|
Logged-in Team Statistics |
Click On or Off to specify whether the agent can view statistics for the team.
|
||
|
Team Statistics |
This setting controls whether the agent can display statistics for all or some teams in the Agent Personal Statistics tab. Do one of the following:
|
||
|
Access To Recordings |
This feature is currently not supported. By default, it's set to No. |
Agent Thresholds
The Agent Thresholds page appears only if your enterprise uses the Threshold Alerts feature. This page provides settings to specify the alerts that the agent can display in the Agent Personal Statistics tab on the Agent Desktop.
This feature is not supported. Enabling or disabling the Allow Agent Threshold under tenant settings to show the agent threshold on the desktop profile page will be removed in sometime. |
If your enterprise uses the Agent Threshold Alerts feature, the page also provides settings to specify the thresholds associated with the agent.
For more information, see Threshold Rules.
|
Setting |
Description |
|---|---|
|
Agent Viewable Threshold Alerts |
Choose rules from the drop-down list to specify the alerts that you want the agent to receive. When an agent breaches a threshold rule, the system generates an alert and displays it in the Agent Personal Statistics tab in Agent Desktop. |
|
Enable Agent Threshold Alerts |
This setting appears only if your enterprise uses the Agent Threshold Alerts feature. Click On or Off to specify whether you want the agent and the supervisor to receive alerts when the agent breaches specified threshold rules. If the agent breaches a selected rule, the system generates the alert and displays it in the Agent Threshold Alerts section of the Agent Personal Statistics tab. The supervisor also receives the alert in their Webex Contact Center Management Portal. |
|
Threshold Alerts |
This is available if you enable threshold alerts. If agent viewable threshold alerts are available, choose the rules for triggering the alerts from the drop-down list. Choose rules from the drop-down list to specify the alerts that you want the agent and supervisor to receive. |
Agent Timeout
Agent Timeout enables you to automatically sign out an agent from the desktop after being inactive for the specified time. An agent is considered inactive if not performing any activity on the Agent Desktop while in the Idle state. Agent activity includes handling contacts, working on custom widgets, or performing any task on the Agent Desktop.
|
Setting |
Description |
|
Desktop Inactivity Timeout |
Choose an idle timeout setting for an agent from the following options: Default Value: Select this to inherit the values given in Timeout Settings at the tenant level configuration. Custom Value: Type the value in minutes to set the idle timeout. Enter any value from 3 to 10,000 minutes in the text box. This overrides the value given in Timeout Settings at the tenant level configuration. |
View the Details of a Desktop Profile
| 1 |
From the Management Portal navigation bar, choose Desktop Profiles. |
| 2 |
Click the ellipsis icon beside the desktop profile you want to view and click View. You can view the following details: |
| 3 |
(Optional) Click Edit in each tab to edit the settings. |
Edit a Desktop Profile
| 1 |
From the Webex Contact Center Portal navigation bar, choose Provisioning. |
| 2 |
Choose Desktop Profiles. The Desktop Profiles page appears. This page displays a list of desktop profiles. |
| 3 |
Click the ellipsis icon beside the desktop profile you want to edit and click Edit. You can edit the following details: |
Copy a Desktop Profile
| 1 |
From the Management Portal navigation bar, choose Provisioning > Desktop Profiles. |
| 2 |
Click the ellipsis icon beside the desktop profile you want to copy and click Copy. You can edit the following details in the copied desktop profile: |
| 3 |
(Optional) Click Edit in each tab to edit the settings. |
Deactivate a Desktop Profile
You cannot deactivate a desktop profile if you associate it with any other entities such as, dial numbers or any other routing strategy. When you try to deactivate these desktop profiles, you get an error message. Click the information icon at the end of the message to view the list of all the associated entities.
After you deactivate a desktop profile, you can still see it in the Desktop Profiles page as Not Active. Historical reports also display details of the deactivated desktop profile.
| 1 |
From the Management Portal navigation bar, choose Provisioning > Desktop Profiles. | ||
| 2 |
Click the ellipsis icon beside a desktop profile and click Mark Inactive. | ||
| 3 |
Click Yes to confirm. The status of the desktop profile changes to Not Active.
|
Activate a Desktop Profile
| 1 |
From the Management Portal navigation bar, choose Provisioning > Desktop Profiles. |
| 2 |
Click the ellipsis icon beside a desktop profile with the status Not Active and click Restore. |
| 3 |
Click Yes to confirm. The status of the desktop profile changes to Active.
|
Address Books
Address books contain entries with phone numbers. Instead of entering a number manually when starting a call, agents can use the address book to select an entry to dial. Agents can access an address book after you add it to their Desktop Profile. For more information, see Dial Plan in Desktop Profiles.
You can create address books that are available to all sites or only to a specific site. The value of Maximum Address Books in the tenant settings of your enterprise determines the number of address books that you can create. For more information, see Tenant Settings.
When an address book is updated, the administrator must inform the agents to reload the bowser or sign out and sign in again to view the updates. |
Create an Address Book
To create a new address book:
| 1 |
From the Management Portal navigation bar, choose . | ||||||||||
| 2 |
Click + New Address Book. | ||||||||||
| 3 |
Enter the following details and click Save.
| ||||||||||
| 4 |
(Optional) In the Entry List, click the + icon to add new entries in the address book. | ||||||||||
| 5 |
In the Add Address Book dialog box, enter the following details:
|
Edit an Address Book
| 1 |
From the Management Portal navigation bar, choose . | ||||||||
| 2 |
Click the ellipsis button beside the address book that you want to edit and click Edit. You can edit the following fields in the General Settings tab:
| ||||||||
| 3 |
In the Entry List section, under the Action column, click the edit button to edit an entry. | ||||||||
| 4 |
You can edit the following in the Edit Address Book dialog box:
| ||||||||
| 5 |
(Optional) In the Entry List section, under the Action column, click Delete to delete an entry. | ||||||||
| 6 |
(Optional) Click the + icon to add a new entry to the entry list. | ||||||||
| 7 |
Click Save. |
Delete an Address Book
You cannot delete an address book if you associate it with any other entities such as, desktop profile. When you try to delete these address books, you get an error message. Click the information icon at the end of the message to view the list of all the associated entities.
| 1 |
From the Management Portal navigation bar, choose . |
| 2 |
Click the ellipsis icon beside the address book that you want to delete and click Delete. |
| 3 |
Click Yes to confirm. |
Outdial Automatic Number Identification (ANI)
The Outdial Automatic Number Identification (ANI) feature allows an agent to select a phone number as the caller ID for an outdial call.
To make an outdial ANI list available to an agent, add the outdial ANI list to a Desktop Profile, and assign the profile to the agent. For more information, see Desktop Profiles.
Create an Outdial ANI
To create an outdial ANI:
| 1 |
From the Management Portal navigation bar, choose . | ||||||||
| 2 |
Click + New Outdial ANI. | ||||||||
| 3 |
Enter the following details in the General Settings section:
| ||||||||
| 4 |
Click the + icon in the Outdial ANI Entry List section to add a new outdial ANI entry. | ||||||||
| 5 |
Enter the following details in the Add Outdial ANI dialog:
| ||||||||
| 6 |
Repeat Step 5 and Step 6 to add another outdial ANI entry to the list. | ||||||||
| 7 |
Click Save. Newly added entries are in the Outdial ANI Entry List section. |
Edit an Outdial ANI
To edit an outdial ANI:
| 1 |
From the Management Portal navigation bar, choose . |
| 2 |
Click the ellipsis icon beside the outdial ANI that you want to edit and click Edit. |
| 3 |
You can edit the following:
|
| 4 |
Click Save. |
Delete an Outdial ANI
You cannot delete an outdial ANI if you have associated it with any entity, for example, a desktop profile. |
To delete an outdial ANI:
| 1 |
From the Management Portal navigation bar, choose . |
| 2 |
Click the ellipsis icon beside the outdial ANI that you want to delete and click Delete. |
| 3 |
Click Yes to confirm. |
Dial Plans
The Dial Plan page allows you to define validation criteria for the:
-
Dial Number (DN) that an agent uses to sign in to the Agent Desktop.
-
DN that an agent uses for outdialing.
If you satisfy the validation prerequisites, the system validates DNs that agents enter in the Desktop environment against the syntax rules that are defined in one or more dial plans. The following table describes the validation prerequisites.
|
DN usage |
Validation prerequisites | ||
|---|---|---|---|
|
Agent Desktop sign-in |
Configure Desktop Profiles > Agent DN Validation as follows:
|
||
|
Outdial calls |
Configure Desktop Profiles > Dial Plan as follows:
|
If you allow agents to enter DNs without requiring validation and their entries don't comply with valid syntax, the Desktop rejects sign-ins and outbound calls fail. |
You can choose from two default dial plans and create new dial plans. The default dial plans are:
-
US
-
Any Format
The default US dial plan accepts entries such as:
-
1-800-555-1234
-
1 (800) 555-1234
-
18005551234
-
18005551234,,,222
In this example, commas indicate pauses before entry of an extension number.
The default Any Format dial plan accepts entries such as:
-
123
-
5551234
-
555-1234
-
8005551234
-
1800FLOWERS
-
bruce.matthews
You can use the Any Format dial plan to validate a DN, the first part of an email address, or a Session Initiation Protocol (SIP) uniform resource identifier (URI). |
All dial plans require a regular expression for the system to recognize what defines a valid entry. The regular expression comprises the syntax rules that the system uses to interpret what is valid.
You can create separate dial plans with appropriate regular expressions to specify the required syntax for the:
-
DN that an agent uses to sign in to the Desktop Station Credentials pop-up window.
-
DN an agent enters in the Enter number to call field of the Desktop dial pad.
Optionally, you can specify a prefix and characters that the system must strip from the entry in the dial pad.
The regular expressions of the default dial plans are described in the following sections. You can refer to the syntax rules that are described in these sections to guide you in formulating regular expressions for the dial plans you create.
For an outdial call, the system performs the following steps to determine the validity of an entry an agent makes in the Enter number to call field of the Desktop dial pad:
-
Strip the characters specified in the dial plan’s Stripped Characters field from the entry in the Enter number to call field.

In the default US and Any Format dial plans, the specified Stripped Characters are left parenthesis, right parenthesis, space, and hyphen.
-
Validate the resulting entry according to the criteria defined in the regular expression of the chosen dial plan. If the entry meets the criteria, it's deemed valid.
-
If the entry is invalid, prepend the entry that is specified in the Prefix field.
In the US dial plan, the specified prefix is number 1.
-
Validate the resulting entry according to the defined regular expression again.
Regular expression for the default US dial plan
The regular expression that is specified for the US dial plan is:
1[0-9]{3}[2-9][0-9]{6}([,]{1,10}[0-9]+){0,1}
Following is a description of what this regular expression specifies.
-
The first digit must be 1.
-
Three digits in the range of 0–9 must follow.
{3} means 3 digits in the preceding range [0-9]
-
One digit in the range of 2-9 must follow.
-
Six digits in the range of 0-9 must follow.
{6} means six digits in the preceding range [0-9]
-
Zero or one occurrence of the following sequence can follow: between one and ten commas [,] followed by one or more digits [0-9].
{1,10} means one to ten pauses as specified by one comma [,] per pause
+ means one or more digits in the preceding range [0-9]
{0,1} means zero or one occurrence of the sequence of pauses [,] followed by one or more digits in the preceding range [0-9]
Regular expression for the default Any Format dial plan
The regular expression that is specified for the Any Format dial plan is:
([0-9a-zA-Z]+[-._])*[0-9a-zA-Z]+
Following is a description of what this regular expression specifies.
-
The dial pad entry can start with zero or more sets of the following sequence:
one or more alphanumeric characters [0-9a-zA-Z] followed by one hyphen, period, or underscore [-._].
-
+ means one or more alphanumeric characters in the preceding range [0-9a-zA-Z]
-
* means zero or more of the preceding sequence of alphanumeric characters [0-9a-zA-Z] followed by one hyphen, period, or underscore [-._].
-
-
One or more alphanumeric characters [0-9a-zA-Z] must follow.
Create a Dial Plan
Before you begin
| 1 |
From the Management Portal navigation bar, choose . The Dial Plan page appears. This page displays a list of existing dial plans. | ||||||||||
| 2 |
Click + New Dial Plan. | ||||||||||
| 3 |
Configure the following settings.
| ||||||||||
| 4 |
Click Save. |
Edit a Dial Plan
Before you begin
| 1 |
From the Management Portal navigation bar, choose . The Dial Plan page appears. This page displays a list of existing dial plans. | ||||||||||
| 2 |
Click the ellipsis icon beside the dial plan you want to edit and choose Edit. The Edit Dial Plan page appears.
| ||||||||||
| 3 |
You can edit the settings described in the following table. When you are done editing, click Save.
|
Delete a Dial Plan
Before you begin
-
You require Administrator privileges to complete this procedure.
-
Before deleting a dial plan, ensure that it isn't provisioned for a desktop profile or used to validate an agent's sign-in Dial Number (DN). If you can't delete a dial plan, contact your Full Administrator.
| 1 |
From the Management Portal navigation bar, choose The Dial Plan page appears. This page displays a list of all existing dial plans. |
| 2 |
Click the ellipsis icon beside the dial plan you want to delete and choose Delete. The Heads Up! dialog box appears.
|
| 3 |
Click Yes to confirm. |
Global Variables
Global variables are custom variables defined in the Provisioning module and accessible throughout a flow. Flow developers can add global variables to the flow as required. For more information, see Global Variables.
Global variables are specific to the Webex Contact Center voice channel. They collect one of the following types of data values:
-
Caller-entered data: Data that a customer enters using IVR during a call, such as an account number.
-
Agent-entered data: Data that an agent enters into the Interaction Control pane of the Desktop during an active call with a customer, such as a case number or action code.
You can create any number of global variables. However, you can enable only up to 100 global variables for reporting at a time.
For more information, see Create a Global Variable.
By default, you are shown only active global variables. To view inactive global variables, check the Show Inactive Global Variables check box.
|
System-Defined Variables
System-defined variables are the predefined global variables used by the Webex Contact Center.
You can edit the system-defined variables in the Provisioning module; but you can’t create or deactivate system-defined variables. |
Webex Contact Center uses the following system-defined variables:
-
Global_FeedbackSurveyOptin: Indicates whether the customer chooses to participate in (opt-in) or not participate in (opt-out) a post call survey. The Variable Type is defined as String; while the default value is
uninitialized, meaning there is no initial value. -
Global_Language: Indicates the language that a customer uses in the flow. The Variable Type is defined as String; and the default value is
en-US. For more information, see Webex Experience Management Language Support. -
Global_VoiceName: Indicates the output-recorded name used in the flow. The Variable Type is defined as String; while the default value is
Automatic. When the value isAutomatic, Google Dialogflow chooses the voice name for a given language.
Create a Global Variable
| 1 |
From the Management Portal navigation bar, choose . | ||||||||||||||
| 2 |
Click + New Global Variable. The Global Variable window appears.
| ||||||||||||||
| 3 |
Enter a Name for the variable.
| ||||||||||||||
| 4 |
Enter a Description for the variable. | ||||||||||||||
| 5 |
Choose one of the following types from the Variable Type drop-down list and specify the variable value.
| ||||||||||||||
| 6 |
(Optional) Disable the Status toggle button to make the variable Not Active. | ||||||||||||||
| 7 |
(Optional) Enable the Make Reportable toggle button to display the variable in the Analyzer for reporting purposes.
| ||||||||||||||
| 8 |
(Optional) Enable the Make Agent Viewable toggle button to display the variable on the Desktop along with the value entered as part of the flow. When you enable the Make Agent Viewable toggle button, the following configurations appear:
| ||||||||||||||
| 9 |
Click Save. |
Edit a Global Variable
To edit a global variable:
| 1 |
From the Management Portal navigation bar, choose . | ||
| 2 |
Click the ellipsis icon beside the required global variable and click Edit. | ||
| 3 |
Make the necessary changes and click Save.
|
Deactivate a Global Variable
| 1 |
From the Management Portal navigation bar, choose . | ||
| 2 |
Click the ellipsis icon beside the global variable that you want to deactivate and click Mark Inactive. | ||
| 3 |
Click Yes to confirm. The status of the global variable changes to Not Active.
|
Activate a Global Variable
| 1 |
From the Management Portal navigation bar, choose . |
| 2 |
Click the ellipsis icon beside the required global variable and click Restore. |
| 3 |
Click Yes to confirm. The status changes from Not Active to Active. |
Multimedia Profiles
If your administrator enables multimedia for your enterprise, you can assign each agent with a multimedia profile. Each profile specifies the number of each type of media, such as email, chat, or telephone, that the agent can handle simultaneously.
The optional multimedia feature enables the Webex Contact Center system to manage routing strategies for email, telephone, and chat contacts.
You can assign multimedia profiles to sites, teams, or individual agents. By default, the system assigns the Default_Telephony_Profile to every site. You cannot edit or delete this profile, but can re-assign a different multimedia profile to the site.
All of the teams under a site have the same multimedia profile as that of the site, unless you assign a different profile to the teams. Similarly, all of the agents under the teams have the same profile as that of the team, unless you change the profile for the agents.
Create a Multimedia Profile
To configure a multimedia profile:
| 1 |
From the Management Portal navigation bar, choose | ||||||||||||
| 2 |
Click + New Multimedia Profile. | ||||||||||||
| 3 |
Do the following:
| ||||||||||||
| 4 |
Click Save. |
View the Details of a Multimedia Profile
| 1 |
From the Webex Contact Center Portal navigation bar, choose Provisioning. | ||||||||||
| 2 |
Click the ellipsis icon beside a multimedia profile and click View.
| ||||||||||
| 3 |
(Optional) Click Edit to change the settings. For more information, see Edit a Multimedia Profile. | ||||||||||
| 4 |
(Optional) Click Delete to deactivate the settings. For more information, see Deactivate a Multimedia Profile. |
Edit a Multimedia Profile
| 1 |
From the Management Portal navigation bar, choose . | ||||||||||||
| 2 |
Click the ellipsis icon beside a multimedia profile and click Edit. | ||||||||||||
| 3 |
Do the following:
| ||||||||||||
| 4 |
Click Save. |
Deactivate a Multimedia Profile
You cannot deactivate a multimedia profile if you associate it with any entity. |
| 1 |
From the Management Portal navigation bar, choose . | ||
| 2 |
Click the ellipsis icon beside the multimedia profile that you want to deactivate, and click Mark Inactive. | ||
| 3 |
Click Yes to confirm. The status of the multimedia profile changes to Not Active.
|
Activate a Multimedia Profile
| 1 |
From the Management Portal navigation bar, choose . |
| 2 |
Click the ellipsis icon beside a multimedia profile with the status Not Active and click Restore. |
| 3 |
Click Yes to confirm. The status of the multimedia profile changes to Active.
|
Desktop Layout
The Desktop Layout feature allows you to configure the Webex Contact Center Desktop as per your business requirements. You can customize elements such as logo, title, and widgets. For the complete list of elements that you can customize, see Define a Custom Desktop Layout. You can create a desktop layout and assign it to a team. This layout generates the agent experience on the desktop for all agents who sign in as part of that team.
There are two types of layouts:
-
Global Layout: This layout is a system-generated layout that gets assigned by default when you create a team. For more information, see Create a team. When you create a team, the Global Layout is automatically set as the desktop layout for the team. You cannot delete this layout.
-
Custom Layout: A layout that provides a customized desktop experience. You can create a custom layout for one or more teams.
If you assign a new desktop layout when an agent is signed in, the agent must reload the page to see the new layout. |
The Webex Contact Center Desktop supports three personas:
-
Agent
-
Supervisor
-
Supervisor and an Agent
The JSON layout file has separate sections for each of the personas. The administrator should configure the settings for each persona in the corresponding section of the JSON layout file. For more information about a sample JSON layout file, see JSON Layout Top-Level Properties.
When Cisco adds a new feature to the Desktop Layout, the unmodified layout is updated automatically with the new features. The updated desktop layout is automatically available to the existing teams that use the unmodified desktop layout. The Desktop users using the unmodified desktop layout receive the new layout-based features when they sign in or reload the browser.
If you are using the |
Create a Desktop Layout
To create a custom desktop layout:
Before you begin
| 1 |
From the Management Portal navigation bar, choose . | ||||||||||||||
| 2 |
Click New Layout. | ||||||||||||||
| 3 |
Enter the following details:
| ||||||||||||||
| 4 |
Upload the JSON file that you customized to define the custom desktop layout.
| ||||||||||||||
| 5 |
If the uploaded custom layout has validation errors, click Restore to restore the default layout. | ||||||||||||||
| 6 |
Click Save to save the configuration. Important: To verify the layout experience, see View Layout Experience on Desktop. |
View Layout Experience on Desktop
| 1 |
Create a test team. For more information, see Create a team. |
| 2 |
Assign yourself to the test team. |
| 3 |
From the Management Portal navigation bar, choose Desktop Agent Desktop. |
| 4 |
Select the test team and validate the experience. |
Define a Custom Desktop Layout
This topic discusses how to create a custom layout by editing the JSON file and provides sample use cases to get started with widgets such as the Customer Experience Management Metrics widget and Customer Experience Journey widget.
Before You Begin
The following are good-to-have skills to customize the Desktop layout:
-
Understanding of the HTML structure
-
Understanding of the document tree model in a browser
-
Understanding of the JSON format
Desktop Layout Overview
In the Desktop, there are two types of widgets—iframe-based and web component-based. The header, navigation (custom page), persistent area, headless area, and aux panel are the customizable area in a Desktop. These are not widgets.
The following list details the spaces that you can configure. The images illustrates the layout of the Desktop:
-
Title and Logo area: This space displays the Webex Contact Center logo and name (default) at the top-left corner of your screen.
-
Horizontal Header area: This space has a configurable area that is populated with custom widgets. These widgets can display, for example, inline information and drop-down menus. As the height of this header is only 64 pixels, the widget height cannot cross the header height.
-
Workspace area: This space changes as per the selection on the navigation bar or when an agent is interacting with customers. When an agent is on a call, this area displays the interaction control and auxiliary information pane (that includes custom widgets and persistent widgets). When an agent is interacting on email, chat, or social channels, this area displays the workspace area and auxiliary information pane (that includes the persistent widget area).
Custom Page displays on the Desktop interface in the workspace pane. You can access the custom page through icons on the navigation bar. Each custom page can contain one or more custom widgets.
Custom Widget is a third-party application that is configured in the JSON layout. You can place the custom widget on the custom page, custom tab (Auxiliary Information pane), or on the horizontal header of the Desktop.
-
Navigation Bar area: Use this space to add navigation items to access custom pages.
JSON Layout Top-Level Properties
Roles
The default JSON layout has following three roles.
-
agent—To set the Desktop Layout to be displayed when an agent signs in to the Webex Contact Center Desktop to handle agent activities.
-
supervisor—To set the Desktop Layout to be displayed when a supervisor signs in to the Webex Contact Center Desktop to handle only supervisor capabilities.
When a supervisor signs in to the Desktop, the desktop layout that is specified for the primary team is applied. If you do not provide a primary team, the global layout applies. By default, APS reports are disabled.
-
supervisorAgent—To set the Desktop Layout to be displayed when a supervisor signs in to the Webex Contact Center Desktop to handle both supervisor capabilities and agent activities.
You can either add or modify widgets for each role in the corresponding persona of the relevant JSON layout file. |
The following are the top-level properties for JSON layout based on the role:
{
"agent": {
"version": "0.1.0",
"appTitle": "Webex Contact Center",
"logo": "",
"taskPageIllustration": "https://www.abc.com/image/logo.jpg",
"stopNavigateOnAcceptTask": false,
"dragDropEnabled": false,
"notificationTimer": 8,
"maximumNotificationCount": 3,
"browserNotificationTimer": 8,
"wxmConfigured": false,
"desktopChatApp": {
"webexConfigured": false,
}
"headerActions": ["outdial", "notification"],
"area": {
"advancedHeader": {
...
},
"panel": {
...
},
"navigation": {
...
},
"persistent": {
...
},
"headless": {
...
}
},
},
"supervisor": {
"version": "0.1.0",
"appTitle": "Webex Contact Center",
"logo": "",
"taskPageIllustration": "https://www.abc.com/image/logo.jpg",
"stopNavigateOnAcceptTask": false,
"dragDropEnabled": false,
"notificationTimer": 8,
"maximumNotificationCount": 3,
"browserNotificationTimer": 8,
"wxmConfigured": false,
"desktopChatApp": {
"webexConfigured": false,
}
"headerActions": ["outdial", "notification"],
"area": {
"advancedHeader": {
...
},
"panel": {
...
},
"navigation": {
...
},
"persistent": {
...
},
"headless": {
...
},
"homePage": {
...
}
},
}
"supervisorAgent": {
"version": "0.1.0",
"appTitle": "Webex Contact Center",
"logo": "",
"taskPageIllustration": "https://www.abc.com/image/logo.jpg",
"stopNavigateOnAcceptTask": false,
"dragDropEnabled": false,
"notificationTimer": 8,
"maximumNotificationCount": 3,
"browserNotificationTimer": 8,
"wxmConfigured": false,
"desktopChatApp": {
"webexConfigured": false,
}
"headerActions": ["outdial", "notification"],
"area": {
"advancedHeader": {
...
},
"panel": {
...
},
"navigation": {
...
},
"persistent": {
...
},
"headless": {
...
}
},
}
},
|
appTitle
To specify a title on the horizontal header of the Desktop. The default title is Webex Contact Center.
Example:
"appTitle": "Webex Contact Center"The default appTitle is changed from |
The title can either be text, an image, or an empty string. The title text appears in two rows. If the text extends beyond the second row, an ellipsis icon is displayed, and the tooltip displays the complete title. Styles cannot be applied to the title.
You can either use data URIs (Uniform Resource Identifier) or host a custom title image on a content delivery network (CDN), Amazon Web Services (AWS) Simple Storage Service (S3) bucket, or a similar hosting service, and then specify the URL to the hosted image. The supported title image formats are PNG, JPG, JPEG, GIF, SVG, and WebP. The supported title image size is 184 x 32 pixels (width x height).
logo
To specify a URL for the company logo. If you do not provide a URL, then the Webex Contact Center logo appears by default.
Example:
"logo": "https://my-cdn.com/logo.png"You can host a custom logo image on a CDN, Amazon Web Services (AWS) Simple Storage Service (S3) bucket, or a similar hosting service, and then specify the URL to the hosted image. The supported logo image formats are PNG, JPG, JPEG, GIF, SVG, and WebP. The supported logo image size is 96 x 32 pixels (width x height).
| Condition | Example | appTitle | logo |
|---|---|---|---|
| If appTitle and logo are not configured |
|
No title | Default logo |
| If appTitle and logo are configured |
|
Configured text | Configured logo |
| If appTitle is configured and logo is not configured |
|
Configured text | Default logo |
|
If appTitle is not configured and logo is configured
|
|
No title | Configured logo |
| If appTitle is configured and logo is not preferred |
|
Configured text | No logo |
|
If appTitle is not configured and logo is not preferred
|
|
No title | No logo |
| If appTitle is added as an image and logo is configured |
|
Configured image | Configured logo |
|
If appTitle is added as an image and logo is not configured
|
|
Configured image | Default logo |
|
If appTitle is added as an image and logo is not preferred
|
|
Configured image | No logo |
|
taskPageIllustration
To specify a custom illustration for the task page based on organization preferences and brand alignment. When an agent signs in, the task page displays the configured illustration as a background. By default, the task page appears without illustration.
Example:
"taskPageIllustration": "https://www.abc.com/image/logo.jpg",You can either use data URIs or host a custom illustration on a content delivery network (CDN), Amazon Web Services (AWS) Simple Storage Service (S3) bucket, or a similar hosting service, and then specify the URL to the hosted illustration. The illustration can be configured at the global or team level based on the layout definition. Ensure to configure the correct URL to prevent the broken image from being displayed on the Desktop.
The supported task page illustration formats are PNG, JPG, JPEG, GIF, SVG, and WebP. The recommended illustration size is 400 x 400 pixels (width x height). If the custom illustration size is larger than the recommended size, the illustration size is adjusted based on the aspect ratio in the task page. If the custom illustration size is smaller than the recommended size, the actual illustration size is retained in the task page.
stopNavigateOnAcceptTask
To determine whether to shift the focus to a newly accepted task, when the agent accepts the new task while working on a previous task. The default value is false.
Example:
"stopNavigateOnAcceptTask": falseIf the value is set as true, when the user accepts a new task on the Desktop, the focus is retained on the previous task and does not shift to the newly accepted task. This setting prevents the user from losing any data when accepting a new request.
For example, consider that Agent 1 is on chat with Customer 1 and simultaneously on a voice call with Customer 2. During the voice call, Agent 1 is updating the details of Customer 2 in the Interaction Control pane. Currently, Agent 1 has two active tasks in the Task List pane, and the focus is on the Interaction Control pane. When Agent 1 accepts a new chat request from Customer 3, the focus remains on the Interaction Control pane with Customer 2 and does not shift to the newly accepted chat request.
To retain the focus on the previous task and not to shift to the newly accepted task, select the custom layout with the stopNavigateOnAcceptTask property value set to true.
If the stopNavigateOnAcceptTask property value is not entered in the JSON layout, the Desktop shifts the focus to the newly accepted task. The behavior is similar to when the stopNavigateOnAcceptTask property value is set to false.
|
dragDropEnabled
To enable the drag-and-drop and resizing of the widgets on the custom pages, set the value to true. The default value is false.
Example:
"dragDropEnabled": falseFor more information about enabling the drag-and-drop feature for the tabs in the Auxiliary Information pane, see Auxiliary Information Pane.
notificationTimer
To set the duration (in seconds) after which the desktop notifications on the Desktop are automatically dismissed. The notification appears at the top-right corner of the Desktop. The default timeout value is 8 seconds. The valid range for timeout values is 1-10 seconds. For the timeout changes to take effect, the browser must be refreshed after the changes are made.
Example:
"notificationTimer": 8maximumNotificationCount
To set the number of desktop notifications to be displayed at a time on the Desktop. The default value is 3. The range for desktop notifications is 1-10. The desktop notifications are stacked. If there are many notifications, they appear with a slight delay depending on the notificationTimer settings.
Example:
"maximumNotificationCount": 3browserNotificationTimer
To set the duration (in seconds) after which the browser toaster notifications on the Desktop are automatically dismissed. Toaster is a native browser notification that appears only if the Desktop is not the active browser window or tab. The Desktop browser window or tab is inactive when
-
You are working on other browser windows or tabs.
-
You are working on other applications.
-
You have minimized the Desktop browser window.
The notification appears at the top-right corner of the Desktop. The default timeout value is 8 seconds. The recommended range for timeout values is 5-15 seconds. For the timeout changes to take effect, the browser must be refreshed after the changes are made.
Example:
"browserNotificationTimer": 8The configured timeout for browser notifications depends on the operating system and browser settings. The timeout value is honored in the Chrome browser across Windows OS, Chrome OS, and macOS. However, the other supported browsers do not honor the configured notification timeout value consistently. |
wxmConfigured
(Optional) To configure Webex Experience Management, set the value to true. The default value is false. For more information, see Add Widgets to Webex Contact Center.
Example:
"wxmConfigured": truedesktopChatApp
To configure multiple Cisco-offered chat applications such as Webex App.
webexConfigured
Webex App along with its messaging and meeting functionalities can be configured within the Desktop. This configuration allows agents to collaborate with other agents, supervisors, and subject matter experts (SMEs) in their organization without navigating away from the Desktop.
|
To configure Webex App within the Desktop:
-
In Cisco Webex Control Hub, when adding services for a user, select the Advanced Messaging check box (). For more information, see Manage User Accounts in Cisco Webex Site Administration.
-
In the custom Desktop Layout, set the
webexConfiguredproperty value totrue.Example:
"desktopChatApp": { "webexConfigured": true },The default value of the
webexConfiguredproperty isfalse.
Webex App is available for the agent, supervisor, and supervisorAgent roles only if you set the
webexConfiguredproperty value totruefor each of these roles. The agent, supervisor, or supervisorAgent can't sign out of Webex App.To display the
 (Webex) icon on the horizontal header of the Desktop, enter the value
 webexin theheaderActionsproperty. For more information, see headerActions.To enable Webex App for a specific team, select the custom layout with the
webexConfiguredproperty value set totrue. For more information, see Create a team.
You can configure Webex App in the Auxiliary Information pane, custom page, and custom widget also. For more information, see Auxiliary Information Pane.
Webex App Notification
The values that are specified using the notificationTimer and browserNotificationTimer properties for the notification timer are applicable for Webex App. The default timeout value is 8 seconds for these properties. For more information, see notificationTimer and browserNotificationTimer.
headerActions
To change the order of the icons on the horizontal header of the Desktop. The default order is as follows:
-
(Webex)
-
 (Outdial Call)
 -
 (Notification Center)
Set the value of the headerActions property as follows:
|
Icon Name |
headerActions Property Value |
|---|---|
|
Webex App |
webex |
|
Outdial Call |
outdial |
|
Notification Center |
notification |
Example:
"headerActions": ["webex", "outdial", "notification"],
The |
To change the default order of the icons, enter the headerActions property and the values in the custom layout accordingly.
Example:
"headerActions": ["notification", "outdial", "webex"],
|
area
The area property is the core section of the Desktop Layout. You can define the layout as per the area.
"area": {
"header": {
...
},
"advancedHeader: {
{
"comp": "widget-1",
"attributes": { ... },
"script": ....
}
},
"panel": {
...
},
"navigation": {
...
},
"persistent": {
...
},
"headless": {
...
}
},You can configure the following area objects:
-
Panel: Represents the second panel or the right-most panel in the Auxiliary Information pane.
-
Navigation: Represents custom pages and their navigation elements that are related to the pages.
-
Persistent: Represents the page-level widgets that are persistent and display on all pages of the Desktop.
-
Headless: Represents the widgets that do not have a visual interface, but execute logic in the background.
If advancedHeader property is configured, the header and headerActions properties must be removed. |
advancedHeader
To customise the visibility and change the order of the icons on the horizontal header of the Desktop. The default order is as follows:
-
(Webex)
-
(Outdial Call)
-
(Notification Center)
-
 (Agent State Selector)
Set the value of the advancedHeader property as follows:
|
Icon Name |
headerActions Property Value |
|---|---|
|
Webex App |
agentx-webex |
|
Outdial Call |
agentx-outdial |
|
Notification Center |
agentx-notification |
|
Agent State Selector |
agentx-state-selector |
Example:
"advancedHeader": [
{
"comp": "agentx-webex"
},
{
"comp": "agentx-outdial"
},
{
"comp": "agentx-notification"
},
{
"comp": "agentx-state-selector"
}
{
"comp": "widget-1",
"attributes": { ... },
"script": ....
}
]The |
To change the default order of the icons, enter the advancedHeader property and the values in the custom layout accordingly.
The widgets flow into the dropdown menu from left to right.
|
Home Page
When you sign in to the Desktop, you land on the Home Page.
The Home Page is only applicable to Supervisors and SupervisorAgent persona. |
You can view the following widgets on the Home Page. Analyzer widgets are provided by default, but the administrator can also configure Persistent and Custom widgets. For more information, see JSON Layout Top-Level Properties.
Analyzer Widgets
By default, Analyzer widget displays on the Desktop Home Page.
Home Page Layout Configuration
You can configure the Home Page of the Desktop to display layout that is based on your organization preferences and brand alignment. Edit the Homepage field to configure the home page. You can configure the following components to be displayed in the Home Page when a user signs in to the Desktop:
-
A Welcome message
-
The Task icon on the Navigation bar to navigate to the Task pane. The Task icon is displayed for the Supervisor and Supervisor & Agent role with the call monitoring feature enabled. Task pane displays incoming customer requests, active and past customer interactions, and active monitoring requests.
-
Filter sections such as Queue Name, Channel Type, and Managed Teams.
The following table describes the page properties that are required to configure the Home Page:
|
Property |
Description and Code | ||
|---|---|---|---|
|
page > useFlexLayout |
Flex layout is a new web component. It doesn't change the existing widgets. The new flex layout uses the same layout configuration format in a simplified way. It's backward compatible and doesn't impact existing widgets. You need to configure the JSON layout. To configure the JSON layout, provide the height and width of the widget. The widget is rendered in the same sequence as it's configured inside the JSON layout. Widgets have a default margin of 8 px. The JSON layout is based on the dimensions (width x height) and coordinates (X, Y, and Z) of the widgets. The flexible layout supports capabilities such as individual widget resize, maximize widgets, and so on. The height of individual widgets is measured in pixels. 1 unit of height = 40 pixels. The width of the widget depends on the number of columns in the container and the number of columns that change based on the container width. Widgets are displayed from the left to the right. The advanced layout engine uses custom logic to apply both horizontal and vertical space adjustment of widgets. Initially, the layout loads horizontally. After loading horizontally, the widget loads vertically and ensures that space utilization is optimal. Configure the widgets based on the screen size. You can either increase or decrease the width of the widgets, based on the screen size. This renders the widgets more readable and usable. Flex layout provides standard breakpoints such as large, medium, small, and extra small.
| ||
|
page > comp |
Ensure you provide a unique custom component. The | ||
|
page > pageHeader |
Ensure to specify a title string that can be static, dynamic, or both. The
| ||
|
page > pageSubHeader |
Ensure to add Sub Header that displays on the Desktop. The user can add Go to Analyzer in the Sub Header.
|
Header Widgets
The header is used to display inline information, to add drop-down menus, and so on. As the header container has limited vertical space, the overall header height is only 64 pixels. For more information on the layout alignment, see the layout property section.
Example:
"header":{
"id":"header",
"widgets":{
"head1":{
"comp":"header-widget-one",
"script":"https://my-cdn.com/dynamic-widgets/header-widget-one.js",
},
"head2":{
"comp":"header-widget-two",
"script":"https://my-cdn.com/dynamic-widgets/header-widget-two.js",
}
},
"layout":{
"areas":[[ "head1", "head2" ]],
"size": { "cols": [1, 1], "rows": [1] }
}
}
To add a tooltip for a header widget, wrap the component with md-tooltip. Enter tooltip information in the message property.
Example:
"header": {
"id": "dw-header",
"widgets": {
"head1": {
"comp": "md-tooltip",
"attributes": {
"message": "Netlify"
},
"children": [{
"comp": "agentx-wc-iframe",
"attributes": {
"src": "https://keen-jackson-8d352f.netlify.app"
}
}]
},
},
}You must add the style attributes display and height to configure any widgets through iFrame in the customizable widget area in the header. The best fit value of the height attribute is 64 pixels.
Ensure that you add the style attributes to the existing header widgets for them to load as expected within the iFrame. |
Example:
"head1": {
"comp": "agentx-wc-iframe",
"attributes": {
"src": "https://widget-kad.s3.amazonaws.com/Headers/Timer/Timer.htm",
"style": "height:64px;display:flex;"
}
},We recommend that you use only a single row with multiple columns for the header because the header height is only 64 pixels. For more information on the alignment, see the layout property section. |
Navigation (Custom Pages)
In this section, you can add pages that appear on the left navigation bar. You specify a navigation icon and a unique URL for the widget to appear on the navigation bar. We recommend using a specific prefix for the URL to avoid conflicts. For more details, see the nav property section.
You can also have a collection of widgets that can display on this page. The page can have a single widget that appears on the screen or a collection of widgets in a grid. For more details on grid arrangement, see the layout property section.
You do not need to add a dynamic-area wrapper to the widget tree. This means that you can drag and drop and resize widgets on custom pages when you enable this option. |
Example:
{
"nav": {
"label": “Custom Page”,
"icon": "stored-info",
"iconType": "momentum",
"navigateTo": "dynamic-tabs",
"align": "top",
"isDefaultLandingPage": true
},
"page": {
"id": “my - custom - page“,
"useFlexLayout": true,
"widgets": {
“
comp1”: {
"comp": "md-tabs",
"children": [{
"comp": "md-tab",
"textContent": "Shift Timer",
"attributes": {
"slot": "tab"
}
},
{
"comp": "md-tab-panel",
"attributes": {
"slot": "panel"
},
"children": [{
"comp": “my - custom - timer”,
“source”: http: //my-cdn.com/my-custom-timer.js
"wrapper": {
"title": "Shift Timer",
"maximizeAreaName": "app-maximize-area"
}
}]
},
{
"comp": "md-tab",
"textContent": "Stock Market",
"responsive": "false"
"attributes": {
"slot": "tab"
},
},
{
"comp": "md-tab-panel",
"attributes": {
"slot": "panel"
},
"children": [{
"comp": "agentx-wc-iframe",
"responsive": "false"
"attributes": {
"src": "https://widget-kad.s3.amazonaws.com/Trading.htm"
},
"wrapper": {
"title": "Stock Market",
"maximizeAreaName": "app-maximize-area"
}
}],
},
{
"comp": "md-tab",
"textContent": "Widget3",
"attributes": {
"slot": "tab"
}
},
{
"comp": "md-tab-panel",
"textContent": "Three Content",
"attributes": {
"slot": "panel"
}
}
]
},
“comp2”: {
"comp": “my - google - maps - component“,
“source”: "https://my-cdn.com/my-google.maps.js
"wrapper": {
"title": "Google Map",
"maximizeAreaName": "app-maximize-area"
}
}
},
"layout": {
"areas": [
["left", "right"]
],
"size": {
"cols": [1, 1],
"rows": [1]
}
}
}
},The following table describes nav and page properties along with their child properties:
|
Property |
Description and Code | ||
|---|---|---|---|
|
nav > label |
This property indicates the page navigation identifier. The screen reader reads this property and it appears in the tooltip. These parameters are necessary to display your custom page on the navigation bar. The | ||
|
nav > iconType |
This property represents the type of icon that displays in the navigation bar for the custom page. The following types of icons are available:
| ||
|
nav > icon |
This property represents the name of the icon in the Momentum library or the CDN URL. | ||
|
nav > align |
This property helps you align the icon to the top or bottom of the navigation bar.
| ||
|
nav > isDefaultLandingPage | This property specifies the default landing page for the agents in Agent Desktop. Set this property to true to make the navigation bar page the default Landing page that appears for the agents after signing in to the Agent Desktop. If more than one navigation bar page has this property set to true, the system considers the first navigation bar page to become the default Landing page. If no navigation bar page has this property set to true, the Home page acts as the default Landing page.
| ||
|
nav > navigateTo |
This property specifies the name of the custom page. This name appears in the address bar when the agent navigates.
|
|
Property |
Description and Code | ||
|---|---|---|---|
|
page > id |
In The | ||
|
page > useFlexLayout |
Flex layout is a new web component. It doesn't change the existing widgets. The new flex layout uses the same layout configuration format in a simplified way. It's backward compatible and doesn't impact existing widgets. You need to configure the JSON layout. To configure the JSON layout, provide the height and width of the widget. The widget is rendered in the same sequence as it's configured inside the JSON layout. Widgets have a default margin of 8 px. The JSON layout is based on the dimensions (width x height) and coordinates (X, Y, and Z) of the widgets. The flexible layout supports capabilities such as individual widget resize, maximize widgets, and so on. The height of individual widgets is measured in pixels. 1 unit of height = 40 pixels. The width of the widget depends on the number of columns in the container and the number of columns that change based on the container width. Widgets are displayed from the left to the right. The advanced layout engine uses custom logic to apply both horizontal and vertical space adjustment of widgets. Initially, the layout loads horizontally. After loading horizontally, the widget loads vertically and ensures that space utilization is optimal. Configure the widgets based on the screen size. You can either increase or decrease the width of the widgets, based on the screen size. This renders the widgets more readable and usable. Flex layout provides standard breakpoints such as large, medium, small, and extra small.
| ||
|
page > widgets page > comp |
Helps you define your custom widgets. To place multiple widgets, specify widget options in sequence. Ensure that you give each widget a unique area name. Use it in the layout section later. This property represents the name of the custom HTML element (known as a Web Component or any other element - if you want to use it as a wrapper). For more information, see Sample Use Case Examples. Enter your custom element name here without angular brackets (“<” or “>”). For example, “my-custom-element.” Each entry under the widgets section supports the following format: | ||
|
page > script |
(Optional) This property is required only when you load the widget or component from a remote location such as a CDN.
| ||
|
page > properties |
You can specify properties that you must pass for the Web component. | ||
|
page > responsive |
Determines whether a web component or an iFrame based widget that is added in the custom layout at the Configure this property with one of the following values:
| ||
|
page > attributes |
You can specify the Web component attributes in this section. | ||
|
page > visibility |
Specifies whether the Cisco-offered widgets added in the custom layout at the Cisco-offered widgets are Contact History, Cisco Webex Experience Management, IVR Transcript, Preview Campaign Call Guide, and Screen Pop.
| ||
|
page > children |
This property is the core part of the layout. In the To know about passing STORE values as properties, see Share Data from Desktop to Widgets. The advantage of the “children” array section is that you can use existing Web Components in your layout specification, which is already part of the Desktop bundle. A few of the Desktop bundle Web Components include:
For more information on the attributes for the persistent tab, see Attributes for Persistent Tabs. | ||
|
page > textContent |
Helps you to add your text content. | ||
|
page > style |
Helps you to assign a particular CSS style to your component. | ||
|
page > wrapper |
Widget wrapper allows you to add a toolbar on top of your widget. The toolbar can contain a title and the Ensure that you use the default value as "app-maximize-area". Currently, only the default value is available. | ||
|
page > wrapper> id |
(Optional) The web component widget wrapper allows you to update the dynamic widget title using a unique identifier. Enter the widget wrapper
To update the iFrame-based widget title, use the iFrame content from the same domain. The following is a sample example: | ||
|
page > agentx-wc-iframe |
Allows you to embed a web page in an iFrame that appears as a widget on the Desktop. You can use the iFrame widget called “agentx-wc-iframe”. | ||
|
page > layout | Allows you to arrange the widgets on a page. The following format represents a grid layout: Here you can define the grid with the area names that you defined in the widgets section. The following example shows how the layout of three rows and three columns is specified: In the size section, numbers represent the fraction of space that a widget can occupy, relative to the other widgets. All three columns occupy equal 1 fraction of space. With 100% as available width, each widget occupies 33.33% of horizontal space. Another use case example, if you set as "cols": [1, 2, 2], it means that overall space is divided by 5 (1+2+2) and the first widget occupies 20% of horizontal space. The second and third widgets take 40% each. For more information, see Basic Concepts of Grid Layout. | ||
|
page > ROOT |
Nesting of layouts is called a sublayout. In case you have nested layouts in your layout configuration, you must have a single "ROOT" object as a parent for sublayouts. Otherwise, your layout configuration can be flat if no nesting is required. This sublayout provides more control over the layout resize behavior. The page layout property must be of type Record<string, Layout>. The layout property allows you to arrange the widgets on a page. This setup creates a grid in the ROOT layout with two subgrids that you can resize independently. Resizing a component affects the components within that sublayout.
Infinite loop: If you include ROOT layout as a sublayout of ROOT, it causes a "call stack exceeded" error and runs into an infinite loop. Same Sub-Layout (N) times: If you include the sublayout into your grid more than once with the same name, and if you resize one of them, all the sublayouts get resized automatically. If this is not the desired behavior, rename each of the sublayouts with a unique name. |
 (
(Attributes for Persistent Tabs
To set the tabs in the custom pages and custom widgets as persistent, enter the attributes for md-tabs in the custom layout.
Example: Set Tabs as Persistent
{
"comp": "md-tabs",
"attributes": {
"persist-selection": true,
"tabs-id": "unique-id for all the tabs together in the container"
},
}|
Property |
Description |
|---|---|
|
persist-selection |
To set |
|
tabs-id |
Unique identification for all the tabs together in the container. |
When you set md-tabs to be persistent (persist-selection: true), Agent Desktop retains the tab selection even if an agent switches between pages or widgets in the Desktop.
|
Persistent Widgets Configuration
You can configure any custom widget to be persistent. Persistent widgets display on all pages of the Desktop. Persistent widgets display as a new tab in the Auxiliary Information pane only when you have an active contact request or conversation. For example, Sample Persistent widget.
Persistent widgets do not display on the Home page in the way they display on the other pages. However, if you have an active interaction, the persistent widgets display in the Home page as part of the Auxiliary Information pane. For example, when you have answered a call, the Interaction Control pane displays, and the Sample Persistent widget displays as part of the Auxiliary Information pane.
Example:
"area": {
"persistent": [{
"comp": "md-tab",
"attributes": {
"slot": "tab"
},
"children": [{
"comp": "md-icon",
"attributes": {
"name": "emoticons_16"
}
},
{
"comp": "span",
"textContent": "Custom Page Widget"
}
]
},
{
"comp": "md-tab-panel",
"attributes": {
"slot": "panel"
},
"children": [{
"comp": "dynamic-area",
"properties": {
"area": {
"id": "dw-panel-two",
"widgets": {
"comp1": {
"comp": "agentx-wc-iframe",
"attributes": {
"src": "https://blog.logrocket.com/the-ultimate-guide-to-iframes/"
},
"wrapper": {
"title": "AgentX iFrame",
"maximizeAreaName": "app-maximize-area"
}
},
"comp2": {
"comp": "uuip-widget-two",
"script": "./dynamic-widgets/widget-two.js",
"attributes": {
"title": "WIDGET 2 content"
},
"wrapper": {
"title": "Widget 2 title",
"maximizeAreaName": "app-maximize-area"
}
}
},
"layout": {
"areas": [
["comp1", "comp2"]
],
"size": {
"cols": [1, 1],
"rows": [1]
}
}
}
}
}]
}
]
}When you customize a widget, you can choose either one of the options:
-
Host an application on a web page that can be embedded within an iframe.
-
Build a custom widget.
The technical widget requirements are described in the Desktop Widget Development Documentation. As a layout editor, ensure that you have these details:
-
What is the name of the custom HTML element (known as Web Component)?
-
What is the URL to the content delivery network (CDN) source that hosts the JavaScript bundle?
Auxiliary Information Pane
The Auxiliary Information pane of the Desktop displays the tabs which include the Cisco-offered (default) widgets and custom widgets. The following Cisco-offered widgets appear in the predefined tabs:
-
Contact History
-
IVR Transcript
-
Customer Experience Journey
-
Screen Pop
You can use the Auxiliary Information pane to:
-
Add tabs
-
Change the tab order
-
Remove predefined tabs
-
Mark the custom tabs as draggable
-
Add tooltips to the custom tabs
-
Add the Reset Tab Order option
Example:
"panel": {
"comp": "md-tabs",
"attributes": {
"class": "widget-tabs"
},
"children": [{
"comp": "md-tab",
"attributes": {
"slot": "tab",
"class": "widget-pane-tab"
},
"children": [{
"comp": "slot",
"attributes": {
"name": "CONTACT_HISTORY_TAB"
}
}]
},
{
"comp": "md-tab-panel",
"attributes": {
"slot": "panel",
"class": "widget-pane"
},
"children": [{
"comp": "slot",
"attributes": {
"name": "CONTACT_HISTORY"
}
}]
},
{
"comp": "md-tab",
"attributes": {
"slot": "tab",
"class": "widget-pane-tab"
},
"children": [{
"comp": "md-icon",
"attributes": {
"name": "pop-out_16"
}
},
{
"comp": "span",
"textContent": "Screen Pop"
}
],
"visibility": "SCREEN_POP"
},
{
"comp": "md-tab-panel",
"attributes": {
"slot": "panel",
"class": "widget-pane"
},
"children": [{
"comp": "#SCREEN_POP"
}],
},
{
"comp": "md-tab",
"attributes": {
"slot": "tab"
},
"children": [{
"comp": "md-icon",
"attributes": {
"name": "emoticons_16"
}
},
{
"comp": "span",
"textContent": "Custom Widget"
}
]
},
{
"comp": "md-tab-panel",
"attributes": {
"slot": "panel"
},
"children": [{
"comp": "dynamic-area",
"properties": {
"area": {
"id": "dw-panel-two",
"widgets": {
"comp1": {
"comp": "agentx-wc-iframe",
"attributes": {
"src": "https://blog.logrocket.com/the-ultimate-guide-to-iframes/"
},
"wrapper": {
"title": "AgentX iFrame",
"maximizeAreaName": "app-maximize-area"
}
},
"comp2": {
"comp": "widget-one",
"script": "https://my-cdn.com/dynamic-widgets/widget-one.js",
"wrapper": {
"title": "Widget title",
"maximizeAreaName": "app-maximize-area"
}
}
},
"layout": {
"areas": [
["comp1"],
["comp2"]
],
"size": {
"cols": [1],
"rows": [1, 1]
}
}
}
}
}]
}
]
},You can configure the Customer Experience Journey widget after you enable the Customer Experience Management Metrics on the Management Portal. |
In the Auxiliary Information pane, add new tabs to place your custom widgets. No special rules apply here and the component nesting is as expected and described in the children section. For more information, see the Children property of the page.
The following are the specific examples to customize your tab headers:
Example to Place Icons and Labels in the Children Property
{
"comp": "md-tab",
"attributes": {
"slot": "tab",
"class": "widget-pane-tab"
},
"children": [{
"comp": "md-icon",
"attributes": {
"name": "transcript_16"
}
},
{
"comp": "span",
"textContent": “My Widget Tab”
}
],
},Example to Place Image (with CSS) and Labels in the Children Property
{
"comp": "md-tab",
"attributes": {
"slot": "tab"
},
"children": [{
"comp": "span",
"attributes": {
"style": "align-items: center; display: flex;"
},
"children": [{
"comp": "img",
"attributes": {
"src": “http: //my-cdn.com/icon.svg”,
"width": 16,
"height": 16,
"style": "margin-right: 0.5rem;"
}
},
{
"comp": "span",
"textContent": “My Widget Tab”
}
]
}],
},The More Tabs drop-down list appears automatically when the Auxiliary Information pane contains multiple tabs.
You must add a custom tab tooltip for readability and accessibility. To add a tooltip for a custom tab, wrap the component with md-tooltip. Enter the tooltip information in the message property and apply the style property values as shown in the following example.
"comp": "md-tooltip",
"attributes": {
"class": "widget-tabs",
"message": "Sample Tab 1",
"style": "max-width: 252px; min-width: 110px; overflow: hidden; text-overflow: ellipsis; white-space: nowrap; display: inline-block; margin-bottom: -10px;"
},For a custom tab, we recommend a maximum width of 252 pixels and a minimum width of 110 pixels. |
To enable the drag-and-drop feature within the custom tab, add the following property within the attributes:
"comp": "md-tabs",
"attributes": {
"class": "widget-tabs",
"draggable": true,
"comp-unique-id": "sample-dynamic-custom-tabs"
},-
draggable: Set thedraggableproperty value to true. -
comp-unique-id: Enter a unique value to identify the component.Example:
"comp-unique-id": "sample-dynamic-custom-tabs"
If you enable drag-and-drop for a custom tab, the agent can drag and drop the tab to the required position within the Auxiliary Information pane. To reset the tabs to the default tab order, add the following property:
"comp": "agentx-wc-more-actions-widget",
"attributes": {
"slot": "settings",
"class": "widget-pane",
"tabs-unique-id": "sample-dynamic-custom-tabs"
},-
agentx-wc-more-actions-widget: Enter the component that is displayed as the More Actions ( ) icon in the Auxiliary Information pane.
 -
slot="settings": Enter an attribute within the component that is displayed as the Reset Tab Order option in the More Actions drop-down list. Agents can reset the tabs in the Auxiliary Information pane to the default order by clicking the > Reset Tab Order. -
tabs-unique-id: Enter the same unique value defined for thecomp-unique-idproperty to map and reset themd-tabscomponents.
The following sample code uses the More Actions and Reset Tab Order functions.
"comp": "agentx-wc-more-actions-widget",
"attributes": {
"slot": "settings",
"class": "widget-pane",
"tabs-unique-id": "sample-dynamic-custom-tabs"
},
"children": [{
"comp": "div",
"attributes": {
"textContent": "custom action",
"slot": "custom-action"
},
"children": [{
"comp": "agentx-wc-notes-header-widget"
},
{
"comp": "agentx-wc-menu-notification"
}
]
}],
}By default, the tooltip, ellipsis icon, and tab order reset for predefined tabs are defined. |
The More Actions drop-down list can be extended to add additional custom components or widgets after the Reset Tab Order option. The following is a sample set of style property values that can be applied to additional components.
"comp": "md-tooltip",
"attributes": {
"class": "widget-tabs",
"message": "Sample Element",
"style": "max-width: 252px; min-width: 110px; overflow: hidden; text-overflow: ellipsis; white-space: nowrap; display: inline-block; margin-bottom: -10px;"
},The drag-and-drop feature is not supported for the additional custom components or widgets that are added to the More Actions drop-down list. |
Headless Widgets
In the headless section, you can add widgets that are hidden and do not appear on the Agent Desktop. These widgets are used to execute logic in the background. This section is useful to trigger events that occur on the Desktop and execute widget-specific logic. For example, opening a custom CRM Screen Pop for an SMS on its arrival.
Example:
"headless":{
"id":"headless",
"widgets":{
"comp1":{
"comp":"headless-widget-one",
"script":"https://my-cdn.com/dynamic-widgets/headless-widget-one.js",
},
"comp2":{
"comp":"headless-widget-two",
"script":"https://my-cdn.com/dynamic-widgets/headless-widget-two.js",
}
},
"layout":{
"areas":[[ "comp1", comp2" ]],
"size": { "cols": [1, 1], "rows": [1] }
}
}
Share Data from Desktop to Widgets
To receive real-time data through properties or attributes inside a custom widget, assign appropriate STORE values in the layout JSON configuration.
In addition, to access the data through JavaScript SDK subscribers, you can also pass the data through properties or attributes. If your component is built to react to property or attribute changes, you get real-time data updates from Agent Desktop, which is called a data provider.
Currently, we have a single data provider under a key STORE. For more information, see the Data Provider—Widget Properties and Attributes section in the Cisco Webex Contact Center Desktop Developer Guide.
Preview Campaign Call
The administrator creates campaigns, configures the dialing mode (preview), and assigns the campaigns to teams. If an agent is part of a team to which campaigns are assigned, then the agent can make an outbound preview campaign call. For more information, see the Cisco Webex Contact Center Campaign Manager User Guide.
The administrator configures the following in the custom layout to enable preview campaign contact for an agent.
Campaign Contact
The administrator adds the Campaign Contact widget in the header container of the custom layout. The campaign contact displays the customer's contact information based on the defined properties. For more information on the layout alignment, see the layout property section.
Example:
"header":{
"id":"dw-header",
"widgets":{
"acqueon-component":{
"comp": "agentx-preview-campaign",
"properties":{
"isCampaignManagementEnabled": "$STORE.agent.isCampaignManagementEnabled",
"agentDbId": "$STORE.agent.acqueonAgentId",
"lcmUrl": "$STORE.agent.lcmUrl",
"isCallInProgress": "$STORE.agentContact.isActiveCall",
"outdialEntryPointId": "$STORE.agent.outDialEp",
"teamId": "$STORE.agent.getAcqueonTeamId",
"campaignManagerAdditionalInfo": "$STORE.agent.campaignManagerAdditionalInfo",
"orgId": "$STORE.agent.orgId",
"dialerProxyHost": "$STORE.envVaribles.serviceUrls.dialerProxyHost",
"isProgressiveCampaignEnabled": "$STORE.app.featureFlags.isProgressiveCampaignEnabled"
}
}
},
"layout":{
"areas":[
[
"acqueon-component"
]
],
"size":{
"cols":[1], "rows":[1]
}
}
}Call Guide
The Call Guide widget displays in the Auxiliary Information pane on the Desktop. The call guide displays the questions and answers at the campaign level. The agent is prompted to read through the set of questions in the call guide and submit the responses.
Example:
"panel":{
"comp":"md-tabs",
"attributes":{
"class":"widget-tabs"
},
"children":[
{
"comp":"md-tab",
"attributes":{
"slot":"tab",
"class":"widget-pane-tab"
},
"children":[
{
"comp":"md-icon",
"attributes":{ "name":"icon-note_16"
}
},
{
"comp":"span", "textContent":"Call Guide"
}
],
"visibility":"CALL_GUIDE"
},
{
"comp":"md-tab-panel",
"attributes":{
"slot":"panel", "class":"widget-pane"
},
"children":[
{
"comp": "acqueon-call-guide",
"script": "http://localhost:5555//index.js", // include CDN link here
"wrapper":{
"title":"Call Guide", "maximizeAreaName":"app-maximize-area"
},
"properties":{
"lcmKey":"$STORE.agentContact.getCallGuideProps.LCMKey",
"agentDbId":"$STORE.agent.acqueonAgentId",
"lcmUrl":"$STORE.agent.lcmUrl",
"campaignManagerAdditionalInfo":"$STORE.agent.campaignManagerAdditionalInfo"
"orgId": "$STORE.agent.orgId",
"dialerProxyHost": "$STORE.envVaribles.serviceUrls.dialerProxyHost",
"isProgressiveCampaignEnabled": "$STORE.app.featureFlags.isProgressiveCampaignEnabled"
}
}
],
"visibility":"CALL_GUIDE"
}
]
}
|
Screen Pop
In the Desktop Layout, you can configure Screen Pop in one of the following ways:
-
As a custom page
-
As one of the widgets in the custom page
-
As a tab in the Auxiliary Information pane
The Screen Pop is displayed on the Desktop based on the following factors:
For the Voice channel:
-
The configuration defined in the Desktop Layout
-
The Screen Pop activity defined in the Flow Designer
For the New Digital Channels:
-
The configuration defined in the Desktop Layout
-
The Screen Pop node defined in the Connect Flow Builder
For more information on configuring Screen Pop, see Screen Pop.
Configuring Screen Pop in the Navigation Bar
You can configure Screen Pop as a custom page, or as one of the widgets in a custom page. To access the Screen Pop custom page, click the Screen Pop icon on the Navigation bar. To access the Screen Pop widget in the custom page, click the custom icon on the Navigation bar. For more information on nav properties, see Navigation (Custom Pages).
Example: Screen Pop as a Custom Page
{
"nav": {
"label": "Screen Pop",
"icon": "pop-out",
"iconType": "momentum",
"navigateTo": "/screenpop",
"align": "top"
},
"page": {
"id": "agentx-wc-screen-pop",
"widgets": {
"comp1": {
"comp": "agentx-wc-screen-pop",
"properties": {
"screenPopUrl": "$STORE.session.screenpop.screenPopSelector"
}
}
},
"layout": {
"areas": [
["comp1"]
],
"size": {
"cols": [1],
"rows": [1]
}
}
},
"visibility": "SCREEN_POP"
}Example: Screen Pop as a Widget in the Custom Page
"comp1": {
"comp": "agentx-wc-screen-pop",
"properties": {
"screenPopUrl": "$STORE.session.screenpop.screenPopSelector"
}If the Screen Pop is not configured in the Flow Designer, the custom page appears blank. For more information on configuring Screen Pop in the Flow Designer, see Screen Pop. |
Configuring Screen Pop in the Auxiliary Information Pane
You can configure Screen Pop to appear as a tab in the Auxiliary Information pane.
By default, Screen Pop appears as a new sub tab in the Screen Pop tab of the Auxiliary Information pane if Screen Pop is configured to be displayed as Inside Desktop in the Flow Designer. |
Add the following attribute in the panel section to include Screen Pop as a tab in the Auxiliary Information pane. For more information on panel details, see Auxiliary Information Pane.
Example: Screen Pop as a tab in the Auxiliary Information Pane
{
"comp":"md-tab",
"attributes":{
"slot":"tab",
"class":"widget-pane-tab"
},
"children":[
{ "comp": "md-icon", "attributes": { "name": "pop-out_16" }},
{ "comp": "span", "textContent": "Screen Pop" }],
"visibility": "SCREEN_POP"
},
{
"comp": "md-tab-panel",
"attributes": { "slot": "panel", "class": "widget-pane" },
"children": [{ "comp": "#SCREEN_POP"
}
],
}The Screen Pop display option defined in the Flow Designer takes precedence over the configuration defined in the Desktop Layout. For example, consider you have configured the following Screen Pop settings:
When the event for which screen pop is configured occurs, the Screen Pop is displayed outside the Desktop - that is, in a new browser tab. |
Sample Use Case Examples
-
Configure and Access Customer Experience Management Metrics Widget From the Navigation Bar
-
Default Auxiliary Information Pane with Contact History, and Screen Pop
-
Auxiliary Information Pane with Customer Experience Journey Widget
Configure and Access Customer Experience Management Metrics Widget From the Navigation Bar
Example:
{
"nav": {
"label": "Customer Experience Management Metrics",
"icon": "/app/images/wxm.bcd45cc3.svg",
"iconType": "other",
"navigateTo": "wxm-metrics",
"align": "top"
},
"page": {
"id": "wxm-metrics",
"widgets": {
"comp1": {
"comp": "agentx-wc-cloudcherry-widget",
"attributes": {
"metrics": true
},
"properties": {
"userModel": "$STORE.app.userModel",
"spaceId": "",
"metricsId": "",
"teamId": "$STORE.agent.teamName",
"ani": "$STORE.agentContact.taskSelected.ani",
"isDarkMode": "$STORE.app.darkMode"
},
"wrapper": {
"title": "Customer Experience Journey",
"maximizeAreaName": "app-maximize-area"
}
}
},
"layout": {
"areas": [
["comp1"]
],
"size": {
"cols": [1],
"rows": [1]
}
}
}
},To get the spaceId and metricsId, see the Webex Experience Management documentation. |
Using Tabs on the Custom Page
Example:
{
"nav": {
"label": "Dynamic Tabs",
"icon": "stored-info",
"iconType": "momentum",
"navigateTo": "dynamic-tabs",
"align": "top"
},
"page": {
"id": "page-id-tabs",
"widgets": {
"comp1": {
"comp": "md-tabs",
"children": [{
"comp": "md-tab",
"textContent": "One",
"attributes": {
"slot": "tab"
}
},
{
"comp": "md-tab-panel",
"attributes": {
"slot": "panel"
},
"children": [{
"comp": "widget-two",
"script": "http:/my-cdn.com/dynamic-widgets/widget-two.js"
}]
},
{
"comp": "md-tab",
"textContent": "Two",
"attributes": {
"slot": "tab"
}
},
{
"comp": "md-tab-panel",
"textContent": "Two Content",
"attributes": {
"slot": "panel"
}
}
]
},
"comp2": {
"comp": "widget-two",
"script": " http:/my-cdn.com/dynamic-widgets/widget-two.js"
}
},
"layout": {
"areas": [
["comp1", "comp2"]
],
"size": {
"cols": [1, 1],
"rows": [1]
}
}
}
}Default Auxiliary Information Pane with Contact History and Screen Pop
Example:
"panel": {
"comp": "md-tabs",
"attributes": {
"class": "widget-tabs"
},
"children": [{
"comp": "md-tab",
"attributes": {
"slot": "tab",
"class": "widget-pane-tab"
},
"children": [{
"comp": "slot",
"attributes": {
"name": "CONTACT_HISTORY_TAB"
}
}]
},
{
"comp": "md-tab-panel",
"attributes": {
"slot": "panel",
"class": "widget-pane"
},
"children": [{
"comp": "slot",
"attributes": {
"name": "CONTACT_HISTORY"
}
}]
},
]
}, {
"comp": "md-tab",
"attributes": {
"slot": "tab",
"class": "widget-pane-tab"
},
{
"comp": "md-tab",
"attributes": {
"slot": "tab",
"class": "widget-pane-tab"
},
"children": [{
"comp": "slot",
"attributes": {
"name": "SCREEN_POP_TAB"
}
}],
"visibility": "SCREEN_POP"
},
{
"comp": "md-tab-panel",
"attributes": {
"slot": "panel",
"class": "widget-pane"
},
"children": [{
"comp": "slot",
"attributes": {
"name": "SCREEN_POP"
}
}],
"visibility": "SCREEN_POP"
}
},Auxiliary Information Pane with Customer Experience Journey Widget
Example:
"panel": {
"comp": "md-tabs",
"attributes": {
"class": "widget-tabs"
},
"children": [{
"comp": "md-tab",
"attributes": {
"slot": "tab"
},
"children": [{
"comp": "slot",
"attributes": {
"name": "WXM_JOURNEY_TAB"
}
}],
"visibility": "WXM_JOURNEY"
},
{
"comp": "md-tab-panel",
"attributes": {
"slot": "panel",
"class": "widget-pane"
},
"children": [{
"comp": "agentx-wc-cloudcherry-widget",
"properties": {
"userModel": "$STORE.app.userModel",
"spaceId": "",
"metricsId": "",
"teamId": "$STORE.agent.teamName",
"ani": "$STORE.agentContact.taskSelected.ani",
"isDarkMode": "$STORE.app.darkMode"
},
"wrapper": {
"title": "Customer Experience Journey",
"maximizeAreaName": "app-maximize-area"
}
}],
{
"comp": "md-tab",
"attributes": {
"slot": "tab",
"class": "widget-pane-tab"
},
"children": {
"comp": "md-tab",
"attributes": {
"slot": "tab",
"class": "widget-pane-tab"
},
"children": [{
"comp": "slot",
"attributes": {
"name": "CONTACT_HISTORY_TAB"
}
}]
},
{
"comp": "md-tab-panel",
"attributes": {
"slot": "panel",
"class": "widget-pane"
},
"children": [{
"comp": "slot",
"attributes": {
"name": "CONTACT_HISTORY"
}
}]
},
{
"comp": "md-tab",
"attributes": {
"slot": "tab",
"class": "widget-pane-tab"
},
"children": [{
"comp": "slot",
"attributes": {
"name": "SCREEN_POP_TAB"
}
}],
"visibility": "SCREEN_POP"
},
{
"comp": "md-tab-panel",
"attributes": {
"slot": "panel",
"class": "widget-pane"
},
"children": [{
"comp": "slot",
"attributes": {
"name": "SCREEN_POP"
}
}],
"visibility": "SCREEN_POP"
}
"visibility": "SCREEN_POP"
},
},Keyboard Shortcuts
Keyboard shortcuts define an alternative way to perform a specific action on the desktop. For more information on the system-defined keyboard shortcuts, see the Access Keyboard Shortcuts section in the Introduction chapter of the Cisco Webex Contact Center Agent Desktop User Guide.
The order of the shortcut key number in the Agent Desktop navigation bar is based on the order in which the related widget or custom page is configured in the Desktop Layout. For example, if the Cisco Webex Experience Management icon is the third item in your navigation bar, the Ctrl + Alt + 3 opens the Cisco Webex Experience Management page. |
The developer can register the keyboard shortcuts for custom widgets using the Shortcut Key module. For more information, see Cisco Webex Contact Center Desktop Developer Guide.
Keyboard Shortcut Conflicts
Keyboard shortcut conflicts occur if multiple widgets use the same keyboard shortcut. This causes the keyboard shortcut to be disabled until the conflict is resolved.
Keyboard shortcut conflicts can occur in the following scenarios:
| Scenario |
Resolution |
|---|---|
|
Conflicts can occur when two widgets (custom widget or Cisco-provided desktop widget) have the same keyboard shortcut, and both are on the same page. |
Move one of the widgets (custom widget) to another page. The resolution is applicable for all non-page-level widgets. |
|
Conflicts can occur when the keyboard shortcut is the same for a custom widget and a page-level widget. |
This conflict cannot be resolved by the Agent Desktop administrator. |
|
Localization
The following are the supported languages:
Bulgarian, Catalan, Chinese (China), Chinese (Taiwan), Croatian, Czech, Danish, Dutch, English (UK), English (US), Finnish, French, German, Hungarian, Italian, Japanese, Korean, Norwegian, Polish, Portuguese (Brazil), Portuguese (Portugal), Romanian, Russian, Serbian, Slovak, Slovenian, Spanish, Swedish, and Turkish.
The Desktop UI language is based on the language preference settings on your browser. For example, let us consider that you have selected the preferred language as French on the Firefox browser. When you launch the Desktop in the Firefox browser, the Desktop UI appears in Français (French). However, the horizontal header, navigation bar, and other components added in the Desktop Layout are not localized based on the language preference settings on your browser.
Localize Desktop Components
To localize desktop components,
-
Use the existing localization keys set in the
app.jsonfile. If the localization keys are not set, the default language English (US) is used. You can submit a service request to Cisco Support to add a localization key to theapp.jsonfile.Example: Localization Key
{ "common": { "buttonTitle": "Stop Timer" } } -
Enter the following case-sensitive property in the Desktop Layout JSON file to localize a component:
"textContent": "$I18N.<key>",where <key> refers to the corresponding localization key in the
app.jsonfile.
Example: Localize Header Component
"header": {
"id": "header",
"widgets": {
"head1": {
"comp": "md-button",
"attributes": {
"slot": "menu-trigger",
"style": "height: 64px"
},
"children": [{
"comp": "span",
"textContent": "$I18N.common.buttonTitle",
}
},
},
}Example: Localize Tab Component in the Auxiliary Information Pane
"panel": {
"comp": "md-tab",
"attributes": {
"slot": "tab"
},
"children": [{
"comp": "span",
"textContent": "$I18N.panelTwo.screenPopTitle"
}]
}View a Desktop Layout
| 1 |
From the Management Portal navigation bar, choose . | ||||||||||
| 2 |
Select the ellipsis icon next to the Desktop Layout name that you need to view, and click View. | ||||||||||
| 3 |
View the following details:
|
Edit a Desktop Layout
| 1 |
From the Management Portal navigation bar, choose . | ||||||||||||||
| 2 |
Select the ellipsis icon next to the Desktop Layout that you need to edit, and click Edit. | ||||||||||||||
| 3 |
Edit the following details:
| ||||||||||||||
| 4 |
Once you've customized the file, click Upload to upload the customized JSON file.
| ||||||||||||||
| 5 |
(Optional) Click Restore to restore the default layout. | ||||||||||||||
| 6 |
Click Save to save the configuration. Important: To verify the layout experience, see View Layout Experience on Desktop. |
Copy a Desktop Layout
| 1 |
From the Management Portal navigation bar, choose . | ||||||||||||||
| 2 |
Select the ellipsis icon next to the Desktop Layout that you need to copy, and click Copy.
| ||||||||||||||
| 3 |
Edit the following details:
| ||||||||||||||
| 4 |
Once you've customized the JSON file locally, click Upload to upload the file. The Webex Contact Center system starts to validate the JSON file.
| ||||||||||||||
| 5 |
(Optional) Click Restore to restore the default layout. | ||||||||||||||
| 6 |
Click Save to save the configuration. |
Deactivate a Desktop Layout
You cannot deactivate a desktop layout if the layout is assigned to a team. When you try to deactivate such a layout, a message informs you that you cannot deactivate the desktop layout. You can click the information icon in the message to view the list of entities that you have associated with this desktop layout.
After you deactivate a desktop layout, you can still see it in the desktop layout page as Not Active.
To deactivate a Desktop Layout:
| 1 |
From the Management Portal navigation bar, choose . | ||
| 2 |
Click the ellipsis icon beside the desktop layout you want to deactivate, and click Mark Inactive. | ||
| 3 |
Click Yes to confirm. The status of the desktop layout changes to Not Active.
|
Activate a Desktop Layout
| 1 |
From the Management Portal navigation bar, choose . |
| 2 |
Click the ellipsis icon beside the desktop layout that you want to activate and click Restore. |
| 3 |
Click Yes to confirm. The status of the desktop layout changes to Active.
|
Skill Definitions
Skills-based routing is an optional Webex Contact Center feature that enables you to assign skill requirements, such as language fluency or product expertise, to incoming calls so they can be distributed to agents with a matching set of skills.
The Skill Definitions page provides an interface for viewing, creating, and editing the skills that can be assigned to calls and to skill profiles, which can then be assigned to teams or individual agents. For more information, see see About Skills-based Routing and Skill Profiles.
The maximum number of active skills that you can create is determined by the Maximum Skills and Maximum Text Skills values provisioned for your enterprise. For more information, see Tenant Settings.
Create a Skill Definition
| 1 |
On the Portal navigation bar, choose . | ||||||||||||||
| 2 |
On the Skill Definitions page, click + New Skill Definition. | ||||||||||||||
| 3 |
Specify the skill settings as described in this table.
| ||||||||||||||
| 4 |
Click Save. | ||||||||||||||
| 5 |
To reset the settings in all fields, click Reset. |
Edit a Skill Definition
To view and edit a skill definition:
| 1 |
On the Management Portal navigation bar, choose . | ||||||||||||||
| 2 |
Click the ellipsis icon beside the skill that you want to edit and click Edit. | ||||||||||||||
| 3 |
Edit the skill settings as described in this table.
| ||||||||||||||
| 4 |
Click Save. |
Deactivate a Skill Definition
| 1 |
On the Management Portal navigation bar, choose . | ||
| 2 |
Click the ellipsis icon besides the skill that you want to delete and click Mark Inactive. | ||
| 3 |
Click Yes to confirm.
|
Activate a Skill Definition
| 1 |
On the Management Portal navigation bar, choose . |
| 2 |
Click the ellipsis icon beside a skill with the status Not Active and click Restore. |
| 3 |
Click Yes to confirm. The status of the skill changes to Active.
|
Skill Profiles
A skill profile is a set of skills, each with an assigned value, that you assign to an agent-based team or to an individual agent. For example, you can assign a skill of English a high level of proficiency in one skill profile and a lower level in another profile.
If you assign a skill profile to a team, all agents that are logged in to that team are associated with that skill profile unless an agent is assigned a specific skill profile.
|
Create a Skill Profile
| 1 |
On the Management Portal navigation bar, choose . |
| 2 |
On the Skill Profiles page, click + New Skill Profile. |
| 3 |
Enter the name of the skill profile and description. |
| 4 |
Select the active skills you want to assign from the Active skills list. |
| 5 |
Provide the appropriate skill value. For more information, see Skill definitions. |
| 6 |
Click Save to save the skill profile. |
| 7 |
(Optional) Click Reset to reset the values in all fields. |
Edit a Skill Profile
| 1 |
On the Management Portal navigation bar, choose . |
| 2 |
Click the ellipsis icon beside the skill profile and click Edit. |
| 3 |
Edit the name, description, and active skills. |
| 4 |
Click Save to save the skill profile. |
Copy a Skill Profile
| 1 |
On the Management Portal navigation bar, choose . |
| 2 |
Click the ellipsis icon beside a skill profile and click Copy. |
| 3 |
Edit the necessary details. |
| 4 |
Click Save to save the skill profile. |
Delete a Skill Profile
| 1 |
On the Management Portal navigation bar, choose . |
| 2 |
Click the ellipsis icon beside the skill profile that you want to delete and choose Delete. |
| 3 |
Click Yes to confirm. |
Threshold Rules
If your enterprise uses the Threshold Alerts feature, authorized users can create threshold rules to monitor agent and call data.
Call Metrics
You can configure threshold rules for call metrics. For each rule, specify a value that triggers the alert. Configure call metrics as described in this table.
|
Metric |
Entity Type |
Trigger Value Type |
|---|---|---|
|
Abandoned Calls |
Queue |
Count |
|
Average Queue Time |
Queue |
Duration |
|
Average Speed of Answer |
Queue |
Duration |
|
Blind Transferred Calls |
Queue |
Count |
|
IVR Calls |
Entry Point |
Count |
|
Longest Time in Queue |
Queue |
Duration |
|
Number of Calls in Queue |
Queue |
Count |
|
Overflow Calls |
Queue |
Count |
|
Service Level Threshold |
Queue |
Percentage |
|
Short Calls |
Entry Point |
Count |
|
Transferred Calls |
Queue |
Count |
Agent Metrics
You can configure threshold rules for agent metrics. For each rule, specify a value that triggers the alert. Configure agent metrics as described in this table.
|
Metric |
Entity Type |
Trigger Value Type |
|---|---|---|
|
Available Agents |
Site or Team |
Count |
|
Connected Agents |
Site or Team |
Count |
|
Current Available Time |
Agent |
Duration |
|
Current Connected Time |
Agent |
Duration |
|
Current Hold Time |
Agent |
Duration |
|
Current Idle Time |
Agent |
Duration |
|
Current Wrap-up Time |
Agent |
Duration |
|
IB Average Handle Time |
Site or Team |
Duration |
|
Idle Agents |
Site or Team |
Count |
|
Not Responding Agents |
Site or Team |
Count |
|
Number of Agents in Outdial |
Site or Team |
Count |
|
Number of Logged in Agents |
Site or Team |
Count |
|
OB Average Handle Time |
Site or Team |
Duration |
|
Occupancy |
Site or Team |
Percentage |
|
Total Available Time |
Agent |
Duration |
|
Total Idle Time |
Agent |
Duration |
By default, the maximum number of threshold rules that are allowed for a tenant is 50. To increase this to a higher limit, contact Cisco Support.
Create a Threshold Rule
A threshold alert is displayed in the Agent Peformance Statistics report on the Agent Desktop if you set Agent Viewable to Yes for the threshold rule and select the threshold alert in the desktop profile. For more information, see Desktop Profiles.
| 1 |
From the Management Portal navigation bar, choose . | ||||||||||||||||||||||||||||||
| 2 |
On the Threshold Rules page:
| ||||||||||||||||||||||||||||||
| 3 |
Specify or change the settings for the rule. You can specify or change the following settings in the General Settings area:
You can specify or change the following settings in the Entity Information area:
You can specify or change the following settings in the Threshold Information area:
You can specify or change the following settings in the Email Information area:
| ||||||||||||||||||||||||||||||
| 4 |
Click Save. |
Copy a Threshold Rule
| 1 |
From the Management Portal navigation bar, choose . | ||||||||||
| 2 |
On the Threshold Rules page, click the ellipsis button beside a listed rule and click Copy. | ||||||||||
| 3 |
Specify or change the settings for the rule. You can specify or change the following settings in the General Settings area:
| ||||||||||
| 4 |
You can specify or change the following settings in the Entity Information area:
| ||||||||||
| 5 |
You can specify or change the following settings in the Threshold Information area:
| ||||||||||
| 6 |
You can specify or change the following settings in the Email Information area:
| ||||||||||
| 7 |
Click Save. |
Edit a Threshold Rule
| 1 |
From the Management Portal navigation bar, choose . | ||||||||||
| 2 |
On the Threshold Rules page:
| ||||||||||
| 3 |
Specify or change the settings for the rule. You can specify or change the following settings in the General Settings area:
| ||||||||||
| 4 |
You can specify or change the following settings in the Threshold Information area:
| ||||||||||
| 5 |
You can specify or change the following settings in the Email Information area:
| ||||||||||
| 6 |
Click Save. |
Deactivate a Threshold Rule
Before you begin
| 1 |
From the Management Portal navigation bar, choose . | ||
| 2 |
Click the ellipsis icon beside the threshold rule that you want to deactivate and click Mark Inactive. | ||
| 3 |
Click Yes to confirm. The status of the threshold rule changes to Not Active.
|
Activate a Threshold Rule
| 1 |
On the Management Portal navigation bar, choose . |
| 2 |
Click the ellipsis icon beside a threshold rule with the status Not Active and click Restore. |
| 3 |
Click Yes to confirm. The status of the threshold rule changes to Active.
|
Entry Point Mappings
The Entry Point Mappings page is an interface for managing the mappings between entry points and the following:
-
Dial Numbers (DN)
-
Webex Contact Center PSTN
-
Voice POP bridge
-
Webex Calling
-
-
Social Messaging
By default, all the DN to entry point mappings are listed. If required, you can filter the list by selecting an entry from the Select Entry Point drop-down list. The list displays DN, Entry Point, Number Type, and ID.
If an incoming Entry Point DN is not in the correct format, the call fails to connect. For example, if the Entry Point DN is in the format (xxx xxx xxx) and the incoming Entry Point DN format is (+1 xxx xxx xxx), the call fails to connect. |
The following points apply if you've a Cisco PSTN add-on:
|
To use an entry point, you must map a dial number to the entry point.
Map an Entry Point
To map an entry point:
| 1 |
On the Management Portal navigation bar, click . | ||||||||||||||||||||||||
| 2 |
Click Entry Point Mappings and choose the appropriate mapping list:DN to Entry Point Mappings.
| ||||||||||||||||||||||||
| 3 |
Click + New DN to EP Mapping. | ||||||||||||||||||||||||
| 4 |
Enter the following fields:
| ||||||||||||||||||||||||
| 5 |
(Only for SMS) After you choose the Entry Point, a Webhook URL gets populated on the page. Copy the Webhook URL and configure MessageBird. This configuration helps exchange SMS messages with MessageBird. | ||||||||||||||||||||||||
| 6 |
Click Save. |
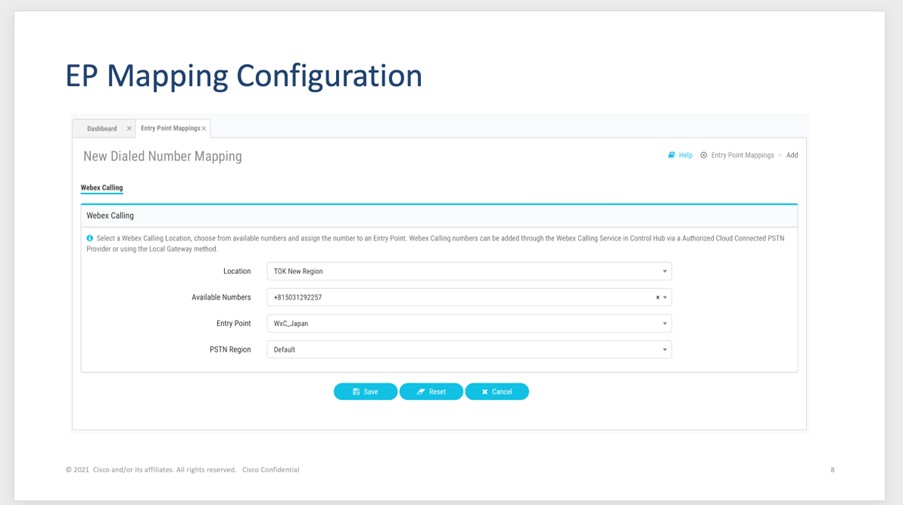
Edit Dial Number to Entry Point Mappings
| 1 |
From the Management Portal navigation bar, click . | ||
| 2 |
Choose the appropriate list:
| ||
| 3 |
To edit a mapping, click the ellipsis icon beside a dial number or social messaging channel, and click Edit. | ||
| 4 |
Make the edits and click Save.
|
Delete Dial Number to Entry Point Mappings
| 1 |
From the Management Portal navigation bar, click . | ||
| 2 |
Choose the appropriate list:
| ||
| 3 |
Click DN to Entry Point Mappings. | ||
| 4 |
Click the ellipsis icon beside the entry that you want to delete and click Delete. | ||
| 5 |
Click Yes to confirm.
|
 (Information) icon in the error message to view the list of entities associated with the selected dial number. You can delete the Dial Number to Entry Point mapping only if the associated entities are deleted.
Reports for the Provisioned Items
Use the Management Portal to generate reports about the active resources that the Webex Contact Center administrator provisions for your enterprise.You can view the following reports:
|
Report |
Description | ||
|---|---|---|---|
|
Site Report |
The details of the sites for your enterprise. For more information, see About Sites, Teams, Entry Points, and Queues |
||
|
Team Report |
The details of the teams for your enterprise. For more information, see About Sites, Teams, Entry Points, and Queues |
||
|
Agent Report |
The details of the agents for your enterprise. For more information, see Desktop Profiles. |
||
|
Inbound EP Report |
The details of the entry points for your enterprise. For more information, see Entry Points and Queues. |
||
|
Inbound Queues Report |
The details of the queues for your enterprise. For more information, see Entry Points and Queues. |
||
|
Outdial EP Report |
The details of the outdial entry points for your enterprise. For more information, see Entry Points and Queues. |
||
|
Outdial Queues Report |
The details of the outdial queues for your enterprise. For more information, see Entry Points and Queues. |
||
|
Desktop Profile Report |
The details of the desktop profiles for your enterprise. For more information, see Desktop Profiles. |
||
|
Skill Report |
The details of the skills that are available for your enterprise. This report is available if your enterprise uses the Skill-Based Routing. For more information on how to define the skills for your enterprise, see Skill Definitions.
|
||
|
Skill Profile Report |
The details of the mapping of the skills and the corresponding profiles. This report is available if your enterprise uses the Skill-Based Routing. For more information on how to define the profiles for the skills, see Skill Profiles. |
||
|
Routing Report |
The details about the mapping of the routing strategies with the entry points, queues, and teams. For more information on how to define routing strategies, see About Contact Routing. |
||
|
Agent Skills Report |
The details about the agents and their corresponding skills. This report is available if your enterprise uses the Skill-Based Routing. For more information on how to define the skills for your enterprise and Desktop Profiles, see Skill Definitions and Desktop Profiles. Note: Currently we do not support Skill-Based Routing. |
Manage Reports for the Provisioned Items
To email the report or download the report for any provisioned item:
| 1 |
From the Management Portal navigation bar, choose . | ||
| 2 |
Select the required type of report. For more information on the types of the reports, see Reports for the Provisioned Items. | ||
| 3 |
Download the report as either an Excel sheet or PDF.
|
Delete inactive objects permanently
Webex Contact Center allows administrators to permanently delete configuration objects that have been marked inactive. This helps customers remove unwanted configurations, keep a lightweight configuration footprint, and improve application performance. Before deleting a configuration object permanently, you will need to mark it inactive. You can also periodically delete inactive objects using an automatic purge tenant level setting.
You can permanently delete the following configuration object types:
-
Users
-
User Profiles
-
Desktop Profiles
-
Work Types
-
Auxiliary Codes
-
Threshold Rules
-
Skill Profile
-
Teams
-
Sites
-
Entry Points
-
Outdial Entry Points
-
Queues
-
Outdial Queues
-
Desktop Layouts
-
Global Variables
-
Multimedia Profiles
-
Skill Definitions
The maximum number of inactive users is 5000. The maximum inactive objects for all other object types is 100. If this limit is reached, you must delete inactive objects to be able to deactivate more objects. If the configuration object has associated objects, you must inactivate all the referenced objects.
| 1 |
From the Management Portal navigation bar, choose Provisioning. | ||
| 2 |
Select an entity. | ||
| 3 |
To permanently delete a configuration object manually, on the entity page, click the ellipsis icon beside the object. Select Delete. | ||
| 4 |
On the dialog box that informs you that the object will be permanently deleted and can't be recovered, click Yes. A message appears that the object is permanently deleted.
|
About Business Rules Engine
The Business Rules Engine (BRE) provides a means for tenants to incorporate their data into the Webex Contact Center environment for custom routing as well as for general implementation. Administrators can use the BRE solution with Webex Contact Center to leverage business data for their organization in flows.
About Contact Routing
The Routing Strategy module provides a flexible environment for routing contacts to the best resource, regardless of location. Each incoming contact arrives at an entry point, from where it’s sent to queue for distribution among teams at contact center sites according to scheduled routing strategies, scheduled team capacity strategies, and queue precedence settings specified in the Routing Strategy module.
In addition, if your enterprise uses the outdial feature, each outdial call passes through an outdial entry point and outdial queue according to routing strategies in the Routing Strategy module.
Although the examples in the following sections refer to phone contacts, the same contact routing options are available to other media types. |
Each contact arrives at an entry point, where a routing strategy applies business logic. Based on the evaluated criteria in the routing strategy, the system selects an appropriate queue to distribute the contact to one of the available teams.
About Skills-based Routing
Skills-based Routing (SBR) is an optional feature that matches the needs of contacts with agents who have the skills to best meet those needs. SBR is available for voice contacts as well as digital channel contacts. When calls arrive at an entry point, SBR classifies the calls into subsets. You can route the calls in each subset to agents who possess a required set of skills, such as language fluency or product expertise.
SBR assigns skill requirements to calls in a flow. Based on the assigned skill requirements, the calls enter a queue for distribution to agents who have matching skills. You can configure SBR in a way that removes or reduces the skill requirements of agents if an agent is not available within a time interval that is specified in the queue. For more information, see Skill Definitions. To remove or reduce the skill requirements, specify the skill relaxations in the Queue Contact activity.
SBR matches all skill requirements of contacts with the skills of agents. If one of the skill requirements of a contact is invalid because skill values are not properly defined in the flow, SBR cannot find a matching agent. In such cases, the call is routed to the longest available agent.
SBR provides the following capabilities:
-
Match skill requirements of contacts with agents who have those specific skills.
-
Add skill requirements to contacts and route contacts with the same skill requirements to a single queue. For more information, see Queue Contact activity.
-
Configure different agent teams with a set of agents to serve a queue. For more information, see Create a Queue and an Outdial Queue.
-
Map various skills to the profiles of these agents. For more information, see Agent Profiles.
In the preceding example, contact C1 requires skill A and contact C2 requires both skill A and skill B. When C2 enters the queue, it requires agents with both skill A and skill B. For best customer service, map C2 to the team that has both skill A and skill B. Do not map C2 to a team that has only skill A or skill B. If you map C2 to a team that has only skill A or skill B, C2 becomes the longest contact in the parked state.
Skills-based Routing Types
SBR routes contacts to agents based on the contact’s skill requirements that are configured in the flow. For more information, see About Skills-based Routing.
You can enable SBR in the Queue Routing Type settings when creating a queue. For more information, see Create a Queue and an Outdial Queue. SBR routes contacts to agents in one of the following ways when more than one agent with the required skill set is available:
-
Longest Available Agent
-
Best Available Agent
Longest Available Agent: SBR routes contacts to the agent who has been available for the longest duration.
Best Available Agent: SBR routes contacts to the agent who has the highest level of proficiency in the skill. To route contacts to the best available agent:
-
Configure the contact’s skill requirements with the necessary condition so that the contact is always routed to an agent with the highest level of proficiency:
-
If you choose <= condition for the contact’s skill requirements, a lower value indicates a better match with the contact's requirement.
-
If you choose >= condition for the contact’s skill requirements, a higher value indicates a better match with the contact's requirement.
-
If you choose IS condition for the contact’s skill requirements, a higher value indicates a better match with the contact's requirement.
For more information, see Skill Requirements in Queue Contact activity.
-
-
Assign the proficiency level to an agent when creating Skill Definitions and Agent Profiles.
For example, you can route contacts to agents with English speaking skill as a language proficiency. Consider two agents: Agent 1 with an English language proficiency level of 3 and Agent 2 with an English language proficiency level of 6. Both agents are available in the queue.
-
If you configure the contact’s skill requirement with <= condition in the flow, Agent 1 with an English language proficiency level of 3 is the best available agent in the queue to connect to the contact.
-
If you configure the contact’s skill requirement with >= condition in the flow, Agent 2 with an English language proficiency level of 6 is the best available agent in the queue to connect to the contact.
Advanced Queue Information
The Advanced Queue Information feature allows you to assess if the skills of the logged in and available agents in a queue match the contact's skill requirement without queueing the contacts for a long duration. The GetQueueInfo activity provides the number of agents that are logged on and available. However, this activity doesn't provide information about any logged in agents who have specific skills that match the requirement of a specific contact. For more information about the GetQueueInfo activity, see Get Queue Info.
At some time of the day, there may be no agents who are adequately skilled to match the skill requirement of a specific contact. The administrator needs information about such agents before and after queuing a contact to initiate alternative action such as playing a message, providing a callback option, or escalating to a different queue.
The administrator can do the following:
-
If this activity is invoked before queuing the contact, the flow uses the skill requirements that are configured in the and the teams from the last call distribution group. This determines the number of logged in and available agents and populates the
LoggedOnAgentsAllandAvailableAgentsAlloutput variables. The system sets the output variableCurrentGroupto –1.
A value of
-1for theCurrentGroupindicates that the contact isn't yet queued when the activity is invoked. Flow designers can use the output variableCurrentGroupand determine if the contact isn't queued. -
If this activity is invoked after queuing the contact, the system considers the current skills of the contact. The skills in the current skill relaxation cycle and the teams from the current call distribution group will be used to calculate the available and logged in agents. These values are populated in the
LoggedOnAgentsCurrentandAvailableAgentsCurrentoutput variables. The system uses skills from the current skill relaxation cycle and the last call distribution group to calculate logged in and available agents and stores these values in theLoggedOnAgentsAllandAvailableAgentsAlloutput variables. The system also stores values in thePIQ,CurrentGroup, andTotalGroupsoutput variables.
You can invoke this activity for LAA-based queues. However, skill requirements that are configured for this activity aren't applicable for LAA-based queues. You can use this activity in a loop. The Flow Designer invokes the Advanced Queue Information activity when executing the flow. In the Flow Designer, you can create flows using the Advanced Queue Information activity only if the feature flag is enabled for this feature. You can't work with flows that have the Advanced Queue Information activity in the Flow Designer, if the feature flag is disabled. Ensure that the feature flag is enabled for the Advanced Queue Information activity. |
As part of the Advanced Queue Information when a contact is parked in a queue and you use the Advanced Queue Information to query another queue stack, this will not be supported and will result in an error. For more information on the error response code, see Advanced Queue Information. |
Escalate Call Distribution Group
The application uses the in the post queuing loop to quickly move to the next call distribution group or the last. Typically, administrators use this activity to identify the contacts that are parked against escalation groups. These escalation groups have at least one logged in agent who has matching skills or no logged in agents.
The application uses the QueueContact activity and calls the advanced GetQueueInfo activity to determine if there are any agents logged in to a specific call distribution group. If no agents are logged in to a specific call distribution group, the flow designer uses the EscalateCallDistribution activity to move ahead to either the next or the last call distribution group in the series. If an agent is available in the escalated group, Webex Contact Center routes the contact to that agent. If not, Webex Contact Center parks the contact immediately in that call distribution group.
For more information about the QueueContact activity, see Queue Contact.
A customer use case is a queue that has many call distribution groups. If an agent is not available in the first call distribution group to answer a call, the flow designer redirects the call to another call distribution group within the queue. At each level, the number of agents in the call distribution group increases so that there is a greater chance of the call getting answered. At certain times of the day, agents from this group or other groups might not be available.
For SBR and LAA-based queues, if you invoke the EscalateCallDistribution activity on a contact that is not yet queued, it results in an error and exits the error path in the flow activity.
In the Flow Designer, you can create flows using the EscalateCallDistributionGroup activity only if the feature flag is enabled for this feature. You can't work with flows that have the EscalateCallDistributionGroup activity in the Flow Designer, if the feature flag is disabled. Ensure that the feature flag is enabled for the EscalateCallDistributionGroup activity. |
Routing of Parked Contacts
SBR parks contacts in a queue until an agent connects with the contacts.
When agents become available, SBR routes contacts by using one of the following selection methods:
-
Skills-based Contact Selection
-
First In, First Out (FIFO) based Contact Selection
By default, Skills-based contact selection is enabled for your organization. |
Skills-based Contact Selection
In skills-based contact selection, contacts are selected based on the exact match between the skill requirements of the contact and the skills of the agent. Skills-based contact selection does not assign contacts to agents on FIFO basis. If the contact's skill requirements match exactly with the agent's skill, the contact connects to the agent irrespective of its position in the queue. If there are many such contacts with the same skill requirements, skills-based contact selection filters contacts in the queue and assigns them to the agent in the following order:
-
Priority
-
Timestamp (oldest to newest)
For example, consider that contact C1 which requires an agent with skill A and contact C2 which requires an agent with skill B are waiting in the queue to connect to an agent. Contact C3 which requires an agent with skill C also enters the queue. If an agent with skill C becomes available, C3 does not wait for C1 and C2 to connect to agents, as the skill requirements of C3 match exactly with the agent who has skill C.
First In, First Out (FIFO) based Contact Selection
The first contact that enters the queue has the highest priority to connect to an agent. The first contact connects to an agent when an agent with matching skills becomes available. If the agent’s skill does not match the skill requirement of the first contact that is parked in the queue, the agent does not connect to the first contact. Even though the agent’s skill matches the skill requirements of other contacts in the queue, the contacts remain parked until the first contact finds an agent.
For example, consider two contacts: C1 is the first contact to enter the queue which requires an agent with skill A and C2 is the second contact to enter the queue which requires an agent with skill B. When an agent with skill B becomes available, C2 does not connect to skill B. Since C1 is the first contact to enter the queue, SBR waits for an agent with skill A to be available to connect to C1 first. C2 connects to skill B only after C1 finds an agent.
To enable FIFO-based contact selection for your organization, contact Cisco Support. |
Set Up Skills-Based Routing
| 1 |
Define the skills. For more information, see Skill Definitions. |
| 2 |
Define the skill profiles. For more information, see Skill Profiles. |
| 3 |
Assign the skill profiles to teams or agents. You can assign a skill profile to each agent-based team. All agents logged in to the team are associated with that skill profile. However, you can also assign a skill profile to an individual agent, which overrides the skill profile of the team. For more information, see Create a team and. View the Details of a User
|
| 4 |
Assign the skill profiles to agents. You can assign a skill profile to an individual agent or a team. For more information, see View the Details of a User. |
| 5 |
Create Entry Points and Queues. |
| 6 |
Create a queue with a channel type as Telephony and Queue Routing Type as Skills-Based. |
| 7 |
Create or upload a call control script that defines how to treat the call. For more information, see Working with Call Control Scripts. |
| 8 |
Create a flow that defines how to treat the call. For more information, see Create and Manage Flows. |
| 9 |
Add a Queue Contact activity and select the queue for which Skills-Based Routing is configured. For more information, see Queue Contact. |
| 10 |
Create an entry point and queue routing strategy. In the entry point routing strategy, you assign skill requirements to calls during call treatment defined in the call control script. For more information, see Assigning Skill Requirements to Incoming Calls. The calls are then distributed to the specified queue where they wait for an agent with the required skills. In the queue routing strategy, you specify options for identifying agents to service the incoming calls. If an agent with the required skills doesn't become available within a specified time interval, you can remove or reduce the skill requirement. For more information, see Create a Desktop Profile. |
| 11 |
Create an entry point routing strategy and select the flow that you created. For more information, see Create a routing strategy. |
Agent-based Routing
Agent-based Routing is an optional feature that routes or queues a contact to the preferred agent directly. An agent lookup with agent's email address or agent's ID routes a contact to the preferred agent. The Queue To Agent activity in the flow helps to achieve Agent-based Routing. For more information, see the section Queue To Agent activity.
A contact can have one or more preferred agents. The mapping between the contacts and their preferred agents is managed in an external application outside Webex Contact Center. The preferred agent lookup for any contact is performed using the HTTP Request activity in the flow. The HTTP Request activity retrieves the mapping from the external application. To route or park the contact against that preferred agent, you can configure the Queue To Agent activity in the flow. The Queue To Agent activity allows you to specify the agent by their Webex Contact Center agent ID or email address. You can also park the contact against a preferred agent if that preferred agent isn't immediately available.
You can consider chaining an activity within the flow to route or queue contacts.
For example, you can chain one Queue To Agent activity to another Queue To Agent activity to queue a contact to multiple preferred agents. You can chain a Queue Contact activity to the Queue To Agent activity to route a contact if none of the preferred agents are available for that contact.
Agent-based Routing is useful in the following scenarios:
-
Preferred agent routing: The customer can assign contacts to dedicated agents or relationship executives. In such scenarios, the Agent-based Routing routes the contacts directly to that preferred agent.
-
Last agent routing: When a contact calls back the contact center multiple times to interact with an agent, Agent-based Routing can route the contact to the last agent who handled that contact.
In both use cases, the details of the contact and the agent mapping are stored outside the Webex Contact Center. The HTTP activity retrieves the data. The Queue To Agent activity routes the contact to the preferred agent or the last agent.
In case of Blended Real-time or Exclusive Multimedia Profiles, if Preferred Agent is already handling one real-time channel, the agent will be considered busy, and the call won't be routed to the preferred agent immediately.
To set up Agent-based Routing:
Before you begin:
You must export the Webex Contact Center agent ID and agent email address from Webex Contact Center to an external application. Webex Contact Center doesn't store the mapping between the agent and its contacts.
-
Retrieve the mapping between the agent and the contact from the external application using the HTTP Request activity in the Flow Designer (From the Management Portal navigation bar, choose and click New to create a new flow). For more information, see the section HTTP Request.
-
Configure the Queue To Agent Activity in the Flow Designer. You can provide the general settings and the contact handling details to route the contact. For more information, see the section Queue To Agent activity.
About global routing overrides
A global routing override is a routing strategy that applies to one or more Telephony entry points. When a call arrives at an entry point, the routing engine checks whether a Global Routing Override exists for that entry point. If a Global Routing Override exists, it becomes the current routing strategy for the entry point, overriding any standard routing strategies associated with that entry point.
Creating a global routing override enables you to change the routing strategies quickly and easily for many entry points simultaneously in urgent situations, rather than changing each routing strategy individually.
Global routing overrides operate in the Tenant time zone.
Configure Multimedia Profiles
If your enterprise uses social channels, chat, and email routing in addition to voice, then Multimedia profiles are enabled. You can associate sites and agents with multimedia profiles.
| 1 |
Define the multimedia profiles. If your enterprise subscribes to the Multimedia feature, each agent is associated with a multimedia profile, which specifies how many contacts of each media type the agent can handle concurrently. For more information, see Multimedia Profiles. |
| 2 |
Assign multimedia profiles to sites, teams, or agents. When Multimedia is enabled, every site is associated with a multimedia profile. Each agent-based team at a given site is associated with the profile assigned to that site unless the team is assigned a different multimedia profile. Similarly, each agent logged in to a team is associated with the team's profile unless the agent is assigned a different multimedia profile. For more information, see Sites, Create a team, and Users. |
| 3 |
Create separate entry points and queues for each media type. For more information, see Create an Entry Point. |
| 4 |
Work with Webex Contact Center Operations to create routing strategies configured to use a specialized call control script. |
| 5 |
Work with your specific CRM vendor to configure the multimedia interaction at the agent level. Alternately you can configure the queue routing strategy to assign multimedia contacts (Chat, Email, Social Channels) to your agents. |
Working with Resource Files
To view the resources, choose Routing Strategy from the Management Portal navigation bar.
You can choose to see the audio files, predefined emails, or predefined chat responses.
Upload an Audio Resource File
Webex Contact Center supports uploading .wav audio files with the following specifications:
-
Channels: 1
-
Sample Rate: 8000
-
Sample Encoding: 8-bit u-law
-
Mono Recording (for combined, caller, or agent recording)
-
Channels: 1
-
Sample Rate: 8000
-
Precision: 16-bit
-
Sample Encoding: GSM
-
Maximum Recording Duration: 2 Hours
-
-
Stereo Recording (for combined recording)
-
Channels: 2
-
Sample Rate: 8000
-
Precision: 13-bit
-
Sample Encoding: 4-bit IMA ADPCM
-
Maximum Recording Duration: 2 Hours
-
By default, only mono recording is enabled for all tenants. |
| 1 |
From the Management Portal navigation bar, choose Routing Strategy. |
| 2 |
From the Routing Strategy page, choose . |
| 3 |
Click New. |
| 4 |
On the Upload Resource page, click Browse. |
| 5 |
Navigate to the file in your system, and click Open. The File field displays the path and file name of the uploaded file, and the Resource Name field displays the file name. |
| 6 |
Click Save. |
Edit an Audio Resource File
Do not update resources that are currently used by the system. |
| 1 |
From the Management Portal navigation bar, choose Routing Strategy. |
| 2 |
From the Routing Strategy page, choose . |
| 3 |
Click the Ellipsis button beside the resource name and click Edit. |
| 4 |
On the Overwrite Resource page, click Browse. |
| 5 |
Navigate to the file in your system, and click Open. The File field displays the path and file name of the uploaded file, and the Resource Name field displays the file name. For audio file specifications, see Upload an Audio Resource File. |
| 6 |
Click Save. |
| 7 |
Click Yes to confirm overwriting the audio file. |
Play or Download a .wav File
| 1 |
From the Management Portal navigation bar, choose Routing Strategy. |
| 2 |
From the Routing Strategy page, choose . |
| 3 |
Click the ellipsis button beside the file name and click Play. |
| 4 |
In the dialog box that opens, specify whether you want to open or save the file. When you click Open, the media player installed on your computer opens and plays the file. If a compatible media player is not installed, a dialog box opens and prompts you to download a player. |
Update a Resource File
| 1 |
From the Management Portal navigation bar, choose Routing Strategy. |
| 2 |
From the Routing Strategy page, choose . |
| 3 |
Click the ellipsis button beside the file name and click Edit. |
| 4 |
Make the necessary changes to the resource. |
| 5 |
Click Save. |
Copy a Resource File
The copy function enables you to create backup copies of prompts and other resource files. Only files with the .wav extension can be copied.
| 1 |
From the Management Portal navigation bar, choose Routing Strategy. |
| 2 |
From the Routing Strategy page, choose . |
| 3 |
Click the ellipsis button beside the file name and click Copy. |
| 4 |
On the page that appears, enter a name for the copied file or leave the default name (Copy_ is prepended to the original name). |
| 5 |
Click Save. |
Export References to a Media File
You can view or export a list showing the name of each routing strategy that references a specified media file along with the name of the associated entry point or queue. In the case of a global routing strategy, the list shows 0 instead of the name of an entry point or queue.
To view or export the references to a media file:
| 1 |
From the Management Portal navigation bar, choose Routing Strategy. |
| 2 |
From the Routing Strategy page, choose . |
| 3 |
Click the ellipsis button beside the file name and click Excel or CSV. |
| 4 |
In the dialog box that opens, specify whether to open or save the file. |
Create a Predefined Email Template
You can predefine the email template that agents use to communicate with customers. An organization can have a single predefined template for email.
To edit or delete the template, click the ellipsis button beside the template in the Predefined Emails page.
You cannot use the predefined email templates for quick-reply emails. |
To create an email template:
| 1 |
From the Management Portal navigation bar, choose Routing Strategy. | ||
| 2 |
From the Routing Strategy page, choose . | ||
| 3 |
Click New.
| ||
| 4 |
In the New Predefined Email dialog box, do the following: |
Configure a Predefined Chat Template
Before you begin
Entry points are the initial landing place for all channel types in Webex Contact Center. The system sends the contact to an agent based on the routing strategy that is set for an entry point.
You can configure one chat template for each entry point. For more information, see Entry Points and Queues.
Only customers whose organization is provisioned on an existing Webex Calling Integrated Platform can configure a chat template for their contact center. |
| 1 |
Log in to the customer organization at https://admin.webex.com. | ||
| 2 |
From the navigation pane on the left, in the Services section, click . | ||
| 3 |
Choose one of the following options:
The system displays the Chat Template wizard. | ||
| 4 |
In the Define Template page:
| ||
| 5 |
In the Proactive Prompt, Off-Hours page:
| ||
| 6 |
In the Customer Information page, click each of the fields in the Preview card and modify the attributes. The customer uses these attributes to fill the form.
| ||
| 7 |
In the Virtual Agent page:
| ||
| 8 |
In the Branding and Identity, Status Messages page:
| ||
| 9 |
In the Feedback page, enter Label and Hint Text in the Attributes card to receive customer feedback. | ||
| 10 |
In the Done page, click Finish.
|
Create a Predefined Chat Response
-
US English
-
Japanese
-
Italian
-
French
-
German
-
Spanish
You can configure 50 responses per language, per queue, for a total of 300 responses per queue. Agents can see the responses in their queue based on the language settings in their local browser. Thus, agents can see only 50 responses at a time.
| 1 |
From the Management Portal navigation bar, choose Routing Strategy. | ||||||||||||
| 2 |
From the Routing Strategy page, choose . | ||||||||||||
| 3 |
Click New. | ||||||||||||
| 4 |
Enter the following details:
| ||||||||||||
| 5 |
Click Save. |
Configure Routing Resources
You can choose either a routing resource or a flow. If you choose a routing resource, you can't customize flow control configurations such as Customize ANI, Screen pop, Global variable and so on, as part of the outdial experience. We recommend that you use flows instead of routing resources to avail any advanced configurations such as Screen pop, Customize ANI and so on. For more information, see Create a Flow.
Routing strategies will be obsolete in the future. It is recommended to use flows configured with business hours and outdial entry points. |
If you want to proceed with routing strategies, consider the following aspects. For each entry point and queue, you should create a set of default routing strategies that cover all time intervals. In addition, you can schedule an alternate strategy beyond the default strategy for any time interval. For example, Queue 1 could have a BusyHourStrategy for the normal day shift and an OffHoursStrategy for non-business hours.
Flag the normal daily schedule as the default strategy. You can create a non-default strategy, such as a holiday schedule for a time interval that overlaps the default strategy. A strategy that is not flagged as default overrides a default strategy and is used as an exception to the default schedule. This means that the system first checks for a strategy that is not flagged as default, and if none exists, the system uses the default strategy.
When the default strategy is the current strategy (that is, the strategy that is currently running), the system checks every three minutes for a non-default strategy and if one is found, it becomes the current strategy.
If no strategy is specified for a time interval, and there is no default strategy for the time interval, the last strategy used by the system may continue as the current strategy even though it has expired. In this case, the system checks every minute for a valid strategy and as soon as it finds one, that strategy becomes the current strategy.
About Team Types
When you create or modify a queue routing strategy, the following options appear:
-
Agent-Based teams have a known number of agents assigned to teams. Authorized users assign a desktop profile to one or more teams. These agents use the Agent Desktop to interface with the Webex Contact Center system.
-
Capacity-Based teams don’t have specific agents assigned to them, and the agents don’t use the Agent Desktop. For example, an outsourcer could have teams that use a PBX or an ACD to handle calls. You can use a capacity-based team to represent a voicemail box or an agent group, which Webex Contact Center doesn’t manage.
The capacity of these teams is based on the provisioned team capacity setting, which can override the team capacity strategies. For more information, see Scheduling Team Capacity. If the team's actual capacity is higher or lower than the value currently used by the system, the result is either not enough or too many calls for agents to handle. This makes strategy design more challenging.
When you use the getNumAgentsLoggedIn API, the response includes the number of agents logged in along with the number of capacity-based teams that are considered as active. |
When you create a routing strategy, you can mix team types. Remember that the accuracy of call routing to capacity-based teams depends on the capacity number specified.
Limitations of Capacity Based Teams when using Classic platform
Webex Contact Center assigns calls to the capacity-based team by transferring the call to a Dial Number (DN). After the call transfers to a DN, Webex Contact Center disconnects from the call. Webex Contact Center is not aware of the call status; that is, whether the capacity-based team answers, handles, or rejects the call.
This limitation causes the following behaviors:
-
Tracking the contact after the call transfer is not possible.
-
Detecting RONA or call failures is not possible
-
Recording the call is not possible.
-
Getting the Connect Time and Handled Time values is not possible. Call report shows the value as zero (0).
-
Setting the capacity is not applicable, hence more calls could go to the capacity-based team.
When using Next Generation media platform, Webex Contact Center assigns calls to the capacity-based teams, wherein the Webex Contact Center:
-
Handles the call status and determines whether the call routed to capacity-based team is answered, handled, or rejected.
-
Monitors the overall status of calls, including call termination, and decides when to update the consumption value of the capacity-based team. For example, if the call is terminated, capacity must be increased and vice versa.
-
Obtain the Connect Time and Handled Time values.
When a static load-balancing strategy includes both agent-based and capacity-based teams, the system distributes the calls to either agent-based teams or capacity-based teams, in the order that they are configured. Once the capacity of the capacity-based teams reaches the maximum limit, calls are routed to agent-based teams, if agents are available. If the call is in queue, it can be routed to either agent-based or capacity-based teams, depending on which team has resources available. If no team has capacity, calls are queued until capacity becomes available. This load-balancing strategy ensures that calls are handled efficiently and that no team is overloaded. |
View routing strategies for an entry point or queue
To view all routing strategies for an entry point or queue:
| 1 |
From the Management Portal navigation bar, choose Routing Strategy. | ||
| 2 |
Choose an entry point or queue from the Select Entry Point drop-down list to display the routing strategies for that entry point or queue. For more information on the parameters that display on the Routing Strategy page, see Routing strategy parameters. The upper section of the list view displays a table that lists all routing strategies available for the selected entry point or queue.
| ||
| 3 |
To see details for a strategy, click the ellipsis beside the routing strategy and click Edit. The lower section of the Routing Strategy page displays the Routing Strategy Mapping Details table, which:
| ||
| 4 |
Click Save. |
Routing strategy parameters
The following table describes the parameters that appear on the Routing Strategy page.
|
Column |
Description | ||
|---|---|---|---|
|
Name |
Displays the name you assign to the strategy. You can't change the strategy name after you create it. | ||
|
ID |
Displays the system-assigned number of the strategy. | ||
|
Status |
Indicates the status of the strategy.
| ||
|
Default |
Indicates whether the strategy is the default. A strategy not flagged as the default overrides a default strategy and potentially replaces the default schedule. | ||
|
Chat Template |
Identifies the chat template used for the routing strategy. | ||
|
Repetition |
Specifies whether the strategy repeats daily or only on specific days of the week. | ||
|
Start Date |
Displays the date on which the strategy starts. | ||
|
End Date |
Displays the date on which the strategy ends. | ||
|
Start Time |
Displays the time at which the strategy starts (in 24-hour format) for any given day in the specified date range. | ||
|
End Time |
Displays the time at which the strategy ends (in 24-hour format) for any given day in the specified date range. | ||
|
Time Zone |
Displays the time zone if you enable the Multiple Time Zone feature when you create the entry point or queue. | ||
|
Flow |
Lists the associated call flows when a routing strategy is executing. |
View the current routing strategies
You can view a list of currently deployed routing strategies for multiple entry points or queues.
| 1 |
From the Management Portal navigation bar, choose Routing Strategy. |
| 2 |
From the Routing Strategy page, choose . |
| 3 |
Choose All from the drop-down list to view current strategies for all entry points or queues. |
| 4 |
Click Apply. table provides details about the current routing strategies for the selected entry points or queues. The Control Script column displays the names of the call control scripts that are associated with the listed entry points or queues. table provides details about the current routing strategies for the selected entry points or queues. The Flow column displays the names of the call flows associated with the listed entry points or queues. |
View routing strategies by time zone
If you enable the Multiple Time Zone feature for your enterprise, you can configure entry points and queues with time zones. Time values that are used in the routing strategies are based on the time zone you configure for the entry point or queue. If you don't configure time zones with entry points and queues, the system uses the time zone that you configure for your enterprise (typically headquarters).
When you click your name button on the upper-right side of the Routing Strategy page, any time zones you configure for entry points or queues appear in a drop-down list.
If you do not enable the Multiple Time Zone feature for your enterprise, time values in routing strategies are based on the time zone you configure for your enterprise.
If the time zone observes daylight-saving time, the time adjusts automatically when the daylight-saving time changes.
| 1 |
On the Management Portal, click the gears icon in the upper-right corner to view the three or four Tab keyed settings panel. |
| 2 |
Click the gears icon. Select a time zone from the Time Zone drop-down list. |
| 3 |
Click Apply. |
| 4 |
From the Management Portal navigation bar, choose Routing Strategy to view the routing strategies based on the selected time zone. |
Create a routing strategy
Use this procedure to create new routing strategies. You can also create a new strategy by editing an existing strategy and changing the parameters in accordance with the requirements.
Before you create new strategies:
-
Always create an active strategy for every time interval. If you don't specify an active strategy for a time interval, the system uses the default. If there’s no default strategy, the last strategy that the system used may continue as the current strategy although it has expired.
-
You can easily create a new strategy from an existing strategy, change some settings, and save it as a new strategy.
-
You can have only one routing strategy for each chat or email entry point.
You can't have a global routing strategy for Chat and Email entry points.
-
You can't save changes to an active strategy when the scheduled dates or times conflict with an existing active strategy.
Before you begin
You must Create a Chat Template before you create a Chat Routing Strategy.
| 1 |
From the Management Portal navigation bar, choose Routing Strategy. | ||||||||||||||||||||||||||||||||||||||||||||||||||||||||||||||||||||||||||||||||||||||||||||||||||||||||||||||||||||||||||||||||||||||||||||||||||||||||
| 2 |
At the Routing Strategy page, choose . | ||||||||||||||||||||||||||||||||||||||||||||||||||||||||||||||||||||||||||||||||||||||||||||||||||||||||||||||||||||||||||||||||||||||||||||||||||||||||
| 3 |
Choose an entry point from the Select Entry Point drop-down list. | ||||||||||||||||||||||||||||||||||||||||||||||||||||||||||||||||||||||||||||||||||||||||||||||||||||||||||||||||||||||||||||||||||||||||||||||||||||||||
| 4 |
Do one of the following in the list view:
| ||||||||||||||||||||||||||||||||||||||||||||||||||||||||||||||||||||||||||||||||||||||||||||||||||||||||||||||||||||||||||||||||||||||||||||||||||||||||
| 5 |
Enter or modify the settings as described in the following tables.
| ||||||||||||||||||||||||||||||||||||||||||||||||||||||||||||||||||||||||||||||||||||||||||||||||||||||||||||||||||||||||||||||||||||||||||||||||||||||||
Modify a Routing Strategy
Before you modify a routing strategy, be aware of the following:
-
Although you cannot copy the current strategy, you can modify any of its settings except those that affect execution time or date. These changes have no effect on the recurring scheduled version of the strategy.
-
When you modify the current strategy, your changes take effect immediately for new calls and remain in effect until the current strategy ends. If there are calls in the queue when the modifications are made, the existing queued calls follow the original strategy unless you check the Apply changes to current calls in queue check box to the right of the Save button.
Changes made to the current Email or Chat entry point routing strategy are also applied to the corresponding active routing strategies.
-
When you modify a strategy that is not the current strategy, your changes take effect according to the scheduled times specified in the strategy.
| 1 |
From the Management Portal navigation bar, choose Routing Strategy. |
| 2 |
On the Routing Strategy page, choose an entry point or queue from the Select Entry Point/Queue drop-down list. |
| 3 |
Click the ellipsis button beside the strategy that you want to modify and choose Edit. |
| 4 |
If you are modifying a global routing strategy: |
| 5 |
Make your changes. For information about each setting, see the setting descriptions table in Create a routing strategy. |
| 6 |
If you modify the current strategy and want the changes to apply to calls currently in queue, check the Apply changes to current calls in queue check box on the lower right side of the page. If you don't check this check box, the changes only apply to new calls. |
| 7 |
Click Save to save your changes. |
Routing Strategies Deletion and Restoration
When you delete a routing strategy, the system moves the strategy to the Deleted Routing Strategies or Deleted Global Routing Overrides page where it can be restored or permanently deleted within 30 days. After 30 days, the system permanently deletes the routing strategy.
When you delete a current strategy, the system activates the next strategy scheduled for that time period. Do not delete a current strategy unless an alternate strategy is available. |
Delete a Standard Routing Strategy
| 1 |
From the Management Portal navigation bar, choose Routing Strategy. |
| 2 |
On the Routing Strategy page, choose an entry point or queue from the Select Entry Point/Queue drop-down list. |
| 3 |
Click the ellipsis button beside the routing strategy that you want to delete and click Delete. |
| 4 |
Click Yes to confirm. The system moves the strategy to the Deleted Routing Strategies page where it can be restored or permanently deleted (see Restore or Permanently Delete a Routing Strategy). |
Restore or Permanently Delete a Routing Strategy
| 1 |
From the Management Portal navigation bar, choose Routing Strategy. | ||
| 2 |
On the Routing Strategy page, click Deleted Strategies. | ||
| 3 |
Choose an entry point or queue from the Select Entry Point/Queue drop-down list. | ||
| 4 |
Click the ellipsis button beside the strategy that you want to either restore or permanently delete and do one of the following:
| ||
| 5 |
If you are restoring a strategy, modify the settings as required, and click Restore.
If any settings conflict with an existing routing strategy, a message informs you. In this case, you must modify the settings before you can restore the strategy. |
Audio on Hold
When a call is queued on the network, an audio file continues to play until the call is distributed to a team with available capacity. If the call is queued for longer than the length of the audio content, the audio file loops back and restarts from the beginning.
We recommend that the audio file include a brief delay message followed by music. The message should announce the name of the associated queue, instruct the caller to hold for the next available agent, and include a warning that calls may be monitored.
You can record one audio file for each strategy, so the message can vary by time of day, day of week, holiday schedule, and other factors.
Working with Global Routing Overrides
A global routing override is a routing strategy that applies to one or more Telephony entry points. When a call arrives at an entry point, the routing engine checks whether a Global Routing Override exists for that entry point. If a Global Routing Override exists, it becomes the current routing strategy for the entry point, overriding any standard routing strategies associated with that entry point.
Creating a global routing override enables you to change the routing strategies quickly and easily for many entry points simultaneously in urgent situations, rather than changing each routing strategy individually.
Global routing overrides operate in the Tenant time zone.
View global routing overrides
Use this procedure to view a list of global routing overrides.
Before you begin
You require Administrator access privileges to perform this procedure.
| 1 |
From the Management Portal navigation bar, choose Routing Strategy. The Routing Strategy page opens. |
| 2 |
From the menu bar, choose . The Global Routing Overrides page opens to display the Global Routing Overrides List. This page displays all existing global routing overrides. You can use the Search function at the top-right of the List area to find your target. See Global routing override parameters for a description of the parameters that are visible on the page. |
| 3 |
(Optional) To export the list of global routing overrides for data analysis, click the ellipsis button near the top-right side of the page and click Excel or CSV. |
| 4 |
(Optional) To display the details of a routing overrides or to edit it, click the ellipsis button at the left of the listed overrides and then click Edit. See Edit a global routing override for further detail on editing a routing override. |
Create global routing overrides
You can change the contact handling flow for multiple telephony entry points at the same time, such as for a holiday or emergency situation. Preconfigure one or more flows that you can apply quickly as an override when needed. When it becomes active, the global routing override only applies to new calls, while active calls follow the current entry point routing strategies.
By default, you create global routing overrides in the Tenant time zone. All the data that are displayed on the Global Routing Overrides page or dashboard are based on the Tenant time zone. |
You can choose between two methods to create a global routing override:
Create a global routing override
Use this procedure to create a global routing override.
Before you begin
You require Administrator access privileges to perform this procedure.
| 1 |
From the Management Portal navigation bar, choose Routing Strategy. The Routing Strategy page opens. |
| 2 |
From the menu bar, choose . The Global Routing Overrides page opens to display the Global Routing Overrides List. This page shows all existing global routing overrides. |
| 3 |
From the Global Routing Overrides page, click + New Override. The Create Global Routing Override page opens. |
| 4 |
Configure the new global routing override as described in Global routing override parameters. |
| 5 |
Click Save or Cancel. |
Create a global routing override from a copy
Use this procedure to create a global routing override from a copy of an existing override.
Before you begin
You require Administrator access privileges to perform this procedure.
| 1 |
From the Management Portal navigation bar, choose Routing Strategy. The Routing Strategy page opens. |
| 2 |
From the menu bar, choose . The Global Routing Overrides page opens to display the Global Routing Overrides List. This page shows all existing global routing overrides. |
| 3 |
Locate the global routing override you want to copy to create a new override. You can use the Search function at the top-right of the Global Routing Overrides List area to find your target. |
| 4 |
Click the ellipsis button to the left of a listed override, and then click Copy. The Copy Global Routing Override page opens. |
| 5 |
Change the settings as required, and in accordance with instructions provided in Global routing override parameters. |
| 6 |
Click Save or Cancel. |
Edit a global routing override
Use this procedure to edit an existing global routing override.
Before you begin
You require Administrator access privileges to perform this procedure.
| 1 |
From the Management Portal navigation bar, choose Routing Strategy. The Routing Strategy page opens. |
| 2 |
From the menu bar, choose . The Global Routing Overrides page opens to display the Global Routing Overrides List. This page shows all existing global routing overrides. |
| 3 |
Locate the global routing override you want to edit. You can use the Search function at the top-right of the Global Routing Overrides List area to find your target. |
| 4 |
Click the ellipsis button at the left of the entry point you want to modify, and then click Edit. The Overwrite Global Routing Override page opens. |
| 5 |
Edit the routing override parameters in accordance with the information provided in Global routing override parameters. |
| 6 |
Click Save or Cancel. |
Global routing override parameters
Parameters for Global Routing Overrides page
The following table lists and describes the parameters you see in the Global Routing Overrides List area on the Global Routing Overrides page.
|
Column |
Description | ||
|---|---|---|---|
|
Name |
Displays the name you assign to the override. You can't change the override name after you create it. | ||
|
ID |
Displays the system-assigned number of the override. | ||
|
Status |
Indicates the status of the override.
| ||
|
Default |
Indicates whether the global routing override is the default routing strategy (Yes) or isn't the default routing strategy (No). | ||
|
Repetition |
Specifies whether the override repeats daily or only on specific days of the week. | ||
|
Start Date |
Displays the date on which the override starts. | ||
|
End Date |
Displays the date on which the override ends. | ||
|
Start Time |
Displays the time at which the override starts (in 24-hour format) for any given day in the specified date range. | ||
|
End Time |
Displays the time at which the override ends (in 24-hour format) for any given day in the specified date range. | ||
|
Time Zone |
Displays the Tenant time zone. Global routing overrides operate in the Tenant time zone. | ||
|
Flow |
Lists the associated call flows when a routing override is executing. |
Parameters for Create, Overwrite, Copy, and Restore Gobal Routing Override pages
The following table lists and describes the parameters that you see on the:
-
Create Global Routing Override page
-
Overwrite Global Routing Override page
-
Copy Global Routing Override page
-
Restore Global Routing Override page
Use this information to configure new or copied overrides and edit existing ones.
| Parameter |
Description | ||||
|---|---|---|---|---|---|
|
General Settings | |||||
|
Name |
Enter the name for the global routing override. You can't change the name after it's created. If you copy an override, you can change the name of the copy. | ||||
|
Enterprise Name |
Displays the name of the Tenant. | ||||
|
Channel Type |
Displays the only valid channel type: Telephony | ||||
|
Entry Points or Queues |
This field appears only if you are creating or copying a global routing override. Choose the entry points or queues to which the global routing override applies. | ||||
|
Routing Type |
This option is available only for queues. It is not available for proxy queues.
| ||||
|
Routing Type (cont'd) |
| ||||
|
Status |
Click the Status toggle button to set the status of the global routing override to either Active or Not Active. When set to Active, the routing override activates and deactivates on the dates and at the times specified in the related Start and End Date and Start and End Time fields. | ||||
|
Time Settings | |||||
|
Time zone |
Displays the Tenant time zone. Global routing overrides operate in the Tenant time zone. | ||||
|
Start Date End Date |
Click in each of these fields and use the calendar controls to specify the start date (the date the global routing override becomes effective) and end date (the date the global routing override expires). | ||||
|
Start Time End Time |
Enter in 24-hour format (0000–2400) the time of day you want the global routing override to start and end. | ||||
|
Day of Week |
From the drop-down list:
| ||||
|
Advanced Settings | |||||
|
Music on Hold |
From the drop-down list, choose the name of the audio (.wav) file to play for calls when an agent puts a call on hold. Music in Queue (MIQ) is handled from Flow. When a contact is queued and if no agent is available, the customer is engaged with MIQ. | ||||
|
Maximum Time in Queue |
If this is a standard Webex Contact Center queue routing strategy, enter the length of time to wait, in seconds, before the system routes a queued call to the overflow destination number provisioned for the queue. Cisco recommends setting this to 1800 (30 minutes) or to three times the average queue length during busy hours. If this is an email routing strategy, set this parameter to a value high enough to avoid overflow. By default, this field adopts the value provisioned for the queue.
| ||||
|
Retries within the Team |
If this is a standard Webex Contact Center queue routing strategy, specify the maximum number of attempts the system makes to send a call to a team before it routes the call to the next available team. The system makes no further attempts to send the call to that team again. Exceptions:
| ||||
|
Flag as Default Routing Strategy |
This setting is available only if you create a new override or copy an existing one. Set to Yes if you want this global routing override to be the default global routing override for the specified time interval for this entry point or queue. Set to No to create an exception to the default schedule, such as a holiday. This override overrides the default override. That is, the system first checks for a override that isn’t flagged as default, and if none exists, the system uses the default override.
| ||||
|
Call Control | |||||
|
Control Script |
Select a call control script from the drop-down list. Every strategy must have a control script associated with it, which defines how calls are handled. If appropriate, change the script's default parameters in the fields displayed. For more information, see Assigning Call Control Scripts and Parameters.
| ||||
|
Flow |
Choose a flow to override the contact handling behavior for the selected entry points during the configured time period. | ||||
|
Call Distribution |
This parameter applies to queues only. It does not apply to proxy queues. If this is a standard queue routing strategy, specify which teams you want to associate with this strategy and organize them into groups. See “Specifying Call Distribution Settings” on page 166 for details. In addition, do the following (as described in “Assigning Teams and Skill-Relaxation Settings to Groups” beginning on page 168): • If the routing type is Load Balance, assign percentage spreads or capacities to each team in Group 1. You can add additional groups, but you cannot assign percentage spreads or capacities to the teams in those additional groups. • If the routing type is Priority, assign priorities. Note that a specific priority can be assigned to only one team within the strategy (for example, only one team can have a priority of 1 assigned to it). • If the routing type is Skills Based, specify skill relaxation settings if appropriate. If this is a routing strategy for an outdial queue, you must specify a team in the Call Distribution section. The specified team is only a placeholder and is not used. In addition, be sure to create only one group for an outdial queue routing strategy. |
Delete a global routing override
Use this procedure to delete a global routing strategy.
Before you begin
| 1 |
From the Management Portal navigation bar, choose Routing Strategy. The Routing Strategy page opens. |
| 2 |
From the menu bar, choose . The Global Routing Overrides page opens to display the Global Routing Overrides List. This page shows all existing global routing overrides. See Global routing override parameters for a description of the elements that are visible on the page. |
| 3 |
Locate the global routing override you want to edit. You can use the Search function at the top-right of the Global Routing Overrides List area to find your target. |
| 4 |
Click the ellipsis button to the left of the routing override you want to delete, then click Delete. In the confirmation dialog box that opens, click OK. The routing override moves to the Deleted Global Routing Overrides page where it awaits restoration or permanent deletion. For more information, see Restore or Permanently Delete a Routing Strategy. |
Restore or permanently delete a global routing override
Use this procedure to restore or permanently delete a global routing override.
Before you begin
| 1 |
From the Management Portal navigation bar, choose Routing Strategy. The Routing Strategy page opens. | ||
| 2 |
From the menu bar, choose . The Global Routing Overrides page opens to display the Global Routing Overrides List. This page shows all existing global routing overrides. See Global routing override parameters for a description of the parameters that are visible on the page. | ||
| 3 |
Click the Deleted Global Routing Overrides button at the top-right side of the page. The Deleted Global Routing Overrides page opens displaying a list of deleted routing overrides, if any exist. | ||
| 4 |
In the Deleted Global Routing Overrides List view, locate the routing override you want to either restore or permanently delete. You can use the Search function at the far-right of the page to locate your target. | ||
| 5 |
Click the ellipsis button to the left of the routing override you want to either restore or permanently delete and do one of the following:
|
Flow Designer Overview
Flow Designer provides an interface to create real-time flows to meet your organizational requirements. Pre-defined activities related to call handling and flow control serve as building blocks for flow creation. The drag-and-drop interface of the Flow Designer provides easy configuration of the flow components. You can set the properties of each activity that influences flow execution. You can also configure variables and expressions to define flow logic.
Getting Started
Before you use Flow Designer, you must provision several entities from the Webex Contact Center Management Portal and the Control Hub. You can use these entities directly, as part of Flow Designer (for example, Queues and Audio Files), or indirectly to enable contact routing (for example, Call Distribution in Queue Routing Strategies).
You must configure the following items before you build flows in Flow Designer:
-
Entry Points
-
Queue
-
Agents
-
User Profile
-
Desktop Profile
-
Teams
-
Virtual Agent
-
Audio Files
Key Terminology
The following terms are referenced in this chapter:
-
Activity: A single step of a flow, as represented by a node in the Flow Designer interface. For example, play a message or make an HTTP request. This is the element that is dragged and dropped by the user into a flow.
For activity properties which are drop-down based, search filter is enabled by default. If there’s a higher number of options available in a drop-down list that is beyond the default limit, you can enter a keyword to search and choose the desired option from the autopopulated result.
-
Event: An internal or external stimulus to the system which may cause a flow or flow path to be executed. These may be Kafka messages, external HTTP requests, user actions, etc. Flow Designer is an event-driven application that executes flows in response to events. If and when certain events are triggered, flows are automatically executed as configured.
-
Flow: A user-defined sequence of activities that are executed in response to an event.
-
Link: A link is the arrow that connects one activity to another. It indicates the direction of the flow and dependency between events. To delete a link and break the connection between two activities, click on the link to reveal the delete icon, and proceed to delete the line.
Access the Flow Designer Application
Flow Designer uses Single Sign-on (SSO) using Cisco Common Identity. If you are already logged in to the Cisco Webex Control Hub or the Cisco Webex Contact Center Management Portal and when you attempt to access Flow Designer, you will automatically gain access to the application. If not, the system prompts you to enter your SSO credentials in the standard login screen.
Before you begin
To access the Flow Designer application, you must have a Premium Agent License and a user profile that has rights to edit the Routing Strategies module.
|
From the Management Portal navigation bar, choose . |
Flow Designer Browser Requirements
The following table lists the supported browsers.
|
Browser |
Microsoft Windows 10 |
Microsoft Windows 11 |
Mac OS X |
Chromebook |
|---|---|---|---|---|
|
Google Chrome |
76.0.3809 |
103.0.5060.114 |
76.0.3809 or higher |
76.0.3809 or higher |
|
Mozilla Firefox |
ESR 68 or higher ESRs |
ESR V102.0 or higher ESRs |
ESR 68 and higher ESRs |
NA |
|
Microsoft Edge |
42.17134 or higher |
103.0.1264.44 or higher |
NA |
NA |
|
Chromium |
NA |
NA |
NA |
79 or higher |
Configure the following browser options:
-
Enable cookies and site data.
-
Set the security level to Medium.
-
Enable Image option.
-
Disable pop-up blocker.
-
Enable JavaScript.
Flow Designer Email Requirements
Flow Designer supports the following email servers:
-
Office 365
-
Gmail
Flow Designer Layout
Activity Library
The Activity Library comprises the list of activities associated with Flow Designer. The user can drag and drop the activities to the Main Flow or Event Flows canvases to design their flows. The Activity Library has the following sections:
-
CALL HANDLING: You use Call Handling activities to build flows that handle voice interactions in the contact center. They are specific to the use case of handling calls through Interactive Voice Response (IVR) and virtual or human agents.
-
FLOW CONTROL: Flow Control activities are agnostic to Flow Type, and you use them to control the logic in the flow regardless of the use case.
You can hide and expand the Activity Library as desired to increase working space on the canvas between configurations.
Canvas, Main Flow, and Event Flows
The Canvas is the gray working space on which you drop the activities. You use the controls in the bottom-left side of the screen to move around the canvas and zoom in and zoom out. There are no constraints on the flow size or canvas usage.
Flow Designer has two tabs that allow extra canvas space:
These tabs logically separate different paths of your flow and create a more organized workspace.
Main Flow
Use the Main Flow tab to script the primary flow based on the Trigger Event defined in the Start Flow activity. In the Main Flow tab, you configure the end-to-end experience for a caller, starting from the Cisco Unified IP Interactive Voice Response (IVR) menu, until opting out or wrapping up the call. The flow contains predictable steps that the system executes in a sequence.
Event Flows
At any point during the execution of the Main Flow, the system triggers events that interrupt the Main Flow. For example, when an agent answers a phone call, the caller’s experience in the queue is interrupted. If you want to define unique behavior for when these events are triggered, you can script optional Event Flows. Event Flows are asynchronous to the Main Flow. You can’t predict if or when an Event Flow will be triggered. For this reason, Event Flows are optional and are intended to extend the Main Flow functionality.
You can configure multiple event handling flows in the Event Flows canvas. Each event flow must have a unique start and end, with no shared activities. |
For more information on event handlers, see Events.
Zoom Toolbar
The zoom toolbar in Flow Designer has Global Properties, zoom-in, and zoom-out buttons to display the Global Properties pane, and minimize or maximize the contents in the canvas.
-
Global Properties: Click the
icon to open the Global Properties pane. For more information, see Properties Pane. -
Zoom-in: Click the
icon on the toolbar. When you reach the maximum limit, the button is disabled. -
Zoom-out: Click the
icon on the toolbar. When you reach the maximum limit, the button is disabled. -
Copy and paste activities: Click the
 icon on the toolbar to copy and paste selected activities on the canvas. For more information, see Copy and Paste Activities.
Properties Pane
Flow Designer has a Properties pane that appears on the right of the application. You set the parameters for either the flow (Global Properties) or for a selected activity. You can hide and expand the pane to increase working space on the canvas between configurations.
The Global Properties pane displays by default when the Flow loads. Click the  icon to open the Global Properties pane. The icon helps you to open and close the Properties Pane when you work on flows. You can also click anywhere on the empty canvas to return to the Global Properties pane view. The Global Properties pane is not visible when you select an activity.
The following configurations are contained in the Global Properties pane:
-
(Optional) Provide a flow description.
-
Manage custom and predefined variables. For more information about flow variables, see Set Variable.
-
View Flow History information, including the owner, last edited date, and Flow Version number.
Click theicon to close the Global Properties pane.
There is currently no version control feature. The Flow Version is the number of times that the flow has been published.
Header Pane
The Header pane displays the name of your flow, which dynamically updates when you edit the flow name from the Global Properties pane. The header panel has a Sign Out button. Flow Designer allows you to save an existing flow draft if you wish to return and continue working later.
To save your drafts of the flows or to close the application, click Save Flow and Sign Out in the top-right corner of the application.
Footer Pane
The Footer Pane has the following:
-
Autosave Enabled: The left of the Footer pane indicates that Autosave is enabled. Flows are saved to avoid data loss, and an error notification appears if autosave is suspended.
There is a scenario in which data could be lost if you close the browser window while data is autosaving. We recommend you wait a few seconds after you make changes to your flow before you close the browser.
-
Application Version: The left of the Footer pane displays the version of the Flow Designer application. You can use the version for troubleshooting errors in the Flow Designer.
-
Flow Validation: Flow Validation checks if there are errors in a flow’s structure that will prevent the flow from working. You can enable the validation toggle on the right of the Footer Pane at any time. By default, validation is not running on the back end, so no errors display in the window. When the toggle is enabled, the backend validation commences and any errors in the flow are surfaced to the UI. For more information about Flow Validation, see Validate a Flow.
-
Flow Publishing: Before you can publish a flow, you must validate the flow and resolve any errors. The Publish button is disabled if the Validation toggle is off. Once validation is enabled, the Publish button remains disabled if there are any active errors in the flow. For more information about Flow Publishing, see Publish a Flow.
Flow Designer Activities and Events
Activities in Call Handling
Play Music
The Play Music activity plays music when a call arrives or is in a queue. You can choose an audio file to play, when you place a caller on hold.
You can configure an error-handling path (Undefined Error) to handle system errors that may occur during flow execution. For more information, see Error Handling. |
The following sections enable you to configure the Play Music activity:
General Settings
|
Parameter |
Description |
|---|---|
|
Activity Label |
Enter a name for the activity. |
|
Activity Description |
(Optional) Enter a description for the activity. |
Music Settings
If any of the ordered list inputs is empty, the system throws a Flow Error. Resolve these errors before publishing the flow. |
|
Parameter |
Description | ||
|---|---|---|---|
| Static Audio File | Choose this option if you wish to configure the static audio to be played from the Resources page in the Management Portal. Choose the name of the audio (.wav) file from the Music File drop-down list. For more information, see Upload an Audio Resource File. | ||
| Dynamic Audio File |
Choose this option if you wish to configure the audio to be played dynamically within a single flow. For example, you can configure this variable to play the audio prompt in multiple languages based on the customer's preference during the interaction. To configure the dynamic audio file, enter the audio variable value in the form of a pebble expression. For more information, see Pebble Template Syntax.
| ||
|
Start Offset |
Set the duration in seconds for the music file to play. For example, assume that your music file is 60 seconds long. If the Start Offset is set as 45 seconds and the music duration is 30 seconds, the file plays the last 15 seconds and loops back to the start and plays the first 15 seconds. 0 is the start time. You can enter the start offset as a static number (example: 20) or an expression (example: Ensure that your input has numeric values. | ||
|
Music Duration |
Specify the duration in seconds for the selected music file. (For example, 30 seconds). You can enter the music duration as a static number (example: 20) or an expression (example: Ensure that your input has numeric values. If the Start Offset and the Music Duration are longer than the file length, the music loops back to the start and continues to play. |
When you include the Play Music activity before the HTTP Request activity in a call flow, the HTTP request executes only after the audio is played fully. |
Feedback
Configure the Feedback activity to initiate post-call surveys (powered by Webex Experience Management) to collect feedback from callers. The following types of surveys are available:
-
IVR Post Call Surveys: Configure the Feedback activity in the Event Flows canvas in the Flow Designer, after the
AgentDisconnectedevent. Depending on the setup in Webex Experience Management, the contact center plays an IVR survey to the callers.The caller uses the keypad to answer the survey. If the caller partially answers the survey by not responding within the configured timeout duration or by providing invalid input, the contact center sends partial survey responses to Webex Experience Management.
Ensure that you use the Disconnect Contact activity after the Feedback activity to end the IVR call.
-
Email or SMS Post Call Surveys: Configure the Feedback activity in the Event Flows tab in the Flow Designer after the
PhoneContactEndedevent. Depending on the dispatch policy rules set up in Webex Experience Management, the contact center sends a survey to callers over email or SMS.
When you design a flow, a Consult interaction can't include a Post Call Survey Feedback activity.
You can configure an error-handling path (Undefined Error) to handle system errors that may occur during flow execution. For more information, see Event Flows. |
The following sections enable you to configure the Feedback activity:
General Settings
|
Parameter |
Description |
|---|---|
|
Activity Label |
Enter the name for the activity. |
|
Activity Description |
(Optional) Enter a description for the activity. |
Survey
To administer a survey to the customer, select from a list of questionnaires for Voice, or dispatches for Email or SMS surveys. The questionnaires and invitations that are configured in Webex Experience Management are available in the list.
| Parameter | Description |
|---|---|
|
Voice Based |
To play an inline survey to the customer, do the following:
|
|
Email/SMS Based |
To provide an offline Email/SMS survey to the customer, do the following:
|
Language Settings
Manage the language in which the customer experiences the survey. If the language is not supported in Webex Experience Management, the fallback language is English (US). For more information, see Webex Experience Management Language Support.
| Parameter | Description |
|---|---|
|
Override Language Settings |
Enable the Override Language Settings toggle button to set any custom language for Webex Experience Management.
If the Override Language Settings toggle button is not enabled, the |
Customer Information
Specify the customer information to be passed along with the prefills that Webex Experience Management sends to capture the survey response. Depending on the dispatch configurations set in Webex Experience Management, the contact center sends the prefill information.
| Parameter | Description |
|---|---|
|
Customer ID | (Optional) Select a unique identifier for the customer from the drop-down list. |
|
| (Optional) Select the email of the customer from the drop-down list. |
|
Phone Number | (Optional) Select the phone number of the customer from the drop-down list. |
Variable Passing
Specify the additional variables as custom prefills that are passed (in addition to survey responses) from Webex Contact Center to Webex Experience Management.
|
Parameter |
Description | ||
|---|---|---|---|
|
Key-Value | Indicates the optional variable parameters that the contact center passes to Webex Experience Management. The Key and Value columns allow you to enter a variable name and the associated value. The variable value can be either a string, an integer, or an expression with double curly braces syntax (in case of flow variable). For more information, see Custom Flow Variables. To add a variable parameter, click Add New. This adds a row where you can enter the respective key-value pair.
|
Advanced Settings
The Feedback activity has the following settings to help validate the expected DTMF responses from the customers.
|
Parameter |
Description |
|---|---|
|
Timeout |
Indicates the maximum duration for which the activity waits for response from the customer. The default value is 3 seconds. |
You can configure the maximum number of retry attempts in case of invalid or no DTMF input, as well as audio notification messages (for invalid input, timeout, and maximum retries exceeded) for questionnaires by using Webex Experience Management. For more information, see Retry And Timeout Settings In Post Call IVR Survey in Webex Experience Management documentation. |
Play Message
The Play Message activity plays an uninterruptible message to the caller. You can use the Play Message activity with or without the Text-to-Speech capability enabled. The configuration options change accordingly.
|
The following sections enable you to configure the Play Message activity:
General Settings
|
Parameter |
Description |
|---|---|
|
Activity Label |
Enter a name for the activity. |
|
Activity Description |
(Optional) Enter a description for the activity. |
Prompt
If you don't wish to use the Text-to-Speech capability in your prompt, disable the Text‐to‐Speech toggle button. By default, Text-to-Speech is not enabled.
You can configure up to five audio prompts (audio files and audio prompt variables combined). The full prompt is played to the caller in the configured order, alternating between the audio files and audio prompt variables.
If any of the ordered list inputs is empty, the system responds with a flow error. Resolve these errors before publishing the flow. |
|
Parameter |
Description | ||
|---|---|---|---|
|
Add Audio Files |
To configure the prompt without Text-to-Speech, add at least one prerecorded audio file. Choose the desired audio file from the drop-down list that is labeled as 1. To add more audio files, click Add New. The files play to the caller in the order in which they appear. To remove an audio file from the sequence, click the Delete icon that appears next to each drop-down list. | ||
|
Add Audio Variable |
Use this option to configure the audio prompt to be played dynamically to the customers. For example, you can configure this variable to play the audio prompt in multiple languages based on the customer's preference during the interaction. To configure the audio variable, click Add Audio Variable. Enter the variable value in the form of a pebble expression. For more information, see Pebble Template Syntax.
|
To use the Text-to-Speech capability in your prompt, enable the Text‐to‐Speech toggle button. You can configure up to a total of five audio prompts (Text-to-Speech messages, audio files, and audio prompt variables combined). The full prompt is played to the caller in the configured order, alternating between the Text-to-Speech messages, audio files, and audio prompt variables.
|
Parameter |
Description | ||
|---|---|---|---|
|
Connector |
Indicates the connector to authenticate the Text‐to‐Speech service. The drop-down list displays the name of all Google connectors in the Control Hub. Only the active connectors are displayed. Select the connector from the drop‐down list. | ||
|
Override Default Language & Voice Settings |
Use this toggle button to override the voice settings configured in the | ||
|
Output Voice |
Indicates the output voice name. This field appears only if you enable the Override Default Language & Voice Settings toggle button. Select the output voice name from the drop-down list.
| ||
| Add Audio File |
To alternate Text-to-Speech messages with prerecorded audio files, click Add Audio File. This adds a new row to the configuration where you can choose the desired audio file from the drop-down list. To remove an item from the sequence, click the Delete icon that appears next to the corresponding input or drop-down list. | ||
| Add Text-to-Speech Message |
To build the prompt, use Text-to-Speech or a mix of prerecorded audio files and Text-to-Speech messages. Click Add Text-to-Speech Message to add a new text input field to the prompt creation section. In this field, type the message to be played to the caller in the selected Language and Voice. The field accepts two types of input—raw text (plaintext) or Speech Synthesis Markup Language (SSML)‐formatted data. You can also use variables as part of the message to read the dynamic content. | ||
|
Add Audio Variable |
Use this option to configure the audio prompt to be played dynamically to the customers. For example, you can configure this variable to play the audio prompt in multiple languages based on the customer's preference during the interaction. To configure the audio variable, click Add Audio Variable. Enter the variable value in the form of a pebble expression. For more information, see Pebble Template Syntax.
|
Text-to-speech settings
The text-to-speech settings include the following settings that are used to validate the expected DTMF input from the caller.
|
Parameter |
Description |
|---|---|
|
Speaking Rate |
Indicates the rate of speech. Increase or decrease the numeric input to maintain the ideal rate of speech and control the output speaking rate. Valid values for the numeric input are in the range of 0.25 to 4.0 words per minute (wpm). The default value is 1.0 wpm. |
|
Volume Gain |
Indicates the increase or decrease in volume output. Increase or decrease the numeric input to maintain the ideal volume of output speech. Valid entries for the numeric input are in the range of –96.0 decibels to 16.0 decibels (dB). The default value is 0.0 dB. |
|
Screen Pop
A Screen Pop is a window or a dialog box that appears in an agent’s Desktop when the agent answers a customer call. The agent gets more information about the caller to proceed further with a conversation. For more information, see the section about Agent Desktop in the Cisco Webex Contact Center Agent Desktop User Guide.
The Screen Pop activity becomes relevant only after an agent involves in an interaction. It typically uses the AgentAnswered event and the PhoneContactEnded event.
When you use this activity in the Main Flow, you expose a set of events in the Event Flows tab. For more information on these events, see Events.
You can build a single event handling flow for each event. For example, when an agent accepts an inbound call, a Screen Pop displays. The Screen Pop activity contains information that is based on the flow variables. The Screen Pop integrates Webex Contact Center with other business applications such as CRM (Salesforce), ticketing tools, and order entry system.
Complete this configuration in the Event Flows tab in Flow Designer. To define different Screen Pop behaviors that are based on Main Flow criteria, use a Condition or Case activity. You can define one Screen Pop for each flow.
You can configure an error-handling path (Undefined Error) to handle system errors that may occur during flow execution. For more information, see Event Flows. |
Screen Pop for new digital channels must be configured in the Connect Flow Builder. For more information, see https://help.imiconnect.io/docs/wxcc-overview. |
The following sections enable you to configure the Screen Pop activity:
General Settings
|
Parameter |
Description |
|---|---|
|
Activity Label |
Enter a name for the activity. |
|
Activity Description |
(Optional) Enter a description for the activity. |
URL Settings
Use the URL settings option to define a URL for Screen Pop configurations. To type a variable, use the syntax {{variables}}.
For example, {{NewPhoneContact.ANI}}.
|
Parameter |
Description |
|---|---|
|
Screen Pop URL |
Enter the URL of the intended website, such as http://www.salesforce.com. After the agent answers a call, the configured URL populates the Screen Pop in the Desktop. |
|
Query Parameters |
Enter the various variables in the payload. To add a new query parameter, click Add New. Enter the attribute–value details in the KEY and VALUE fields respectively. |
|
Screen Pop Desktop Label |
Enter a short and intuitive custom display text that replaces the Screen Pop URL on the Agent Desktop. After the agent answers or ends a call, this label appears as a hyperlink in the Screen Pop notification on the Agent Desktop. For example, if the Screen Pop URL is http://www.salesforce.com and the Screen Pop Desktop Label is Salesforce, the system displays the hyperlink as Salesforce in the Screen Pop notification. This label also appears in the Screen Pop tab. If the screen pop label is missing, the system displays the default label Screen Pop. |
Display Settings
|
Parameter |
Description |
|---|---|
|
New browser tab |
The Screen Pop displays in a new browser tab every time without affecting the existing Screen Pop. |
|
Existing Screen Pop tab |
The Screen Pop displays inside the existing browser tab replacing the previous Screen Pop. |
|
Inside Desktop |
The Screen Pop displays as a tab in the Auxiliary Information pane in the Desktop. If the Screen Pop display option is Inside Desktop, the Screen Pop displays in the Auxiliary Information pane for the duration of the call. The Screen Pop is retained even when you select a task from another channel type in the Task List pane. |
If the Screen Pop display option is Inside Desktop or Existing browser tab, data being entered in the Screen Pop for a call is lost if the agent accepts a new call. To prevent the loss of data, configure the display option as New browser tab. For example, consider that the Screen Pop display option is Inside Desktop. If the agent accepts a new inbound call while entering data in the Screen Pop for a previous call, the data being entered for the previous call is lost when the Screen Pop for the new call pops up. |
Collect Digits
The Collect Digits activity prompts the caller to enter a Dual-Tone Multi-Frequency (DTMF) input such as an account number. Similar to the Play Message and Menu activities, the Collect Digits activity can use audio files, text-to-speech messages, or a combination of both.
This activity accepts DTMF input digits from 0 through 9. The caller can enter # or * as a termination symbol to indicate the end of DTMF input.
|
You can configure these error-handling paths to handle flow execution errors:
|
Path |
Description |
|---|---|
|
Entry Timeout |
Indicates the error output path that the flow takes after the entry timeout duration has elapsed. Configuring this path ensures that the caller doesn’t go idle for too long. Modify the entry timeout duration in the Advanced Settings section of the Properties pane. Consider playing a message to clarify what is expected from the caller, and then loop back to the start of the activity. |
|
Unmatched Entry |
Indicates the error output path that the flow takes if the caller enters a DTMF input that is not configured in the Custom Menu Links section. Configuring this path ensures that the caller is allowed to restart the activity and try again. Consider playing a message to clarify what is expected from the caller, and then loop back to the start of the activity. |
|
Undefined Error |
For more information, see Error Handling. |
You can configure the Collect Digits activity using the following settings:
General Settings
|
Parameter |
Description |
|---|---|
|
Activity Label |
Enter a name for the activity. |
|
Activity Description |
(Optional) Enter a description for the activity. |
Prompt settings without text-to-speech enabled
By default, text-to-speech is not enabled. To configure the prompt without text-to-speech, add at least one prerecorded audio file. Choose the audio file from the drop-down list. You can configure up to a total of five audio prompts (audio files and audio prompt variables combined). The full prompt is played to the caller in the configured order, alternating between the audio files and audio prompt variables.
If any of the ordered list inputs is empty, the system displays a Flow Error. Resolve these errors before publishing the flow. |
|
Parameter |
Description | ||
|---|---|---|---|
|
Add Audio File(s) |
To add more audio files, click Add New. The files are played to the caller in the sequence that they are configured. To remove an audio file from the sequence, click the Delete icon that appears beside each drop-down list. The Delete icon doesn’t appear when only one drop-down list is available because you need at least one audio file for the prompt.
| ||
|
Add Audio Variable |
Use this option to configure the audio prompt to be played dynamically to the customers. For example, you can configure this variable to play the audio prompt in multiple languages based on the customer's preference during the interaction. To configure the audio variable, click Add Audio Variable. Enter the variable value in the form of a pebble expression. For more information, see Pebble Template Syntax.
| ||
|
Make Prompt Interruptible |
The Make Prompt Interruptible check box allows you to indicate if the configured prompt can be interrupted by the caller's input or event. By default, prompts can't be interrupted. If the prompt is important for the caller to hear, don’t allow it to be interruptible.
|
Prompt settings with text-to-speech enabled
By default, text-to-speech isn’t enabled. To use text-to-speech in your prompts, enable the Text-to-Speech toggle button. You can configure up to a total of five audio prompts (text-to-speech messages, audio files, and audio prompt variables combined). The full prompt is played to the caller in the configured order, alternating between the text-to-speech messages, audio files, and audio prompt variables configured.
|
Parameter |
Description | ||
|---|---|---|---|
|
Connector |
The Language and Voice options change based on the selected connector. The selection dictates the language, gender, and tone that the system uses to read text-to-speech messages to the caller. If you’re using Google TTS, you can preview the various options on the Google Text to Speech page. | ||
|
Override Default Language & Voice Settings |
Use this toggle to override the voice settings configured in the | ||
|
Output Voice |
Indicates the output voice name. This field appears only if you enable the Override Default Language & Voice Settings toggle button. Select the output voice name from the drop-down list.
| ||
|
Add Text to Speech Message |
When you build your prompt, you can use text-to-speech or a mix of prerecorded audio files and text-to-speech messages. Click Add Text-to-Speech Message to add a new text input field to the Prompt section. Here, you can type the message that is read to the caller with the selected language and voice. The field accepts two types of input: raw text (plaintext) or SSML-formatted data. You can use variables also as part of the message to read the dynamic content. To specify a variable, use this syntax: | ||
|
Add Audio File |
To alternate text-to-speech messages with prerecorded audio files, click Add Audio File. This adds a new row to the configuration where you can select an audio file from a drop-down list. To remove an item from the sequence, click the Delete icon next to that item. The Delete icon isn’t visible when only one field is configured, because at least one message or audio file is required. | ||
|
Add Audio Variable |
Use this option to configure the audio prompt to be played dynamically to the customers. For example, you can configure this variable to play the audio prompt in multiple languages based on the customer's preference during the interaction. To configure the audio variable, click Add Audio Variable. Enter the variable value in the form of a pebble expression. For more information, see Pebble Template Syntax.
| ||
|
Make Prompt Interruptible |
The Make Prompt Interruptible check box allows you to indicate if the configured prompt can be interrupted by the caller's input or event. By default, prompts can't be interrupted. If the prompt is important for the caller to hear, don’t allow it to be interruptible.
|
Text-to-speech settings
The text-to-speech settings include the following settings that are used to validate the expected DTMF input from the caller.
Text-to-speech settings is not applicable for the Cisco Cloud Text-to-Speech connector. |
|
Parameter |
Description |
|---|---|
|
Speaking Rate |
Indicates the rate of speech. Increase or decrease the numeric input to maintain the ideal rate of speech and control the output speaking rate. Valid values for the numeric input are in the range of 0.25 to 4.0 words per minute (wpm). The default value is 1.0 wpm. |
|
Volume Gain |
Indicates the increase or decrease in volume output. Increase or decrease the numeric input to maintain the ideal volume of output speech. Valid entries for the numeric input are in the range of –96.0 decibels to 16.0 decibels (dB). The default value is 0.0 dB. |
Advanced Settings
The Collect Digits activity includes the following advanced settings that are used to validate the expected DTMF input from the caller.
|
Parameter |
Description | ||
|---|---|---|---|
|
No-Input Timeout |
Indicates the maximum duration that the Collect Digits activity waits for input, before proceeding to the Entry Timeout path. The default value is 3 seconds. | ||
|
Inter-Digit Timeout |
Indicates the maximum duration for which the Collect Digits activity waits between digits, before continuing in the flow. This occurs only after at least one digit is entered. The caller can enter the terminator symbol to indicate that the entry is completed, so that the call proceeds without waiting for the Inter-Digit Timeout.
| ||
|
Minimum Digits |
Indicates the minimum number of digits that the caller must enter. The default value is 1. If the caller enters the input that is less than this value, the flow follows the Unmatched Entry path that is configured in the Error Handling section. | ||
|
Maximum Digits |
Indicates the maximum number of digits that the caller can enter. The default value is 10. If the caller enters the input that is more than this value, the flow follows the Unmatched Entry path that is configured in the Error Handling section. | ||
|
Terminator Symbol |
Indicates the character that the caller can enter to specify the end of input. The Terminator Symbol can be either # or * depending on the configuration. By default, the Terminator Symbol is #. |
Output Variables
The Collect Digits activity includes the {{CollectDigits.DigitsEntered}} output variable. When the flow is executed, this variable stores the DTMF input that the caller entered during their interaction with the activity. Use this variable in later activities to control the flow sequence. The variable name dynamically changes based on the label that is associated with the Collect Digits activity. The system must capture multiple variable values if the flow uses more than one Collect Digits activity in the flow. For more information, see Event Output Variables.
Menu
The Menu activity allows you to build an Interactive Voice Response (IVR) experience in your flow. The activity plays a prompt that allows the caller to enter a DTMF digit. Based on the digit that the caller enters, the flow can take a different path.
A Menu can have 1–10 branches that are represented by digits 0–9.
You can use the Menu activity with or without text-to-speech enabled. The configuration options change accordingly.
You can configure these error-handling paths to handle flow execution errors:
|
Path |
Description |
|---|---|
|
Entry Timeout |
Indicates the error output path that the flow takes after the entry timeout duration has elapsed. Configuring this path ensures that the caller doesn’t go idle for too long. Modify the entry timeout duration in the Advanced Settings section of the Properties pane. Consider playing a message to clarify what is expected from the caller, and then loop back to the start of the activity. |
|
Unmatched Entry |
Indicates the error output path that the flow takes if the caller enters a DTMF input that is not configured in the Custom Menu Links section. Configuring this path ensures that the caller is allowed to restart the activity and try again. Consider playing a message to clarify what is expected from the caller, and then loop back to the start of the activity. |
The following sections enable you to configure the Menu activity:
General Settings
|
Parameter |
Description |
|---|---|
|
Activity Label |
Enter a name for the activity. |
|
Activity Description |
(Optional) Enter a description for the activity. |
Prompt
Prompt settings without text-to-speech
By default, text-to-speech is not enabled. To use text-to-speech in your prompt, enable the Text-to-Speech toggle button. Choose the audio file from the drop-down list. You can configure up to a total of five audio prompts (audio files and audio prompt variables combined). The activity plays the full prompt to the caller in the configured order, alternating between the audio files, and audio prompt variables configured.
If any of the ordered list inputs is empty, the system throws a Flow Error. Resolve these errors before publishing the flow. |
|
Parameter |
Description | ||
|---|---|---|---|
|
Add Audio Files |
To configure the prompt without text-to-speech, add at least one pre‐recorded audio file. Choose the file from the drop‐down field labeled 1. To add more audio files, click Add New. To remove an audio file from the sequence, click the Delete icon that appears beside the drop‐down list. Because at least one audio file is required, the Delete icon is not visible if only one drop‐down field is visible.
| ||
|
Add Audio Variable |
Use this option to configure the audio prompt to be played dynamically to the customers. For example, you can configure this variable to play the audio prompt in multiple languages based on the customer's preference during the interaction. To configure the audio variable, click Add Audio Variable. Enter the variable value in the form of a pebble expression. For more information, see Pebble Template Syntax.
| ||
|
Make Prompt Interruptible |
This option allows you to indicate if the configured prompt can be interrupted by the caller's input or event. By default, Make Prompt Interruptible is not checked for the Menu activity. If you want the caller to be able to interrupt the menu when they enter their DTMF input, consider making the message interruptible.
|
Prompt settings with text-to-speech
To use text-to-speech in your prompt, enable the Text-to-Speech toggle button. You can configure up to a total of five audio prompts (Text-to-Speech messages, audio files, and audio prompt variables combined). The activity plays the full prompt to the caller in the configured order, alternating between the Text-to-Speech messages, audio files, and audio prompt variables.
|
Parameter |
Description | ||
|---|---|---|---|
|
Connector |
Choose a connector to authenticate the text-to-speech service. The drop‐down list displays the names of the Google connectors that are configured in the Control Hub. | ||
|
Override Default Language & Voice Settings |
Use this toggle button to override the voice settings configured in the | ||
|
Output Voice |
Select the output voice name from the drop-down list.
| ||
|
Add Audio File(s) |
To alternate text-to-speech messages with prerecorded audio files, click Add Audio File. This adds a new row to the configuration where you can choose an audio file from a drop‐down list. To remove an item from the sequence, click the Delete icon near that item. Because at least one message or audio file is required, the Delete icon is not visible when only one field is configured. | ||
|
Add Text to Speech Message |
When you build your prompt, you can exclusively use text-to-speech or you can use a mix of prerecorded audio files and text-to-speech messages. Click Add Text-to-Speech Message to add a new text input field to the prompt creation section. You can type the message that should be read to the caller using the selected Language and Voice. The field accepts two types of input: raw text (plain text) or Speech Synthesis Markup Language (SSML)‐formatted data. You can also use variables as part of the message to read the dynamic content. If typing a variable, use this syntax: | ||
|
Add Audio Variable |
Use this option to configure the audio prompt to be played dynamically to the customers. For example, you can configure this variable to play the audio prompt in multiple languages based on the customer's preference during the interaction. To configure the audio variable, click Add Audio Variable. Enter the variable value in the form of a pebble expression. For more information, see Pebble Template Syntax.
| ||
|
Make Prompt Interruptible |
This option allows you to indicate if the configured prompt can be interrupted by the caller's input or event. By default, Make Prompt Interruptible is not checked for the Menu activity. If you want the caller to be able to interrupt the menu when they enter their DTMF input, consider making the message interruptible.
|
Custom Menu Links
The Custom Menu Links option allows you to configure one or more menu links based on the organizational requirements.
This capability helps one or more users to select different branches in the flow based on the selected digit.
You can configure up to ten Custom Menu Links. |
|
Parameter |
Description |
|---|---|
|
DIGIT |
Choose a number from the drop‐down list. DIGIT corresponds to the DTMF input that the caller enters to indicate which path of the flow to follow. Digits 0‐9 are available for selection, and you can select each option only once. |
|
LINK DESCRIPTION |
Add a description to indicate what path of the flow the digit corresponds to. For example, if pressing 1 leads the caller to a queue that can help with a sales question, type |
|
Add New |
Click Add New to add more menu links. You can add a digit and link description for each row. You can add up to ten links. |
You can configure menu links in both the Properties pane and in the activity itself. This allows for different configuration options that are based on the preference of the user. The system updates the content in real‐time in both locations when an edit is made. |
Text-to-Speech settings
The text-to-speech settings include the following settings that are used to validate the expected DTMF input from the caller.
Text-to-speech settings is not applicable for the Cisco Cloud Text-to-Speech connector. |
|
Parameter |
Description |
|---|---|
|
Speaking Rate |
Indicates the rate of speech. Increase or decrease the numeric input to maintain the ideal rate of speech and control the output speaking rate. Valid values for the numeric input are in the range of 0.25 to 4.0 words per minute (wpm). The default value is 1.0 wpm. |
|
Volume Gain |
Indicates the increase or decrease in volume output. Increase or decrease the numeric input to maintain the ideal volume of output speech. Valid entries for the numeric input are in the range of –96.0 decibels to 16.0 decibels (dB). The default value is 0.0 dB. |
|
Entry Timeout |
Specifies the maximum time that the activity waits for input before proceeding down the Entry Timeout path. The default value is 3 seconds. |
Output Variable
The Menu activity employs the {{Menu.OptionEntered}} output variable. When the system executes the flow, this variable stores the DTMF input that the caller entered during their interaction with the Menu.
You can use the {{Menu.OptionEntered}} output variable in later activities to control the flow sequence. The variable name dynamically changes based on the label that is associated with the Menu activity. The system can capture multiple variable values when the flow uses more than one Menu activity. For more information about this variable type, see Activity Output Variables.
Blind Transfer
Transferring a voice call to either an external or third-party Dial Number (DN) through Interactive Voice Response (IVR) without agent intervention triggers the Blind Transfer activity.
The Blind Transfer activity applies when a call should be transferred to an external or third-party DN based on a flow criteria set. The transfer can also be initiated to an external bridge. The configured criteria set triggers the activity.
In case of blind transfer, the previous skill limitations will be retained when a call is transferred to a skill based queue. This is because skill limitations are calculated when a flow is executed. However, since the flow is not executed in case of blind transfer, the previous skill limitations are retained.
You can configure an error-handling path (Undefined Error) to handle system errors that may occur during flow execution. For more information, see Event Flows. |
The following sections enable you to configure the Blind Transfer activity.
|
General Settings
|
Parameter |
Description |
|---|---|
|
Activity Label |
Enter a name for the activity. |
|
Activity Description |
(Optional) Enter a description for the activity. |
Transfer Dial Number
The Transfer Dial Number section indicates the DN that a call is transferred to. You can enter the number manually or select a dynamic number through a variable.
|
Parameter |
Description |
|---|---|
|
Transfer Dial Number |
Enter the DN to which a call should be transferred. This can be a specific number that is manually entered, or a dynamic number that is indicated through a flow variable. |
|
Specific Dial Number |
Enter the number to which the call must be transferred. |
|
Variable Dial Number |
Choose the flow variable from the drop-down list. The variable stores the number to which the call should be transferred. |
Virtual Agent
Before you use a Virtual Agent:
-
Set up a Dialogflow agent. For more information on building a Dialogflow agent in the Google Cloud, see Build an agent.
Include
Helloas a training phrase in the preferred language for the Dialogflow agent to start a conversation with the caller. You can add this training phrase in the default welcome intent or in any other intent of the Dialogflow agent. For more information, see Intents.Depending on the way you set up the Dialogflow agent, you can use the Virtual Agent activity to handle different kinds of use cases.
-
Configure a Virtual Agent in Control Hub. For more information, see Configure a Virtual Agent for Webex Contact Center.
You can configure an error-handling path (Undefined Error) to handle system errors that may occur during flow execution. For more information, see Event Flows. |
The following sections enable you to configure the Virtual Agent activity:
General Settings
|
Parameter |
Description |
|---|---|
|
Activity Label |
Enter a name for the activity. |
|
Activity Description |
(Optional) Enter a description for the activity. |
Conversational Experience
|
Parameter |
Description | ||
|---|---|---|---|
| Virtual Agent | Choose a Virtual Agent in Control Hub. The Virtual Agent powers the natural language conversation as part of the IVR experience with the caller. | ||
|
Make Prompts Interruptible |
Enables the customers to interrupt the Virtual Agent to make new requests or end the call. | ||
|
Override Default Language & Voice Settings |
Use this toggle button to override the language and voice settings that are configured in
| ||
|
Input Language |
Indicates the language that the customer uses while speaking to the Virtual Agent. This field appears only if you enable the Override Default Language & Voice Settings toggle button.
Virtual Agent voice deployments in Webex Contact Center support only languages with the recognition model as an enhanced phone call(see Supported voices and languages that are available with Dialogflow Essentials (ES) (see Language reference). | ||
|
Output Voice |
The default value is
|
For more information on Text to Speech voices, see Supported voices and languages.
Variable Passing
The optional parameters in the Virtual Agent activity can contain personally identifiable information (PII). Webex Contact Center sends these parameters to the Google Dialogflow as variables to implement advanced conversational logic with the bot.
|
Parameter |
Description |
|---|---|
|
Key-Value | The Key-Value parameter allows you to enter a variable name and the associated value. You can enter variable values by using the double curly braces syntax. For example, if you want to return the account balance of a customer based on the ANI, the key and value can be: Key: Value: The contact center sends these parameter values to the Google Dialogflow as a JSON value in the |
Advanced Settings
| Parameter |
Description |
|---|---|
|
No-Input Timeout |
Indicates the amount of time that the Virtual Agent waits for customer input (voice or DTMF). The default value is 5 seconds. The value can range 1–30 seconds. |
|
Max No-Input Attempts | Indicates the number of times the Virtual Agent waits for customer input (voice or DTMF). The default value is 3. The value can range 0–9. When the maximum number of attempts elapse, the Virtual Agent exits, with the output variableErrorCode set to the value max_no_input. |
|
Inter-digit Timeout |
The amount of time that the Virtual Agent waits for the next DTMF input from the customer before the Virtual Agent moves on in the conversation flow. The default value is 3 seconds. The value can range 0–30 seconds. |
|
Terminator Symbol |
The character that the customer can enter to indicate the end of input. The Terminator Symbol can be either # or * depending on the configuration. |
|
Termination Delay |
Enables the Virtual Agent to complete the last message before the activity stops and moves on to the next step in flow. For example, if you want the Virtual Agent to indicate something to the caller before the system escalates the call to an agent, consider the time it takes to complete the final message before escalation. The value can range 1–30 seconds. |
|
Speaking Rate |
Indicates the rate of speech. Increase or decrease the numeric input to maintain the ideal rate of speech and control the output speaking rate. Valid values for the numeric input are in the range of 0.25 to 4.0 words per minute (wpm). The default value is 1.0 wpm. |
|
Volume Gain |
Indicates the increase or decrease in volume output. Increase or decrease the numeric input to maintain the ideal volume of output speech. Valid entries for the numeric input are in the range of –96.0 decibels to 16.0 decibels (dB). The default value is 0.0 dB. |
|
Enable Conversation Transcript |
Enables the Desktop to display the transcript of the conversation between the Virtual Agent and the customer. The raw transcript is also available through a dynamic URL. You can use this URL to extract specific sections from the transcript using an HTTP request. |
Output Variables
These variables store the output status of the event that occurs during the conversation between the Virtual Agent and the customer.
|
Output Variable |
Description | ||
|---|---|---|---|
|
VVA.LastIntent |
Stores the last intent that is triggered by the Virtual Agent before moving to the Escalation or Handled intent. | ||
|
VVA.TranscriptURL |
Stores the URL that points to the transcript of the conversation between the Virtual Agent and the customer.
| ||
|
VVA.ErrorCode |
Stores the status code whose value depends on the outcome of the conversation between the Virtual Agent and the customer. This variable holds one of the following values:
|
Outcomes
Indicates the output paths for the Virtual Agent that occurs based on the outcome of the conversation between the Virtual Agent and the customer.
-
Handled: The Dialogflow takes this path if the system triggers the Handled intent.
-
Escalated: The Dialogflow takes this path if the system triggers the Escalation intent.
For more information on the intents in the Dialogflow, see Intents.
Error Handling
Indicates the output path of the Virtual Agent that is based on the error that occurs during the conversation between the Virtual Agent and the customer.
Error: The flow takes this path in any error scenarios.
If there is an error, the contact center does not play any audio message to notify the customer of the error, by default. The flow developer can configure a Play Message activity either generically or based on the error code as described in the Output Variables section.
The functionality of the output paths depends on the configuration and the flow that is defined by the administrator. |
Callback
The Callback activity is available only if the preferred queue and the Callback feature are enabled for the enterprise. By default, the Callback activity creates a Courtesy Callback task in the same queue that the call was originally placed. If preferred, you can configure a different queue. If you use the same queue, the task retains its position in the queue until the next agent is available.
When you design a flow, a Consult interaction can't include a Courtesy Callback activity. |
If a new queue is preferred, place the task at the bottom of the preferred queue. As an agent accepts the task, the Callback is initiated. If the caller doesn’t answer, the Callback isn’t retried.
You can configure an error-handling path (Undefined Error) to handle system errors that may occur during flow execution. For more information, see Event Flows. |
The following sections enable you to configure the Callback activity:
|
Parameter |
Description |
|---|---|
|
Activity Label |
Enter a name for the activity. |
|
Activity Description |
(Optional) Enter a description for the activity. |
Callback Settings
The Callback Settings section defines the Callback Dial Number and the queue in which the caller must be placed for the Callback request. The system reserves the caller's place in the queue until the next agent is available.
|
Parameter |
Description |
|---|---|
|
Callback Dial Number |
Enter the dial number at which the caller is to receive the Callback. Choose the variable from the drop-down list that contains the Callback number, such as the ANI that is associated with the call. The variable can be a number that is collected in a Collect Digits activity in the call flow. If no selection is made, the caller's ANI is used. The Callback number is stored in the By default, the toggle button for Register callback to different destination? is set to off. The callback is registered on the same queued destination. If the preferred agent is busy and isn't available, set the toggle button on to select a new callback destination. The destination changes from agent to queue. You can't change the destination directly to another agent, but only to a queue which contains agents. |
|
Callback Queue |
Choose one of the available Callback Queue options from the drop-down list:
|
|
Callback ANI |
Enables callback ANI configuration for customers when they receive a callback. Courtesy callback ANI configuration is not mandatory. Choose one of the available options:
|
You must use a Disconnect Contact activity to terminate a flow branch that uses a Callback activity. Otherwise, the call doesn’t end when a Callback request is placed. |
Flow administrators should test the feature in a non-production environment to make sure that the ANI configured as part of Variable ANI is correct or not. If the ANI provided is incorrect, then the callback switches to the default system ANI.
These are the scenarios where the customized ANI is configured and validated for Tenant Management and Flow Control. Based on the stack that you use, you can see validations that are applicable to that stack only.
|
Description |
Tenant Management–ANI input |
PreDial/Courtesy callback–ANI input (Flow Control) |
Validation |
|---|---|---|---|
|
ANI without country code |
Without country code. For example, 2567312213 |
Without country code. For example: 2567312213 |
Valid ANI. Same ANI is used. |
|
Tenant Management ANI input is with country code and Flow Control ANI input is without country code configured. |
With country code. For example, +1-2567312213 |
Without country code. For example, 2567312213 |
Invalid ANI. DNIS is used |
|
Tenant Management ANI input is without country code and Flow Control ANI input is with country code configured |
Without country code. For example, 2567312213 |
With country code. For example, +1-2567312213 |
Invalid ANI. DNIS is used. |
|
Tenant Management ANI input and Flow Control ANI input have country code configured. |
With country code. For example, +1-2567312213 |
With country code. For example, +1-2567312213 |
Valid ANI. Same ANI is used. |
|
Tenant Management ANI input does not have space in between and Flow Control ANI input has space in between. |
No space in between the number. For example, +1-2567312213 |
Space in between the number. For example, +1-256 7312213 |
Valid ANI. Same ANI is used. |
|
Tenant Management ANI input does not have hyphens in between and Flow Control ANI input has hyphens in between. |
No hyphens in between the number. For example, +1-2567312213 |
Hyphens in between the number. For example, +1-256-731-2213 |
Valid ANI. Same ANI is used. |
|
Flow Control ANI input matches the last few digits of the Tenant Management ANI input. |
Complete ANI input. For example, +1-2567312213 |
Last four digits match. For example, 2213 |
Invalid ANI. DNIS is used. |
|
Flow Control ANI input has more digits configured than Tenant Management ANI input. |
Partial ANI input. For example, 2213 |
10-digit ANI input. For example, 2567312213 |
Invalid ANI. DNIS is used. |
|
Tenant Management ANI input is configured and Flow Control ANI input is not configured. |
Complete ANI input. For example, +1-2567312213 |
ANI is not configured. |
Invalid ANI. DNIS is used. |
|
Flow Control ANI does not include a plus symbol. |
Plus symbol is used. For example, +1-2567312213 |
Plus symbol not used. For example, 12567312213 |
Invalid ANI. DNIS is used. |
Output Variables
When Callback triggers, the following variables update:
|
Output Variable |
Description |
|---|---|
|
FailureCode |
Stores the failure code. The system sets this value only when the activity fails. |
|
FailureDescription |
Stores the failure details. The system sets this value only when the activity fails. |
Error Codes
The following are the error codes and descriptions for the Callback activity:
|
Failure Code |
Failure Code Value |
Failure Description |
|---|---|---|
|
1 |
INVALID_REQUEST |
An invalid request was made in the activity. |
|
2 |
CALLBACK_NOT_SUPPORTED_ON_CHILD_INTERACTION |
Callback isn’t allowed on a child contact. |
|
3 |
INVALID_QUEUE |
An invalid queue was specified in the activity. |
|
4 |
INVALID_DESTINATION |
The destination number for the callback is invalid. |
|
5 |
FEATURE_NOT_ENABLED |
Feature isn’t enabled in the Webex Contact Center application. |
|
6 |
SYSTEM_ERROR |
The system encountered an internal error. |
Get Queue Info
The Get Queue Info activity provides the caller's current Position in Queue (PIQ) and the Estimated Wait Time (EWT) along with other Activity output variables. You can use these variables to determine agent availability in a queue, and to route calls elsewhere when needed.
The following sections of the Flow Designer enable you to configure the Get Queue Info activity:
General Settings
|
Parameter |
Description |
|---|---|
|
Activity Label |
Enter a name for the activity. |
|
Activity Description |
(Optional) Enter a description for the activity. |
Queue Information and Lookback Time
|
Parameter |
Description |
|---|---|
|
Queue Information |
Choose the name of the queue for which you must retrieve a caller's estimated wait time and current position in the queue. You can manage the queues using the Management Portal. |
|
Lookback Time |
Specify the Lookback Time used to calculate the EWT after Get Queue Info triggers. Specify the duration in minutes only. Ensure that your input has numeric values only. The accepted value range is 5–240 minutes. |
The Get Queue Info activity has three types of output flow branches. These branches trigger based on the return status and values of EWT, PIQ, and the real-time statistics for other output variables.
-
Success: This branch triggers when both the EWT and PIQ API return positive variable values. In this flow, you can retrieve and access valid EWT and PIQ variable values.
-
Insufficient Information Flow: This branch triggers when the PIQ API returns a valid variable value, and EWT has the value of –1. In this flow, you can retrieve and access the PIQ value, but the EWT API fails because of insufficient data to calculate the EWT value.
-
Failure: This branch triggers when PIQ API, EWT API, or one or more of the real-time statistics APIs fail or return invalid values. The EWT API fails because of reasons other than insufficient data to calculate the EWT value.
Output Variables
When Get Queue Info triggers, the following variables update:
|
Output Variable |
Description |
|---|---|
|
Position In Queue (PIQ) |
Stores the value for the caller's current position in the queue for the selected queue. If the contact isn't queued when the flow invokes this activity, the PIQ value is set to the number of contacts that are currently waiting in the queue + 1. This identifies the position of the contact in the queue, if the contact is queued after executing the GetQueueInfo activity. |
|
EstimatedWaitTime (EWT) |
Stores the approximate amount of time a task has to wait in a queue before being answered by an agent. EWT is calculated for each Queue and is based on the average time that previous calls in the same queue waited for an agent. EWT uses the Lookback Time parameter entry and is reported in milliseconds (ms). |
|
LoggedOnAgentsCurrent |
Stores the number of agents in the current Call Distribution Group, for the selected queue, signed in to the desktop. If the activity is used before queueing, the stats for agents in current Call Distribution Group cycle will be returned based on the first Call Distribution Group cycle. |
|
LoggedOnAgentsAll |
Stores the total number of agents in all the Call Distribution Groups, for the selected queue, who are signed in to the desktop. This value may change as the Call Distribution Groups change over time in the queue. |
|
AvailableAgentsCurrent |
Stores the number of agents in the current Call Distribution Group, for the selected queue, who are available to accept the contact. If the activity is used before queueing, the stats for agents in current Call Distribution Group cycle will be returned based on the first Call Distribution Group cycle. |
|
AvailableAgentsAll |
Stores the total number of agents in all the Call Distribution Groups, for the selected queue, who are available to accept the call. This value may change as the Call Distribution Groups change over time in the queue. |
|
CallsQueuedNow |
Stores the total number of calls in the selected queue. |
|
OldestCallTime |
Stores the number of seconds that the oldest call has been in the selected queue. |
|
FailureCode |
Stores the failure code. The system sets this value only when the activity fails. |
|
FailureDescription |
Stores the failure details. The system sets this value only when the activity fails. |
Estimated Wait Time Calculation
The Estimated Wait Time (EWT) is reported in ms.
To calculate EWT, the application collects all statistically valid samples (a sample is the average of wait times for tasks that successfully connected to an agent in a one-minute interval) for the last XX minutes specified by the user-defined Lookback Time. The average value of the samples collected is used as the EWT.
Statistically valid samples are those samples collected, for which the maximum value for CoV (Coefficient of Variance of the wait times for those tasks that got connected to an agent in each one minute interval) falls below 40 percent.
If the percentage of valid samples collected for the user-defined Lookback Time falls below 40 percent, the EWT isn’t computed.
Error Codes
The following are the error codes and descriptions for the Get Queue Info activity:
|
Failure Code |
Failure Code Value |
Failure Description |
|---|---|---|
|
1 |
SYSTEM_ERROR |
The system encountered an internal error. |
|
2 |
STALE_DATA |
The data returned is not up-to-date. |
|
3 |
INSUFFICIENT_DATA |
The data returned by the activity is not complete. |
|
4 |
INVALID_QUEUE |
An invalid queue was specified in the activity. |
Advanced Queue Information
The Advanced Queue Information activity returns the real-time count of agents who are in the Available state in a queue and are logged in for a specific set of skills, along with other queue information. Flow developers use the Advanced Queue Information activity to program the flow. Flow designers make decisions based on the Advanced Queue Information activity.
You can configure an error-handling path (Undefined Error) to handle system errors that may occur during flow execution. For more information, see Event Flows. |
The following sections of the Flow Designer enable you to configure the Advanced Queue Information activity:
General Settings
|
Parameter |
Description |
|---|---|
|
Activity Label |
Enter a name for the activity. |
|
Activity Description |
(Optional) Enter a description for the activity. |
Output Variables
When the Advanced Queue Information activity is triggered, the following variables are updated:
|
Output Variable |
Description |
|---|---|
|
Position In Queue (PIQ) |
Stores the value for the caller's current position in the selected queue. If the contact isn't queued when the flow invokes this activity, the PIQ value is set to the number of contacts that are currently waiting in the queue + 1. This identifies the position of the contact in the queue if the contact is queued after executing the AdvancedQueueInformation activity. |
|
LoggedOnAgentsCurrent |
Stores the number of agents in the current Call Distribution Group for the selected queue logged in to the desktop. The stats for agents in current Call Distribution Group will return -1 after considering the current Call Distribution Group as N/A before queueing. |
|
LoggedOnAgentsAll |
Stores the total number of agents in all the Call Distribution Groups for the selected queue, who are logged in to the desktop. This value may change as the Call Distribution Groups change over time in the queue. |
|
AvailableAgentsCurrent |
Stores the number of agents in the current Call Distribution Group for the selected queue, who are available to accept the contact. The stats for agents in current Call Distribution Group will return -1 after considering the current Call Distribution Group as N/A before queueing. |
|
AvailableAgentsAll |
Stores the total number of agents in all the Call Distribution Groups for the selected queue, who are available to accept the call. This value may change as the Call Distribution Groups change over time in the queue. |
|
CurrentGroup |
Stores the value of the current call distribution group where the contact is parked in a particular queue. |
|
TotalGroups |
Stores the value of the total number of call distribution groups in the queue for the contact. |
|
FailureCode |
Stores the failure code. The system sets this value only when the activity fails. |
|
FailureDescription |
Stores the failure details. The system sets this value only when the activity fails. |
Error Codes
The following are the error codes and descriptions for the Advanced Queue Information activity:
|
Failure Code |
Failure Code Value |
Failure Description |
|---|---|---|
|
1 |
INVALID_REQUEST |
An invalid request was made in the activity. |
|
2 |
QUEUE_NOT_FOUND |
The queue selected in the activity is not found. |
|
3 |
FEATURE_NOT_ENABLED |
Feature isn’t enabled in the Webex Contact Center application. |
|
4 |
DATABASE_OPERATION_FAILURE |
Database operation is failed during the activity execution. |
|
5 |
INVALID_QUEUE |
An invalid queue was specified in the activity. |
Disconnect Contact
Use this terminating activity to disconnect an active leg of a call. This activity is required if no agents join the call to manually disconnect.
For instance, use this activity before a call is queued or after scripting an opt-out of the queue experience. You can use as many Disconnect Contact activities as desired when you construct your flow to ensure that the call is terminated no matter which flow path it takes.
You have the option of giving each activity a unique label and description, but no other configuration is required.
You can configure an error-handling path (Undefined Error) to handle system errors that may occur during flow execution. For more information, see Event Flows. |
|
Parameter |
Description |
|---|---|
|
Activity Label |
Enter a name for the activity. |
|
Activity Description |
(Optional) Enter a description for the activity. |
Output Variables
This activity has no Output Variables available.
Queue Contact
The Queue Contact activity places a contact in a queue. When you use this activity in the Main Flow, you expose a set of events in the Event Flows tab. For more information on these events, see Events.
You can configure an error-handling path (Undefined Error) to handle system errors that may occur during flow execution. For more information, see Event Flows. |
The following sections enable you to configure the Queue Contact activity:
General Settings
|
Parameter |
Description |
|---|---|
|
Activity Label |
Enter a name for the activity. |
|
Activity Description |
(Optional) Enter a description for the activity. |
If you don't see the fields such as Static Queue, Variable Queue, Variable Priority, Variable Skill Value, Set Contact Priority, and Variable Agent Availability Check, contact Cisco Support to enable the corresponding feature flag. |
Contact Handling
Use the Contact Handling section to choose if all contacts should go to a single queue, or if queue selection should change based on the value of a flow variable.
| Parameter | Description | ||
|---|---|---|---|
|
Static Queue |
Click the Static Queue radio button to route contacts to the single queue chosen in the Queue drop-down list. All contacts coming from the Entry Point associated with the configured workflow route to the chosen queue. | ||
|
Queue |
Choose a queue from the Queue drop-down list to route the contacts coming from the Entry Point associated to the workflow.
| ||
|
Variable Queue |
Click the Variable Queue radio button to use a Queue Variable to dynamically select a queue to route contacts. You can also choose a Fallback Queue in case the Queue Variable fails during the flow execution. | ||
|
Queue Variable |
Choose a flow variable from the Queue Variable drop-down list that yields a valid Queue ID. The flow variable indicates which queue should be dynamically selected during the flow execution. The Fallback queue is used only if the Queue Variable fails to return a valid Queue ID. This field appears when you click the Variable Queue radio button. | ||
|
Fallback Queue |
Choose the Queue ID from the Fallback Queue drop-down list. In case the Queue Variable returns an invalid Queue ID, the contacts are queued to the selected Fallback Queue. If you click the Variable Queue radio button, you can’t input the skill requirements for the queue that uses skill-based routing. In such case, the contacts are routed to the Longest Available Agent overriding the selected queue routing algorithm. This field appears only when you click the Variable Queue radio button. | ||
|
Check Agent Availability |
Enable the Check Agent Availability toggle button to exclude teams with no available agents from routing as time in the queue progresses. The Call Distribution Group of the selected queue may skip to find an agent sooner. By default, this toggle button is disabled. | ||
|
Always Check Agent Availability |
Click the Always Check Agent Availability radio button to enable agent availability checking. By default, the radio button is enabled. This option appears only if you enable the Check Agent Availability toggle button. | ||
|
Variable Agent Availability Check |
Click the Variable Check Agent Availability radio button to select a flow variable from the Check Agent Availability Variable drop-down list that returns a Boolean. The Boolean determines whether to check the agent availability in the variable queue. This option appears only if you enable the Check Agent Availability toggle button. | ||
|
Set Contact Priority |
Enable the Set Contact Priority toggle button if you want to assign a priority to queued contacts. By default, this toggle button is disabled. The highest priority contact across all queues (voice and digital) is assigned to the next available agent who is:
The contacts are handled as follows:
| ||
|
Static Priority |
Set the Static Priority if you want to assign a priority before publishing the flow. You can see this field only when the Set Contact Priority toggle button is enabled. Choose a priority from the Static Priority Level drop-down list. You can set a priority from P1 to P9, where P1 is the highest and P9 is the lowest. | ||
|
Variable Priority |
Choose Variable Priority if the contact priority should change dynamically with each flow execution. This field appears only when the Set Contact Priority toggle button is enabled. Choose a flow variable which returns an Integer with priority from 1 through 9 from the Contact Priority Variable drop-down list. If the priority isn’t in the range 1–9, then the default priority is 10. |
Skill Requirements
If the selected queue uses Skill-based Routing, another sections display to configure skill requirements and skill relaxation.
You can add one or more skill requirements to assign to a contact in this queue based on the selected queue.
If you don’t specify any skills, all the available agents in the selected queue are eligible to receive contacts. |
|
Parameter |
Description | ||
|---|---|---|---|
|
Skill |
Choose the desired skill from the drop-down list. You configure the skill definitions in the Management Portal. | ||
|
Condition |
Choose the desired condition from the drop-down list. The condition options are based on the chosen skill type.
The available conditions are: IS, IS NOT, >= , <= | ||
|
Value |
Click the Static Skill Value radio button to select the static skill values specified in the Skill Value field. Click the Variable Skill Value radio button to select the skill value from a flow variable listed in the Variable drop-down list. If the skill value is invalid, all skill requirements and relaxations that are associated with the contact that came through the QueueContactActivity are dropped. |
Skill Relaxation
Use the Skill-relaxation settings to reduce or remove the assigned skill requirements to a flow in response to excessive customer wait times. This setting enables you to expand the pool of agents available to serve contacts.
Use common time intervals to align Skill Relaxation with queue logic in the flow and with Call Distribution settings configured for teams in the queue. |
To configure skill relaxation:
-
Enable the Enable Skill Relaxation toggle button to configure skill relaxation.
Enable this toggle button to copy and display the initial Skill Requirements by default. This allows you to configure the skill relaxation with an ideal set of skills.
Set the After waiting in the queue for field to the duration in seconds that must exceed before the skill relaxation applies in the queue. The default wait time is 60 seconds.
-
You can add, edit, or delete the skill relaxation requirements.
-
Click Add Skill Requirement to add a new skill relaxation requirement.
-
Click Delete to delete the skill relaxation requirement.
-
Click Edit to edit the skill relaxation requirement.
-
-
Click Add Skill Relaxation Step to add a new skill relaxation group.
The default skill requirements that appear in step 1 make it easier to set the skill relaxation requirements.
Error Codes
The following are the error codes and descriptions for the Queue Contact activity:
|
Failure Code |
Failure Code Value |
Failure Description |
|---|---|---|
|
1 |
INVALID_REQUEST |
The parameters specified in the activity are invalid. |
|
2 |
INVALID_ROUTING_STRATEGY |
The chosen routing strategy is invalid. |
|
3 |
INVALID_WAIT_TIME |
The defined wait time is invalid. |
|
4 |
INVALID_QUEUE |
An invalid queue was specified in the activity. |
|
5 |
ROUTING_LIMIT_EXCEEDED |
Routing has reached the maximum limit. |
|
6 |
SYSTEM_ERROR |
The system encountered an internal error. |
|
7 |
VTEAM_TRANSITION_LIMIT_REACHED |
The contact has reached maximum limit from being queued to multiple queues. |
|
8 |
OWNER_ASSIGNED_TO_INTERACTION |
The contact is already assigned to an agent. |
Escalate Call Distribution Group
The Escalate Call Distribution Group activity allows administrators to escalate a queued contact to its next or last call distribution group. This provides better control and flexibility to administrators to manage contacts that are parked in a queue.
You can configure an error-handling path (Undefined Error) to handle system errors that may occur during flow execution. For more information, see Event Flows. |
The following sections of the Flow Designer enable you to configure the Escalate Call Distribution Group activity:
General Settings
|
Parameter |
Description |
|---|---|
|
Activity Label |
Enter a name for the activity. |
|
Activity Description |
(Optional) Enter a description for the activity. |
Output Variables
When the Escalate Call Distribution Group activity is triggered, the following variables are updated:
|
Output Variable |
Description |
|---|---|
|
CurrentGroup |
Stores the value of the current call distribution group where the contact is parked in a particular queue. |
|
TotalGroups |
Stores the value of the total number of call distribution groups in the queue for the contact. |
|
FailureCode |
Stores the failure code. The system sets this value only when the activity fails. |
|
FailureDescription |
Stores the failure details. The system sets this value only when the activity fails. |
Error Codes
The following are the error codes and descriptions for the Escalate Call Distribution Group activity:
|
Failure Code |
Failure Code Value |
Failure Description |
|---|---|---|
|
1 |
INVALID_REQUEST |
An invalid request was made in the activity. |
|
2 |
CONTACT_NOT_QUEUED |
The contact isn’t queued. |
|
3 |
FEATURE_NOT_ENABLED |
Feature isn’t enabled in the Webex Contact Center application. |
Queue To Agent
The Queue To Agent activity enables Agent-based Routing. The Queue To Agent activity routes the contacts to the preferred agent directly. For information on Agent-based Routing, see Agent-based Routing.
The Queue To Agent activity identifies an agent by its Webex Contact Center agent ID or email address.
If the agent is available, you can configure the Queue To Agent activity to route the contact to a preferred agent. If the agent is unavailable, you can configure the Queue To Agent activity to park the contact against that agent until the agent becomes available.
The flow developer can chain a Queue To Agent activity with another Queue To Agent activity to route contacts to consecutive preferred agents. The flow developer can also chain a Queue To Agent activity with a Queue Contact activity to route the contact using a regular Queue when none of the preferred agents are available.
The flow developer can chain a Queue To Agent activity with a Callback activity in the Main flow and Event flows. This helps configure callback to preferred agent to whom the call was originally queued as part of Queue To Agent activity.
Use the Callback activity after the Queue Contact or Queue To Agent activity. |
The Queue To Agent activity triggers the following events in the Event Flows tab in the Main Flow:
-
AgentAnswered: The Queue To Agent activity triggers this event when an agent answers an inbound call.
-
AgentDisconnected: The Queue To Agent activity triggers this event when the agent disconnects from a live call.
You can configure an error-handling path (Undefined Error) to handle system errors that may occur during flow execution. For more information, see Event Flows. |
The following sections enable you to configure the Queue To Agent activity:
-
General Settings
-
Contact Handling
To configure Queue To Agent activity:
| 1 |
In the Flow Designer, drag and drop the Queue To Agent activity from the Activity Library to the canvas. | ||||
| 2 |
Click the Queue To Agent activity to configure the activity settings. | ||||
| 3 |
In the General Settings section, enter the following information: | ||||
| 4 |
In the Contact Handling section, choose an Agent Variable from the drop-down list. The Queue To Agent activity associates this flow variable with the agent's Email or agent's ID that you want to choose for each flow execution. | ||||
| 5 |
Choose the agent's Email or agent's ID from the Agent Lookup Type drop-down list to route contacts to the preferred agent.
| ||||
| 6 |
Enable the Set Contact Priority toggle button to prioritize the contacts waiting in the queue. By default, the toggle button is disabled. The Queue To Agent activity handles the contacts as follows:
| ||||
| 7 |
Choose the reporting queue ID from the Reporting Queue drop-down list. The Queue To Agent activity reports the contact's details using the reporting queue: The reporting queue also specifies the configuration for:
| ||||
| 8 |
Enable the Park Contact if Agent is unavailable toggle button if you want to park the contact to a preferred agent until the agent becomes available. If the agent is unavailable and the Park Contact if Agent is unavailable toggle button is disabled, the contact fails to reach the agent. The Queue To Agent activity exits the failure branch to the next activity in the flow with the corresponding output. | ||||
| 9 |
Choose the recovery queue ID from the Recovery Queue drop-down list. The Queue To Agent activity queues contacts to the recovery queue when:
You can configure the recovery queue with the Longest Available Agent. The recovery queue doesn't support Skills-based Routing. |
The Queue To Agent activity is successful when the contact connects to the preferred agent. An error scenario occurs when a contact fails to reach the agent.
Error Scenarios
A contact fails to reach the agent when:
-
A preferred agent is unavailable and parking is disabled for the contact.
-
A variable lookup can't find the preferred agent.
Activity Output Variables
The Activity Output Variables store the data that is captured from activities and are automatically created when you add specific activities to the canvas.
The queue to agent activity has the following output variables:
|
Output Variable |
Description |
|---|---|
|
QueueToAgent.AgentId |
Stores the agent ID to which the contact is queued. |
|
QueueToAgent.FailureDescription |
Stores the description for the error scenario when the contact fails to get queued. |
|
QueueToAgent.FailureCode |
Stores the failure code value for the error scenario when the contact fails to get queued. |
|
QueueToAgent.AgentState |
Stores the states of the preferred agent when trying to queue the contact. |
|
QueueToAgent.AgentIdleCode |
Stores the description for the idle code of the preferred agent. |
The QueueToAgent.FailureCode output variable contains one of the following values when a failure occurs. Each value indicates a failure code and a failure description.
|
Failure Code |
Failure Code Value |
Failure Description |
|---|---|---|
|
1 |
AGENT_UNAVAILABLE |
Agent is currently not in the available state. |
|
2 |
AGENT_NOT_FOUND |
The Queue To Agent activity is unable to find the agent by agent’s id or email address. |
|
3 |
AGENT_NOT_LOGGED_IN |
Agent is currently not logged in. |
|
4 |
FEATURE_NOT_ENABLED |
The Agent-based Routing feature isn’t enabled. |
|
5 |
INVALID_VTEAM_ERROR |
The reporting or recovery queue is invalid. |
|
6 |
AGENT_BUSY |
The agent is available, but engaged in another call. |
The following table shows the applicable QueueToAgent.AgentState and QueueToAgent.AgentIdleCode values.
|
Use Case |
AgentState |
AgentIdleCode |
|---|---|---|
|
NOT_APPLICABLE |
NOT_APPLICABLE |
|
Agent is reserved for this call. |
AVAILABLE |
NOT_APPLICABLE |
|
Park Contact if Agent is unavailable toggle button is On and the agent is idle |
Idle |
<AuxCode Name> The idle code selected by the agent in the Agent Desktop. |
|
Park Contact if Agent is unavailable toggle button is On and the agent channel is busy |
AVAILABLE |
NOT_APPLICABLE |
|
Park Contact if Agent is unavailable toggle button is Off and the agent is idle |
Idle |
<AuxCode Name> The idle code selected by the agent in the Agent Desktop. |
|
Park Contact if Agent is unavailable toggle button is Off, agent is available, and agent channel is busy |
AVAILABLE |
NOT_APPLICABLE |
Set Caller ID
Use the Set Caller ID activity to define the caller ID that displays during a call. The Set Caller ID activity is to be used only on Event Flows. The Set Caller ID is a terminal activity that marks the end of an occurred PreDial event flow. The Set Caller ID activity helps configure the ANI for the following scenarios:
-
Inbound calls
-
Outdial calls
-
Courtesy callback
-
Preview campaign
-
Web callback
-
Execute flow
-
Transfer to dial number
-
Consult to dial number
-
Consult to agent
-
Consult to EP-DN/queue
-
Transfer to EP/queue
You can configure this activity next to a PreDial event handler. The required ANI can be configured using Set Caller ID activity based on the Dialed Number Identification Service (DNIS), operation type, or participant type.
You can configure the agent's DN as a customized ANI, so that the callee agent can see the caller agent DN/extension number when they are contacted. This reduces the chances of internal calls getting dropped. For example, when a front office user (the contact center agent) calls a back-office user (an internal employee), the back-office user can see the internal caller id (contact number/extension) of the agent, hence minimizes call rejections.
For this purpose, the caller can see the contact number/extension only when the callee agent is contacted through outdial, consult, or transfer to DN, and the DN is added to the list of contact numbers.
You must add the contact number to the list of internal numbers for an organization in Control Hub. For more information on how to add a contact number, see Add contact number or extension.
If you enter a random number, the system checks this number with the default EP-DN mapping that is configured on Control Hub or Management Portal. If there is a mismatch, the system routes it back to the default ANI. For more information on Customized ANI validation, see Callback. |
|
Parameter |
Description |
|---|---|
|
Static Caller ID |
Choose a Dial Number that is mapped to an Entry Point, from the drop-down list. If you don't select a number, the system considers the default value depending on the call scenario. |
|
Variable Caller ID |
Choose a valid variable (a E.164 number, with a valid EP-DN mapping) from the drop-down list. If you don't select a number, the system considers the default value depending on the call scenario. If you provide a number that is not in the E.164 number format, the system uses the default value, depending on the call scenario. To allow internal extensions as customized ANI for the callers, when you configure the predial flow for customer/consulted agent or dn/transferred agent or dn, choose |
|
For ANI to work as expected in different call scenarios, you require a Next Generation environment.
The ANI usage for multiple scenarios that are applicable in the Next Generation environment are:
|
Scenario |
Configuration |
Result ANI |
|---|---|---|
|
Customer calls in |
PreDial event handler is not configured |
|
|
Customer calls in |
PreDial event handler is configured |
ANI is presented on the agent's device - as defined in the Set Caller ID activity |
|
Agent Outdial |
PreDial event handler is not configured |
The contact's device and the agent's device are both presented with Agent selected Outdial ANI if the agent selects an Outdial ANI on the Desktop. Otherwise the contact's device and agent's device are both presented with the tenant's default ANI. |
|
Agent Outdial |
PreDial event handler is configured |
For each participant's device, either the Agent selected Outdial ANI can be retained, if selected, or can be customised, as defined in the Set Caller ID activity. |
|
Courtesy callback |
Customer ANI defined in Callback activity |
ANI defined at the Callback activity is presented to the contact's device. |
|
Courtesy callback |
|
Set Caller ID activity configured will take precedence. |
|
Courtesy callback |
|
|
|
Courtesy callback |
|
Tenant default ANI is presented on the contact's device. |
|
Agent transfer, consult |
PreDial event handler is configured |
Configured Set Caller ID is displayed on transferred consulted Agent-2 device. |
Create contact number or extension
You can add a contact number to the list of internal numbers for your organization. The customized ANIs will be visible to these added contacts. You can either add a single contact number at a time, or use Bulk operations to upload contact numbers as a CSV file.
For more information on how perform bulk operations to create, modify, import, or export configuration objects in Control Hub, see Bulk Operations in Webex Contact Center.
To add a contact number or extension:
| 1 |
Sign in to your customer organization using the Control Hub URL https://admin.webex.com/. |
| 2 |
Go to . |
| 3 |
Click Add more to add a new contact number/extension to the list. You can create contact number/extension in a range between 2 to 9 digits. The contact number/extension can start with 0. You can add a maximum of 5000 contact numbers/extensions per organization. |
Recording Control
Flow Designer provides a Recording Control activity for the purpose of capturing recording consent from the user or caller. Recording consent is one of the configuration properties that is available as part of this activity. Use a Menu activity to capture user consent into a Boolean flow variable. During an interaction, if you want to capture the consent value to generate a report, use the Boolean variable as an input to the Recording Control activity's consent property value. Then you can mark the variable used to capture the caller consent as reportable.
The flow developer can determine whether the recording consent for a call needs to be captured or not, for reporting purposes. When a customer wants to capture the consent for recording, then use global variables to generate a consent report. When a customer does not want to capture the consent for recording, use local variables. This offers better flexibility for tenants and customers to manage the use of variables.
You can configure Recording Control using these steps:
-
In the Flow Designer, drag and drop the Recording Control activity from the Activity Library to the canvas.
-
Click the Recording Control activity to configure the activity settings.
-
In General Settings, enter a name for the activity in Activity Label.
-
(Optional) In the Activity Description field, enter a description for the activity.
-
In Recording Control Settings, select a flow variable from the drop-down list for Enable Recording.
A Menu activity for IVR (Interactive Voice Response) and a Recording Control activity when used together in the flow enables capture of recording consent. Priority is given to user consent setting in the flow compared to tenant level or queue level or recording schedule level configuration settings.
Recording control can be managed in the following scenarios:
-
If the user consent configuration is set to Yes in the flow, then the call is recorded, regardless of the recording configuration set at the tenant or queue or recording schedule level.
-
If the user does not consent and the configuration is set to No in the flow, then the call is not recorded, regardless of the recording configuration set at the tenant or queue or recording schedule level.
-
If the user consent is not configured in the flow, but a configuration is set to Yes at any one of the other levels such as tenant or queue or recording schedule, then the call is recorded.
-
If the user consent is not configured, and a configuration is set to No at all levels such as tenant, queue and recording schedule, the call is not recorded.
In addition, other recording configurations such as Continue On Transfer, Pause Resume Enabled and Pause Duration and so on, are still applied based on the existing hierarchy such as tenant, queue, or recording schedule level.
Output Variables
This activity has no output variables.
Record activity
The Record activity records the speech input or utterance of callers that can be referenced in the same call flow. This activity is available only for customers who use the Next Generation media platform. The system stores the recorded audio files only during the call, after which those files are automatically deleted from the system. Currently, the recorded audio files are in an un-encrypted format. We do not recommend recording sensitive information using this feature.
|
| 1 |
Sign in to Control Hub, choose Services > Contact Center > Flows. | ||||||||||||||||||||||||||
| 2 |
Click Manage Flows and then click Create Flows. | ||||||||||||||||||||||||||
| 3 |
In the Flow Name field, enter a unique name and click Start Building Flow. The Flow Designer window appears. | ||||||||||||||||||||||||||
| 4 |
Drag and drop the Record activity from the Activity Library to the main flow canvas. | ||||||||||||||||||||||||||
| 5 |
In General Settings, perform the following actions:
| ||||||||||||||||||||||||||
| 6 |
In Record Settings, configure the following fields:
| ||||||||||||||||||||||||||
| 7 |
In the Output Variables section, view the following variables:
The following table lists the error codes and descriptions for the Record activity:
|
Activities in Flow Control
Start Flow
The Start Flow activity appears on the Main Flow canvas by default and cannot be deleted. This activity indicates the event that triggers this flow. This activity dictates how the flow can be used and the types of activities that are available for configuration.
The only Flow Trigger Event currently available is |
The Start Flow activity is automatically labeled with the name of the selected Flow Trigger Event. This allows you to quickly see what type of flow is being built.
Output Variables
The number and type of Output Variables associated with the Start Flow activity depend on the selected Flow Trigger Event. These variables store data that is captured at the moment the flow is triggered. For example, the three output variables described below are exposed through the NewPhoneContact event.
Use these variables in later activities to control the flow sequence.
-
NewPhoneContact.ANIAutomatic Number Identification (ANI) is a feature of a telecommunications network to automatically determine the originating phone number of a call. This variable stores the phone number of the caller who triggered the
NewPhoneContactevent. -
NewPhoneContact.DNISDialed Number Identification Service (DNIS) is a service that identifies the originally dialed telephone number of a call. This variable stores the phone number that the caller dialed to trigger the
NewPhoneContactevent. -
NewPhoneContact.InteractionIDThis variable stores a unique Webex Contact Center identifier that is associated with each interaction triggered by the
NewPhoneContactevent. -
NewPhoneContact.PSTNRegionThis variable indicates the PSTN region that is configured in Entry Point (EP)- Dial Number (DN) mapping for regional voice media services. This variable is supported only on the Next Generation voice platform.
End Flow
End Flow is a terminating activity that marks the end of a flow path. You can use any number of End Flow activities to construct your flow to ensure that all flow paths terminate.
Don't use the End Flow activity in an IVR flow. End Flow use with IVR may result in dead air and the call may not disconnect. |
You can give each activity a unique label and description.
| Parameter | Description |
|---|---|
|
Activity Label |
Enter a name for the activity. |
|
Activity Description |
(Optional) Enter a description for the activity. |
Set Variable
Use the Set Variable activity to set value to a variable. You can modify the value of the variable based on your requirement or according to a flow.
Specify the type of variable you wish to select. For more information, see Custom Flow Variables and Predefined Variables. |
You can configure an error-handling path (Undefined Error) to handle system errors that may occur during flow execution. For more information, see Error Handling.
The following sections enable you to configure the Set Variable activity:
General Settings
|
Parameter |
Description |
|---|---|
|
Activity Label |
Enter a name for the activity. |
|
Activity Description |
(Optional) Enter a description for the activity. |
Variable Settings
|
Parameter |
Description |
|---|---|
|
Variable |
Choose the variable from the drop‐down list. Only Custom Flow variables can be set to custom values. Predefined Variables have fixed values as dictated by the flow execution. |
|
Variable Value | Click the Set Value radio button to set the variable to a specific value. The input field type changes based on the data type of the selected variable. To learn more about variable data types, see Create Custom Flow Variables. If the value is a string, you can enter basic text or an expression.To enter an expression, use the Click the Set to Variable radio button to set the variable value to the value of another variable in the flow. Choose a variable from the drop‐down list. All variables in the flow are available for selection. |
BRE Request
Use the BRE Request activity to retrieve the data from your organization's Business Rules Engine (BRE) to use in the flow. The BRE Request activity uses standard HTTP protocols to fetch data from the BRE.
The following sections enable you to configure the BRE Request activity:
General Settings
|
Parameter |
Description |
|---|---|
|
Activity Label |
Enter a name for the activity. |
|
Activity Description |
(Optional) Enter a description for the activity. |
Query Parameters
As part of the BRE Request, you can pass the parameters that are provided in the API call to the BRE. In the Key‐Value columns, you can enter the key for the query and the associated value to send along with the query. You can also use the double curly braces syntax to pass variable values.
The BRE activity has one predefined Query Parameter: context. This query parameter is passed in the API call to the BRE.
The |
|
Parameter |
Description |
|---|---|
|
Context |
Contains the reason for the request. This mandatory parameter can't be edited or deleted. This parameter must contain the same value as the value specified in the Attribute |
|
ANI |
Contains the originating phone number of the call. This is a default parameter that you can edit or delete, based on the rules configuration in the BRE. A sample value for ANI is |
|
Response Timeout | Specifies the connection timeout for the BRE Request. Default is set at 2000 milliseconds. |
|
Number of Retries |
Specifies the number of times the BRE Request is attempted after failure. This parameter is used if the status code is 5xx; for example, 500 or 501. |
To add a query parameter, click Add New. This adds a row where you can enter the key value pairs. You can add as many query parameters as required as part of the BRE Request.
Parse Settings
This section enables you to parse the response from the BRE Request into different variables:
|
Parameter |
Description |
|---|---|
|
Response Variable |
Choose a variable to which you want to extract a particular section from the BRE Request response object. You can choose only Custom Flow variables from the drop-down list. |
|
Path Expression |
Define the Path Expression for parsing the response object. Depending on the kind of data structure of the response object and the use cases for extracting a subset of that information, the Path Expression varies. Data is normalized to an object hierarchy before Path Expression execution, so JSONPath is used in the response object regardless of the configured Content Type. |
Output Variables
The BRE Request returns two output variables:
-
BRERequest1.httpResponseBody: Returns the response body for the BRE Request. -
BRERequest1.httpStatusCode: Returns the status code of the BRE Request.These response codes are classified into the following categories:
-
Informational responses (100–199)
-
Successful responses (200–299)
-
Redirects (300–399)
-
Client errors (400–499)
-
Server errors (500–599)
-
Content Type Formats
The following examples describe sample input Content Type formats and the JSON response.
Content Type XML
Use this tool to convert XML into JSON format https://codeshack.io/xml-to-json-converter/.
XML Input Format:
<note>
<to>Tove</to>
<from>Jani</from>
<heading>Reminder</heading>
<body>Test application</body>
</note>
Data/JSON Normalized Response
{
"note": {
"to": "Tove",
"from": "Jani",
"heading": "Reminder",
"body": "Test application"
}
}
Example JSON Path Expression: Use $.note.from to get the value as Jani.
Content Type TOML
Use this tool to convert TOML to JSON format https://www.convertjson.com/toml-to-json.htm.
TOML Input Format:
title = "TOML Example"
[owner]
name = "Tom Preston-Werner"
dob = 1979-05-27T07:32:00-08:00
Data/JSON Normalized Response
{
"title": "TOML Example",
"owner": {
"name": "Tom Preston-Werner",
"dob": "1979-05-27T15:32:00.000Z"
}
}
Example JSON Path Expression: Use $.owner.name to get the value as ‘Tom Preston-Werner’.
Content Type YAML
Use this tool to convert YAML to JSON format https://www.convertjson.com/yaml-to-json.htm.
YAML Input Format:
# An employee record
martin:
name: Martin D'vloper
job: Developer
skill: Elite
Data/JSON Normalized Response
{
"martin": {
"name": "Martin D'vloper",
"job": "Developer",
"skill": "Elite"
}
}
Example JSON Path Expression: Use $.martin.job to get the value Developer.
Content Type JSON
Use the JSON Expression Evaluator https://jsonpath.herokuapp.com/.
JSON Input Format:
{
"martin": {
"name": "Martin D'vloper",
"job": "Developer",
"skill": "Elite"
}
}
Data/JSON Normalized Response
{
"martin": {
"name": "Martin D'vloper",
"job": "Developer",
"skill": "Elite"
}
}
Example JSON Path Expression: Use $.martin.job to get the value Developer.
HTTP Request
The HTTP Request activity fetches information from an external data source such as a CRM using standard HTTP protocols.
Basic Auth and OAuth 2.0 attributes are supported for authenticated endpoints.
The following sections enable you to configure the HTTP Request activity:
General Settings
|
Parameter |
Description |
|---|---|
|
Activity Label |
Enter a name for the HTTP Request activity. |
|
Activity Description |
(Optional) Enter a description for the activity. |
HTTP Request Settings
|
Parameter |
Description |
|---|---|
|
Use Authenticated Endpoint |
Enables the ability to make an HTTP request to an authenticated endpoint. By default, this toggle button is on. |
|
Connector |
Choose the Connector from the drop-down list. The drop-down list displays the name of the Connectors configured in the Control Hub. The Connector provides a common location to store credentials for the service you want to access. For example, the Salesforce Connector validates and allows connectivity to the Salesforce account. This Connector can then be referenced from within the HTTP Request activity to make a request. This essentially creates the domain section of the URL. To configure a connector on Control Hub, see the Set Up Integration Connectors for Webex Contact Center article. |
|
Request Path |
Enter the request path for the HTTP request. This field displays when the Use Authenticated Endpoint toggle button is on. |
|
Request URL |
Defines the Request URL which spans both domain and request paths for unauthenticated endpoints. This field displays when the Use Authenticated Endpoint toggle button is off. |
|
Method Types: GET, POST, PUT, PATCH, DELETE, OPTIONS, HEAD |
Defines the HTTP request activity that supports the following popular methods:
|
|
Query Parameters | Defines parameters that you pass as part of the HTTP Request. The web server provides these extra parameters to use, for example, to make a GET Request. In the Key‐Value columns, enter the key for the query and the associated value that needs to be sent with the query. The parameters are a list of key-value pairs that are separated with the ampersand (&) symbol. You can also use the variable values in the double curly braces syntax to pass variable values. For example, if you want to fetch the account balance of a customer based on the ANI, depending on the data store service APIs, the key and value can be: Key: Value: |
|
HTTP Request Headers |
Defines the HTTP headers that let the client pass additional information with an HTTP request. Request headers such as Accept, Accept‐*, or If‐* allow to perform conditional requests along with other headers such as Cookie and User‐Agent. For example, as part of a GET Request, use: To add an HTTP Header, click Add New. This adds a row where you can enter the respective key‐value pairs. You can add as many HTTP headers as required as part of the HTTP Request. |
|
Content Type |
Specifies the expected content type of the request body. Application/ JSON, Form URL Encoded, TOML, XML, File and YAML are supported content types. |
|
Request Body |
Specifies the data bytes transmitted in an HTTP transaction message, immediately following the headers if there are any. In certain types of HTTP Requests such as a POST or PUT request, you can send a request body that specifies the content to update at the target resource. If you choose the Content Type as File, the CONTENT and FILE NAME columns appear. The CONTENT drop-down displays the list of JSON variables from the flow and output variables from the Record activities.
|
|
Response Timeout |
Specifies the connection timeout for the HTTP Request. Default is set at 2000 milliseconds. |
|
Number of Retries |
Specifies the number of times the HTTP Request is attempted after failure. Retry for service is unavailable. This parameter is used if the status code is 5xx; for example, 500 or 501. |
Parse Settings
This section enables you to parse the response generated from the HTTP Request into different variables. This configuration is optional because not all HTTP Request scenarios require parsing.
|
Parameter |
Description |
|---|---|
|
Content Type |
Specifies the expected content type of the response body. JSON, TOML, XML, and YAML are the supported content types. |
|
Output Variable |
Choose a variable to contain the data from a specific section of the HTTP Request response object. |
|
Path Expression |
Define the Path Expression for parsing the response object. Depending on the response object data structure and the reason to extract a subset of information, the Path Expression varies. Data is normalized to an object hierarchy before Path Expression execution, so JSONPath is used in the response object regardless of the configured Content Type. |
Output Variables
The HTTP Request returns the following output variables:
-
HTTPRequest1.httpStatusCode: Returns the status code of the HTTP.These response codes are classified into five main categories:
-
Informational responses (100–199)
-
Successful responses (200–299)
-
Redirects (300–399)
-
Client errors (400–499)
-
Server errors (500–599)
-
-
HTTPRequest1.httpResponseBody: Returns the response body for the HTTP Request. -
HTTPRequest1.httpResponseHeaders: Returns the header information from the response.
Content Type Formats
The following examples describe sample input Content Type formats and the JSON response.
Content Type XML
Use this tool to convert XML into JSON format https://codeshack.io/xml-to-json-converter/.
XML Input Format:
<note>
<to>Tove</to>
<from>Jani</from>
<heading>Reminder</heading>
<body>Test application</body>
</note>
Data/JSON Normalized Response
{
"note": {
"to": "Tove",
"from": "Jani",
"heading": "Reminder",
"body": "Test application"
}
}
Example JSON Path Expression: Use $.note.from to get the value as Jani.
Content Type TOML
Use this tool to convert TOML to JSON format https://www.convertjson.com/toml-to-json.htm.
TOML Input Format:
title = "TOML Example"
[owner]
name = "Tom Preston-Werner"
dob = 1979-05-27T07:32:00-08:00
Data/JSON Normalized Response
{
"title": "TOML Example",
"owner": {
"name": "Tom Preston-Werner",
"dob": "1979-05-27T15:32:00.000Z"
}
}
Example JSON Path Expression: Use $.owner.name to get the value as ‘Tom Preston-Werner’.
Content Type YAML
Use this tool to convert YAML to JSON format https://www.convertjson.com/yaml-to-json.htm.
YAML Input Format:
# An employee record
martin:
name: Martin D'vloper
job: Developer
skill: Elite
Data/JSON Normalized Response
{
"martin": {
"name": "Martin D'vloper",
"job": "Developer",
"skill": "Elite"
}
}
Example JSON Path Expression: Use $.martin.job to get the value Developer.
Content Type JSON
Use the JSON Expression Evaluator https://jsonpath.herokuapp.com/.
JSON Input Format:
{
"martin": {
"name": "Martin D'vloper",
"job": "Developer",
"skill": "Elite"
}
}
Data/JSON Normalized Response
{
"martin": {
"name": "Martin D'vloper",
"job": "Developer",
"skill": "Elite"
}
}
Example JSON Path Expression: Use $.martin.job to get the value Developer.
Parse
Use the Parse activity to extract information from the data object. The Parse activity takes input string (JSON, TOML, XML, and YAML) and converts it into a JSON structure based on the specified data. You can then assign the JSON structure to a variable using a JSON path expression.
You can configure an error-handling path (Undefined Error) to handle system errors that may occur during flow execution. For more information, see Error Handling.
The following sections enable you to configure the Parse activity:
General Settings
|
Parameter |
Description |
|---|---|
|
Activity Label |
Enter a name for the activity. |
|
Activity Description |
(Optional) Enter a description for the activity |
Parse Settings
|
Parameter |
Description |
|---|---|
|
Input Variable |
Specifies the variable that stores the data object to use for parsing. |
|
Content Type |
Specifies the expected content type of the data object. JSON, TOML, XML, and YAML are supported content types. |
|
Output Variable |
Choose a variable to contain the data from a specific section of the HTTP Request response object. |
|
Path Expression |
Define the Path Expression for parsing the response object. Depending on the response object data structure and the reason to extract a subset of information, the Path Expression varies. Data is normalized to an object hierarchy before Path Expression execution, so JSONPath is used in the response object regardless of the configured Content Type. Path Expressions should confirm to Jayway JSONPath expressions. For more information, see https://github.com/json-path/JsonPath. |
Content Type Formats
The following examples describe sample input Content Type formats and the JSON response.
Content Type XML
Use this tool to convert XML into JSON format https://codeshack.io/xml-to-json-converter/.
XML Input Format:
<note>
<to>Tove</to>
<from>Jani</from>
<heading>Reminder</heading>
<body>Test application</body>
</note>
Data/JSON Normalized Response
{
"note": {
"to": "Tove",
"from": "Jani",
"heading": "Reminder",
"body": "Test application"
}
}
Example JSON Path Expression: Use $.note.from to get the value as Jani.
Content Type TOML
Use this tool to convert TOML to JSON format https://www.convertjson.com/toml-to-json.htm.
TOML Input Format:
title = "TOML Example"
[owner]
name = "Tom Preston-Werner"
dob = 1979-05-27T07:32:00-08:00
Data/JSON Normalized Response
{
"title": "TOML Example",
"owner": {
"name": "Tom Preston-Werner",
"dob": "1979-05-27T15:32:00.000Z"
}
}
Example JSON Path Expression: Use $.owner.name to get the value as ‘Tom Preston-Werner’.
Content Type YAML
Use this tool to convert YAML to JSON format https://www.convertjson.com/yaml-to-json.htm.
YAML Input Format:
# An employee record
martin:
name: Martin D'vloper
job: Developer
skill: Elite
Data/JSON Normalized Response
{
"martin": {
"name": "Martin D'vloper",
"job": "Developer",
"skill": "Elite"
}
}
Example JSON Path Expression: Use $.martin.job to get the value Developer.
Content Type JSON
Use the JSON Expression Evaluator https://jsonpath.herokuapp.com/.
JSON Input Format:
{
"martin": {
"name": "Martin D'vloper",
"job": "Developer",
"skill": "Elite"
}
}
Data/JSON Normalized Response
{
"martin": {
"name": "Martin D'vloper",
"job": "Developer",
"skill": "Elite"
}
}
Example JSON Path Expression: Use $.martin.job to get the value Developer.
Condition
The Condition activity represents a decision. The flow takes the True or False path depending on whether the condition is met.
You can configure an error-handling path (Undefined Error) to handle system errors that may occur during flow execution. For more information, see Event Flows. |
The following sections enable you to configure the Condition parameters and outputs:
General Settings
|
Parameter |
Description |
|---|---|
|
Activity Label |
Enter a name for the activity. |
|
Activity Description |
(Optional) Enter a description for the activity. |
Expression
Wrap each expression as follows: {{Enter Expression}}.
Example: {{HTTPRequest1.httpStatusCode == 200}}
If you use an expression without braces, the system throws a Flow Error.
|
Condition |
Description |
|---|---|
|
Condition |
Choose the Condition from the drop‐down list:
|
Case
Use the Case activity if there are multiple possibilities or outcomes at a certain decision point in your call flow.
For example, you can use a Case activity to define different screen pops for different agent teams depending on the team name. Each Case becomes a branch from which you define the appropriate paths. The flow proceeds down the path that evaluates as true for a particular instance of the flow. Each Case activity has a default that the system uses for any undefined case. If none of the cases are true, the default Case is evaluated as true and the flow proceeds along that branch.
You can configure an error-handling path (Undefined Error) to handle system errors that may occur during flow execution. For more information, see Event Flows. |
The following sections enable you to configure the Case activity:
General Settings
|
Parameter |
Description |
|---|---|
|
Activity Label |
Enter a name for the activity. |
|
Activity Description |
(Optional) Enter a description for the activity. |
Case
|
Parameter |
Description |
|---|---|
|
Variable |
Choose a variable against which you want to evaluate the different cases. Choose the variable from the drop-down list. |
|
Expression |
Enter an expression to evaluate the different cases against. Use the Pebble Template syntax to define the expression. For more information on the Pebble Template Syntax, see Pebble Template Syntax. |
|
Case |
Defines the different cases to compare to the variable or expression. You can add up to 20 case statements per activity. Click Add New to add a new case statement block to compare against a static value, a variable, or an expression. If you use a variable or expression, use the Pebble Template Syntax. For more information on the Pebble Template Syntax, see Pebble Template Syntax. |
|
Output |
Description |
|---|---|
|
True |
Path to take if the condition is met. |
|
False |
Path to take if the condition is not met. |
GoTo
Flow chaining gives you the ability to chain multiple flows. To achieve flow chaining, you can add the GoTo terminating activity to the canvas and indicate if the current flow should go to an entry point or another flow. For more information, see Flow Chaining.
If the activity library does not display the GoTo activity, contact Cisco Support to have the corresponding feature flag enabled. |
You can configure an error-handling path (Undefined Error) to handle system errors that may occur during flow execution. For more information, see Event Flows. |
The following sections enable you to configure the GoTo activity:
General Settings
|
Parameter |
Description |
|---|---|
|
Activity Label |
Enter a name for the activity. |
|
Activity Description |
(Optional) Enter a description for the activity. |
Flow Destination Settings
You can modify the caller's experience based on time (if handing off the call to an entry point), or to reuse a single flow in multiple scenarios (if handing off the call to a flow). Based on the GoTo option, the flow variables are passed on from the current flow as follows:
-
Go to Entry Point: The custom flow variables and global variables with the same name and data type are copied from the current flow to the flow that is associated with the entry point.
-
Go to Flow: The flow variables that are configured in the Variable Mapping section are copied from the current flow to the new flow.
|
Parameter |
Description |
|---|---|
|
Go to Entry Point |
Choose this option if the current flow should go to an entry point. In the combo box, enter the entry point if the flow logic should change based on the active routing strategy at the time of transfer. The custom flow variables and global variables with the same name and data type are copied from the first flow to the new flow associated with the entry point. Only the telephony entry points that are created in the Webex Contact Center Management Portal are displayed. |
|
Go to Flow |
Choose this option if the current flow should go to another flow. In the combo box, choose the destination flow from the drop-down list. The destination drop-down list lists only the published flows. You can manually map variables across two flows in the Flow Variable Mapping section. |
Flow Variable Mapping
If you choose the Go To Flow option, the Flow Variable Mapping section displays. Flow variables and global variables with the same name and same data type between flows are automatically mapped. This feature helps you to edit, delete, or add more variable mappings between the current flow and the destination flow.
When you map a JSON variable from a main flow to the target flow in GoTo activity, store the JSON output in another variable such as a string or any other variable type, and map that to the same type of variable in the target flow. |
|
Parameter |
Description |
|---|---|
|
Map Current Variables |
Lists all the flow variables and global variables in the current flow. You can map the same variable to multiple variables in the destination flow. In the combo box, enter the variable to be mapped. |
|
To Destination Variable |
List of all the flow variables and global variables in the destination flow that will be copied from the current flow after hand-off. In the combo box, enter the variable that is mapped in the destination flow. You can map the variables in the destination flow only once, while you can map the variables in the current flow multiple times. |
To add, edit, or delete variable mappings:
-
To edit a variable mapping, choose the appropriate flow from the drop-down list.
After you choose a variable in either the Map Current Variables or To Destination Variable drop-down lists, the other drop-down list displays only the variables of the same data type.
For example, if you choose
customerIdof typeIntegerfrom the Map Current Variables drop-down list, the To Destination Variable drop-down list displays only variables of typeIntegerin the new flow. -
Click the Delete icon to delete a variable mapping.
-
Click Add New to add a new variable mapping. Choose the variables to be mapped in the Map Current Variables and To Destination Variable drop-down lists.
Variable Details
The Current Flow Variable Details section displays all of the flow and global variables in the current flow.
The Destination Flow Variable Details section displays all of the flow and global variables in the destination flow.
You can click on the tag for information about a variable. When you select a variable for mapping, the variable turns green that helps you see what has already been mapped.
Business Hours
The Business Hours activity enables you to use working and nonworking hours such as holidays, and overrides in your organization that are defined in Control Hub. You can add the Business Hours activity into a flow and assign that flow to an entry point. Using this activity, you can consume working hours, holidays, and overrides to consolidate multiple routing strategies for all their schedules into a single flow.
Use the Business Hours activity to program a schedule of operation in a flow. This activity determines if a certain schedule is active at any given time and routes the execution of the flow accordingly.
Administrators can manage business hours entities from Control Hub. For more information, see Set up Business Hours.
You can configure an error-handling path (Undefined Error) to handle system errors that may occur during the flow execution. For more information, see Error Handling. |
The following sections enable you to configure the Business Hours activity:
General Settings
|
Parameter |
Description |
|---|---|
|
Activity Label |
Enter a name for the activity. |
|
Activity Description |
(Optional) Enter a description for the activity. |
Schedule Details
In the Schedule Details section, you can choose a business hour from the dropdown list to define when different paths of the flow are executed. Schedule indicates the shift that is defined in the working hours object of the chosen business hour. The flow gets executed primarily based on the timeframe defined in the shift of the chosen business hour. Other business hours entities like holiday lists and overrides take precedence over the working hours if the timings coincides with the current shift timing.
If any of the ordered list inputs is empty, Flow Designer throws a flow validation error. You must resolve these errors before publishing the flow. |
Business Hours Nodes
You can configure the following nodes in the Business Hours activity:
|
Parameter |
Description |
|---|---|
| Overrides |
If the current time is defined as an override as in the Overrides list, the activity takes the Override branch regardless of the shift timings mentioned in the chosen working hours. |
| Holidays |
If the current day is a holiday as defined in the Holidays List, the activity takes the Holidays branch regardless of the shift timings mentioned in the chosen working hours. |
| Working Hours |
This is the primary node that considers the shift timing mentioned in the selected business hour in the Schedule Details section. The activity takes this branch if the current time matches the chosen shift timing. |
| Default |
The activity takes the Default branch if none of the above evaluates. |
Output Variables
The Business Hours activity employs the following output variables.
|
Variable Name |
Description |
|---|---|
|
|
During the flow execution, this variable stores the name of the shift defined in the working hour. |
|
|
During the flow execution, this variable stores the name of the holiday if the current day is a holiday as defined in the Holidays List. |
|
|
During the flow execution, this variable stores the name of the override that matches with the current time as defined in the Overrides. |
|
|
This variable stores which of the above node was chosen during the flow execution, such as working hours, holidays, override, or default. |
Wait
The Wait activity enables you to pause the flow execution for a specified duration. When you configure this activity with the wait period, the flow execution pauses for the duration specified in the Wait activity in the execution path.
We don't recommend usage of the Wait activity when an IVR session is active as it may cause the IVR session to time out. In such cases, contact will experience dead air resulting in call failures. We strongly recommend flow designers to use the Wait activity in the |
The Wait activity is generic in nature. When you design a flow, you can place this activity after any activity as per your requirement. For example, during callback retry, this activity pauses the flow execution and retries the callback.
The following sections enable you to configure the Wait activity:
General Settings
|
Parameter |
Description |
|---|---|
|
Activity Label |
Enter a name for the Wait activity. |
|
Activity Description |
(Optional) Enter a description for the activity. |
Wait Settings
|
Parameter |
Description |
|---|---|
|
Duration | Choose a duration in HH:MM:SS format to specify the time duration for which the flow execution pauses with a minimum of 10 seconds and a maximum of 72 hours. Click on the Duration field to set the time. If you enter the minutes and seconds fields to more than 59, it automatically defaults to 59. If you set the hours field to more than 72, it prompts you to enter the duration between 00:00:10 and 72:00:00. Currently there’s a deviation up to a few milliseconds while executing this activity. Don't use the wait activity in use cases that require high precision. |
Output Variables
No output variable is available in this activity.
Percentage Allocation
The Percentage Allocation activity enables you to distribute call traffic across different paths in a flow. You can use this activity as a flow branching mechanism across multiple flow paths and create multiple exit paths to allocate contacts to different queues, sites, and external servers.
The system uses a Weighted Round Robin (WRR) algorithm to distribute traffic and this may create imbalances. The algorithm resets every time you publish the flow. We recommend you to test the flow execution before deploying changes into production. Let's take an example of a percentage distribution of 50%, 30% and 20% respectively to understand the distribution of 10 calls under WRR. Eventually, the system will distribute calls evenly, such as 5 in exit path 1, 3 in exit path 2, 2 in exit path 3. However, this happens dynamically in an adjusted manner with the weights of 5:3:2. One possible outcome of distribution is as follows, taking 10 consecutive calls such as Path1, Path2, Path1, Path2, Path3, Path1, Path2, Path3. It is important to note that this is one possible distribution and that contact distributions are adjusted with varying load distributions. The percentage allocation activity now allows percentage values ranging from 0 to 100. Administrators can utilize the 0% setting to create switchboard use cases. This allows the traffic to be turned off by default. However, you can activate these connections later to allocate distributions greater than 0%. |
Moreover, you can add the Percentage Allocation activity before the Feedback activity to configure how you want to manage the call traffic. You can allocate 50% of feedback via email, 30% from SMS, and 20% from survey.
Similarly, in a geographically diverse environment, you can configure the Percentage Allocation activity to send 10% of contacts to Boston, 5% to Chicago, and distribute the remaining 85% to another set of locations.
You can configure an error-handling path (Undefined Error) to handle system errors that may occur during flow execution. For more information, see Error Handling. |
Before you begin
| 1 |
In Flow Designer, drag and drop the Percentage Allocation activity from the Activity Library to the main canvas. | ||||
| 2 |
Click the Percentage Allocation activity to configure the activity settings. | ||||
| 3 |
In General Settings:
| ||||
| 4 |
In Percent Allocation, create the required allocation paths. Initially, the system sets the allocation default path to 100%. You can edit the percent value and description, and also add new paths.
|
Support for workflows in Outdial Entry Point
The following activities and events are supported when you create workflows for outdial voice contacts:
-
HTTP Request
-
Condition
-
Parse
-
Set Variable
-
Business Hours
-
End Flow
-
Screen Pop
-
PreDial event
All event handlers as applicable are supported. Event handlers such as PreDial event, Agent Offered and so on, will be populated based on the activities that you add in the main flow. Global variables and local variables are supported as part of the flow.
The following activities are not supported when you create workflows for outdial voice contacts:
-
Queue Contact
-
Queue To Agent
-
Callback
-
Queue Lookup
-
Advanced Queue Information
-
Blind Transfer
-
Escalate Call Distribution Group
-
IVR message
Based on the above activities, the system will gracefully support the error and success paths seamlessly.
When you design a flow for Outdial Entry Point, don't include a Disconnect Contact activity at the end of the flow. If you use a Disconnect Contact activity in the flow, this causes the flow to end the call and prompt a wrap-up, while the outdial call is actually active and connected. |
Events
The Event Flows tab contains the following event handlers that you use across different activities:
-
OnGlobalErrorThis event facilitates the global error handling. The system triggers this event when you don't configure the error path links on an activity. All Activities in Call Handling and Activities in Flow Control expose this event. For more information, see OnGlobalError Workflow.
-
AgentAnsweredThe system triggers this event when an agent answers an inbound call and interrupts the contact's experience in a queue.
Activities that open up this event are Screen Pop and Queue Contact.
-
PhoneContactEndedThe system triggers this event when a live call disconnects, and removes all participants. The event is available if you use selected call handling activities in a flow such as Screen Pop and Feedback. This event doesn't require escalation to an agent.
When you create a flow, don’t add any IVR activity after the
PhoneContactEndedevent. During the flow execution, the flow won't work when you add an activity after the contact ends.Only the Queue Contact activity exposes this event.
-
AgentDisconnectedThe system triggers this event when the last agent disconnects from a live call, leaving the customer alone on the line.
The Queue Contact activity exposes this event.
-
AgentOfferedThe system triggers this event when a voice contact is offered to an agent. This event allows the flow developer to configure multiple supported activities that are part of event handling. For example, a flow developer can configure a Screen Pop activity against an AgentOffered event. This configuration provides customer-related information to the agent, before the agent takes or answers a call. This event is associated with
NewPhoneContact.You can view the related variables in Event Output Variables.
-
CallbackFailedThe system triggers this event when a courtesy callback fails. This event is available if you use Callback activity in the Main Flow.
-
The system retries a callback only when a callback fails from the contact's end. The callback fails when the contact is busy or unavailable, or there is no answer from an agent.
-
Also, the call fails from the agent end when an agent's phone is not reachable or the agent declines the call. The call moves back to the queue and routes again to an available agent.
To use a retry callback in a flow, configure a local flow variable (using SetVariable activity) with value 0 and increment it as required. Ensure that the value is less than the Retry variable count value.
You can attach other events that you require in the flow to attempt a callback retry. Include a Wait activity followed by a Callback or any of the queuing activities such as Queue To Agent and Queue Contact in the flow. Use these activities in any combination or order, after the Wait activity.
To end the retries:
-
For a true condition, use End Flow activity. Don't use a Disconnect activity.
-
For a false condition, use a Disconnect after a Retry variable is configured in the flow. In this case, all the retry attempts are complete and there are no retries available.
-
The maximum number of callback retry attempts are 10. The maximum time the interaction can stay in the system is 14 days. Whichever occurs first is considered as the life of an interaction for configuring a retry.
-
When you use a Wait activity, the minimum delay interval between retry is 10 seconds, and the maximum delay interval between retry is 72 hours.
-
When the state of a contact is in parked timeout, and if retry attempts are available, a CallbackFailed event generates. The configured event handler in the flow continues to retry the callback for the remaining attempts.
-
When a callback to a contact fails, the contact is dequeued, and the CallbackFailed event generates. The retry handler can queue it again using any of the activities like Callback (same or different destination), Queue Contact, and/or Queue To Agent.
-
-
PreDialAs part of NewPhoneContact, the PreDial event enables the flow developer to set or customize the caller ID using the Set Caller ID activity.
When you create a workflow, this event is available on the Event Flows tab of Flow Designer. This is an event which is terminated by configuring Set Caller ID activity. This event is triggered for both agent and customer based on the call scenario.
For campaign calls to succeed, the agent calls and customer calls must be made from the same media region. The media region is selected based on the ANI/CLID of the call when presented to media. The mapping between the the ANI and the media region is performed in Control Hub. The ANIs which are selected on the agent call and the customer call, if controlled via the PreDial event in the flow, should be chosen such that both calls emanate from the same region.
For example, if an agent is located in Singapore, but the customer calls are to be made in the United States, the ANI for the customer call may be selected such that the media region is the US. Similarly, the ANI selected for the agent call in the PreDial event should also be chosen such that the media region selected is the US.
The following table provides the list of operation types and the corresponding participant types for
PreDial.operationType.Table 51. PreDial.operationType related operation and participant types PreDial.OperationType
PreDial.ParticipantType
INBOUNDAgent
OUTDIALAgent, Customer
COURTESY_CALLBACKAgent, Customer
PREVIEW_CAMPAIGNAgent, Customer
WEB_CALLBACKAgent, Customer
TRANSFER_TO_DNDN
TRANSFER_TO_AGENTAgent
CONSULT_TO_DNDN
CONSULT_TO_AGENTAgent
CONSULT_TO_QUEUEAgent
CONSULT_TO_EP_DNEP-DN
-
Customize ANI is not applicable for Supervisor when call monitoring is configured.
-
Configure every PreDial event handler path with Set Caller ID as a terminal activity, otherwise the contact can be abandoned.
-
Flow support is required for any inbound or outbound scenario to use PreDial event handler.
-
Do not use flow activities that queue a contact with the PreDial event handler.
-
For ANI configured against an outbound contact, the call is routed through the region the Agent ANI is mapped to regardless of the region where the contact is located. For example, if an organization has contact centers in the US and Australia and an outbound call is triggered for a contact that is located in the US with the Agent ANI mapped to the Australia region, the call is routed through Australia.
Refer to the table ANI usage for multiple scenarios in a Next Generation environment in Set Caller ID section for ANI usage in various call scenarios.
You can view the related variables in Event Output Variables.
-
OnGlobalError Workflow
While you create a flow, you can set the error path of an activity to handle an activity error or a generic error that you get during the flow execution.
If you get an error during the flow execution, the execution continues with the next activity defined in the error path. If you don't configure the error path in the Main Flow, you can still set the OnGlobalError event available in the Event Flows tab to handle the flow execution error.
If you fail to define error paths in both Main Flow and Event Flows, the flow ends when an error occurs during the flow execution.
Let's consider a scenario where you configure the Set Variable activity in a flow.
You can set the Undefined Error node of the Set Variable activity on the Main Flow to handle any system errors during the flow execution. If you don't want to define the error path in the main flow, you can still go to the Event Flow tab and configure the OnGlobalError event flow.
In the above example, Play Message is appended to the OnGlobalError event handler. If there’s a system error during the execution of Set Variable activity in Main Flow, the system will consider the configuration made in the Set Variable activity first. If there's no error path defined, the system checks the OnGlobalError event handler in the Event Flow. Since a Play Message activity is attached to the OnGlobalError event in the above example, the system plays the message and ends the flow.
Variables and Expressions in Flow Designer
Flow Designer has the following types of variables:
Custom Flow Variables
Custom Flow Variables are configurable variables of different data types that you can use throughout the flow. You can create as many Flow Variables as you need to satisfy the logic in your flow.
Secure Variables
You can mark flow variables as Secure to prevent logging and storing of any sensitive information such as Personally Identifiable Information (PII) and Payment Card Industry (PCI) data. You can set secure variables as Agent Viewable or Agent Editable to control how these variables are presented on the Agent Desktop.
By default, all existing variables in the deployed flows behave as nonsecure variables. Open these flows in edit mode to review and retain the secure variables as needed.
In flow variable mapping, you cannot map a secure variable to a nonsecure variable in the GoTo activity.
You can't mark global variables as secure.
Create Custom Flow Variables
| 1 |
From the Management Portal navigation bar, choose . | ||||||||||||||||||||
| 2 |
Click the ellipsis icon beside the flow and click Open. The Flow Designer window appears.
| ||||||||||||||||||||
| 3 |
From the Configuration panel, open the Variable Definition section. | ||||||||||||||||||||
| 4 |
Click Add Flow Variable. | ||||||||||||||||||||
| 5 |
Enter the Name and Description of the variable. | ||||||||||||||||||||
| 6 |
Choose a Variable Type from the drop-down list.
The supported variable types are:
| ||||||||||||||||||||
| 7 |
Specify the Default Value of the variable as per the chosen variable type. | ||||||||||||||||||||
| 8 |
(Optional) If you enable the Contains Sensitive Information toggle button, the system marks the variable as a secure variable. During flow execution, the system doesn't log or store any information that is passed through this variable. | ||||||||||||||||||||
| 9 |
(Optional) If you enable the Mark Agent Viewable toggle button, the variable a on the Desktop along with the value captured as part of the flow. When you enable the Mark Agent Viewable toggle button, the following fields appear:
| ||||||||||||||||||||
| 10 |
Click Save. When you save a Custom Flow Variable, the variable is saved as a tag in the Global Properties Panel on the Desktop. If you marked the variable as Agent Viewable, the tag displays a headset icon for easy identification. |
Example: Order of Flow Variables Displayed on the Desktop
When you create variables that are marked as Agent Viewable, the desktop displays these variables in a particular order.
For example, if you create the following flow variables: CustomerType, SubscribedCustomer, CustomerCount, CallRatio, dob, Datetest.
The Desktop receives these variables from Flow Designer in the following order: CallRatio, CustomerCount, CustomerType, SubscribedCustomer, ANI, DN, dob, ronaTimeout, Datetest.
The Desktop displays the variables in the following order, from left to right, on the user interface:
-
The Customer variables Phone Number, DN, Queue, RONA Time
-
The flow variables are sorted in alphabetical order with variables beginning with uppercase first, followed by variables with lowercase: CallRatio, CustomerCount, CustomerType, Datetest, SubscribedCustomer, dob.
Edit Custom Flow Variables
If the variable is already in use, then you cannot edit the Variable Type. Doing so may have major implications on the flow. So, this action is prohibited. In this case, the Variable Type drop-down field is disabled and a warning message appears.
Upon successfully editing a variable, the changes that are made appears throughout the flow, and in the pop-over that appears when you click a flow variable in the Global Properties pane.
To edit a custom flow variable, perform the following steps:
| 1 |
From the Management Portal navigation bar, choose . |
| 2 |
Click the ellipsis icon beside the flow and click Open. The Flow Designer window appears.
|
| 3 |
Click on a variable tag from the Global Properties Pane that you want to edit. It displays a pop-over window showing a summary of the information that is originally configured for the variable.
|
| 4 |
Click Edit in the upper-right corner of the pop-over. The Edit Flow Variable dialog box appears. If the variable is not used in the flow, then all the fields are editable. You can modify the variable name, description, type, and value. |
| 5 |
Click the Information icon in this message to see a list of the activities where the variable is used. If you want to proceed with editing the variable, remove the variable from all flow configurations before trying to edit again. |
| 6 |
Make the necessary changes. The Save button remains disabled until you make a change. |
| 7 |
Click Save. |
Delete Custom Flow Variables
If the variable is used in a flow, then you cannot delete it. Doing so has major implications on the flow. In this case, the Delete button in the Delete Variable window is disabled, and a list of activities where the variable is being used appears.
The activities are grouped based on whether they appear in the Main Flow or Event Flows tab. If you want to delete a variable that is in use, remove it from all flow configurations before you try to delete.
To delete a custom flow variable, perform the following steps:
| 1 |
From the Management Portal navigation bar, choose . |
| 2 |
Click the ellipsis icon beside the flow and click Open. The Flow Designer window appears.
|
| 3 |
In the Global Properties Pane, click the Delete icon that appears on the variable tag that you want to delete. |
Predefined Variables
Flow Designer automatically creates predefined variables when you use certain events and activities in a flow.
A list of the available predefined variables appears in the Predefined Variables section in the Global Flow Properties pane. They also appear in the Properties pane for the selected Event or Activity.
Click on each variable to open a pop-up window that explains what type of data the variable stores, so you know how to use the variable in your flow.
While most attributes of an Event Output Variable are predefined and cannot be edited, you can edit the variable to modify the global variable designation.
Event Output Variables
Event Output Variables are specifically associated with events and take on the nomenclature: <EventName>.<VariableName>.
All of the Event Output Variables available for use in a flow automatically appear in the Global Properties pane after an event is introduced to the flow, and also in the Properties pane for the associated Event Handler activity.
The available Event Output Variables are:
-
NewPhoneContact.ANI -
NewPhoneContact.DNIS -
NewPhoneContact.InteractionID -
NewPhoneContact.PSTNRegion -
AgentAnswered.AgentID -
AgentAnswered.AgentName -
AgentAnswered.AgentSessionID -
AgentAnswered.QueueID -
AgentAnswered.QueueName -
AgentAnswered.TeamID -
AgentAnswered.TeamName -
AgentAnswered.TenantID -
AgentAnswered.CAD -
PhoneContactEnded.AgentID -
PhoneContactEnded.TeamID -
PhoneContactEnded.QueueID -
PhoneContactEnded.InboundChannel -
PhoneContactEnded.RoutingStrategyID -
AgentOffered.agentId -
AgentOffered.agentName -
AgentOffered.agentSessionId -
AgentOffered.queueId -
AgentOffered.queueName -
AgentOffered.teamId -
AgentOffered.teamName -
AgentOffered.tenantId -
AgentOffered.callAssociatedData -
AgentOffered.AgentID -
AgentOffered.AgentName -
AgentOffered.AgentSessionID -
AgentOffered.QueueID -
AgentOffered.QueueName -
AgentOffered.TeamID -
AgentOffered.TeamName -
AgentOffered.TenantID -
AgentOffered.CAD -
PreDial.direction -
PreDial.participantType -
PreDial.dialNumber -
PreDial.otherPartyDn -
PreDial.epDn -
PreDial.agentSelectedAni -
PreDial.operationType
Customize System Variables
You can customize the desktop label of Phone Number and DNIS (Dialed Number Identification Service) variables only. You can create an alias of these variables and configure it using the Set Variable activity in the flow.
| 1 |
From the Management Portal navigation bar, choose . |
| 2 |
Click the ellipsis icon beside the flow and click Open. The Flow Designer window appears.
|
| 3 |
From the Global Flow Properties pane, open the Variable Definition section. |
| 4 |
Click the Configuration tab. |
| 5 |
Click Add Flow Variable. |
| 6 |
Enter the Name and Description of the variable. |
| 7 |
Choose String in the Variable Type drop-down list. |
| 8 |
Enable the Make Agent Viewable toggle button. |
| 9 |
In the Desktop Label field, enter the desired desktop label for the variable. |
| 10 |
Click Save. This creates the variable.
|
| 11 |
From the Activity Library, drag the Set Variable activity into the canvas. |
| 12 |
In the Variable Settings section in the Activity Settings pane, do the following: When you publish the flow, the newly created flow variable replaces the chosen system variable. During the flow execution, the Desktop Label of the newly created variable appears in the Incoming popover and Interaction pane of the Desktop.
|
Activity Output Variables
Activity Output Variables store the data captured from activities and are automatically created when you add specific activities to the canvas. Activity Output Variables use the following syntax: <ActivityName>.<VariableName> where the ActivityName dynamically changes based on the activity.
If a flow uses an activity multiple times, each activity has a unique instance of each associated Activity Output Variable. All the Activity Output Variables available for use in a flow automatically appear in the Global Properties pane when you introduce an activity to the flow, and also in the Properties pane for the associated activity.
The available Activity Output Variables are:
-
Menu.OptionEntered: Stores the menu option that the caller selected during the Menu activity instance. This is a single digit from 0 to 9. -
CollectDigits.DigitsEntered: Stores the digits entered by the caller during the Collect Digits activity instance. The number of digits depends on the activity configuration. -
HTTPRequest.HTTPStatusCode: Stores the status code received when the HTTP Request is attempted. -
HTTPRequest.HTTPResponseBody: Stores the response when the HTTP Request is successfully triggered. -
HTTPRequest.ResponseHeaders: Stores the headers that are sent as part of the HTTP Request. -
VirtualAgent.IntentTriggered: Stores the intent that triggered the conversational experience to be either handled or escalated. -
GetQueueInfo.EWT: Stores the value for the estimated wait time for the selected queue. -
GetQueueInfo.PIQ: Stores the value for the position in a queue for the selected queue.
Global Variables
Global variables are custom variables that you can view and access when create flows. Administrator creates global variables in the Provisioning module of the Management Portal. For more information, see Global Variables.
As a flow developer, you can consume these variables as per your requirement. You can add these variables in a flow. You can also edit and remove a global variable after adding it to the flow.
Add Global Variable in a Flow
You can add a maximum of 30 variables in a flow. This count doesn't include variables which are non-reportable and not Agent Viewable.
If you want to add more variables beyond the maximum limit, you must delete an equal number of the existing variables. For more information about how to delete a global variable, see Remove Global Variables from a Flow. |
During flow creation, a global variable of type String can be initialized with a maximum length of 256 characters. But during flow execution, the variable can be updated to hold up to 1024 characters. Exceeding this limit can have undesirable behavior such as call failures and invalid values. |
To add global variables in a flow:
| 1 |
From the Management Portal navigation bar, choose . |
| 2 |
Click the ellipsis icon beside the flow and click Open. The Flow Designer window appears.
|
| 3 |
In the Global Flow Properties pane, scroll down to Variable Definition > Predefined Variables section. |
| 4 |
In the Global Variables section, click Add Global Variables. The Add Global Variables dialog box appears. It shows all global variables that the administrator created in the Provisioning module.
|
| 5 |
(Optional) Use the Search Global Variables field to filter and search for the required global variables from the list. |
| 6 |
Check the check boxes of the required global variables from the list and click Add. The system displays the chosen variables in the Global Variables section.
By default, each variable carries administrator-defined metadata fields such as, Reportable, Agent Viewable, Agent Editable, and Desktop Label. If administrator changes any metadata values while the global variable is in use, the changes made in the Management Portal reflects across flows (with a cache expiry delay of 8 hours). |
Edit Global Variable in a Flow
When you edit a global variable, you cannot change any metadata value of a global variable in the flow designer. However, you can change the default value using the Overwrite Default Value toggle button.
To edit a global variable in a flow:
| 1 |
From the Management Portal navigation bar, choose . | ||
| 2 |
Click the ellipsis icon beside the flow and click Open. The Flow Designer window appears.
| ||
| 3 |
In the Global Flow Properties pane, scroll down to Variable Definition > Predefined Variables section. | ||
| 4 |
In the Global Variable panel, click on a global variable and click the edit ( The Edit Global Variables dialog box appears. It shows the details of the chosen global variable such as, Variable Type, Default Value, Desktop Label, and Agent Editable.
| ||
| 5 |
(Optional) Enable the Overwrite Portal Configurations toggle button to overwrite the existing values that are configured in Management Portal. This enables you to modify field values such as Default Value, Agent Viewability, Agent Editable, and Desktop Label.
| ||
| 6 |
Make the necessary changes. | ||
| 7 |
Click Save. |
Remove Global Variables from a Flow
You can remove a global variable that is not in use in any flow.
If you cannot remove a global variable, contact your administrator to enable the feature flag to remove global variables from the flow. |
To remove a global variable from a flow:
| 1 |
From the Management Portal navigation bar, choose . |
| 2 |
Click the ellipsis icon beside the flow and click Open. The Flow Designer window appears.
|
| 3 |
In the Global Flow Properties pane, scroll down to Variable Definition > Predefined Variables section. |
| 4 |
In the Global Variables panel, click the remove (x) icon of the global variable that you want to remove. A pop-up message prompts you to confirm your action.
|
| 5 |
Click Delete. This removes the selected global variable from the list.
|
Desktop viewable variables
You can configure the following variable types for the incoming popover and Interaction pane of the Desktop for incoming and outgoing voice calls:
-
System Variables such as Phone Number, DNIS (Dialed Number Identification Service), Queue Name, and RONA Timeout
-
Global Variables that are created and managed in Management Portal
-
Custom Flow Variables that are created and managed in Flow Designer
|
- Incoming popover on the Desktop
- The incoming popover appears when an agent receives an incoming call or dials an outgoing call. It displays key information about the customer according to the variables configured in Flow Designer. You can set an order of appearance of each of these variables in the incoming popover that can include any combination of the system, global and custom flow variables. You can also edit the desktop label of these variables.
- You can customize the desktop label of the system variables such as Phone Number and DNIS. For more information, see Customize System Variables.
- For incoming and outgoing calls, you can choose a minimum of three and a maximum of six variables. For consult calls, the consulted agent would view an additional three variables such as Agent Name, Agent DN, and Agent Team that are added to the list by default.
-
You cannot configure variables that contain sensitive information in the incoming popover on the Desktop.
- For more information on how to configure variables for the incoming popover, see Configure variables for Incoming popover.
- Interaction pane
- The Interaction pane on the Desktop appears after the agent accepts the incoming or outgoing call. It displays information set in the Interaction pane variables that are configured in Flow Designer. You can choose a maximum of 30 variables. You can set an order of appearance of each of these variables in the interaction pane that can include any combination of the system, global and custom flow variables. You can also edit the desktop label of these variables.
- You can customize the desktop label of the system variables such as Phone Number and DNIS. For more information, see Customize System Variables.
- For more information on how to configure variables for the Interaction pane, see Configure variables for Interaction pane.
Configure variables for Incoming popover
Before you begin
Configure variables on Incoming popover for incoming and outgoing calls.
-
You must create variables that you want to add in the incoming popover of the Desktop. For more information, see Create a Global Variable and Create Custom Flow Variables.
-
You must mark variables as Agent Viewable. For more information on how to mark a Global Variable as Agent Viewable, see Edit Global Variable in a Flow.
| 1 |
From the Management Portal navigation bar, choose . |
| 2 |
To create a flow, click New. To edit an existing flow, click the ellipsis icon beside the flow and click Open. The Flow Designer window appears.
|
| 3 |
From the Global Flow Properties pane, open the Variable Definition section. |
| 4 |
Click the Desktop Viewability & Order tab. |
| 5 |
In the Incoming Popover section, click Select Variables for Incoming Popover. The Select Variables on Incoming Popover window appears. It shows all variables that include four default system variables such as Phone Number, DNIS, Queue Name, and RONA Timeout. System variables such as Phone Number, DNIS, and Queue Name are selected by default that you can uncheck when you add more variables.
|
| 6 |
Use the following search options to filter the list: The list is autopopulated with variables as per your criteria entries.
|
| 7 |
Check the check boxes of the variables that you want to choose for the incoming popover. You can choose a minimum of three and a maximum of six variables. |
| 8 |
Click Save. You can skip this step if you enable the Autosave toggle button. The chosen variables appear in the Incoming Popover section.
|
| 9 |
Use the handle icon ( |
| 10 |
(Optional) Click the x icon beside a variable to remove that variable from the list. |
Configure variables for Interaction pane
Before you begin
Configure variables on the Interaction pane for incoming and outgoing calls.
-
You must create variables that you want to add in the incoming popover of the Desktop. For more information, see Create a Global Variable and Create Custom Flow Variables.
-
You must mark variables as Agent Viewable. For more information on how to mark a Global Variable as Agent Viewable, see Edit Global Variable in a Flow.
| 1 |
From the Management Portal navigation bar, choose . |
| 2 |
To create a flow, click New. To edit an existing flow, click the ellipsis icon beside the flow and click Open. The Flow Designer window appears.
|
| 3 |
From the Global Flow Properties pane, open the Variable Definition section. |
| 4 |
Click the Desktop Viewability and Order tab. |
| 5 |
In the Interaction Pane section, click Select Variables for Interaction Pane. The Select Variables on Interaction Pane window appears. It shows all variables along with four system variables such as Phone Number, DNIS, Queue Name, and RONA Timeout.
|
| 6 |
Use the following search options to filter the list: The list is autopopulated with variables as per your criteria entries.
|
| 7 |
Check the check boxes of the variables that you want to choose for the Interaction pane. You can choose a maximum of 30 variables. |
| 8 |
Use the handle icon ( |
| 9 |
Click Save. You can skip this step if you enable the Autosave toggle button. The chosen variables appear in the Interaction Pane section.
|
| 10 |
(Optional) Click the x icon beside a variable to remove that variable from the list. |
JSON Variables
JSON variables are custom flow variables of type JSON. You can create JSON variables in Flow Designer. For more information, see Create Custom Flow Variables.
You can use the following activities to store the data in JSON variable: HTTP Request, Parse, and Set Variable.
In HTTP and Parse activities, you can extract data using JSON path filter expression and store it in JSON variable.
In Set Variable activity, you can use the JSON variable in the Set Value option in the following ways:
-
Type in the JSON value in the text box. For example:
{ "userId":"rirani", "jobTitleName":"Developer", "firstName":"Romin", "lastName":"Irani", "preferredFullName":"Romin Irani", "employeeCode":"E1", "region":"CA", "phoneNumber":"408-xxxxx67", "emailAddress":"rirani@xyz.com" } -
Use a Pebble expression.
Usage of JSON Variables in Pebble Expression
-
Dot(.) separated access: You can use dot(.) separated access in Pebble expression for JSON variable in call handling and flow control activities.
Syntax:
{{ jsonVariableName.fieldName }}where,jsonVariableName.fieldNameshould evaluate to a field in JSON variable.In the previous sample code snippet, if you extract the employee to a variable called
empvarusing HTTP or Parse:use
{{empvar.employeeCode}}to get the value asE1. -
Index access of JSON array: You can access a specific index from the JSON array similar to Pebble Syntax. For more details on Index Access in Pebble, visit https://pebbletemplates.io/wiki/guide/basic-usage/, for example:
If you extract the Employees JSON array into a variable called{ "Employees" : [ { "userId":"rirani", "jobTitleName":"Developer", "firstName":"Romin", "lastName":"Irani", "preferredFullName":"Romin Irani", "employeeCode":"E1", }, { "userId":"thanks", "jobTitleName":"Program Manager", "firstName":"Tom", "lastName":"Hanks", "preferredFullName":"Tom Hanks", "employeeCode":"E3", "directReports":[ { "userId":"John", "jobTitleName":"Developer", "firstName":"John", "lastName":"Irani", "preferredFullName":"John Irani", "employeeCode":"E2" }, { "userId":"Sam", "jobTitleName":"Developer", "firstName":"Sam", "lastName":"Das", "preferredFullName":"Sam Das", "employeeCode":"E2" } ] } ] }varusing HTTP or Parse:-
Use
{{ var[0]}}to get the employee details ofriraniwho is a manager. -
Use
{{ var[1].directReports[0] }}to get the employee details ofJohnwho is a direct reportee of the manager. -
Use
{{ var[1].directReports[0].preferredFullName }}to get the value asJohn Irani. -
Use
{{ var[0].preferredFullName }}to get the value asRomin Irani.
-
Usage of JSON variable in HTTP request
To use a JSON variable as request body of a HTTP request, use the Set Variable activity first to convert the JSON variable to a string. For example, in the Set Variable activity Variable Settings section, set a variable jsonString with value as {{ jsonVariable }}.
Use this variable as an input to the HTTP settings. For example, in the HTTP Request Settings section, set the Request Body as {{ jsonString }}.
Writing Expressions
Most text input fields in Flow Designer support writing expressions. Expressions are not required, but they allow for powerful scripting functionality through variables for advanced users. You can also enter basic text and numbers in the same input fields for simple flows if you do not need expressions.
Wrap each expression in double curly brackets as seen here: {{Enter Expression}}
For example, if you want to combine two string variables together, you must use {{var1+var2}}. For more information see: https://pebbletemplates.io/.
Pebble Template Syntax
All input fields in the Flow Designer use an open-source expression syntax called Pebble Templates: https://pebbletemplates.io/.
The following are supported symbols in Pebble Templates: ==, !=, <, >, <=, >=, +, -, *, / . To type custom variables in an expression, use this syntax: {{variable}}
Logic operators are also supported. For more information, see https://pebbletemplates.io/wiki/operator/logic/.
We recommend that you review the Pebble Template documentation before you use expressions in Flow Designer. For information on writing expressions, see the documents at: https://pebbletemplates.io/wiki/.
For example, in this basic condition use case, the expression checks to see if the caller’s AccountNumber is greater than or equal to a certain value. Based on how the expression evaluates for a given flow execution, the flow can take the True or the False path.
Custom Pebble filters
Epoch Time Stamp
You can use the following Pebble filters to return the epoch time stamp for Now or a given date string:
Epoch time stamp for Now:
{{ now() | epoch }} => default UTC timezone and in seconds
{{ now() | epoch(inMillis=true) }} => default UTC timezone and in milliseconds
Example:
{{ now() | epoch }} -> 1667471488
{{ now() | epoch(inMillis=true) }} -> 1667471522829Epoch Time Stamp for a specific date:
{{ '2017-10-19 16:18:03.779' | epoch(format='yyyy-MM-dd HH:mm:ss.SSS', inMillis=true) }} => custom format and in milliseconds
{{ '2017-10-19 16:18:03.779' | epoch(format='yyyy-MM-dd HH:mm:ss.SSS', inMillis=true, timeZone='America/Phoenix') }} => custom format with timezone and in milliseconds
Example:
{{ '2017-10-19 16:18:03.779' | epoch(format='yyyy-MM-dd HH:mm:ss.SSS', inMillis=true) }} -> 1508429883779
{{ '2017-10-19 16:18:03.779' | epoch(format='yyyy-MM-dd HH:mm:ss.SSS', inMillis=true, timeZone='America/Phoenix') }} -> 1508455083779Validate Expressions
If an input field detects that an expression is being used (that is the {{ }} syntax is entered), a blue icon appears in the lower-right corner of the field.
Click the blue icon to open a modal where you can test and modify the expression until you get the desired outcome.
The Test Expression modal contains the following fields:
-
Expression: Shows the expression that was initially entered in the input field from the activity configuration.
-
Variable Fields: Each variable used in the expression has a supporting field where you can enter a sample variable value. Enter a value for each variable, then click Test to see the results if the expression is executed with the entered parameters.
To set variables in an expression, use the format {{variable name}} only. For instance, {{NewPhoneContact.ANI}} is a variable syntax.
-
Result: Shows the result of the expression after you click Test. If the results are different than expected, modify the Expression as desired. If you make changes to the configuration, click Apply Changes to update the expression in the activity configuration.
Create and Manage Flows
Create a Flow
You can create and manage flows using the Routing Resources module. When you design a flow, a Consult interaction can't contain a Courtesy Callback, Post-Call Survey Feedback, or Blind Transfer activity.
When you create a flow, if the number of nodes exceeds 100, you may experience latency in the Flow Designer. In such cases, we recommend that you use the Flow Chaining and Dynamic Variables features to break a large flow down into easily manageable smaller flows. For more information, see Flow Chaining and Queue Contact. |
| 1 |
From the Management Portal navigation bar, choose Routing Strategy > Flows. | ||
| 2 |
Click New. | ||
| 3 |
In the Flow Name field, enter a unique name.
| ||
| 4 |
Click Start Building Flow. The Flow Designer window appears. | ||
| 5 |
In the General Settings section, enter the description of the flow. This description cannot be modified later. | ||
| 6 |
(Optional) Configure the following settings in the View Settings section.
| ||
| 7 |
Perform the following tasks to create the flow: |
Edit Flow Variables
You can't edit a variable when it is in use. You can't edit the variable type after the variable is created.
| 1 |
From the Management Portal navigation bar, choose . |
| 2 |
Click the ellipsis icon beside the flow that you want to edit and click Open. |
| 3 |
Click on a variable tag from the Global Flow Properties Pane. A pop-up window displays a summary of the variable information.
|
| 4 |
Click Edit in the upper-right corner of the pop-up window. |
| 5 |
Select a variable that is not used in the flow. |
| 6 |
Make the necessary changes to the variable name, description, value, and variable configurations. |
Modify a Flow
Use the Edit toggle button to edit a flow. If you turn on the toggle button, other flow developers will not be able to edit the flow at the same time. When you open a flow, it defaults to the read-only mode. Turn on the Edit toggle button to edit the flow.
Flow Designer now enables you to mark variables that contain sensitive information as Secure. When you open an existing flow that contains Flow variables, you get a prompt to review and mark those variables as Secure as per your requirements. For more information on secure variables, see Secure Variables.
| 1 |
From the Management Portal navigation bar, choose . A table appears, listing all of your existing tenant flows. The table contains the following fields:
| ||||||||||||||||
| 2 |
Click the ellipsis icon beside the flow that you want to edit, and click Open. If the selected flow has flow variables, a message prompts you to mark variables as secure. You can do the modifications to the flow only if the Edit On toggle button is enabled. If the Edit On toggle button is set to off, the flow appears in read-only mode. | ||||||||||||||||
| 3 |
Click Go Select Secure Variables to open the Edit Secure Variables dialog box.
| ||||||||||||||||
| 4 |
Check the check boxes of the variables that contain sensitive information and click Save. The flow designer window displays the selected variables with a lock icon beside the variable names. The selected flow opens in read-only mode. | ||||||||||||||||
| 5 |
Enable the Edit toggle button to make any changes to the flow. | ||||||||||||||||
| 6 |
Edit the draft flow as desired.
| ||||||||||||||||
| 7 |
Click Save to save the flow if you disable the Autosave toggle button. |
Search entities in a flow
Search functionality in Flow Designer enables flow developers to search for entities in a flow and access their locations quickly. For flows which are more elaborate and complex, use this search capability to avoid manual effort in finding the desired entities.
You can search the following entities in the flow using this search feature:
-
Activity names, descriptions, and inputs
-
Variable names
-
Pebble expressions
-
Flow properties
You can find and replace free text inside fields such as text inputs, descriptions, pebble expressions, and so on.
| 1 |
From the Management Portal navigation bar, choose . |
| 2 |
Click the ellipsis (...) beside the flow that you want to edit, and click Open. |
| 3 |
In the search box that appears in the top right corner, enter the keyword (activity name, variable name, or string) and press Enter. Alternatively, you can trigger the search box by using the keyboard shortcuts: Cmd + K (for macOS) and ctrl + k (for Windows). The search results appear in a separate search panel on the left side of the screen.
|
| 4 |
(Optional) Choose one or more entity types from the drop-down list to filter the search results. |
| 5 |
To find and replace a text, do the following: |
Apply version labels to a flow
We recommend you to follow the best practice of adding version label to build a lifecycle of the flow through various phases such as development, test, and live for better control while managing the production flow. Instead of applying changes directly to the flow, you can publish the flow through phases before you deploy the flow to the production. This feature helps you avoid overwriting of your current flow in the production.
When you publish a flow, you can associate a version label such as Live, Test, or Dev with the new flow version in addition to the flow name. This gives the ability to attach different versions of the same flow to different entry points or GoTo activity. Latest is the default version label that you can't remove from a flow version. You can apply any other version label along with Latest.
Moreover, you can attach multiple versions of the same flow to an entry point. During an entry point configuration, you can choose a flow along with one of its associated version labels.
When you open the flow in edit mode, you see the Draft version from the Latest flow version published. When you publish this Draft version, it will associate the Latest version label to it. At a given time, only one flow has the Latest version label associated to it. This corresponds to the last published version of the flow. |
Before you begin
You must publish the flow at least once.
| 1 |
From the Management Portal navigation bar, choose . | ||
| 2 |
Click the ellipsis icon beside the flow that you want to edit and click Open. | ||
| 3 |
Edit the flow. | ||
| 4 |
Click Save to save the flow if you disable the Autosave toggle button. | ||
| 5 |
Turn on the Validation toggle button to enable publish. | ||
| 6 |
Click Publish. | ||
| 7 |
(Optional) In the Publish Flow dialog box, enter a note about the version or any information that you want to share with other flow developers. | ||
| 8 |
By default, the Latest is selected as the version label that indicates the latest version of the flow. You can apply multiple version labels to a flow version such as live, dev, or test from the Add Version Label drop-down list. If a specific version label is already mapped to an entry point, an alert appears beside that version label in the drop-down list that says the label is mapped to an entry point. | ||
| 9 |
Click Publish. After you choose one or more appropriate version labels and publish, you can use this version of the flow when you assign to an entry point. | ||
| 10 |
(Optional) Click the timer icon beside the version number to view the version history of the flow. The Version History modal appears that displays the following details for Active Versions and Other Versions of the flow:
Use any of the following keyword search attributes to filter the table:
Click the View icon of any row to view the flow published in the chosen version. | ||
| 11 |
(Optional) Click the View icon of any row to view the flow published in the chosen version.
|
Enable or Disable the Autosave Option
| 1 |
From the Management Portal navigation bar, choose Routing Strategy > Flows. |
| 2 |
To create a flow, click New. To edit an existing flow, click the ellipsis icon beside the flow and click Open. |
| 3 |
To enable the autosave option, set the Autosave toggle button to ON. |
| 4 |
To disable the autosave option: After you disable the Autosave option, save your changes manually. Otherwise, you will lose the changes made to the flow. |
Copy and Paste Activities
As a flow developer, you can copy and paste an activity or a group of activities in the same flow so that you don't have to configure these activities from the scratch. For this purpose, you can select a single activity or a group of activities at a time and reuse them in the same flow. When you copy activities, the system creates duplicates of those activities and copies all the configured settings and links.
| 1 |
From the Management Portal navigation bar, choose Routing Strategy > Flows. |
| 2 |
To create a flow, click New. To edit an existing flow, click the ellipsis icon beside the flow and click Open. |
| 3 |
Do either of the following: Alternatively, you can press Ctrl+C on your keyboard to copy the selected activities and press Ctrl+V to paste the selected activities on the canvas. |
| 4 |
Rearrange the copied activities as per your requirement. |
Validate a Flow
You validate a flow to ensure that you configured all of the required fields and that the structure of the flow is valid. Validation cannot determine how the system executes the flow at run-time and doesn't guarantee that the flow runs as expected.
When validation succeeds, leave the Validation toggle on. You can't publish the flow unless validation succeeds.
| 1 |
From the Management Portal navigation bar, choose . | ||
| 2 |
Select a flow. | ||
| 3 |
Set the Validation toggle to On. The validation starts and errors display in the window. During validation, the system displays errors in these ways:
| ||
| 4 |
If you close the Validation Details window and want to reopen it, click the Flow Errors button. | ||
| 5 |
Optional. If there are errors, set the Validation toggle to Off. You must fix the errors and restart the validation.
|
Copy a Flow
| 1 |
From the Management Portal navigation bar, choose . |
| 2 |
Click the ellipsis icon beside the flow that you want to copy and click Copy. The name of the copied flow has this format: Copy_FlowName_FlowID where Flow Name is the name of the original flow, and FlowID is a unique identifier for the original flow. |
| 3 |
Open the copied flow in the Flow Designer to edit the name. |
Export a Flow
To extract a flow definition as a JSON file, use the Export option. Later, you can import the JSON file to create the same flow on a different tenant. To import a flow, see Import a Flow.
| 1 |
From the Management Portal navigation bar, choose . |
| 2 |
Click the ellipsis icon beside the flow that you want to export and click Export. |
| 3 |
In the dialog box that opens, select Save and click OK to download the flow file. The file downloads to your local system with the existing filename in JSON format. |
Import a Flow
To import a flow into your tenant, use the Import option. You must export the flow as a JSON file from another tenant before importing it. To export a flow, see Export a Flow.
To reuse an existing flow within the same tenant, use the Copy option. For more information, see Copy a Flow. |
| 1 |
From the Management Portal navigation bar, choose . | ||
| 2 |
Click Import and choose the flow file that is in JSON format from your local system. | ||
| 3 |
Click Open to import the file. The flow is imported into your tenant.
|
What to do next
You can modify or publish the flow. For more information, see Working with Flows.
Publish a Flow
You can publish a flow after the system validates the flow and finds it free of errors. You can use a published flow in Entry Point Routing Strategies.
Before you publish a flow, ensure that you are fully satisfied with the configuration and that the flow is suitable for use in live contact center interactions. Editing a published flow is not fully supported.
The Publish Flow button is disabled as long as the Validation toggle is off. The Publish Flow button remains disabled if there are any active errors in the flow.
When you click the Publish Flow button, the Publish Flow confirmation window appears. Before you publish a flow, ensure that all of the expressions work and that the flow behaves as desired.
If an error occurs:
-
You see a notification window with the
Tracking IdandFlow Id. Contact Cisco Support for assistance with errors. Support requires theTracking Id. -
Click the Retry Publish button.
| 1 |
From the Management Portal navigation bar, choose . | ||
| 2 |
Select a flow. | ||
| 3 |
Click Publish to publish the flow. If the flow publishes successfully, you see the confirmation message. | ||
| 4 |
Select one of the following options:
|
Delete a Flow
If a flow has a status of Published, it can be part of a Routing Strategy configuration. Ensure that you know where a flow is used before you delete it. Otherwise, you could impact live contact center interactions.
| 1 |
From the Management Portal navigation bar, choose . |
| 2 |
Click the ellipsis icon beside the flow that you want to delete, and click Delete. |
| 3 |
Click Yes to confirm. |
Entry Point Routing Strategies
An Entry Point Routing Strategy is a configuration that controls the routing behavior of a contact when the contact reaches an entry point. When a contact arrives at an entry point, the routing engine checks to see which Entry Point Routing Strategy is active at the given time and follows that configuration.
The Call Control section of the Entry Point Routing Strategy configuration allows you to choose a flow that controls the experience callers have during their interaction. With the Flow Designer application, you can configure an end-to-end flow that controls both the initial treatment of the call in the IVR, as well as the queue experience after the contact is queued.
Choose a flow from the Flow drop-down to indicate the flow that controls this end-to-end call experience during the time interval specified in the routing strategy. Only flows that have been published from the Flow Designer application are available from this drop-down list.
Flows are only available for Telephony Entry Points. You cannot override any settings in the flow from the Entry Point Routing Strategy.
Queue Routing Strategies
A Queue Routing strategy is a configuration that controls the routing behavior of a contact when the contact reaches a queue. When a contact arrives at a queue, the routing engine checks to see which Queue Routing Strategy is active at the given time and follows that configuration.
Customers who have Queue Routing Strategies in Webex Contact Center can access them, but they cannot create new strategies. We recommend that all customers transition their configurations to Queues.
|
Error Handling
The error handling path appears for each activity that is configured in a flow. You can configure the error handling path to handle the errors that may occur during flow execution. The error handling path appears by default and is optional to configure. If you don't configure the error handling path in the activity, alerts appear during flow validation. However, you can publish the flow with the validation alerts.
Errors that occur during flow execution are broadly classified into two types:
-
Activity execution errors: Indicate the errors that occur during the functional execution of the activity. For example, an activity error occurs when a customer enters an unmatched entry during execution of the Menu activity.
-
System/Global errors: Indicate the errors that occur in the system during the execution of activities. For example, system errors occur when there is an invalid pebble expression during the execution of the Set Variable activity.
-
Undefined Error: This error node sets the error output path that the flow takes when there are undefined system errors during flow execution. You can configure the flow for undefined errors by connecting the output path of this activity to appropriate activities.
The following Flow Control activities don't have the Undefined Error node - Start Flow, End Flow, HTTP Request, and Parse.
If you don't see the Undefined Error node in any activity, contact Cisco Support to enable the corresponding feature flag.
-
Configure error handling paths to optimize the flow. If there is no error handling path configured for the activity, the flow uses the default path that is configured in the |
Flow Chaining
Flow chaining gives you the ability to link multiple flows. You can modify the caller's experience based on time (if handing off the call to an entry point), or to reuse a single flow in multiple scenarios (if handing off the call to a flow). Use GoTo to chain multiple flows. You can map flow variables across flows to ensure that data persists across the end-to-end call experience.
Example: Vaccination Registration
To handle customers participating in a vaccination campaign, you can provide two options: one for premium customers and the other for general customers.
When general customers call, the system hands the call off to the flow associated with the entry point handling registrations. Based on the active Entry Point Routing Strategies, the system routes the call to the appropriate agent to register the general customer.
When premium customers call, the system hands the call off to another flow to book an appointment.
Known Issues with Flow Chaining
-
You cannot delete an entry point that is used in flow chaining. Before you delete an entry point, ensure that you delete all of the resources such as queues and flows that are associated with the entry point.
-
You cannot delete a flow that is used in flow chaining. Before you delete the flow, ensure that you delete any references to the flow that were created as part of flow chaining.
-
If you forcefully delete an entry point or flow that is used in flow chaining from the Management Portal, the flow control user interface does not validate or display any error messages to indicate that an entry point or flow was deleted.
Flow Tracing
Flow tracing is a postcall debugging process in Flow Designer that enables flow developers to get insights into the flow and view the path it took for a call. This feature also allows flow developers to view all the relevant information in the flow control execution path that helps to debug flows and troubleshoot any issues that arise during the flow execution.
If you have applied multiple version labels to a flow, you can trace the flow with respect to those version labels as well. For more information, see Apply version labels to a flow.
An interaction summarizes and correlates a set of activities associated with a contact's journey through a contact center. An Interaction ID is a system generated unique ID that identifies a given interaction. Interaction IDs corelate the journey of interactions through various paths that prompts you to identify the failure scenarios and activity failure paths to troubleshoot the flow execution.
You can use Flow Tracing to view different call control paths after execution of the flow in the production. This ensures verification of all the activity settings and other dependent flow configurations for a successful flow execution.
Before you begin
You must publish and execute a flow so that at least one interaction is established. For more information, see Create and Manage Flows.
| 1 |
From the Management Portal navigation bar, choose . |
| 2 |
Click the ellipsis icon beside the flow that you want to edit and click Open. |
| 3 |
Click Debug. The Interactions pane appears. A table displays the most recent 100 interactions for the flow. You can see the following details in the table:
|
| 4 |
(Optional) Use the search option to filter the list with the following search parameters:
|
| 5 |
Choose an Interaction from the table. The selected activity path gets highlighted in the canvas. A new tab opens that displays the sequence of activities executed during the interaction. It shows the following details:
You can choose multiple interactions that open in separate tabs. |
| 6 |
Select an activity to view the following details:
|
| 7 |
(Optional) Click the copy icon ( |
Flow Designer Error Codes
Flow Designer returns error codes to show the nature or reason for an error. Use the following table to identify the error and its description.
|
Error Code |
Description |
|---|---|
|
FC1001 |
Flow version not found. Refresh the page or create a new flow. |
|
FC1002 |
Start activity not found. Refresh the page or create a new flow. A Start activity appears by default when you create a new flow. |
|
FC1003 |
One or more event flows do not have a valid start. Add an Event Handler activity to the start of each event flow. |
|
FC1004 |
All non-event branches must lead to the end node. |
|
FC1005 |
One of the variable configurations is invalid. For each variable, ensure that the configured data type and variable value are compatible. |
|
FC1006 |
One or more ports in the activity are not connected. Ensure that all ports are connected to another activity through a link. |
|
FC1007 |
Add a description for the activity. |
|
FC1008 |
Some of the variables have the same name. Ensure that all variables have a unique name. |
|
FC1009 |
The expression is invalid. |
|
FC1010 |
The condition is invalid. |
|
FC1011 |
A link in the Main Flow is broken. Delete the link to fix the error. |
|
FC1012 |
A link in the Event Flow is broken. Delete the link to fix the error. |
|
FC1013 |
The activity is used in more than one Event Flows. Event Flows cannot share common activities and must have a unique start and end. |
|
FC1014 |
Queue Contact must terminate the flow. The output link can only connect to an End Flow activity. |
|
FC1015 |
One or more fields in the activity are not configured correctly. Follow the requirements of each field to correct all errors and enter valid inputs. |
|
FC1016 |
Another user created a flow that conflicts with the name of this flow. Edit the flow name to make it unique. |
|
FC1017 |
An activity has arrows that originate from and point to itself. |
For more information about GraphQL Server errors, see https://www.apollographql.com/docs/react/data/error-handling/.
Monitor Calls
The Call Monitoring module enables authorized users to silently monitor any active call that is managed by the Webex Contact Center service at any time, across any site, and to verify that customers are being served in a professional manner. Authorized users can also create monitoring schedules, coach an agent who is connected to a call by providing comments that only the agent can hear, and barge in on calls as needed.
Monitoring Overview
The Webex Contact Center Call Monitoring module enables contact center managers to monitor the quality of service being delivered across their multisource contact centers. Through a simplified Web interface, authorized users can select a combination of one or more queues, sites, and teams, as well as a specific agent that they want to monitor. After these criteria are entered, the system places a request to monitor the next call that matches the combination of all the criteria when the call is distributed to the destination site. Monitoring can be done on a continuous, one time only (ad hoc), or scheduled basis, and authorized users can monitor a call that is already in progress.
The audio for the call is delivered through an inbound phone call using a phone number associated with the user engaged in monitoring. Authorized supervisors can coach an agent during a connected call by providing comments that only the agent can hear and can barge in on a call and become part of the conversation between the agent and the customer.
Note the following:
-
You cannot make a continuous monitoring request and an ad-hoc request for the same target at the same time.
-
If a scheduled request and a continuous request are made for the same target, the continuous request takes precedence. When the continuous request is paused or canceled, the scheduled request is enabled.
-
If a scheduled request and an ad-hoc request are made for the same target, the ad-hoc request takes precedence. When the ad-hoc request is either canceled or completed, the scheduled request is enabled.
-
If you sign out of the Management Portal while a monitoring request is still active, a message asks if you want to cancel the monitor request or continue monitoring.
If you select Yes, any active ad-hoc, or continuous monitoring requests are canceled after you log out. Any scheduled requests are suspended.
Monitor Calls
The Call Monitoring page provides an interface for monitoring a call on a continuous or one-time only basis.
| 1 |
From the Management Portal navigation bar, choose Call Monitoring. | ||||||||||
| 2 |
In the Monitoring Filter panel, specify one or more queues, sites, teams, and agents that you want to monitor. If you set a queue, site, team, or agent list to All, it includes only entities to which you have access in the request. | ||||||||||
| 3 |
In the Callback Number field, enter the phone number and click Register. If you must update a number, enter the new callback number and click Update. Enter the callback number in one of the following formats:
| ||||||||||
| 4 |
To prevent this monitoring session from being displayed on the Management Portal for other users, check the Use Invisible Mode check box. | ||||||||||
| 5 |
Click one of the options in the following table to submit your call monitoring request.
Your request appears in the Monitor Requests list along with any pending requests from other agents. The monitored call appears in the Calls Being Monitored list. For more information about the Call Monitoring page, see Viewing Call Monitoring Information. | ||||||||||
| 6 |
If your user profile has authorization, you can click the Coach or Barge In button in the Action column to coach the agent or barge in on the monitored call. For details, see Barge in on a Call. | ||||||||||
| 7 |
When the call ends, click Monitor Next Call to monitor the next call in the queue. Alternatively, if you choose the Continuous Monitor option, the system sends the next call in the queue to you. | ||||||||||
| 8 |
Click Cancel to cancel the monitoring activity for that request. If you choose Continuous Monitor, click the Pause button to temporarily halt incoming calls. You can click the Resume button to resume call monitoring.
|
Coach an Agent
If the Whisper Coach feature is enabled in your user profile, you can speak to an agent who is being monitored without being heard by the customer.
-
The coaching session continues, even if the call is transferred to another agent, until the call either ends or is transferred to another number (agent-to-DN transfer).
-
If the coached agent consults with another agent, you hear music on hold and are not able to continue coaching the agent until the caller is taken off hold.
While coaching an agent, you can barge in on the call if the Barge In feature is enabled in your user profile.
To silently coach an agent:
| 1 |
While you monitor a call (as described in Monitor Calls) and the call is connected to an agent, click Coach. Do not click Coach if the call is waiting in a queue after being transferred by the agent to another queue. Doing so causes your coach request to fail. The Coach button is not available when the agent transfers the call to another number (DN transfer). |
| 2 |
Provide verbal instructions to the agent. |
| 3 |
To remove yourself from the call, hang up. The call is removed from the Calls Being Monitored list. |
Barge in on a Call
| 1 |
While you are monitoring or coaching a call, and the call is connected to an agent (and not waiting in a queue), click Barge In. You are immediately connected to the call. The Barge In button disappears from the page. |
| 2 |
To remove yourself from the call, hang up. The call is removed from the Calls Being Monitored list. |
Viewing Call Monitoring Information
To view call monitoring information, from the Management Portal navigation bar, click Call Monitoring
The Call Monitoring page displays the following:
-
Controls for requesting a monitoring session. For more information, see Monitor Calls.
-
A chart of active and queued calls for the queue that is currently selected in the Monitoring Filter panel on the left side of the page.
-
The Monitoring Requests/Calls Being Monitored table, which displays the two lists described in the following sections.
If you resize the Call Monitoring window to a very narrow size, the Monitoring Requests/Calls Being Monitored table displays at the bottom of the window. It might appear that the table is missing, but you can see it if your scroll to the bottom of the window.
Calls Being Monitored List
The Calls Being Monitored list displays information about all calls currently being monitored in your enterprise.
When a monitored call is transferred to a specific phone number (agent-to-DN transfer), it is removed from the Calls Being Monitored list and thus, the Coach and Barge In buttons are no longer available. |
|
Column |
Description |
|---|---|
|
Queue |
The queue that received the call. |
|
Site |
The contact center location to which the call was distributed. |
|
Team |
The team to which the call was distributed. |
|
Agent |
The name of the agent being monitored or a numeric ID code if the call was answered by a capacity-based team resource instead of by a Webex Contact Center agent. |
|
Monitoring Status |
The status of the monitoring session:
|
|
Supervisor Name |
The name of the person monitoring the call. |
|
Supervisor Number |
The phone number of the person monitoring the call. |
|
Duration (mm:ss) |
The number of minutes and seconds since the call arrived. |
|
Action |
Buttons that you can click to coach or barge in on a call that is being monitored, if authorized by your user profile. |
Monitoring Requests List
The Monitor Requests list displays information about all monitoring requests in your enterprise.
If a monitoring request includes multiple queues, sites, teams, or agents, you can display a list of them in a tool tip by placing your mouse on a value in the Queue, Site, Team, or Agent column.
|
Column |
Description |
|---|---|
|
Request Type |
The request types are:
|
|
Queue |
The queues included in the request. If multiple queues are included, you can display a list of them by pointing to the value displayed in the column. |
|
Site |
The sites included in the request. If multiple sites are included, you can display a list of them by pointing to the value displayed in the column. |
|
Team |
The teams included in the request. If multiple teams are included, you can display a list of them by pointing to the value displayed in the column. |
|
Agent |
The agents included in the request. If multiple agents are included, you can display a list of them by pointing to the value displayed in the column. |
|
Monitoring Status |
The status of the monitoring session:
|
|
Supervisor Name |
The name of the person who submitted the request. |
|
Supervisor Number |
The phone number of the person who submitted the request. |
|
Action |
Buttons that you can click to pause, resume, or cancel a monitoring request. |
Working with Monitoring Schedules
The Monitoring Schedules page in the Call Monitoring module enables authorized users to schedule call monitoring requests at specific times of the day or week. Note the following:
-
Unless otherwise authorized by your user profile, you can view and edit only those call monitoring schedules that you created.
-
The start and end times specified in the Call Monitoring Schedule use the enterprise time. However, calls are monitored in local time. Be sure to adjust for this when you specify the start and end times in your monitoring schedules.
Create or Edit a Monitoring Schedule
To create a new monitoring schedule or edit an existing schedule:
| 1 |
From the Management Portal navigation bar, choose . | ||||||||||||||||||
| 2 |
To create a new schedule:
| ||||||||||||||||||
| 3 |
To copy or edit an existing schedule from the list view, click the ellipsis button beside a listed schedule and choose Copy or Edit. | ||||||||||||||||||
| 4 |
On the page that appears, specify the appropriate settings as described in the following table:
| ||||||||||||||||||
| 5 |
Click Save. |
Activate or Deactivate Monitoring Schedules
You can activate or deactivate a monitoring schedule by editing the Status field in the settings for the schedule, or you can click a button in the list view Monitoring Schedules page as follows:
| 1 |
From the Management Portal navigation bar, choose . |
| 2 |
Click the ellipsis button beside a listed schedule and click Activate or Deactivate. |
Export the Monitoring Schedule List
To export the monitoring schedule list to a data analysis tool such as Microsoft Excel:
| 1 |
From the Management Portal navigation bar, choose . |
| 2 |
In the list view, click Action on the upper-right side of the page header and choose Excel or CSV. |
| 3 |
In the dialog box that opens, either click Open to open the file, or click Save, navigate to the directory where you want to save the file, and then click Save. |
Delete a Monitoring Schedule
To delete a monitoring schedule:
| 1 |
From the Management Portal navigation bar, choose . |
| 2 |
In the list view, click the ellipsis button beside a listed schedule and click Delete. |
| 3 |
Click Yes to confirm the deletion. |
Call Recording
The optional Call Recording module enables authorized users to record any active call that Webex Contact Center manages.
Authorized users can create recording schedules with a time period. Choose queue, team, site, and agent for which you want to record voice calls. The system then starts recording the calls that match the criteria.
You can also record calls after you obtain customer consent and configure this setting at a flow level. For more information, see Recording Control. The flow level recording configuration will override any other recording configuration.
Because you can't determine the total number of incoming calls and the number of calls to be recorded, Webex Contact Center uses predictive modeling to decide which calls to record. The models include pseudorandom number generator (PRNG) or deterministic random bit generator (DRBG). The accuracy in the percentage of calls that are recorded increases with the number of contacts.
Regardless of the call recording duration, the first two hours of each call recording is available in Webex Contact Center. |
Recordings are transferred daily to your enterprise's recording repository over a secure encrypted virtual private network (VPN). The recording repository is a standalone server housed at a location of your enterprise's choosing, such as the contact center premise location or data facility. Your enterprise has full control over the length of storage for these recordings.
The recordings are in standard .wav format and only authorized users can access these recordings directly and review these using standard third-party utilities. External or partner administrators can't download or play these recordings.
You can also use the features of the optional Webex Contact Center Recording Management module to search for and play recorded files.
|
Segment Recording
Segment recording refers to the functionality that allows for the recording of interactions in separate, discrete segments based on certain conditions or triggers. This is useful for ensuring compliance monitoring and quality management. In the context of segment recording, there are a few differences between Classic media platform and Next Generation media platform that are highlighted in the following table:
|
Feature |
Classic media platform |
Next Generation media platform |
|---|---|---|
|
File Name of the segment | In the format combined-n.wav | In the format <RecordingId>-segment.wav |
|
Music on Hold (MoH) handling | Segment recording is audible | Segment recordings feature silence during MOH periods, while the combined recordings retain the MOH. |
|
Channel Designation | Channel 1 is assigned to the Agent, and Channel 2 to all other parties in segment recordings | Channel 1 is assigned to the Caller, and Channel 2 to all other parties in segment recordings |
Create or Edit a Recording Schedule
To create or edit a call recording schedule:
| 1 |
From the Management Portal navigation bar, choose the Call Recording module. | ||||||||||||||||||||||||||
| 2 |
On the Recording Schedules page, select a queue from the Queue drop-down list. All call recording schedules for that queue are displayed. From here, you can:
| ||||||||||||||||||||||||||
| 3 |
To create a new schedule:
| ||||||||||||||||||||||||||
| 4 |
To copy or edit an existing schedule, from the list view, click the ellipsis button beside a listed schedule and click Copy or Edit. | ||||||||||||||||||||||||||
| 5 |
On the page that appears, specify the appropriate settings as described in the following table, and then click Save.
|
Deleting a Recording Schedule
| 1 |
From the Management Portal navigation bar, choose the Call Recording module. |
| 2 |
On the Recording Schedules page, select a queue from the Queue drop-down list. |
| 3 |
Click the ellipsis button beside a listed schedule and click Delete. |
The optional Webex Contact Center Recording Management module enables authorized users to search for and play audio files that are recorded through the Webex Contact Center Call Recording feature. In addition, authorized users can create tags that can be assigned to audio files for use as search criteria, specify which global (previously known as CAD) variables to store with recordings, and view recent Recording Management activity.
For configuration objects that have been deleted, an option to filter data using the deleted object names will not be available. It is recommended to query and fetch the data by a date range. The result set will contain details of calls handled for those configuration objects which are permanently deleted. |
Search for and Play Recordings
To search for and play a recording:
| 1 |
From the Management Portal navigation bar, choose Recording Management. By default, the search page lists the recordings for the previous 13 months from the current date. To search based on specific criteria, use the following search fields on the left pane to filter the recordings:
| ||||||||||
| 2 |
To filter the list based on more criteria, click the Advanced Search button. In the dialog box that appears, you can filter the search results based on Recording Duration and Call Attributes:
| ||||||||||
| 3 |
Click the Search button to search. If the search criteria match, then the Search Results page lists the recordings. | ||||||||||
| 4 |
Click the ellipsis button beside an entry. The following options appear:
|
Assign and Remove Tags
You can assign the same tag to multiple recordings and you can assign multiple tags to an individual recording.
To assign a tag to a recording or remove a tag from a recording:
| 1 |
From the Management Portal navigation bar, choose Recording Management. |
| 2 |
On the Search page, perform a search for the recordings you want to either assign tags to or remove tags from, as described. |
| 3 |
Click the ellipsis button beside a listed recording on the Search Results page and click Tags. On the upper part of the dialog box that opens, the list of tags assigned to the recording is displayed on the right and a list of tags that are available is displayed on the left. |
| 4 |
To assign a tag to the recording, select a tag in list on the left and click Assign Tag to move it to the list on the right. |
| 5 |
To remove a tag from the recording, select a tag in the list on the right and click Remove Tag to move it to the list on the right. |
| 6 |
When you are finished, click Save. |
Search Attributes
The Recording Management > Search Attributes page provides access to controls where you can perform the tasks described in the following topics:
Create and Export Tags
The Tags section of the page enables authorized users to create and export a list of tags that can be assigned to recordings (see Assign and Remove Tags).
To create a tag or export a list of tags:
| 1 |
From the Management Portal navigation bar, choose . |
| 2 |
In the Tags section of the page that appears, do one of the following:
|
For information about the supported digital channels and their configuration details, visit Set up digital channels in Webex Contact Center.
This feature enables the agent to make an outbound call from the Agent Desktop. After the conversation with a customer, the agent can transfer the call to another queue in the contact center.
Map the Outdial Transfer to Queue Entry Point to a DN
To map the Outdial Transfer to Queue entry point to a DN:
| 1 |
Choose the Outdial Transfer to Queue entry point from the Entry Point drop-down list when you Map an Entry Point. |
| 2 |
Save the mapping. The agent can now use this mapping on the Agent Desktop to transfer an outbound call. |
Transfer an Outdial Call to a Queue on the Agent Desktop
To transfer an outdial call to a queue:
| 1 |
From the Agent Desktop, make an outbound call. For more information, see the section on how to make aboutbound call in Cisco Webex Contact Center Agent Desktop User Guide. |
| 2 |
After the conversation, transfer the call to the configured queue. For more information, see the section on how to transfer a call to a different queue in Cisco Webex Contact Center Agent Desktop User Guide. |
View Agent Outdial Statistics Report
To view the Agent Outdial Statistics report:
| 1 |
From the Analyzer portal, click Visualization. |
| 2 |
Navigate to . For more information, see the section on agnt outdial statistics in the Cisco Webex Contact Center Customer Journey Analyzer User Guide. |
The agent handling a call can transfer the call to a different flow associated with an entry point. Global (previously known as CAD) variables with the same name and data type are copied from the first flow to the new flow that is active in the associated entry point.
For example, if a customer is connected to an agent who handles debit card transactions, but intends to transact on credit cards, the agent servicing the customer can now transfer the call to the credit card flow.
Task Flow to Transfer a Call to an Entry Point
The agent has accepted the call request from a customer. The agent can transfer the active voice call (inbound and outbound) to another entry point.
-
The agent clicks Transfer in the Agent Desktop and chooses the entry point from the Queue drop-down list.
For more information about how to transfer a call, see the Cisco Webex Contact Center Agent Desktop User Guide.
After the call is transferred to an entry point, the call can't be routed back to the same agent who transferred the call.
-
During the transfer, the global variable values with the same name and data type are copied to the new flow associated with the entry point selected above.
Any global variables in the first flow that don't match the name and data type of global variables in the new flow aren't carried over.
Example
When the agent transfers the call from flow1 to flow2 associated with an entry point:
-
-
If both flow1 and flow2 have a global variable
customerIDof type Integer and flow2 is active, the value of the global variablecustomerIDgets copied from flow1 to flow2. -
If flow1 and flow2 have variable var1 with data type Integer in flow1 and String in flow2, then var1 isn't carried over from flow1 to flow2.
-
If both flow1 and flow2 have a global variable var1 of type Integer, and activities such as Set Variable or HTTP Request update the value of var1 in flow2, then var1 in flow2 has the new value.
For more information about global variables, see Global Variables.
-
-
The Stereo Recording feature replaces the combined mono output file with a stereo output file. The stereo file provides the audio streams of the agent and the other participant (the caller or the called party) as two separate audio channels within a single recording. This enables better voice analytics than in a mono file, where the audio is mixed into a single stream.
Play a Stereo Recorded File
To play a stereo recorded file, the Webex Contact Center Recording Management module enables authorized users to search for and play stereo recorded audio files. For more information, Search for and Play Recordings.
Queue is where the contact waits before the system assigns to an agent or a dial number. The queue is created in the Provisioning module of the Management Portal.
The customer is presented with the opt-out of the queue menu with information about the estimated wait time and the position in the queue. The customer can choose to opt out and exit the queue.
Task Flow to Set Up the Opt-Out Functionality
To set up the opt-out functionality:
| 1 |
Create new opt-out-of-queue flow from the Cisco Webex Contact Center Management Portal (). |
| 2 |
Configure the Play Music activity in the Flow Designer. Specify the audio file, music duration, and the start offset. |
| 3 |
Configure the Queue Contact activity to place the contact in a queue or the Queue to Agent activity to route the contact directly to a preferred agent. |
| 4 |
Configure the Get Queue Info activity to know the current position in the queue and the estimated wait time. |
| 5 |
Configure the Menu activity for the wait-in-queue prompt or the opt-out-of-queue prompt with the Text-to-Speech functionality enabled. |
| 6 |
Configure the Callback flow if the contact selects to opt out of the queue and registers for a callback in the opt-out-of-queue prompt selection. |
| 7 |
Click Publish Flow. For more information, see Publish a Flow. |
View Opt-out-of-Queue Report
The Opt-out-of-Queue report captures the average wait time in a queue after the customer chooses to opt out of the queue. For more information about how to view the Opt-out-of-Queue report, see the Webex Contact Center Analyzer User Guide.
This feature enables the user (who has a Webex Calling license) to use the Webex Calling DN as their preferred agent endpoint device when used with the Webex Contact Center Agent Desktop. This helps the agent to be remote on their Webex Calling devices and also provide on-net call transfers to internal users on both solutions bypassing the PSTN.
Webex Contact Center supports all features supported by the Webex Calling.
Webex Calling Integration Task Flow
This feature is only applicable to customers with the Webex Calling subscription.
To integrate Webex Calling with Webex Contact Center and map the DNs:
| 1 |
The partner administrator can use the article Get Started with Cisco Webex Contact Center and onboard customers by selecting the Webex Calling option. |
| 2 |
Dial numbers must be configured as recommended in the Webex Calling article Manage Number in Location. |
| 3 |
After the dial numbers are added, map them to the Entry Point. For more details, see Entry Point Mappings. |
Overview
Blended Multimedia Profiles offer Webex Contact Center administrators the ability to configure the media channel types (voice, chat, email, and social) and the number of contacts of each media channel that an agent can handle simultaneously.
Administrators can configure multimedia profiles of the following types:
-
Blended
-
Blended Real-time
-
Exclusive
The administrator can then associate the multimedia profile to agents at the site, team, or agent level.
Advantages of Blended Multimedia Profiles
Blended Multimedia Profiles enable organizations to provide dedicated attention to customers, promoting better quality of service, improved customer experience, and better conversion rates. Also, organizations can balance the load across media channels when experiencing uneven load in some channels, enabling efficient utilization of agents.
Setting Up Blended Multimedia Profiles
To set up Blended Multimedia Profiles:
-
The administrator configures the Blended Multimedia Profile using the Multimedia settings in the Provisioning module of the Management Portal.
-
The administrator associates the Blended Multimedia Profile to an agent, team, or site.
In the Agent Desktop, agents are assigned contacts based on the multimedia profile associated with them at any point in time.
Administrators and supervisors can view multimedia profile settings of agents and the number of contacts of each media channel type that the agents handled, via the Agent Details report. This report is available in the Webex Contact Center Analyzer.
Configure a Multimedia Profile
As an administrator, do the following to configure a multimedia profile:
-
From the Management Portal navigation bar, choose Provisioning > Multimedia Profiles.
-
On the Multimedia Profiles page, click + to create a new multimedia profile or click the ellipsis button to edit an existing multimedia profile.
-
In the Media Details section, select the blended multimedia profile as required. The available multimedia profile types are:
-
Blended: Allows you to specify the media channels and the number of contacts per media channel that an agent can handle simultaneously (for example, 1 voice, 3 chats and 5 emails).
-
Blended Real-time: Contacts of only one real-time media channel (either voice or chat) will be assigned to an agent at a point in time, along with contacts of other media channel types (email and social).
For Blended and Blended Real-time multimedia profiles, the maximum number of contacts that can be assigned to an agent is 1 for voice, and 5 for chat, email and social.
-
Exclusive: Select this profile type to assign only one contact to the agent across all media channels, at a point in time.
-
For more information, see Create a Multimedia Profile.
Associate a Multimedia Profile to an Agent, Team, or Site
After you configure the multimedia profile, associate the profile to a site, team, or agent via the Provisioning module in the Management Portal. For more information, see Sites, Teams, and Users.
A multimedia profile associated with an agent takes precedence over the multimedia profile of the agent's team. A multimedia profile of the team takes precedence over the multimedia profile associated with the site. |
Assign Contacts to Agents
In the Agent Desktop, contacts are assigned to an agent based on the multimedia profile associated with the agent. For more information, see the section on how to work with the Agent Desktop in the Cisco Webex Contact Center Agent Desktop User Guide.
View Agent Details
As an administrator or supervisor, you can view the multimedia profile settings of agents and the number of contacts of each channel type handled by the agents, via the Agent Details report in the Webex Contact Center Analyzer.
For more information, see Agent Details Report in the Visualization chapter in the Cisco Webex Contact Center Analyzer User Guide.
About Courtesy Callback
A customer calling the contact center can be offered an option to receive a callback rather than waiting in the queue to connect to an agent. The customer can be offered the callback option during peak hours when the wait time is longer, or during non-working hours of the contact center.
Advantages of Courtesy Callback
Courtesy callback enables the contact center to offer better quality of service, and increase customer retention. The customer experience is enhanced, because the contact receives a proactive call from an agent rather than having to wait to connect to the agent.
Setting Up Courtesy Callback
To set up courtesy callback, the flow developer needs to configure the callback flow using the Flow Designer.
|
When a customer dials in to the contact center and waits in queue for an agent, the customer can be provided with the option to opt out of the queue and receive a callback instead. The customer's position in the queue is retained for receiving the callback. The contact will remain in a queue based on the duration set in MAX_TIME_IN_QUEUE configuration. When an agent is available, the agent is offered the callback request in the Agent Desktop, based on the customer’s position in the queue. After the agent accepts the callback request, the call is dialed out to the customer. When the interaction ends, the agent chooses a wrap-up code to wrap up the call.
A Courtesy Callback report is available in Webex Contact Center Analyzer, for the supervisor and administrator to view callback statistics. In addition, agents can gain insights on their callback statistics via the Team Stats- Historic
Agent Performance Statistics (APS) report.
Configure the Callback Flow
Ensure that the administrator has set up the inbound entry point and queue for courtesy callback. For more information about how to set up entry points and queues, see Entry Points and Queues. |
As a flow developer, set up the courtesy callback flow using the Flow Designer. The following figure illustrates a sample courtesy callback flow:
For more information on how to configure a flow using the Flow Designer, see Flow Designer Overview.
The following steps summarize the sample courtesy callback flow:
-
The customer dials into the IVR.
-
The customer contact is routed to an appropriate queue in accordance with the Menu and Queue Contact configuration. The sample flow and the sequence of steps depicted here are based on this scenario.
Alternatively, you can enable the customer to opt out of the call and receive a callback before the call is routed to a queue; for example, during non-working hours of the contact center. The contact can then be routed to an appropriate queue by configuring the Callback activity.
When the customer waits in a queue (call is parked) for an agent, you can engage the customer with the following activities:
-
Play Music: Plays a static .wav file as the customer waits in queue.
-
Play Message: Informs the customer of the position in queue (PIQ) and the estimated wait time (EWT) using this activity. Use the Get Queue Info activity to fetch the EWT/PIQ.
You can configure the Play Music activity and the Play Message activity to play the audio files intermittently, until an agent is available or until the customer opts out of the queue.
-
-
The customer can be offered an Opt Out of Queue menu option, based on the EWT/PIQ. You can configure any of the following options when the customer opts out of the queue:
-
Leave a voice mail: Configure a Blind Transfer activity to enable the customer to leave a voice mail when the customer opts out of the queue.
-
Receive a courtesy callback: The customer's position in queue is retained to receive a courtesy callback.
The following activities enable you to configure the callback:
-
Menu: Configure a callback menu to enable the customer to choose a callback number.
The customer can provide the callback number, or the customer's ANI (Automatic Number Identification) number is used as the default callback number.
You can use the Collect Digits and Set Variable activities to set the callback number, as illustrated in the callback flow.
-
Callback: Configure the Callback activity to make the courtesy callback. You can configure the Callback activity to use the same queue as the inbound call, or a different queue to make the callback.
Do not configure callback to use a queue served by a capacity-based team (CBT) as it results in call failure. Callback processing requires an Agent ID, and CBTs have no individual agents assigned to them.
If you select the same queue to make the callback, the customer is called back when the agent is available in the queue, based on the customer's position in queue.
If you select a different queue to make the callback, the callback request is placed at the end of the new queue.
You can select a static queue or a variable queue when you configure the Callback activity. For more information on setting the Callback activity parameters, see Callback.
-
You can configure a confirmation message that the callback is registered and then disconnect the contact, by using the Play Message and the Disconnect Contact activities.
-
|
Make a Courtesy Callback
After the customer opts out of the queue, a callback request to the customer is initiated when an agent is available in the queue, based on the contact's position in the queue. The agent is offered the callback request in the Agent Desktop.
|
After the agent accepts the call, the call is dialed out to the customer. The customer receives the call from an ANI associated with the contact center. For more information on ANI, see Outdial Automatic Number Identification (ANI).
If the customer does not respond to the call or rejects the call, the callback request is canceled. If the customer answers the call, the callback request is marked as processed.
When the interaction ends, the agent chooses a wrap-up code to wrap up the call.
For more information on how to process a callback request via the Agent Desktop, see the Courtesy Callback
section in the Manage Voice Calls
chapter in the Cisco Webex Contact Center Agent Desktop User Guide.
View Courtesy Callback Reports
The following reports are available for courtesy callback:
-
Courtesy Callback Report: Enables administrators and supervisors to view callback statistics. For more information, see Courtesy Callback Report in the Visualization chapter in the Cisco Webex Contact Center Analyzer User Guide.
-
Team Stats - Historic Report: Enables agents to gain insights on their performance with respect to callback contacts. The APS report is available in the Agent Desktop. For more information, see the Team Stats - Historic report in the Agent Performance Statistics Reports chapter in the Cisco Webex Contact Center Agent Desktop User Guide.
Overview
Webex Contact Center provides enterprises with the ability to manage outbound preview campaigns using the LCM (List and Campaign Manager) application.
To be able to manage campaigns, the enterprise must have purchased the Campaign Manager SKU. |
Setting Up Campaign Management
The contact center administrator performs the following tasks to set up outbound preview campaigns:
-
The administrator provisions Campaign Management for the enterprise. This enables outbound (voice) capability in addition to multichannel inbound capability for campaign management.
-
The administrator configures outbound preview campaigns using the LCM interface. The administrator configures the same team in the outdial queue as confirmed in LCM.
Agents can then initiate and make outbound campaign calls from the Agent Desktop.
An administrator can access and configure campaign reports available in the Cisco Webex Contact Center Campaign Manager modules. In addition, administrators and supervisors can view campaign statistics via the OEM Integration with Acqueon report, to measure the effectiveness of the campaigns. The report is available in the Cisco Webex Contact Center Analyzer User Guide.
Set Up Campaign Management
As an administrator, you will need to do the following to set up campaign management for your enterprise:
Before you begin
-
You can configure and use outbound campaigns only if your enterprise has purchased the premium agent license and Campaign Manager SKU.
-
For outbound progressive campaign calls, make sure that you use Acqueon LCM version 23.10 and above.
| 1 |
In the Management Portal navigation bar, choose Provisioning, and select your enterprise. |
| 2 |
On your enterprise page, choose the Provisioning tab and enable Campaign Management. For more information, see Provisioning. |
| 3 |
Log in to the customer organization on Control Hub. |
| 4 |
Navigate to Services > Contact Center. |
| 5 |
From the Contact Center navigation pane, select Tenant Settings > Integrations > Connectors. |
| 6 |
Under Custom Connectors click Set up. The Set up Custom Connectorscreen displays. If you have already added other connectors and you want to add this connector, click Add More. |
| 7 |
Enter a name for the connector. |
| 8 |
Select an authentication type from the drop-down list. |
| 9 |
In Resource Domain, enter the domain name link that Campaign Manager provides to you. This link is sent by email. |
| 10 |
Enter the username and password that Campaign Manager provides for your organization. The username and password are sent to you by email. |
| 11 |
Enter the validation URL details. |
| 12 |
Click Done to save the connector. This is a one-time activity to set up the connector. |
| 13 |
Configure outbound campaigns using the LCM interface. Webex Contact Center data such as entry points, teams, and wrap-up codes are available to you in the LCM interface to configure campaigns. Additionally, the LCM interface enables you to configure the questions and answers to display in the call guide at the campaign level. |
What to do next
For more information about how to configure campaigns using LCM, see the Cisco Webex Contact Center Campaign Manager User Guide.
Make Outbound Campaign Calls
Outbound Preview Campaign Calls
An agent who is not handling active contacts can click the Campaign Contact icon in the Agent Desktop to initiate an outbound preview campaign call. Campaign Management synchronizes the agent state and team information for the enterprise in real-time. Campaign Management dynamically retrieves a contact to whom an agent can dial out to, based on the preview campaigns that are currently active for the agent's team. There can be multiple campaigns that are active at the same time. The contact details are displayed to the agent. The agent can then make the outbound preview campaign call.
For preview calls, the outdial entry point configured on the campaign is in use and allows a flow to be configured for the campaign, thus enabling to set up a custom Agent Desktop layout for incoming popover and interaction panel.
A call guide is available for the agent to walk the customer through a sequence of campaign-specific questions and answers. The agent wraps up the call based on the call outcome.
For more information about making outbound preview campaign calls, see Make an Outbound Preview Campaign Call.
Outbound Progressive Campaign Calls
Agents don't need to manually initiate the outbound call in the Progressive dialer. When an agent completes a call and moves to the Available state, the dialer automatically dials the next number in the contact list. The dialer dials one contact for every available agent. Progressive dialers are ideal where the calls are similar in nature such as campaigns, and agents benefit when the system connects them to the contact.
As an administrator, you can create campaigns and configure the dialing mode as progressive. You can map outdial entry points to the campaign, and create an outdial queue for each campaign. You must configure business hours for the outbound progressive campaign since routing strategies are not supported for progressive campaigns.
During set up of the new tenant, as part of configuration of the Campaign Manager, the administrator will create fields such as Zipcode, Areacode, State Name and Time zone manually, based on the needs of the customer.
Earlier versions of Campaign Manager that are in use with Webex Contact Center 1.0 have fields such as Zipcode, Areacode, State Name, and Time Zone that are populated automatically. As part of the upgrade to a new tenant, if these fields are in use, then these fields need to be manually created and pushed to the Campaign Manager. For progressive campaigns, customers using Webex Contact Center 1.0 or earlier versions of Campaign Manager will need to upgrade their version of Campaign Manager to use all features. |
These are the steps for creating a progressive campaign:
| 1 |
Create an agent based team and associate the agents. |
| 2 |
Create an outdial queue and add the team. Only teams in the first group will be considered. |
| 3 |
Create global variables for the customer data which is being imported into LCM. Do not make global variables reportable if they contain Personally Identifiable Information (PII). Set Agent Viewable as True for any variable which is to be shown on the Agent Desktop. You can create a maximum of 28 global variables for this purpose.
|
| 4 |
Create a flow for the progressive call. Add the global variables that are to be displayed on the Agent Desktop in the interaction panel. Create a variable with the name campaignId (case sensitive) and Desktop label as Campaign Name. |
| 5 |
Create an outdial entry point and reference it to the outdial queue and the flow that you created above. |
| 6 |
You can then reference the outdial entry point in Acqueon Engagement LCM when creating the campaign group. Additionally, you can configure the call guide with questions and answers for a campaign. |
What to do next
For more information about making outbound progressive campaign calls, see Make an Outbound Progressive Campaign Call.
Campaign Management Reports
The following campaign-specific reports are available in Webex Contact Center:
-
Campaign Manager Reports: The Campaign Manager reports are available in the Cisco Webex Contact Center Campaign Manager modules. As an administrator, you can configure real-time and historical reports and schedule reports to be sent periodically to specified recipients.
For more information about Campaign Manager reports, see the Cisco Webex Contact Center Campaign Manager Reports Guide.
-
OEM Integration with Acqueon Report: Supervisors and administrators can view outbound campaign statistics via the historical report in Analyzer to gain insights into the effectiveness of campaigns.
For more information, see the Historical Reports section in the Visualization chapter in the Cisco Webex Contact Center Analyzer User Guide.
The Webex Contact Center offers Self Service functionality to handle the customer requests without involving human agents. Self Service uses the Interactive Voice Response (IVR) system in the call flow. This IVR includes basic activities such as Play Message, Collect Digits, and Menu. All of these activities can also play the audio dynamically through Text-to-Speech functionality.
The maximum file size supported for audio files is 8 MB. The supported file format is .wav. For more information, see Working with Resource Files. |
You can extend interactions in Self Service to have Virtual Agents in the flow. The Virtual Agent can understand caller utterances to deliver a conversational Self Service experience.
You can use the Flow Designer to script any possible use cases in the Self Service space. For more information, see Activities In Flow Designer.
Configure Entry Point and Select the Flow in Routing Strategy
You configure the Entry Point and select the flow in Routing Strategy in the Management Portal.
For more information on how to configure the Entry Point, see Entry Point and Queues. For more information on how to select the flow in Routing Strategy, see Viewing, Creating, Deleting and Modifying Routing Strategies.
Enable a Virtual Agent
A virtual agent handles conversations with your customers. The virtual agent understands the intent of the conversation and assists the customer as part of the IVR experience. The virtual agent is powered by Google's Dialogflow capabilities. The administrator has access to the Conversational IVR transcript.
The virtual agent supports the following audio codecs:
|
| 1 |
Create a Dialogflow agent to integrate the conversational experience into the IVR system. For more information, see Build a Dialogflow Agent.
| ||
| 2 |
Configure a virtual agent in the Control Hub. For more information, see Configure Virtual Agent. | ||
| 3 |
Add a Virtual Agent activity to the call flow to handle customer queries in conversational format. For more information, see Create Virtual Agent Activity in Flow Designer. |
Build a Dialogflow Agent
Configure Google Dialogflow:
|
Build a Dialogflow agent that provides automated responses. |
Configure Virtual Agent
After you download the Authentication Key, upload the Authentication Key by choosing the JSON file to create the Virtual Agent in the Control Hub.
The administrator must Configure a Virtual Agent in the Control Hub.
After configuring a Virtual Agent on the Control Hub, the administrator can configure the Virtual Agent activity in the Flow Designer.
Create VA activity in Flow Designer
After configuring the Virtual Agent on Control Hub, configure the Virtual Agent activity in the Flow Designer.
You can add a Virtual Agent to a call flow to handle customer queries in a conversational format. The Virtual Agent understands the intent of the conversation and assists the customer as part of the IVR experience. For more information, see Virtual Agent .
Blind Transfer
The Blind Transfer activity refers to a process wherein a contact is transferred to an external Dial Number (DN) and entry point through the IVR, without agent intervention.
The Blind Transfer activity is applicable when a call should be transferred to an external Dial Number and entry point. The transfer can also be initiated to an external bridge. For more information, see Blind Transfer.
Disconnect Contact
This activity is used to disconnect the contact from the call. This refers to the end of a contact in IVR.
For more information, see Disconnect Contact.
IVR Transcript and global Variables in Agent Desktop
The administrator can provide access to an agent to view the Conversational IVR transcript and to view or edit the global (previously known as CAD) variables based on the configurations set in the call flow.
An agent can view the Conversational IVR transcript and the global variables extracted from the Conversational IVR transcript based on the permissions set in the call flow by the administrator. For more information on the Conversational IVR transcript in Agent Desktop, see the section IVR Transcript in the Cisco Webex Contact Center Agent Desktop User Guide.
For more information on the global variables in Agent Desktop, see the section Call-Associated Data Variables in the Cisco Webex Contact Center Agent Desktop User Guide.
IVR and CVA Dialog Flow Report in Analyzer
The IVR and CVA Dialog Flow report enables the administrators and supervisors to view the Self-service operational metrics.
For more information on the IVR and CVA Dialog Flow report in Analyzer, see the section IVR and CVA Dialog Flow Report in the Cisco Webex Contact Center Analyzer User Guide.
Text-to-Speech
The Text-to-Speech capability is powered by Google's Text-to-Speech APIs. To enable this functionality, you must set up a Google Cloud account and configure the Text-to-Speech service.
With Text-to-Speech, you can convert arbitrary strings, words, sentences, and variables into an actual human speech that is played dynamically to the caller. This is in place of playing a prerecorded audio.
To enable Text-to-Speech, follow this task flow:
| 1 |
Create a Service Account to download the private key. For more information, see Create a Service Account for Google Connector. |
| 2 |
Configure the Google Connector in Control Hub to enable the Text-to-Speech capability in Flow Designer. For more information, see Configure a Google Connector. |
| 3 |
To use Text-to-Speech in your prompt, enable the Text-to-Speech toggle. For more information, see Text-to-Speech Toggle. |
Create a Service Account for Google Connector
Complete the following procedure to configure the Google Connector:
|
Create a service account and download the JSON file that contains the Authentication Key. |
Configure a Google Connector
After you download the Authentication Key, upload the Authentication Key by choosing the JSON file to configure the Google Connector in the Control Hub.
-
The administrator must Configure a Connector (see the Google tab) in the Control Hub.
-
Add the ability to read dynamic messages. These messages can contain variables and can be used in a sequence with audio files.
-
If you are using variables, use this syntax: {{ variable }}. You can also use SSML to construct the message. If you are using SSML, insert it inside the <speak></speak> tags.
-
To learn more about Google tags, see: https://developers.google.com/assistant/conversational/df-asdk/ssml%22
After creating the connector, the administrator can enable the Text-To-Speech functionality.
Text-to-Speech Toggle
The Text-to-Speech toggle allows you to create natural-sounding, synthetic human speech as part of activities in your flow that can play messages to the caller, including Menu, Play Message, and Collect Digits. With Text-to-Speech, you can convert arbitrary strings, words, sentences, and variables into an actual human speech. This is in place of playing a pre‐recorded audio.
Text-to-Speech takes two types of input: raw text (plain text) or Speech Synthesis Markup Language-formatted (SSML-formatted) data.
After creating the Google connector, enable the Text-To-Speech toggle in IVR activities in the Flow Designer. For more information, see Menu, Play Message, Collect Digits.
Webex Experience Management is a Customer Experience Management (CEM) platform that enables you to see your business from your customers' perspective and see their experience with the brand. Webex Experience Management powers customer journey mapping, text analytics, and predictive modeling using the feedback collected from customers through different channels such as email, SMS, and Interactive Voice Response (IVR). For more information, see Cisco Webex Experience Management Overview.
-
Customer experience survey: Administrators can configure and send post-call surveys to customers, after an interaction, to collect feedback about their interaction.
-
Customer Experience Journey (CEJ) gadget: Displays all the past survey responses from a customer in a chronological list. The agent and supervisor use this gadget to gain context about the customer's past experiences with the business and engage with them appropriately. Administrators can configure and add the CEJ widget on the Webex Contact Center Agent Desktop.
-
Customer Experience Analytics (CEA) gadget: Displays the overall experience of the customer interaction with agents using industry-standard metrics such as NPS, CSAT, and CES or other KPIs tracked within Webex Experience Management. Administrators can configure and add the CEA widget on the Webex Contact Center Agent Desktop.
Webex Experience Management Post Call Survey
Webex Experience Management Post Call surveys collect feedback from customers to determine the performance of the contact center and the relevant services. With Webex Experience Management, you can do one of the following:
- Configure post-call surveys and initiate them over IVR when agents end the calls in the Webex Contact Center Agent Desktop.
- Send post-call surveys to the customer through email or SMS after the call ends.
For a survey over IVR, after an agent ends the call, Webex Contact Center transfers the call to Webex Experience Management and the customer receives the inline survey. The customer can barge-in during the inline survey and use the keypad to answer the survey.
For a survey through email or SMS, you can configure Webex Contact Center to send out an email or SMS that contains a message along with a link to launch the survey.
You can collect, analyze, and present the data from various surveys as widgets on the Webex Contact Center Agent Desktop.
Webex Experience Management Account Setup
To create an Webex Experience Management account:
| 1 |
Submit the form Assurance to Quality(A2Q) process for Cisco Webex Experience Management. Provide a correct provisioning administrator email address in the A2Q form to ensure that provisioning notification and service access information is received. |
| 2 |
As part of the account creation process, the following actions are performed:
|
| 3 |
After the account is created and provisioned, the handover information is sent to the admin email address provided in the A2Q form. The handover emails contain credentials and other essential information about your account. Initially, Spaces and Widgets are created as part of the Webex Experience Management account provisioning. To know more about the different default Widgets within Experience Management, how to use the Metric Library to create additional Experience Management Widgets, and how to export and derive meaningful insights from them, see Webex Experience Management Widgets. |
| 4 |
Add the Webex Experience Management widgets as an Agent Desktop widget into the Agent Desktop layout. For more information, see Cisco Webex Experience Management Widgets and Gadgets. |
Create a Webex Experience Management Connector
After you receive the handover emails with credentials and other essential information about your Webex Experience Management account, use the credentials to create a Webex Experience Management connector in Control Hub.
| 1 |
Configure the Webex Experience Management Connector on Control Hub. |
| 2 |
Create the feedback activity in the Webex Contact Center Management Portal. |
Create Feedback Activity in the Flow Designer
After you create the Webex Experience Management connector, you configure the post-call surveys.
Configure an IVR Post-call Survey
The steps to enable IVR post-call survey in Webex Contact Center are as follows:
| 1 |
Create and configure the questionnaires in Webex Experience Management for sending IVR surveys to the customer.
| ||
| 2 |
Create a voice-based feedback activity in Flow Designer. For more information, see Feedback activity. |
Validate DTMF Input Response in IVR Post-call Survey
Webex Contact Center validates Dual-Tone Multi-Frequency (DTMF) input responses from the customers during IVR post-call surveys.
You can configure the maximum number of retry attempts in case of invalid or no DTMF input, as well as audio notification messages (for invalid input, timeout, and maximum retries exceeded) for questionnaires by using Webex Experience Management.
For more information, see Retry And Timeout Settings In Post Call IVR Survey in Webex Experience Management documentation.
If the customer enters an invalid DTMF input or does not enter any DTMF input to a survey question within the specified duration ( Timeout parameter in the Feedback activity), the contact center:
-
Notifies the customer about the invalid entry or timeout by playing the audio message that is configured in the survey questionnaire in Webex Experience Management.
-
Plays the same survey question to the customer based on the number of retry attempts that is configured in the survey questionnaire in Webex Experience Management.
When the maximum number of retry attempts for invalid input and timeout exceeds, the contact center:
-
Notifies the customer that the maximum retries have exceeded, by playing the audio message that is configured in the survey questionnaire in Webex Experience Management.
-
Skips the remaining survey questions and plays the Thank You message (if a Thank You note is configured in Webex Experience Management) to end the survey.
|
Configure SMS or Email Post-Call Survey
To configure the Webex Experience Management Invitation module for sending SMS/Email surveys to the customer:
Before you begin
The partner hosted module in the Webex Experience Management Invitations solution is mandatory for the SMS/Email surveys to work.
For information about partner hosted module, see Cisco Webex Experience Management Invitations Module Architecture Document.
| 1 |
Provision the infrastructure required to deploy the partner hosted components of the Webex Experience Management Invitations module. For more information, see Infra Provisioning Guide For Webex Experience Management Invitations Module. |
| 2 |
Deploy the partner-hosted components. For information about how to deploy the partner hosted components, see Deployment Guide for Invitations Module. |
| 3 |
Create dispatch templates on Webex Experience Management. For more information, see Dispatch User Guide. |
| 4 |
Create a SMS/Email Based feedback activity in Webex Contact Center Management Portal. For more information, see Feedback. |
View Agent Desktop Widgets
After you configure the Agent Desktop widgets, you can view the Customer Experience Journey (CEJ) and Customer Experience Analytics (CEA) widgets. For more information on how to configure widgets, see Cisco Webex Experience Management Widgets.
|
View the CEJ and CEA widgets in the Agent Desktop. For more information, see the section about the Webex Experience Management in the Cisco Webex Contact Center Agent Desktop User Guide. |
Troubleshooting Management Portal Problems
Management Portal Problems
If you experience a problem with the Management Portal, the following table may help you solve the problem.
|
Problem |
Description/Workaround |
|---|---|
|
You cannot log in to the Management Portal. |
Check to make sure that you enetered the correct user name and password. |
|
You cannot access a module from the Management Portal, or you cannot see some entry points or queues. |
You do not have the correct privileges to access these modules, entry points, or queues. Contact your Webex Contact Center administrator. |
|
The Management Portal does not display data for agents or calls, or shows that no agents are logged in. |
Make sure that the privacy setting for Internet Explorer is set to Medium. |
|
Occasionally the message |
Log out of the current Webex Contact Center session. Close any remaining Webex Contact Center windows and log in again. |
|
When you resize the Agent view of a real-time agent report, tooltips for idle and wrap-up codes are sometimes displayed in the graph area instead of near the cursor. |
Maximize the window to display the tooltip near the cursor. |
|
Too many abandoned calls are being reported. |
Escalate to Customer Support. |
|
While you view a chart in a report or on a monitoring page, you see the following message |
The system has been unable to refresh the data in the chart since the time indicated in the message, typically because of an intermittent network interruption or server issue. If the problem persists for several minutes, notify your system administrator. |
|
The real-time reports are not refreshing on the Management Portal. |
Escalate to Customer Support. |
|
The real-time report statistics are not displayed. |
Escalate to Customer Support. |
|
In a real-time agent report, the wrap-up count and number of entered wrap-up codes do not match. |
This discrepancy occurs when an agent logs out while still in the Wrap-up state without selecting a wrap-up code. Instruct agents to always go into the Idle state and then click the Log Out button to log out rather than closing the browser while logged in. |
|
Changes to the names of existing idle and wrap-up codes do not appear immediately in agent reports. Instead, agent reports display the previous code names before they were edited or N/A for a new code. |
Log out and then log in again to see the changes. |
|
When exported to CSV format, data in the Agent View of a current snapshot agent report displays incorrectly. |
The Time Value displays in two cells instead of one when exported to CSV format. This is because a comma separates the day from the date and time in the Login Time field. |
|
When you export historical report data to Microsoft Excel that includes date and time in the hh:mm:ss format, Excel displays only the hours and minutes, and not the seconds. |
By default, Excel displays the data in hh:mm format. However, you can double-click in the cell to see the data in hh:mm:ss format. |
|
For a new team, data in the agent interval report displays in half-hour intervals from the time an agent on the team logs in after system restart. |
This is transient for teams that log in for the first time. Normally, data displays in half-hour intervals from midnight. |
|
In the Historical Reports module, occasionally the parameters for a customized default report are not saved after you log out and log in again. |
After you save a custom report, wait 10-15 seconds before logging out. |
|
You cannot make a monitoring request. |
Ensure that you use the correct DN and prefix. |
|
Monitoring session left open for an hour or longer displays a blank page or unexpected behavior |
Close the module and re-open it. |
|
Supervisor phone rings even when the monitoring request is for a different queue. |
If a monitoring request is made for a team and if multiple queues use the same team for routing, any of the queue's calls for that team can be monitored. |
|
A call ends, but the monitoring screen indicates that the call is still in progress. |
Escalate to Customer Support |
|
Signed in agents cannot see changes made to Skill profile. |
The agent needs to sign in again to view the changes. |
Reporting Management Portal Issues to Customer Support
When you escalate a Management Portal issue to Cisco Webex Contact Center Customer Support, make sure to provide the following information:
-
The login and user name of the person experiencing the problem.
-
The time that the issue was first observed.
-
If the problem occurred in the Monitoring module, the number that the supervisor was attempting to call and a call session ID, if available.
Troubleshooting Desktop Problems
Network Interruptions
If a network interruption occurs that lasts for less than two minutes, the Desktop display a Reconnecting message and then successfully reconnect.
If a network interruption lasts longer than two minutes, instruct agents to close the current Desktop window, and then sign in using the primary URL. If the sign in fails with the primary URL, instruct agents to use the backup application center sign in.
Escalate all network interruptions; report the time that the problem occurred and the number of agents affected.
If the network to the primary application center is down, Management Portal users cannot view any statistics.
Desktop Application Problems
If you experience a problem with the Desktop application, the following table may help you solve the problem.
|
Problem |
Description/Workaround |
|---|---|
|
You are not able to sign in to the Desktop. |
|
|
During sign in, the error message |
Check the format of the DN that you entered and make sure that the number is valid. |
|
You accidentally closed the browser window while on a call. |
If you close the browser window while on a call, you cannot sign in again until you complete the call. If you close the browser window while the call is on hold, the system automatically takes the call off hold. |
|
When you refresh the Desktop window, you are signed out and the sign-in screen displays. |
Sign in again. Avoid refreshing the window while signed in. |
|
The status bar on the Desktop displays |
|
|
After reconnecting to the system following a network interruption, you are suddenly signed out. |
Sign in to the Desktop again. If you are unable to sign in, escalate to Customer Support. |
|
Re-launching the Desktop while you are signed in may create problems |
Do not open more than one Desktop application at a time on the desktop. |
|
The Desktop becomes very slow. |
This can happen when you leave the Desktop open for long periods of time. Close both the Desktop and the browser after you sign out of the system. If this does not help, end the process from the Windows Task Manager. |
|
The Desktop occasionally signs out agents following a network interruption. |
Sign in to the Desktop again. |
|
The Desktop is not displayed. |
Minimize the Desktop, and then restore it from the taskbar. |
|
Launch pages and graphs do not display properly. |
Make sure that in Internet Explorer, the Show Pictures option is selected in the Advanced tab of the Internet Options dialog box. |
|
You are available but no calls are sent to you. |
Make sure you are in the Available state and are signed in to the correct team. |
|
You are talking to a customer, but the Desktop status bar displays |
Report the incident to Customer Support. |
|
Your agent softphone is not ringing, but the Desktop status bar displays |
Make sure that you entered the correct DN. |
|
The Desktop status bar displays |
Check to see if the computer network cable has been disconnected or loosened. If you do not see a message indicating that there has been a network problem, escalate to Customer Support. |
|
You answer a call, but the call disconnects after 30 seconds. |
If |
|
The Internet Explorer browser freezes. |
Open Windows Task Manager and end all browser processes. |
|
Pop-up blockers appear. |
From the Internet Explorer Tools menu, disable pop-up blockers. |
|
The Desktop status bar displays a connected state while the phone is ringing. |
Report the incident to Customer Support. |
|
An outbound call fails. |
Make sure you entered the correct DN and prefix. |
|
During a blind transfer, call details do not display on the Desktop of the receiving agent while that agent is in the Reserved state. |
The Reserved state is transient. Call details display when the second agent answers the call. |
Audio Problems
If you experience audio problems with the Desktop, the following table helps to resolve the problems.
|
Problem |
Description/Workaround | ||
|---|---|---|---|
|
Echo or low volume |
Check the phone settings. If using a softphone, check the Microsoft Windows and softphone settings. |
||
|
Jitter/Stutter audio -OR- High latency |
Bad connectivity, probably due to a network problem. Check to make sure that your PC is not also running other software that uses audio. Escalate to Customer Support. |
||
|
Cross talk |
Escalate to Customer Support. |
||
|
One-way audio |
Make sure you are not on mute. If not, escalate to Customer Support. |
||
| Background noise |
The background noise removal feature is enabled by default for your organization. In situations where the agent wants to hear background noise from the customer, contact Customer Support to disable the feature flag.
|
Reporting Agent Desktop Issues to Customer Support
When you escalate an Agent Desktop issue to Webex Contact Center Customer Support, make sure to provide the following information:
-
Ask the agent to provide a screen capture of the Agent Desktop screen.
-
Include the time that the issue was first observed.
Call Report Parameters
The following table describes the parameters available in Webex Contact Center real-time and historical call reports. In the table, CSR is an abbreviation for Customer Session Record.
|
Parameter |
Description |
Report | ||
|---|---|---|---|---|
|
% Abandoned |
The percentage of calls that were abandoned during the report interval. (Abandoned/Total) * 100 |
Real-time Call Interval reports for Queues & Skills by Queue; Historical Call reports for Queues |
||
|
% Answered |
The number of answered calls divided by the number of calls that entered the queue minus short calls multiplied by 100. (Answered/(Answered + Abandoned)) * 100 |
Real-time Call Interval reports for Queues & Skills by Queue; Historical Call reports for Queues |
||
|
Abandoned |
The number of calls that were abandoned during the report interval. An abandoned call is a call that was terminated without being distributed to a destination site, but that was in the system for longer than the time specified by the Short Call threshold provisioned for the enterprise. |
Real-time Call Interval reports for Queues & Skills by Queue; Historical Call reports for Queues |
||
|
Abandoned Time |
The cumulative amount of time that calls were in the system for longer than the time specified by the Short Call threshold, but terminated before being distributed to an agent or other resource. |
Real-time Call Interval reports for Queues & Skills by Queue; Historical Call reports for Queues |
||
|
Abandoned within SL |
The number of calls that were terminated while in queue within the Service Level threshold provisioned for the queue or skill (in a skills interval by queue report).
|
Real-time Call Interval reports for Queues & Skills by Queue; Historical Call reports for Queues |
||
|
Adjusted Service Level % |
The number of calls that were either answered or abandoned within the Service Level threshold provisioned for the queue or skill (in a skills interval by queue report), divided by total calls (including abandoned calls) multiplied by 100. ((In Service Level + Abandoned within SL)/(Answered + Abandoned)) * 100
|
Real-time Call Interval reports for Queues & Skills by Queue; Historical Call reports for Queues, Sites, & Teams |
||
|
Agent |
The name of the agent who handled the call or a numeric ID code if the call was handled by a capacity-based team resource instead of by a Webex Contact Center agent. |
CSR |
||
|
Agent Start Time |
The time the agent picked up the phone and began talking with the caller. |
CSR |
||
|
ANI |
The ANI digits delivered with the call. ANI, or Automatic Number Identification, is a service provided by the phone company that delivers the caller's phone number along with the call. |
CSR |
||
|
Answered |
The number of calls that were routed from the queue to an agent or available resource and were answered by the agent or resource. |
Real-time Call Interval reports for Queues, Skills by Queue, Sites, & Teams; Historical Call reports for Queues, Sites, & Teams |
||
|
Answered Time |
The cumulative amount of time between when calls entered the queue and when they were answered (connected to an agent or other resource) during the report interval. Because answered time is calculated after the call is answered, answered time for calls that are waiting to be answered is not reflected in the report. |
Real-time Call Interval reports for Queues, Skills by Queue, Sites, & Teams; Historical Call reports for Queues, Sites, & Teams |
||
|
Available Agents |
The number of logged-in agents who are currently in the Available state. |
Call Snapshot report |
||
|
Avg Abandoned Time |
The total amount of time that calls were in the system before they were abandoned divided by the total number of calls that were abandoned: Abandoned Time/Abandoned |
Real-time Call Interval reports for Queues & Skills by Queue; Historical Call reports for Queues |
||
|
Avg Connected Time |
The total connected time divided by the total number of calls that were answered during the report interval: Connected Time/(Answered + Secondary Answered) |
Real-time Call Interval reports for Queues, Skills by Queue, Sites, & Teams; Historical Call reports for Queues, Sites, & Teams |
||
|
Avg Handle Time |
The average length of time spent handling a call (connected time plus wrap-up time), divided by number of answered calls: Connected Time+Wrap Up Time/(Answered + Secondary Answered) |
Real-time Call Interval reports for Queues, Skills by Queue, Sites, & Teams; Historical Call reports for Queues, Sites, & Teams |
||
|
Avg IVR Time |
The total amount of time that calls were in the IVR system divided by the total number of calls that were in the IVR system. |
Real-time Call Interval & Historical Call reports for Entry Points |
||
|
Avg Queued Time |
The total amount of time that calls were in queue divided by the total number of calls that were queued: Queued Time/Queued |
Real-time Call Interval reports for Queues & Skills by Queue; Historical Call reports for Queues. |
||
|
Avg Speed of Answer |
The total answered time divided by the total number of answered calls: Answered Time/Answered |
Real-time Call Interval reports for Queues, Skills by Queue, Sites, & Teams; Historical Call reports for Queues, Sites, & Teams |
||
|
Avg Wrap Up Time |
The total amount of time agents spent in the Wrap-up state divided by the total number of answered calls: Wrap Up Time/(Answered + Secondary Answered) |
Real-time Call Interval reports for Queues, Skills by Queue, Sites, & Teams; Historical Call reports for Queues, Sites, & Teams |
||
|
Blind Transfer Count |
The number of times the call was transferred out of the queue by the agent without the first agent consulting or conferencing with the party to whom the call was transferred |
CSR |
||
|
Blind Transfers |
The subset of transferred out calls that were transferred by the agent to another agent or an external DN without the first agent consulting or conferencing with the party to whom the call was transferred. |
Real-time Call Interval reports for Queues, Skills by Queue, Sites, & Teams; Historical Call reports for Queues, Sites, & Teams |
||
|
Call Duration |
The amount of time between when the call arrived at the entry point or queue and when it was terminated. |
CSR |
||
|
Call End Time |
The time the call was terminated. |
CSR |
||
|
Call Start Time |
The time the call arrived at the entry point or queue. |
CSR |
||
|
Completed |
The number of calls that ended during the report interval. Answered, abandoned, and disconnected calls are included in this count. Transferred and short calls are not counted. |
Real-time Call Interval reports for Queues, Skills by Queue, Sites, & Teams; Historical Call reports for Queues, Sites, & Teams |
||
|
Conference Count |
The number of times the agent established a conference call with the caller and another agent. |
CSR |
||
|
Conference Count |
The number of times agents initiated a conference call to an agent or external number. |
Real-time Call Interval reports for Queues, Skills by Queue, Sites, & Teams; Historical Call reports for Queues, Sites, & Teams |
||
|
Conference Time |
The amount of time an agent spent in conference with the caller and another agent. |
CSR |
||
|
Connected |
The number of calls currently connected to an agent. |
Call Snapshot report |
||
|
Connected Time |
The time interval between when calls were answered by an agent or other resource and when the calls were terminated. Because connected time is not calculated until the call is terminated, the connected time for a call that is still in progress is not reflected in the report. |
Real-time call interval reports for Sites, Teams, Queues, & Skills by Queue; Historical Call reports for Queues, Sites, & Teams |
||
|
Connected Time |
The total amount of time the call was connected to an agent (talk time plus hold time). |
CSR |
||
|
Consult Count |
The number of times agents initiated a consult with another agent or someone at an external number during a call. |
Real-time Call Interval reports for Queues, Skills by Queue, Sites, & Teams; Historical Call reports for Queues, Sites, & Teams |
||
|
Consult Count |
The number of times the agent consulted another agent during the call. |
CSR |
||
|
Consult Errors |
The number of times agents did not respond to a consult invitation. |
CSR |
||
|
Consult Time |
The amount of time an agent spent consulting with another agent during this call. |
CSR |
||
|
CTQ Answer Count |
The number of times consult-to-queue requests were answered. |
Real-time Call Interval reports for Queues, Skills by Queue, Sites, & Teams; Historical Call reports for Queues, Sites, & Teams |
||
|
CTQ Answer Time |
The cumulative amount of time between when consult-to-queue requests were answered and when the consultations ended. |
Historical Call reports for Queues, Sites, & Teams |
||
|
CTQ Request Count |
The number of times consult-to-queue requests were initiated. |
Real-time Call Interval reports for Queues, Skills by Queue, Sites, & Teams; Historical Call reports for Queues, Sites, & Teams; CSR |
||
|
CTQ Request Time |
The cumulative amount of time between when consult-to-queue requests were initiated and when the consultations ended. |
Historical Call reports for Queues, Sites, & Teams; CSR |
||
|
Current Service Level % |
The percentage of calls in queue that have not yet reached the Service Level threshold provisioned for the queue (in a queue report) or skill (in the skill rows of a skills-by-queue report).
|
Call Snapshot report |
||
|
Disconnected |
The number of calls that were answered (that is, connected to an agent or distributed to and accepted by a destination site), but that were then immediately disconnected within the Sudden Disconnect threshold provisioned for the enterprise. |
Real-time Call Interval reports for Queues, Skills by Queue, Sites, & Teams; Historical Call reports for Queues, Sites, & Teams |
||
|
DN |
The number the caller dialed (DNIS). |
All DN Canned report |
||
|
DNIS |
The DNIS digits delivered with the call. DNIS, or Dialed Number Identification Service, is a service provided by the phone company that delivers a digit string indicating the number the caller dialed along with the call. |
CSR |
||
|
Entry Point |
The name of the entry point associated with the call. |
CSR |
||
|
From Entry Point |
The number of calls that entered this queue after having been classified into the queue from an entry point by the IVR call control script. The number of calls that entered this queue after having been classified into the queue from an entry point by the IVR flow. |
Real-time Call Interval reports for Queues & Skills by Queue; Historical Call reports for Queues |
||
|
From Entry Point |
The number of calls that came in to this entry point from another entry point. |
Real-time Call Interval & Historical Call reports for Entry Points |
||
|
Full Monitored Calls |
The number of calls that were monitored from beginning to end. |
Monitored Calls report |
||
|
Handle Time |
The amount of time spent handling the call (Connected Time + Wrap Up Time). |
CSR |
||
|
Handle Time |
The cumulative amount of time spent handling calls: Connected Time + Wrap Up Time |
Real-time Call Interval reports for Queues, Skills by Queue, Sites, & Teams; Historical Call reports for Queues, Sites, & Teams |
||
|
Handle Type |
How the call was handled. Possible values:
|
CSR |
||
|
Hold Count |
The number of times the call was put on hold. |
|
||
|
Hold Time |
The amount of time the call was on hold in this queue (for a queue CSR) or in all underlying queues (for an entry point CSR). |
CSR |
||
|
In IVR |
The number of calls that are currently in the IVR system. |
Call Snapshot report |
||
|
In Queue |
The number of calls currently in the queues that are covered in the report. In the case of entry-point reports, this is the number of calls that are currently in queues fed by the entry point. In entry point and queue reports, you can click a number in this column to display the Age of Calls in Queue pie chart in a pop-up window. The chart displays the number of calls that have been in the queue for the length of time represented by three time segments. The time segments are derived by dividing the Longest Time in Queue value by three, rounding the resulting value down to the nearest 10 seconds, and then multiplying that value by 1, 2, and 3. For example, if the Longest Time in Queue value is 85 seconds, then 85/3=28.3, which is rounded down to 20, and the chart displays time segments of 20, 40, and 60 seconds. |
Call Snapshot report |
||
|
In Service Level |
The number of calls that were answered within the Service Level threshold provisioned for this queue or skill (in a skills interval by queue report).
|
Real-time Call Interval reports for Queues & Skills by Queue; Historical Call reports for Queues, Sites, & Teams |
||
|
Invisible Monitored Calls |
The number of calls that were monitored using the Invisible mode, which prevents the monitoring session from being displayed on Management Portals other than that of the initiating supervisor. |
Monitored Calls report |
||
|
IVR Ended |
The number of calls that ended in the IVR but were not short calls. |
Real-time Call Interval & Historical Call reports for Entry Points |
||
|
IVR Time |
The amount of time the call was in the IVR system. |
CSR |
||
|
IVR Time |
The cumulative amount of time calls were in the IVR system. |
Real-time Call Interval & Historical Call reports for Entry Points |
||
|
Logged-in Agents |
The number of agents who are currently logged in to this team or to all teams at this site. At the queue level, this is the number of agents logged in to all teams at the sites serving this queue. |
Call Snapshot report |
||
|
Longest Call In Queue Time |
The longest amount of time a call has been in each queue covered in the report. |
Call Snapshot report |
||
|
Maximum Wait Time |
The longest amount of time a call was in the queue waiting to be answered. |
Historical Call reports for Queues |
||
|
Midcall Monitored Calls |
The number of calls for which monitoring began after the call was already in progress. |
Monitored Calls report |
||
|
Monitor Flag |
Whether or not the call was monitored, coached, or barged in on. Possible values:
For information about monitoring, see Monitor Calls. |
CSR |
||
|
New |
The number of external calls that came in to the entry point. |
Real-time Call Interval & Historical Call reports for Entry Points |
||
|
New |
The number of calls that came into the system by way of a specific dialed number. |
All DN Canned report |
||
|
No. of Transfers |
The number of times the call was transferred by an agent. |
CSR |
||
|
Overflow |
The number of calls that were sent to the overflow number provisioned for the queue and were answered. Typically, a call is sent to an overflow number if it is queued for longer than the maximum time specified in the routing strategy or because an error occurred when the call was sent to an agent. If the call is not answered, it is included in the Abandoned or Disconnected count when the call ends. |
Real-time Call Interval reports for Queues & Skills by Queue; Historical Call reports for Queues |
||
|
Queue |
The name of the queue associated with the call. |
CSR |
||
|
Queue |
The name of the queue that was monitored. |
Calls Monitored report |
||
|
Queue Time |
The amount of time the call was in a queue waiting to be sent to a destination site. |
CSR |
||
|
Queued |
The number of calls that entered the queue during this interval. |
Real-time Call Interval reports for Queues & Skills by Queue; Historical Call reports for Queues |
||
|
Queued Time |
The cumulative amount of time calls were in queue, waiting to be sent to an agent or other resource. Because queued time is calculated after the call leaves the queue, the queued time for a call that is still in the queue is not reflected in the report. |
Real-time Call Interval reports for Queues & Skills by Queue; Historical Call reports for Queues |
||
|
Record Flag |
Whether or not the call was recorded by Webex Contact Center through the optional call recording feature. |
CSR |
||
|
Requeued |
The number of calls that left this queue after having been transferred by the agent to another queue. For calls to be requeued, the first agent clicks the Queue button, selects a queue from the drop-down list, and clicks Transfer. |
Real-time Call Interval reports for Queues, Skills by Queue, Sites, & Teams; Historical Call reports for Queues, Sites, & Teams |
||
|
S No. |
A sequence number identifying each leg of a call as it moves through the Webex Contact Center system. Click an entry in this column to open a window that displays the history of the call throughout its life cycle. |
CSR |
||
|
Secondary Answered |
The number of calls that were answered by an agent after being transferred to the agent by another agent. |
Real-time Call Interval reports for Queues, Skills by Queue, Sites, & Teams; Historical Call reports for Queues, Sites, & Teams |
||
|
Service Level % |
The number of calls that were answered within the Service Level threshold provisioned for the queue or skill (in a skills interval by queue report), divided by total calls (including abandoned calls) multiplied by 100: ((In Service Level)/(Answered + Abandoned)) * 100
|
Real-time Call Interval reports for Queues & Skills by Queue; Historical Call reports for Queues, Sites, & Teams. |
||
|
Session ID |
A value assigned by the system that uniquely identifies a call during its life cycle. |
CSR |
||
|
Short |
The number of calls that were terminated within the Short Call threshold provisioned for the enterprise without being distributed to a destination site or connected to an agent. |
Real-time Call Interval & Historical Call reports for Entry Points |
||
|
Short |
The number of calls that were terminated within the Short Call threshold provisioned for the enterprise without being connected to an agent. |
Real-time Call Interval reports for Queues & Skills by Queue; Historical Call reports for Queues |
||
|
Site |
The contact center location to which the call was distributed. |
CSR |
||
|
Site |
The name of the site that was monitored. |
Monitored Calls report |
||
|
Team |
The name of the team to which the call was distributed. |
CSR |
||
|
Team |
The name of the team that was monitored. |
Monitored Calls report |
||
|
Terminating Party |
Who terminated the call: Agent or Caller |
CSR |
||
|
Termination Type |
How the call was terminated. Possible values:
|
CSR |
||
|
To Entry Point |
The number of calls that were transferred to another entry point. |
Real-time Call Interval & Historical Call reports for Entry Points |
||
|
To Queue |
The number of calls that were sent to a queue. |
Real-time Call Interval & Historical Call reports for Entry Points |
||
|
Total Monitored Calls |
The total number of calls monitored during the report time interval. |
Monitored Calls report |
||
|
Transfer Errors |
The number of times an error occurred during the transfer process. |
CSR |
||
|
Transferred |
The sum of all calls transferred from this queue to an agent, external DN, or another Webex Contact Center queue: Transferred Out + Requeued |
Real-time Call Interval reports for Queues, Skills by Queue, Sites, & Teams; Historical Call reports for Queues, Sites, & Teams |
||
|
Transferred In |
The number of calls that were transferred to this entry point by an agent. |
Real-time Call Interval & Historical Call reports for Entry Points |
||
|
Transferred In |
The number of calls that entered this queue after being transferred into the queue by an agent who clicked the Queue button, selected a queue from the drop-down list, and clicked Transfer. |
Real-time Call Interval reports for Queues & Skills by Queue; Historical Call reports for Queues |
||
|
Transferred Number |
The phone number to which the agent transferred the call in an agent-to-DN transfer. This parameter appears in the Webex Contact Center window that opens when you click an entry in the S No. (sequence number) column of either an entry point or queue call detail record (CSR). |
CSR |
||
|
Transferred Out |
The number of calls that left this queue after being transferred by an agent to an external DN or to another agent. Transferred-out calls result when an agent clicks the Agent button, selects an agent from the drop-down list, and clicks Transfer, or when the agent clicks the DN button, enters a phone number, and clicks Transfer. Transferred-out calls may begin as a consultation or conference, but are counted as transferred-out only when the first agent completes the transfer to the second party. |
Real-time Call Interval reports for Queues, Skills by Queue, Sites, & Teams; Historical Call reports for Queues, Sites, & Teams |
||
|
Wrap Up |
The wrap-up code that the agent gave for the call. Note that if the agent wraps up the call after the CSR is generated, the corresponding CSR is updated after the agent selects the wrap-up code for that call. |
CSR |
||
|
Wrap Up Time |
The amount of time an agent spent in the Wrap-up state during the call. |
CSR |
||
|
Wrap Up Time |
The cumulative amount of time agents spent in the Wrap-up state during the call. |
Real-time Call Interval reports for Queues, Skills by Queue, Sites, & Teams; Historical Call reports for Queues, Sites, & Teams |
Agent Report Parameters
The following table describes the parameters available in Webex Contact Center real-time and historical agent reports. In the table, ADR is an abbreviation for Agent Detail Report.
|
Parameter |
Description |
Report | ||
|---|---|---|---|---|
|
Action |
Icons you can click to perform an action:
|
Snapshot/Team & Skill views |
||
|
Agent |
The name of an agent in the report. If your enterprise uses the Multimedia feature and the report includes more than one media channel, you can click the a collapse arrow or expand arrow to the left of an agent name to collapse or expand the data grouped by channel type. |
Snapshot/Agent view; Real-time Agent Interval/Agent-level |
||
|
Agent Requeue |
The number of times an agent requeued an inbound call. |
Historical Agent Summary & Interval reports; ADR; Snapshot/Agent view; Agent Trace report |
||
|
Agent Transfer |
The number of times an agent transferred an inbound call to another agent. |
Historical Agent Summary & Interval reports; ADR; Agent Trace report |
||
|
Available |
Count: The number of times an agent went into the Available state. Total Time: The total amount of time an agent spent in the Available state. Average Time: (Not in ADR or Snapshot/Agent view or Agent Trace report) The average length of time agents were in the Available state (Total Available Time divided by Available Count). % Time: (Only in ADR) The percentage of time the agent was in the Available state. |
Historical Agent Summary & Interval reports; ADR & Snapshot/Agent view; Agent Trace report |
||
|
Available |
The number of agents currently in the Available state or, in the Skill view, the number of agents in the Available state who possess the skill. |
Snapshot/Site, Skill, & Skills by Team views |
||
|
Available Time |
The amount of time agents were in the Available state during the time interval. |
Real-time Agent Interval reports |
||
|
Average Connected Time |
The connected time divided by the number of calls that were connected during the time interval. |
Real-time Skills Interval by Team |
||
|
Average Handle Time |
The average length of time spent handling a call (connected time plus wrap-up time, divided by number of calls). |
Real-time Skills Interval by Team |
||
|
Blind Transfer |
The number of times an agent transferred an inbound call without consulting first. |
Historical Agent Summary & Interval reports; ADR; Snapshot/Agent view; Agent Trace report |
||
|
Calls Handled |
The number of calls the agent handled (or, for the Skill view, the number of calls the agent handled for that skill) since logging in. Rest the cursor over a number in this column to display a pop-up showing the wrap-up codes the agent entered and how many times each code was entered. |
Snapshot/Team view & Skill view |
||
|
Calls Handled |
The total number of inbound and outdial calls handled. |
Historical Agent Summary & Interval reports |
||
|
Channel |
The media channel associated with the activity. (Appears only if your enterprise uses the Multimedia feature.) |
ADR; Agent Trace report |
||
|
Conference |
The number of times the agent initiated a conference call. |
Historical Agent Summary & Interval reports; ADR; Snapshot/Agent view; Agent Trace report |
||
|
Connected |
The number of agents currently connected to an inbound call, or in the Skill view, the number of agents connected to a call who possess the skill. |
Snapshot/Site, Skill, & Skills by Team views |
||
|
Connected Time |
The amount of time inbound calls were connected to an agent during the time interval (talk time plus hold time). |
Real-time Skills Interval by Team |
||
|
Consult |
Count: The number of times an agent answered a consult request plus the number of times an agent consulted other agents. Total Time: Total Consult Answer Time plus Total Consult Request Time. Average Time: (Not in ADR or Agent Trace report) The average length of consulting time (Total Consult Time divided by Consult Count). |
Historical Agent Summary & Interval reports; ADR; Agent Trace report |
||
|
Consult Answer |
Count: The number of times an agent answered a consult request from another agent. Total Time: The total amount of time an agent spent answering consult requests from agents. Average Time: (Not in ADR or Agent Trace report) The average length of time agents spent answering consult requests (Total Consult Answer Time divided by Consult Answer Count). % Time: (Only in ADR and Agent Trace report) The percentage of time the agent spent answering consult requests. |
Historical Agent Summary & Interval reports; ADR; Agent Trace report |
||
|
Consult Request |
Count: The number of times an agent sent a consult request to another agent. Total Time: The total amount of time an agent spent consulting other agents. Average Time: (Not in ADR or Agent Trace report) The average length of time agents spent consulting other agents (Total Consult Request Time divided by Consult Request Count). % Time: (Only in ADR and Agent Trace report) The percentage of time the agent spent consulting other agents while on an inbound call. |
Historical Agent Summary & Interval reports; ADR; Agent Trace report |
||
|
Consulting |
The number of agents currently consulting with another agent. |
Snapshot/Site & Skills by Team views |
||
|
CTQ |
The number of agents currently consulting with another agent after initiating or answering a consult-to-queue request. |
Snapshot/Site view |
||
|
Current State |
The agent's current state. In Team and Skill views, if the current state is Idle, the idle code the agent selected is shown in parentheses. No code shows if the agent has just signed in and has not selected an idle code. |
Snapshot/Team, Skill, & Agent views |
||
|
Disconnected Count |
The number of calls that were connected to an agent, but that were then immediately disconnected within the Sudden Disconnect threshold provisioned for the enterprise. |
Historical Agent Summary & Agent Interval reports; ADR; Agent Trace report |
||
|
Disconnected Hold Count |
The number of times an inbound call was disconnected while the caller was on hold. |
Snapshot/Agent view |
||
|
DN |
The dial number the agent used to log in to the Agent Desktop. |
Snapshot/Team, Agent, & Skill views; ADR; Agent Trace report |
||
|
Duration |
The amount of time the agent was in the state. |
Agent Trace Report |
||
|
Final Logout Time |
The date and time the agent logged out. This column appears only in agent-level summary reports. |
Historical Agent Summary/Agent level |
||
|
Hold |
The number of agents in the Connected state who have placed the caller on hold. |
Snapshot/Site view & Skills by Team view |
||
|
Hold Time |
The amount of time callers were on hold during the time interval. |
Real-time Skills Interval by Team |
||
|
Idle |
The number of times the agent went into the Idle state from a different state. Rest the cursor over a number in this column to display a pop-up showing the idle codes the agent entered and how many times each code was entered.
|
Snapshot/Team & Skill views |
||
|
Idle |
The number of agents currently in the Idle state. |
Snapshot/Site & Skills by Team views |
||
|
Idle |
Count: The number of times an agent went into the Idle state. Total Time: The total amount of time agents spent in the Idle state. Average Time:(Not available in ADR or Agent Trace report) The average length of time agents were in the Idle state (Total Idle Time divided by Idle Count). % Time.:(Not available in Agent Summary and Interval reports) The percentage of time the agent was in the Idle state. |
Historical Agent Summary & Interval reports; ADR; Agent Trace report |
||
|
Idle |
Count: The number of times the agent went into the Idle state from a different state. Rest the cursor over the number in this field to see the idle codes the agent entered and how many times each code was used.
|
Snapshot/Agent view |
||
|
Idle Time |
The amount of time agents were in the Idle state during the time interval. |
Real-time Agent Interval reports |
||
|
In Outdial |
The number of agents who are connected to or are wrapping up an outdial call. |
Snapshot/Site view & Skills by Team view |
||
|
In Outdial |
The number of times the agent was connected to or was wrapping up an outdial call. |
Snapshot/Team view |
||
|
In Time |
The time the agent entered the state. |
Agent Trace report |
||
|
Inbound |
Reserved Time: The amount of time agents were in the Reserved state, during which incoming calls were ringing but had not yet been answered. Answered Count: The number of inbound calls that were answered by an agent during the time interval. Talk Time: The amount of time agents were talking on inbound calls during the time interval. Hold Time: The amount of time inbound calls were on hold during the time interval. Connected Time: The amount of time inbound calls were connected to an agent during the time interval (inbound talk time plus inbound hold time). Wrap Up Time: The amount of time agents spent in the Wrap-up state after an inbound call during the time interval. Average Connected Time: Inbound connected time divided by the number of inbound calls that were connected during the time interval. Average Handle Time: The average length of time spent handling an inbound call (inbound connected time plus inbound wrap-up time, divided by number of inbound calls). |
Real-time Agent Interval reports |
||
|
Inbound Average Handle Time |
The average length of time spent handling a call (total connected time plus total hold time and total wrap-up time, divided by connected count). |
Snapshot/Agent view |
||
|
Inbound Avg Handle Time |
The average length of time spent handling an inbound call (Total Inbound Connected Time plus Total Wrap Up Time, divided by Inbound Connected Count). |
Historical Agent Summary & Interval reports; ADR; Agent Trace report |
||
|
Inbound Connected |
Hold Count: The number of times an agent put an inbound caller on hold. Connected Count: The number of inbound calls that were connected to an agent. Total Talk Time: The total amount of time an agent was talking with a caller. Total Hold Time: The total amount of time inbound calls were on hold. Total Time: The total amount of time agents were connected to inbound calls. Average Hold Time: (Not in ADR or Snapshot/Agent view or Agent Trace report) The average hold time for inbound calls (Total Hold Time divided by Hold Count). Average Time: (Not in ADR or Snapshot/Agent view) The average inbound connected time (Total Time divided by Connected Count). % Talk Time: (Only in ADR and Agent Trace report) The percentage of inbound connected time the agent was talking with the caller. % Hold Time: (Only in ADR) The percentage of inbound connected time the caller was on hold. % Time: (Only in ADR) The percentage of time the agent was connected to an inbound call. |
Historical Agent Summary & Interval reports; ADR; Snapshot/Agent view; Agent Trace report |
||
|
Inbound Consult |
Count: The number of times an agent answered a consult request plus the number of times an agent consulted other agents. Total Time: Total Consult Answer Time plus Total Consult Request Time. |
Snapshot/Agent view |
||
|
Inbound Consult Answer |
Count: The number of times an agent answered a consult request from another agent handling an inbound call. Total Time: The total amount of time an agent spent answering consult requests from agents handling inbound calls. |
Snapshot/Agent view |
||
|
Inbound Consult Request |
Count: The number of times an agent sent a consult request to another agent during an inbound call. Total Time: The total amount of time an agent spent consulting other agents during inbound calls. |
Snapshot/Agent view |
||
|
Inbound CTQ |
Count: Inbound CTQ Answer Count plus Inbound CTQ Request Count. Total Time: Total Inbound CTQ Answer Time plus Total Inbound CTQ Request Time. |
Snapshot/Agent view |
||
|
Inbound CTQ Answer |
Count: The number of times an agent answered a consult-to-queue request from an agent who was handling an inbound call. Total Time: The total amount of time an agent spent answering consult-to-queue requests from agents handling inbound calls. |
Snapshot/Agent view; Historical Agent Summary & Interval reports; ADR |
||
|
Inbound CTQ Request |
Count: The number of times an agent initiated a consult to queue while handling an inbound call. Total Time: The total amount of time between when an agent initiated consult-to-queue requests while handling inbound calls and when the consultations ended. |
Snapshot/Agent view; Historical Agent Summary & Interval reports; ADR |
||
|
Inbound Reserved |
Count: (Not in ADR or Agent Trace report) The number of times an agent went into the Inbound Reserved state, during which a call is coming in to an agent’s station but has not yet been answered. Total Time: The total amount of time an agent spent in the Reserved state. Average Time: The average length of time agents were in the Inbound Reserved state (Total Available Time divided by Available Count). % Time: (Only in ADR and Agent Trace report) The percentage of time the agent was in the Inbound Reserved state. |
Snapshot/Agent view |
||
|
Inbound Transfers |
The number of inbound calls the agent transferred to another agent, queue, or number. |
Snapshot/Agent view |
||
|
Inbound Wrap Up |
Count: The number of times an agent went into the Wrap-up state after an inbound call. In the Snapshot/Agent view, you can rest the cursor over a number in this column to see the wrap-up codes the agent entered and how many times each code was used. Total Time: The total amount of time an agent spent in the Wrap-up state after an inbound call. Average Time: (Not in ADR, Agent Trace report, or Snapshot/Agent view) The average length of time agents were in the Wrap-up state after an inbound call (Total Wrap Up Time divided by Wrap Up Count). % Time: (Only in ADR and Agent Trace report) The percentage of time the agent was in the Wrap-up state after an inbound call. |
Historical Agent Summary & Interval reports; ADR; Agent Trace report; Snapshot/Agent view |
||
|
Initial Login Time |
The date and time the agent signed in. |
Historical Agent Summary/Agent level |
||
|
Login Count |
Total number of times an agent sined in on that day. Appears only if Agents is selected in the Display Results By drop-down list. |
Historical Agent Summary/Agent level |
||
|
Login Time |
The date and time the agent logged in to the Agent Desktop. |
Snapshot/Team, Agent, & Skill views; ADR; Agent Trace report |
||
|
Logout Time |
The date and time the agent signed out of the Agent Desktop. |
ADR; Agent Trace report |
||
|
Not Responding |
The number of agents currently in the Not Responding state. |
Snapshot/Site & Skills by Team views |
||
|
Not Responding |
Count: The number of times an agent was in the Not Responding state. Total Time: The total amount of time an agent spent in the Not Responding state. Average Time: (Not in ADR or Snapshot/Agent view or Agent Trace report) The average length of time agents were in the Not Responding state (Total Not Responding Time divided by Not Responding Count). % Time: (Only in ADR and Agent Trace report) The percentage of time the agent was in the Not Responding state. |
Historical Agent Summary & Interval reports; ADR; Agent Trace report; Snapshot/Agent view |
||
|
Not Responding Time |
The amount of time agents spent in the Not Responding state during the time interval. |
Real-time Agent Interval reports |
||
|
Number of Calls |
The number of inbound calls that were connected to the site or team during the time interval. |
Real-time Skills Interval by Team |
||
|
Occupancy |
The measure of time the agent spent on calls compared to available and idle time, calculated by dividing total connected time (inbound connected time plus outdial connected time) plus total wrap up time (inbound wrap-up time plus outdial wrap up time) by staff hours. |
Snapshot/Agent view; Real-time Agent Interval reports; Historical Agent Summary, Agent Interval, ADR, & Agent Trace report |
||
|
Occupancy |
The measure of time the agent spent on calls compared to available and idle time, calculated by dividing inbound connected time plus inbound wrap up time by staff hours. |
Real-time Skills Interval by Team |
||
|
Out Time |
The time the agent left the state. |
Agent Trace report |
||
|
Outdial |
Attempted: The number of calls that agents initiated during the time interval. Connected: The number of outdial calls that were connected to an agent during the time interval. Reserved Time: The amount of time agents were in the Outdial Reserved state, a state indicating that the agent has initiated an outdial call, but the call is not connected yet. Talk Time: The amount of time agents were talking on outdial calls during the time interval. Hold Tim: The amount of time outdial calls were on hold during the time interval. Connected Time: The amount of time outdial calls were connected to an agent during the time interval (outdial talk time plus outdial hold time). Average Connected Time: Outdial connected time divided by the number of outdial calls that were connected during the time interval. Wrap Up Time: The amount of time agents spent in the Wrap-up state after an outdial call during the time interval. Average Handle Time: The average length of time spent handling an outdial call (outdial connected time plus outdial wrap up time, divided by number of outdial calls). |
Real-time Agent Interval reports |
||
|
Outdial Avg Handle Time |
The average length of time spent handling an outdial call (Total Outdial Connected Time plus Total Outdial Wrap Up Time, divided by Outdial Connected Count). |
Historical Agent Summary, Agent Interval, ADR, & Agent Trace report |
||
|
Outdial Conference |
The number of outdial calls the agent conferenced with another party. |
Snapshot/Agent view |
||
|
Outdial Connected |
Attempted Count: The number of times an agent attempted to make an outdial call. Connected Count: The number of outdial calls that were connected to an agent. Hold Count: The number of times an agent put an outdial call on hold. Total Talk Time: The total amount of time an agent was talking with a party on an outdial call. Total Hold Time: The total amount of time outdial calls were on hold. Total Time: The total amount of time agents were connected to outdial calls. Average Hold Time: (Not in ADR, Agent Trace report, or Snapshot/Agent view) The average hold time for outdial calls (Total Hold Time divided by Hold Count). Average Time. (Not in ADR, Agent Trace report, or Snapshot/Agent view) The average outdial connected time (Total Time divided by Connected Count). |
Historical Agent Summary & Interval reports; ADR; Agent Trace report; Snapshot/Agent view |
||
|
Outdial Consult |
Count: Outdial Consult Answer count plus Outdial Consult Request count. Total Time: Total Outdial Consult Answer Time plus Total Outdial Consult Request Time. |
Snapshot/Agent view |
||
|
Outdial Consult Answer |
Count: The number of times the agent answered a consult request from another agent who was on an outdial call. Total Time: The amount of time the agent was consulted by another agent who was on an outdial call. |
Snapshot/Agent view |
||
|
Outdial Consult Request |
Count: The number of times the agent consulted another agent while on an outdial call. Total Time: The amount of time the agent consulted another agent during an outdial call. |
Snapshot/Agent view |
||
|
Outdial CTQ |
Count: Outdial CTQ Answer Count plus Outdial CTQ Request Count. Total Time: Total Outdial CTQ Answer Time plus Total Outdial CTQ Request Time |
Snapshot/Agent view |
||
|
Outdial CTQ Answer |
Count: The number of times an agent answered a consult-to-queue request from an agent who was handling an outdial call. Total Time: The total amount of time an agent spent answering consult-to-queue requests from agents handling outdial calls. |
Snapshot/Agent view; Historical Agent Summary & Interval reports; ADR |
||
|
Outdial CTQ Request |
Count: The number of times an agent initiated a consult to queue while handling an inbound call. Total Time: The total amount of time between when an agent initiated consult-to-queue requests while handling inbound calls and when the consultations ended. |
Snapshot/Agent view; Historical Agent Summary & Interval reports; ADR |
||
|
Outdial Reserved |
Count: The number of times an agent was in the Outdial Reserved state, a state indicating that the agent has initiated an outdial call, but the call is not connected yet. Total Time: The total amount of time an agent was in the Outdial Reserved state. Average Time: (Not in ADR, Agent Trace report, or Snapshot/Agent view) The average amount of time agents were in the Outdial Reserved state (Total Time divided by Count). |
Historical Agent Summary & Interval reports; ADR; Agent Trace report; Snapshot/Agent view |
||
|
Outdial Transfers |
The number of outdial calls the agent transferred to another agent, queue, or number. |
Snapshot/Agent view |
||
|
Outdial Wrap Up |
Count: The number of times an agent went into the Wrap-up state after an outdial call. Total Time: The total amount of time an agent spent in the Wrap-up state after an outdial call. Average Time: (Not in ADR, Agent Trace report, or Snapshot/Agent view) The average length of time agents were in the Wrap-up state after an outdial call (Total Outdial Wrap Up Time divided by Outdial Wrap Up Count). |
Historical Agent Summary & Interval reports; ADR; Agent Trace report; Snapshot/Agent view |
||
|
Queue |
If the agent is currently handling a call, the name of the queue that the call came in on. |
Snapshot/Team, Agent, & Skill views |
||
|
Reason |
The reason the agent logged out. For example:
Other reasons can occasionally occur. |
ADR; Agent Trace report |
||
|
Reserved |
The number of agents currently in the Reserved state, during which a call is coming in but has not yet been answered. |
Snapshot/Site view & Skills by Team view |
||
|
Reserved |
The number of agents in the Reserved state who possess the skill. |
Snapshot/Skill view |
||
|
Site |
The name of a site. If your enterprise uses the Multimedia feature and the report includes more than one media channel, you can click the a collapse arrow or expand arrow to the left of a team name to collapse or expand the data grouped by channel type. In the Site view of a current snapshot agent report, you can do the following:
|
Snapshot/Site view; Real-time Agent Interval reports (except Agent-level) |
||
|
Site |
The site where the team the agent was handling calls for is located. |
ADR; Agent Trace report |
||
|
Skill |
The name of the skill. In the Skill view of the current snapshot agent report you can do the following:
|
Snapshot/Skill view; Real-time Skills Interval by Team |
||
|
Staff Hours |
The amount of time the agent has been logged in. |
Snapshot/Team, Agent, & Skill views |
||
|
Staff Hours |
The amount of time the agent was logged in during the time interval. |
Real-time Agent Interval reports & Skills Interval by Team |
||
|
Staff Hours |
The total amount of time agents were logged in. |
Historical Agent Summary & Interval reports |
||
|
Staff Hours |
The amount of time the agent was logged in during each login session. |
ADR; Agent Trace report |
||
|
State |
The time the agent logged in and logged out and each state the agent was in during the login session:
|
Agent Trace report |
||
|
Talk |
The number of agents in the Connected state who are currently talking with a caller. |
Snapshot/Site & Skills by Team views |
||
|
Talk Time |
The amount of time agents were talking with callers during the time interval. |
Real-time Skills Interval by Team |
||
|
Team |
The name of a team in the report. In the Team view and Skills by Team view of a current snapshot agent report you can do the following:
In the Team view, you can click the name of an agent to drill-down to the Agent view for that agent. |
Snapshot/Team view & Skills by Team view; Real-time Agent Interval report/Team & Skills by Team level |
||
|
Team |
The team the agent was handling calls for. |
ADR; Agent Trace report |
||
|
Time in Current State |
The amount of time the agent has been in the current state. |
Snapshot/Team, Agent, & Skill views |
||
|
Total Calls |
Inbound Answered calls plus Outdial Attempted calls. |
Real-time Agent Interval reports |
||
|
Total Logged In |
The number of agents currently logged in or, in the Skill view, the number of agents currently logged in who possess the skill. |
Snapshot/Site, Team, Skill, & Skills by Team views |
||
|
Channels Logged In |
The number of media channels to which agents are currently logged in. Appears only if your enterprise uses the Multimedia feature. |
Snapshot/Site, Team, Skill, & Skills by Team views |
||
|
Wrap Up |
The number of agents currently in the Wrap-up state. |
Snapshot/Site & Skills by Team view |
||
|
Wrap Up Time |
The amount of time agents spent in the Wrap-up state after an inbound call during the time interval. |
Real-time Skills Interval by Team |
Historical Skill Report Parameters
The following table describes the parameters available in Webex Contact Center historical Skills by Queues reports. Asterisks (*) mark parameters that are available only in a skill summary report, which you can display by drilling down on a skill name in a Skills by Queue report.
|
Parameter |
Description |
Report |
|---|---|---|
|
% Calls Matched |
The percentage of calls for which the initial value of the skill required by the call was equal to the final value when the call was distributed to an agent. (Matched Calls * 100)/ (Connected + Abandoned + Reclassified) |
Skills by Queue |
|
Abandoned |
The number of calls with this skill requirement that were abandoned during the report interval. |
Skills by Queue |
|
Abandoned within SL |
The number of calls that were terminated while in queue within the Service Level threshold provisioned for this skill. |
Skills by Queue |
|
Avg Handle Time |
The average length of time spent handling a call with this skill requirement (total connected time plus total wrap-up time, divided by calls handled). |
Skills by Queue & Skills by Agents |
|
Connected |
The number of calls with this skill requirement that were connected during the report interval. |
Skills by Queue & Skills by Agents |
|
Connected within SL |
The number of calls with this skill requirement that were connected within the Service Level threshold provisioned for this skill. |
Skills by Queue & Skills by Agents |
|
Final Operand* |
The skill operand type that was assigned to the call when it was distributed to an agent with a matching skill. |
Skills by Queue |
|
Final Value* |
The value of the skill requirement assigned to the call when the call was distributed to an agent. |
Skills by Queue |
|
Initial Operand* |
The skill operand type that was assigned to the call when it was distributed to the queue. Possible values:
|
Skills by Queue |
|
Initial Value* |
The value of the skill requirement assigned to the call when it arrived in the queue. |
Skills by Queue |
|
Operand |
The skill operand type that was assigned to the call when it was distributed to the agent. Possible values:
|
Skills by Agents |
|
Reclassified |
The number of calls with this skill requirement that were transferred from the queue by the system. |
Skills by Queue |
|
Reclassified within SL |
The number of calls with this skill requirement that were transferred from the queue by the system within the Service Level threshold provisioned for the skill. |
Skills by Queue |
|
Skill |
The name of a skill. In a Skills by Queue report, you can click an entry in this column to drill down to view daily activity for the month (from a monthly summary) or to view half-hourly data for a day (from a daily summary). |
Skills by Queue Skills by Agents |
|
Total |
The total number of calls. |
Skills by Queue |
|
Value |
The value of the skill requirement assigned to the call when the call was distributed to the agent. |
Skills by Agents |
Historical Threshold Alerts Report Parameters
If your enterprise uses the threshold alerts feature and your user profile authorizes you to view alerts, you can use the controls on the Threshold Alerts page of the Historical Reports module to display details about threshold alerts that were triggered between midnight of the current day and three months ago. The following table describes the available parameters.
|
Parameter |
Description |
|---|---|
|
Acknowledged |
Whether or not a supervisor acknowledged the alert. |
|
Acknowledged Time |
The time the alert was acknowledged. |
|
Actual Value |
The actual value that triggered the alert. |
|
Archived |
Whether or not a supervisor archived the alert. |
|
Comments |
Optional comments, if any, entered by the supervisor who acknowledged the alert. |
|
Metric |
The metric that the threshold is associated with. |
|
Operand |
> (greater than) >= (greater than or equal to) < (less than) <= (less than or equal to) = (equal to) |
|
Supervisor |
The name of the supervisor who acknowledged the alert. |
|
Time |
The date and time that the threshold alert was triggered. |
|
Trigger Interval |
The number of seconds specified in the threshold rule as the interval during which the system should generate only one alert for the threshold rule check. |
|
Trigger Value |
The value that the threshold rule defined as the trigger. |
Usage Metrics Report Parameters
The following table describes the parameters available in the Usage Metrics Report.
|
Column |
Description |
|---|---|
|
Calls Duration (min) |
The total amount of time between when inbound calls arrived or outdial calls were placed and when they were terminated. |
|
Inbound |
Total Calls: The total number of inbound calls. Connected Calls: The number of inbound calls that were connected to an agent. IVR Duration (min): The number of minutes during which calls were in the IVR system. Queue Duration (sec): The number of seconds during which calls were in a queue. Talk Time (min): The number of minutes during which agents were talking with callers. Hold Time (min): The number of minutes during which inbound calls were on hold. |
|
Month |
The month during which the call activity occurred. |
|
Outdial |
Total Calls: The total number of outdial calls. Connected Calls: The number of outdial calls that were connected to an agent. Talk Time (min): The number of minutes during which an agent was talking with a party on an outdial call. Hold Time (min): The number of minutes during which outdial calls were on hold. |
|
Recorded Calls |
The number of calls that were recorded. |
|
Total Calls |
The total number of inbound and outdial calls. |


