Unified CCE Administration
Provision Unified CCE Using Unified CCDM
Complete the following procedures to provision the Unified CCE using Unified Contact Center Domain Manager (Unified CCDM).
CRUD Operations for Unified CCDM Objects
 Note |
Bulk upload supports only the create operation. See Bulk Operations Using Unified CCDM. You cannot edit any default resources in CCDM portal. |
| Object | Create | Read | Update | Delete | Bulk Upload |
|---|---|---|---|---|---|
| Bucket Interval, see Configure Call Type. | x | ||||
| ECC Variables, see Configure Expanded Call Variable. | x | x | x | x | |
| Network VRU Script, see Configure Network VRU Scripts. | x | x | x | x | x |
| Call Type, see Create a Call Type. | x | x | x | x | x |
| Dialed Number, see Configure Dialed Number. | x | x | x | x | x |
| Skill Group, see Configure Skill Group. | x | x | x | x | x |
| Folder, see Configure Folder. | x | x | x | x | x |
| Group, see Configure Group. | x | x | x | x | |
| Agent, see Configure Agents. | x | x | x | x | x |
| Agent Desktop, see Configure Agent Desktop. | x | x | x | x | x |
| Agent Team, see Configure Agent Team. | x | x | x | x | x |
| Person, see Configure Person. | x | x | x | x | x |
| User, see Configure User. | x | x | x | x | x |
| User Variable, see Configure User Variable. | x | x | x | x | x |
| Enterprise Skill Group, see Configure Enterprise Skill Group. | x | x | x | x | x |
| Label, see Configure Label. | x | x | x | x | x |
| Attribute, see Configure Precision Attribute. | x | x | x | x | x |
| Precision Queue, see Configure Precision Queue. | x | x | x | x | x |
| Service, see Configure Service | x | x | x | x |
Configure User
Complete the following procedures to configure a user:
Create User
Note |
Login as administrator to create tenant/sub customer user. |
Procedure
| Step 1 |
In Unified CCDM portal, click burger icon in the top-left corner and select . |
| Step 2 |
Select the tenant in which you have to create user and click New. |
| Step 3 |
Enter Login Name. |
| Step 4 |
Enter First Name, Last Name and Description. |
| Step 5 |
From Culture drop-down list, select English (United States) option. |
| Step 6 |
Check the following check boxes: Advanced Mode
|
| Step 7 |
In User Home Folder field, ensure that selected path is correct. Ensure that Create a new folder for this user check box is unchecked. |
| Step 8 |
Enter Password and Confirm the password. |
| Step 9 |
Click Save. |
Configure an Imported Unified CCE User
After integration of Unified CCE with Unified CCDM, Unified CCDM import existing Unified CCE users. All imported users are located in default import location, move the imported users to appropriate tenants/folders.
Follow the below steps to configure imported users.
Procedure
| Step 1 |
In Unified CCDM, locate the imported Unified CCE user. Edit the username of Unified CCDM as follows: <username>@<domainname>, where username is a windows username and domainname is a fully qualified windows domain name. Example: |
||
| Step 2 |
Select the user to view the details. |
||
| Step 3 |
Select Details tab and check the following check boxes:
|
||
| Step 4 |
Click Save to update the user details for the linked Unified CCDM user.
|
Assign Roles to Users
Follow the below procedure to assign corresponding roles to the user:
Procedure
| Step 1 |
In Unified CCDM portal, click burger icon in the top-left corner and select . |
| Step 2 |
Select newly created user from the list. |
| Step 3 |
Select Group tab, click Add to Group. |
| Step 4 |
Select the tenant/folder that has a user you want to assign roles. |
| Step 5 |
Check Basic Users check box to provide basic permission for the tenant. |
| Step 6 |
Check Advanced Users check-box for a tenant/ISE user and click OK. Default, advanced users will have Browse Dimension permission. |
| Step 7 |
Check Supervisors check-box for a supervisor user and click OK. |
| Step 8 |
Click Save. |
Assign Permission to Sub-customer Tenant and User
Procedure
| Step 1 |
Log in to CCDM Web portal. |
| Step 2 |
Click burger icon. |
| Step 3 |
Select . |
| Step 4 |
Select the sub-customer tenant and click Permission tab, uncheck Inherit Permissions from /Root and click OK. Repeat this step for . |
| Step 5 |
Select newly added user and click Group tab. |
| Step 6 |
Click Add to Groups. |
| Step 7 |
Click and enable Basic Users permissions. |
| Step 8 |
Click the sub-customer tenant and assign Advanced Users permissions and click OK. Default, Advanced User will have Browse Dimension permission. |
| Step 9 |
Click Save. |
Edit User
Follow the below procedure to edit user:
Procedure
| Step 1 |
In Unified CCDM portal, click burger icon in the top-left corner and select . |
| Step 2 |
From the folder tree, select the folder containing the user that you want to edit. |
| Step 3 |
Select the user you want to edit. |
| Step 4 |
Click Details tab. |
| Step 5 |
Edit the required details. |
| Step 6 |
Click Groups tab, to add or remove the groups. |
| Step 7 |
Click Save. |
Delete User
Follow the below procedures to delete users:
Procedure
| Step 1 |
In Unified CCDM portal, click burger icon in the top-left corner and select . |
| Step 2 |
From folder tree on left, select the folder containing the user that you want to delete. |
| Step 3 |
Select the user that you want to delete. |
| Step 4 |
Click Delete and click Yes. |
Configure Departments
Create a Department
Procedure
| Step 1 |
Log in to CCDM portal as Tenant Administrator. |
| Step 2 |
Click the burger icon and select |
| Step 3 |
Select the required Folder from the Tenant. Click Resource and select Department. |
| Step 4 |
Enter the name of the department and complete the mandatory fields. |
| Step 5 |
Click Save. |
Edit a Department
Procedure
| Step 1 |
Log in to CCDM portal as Tenant Administrator. |
| Step 2 |
Click the burger icon and select |
| Step 3 |
Expand the required Folder from the Tenant. Click Department. |
| Step 4 |
Select the department that you want to edit and modify the required fields. |
| Step 5 |
Click Save. |
Move a Department
Procedure
| Step 1 |
Log in to CCDM portal as Tenant Administrator. |
| Step 2 |
Click the burger icon and select |
| Step 3 |
Expand the required Folder from the Tenant. Click Department. |
| Step 4 |
In Department tab, check the department you want to move and click Move. |
| Step 5 |
Browse to the destination folder you want the department to be moved and click Save and click Ok. |
Delete a Department
Procedure
| Step 1 |
Log in to CCDM portal as Tenant Administrator. |
| Step 2 |
Click the burger icon and select |
| Step 3 |
Expand the required Folder from the Tenant. Click Department. |
| Step 4 |
In the Department tab, Select the department that you want to delete. |
| Step 5 |
Click Delete and click Ok. |
Configure Agents
Complete the following procedures for agent configuration:
Create an Agent
Complete the following procedure to create an agent:
Procedure
| Step 1 |
Log in to CCDM portal as tenant or sub customer user or Supervisor user. |
| Step 2 |
Click the burger icon and select Provisioning. |
| Step 3 |
Create an agent.
|
| Step 4 |
Click the Details tab and configure as follows: |
| Step 5 |
To make agent a supervisor, click Supervisor tab and check the Supervisor checkbox. If supervisor is a non-SSO agent, do the following: |
| Step 6 |
Click the Agent Teams tab and configure the following: |
| Step 7 |
Click the Skill Groups tab and configure the following:
|
| Step 8 |
Click Save. |
Edit an Agent
Procedure
| Step 1 |
Log in to Unified CCDM Portal as Tenant or Sub Customer user. |
| Step 2 |
Click the burger icon and select . |
| Step 3 |
In Resource Manager, in the folder tree panel, select the folder where you want to edit the agent. |
| Step 4 |
In Items panel, select the agent from the list. |
| Step 5 |
Edit the agent details. Clicking a different tab (such as Supervisor or Agent Teams) shows a different set of fields. You can return to previous tabs if necessary. |
| Step 6 |
Click Save. |
Delete an Agent
Complete the following procedure to delete an agent.
Procedure
| Step 1 |
Log in to Unified CCDM Portal as Tenant or Sub Customer user. |
| Step 2 |
Click the burger icon and select . |
| Step 3 |
In Resource Manager, navigate to the folder containing the Agent you want to delete, and view the agents in that folder using the Items panel list view. |
| Step 4 |
In the Items panel, check the required agent check boxes that you want to delete. |
| Step 5 |
Click Delete. |
| Step 6 |
Click Yes to delete the agent. |
Configure Agent Desktop
Complete the following procedures to configure an agent desktop:
Create an Agent Desktop
Complete the following procedure to create an agent desktop.
Procedure
| Step 1 |
Login to Unified CCDM Portal as Tenant or Sub customer user and select Resource Manager. |
| Step 2 |
In Resource Manager, in the Folder Tree panel, select the folder where you want to create the agent desktop. |
| Step 3 |
Click Resource, and click Agent Desktop. |
| Step 4 |
Complete the required fields. |
| Step 5 |
Click Save. |
Edit an Agent Desktop
Complete the following procedure to edit an agent desktop.
Procedure
| Step 1 |
Log in to Unified CCDM Portal as Tenant or Sub Customer user. |
| Step 2 |
Click the burger icon and select . |
| Step 3 |
Select the folder that contains the agent desktop you want to edit, and view the agent desktops in that folder using the Items panel list view. |
| Step 4 |
In the Items panel, click the agent desktop you want to edit. The details of this agent desktop appears in the Details panel. |
| Step 5 |
In the Details tab, click the appropriate tab and make the required changes. |
| Step 6 |
Click Save. |
Delete an Agent Desktop
Complete the following procedure to delete the agent desktop.
Procedure
| Step 1 |
Log in to Unified CCDM Portal as Tenant or Sub Customer user. |
||
| Step 2 |
Click the burger icon and select . |
||
| Step 3 |
Select the folder that contain the agent desktop you want to delete, and view the agent desktops in that folder using the Items panel list view. |
||
| Step 4 |
In the Items panel, check the check box or check boxes of the agent desktops you want to delete. |
||
| Step 5 |
Click Delete and Click Yes.
|
Configure Agent Team
Create an Agent Team
Complete the following procedure to create an agent team:
Procedure
| Step 1 |
Log in to Unified CCDM Portal as Tenant or Sub Customer user. |
| Step 2 |
Click the burger icon and select . |
| Step 3 |
In the folder tree panel, select the folder where you want to create the agent team. |
| Step 4 |
Click Resource, and then click Agent Team. |
| Step 5 |
Enter a unique name for the team. |
| Step 6 |
Enter all the required fields to create the agent team. |
| Step 7 |
To assign agents to the team, check the check boxes of one or more agents in the Agents tab, and click Add. |
| Step 8 |
When you add an agent to the team, you must also check their Member check box to make them a member of the team. This is because it is possible to be involved with a team without being a member, by supervising it. If an agent is a supervisor, a drop-down list appears in the right-hand column. |
| Step 9 |
Specify whether the agent has a supervisory role for this particular team. |
| Step 10 |
Click Save. |
Edit an Agent Team
Complete the following procedure to edit an agent team.
Procedure
| Step 1 |
Log in to Unified CCDM Portal as Tenant or Sub Customer user. |
| Step 2 |
Click the burger icon and select . |
| Step 3 |
Select the folder that contain the agent team you want to edit, and view the agent teams in that folder using the Items panel list view. |
| Step 4 |
In the Items panel, click the agent team you want to edit. The details of this agent team appear in the Details panel. |
| Step 5 |
Click through the tabs and edit the fields you want to change. |
| Step 6 |
To remove agents from a team, click the Agents tab and check the check boxes of the agents you wish to remove from the team and click Remove. |
| Step 7 |
Click Save. |
Delete an Agent Team
Complete the following procedure to delete an agent team
Procedure
| Step 1 |
Log in to Unified CCDM Portal as Tenant or Sub Customer user. |
| Step 2 |
Click the burger icon and select . |
| Step 3 |
Select the folder that contains the agent teams you want to delete, and view the agent teams in that folder using the Items panel list view. |
| Step 4 |
In Items panel, check the check box or check boxes of the agent teams you want to delete. |
| Step 5 |
Click Delete. Delete Agent Teams confirmation dialog box appears. |
| Step 6 |
Click Yes to delete the agent teams. |
Configure Call Type
Create a Call Type
Complete the following procedure to create a call type.
Procedure
| Step 1 |
Log in to Unified CCDM Portal as Tenant or Sub Customer user. |
| Step 2 |
Click the burger icon and select . |
| Step 3 |
In folder tree panel, select a folder where you want to create the call type. |
| Step 4 |
Click Resource, and then click Call Type. |
| Step 5 |
Enter the following details: |
| Step 6 |
Click Save. |
Edit a Call Type
Complete the following procedure to edit a call type.
Procedure
| Step 1 |
Log in to Unified CCDM Portal as Tenant or Sub Customer user. |
| Step 2 |
Click the burger icon and select . |
| Step 3 |
Select the folder that contain call types that you want to delete, and view the call types in that folder using the Items panel list view. |
| Step 4 |
In Items panel, select the call types you want to edit. |
| Step 5 |
Click through the tabs and edit the fields you want to change. |
| Step 6 |
Click Save. |
Delete a Call Type
Complete the following procedure to delete a call type.
Note |
You cannot delete the default call type. |
Procedure
| Step 1 |
Log in to Unified CCDM Portal as Tenant or Sub Customer user. |
| Step 2 |
Click the burger icon and select . |
| Step 3 |
Select the folder containing the call types you want to delete and under Summary in Items panel list view click Call Type . |
| Step 4 |
In Items panel, select the call types you want to delete. |
| Step 5 |
Click Delete and click Yes. |
Configure Precision Routing
Complete the following procedures to configure precision routing.
Configure Precision Attribute
Complete the following procedures to configure precision attribute.
Create Precision Attribute
Complete the following procedure to create a precision attribute.
Procedure
| Step 1 |
Log in to Unified CCDM Portal as Tenant or Sub Customer user. |
| Step 2 |
Click the burger icon and select . |
| Step 3 |
Select the required tenant to create precision attribute. |
| Step 4 |
Click Resource, and click Precision Attribute. |
| Step 5 |
Provide a Name for the precision attribute. For example, ENGLISH. |
| Step 6 |
Enter the Description for the precision attribute. |
| Step 7 |
Select the Data Type for the precision attribute. For example, Proficiency. |
| Step 8 |
Select the Default Value from the drop-down list. |
| Step 9 |
Click Save. |
Edit Precision Attribute
Complete the following procedure to edit a precision attribute.
Procedure
| Step 1 |
Log in to Unified CCDM Portal as Tenant or Sub Customer user. |
||
| Step 2 |
Click the burger icon and select . |
||
| Step 3 |
In Resource Manager, select the folder containing the precision attribute you want to edit, and view the precision attributes in that folder using the Items panel list view. |
||
| Step 4 |
In the Items panel, click the precision attribute you want to edit. The details of this precision attribute appears in the Details panel. |
||
| Step 5 |
In the Details panel, click the appropriate tab and make the desired changes. |
||
| Step 6 |
Click Save.
|
Delete Precision Attribute
Complete the following procedure to delete a precision attribute.
Procedure
| Step 1 |
Log in to Unified CCDM Portal as Tenant or Sub Customer user. |
||
| Step 2 |
Click the burger icon and select . |
||
| Step 3 |
In Resource Manager, select the folder containing the precision attribute you want to delete, and view the precision attributes in that folder using the Items panel list view. |
||
| Step 4 |
In Items panel, check the check boxes of the precision attributes that you want to delete. |
||
| Step 5 |
Click Delete.
|
||
| Step 6 |
Click Yes. |
Assign Precision Attribute to an Agent
Complete the following procedure to assign the precision attribute to an agent.
Procedure
| Step 1 |
Log in to Unified CCDM Portal as Tenant or Sub Customer user. |
||
| Step 2 |
Click the burger icon and select . |
||
| Step 3 |
In Resource Manager, navigate to the folder containing the agent to which you want to assign the precision attribute and view the agent in that folder using the Items panel list view. |
||
| Step 4 |
In the Items panel, click the agent to which you want to assign the precision attribute. The details of this agent appear in the Details panel. |
||
| Step 5 |
In the Details panel, click Precision Attribute. Check the check box against the precision attribute tab and click Add. |
||
| Step 6 |
Click Save.
|
Configure Precision Queue
Complete the following procedures to configure precision queue.
Create Precision Queue
Procedure
| Step 1 |
Log in to Unified CCDM Portal as Tenant or Sub Customer user. |
||
| Step 2 |
Click the burger icon and select . |
||
| Step 3 |
Select the required tenant to create the precision queue. |
||
| Step 4 |
Click Resource, and click Precision Queue. A new page appears. |
||
| Step 5 |
Complete the required fields |
||
| Step 6 |
Select the Steps tab and click Step1. A new page appears. |
||
| Step 7 |
In the Expression1 field, provide the attribute name and select the operation from the drop-down list and also select Proficiency level from the drop-down list. For example, Attribute = ENGLISH, Operation is >, and Proficiency level is 6.
|
||
| Step 8 |
Click OK. |
||
| Step 9 |
Click Save. |
Edit Precision Queue
Complete the following procedure to edit a Precision Queue.
Procedure
| Step 1 |
Log in to Unified CCDM Portal as Tenant or Sub Customer user. |
| Step 2 |
Click the burger icon and select . |
| Step 3 |
In Resource Manager, select the folder containing the Precision Queue you want to edit, and view the Precision Queue in that folder using the Items panel list view. |
| Step 4 |
In the Items panel, click the Precision Queue that you want to edit. The details of this Precision Queue appears in the Details panel. |
| Step 5 |
In the Details panel, click the appropriate tab and make the desired changes. |
| Step 6 |
Click Save. |
Delete Precision Queue
Complete the following procedure to delete the Precision Queue.
Note |
You cannot delete a precision queue that is referenced in a routing script, remove the reference to delete the precision queue. |
Procedure
| Step 1 |
Log in to Unified CCDM Portal as Tenant or Sub Customer user. |
| Step 2 |
Click the burger icon and select . |
| Step 3 |
In Resource Manager, navigate to the folder containing the Precision Queue you want to delete and view the Precision Queue in that folder using the Items panel list view. |
| Step 4 |
In the Items panel, check the check boxes of the Precision Queue that you want to delete. |
| Step 5 |
Click Delete. |
| Step 6 |
Click Yes. |
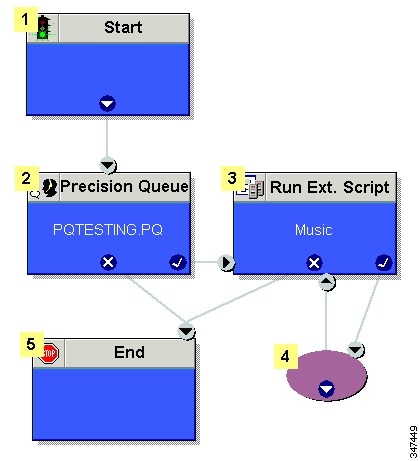
Create Routing Scripts
See the following illustration to create routing scripts:
Configure Network VRU Scripts
Create Network VRU Script
Complete the following procedure to set up the network VRU script.
Procedure
| Step 1 |
Log in to Unified CCDM Portal as Tenant or Sub Customer user. |
||
| Step 2 |
Click the burger icon and select . |
||
| Step 3 |
Select the folder where you want to create the network VRU Script. |
||
| Step 4 |
Select Resource, and click Network Vru Script. |
||
| Step 5 |
Complete fields as follows:
|
||
| Step 6 |
Click Save. |
Edit Network VRU Scripts
Complete the following procedure to edit Network VRU details and associate an audio file with a VRU script:
Procedure
| Step 1 |
Log in to Unified CCDM Portal as Tenant or Sub Customer user. |
| Step 2 |
Click the burger icon and select . |
| Step 3 |
Select the folder containing the Network VRU script you want to edit. |
| Step 4 |
In the Items panel, click the Network VRU script you want to edit. |
| Step 5 |
Click the Audio tab. |
| Step 6 |
Click Browse and select the audio file from your hard drive. |
| Step 7 |
Click Upload. |
| Step 8 |
After the file has uploaded, click Save. |
Delete Network VRU Scripts
Note |
You cannot delete the dialed number that is referenced in a script. This reference should be removed to delete the dialed number. |
Procedure
| Step 1 |
Log in to Unified CCDM Portal as Tenant or Sub Customer user. |
| Step 2 |
Click the burger icon and select . |
| Step 3 |
Select the folder containing the Network VRU script you want to delete. |
| Step 4 |
In the Items panel, click the Network VRU script you want to delete. |
| Step 5 |
Select the Delete option. |
| Step 6 |
Click Yes, to delete the Network VRU script. |
Configure Dialed Number
Complete the following procedures for dialed number configuration:
Create a Dialed Number
Complete the following procedure to create one or more dialed numbers.
Procedure
| Step 1 |
Log in to Unified CCDM Portal as Tenant or Sub Customer user. |
| Step 2 |
Click the burger icon and select . |
| Step 3 |
Select the folder where you want to create the dialed number. |
| Step 4 |
Click Resource, and then click Dialed Number. |
| Step 5 |
Enter unique name of up to 32 characters for the dialed number. This should consist alphanumeric characters, periods, and underscores only. For wild card dialed number follow the pattern below: Example: |
| Step 6 |
Complete fields as for the dialed number Fields. |
| Step 7 |
Click Add to specify the call types and other dialing information to be associated with this dialed number. |
| Step 8 |
Click Save. |
Edit a Dialed Number
Complete the following procedure to edit the dialed numbers.
Procedure
| Step 1 |
Log in to Unified CCDM Portal as Tenant or Sub Customer user. |
| Step 2 |
Click the burger icon and select . |
| Step 3 |
Select the folder where you want to edit, and view the dialed number in that folder using the Items panel list view. |
| Step 4 |
In the Items panel, select the dialed numbers that you want to edit. |
| Step 5 |
After modification, click Save. |
Delete a Dialed Number
Complete the following procedure to delete one or more dialed numbers.
Note |
You cannot delete the dialed number that is referenced in a script, remove the reference to delete the dialed number. |
Procedure
| Step 1 |
Log in to Unified CCDM Portal as Tenant or Sub Customer user. |
| Step 2 |
Click the burger icon and select . |
| Step 3 |
Select the folder containing the dialed numbers that you want to delete, and view the dialed numbers in that folder using the Items panel list view. |
| Step 4 |
In Items panel, select the dialed numbers to be deleted. |
| Step 5 |
Click Delete. |
| Step 6 |
Click Yes. |
Configure Enterprise Skill Group
Complete the following procedures for enterprise skill group configuration:
Create an Enterprise Skill Group
Complete the following procedure to create an enterprise skill group.
Procedure
| Step 1 |
Log in to Unified CCDM Portal as Tenant or Sub Customer user. |
| Step 2 |
Click the burger icon and select . |
| Step 3 |
Select the folder where you want to create the enterprise skill group. |
| Step 4 |
Click Resource, and then click Enterprise Skill Group. |
| Step 5 |
Enter a unique name for the group. |
| Step 6 |
Enter all the required fields to create an enterprise skill group. |
| Step 7 |
To assign skill groups to the group, click Add and select one or more skill groups. |
| Step 8 |
Click Save. |
Edit an Enterprise Skill Group Configuration
Complete the following procedure to edit an enterprise skill group.
Procedure
| Step 1 |
Log in to Unified CCDM Portal as Tenant or Sub Customer user. |
| Step 2 |
Click the burger icon and select . |
| Step 3 |
In the folder tree panel, select the folder where you want to edit, and view the enterprise skill groups in that folder using the Items panel list view. |
| Step 4 |
In the Items panel, select the enterprise skill groups that you want to edit. |
| Step 5 |
After modification, click Save. |
Delete an Enterprise Skill Group
Complete the following procedure to delete an enterprise skill group.
Procedure
| Step 1 |
Log in to Unified CCDM Portal as Tenant or Sub Customer user. |
| Step 2 |
Click the burger icon and select . |
| Step 3 |
Select the folder containing the enterprise skill groups you want to delete, and view the enterprise skill groups in that folder using the Items panel list view. |
| Step 4 |
In the Items panel, check the check box or check boxes of the enterprise skill groups you want to delete. |
| Step 5 |
Click Delete. |
| Step 6 |
Click Yes. |
Configure Expanded Call Variable
Complete the following procedures to configure an expanded call variable.
Create an Expanded Call Variable
Complete the following procedure to create an expanded call variable.
Procedure
| Step 1 |
Log in to Unified CCDM Portal as Tenant or Sub Customer user. |
||
| Step 2 |
Click the burger icon and select . |
||
| Step 3 |
Select the folder where you want to create the expanded call variable. |
||
| Step 4 |
Click Resource, and then click Expanded Call Variable. |
||
| Step 5 |
Enter the required information in the following fields:
|
||
| Step 6 |
In Advanced tab, set the end date for the call variable.
|
||
| Step 7 |
Click Save. |
Edit an Expanded Call Variable
Procedure
| Step 1 |
Log in to Unified CCDM Portal as Tenant or Sub Customer user. |
| Step 2 |
Click the burger icon and select . |
| Step 3 |
Select the folder where you want to modify the expanded call variable. |
| Step 4 |
Click Expanded Call Variable in the items panel. |
| Step 5 |
Select the Expanded Call Variable to modify. |
| Step 6 |
Modify the fields in Details tab as required. |
| Step 7 |
Click Save. |
Delete an Expanded Call Variable
Complete the following procedure to delete expanded call variable.
Procedure
| Step 1 |
Log in to Unified CCDM Portal as Tenant or Sub Customer user. |
| Step 2 |
Click the burger icon and select . |
| Step 3 |
Select the folder containing the expanded call variables you want to delete, and view the expanded call variables. |
| Step 4 |
In Items panel, select the expanded call variables that you want to delete. |
| Step 5 |
Click Delete. |
| Step 6 |
Click Yes. |
Configure Folder
Complete the following procedures for folder configuration:
Create Folders
Complete the following procedures to create folders:
Procedure
| Step 1 |
Log in to Unified CCDM Portal as Tenant or Sub Customer user. |
| Step 2 |
Click the burger icon and select . |
| Step 3 |
Select the folder/tenant where you want to create the new folder. |
| Step 4 |
Click System, and then click Folder. |
| Step 5 |
In the Name field enter a name for the new folder. |
| Step 6 |
In the Description field enter any explanatory text for the folder, this is optional. |
| Step 7 |
If required, uncheck the Inherit Permissions check box to make this folder a policy root that does not inherit security permissions from its parent folder. |
| Step 8 |
Check the Create Another check box if you want to create more folders at the same point in the tree structure. |
| Step 9 |
Click Save to save the new folder in the tree. |
Rename a Folder
Procedure
|
In Resource Manager, right-click the folder in the Folder Tree panel and select Rename Folder and enter the required name. |
Move Folder
Complete the following procedure to move a folder:
Procedure
| Step 1 |
Log in to Unified CCDM Portal as Tenant or Sub Customer user. |
| Step 2 |
Click the burger icon and select . |
| Step 3 |
In the Items panel, click Folders. |
| Step 4 |
Check the folder(s) check box that you want to move. |
| Step 5 |
Click Move. |
| Step 6 |
In the folder tree, select the location that you want to move the folders. |
| Step 7 |
Click Save. You can also use drag and drop option to move folders. |
Delete Folder
Complete the following procedures to delete a folder:
Procedure
| Step 1 |
Log in to Unified CCDM Portal as Tenant or Sub Customer user. |
| Step 2 |
Click the burger icon and select . |
| Step 3 |
In the Items panel, click Folders. |
| Step 4 |
Check the folder(s) check boxes that you want to delete. |
| Step 5 |
Click Delete. |
| Step 6 |
In the Delete folder dialog, select Yes. |
Configure Group
Complete the following procedure for group configuration:
Create a Group
Complete the following procedure to create a group.
Procedure
| Step 1 |
Log in to Unified CCDM Portal as Administrator/Tenant /Sub Customer user. |
| Step 2 |
Click the burger icon and select . |
| Step 3 |
Select the folder or the tenant where you want to create the new group. |
| Step 4 |
Click System , and then click Group |
| Step 5 |
Enter the following details: |
Edit a Group
Complete the following procedure to edit or view group details.
Procedure
| Step 1 |
Log in to Unified CCDM Portal as Administrator/Tenant /Sub Customer user. |
| Step 2 |
Click the burger icon and select . |
| Step 3 |
Select the folder that contain groups that you want to modify, and view the group in that folder using the Items panel list view. |
| Step 4 |
In the Items panel , select the group that you want to edit. |
| Step 5 |
Edit the group details as required. |
| Step 6 |
Click the Members tab to add or remove the members of the group. |
| Step 7 |
Click the Groups tab to add or remove the group from other groups. |
| Step 8 |
Click Save. |
Move a Group
Complete the following procedure to move a group.
Procedure
| Step 1 |
Log in to Unified CCDM Portal as Administrator/Tenant /Sub Customer user. |
| Step 2 |
Click the burger icon and select . |
| Step 3 |
Select the folder that contain groups that you want to move, and view the group in that folder using the Items panel list view. |
| Step 4 |
In the Items panel , select the group to be moved. |
| Step 5 |
Click Move. |
| Step 6 |
Navigate to the tenant or the folder you want to move the group to. |
| Step 7 |
Click Save. |
Delete a Group
Complete the following procedure to delete a group.
Procedure
| Step 1 |
Log in to Unified CCDM Portal as Administrator/Tenant /Sub Customer user. |
| Step 2 |
Click the burger icon and select . |
| Step 3 |
Select the folder that contain groups that you want to delete, and view the group in that folder using the Items panel list view. |
| Step 4 |
In the Items panel , select the group that you want to deleted. |
| Step 5 |
Click Delete and confirm the deletion when prompted. |
Configure Label
Complete the following procedures for label configuration:
Create a Label
Complete the following procedure to create a label.
Procedure
| Step 1 |
Log in to Unified CCDM Portal as Tenant or Sub Customer user. |
| Step 2 |
Click the burger icon and select . |
| Step 3 |
Select the folder where you want to create the label. |
| Step 4 |
Click Resource, and click Label. |
| Step 5 |
Complete all fields for the label. |
| Step 6 |
Click Save. |
Edit a Label
Complete the following procedure to edit a label.
Procedure
| Step 1 |
Log in to Unified CCDM Portal as Tenant or Sub Customer user. |
| Step 2 |
Click the burger icon and select . |
| Step 3 |
Select the folder containing the labels that you want to edit, and view the labels in that folder using the Items panel list view. |
| Step 4 |
In the Items panel, select the labels that you want to edit. |
| Step 5 |
After modification, Click Save. |
Delete a Label
Complete the following procedure to delete a label.
Procedure
| Step 1 |
Log in to Unified CCDM Portal as Tenant or Sub Customer user. |
| Step 2 |
Click the burger icon and select . |
| Step 3 |
Select the folder containing the labels you want to delete, and view the labels in that folder using the Items panel list view. |
| Step 4 |
In the Items panel, check the check box or check boxes of the labels you want to delete. |
| Step 5 |
Click Delete. |
| Step 6 |
In the Delete Labels dialog box, click Yes. |
Configure Person
Complete the following procedures to configure a person:
Create a Person
Complete the following procedure to create a person.
Procedure
| Step 1 |
Log in to Unified CCDM Portal as Tenant or Sub Customer user or Supervisor user. |
||
| Step 2 |
Click the burger icon and select Provisioning. |
||
| Step 3 |
Create a person.
|
||
| Step 4 |
Complete the required fields for person. |
||
| Step 5 |
Select Equipment tab, select the Unified Contact Center Enterprise. |
||
| Step 6 |
Set Active from and to dates in the Advanced tab. |
||
| Step 7 |
Click Save.
|
Edit a Person
Complete the following procedure to edit a person.
Procedure
| Step 1 |
Log in to Unified CCDM Portal as Tenant or Sub-Customer user. |
| Step 2 |
Click the burger icon and select . |
| Step 3 |
Select the folder containing the persons that you want to edit, and view the person in that folder using the Items panel list view. |
| Step 4 |
In the Items panel, select the persons that you want to edit. |
| Step 5 |
Optional, reset the password as follows:
|
| Step 6 |
After modification, Click Save. |
Delete a Person
Complete the following procedure to delete a person.
Note |
Deletes all the agents associated with the person. |
Procedure
| Step 1 |
Log in to Unified CCDM Portal as Tenant or Sub Customer user. |
| Step 2 |
Click the burger icon and select . |
| Step 3 |
Select folder containing the person or persons you want to delete the persons in that folder using the Items panel list view. |
| Step 4 |
In the Items panel check the check box or check boxes of the person or persons you want to delete. |
| Step 5 |
Click Delete. |
| Step 6 |
Click Yes to delete the person. |
Configure Supervisors
Complete the following procedure to configure a supervisor.
Before you begin
This is applicable for Sub-customer users of Small Contact Center Deployment that requires Supervisor to associate with Domain account.
-
Select .
-
Select and click Change Permission.
-
Check Full Permission check-box for the Sub customer tenant and click OK.
-
Add this sub-customer tenant to Advanced Group.
Procedure
| Step 1 |
Log in to the CCDM portal as Tenant/Sub Customer User and select Resource Manager. |
| Step 2 |
In Resource Manager, select the folder that contains the agent that you want as a supervisor or create a new agent to configure supervisor, see Create an Agent. |
| Step 3 |
Click Supervisor tab and and check the Supervisor checkbox. If supervisor is a non-SSO agent, do the following: |
| Step 4 |
Click Save. |
Configure Service
Note |
Complete the following procedures to configure service: |
Create Service
Complete the following procedure to create service:
Procedure
| Step 1 |
Log in to Unified CCDM Portal as Tenant. |
| Step 2 |
Click the burger icon and select . |
| Step 3 |
Select the folder that you want to create service from the left-hand side panel. |
| Step 4 |
In Resource drop-down list, select Service option. |
| Step 5 |
Complete the required fields. |
| Step 6 |
Goto Advanced tab, choose Cisco_Voice from Media Routing Domain drop-down list. |
| Step 7 |
Goto Skillgroups tab, check the skill group that you want to add and click Add. |
| Step 8 |
Click Save. |
Edit Service
Procedure
| Step 1 |
Log in to Unified CCDM Portal as Tenant. |
| Step 2 |
Click the burger icon and select . |
| Step 3 |
Navigate to the folder that you want to edit or view service from the left-hand side panel. |
| Step 4 |
Click on the service that you want to edit. |
| Step 5 |
After editing click Save. |
Delete Service
Procedure
| Step 1 |
Log in to Unified CCDM Portal as Tenant. |
| Step 2 |
Click the burger icon and select . |
| Step 3 |
Select the folder that you want to delete service from the left-hand side panel. |
| Step 4 |
Check the service from the list that you want to delete. |
| Step 5 |
Click Delete and click Yes. |
Configure Skill Group
Complete the following procedures to configure skill group:
Create a Skill Group
Complete the following procedure to create a skill group.
Note |
When you create a skill group, a default route is created. |
Procedure
| Step 1 |
Log in to Unified CCDM Portal as Tenant or Sub Customer user. |
| Step 2 |
Click the burger icon and select . |
| Step 3 |
In the folder tree panel, select the folder where you want to create the skill group. |
| Step 4 |
Click Resource, and click Skill Group. |
| Step 5 |
Enter a unique name for the group. |
| Step 6 |
Select Agents tab, check the agent(s) check box and click Add. |
| Step 7 |
Click Save. |
Edit a Skill Group
Complete the following procedure to edit a skill group.
Procedure
| Step 1 |
Log in to Unified CCDM Portal as Tenant or Sub Customer user. |
| Step 2 |
Click the burger icon and select . |
| Step 3 |
Select the folder containing the skill group that you want to edit, and view the skill groups in that folder using the Items panel list view. |
| Step 4 |
In the Items panel, click the skill group you want to edit. The details of this skill group display in the Details panel. |
| Step 5 |
Click the tabs and edit the fields you want to change. |
| Step 6 |
Optional, to remove agents from a skill group, select Agents tab and select the agents you want to remove from the team. |
| Step 7 |
Click Remove. |
| Step 8 |
Optional, to remove the route association from a skill group, select Route tab and click Delete for which route you want to delete. |
| Step 9 |
Optional, to edit the details of an existing route associated with the skill group, select Route tab and click Edit for which route you want to delete. Click Update. |
| Step 10 |
Click Save. |
Delete a Skill Group
Complete the following procedure to delete a skill group.
Note |
You cannot delete the skill group that is referenced in a script, remove the reference to delete the skill group. |
Procedure
| Step 1 |
Log in to Unified CCDM Portal as Tenant or Sub Customer user. |
||
| Step 2 |
Click the burger icon and select . |
||
| Step 3 |
Select the folder containing the skill groups you want to delete, and view the skill groups in that folder using the Items panel list view. |
||
| Step 4 |
In the Items panel, select the skill groups you want to delete.
|
||
| Step 5 |
Click Delete. Delete Skill Groups page appears. |
||
| Step 6 |
Click Yes. The skill groups are deleted. |
Configure Route
Complete the following procedure to configure a route.
Procedure
| Step 1 |
Log in to Unified CCDM Portal as Tenant or Sub Customer user. |
| Step 2 |
Click the burger icon and select . |
| Step 3 |
In the folder tree panel, select the folder where you want to create the route. |
| Step 4 |
In the Folder Tree panel, click Skill Group. |
| Step 5 |
Choose the skill group for which you are creating a route. |
| Step 6 |
Select Routes tab. |
| Step 7 |
In Route Name field, enter a unique name that will identify the script. |
| Step 8 |
Click Add. |
| Step 9 |
Click Save. |
Agent Re-skilling and Agent Team Manager
You can login as user with supervisor role to perform agent re-skilling and agent team manager.
Before performing these tasks ensure that the user is created. To create user, see Create User and to assign supervisor role, see Assign Roles to Users.
Configure Supervisor for Agent Re-skill and Agent Team Manager in CCDM
Procedure
| Step 1 |
Log in to the Unified CCDM Portal as administrator. |
| Step 2 |
Click the burger icon and select . |
| Step 3 |
Click on resource and select Agent resource. |
| Step 4 |
Select an agent for the supervisor. |
| Step 5 |
In Supervisor tab, check the checkbox for supervisor and click Save. |
| Step 6 |
In Person tab, select the goto person icon. |
| Step 7 |
In Portal tab, click the portal account and click the existing user. |
| Step 8 |
Select the tenant and select supervisor user from the list of users. |
| Step 9 |
Click next icon. |
| Step 10 |
Make sure supervisor group is added to the user and click Save. |
| Step 11 |
Click Save. |
Associating Supervisor Agent to Agent Team
Procedure
| Step 1 |
Log in to Unified CCDM Portal as administrator. |
| Step 2 |
Click the burger icon and select . |
| Step 3 |
Click resource and select Agent resource. |
| Step 4 |
Select the Supervisor agent. |
| Step 5 |
In the Agent Team tab, select agent teams that you want to add and click Add. |
| Step 6 |
In Supervisory Role column, Select Primary from the drop-down list and click Save. |
View Skill Group
Complete the following procedure to view a skill group.
Procedure
| Step 1 |
Log in to Unified CCDM portal as supervisor. |
| Step 2 |
Click the burger icon and select . |
| Step 3 |
From the Skill Group drop-down list, select the skill group you want to view. |
| Step 4 |
Click the Goto Agent icon to modify the agent details |
Add an Agent to Skill Group
Complete the following procedure to add an agent to a skill group.
Procedure
| Step 1 |
Log in to Unified CCDM portal as supervisor. |
||
| Step 2 |
Click the burger icon and select . |
||
| Step 3 |
Select Skill Group from the drop-down list. |
||
| Step 4 |
In My Agents on Peripheral list, select the agents you want to add to the skill group, then click Add.
|
||
| Step 5 |
Click Save. |
Remove an Agent from Skill Group
Complete the following procedure to remove an agent from a skill group.
Procedure
| Step 1 |
Log in to Unified CCDM portal as supervisor. |
| Step 2 |
Click the burger icon and select . |
| Step 3 |
Select a skill group to remove an agent or agents. |
| Step 4 |
In the top list, select the agents to remove from the skill group using the check boxes. |
| Step 5 |
You enter part of an agent's name into the search box, and then click Search to filter the list of agents by the specified search string. |
| Step 6 |
Click Remove to remove the agents from this skill group. |
| Step 7 |
Click Save to save your changes, or Cancel to leave the details as they were before you started. |
View Agent Team
Login as a supervisor user and complete the following procedure to view Agent team
Procedure
| Step 1 |
Log in to Unified CCDM portal as supervisor. |
| Step 2 |
Click the burger icon and select . |
| Step 3 |
Select the Agent team drop-down list and select the agent team you want to view. |
Modify Agent Team
Complete the following procedure to modify an agent's team:
Procedure
| Step 1 |
Log in to Unified CCDM portal as supervisor. |
||
| Step 2 |
Click the burger icon and select . |
||
| Step 3 |
From the My Agent Team drop-down list, select the agent team to which agent belongs. |
||
| Step 4 |
Click the Goto Agent icon to modify the agent details. |
||
| Step 5 |
Select Agent Team tab. |
||
| Step 6 |
Optional, check the agent team check box that you want to remove and click Remove. |
||
| Step 7 |
Optional, select the agent team from the list that you want to add and click Add.
|
||
| Step 8 |
Click Save. |
Configure User Variable
Complete the following procedure for user variable configuration:
Create a User Variable
Complete the following procedure to create a user variable.
Procedure
| Step 1 |
Log in to Unified CCDM Portal as Tenant or Sub Customer user. |
| Step 2 |
Click the burger icon and select . |
| Step 3 |
In folder tree panel, select the folder where you want to create the user variable. |
| Step 4 |
Click Resource and click User Variable |
| Step 5 |
Complete the required fields for user variable. |
| Step 6 |
Set Active from and to dates in Advanced tab. |
| Step 7 |
Click Save. |
Edit a User Variable
Complete the following procedure to edit a user variable.
Procedure
| Step 1 |
Log in to Unified CCDM Portal as Tenant or Sub Customer user. |
| Step 2 |
Click the burger icon and select . |
| Step 3 |
Select the folder containing the user variables that you want to edit, and view the user variables in that folder using the Items panel list view. |
| Step 4 |
In the Items panel, select the user variables that you want to edit. |
| Step 5 |
After modification, Click Save. |
Delete a User Variable
Complete the following procedure to delete a user variable.
Procedure
| Step 1 |
Log in to Unified CCDM Portal as Tenant or Sub Customer user. |
| Step 2 |
Click the burger icon and select . |
| Step 3 |
Select the folder containing the user variables you want to delete, and view the user variables in that folder using the Items panel list view. |
| Step 4 |
In Items panel, check the check box or check boxes of the user variables you want to delete. |
| Step 5 |
Click Delete. |
| Step 6 |
In the Delete User Variables dialog box, click Yes. The user variables are deleted. |
View the Unified CCDM Version
Complete the following procedure to view the Unified CCDM version.
Procedure
| Step 1 |
In the Settings page, click Settings. |
| Step 2 |
Click About. View the Unified CCDM version installed on your system. |
Bulk Operations Using Unified CCDM
The bulk upload tool is used for importing large numbers of resource items into Unified CCDM. It is used to generate resources such as Agents or Skill Groups by filling in resource attributes using the standard CSV format. All CSV files require headers that dictate where each value goes. These headers are provided by templates that can be downloaded from the appropriate Bulk Upload page in Unified CCDM. You can bulk upload the following resources:
- Agents
- Agent desktop
- Agent team
- Call Type
- Department
- Dialed Number
- Enterprise Skill Group
- Skill Group
- User Variable
- Folder
- Network VRU Script
- Label
- Person
- User
- Precision Attribute
- Precision Queue
Bulk Upload for Unified CCDM
Complete the following procedure to bulk upload Unified CCDM:
Procedure
| Step 1 |
Log in to Unified CCDM portal as Tenant or Sub-Customer. |
||
| Step 2 |
Click the burger icon and select . |
||
| Step 3 |
Click the required folder. |
||
| Step 4 |
Click Upload in the Folder Tree panel and then select the item type you want to bulk upload from the drop-down list. The Bulk Upload Control page appears. |
||
| Step 5 |
Select a template for your chosen resource. The template link is present in the horizontal toolbar near the top of the page. Once selected, a download box is presented allowing you to save this CSV file onto your machine. . |
||
| Step 6 |
Open the template in the editor you require (such as Notepad) and begin to enter your data or paste it from another source. |
||
| Step 7 |
Return to the Bulk Upload Control page and make sure the path is set correctly.
|
||
| Step 8 |
Browse to the CSV file into which you just entered the data. |
||
| Step 9 |
Click Upload.
|
Templates for Creating CSV Files
Data types
The following data types are used for creating CSV files:
-
Standard Naming Convention (SNC). This is alphanumeric data with no exclamation marks or hyphens, although underscores are permitted.
-
BOOLEAN values can be one of the following:
-
TRUE.
-
FALSE.
-
Empty field. Leaving these fields empty defaults the field to FALSE.
-
-
Y/N is similar to BOOLEAN however it can only contain the values Y or N.
-
Date format is the universal date format <Year>-<Month>-<Day> for example 2006-08-30.
-
Any Data Type marked with a hyphen (-) implies that there are no constraints on what you can put in the field (except for the constraints imposed by the native CSV format).
-
When a column supports a list of values (for example, an agent may belong to multiple skill groups) separate each skill group with a semi-colon, for example Skillgroup1; Skillgroup2; Skillgroup3.
Global Template Columns
These columns are common to every template file except where stated. The Required? column indicates whether the column can be removed entirely.
|
Column Name |
Data Type |
Required? |
Description |
||
|---|---|---|---|---|---|
|
Path |
Path |
No |
Describes where in the tree the resource will be created. If you wish to supply the path in the bulk upload screen, you must remove this column.
|
||
|
Name |
SNC |
Yes |
The name of the resource in the Unified CCDM system. This must be a unique name. In most cases, this is not provisioned. |
||
|
Description |
— |
Yes |
Describes the dimension being created. This is never provisioned. |
||
|
EnterpriseName |
SNC |
No |
The name for the resource being created. This field is provisioned. If you leave it blank an Enterprise name is generated for you. |
||
|
EffectiveFrom |
Date |
No |
The date from which the resource is active. The default is the current date.
|
||
|
EffectiveTo |
Date |
No |
The date on which the resource becomes inactive. The default is forever.
|
Department Template
| Column Name | Data Type | Required? | Description |
|---|---|---|---|
| EnterpriseName | SNC |
No |
The name for the Department being created. This field is provisioned. If you leave it blank an Enterprise name is generated for you. |
| Name | SNC | Yes | The name of the Department in the Unified CCDM system. This must be a unique name. In most cases, this is not provisioned. |
| EffectiveFrom | Date | No | The date from which the resource is active. The default is the current date. Note This date is not localized, and is treated as a UTC date. |
| EffectiveTo | Date | No | The date on which the resource becomes inactive. The default is forever. Note. This date is not localized, and is treated as a UTC date. |
Person Template
| Column Name | Data Type | Required? | Description |
| EquipmentName | SNC | No |
The instance name of the Unified CCE or Unified CM you want this person added to. This name corresponds directly with the equipment instance name that was specified when configured through the Unified CCDM Cluster Configuration utility. |
| FirstName | SNC | Yes | The first name of the person. |
| LastName | SNC | Yes | The last name of the person. |
| LoginName | SNC | Yes | The peripheral login name for the person. |
| PassPhrase | Password | Yes | The peripheral login password for the person. |
| DepartmentMember | Enterprise Name |
No |
The department that this person represents. |
Agent Template
|
Column Name |
Data Type |
Required? |
Description |
|---|---|---|---|
|
PeripheralNumber |
Numeric |
No |
The service number as known at the peripheral. |
|
PeripheralName |
SNC |
No |
The name identifying the agent on the associated peripheral. |
|
Supervisor |
Boolean |
No |
Indicates whether the agent is a supervisor. The Supervisor column name does not create a Unified CCDM system user but it allows you to bind this agent to a domain login name. |
|
AgentStateTrace |
Y/N |
No |
Indicates whether the software collects agent state trace data for the agent. |
|
DomainLogin |
NETBIOS Login Name |
If Agent is a supervisor |
The login name for the domain user this agent is associated with. The login name often uses the form <domain>\<username> |
|
DomainUserName |
NETBIOS Username |
If Agent is a supervisor |
The username of the domain user this agent is associated with. |
|
PeripheralMember |
Enterprise Name-PG name |
Yes |
The peripheral to assign this agent to. |
|
AgentDesktopMember |
Enterprise Name |
No |
The desktop this agent will use. |
|
PersonMember |
Enterprise Name |
Yes |
The person that this agent represents. |
|
AgentTeamMember |
Enterprise Name |
No |
The team this agent belongs to. The team must be on the same peripheral otherwise provisioning will fail. This column may also be subject to capacity limitations. For example, there may only be so many agents allowed in a team and that team has already reached its capacity. |
|
SkillGroupMember |
Enterprise Name |
No |
The skill group or skill groups this agent belongs to. The skill groups must be on the same peripheral otherwise provisioning fails. To specify multiple skill groups, separate each skill group with a semi-colon (;) character. |
|
DepartmentMember |
Enterprise Name |
No |
The department that this agent represents. |
|
PrecisionAttributeMember |
Enterprise Name and Values |
No |
The attributes that agent has and the values of each. Assign values using '=' and separate each attributes with a semicolon(;). Example: Spanish=5, MortgageTraining=True |
|
DefaultSkillGroup |
Enterprise Name |
No |
Agent Desktop Template
| Column Name | Data Type | Required? | Description |
| WrapupDataIncomingMode | Numeric |
No |
Indicates whether the agent
is allowed or required to enter wrap-up data after an inbound call.
0: Required 1: Optional 2: Not allowed 3 : Required with Wrap up Data. If value is blank, it assigns default value to 1 |
| WrapupDataOutgoingMode | Numeric |
No |
Indicates whether the agent
is allowed or required to enter wrap-up data after an outbound call.
0: Required 1: Optional 2: Not allowed 3 : Required with Wrap up Data. If value is blank, it assigns default value to 1 |
| WorkModeTimer | Numeric |
No |
The amount of time in seconds
(1-7200) allocated to an agent to wrap up the call.
Default value will be 7200. |
| RemoteAgentType | Numeric |
No |
Indicates how mobile agents
are handled.
0 : No remote access 1 : Use call by call routing 2 : Use nailed connection 3 : Agent chooses routing at login 4 : Required with Wrap up Data If value is blank, it assigns default value to 1 |
| DepartmentMember | Alpha Numeric |
No |
The department that this agent desktop represents |
Agent Team Template
| Column Name | Data Type | Required? | Description |
| PeripheralMember | Enterprise Name- PG name | Yes | The peripheral to assign this agent team to. |
| DialedNumberMember | Enterprise Name | No | The dialed number to use for this agent team. |
| DepartmentMember | Enterprise Name |
No |
The department that this agent team represents. |
Call Type Template
| Column Name | Data Type | Required? | Description |
|---|---|---|---|
| ServiceLevelType | Numeric | No | Indicates how the system software calculates the service level for the skill group. If this field is 0, Unified CCE uses the default for the associated Peripheral/MRD pair. Valid numbers are as follows: 0 or blank: Use Default 1: Ignore Abandoned Calls 2: Abandoned Call Has Negative Impact 3:Abandoned Call Has Positive Impact. |
| ServiceLevelThreshold | Numeric | No | The service level threshold, in seconds, for the service level. If this field is negative, the value of the Service Level Threshold field in the Peripheral table is used. |
| DepartmentMember |
Enterprise Name |
No | The department that agent team represents. |
Dialed Number Template
| Column Name | Data Type | Required? | Description |
|---|---|---|---|
|
Dialed Number |
SNC |
Yes |
The string value by which the Agent/IVR Controller identifies the dialed number. |
| RoutingClient Member | SNC | Yes | The name of the routing client (such as NIC or PG) that this number should use to submit routing requests to the Unified CCE. |
| MediaRouting DomainMember | SNC | Yes | The name of the media routing domain. |
| DepartmentMember |
Enterprise Name |
No | The department that agent team represents. |
Skill Group Template
| Column Name | Data Type | Required? | Description | ||
| PeripheralNumber | Numeric |
No |
The service number as known at the peripheral. | ||
| PeripheralName | SNC | No | The name of the peripheral as it is known on the site. | ||
| AvailableHoldoffDelay | Numeric | No | The value for this skill group instead of using the one associated with this peripheral. | ||
| Priority | Numeric | No | The routing priority for the skill. This should be set to 0. | ||
| Extension | Numeric | No | The extension number for the service. | ||
| IPTA | Y/N | No | Indicates whether the Unified CCE picks the agent. | ||
| ServiceLevelThreshold | Numeric | No | The service level threshold, in seconds, for the service level. If this field is negative, it uses the value of the Service Level Threshold field in the peripheral table. | ||
| ServiceLevelType | Numeric | No | Indicates how the system software calculates the service level for the skill group. If this field is 0, Unified CCE uses the default for the associated peripheral/MRD pair. Possible values are:
0 = Use Default 1 = Ignore Abandoned Calls 2 = Abandoned Call Has Negative Impact 3 = Abandoned Call Has Positive Impact |
||
| DefaultEntry | Numeric | No | Normal entries are 0 (zero). Any records with a value greater than 0 are considered a default skill group for configuration purposes. Unified CCE uses records with the value of 1 as the default target skill group. | ||
| PeripheralMember | Enterprise Name | Yes | The peripheral to assign this skill group to. | ||
| MediaRoutingDomainMember | Numeric | Yes | You cannot change this column name after skill group upload. | ||
| DepartmentMember | Enterprise Name | Yes | The department that this skill group represents. | ||
| RouteMember | SNC | No | The Routes associated with this skill
group. To supply a list of routes, separate the routes in the list with a
semi-colon (;).
|
Enterprise Skill Group Template
| Column Name | Data Type | Required? | Description |
|---|---|---|---|
| DepartmentMember | Enterprise Name | No | The department that this item belongs to. This field is only valid if the tenant is associated with a Unified CCE instance running Unified CCE version 10.0 or later. Otherwise, an error will be reported if this field is present. |
| SkillGroupMember | Enterprise Name | No | The skill group or skill groups associated with this enterprise skill group. The skill groups must be on the same Peripheral otherwise provisioning will fail. To specify multiple skill groups, separate each skill group with a semi-colon (;) character. |
User Variable Template
|
Column Name |
Data Type |
Required? |
Description |
|---|---|---|---|
|
ObjectType |
Numeric |
Yes |
A number indicating the type of object with which to associate the variable. Select 31 (User Variable) if you choose to not associate the user variable with an object. The valid numbers are: 1: Service 2: Skill Group 7: Call Type 8: Enterprise Service 9: Enterprise Skill Group 11: Dialed Number 14: Peripheral 16: Trunk Group 17: Route 20: Master Script 21: Script Table 29: Application Gateway 31: User Variable |
Label Template
| Column Name | Data Type | Required? | Description |
|---|---|---|---|
| RoutingClientMember | SNC | Yes | The name of the routing client (NIC or PG), this number is used to submit the routing request to Unified CCE. |
| LableType | Numeric | False | The
type of label:
|
| Label | SNC | False |
The string value used to identify the label by the routing client. |
Network VRU Script Template
| Column Name | Data Type | Required? | Description |
|---|---|---|---|
| NetworkVruMember | SNC | Yes | The network VRU to associate with this Network VRU Script. |
| VruScriptName | SNC | Yes | Represent the VRU Script Name |
| DepartmentMember | Enterprise | No | The department that is Network VRU represent . |
| Timeout | Numeric | Yes | The number of seconds to wait for a response after the script starts executing. |
Folder Template
Note |
Folders do not use the Enterprise Name, Effective To or Effective From global columns. |
| Column Name | Data Type | Required? | Description |
|---|---|---|---|
| Security | CSS Styled List | No | Allows you to set security on the folder you upload. See section Security Field Example for an example of the syntax for this field. |
User Template
Note |
Users use only the 'Path' and 'Description' global columns from the Global Template |
| Column Name | Data Type | Required? | Description |
|---|---|---|---|
| LoginName | SNC | Yes | Login name of the user that will be used for application logon |
| Password | Password | Yes | Password for the new user account |
| AdvancedMode | Boolean | No | Determines if the user is advanced or not |
| FirstName | SNC | No | The first name of the user |
| LastName | SNC | No | The last name of the user |
| ChangePasswordOn NextLogon | Boolean | No | Determines if after the initial logon the user should be prompted to reset their password |
| PasswordNeverExpires | Boolean | No | Determines if the password for this user will ever expire |
| HomeFolder | Path | No | The folder path to the folder which will be used as the users home folder |
| CreateNewUserFolder | Boolean | No | Determines whether a new folder should be created for the user home folder in the HomeFolder location |
| Groups | Group Name(s) | No | A semi colon separated list of Group names (including their path) to which the user will be added. Since group names are not unique the path must also be specified for example, /Folder1/Admins;/Folder2/Admins |
| InternetScriptEditorEnabled | Boolean | No |
Whether the user is linked to a Unified CCE user that can access Cisco's Internet Script Editor. If true, the following apply:
|
Precision Attribute Template
The following table includes the columns that are required for loading bulk precision attributes.
|
Column Name |
Data Type |
Required? |
Description |
|---|---|---|---|
|
AttributeDataType |
Numeric |
Yes |
Type of data to associate with one of the following attributes: 3: Boolean (true or false only) 4: Proficiency (a numeric range) |
|
DefaultValue |
Boolean or Numeric, according to Attribute Data Type |
Yes |
Default value to be used when an attribute is assigned to an agent if no explicit value is specified. |
| DepartmentMember | Enterprise Name |
No |
The department that this attribute represents. |
Precision Queue Template
The following table includes the columns that are required for loading bulk precision queues.
| Column Name | Data Type | Required? | Description |
|---|---|---|---|
|
Steps |
__ | Yes |
Specification of the steps in this precision queue. See Syntax for Precision Queue Steps |
|
AgentOrdering |
Numeric |
Yes |
If more than one agent satisfies the precision queue criteria agents are chosen in the following order to handle the call: 1: Agent that has been available the longest. 2: Most skilled agent. 3: Least skilled agent. |
|
ServiceLevelThreshold |
Numeric |
No |
The service level threshold in seconds for allocating the call to a suitable agent using the rules in the precision queue from 0 to 2147483647. |
|
ServiceLevelType |
Numeric |
No |
Abandoned calls in service level calculations, calls are handled in the following order: 1: Ignore abandoned calls. 2: Abandoned calls have negative impact (that is, exceed the service level threshold). 3: Abandoned calls have positive impact (that is, meet the service level threshold). |
| DepartmentMember | Enterprise Name |
No |
The department that this precision queue represents. |
Syntax for Precision Queue Steps
-
Consider If condition (optional, but not valid if there is only one step, and not valid for the last step if there is more than one step). If it is present, this condition specifies the circumstances to which the step applies. For example, a step might apply only if there has been a higher than usual number of unanswered calls for the day.
-
Condition Expressions (always required for each step). This condition specifies the attributes that an agent must have to receive the call. It may be a simple comparison, or it may involve multiple comparisons linked by and or or. For example, the condition expressions might specify an agent who can speak Spanish and is trained to sell mortgages and is based in London.
-
Wait Time (always required, except for the last step) this condition specifies the amount of time in seconds to wait before moving on to the next step if the conditions in this step cannot be satisfied. For example, a wait time value of 20 means that if no agent that matches the conditions for that step is available at the end of 20 seconds, the next step is considered.
Note |
To build the Steps field from these components, separate each step with a semicolon (;) and separate the parts of each step with a colon (:) as example shown below: Example: ENGLISH1==5:WaitTime=22;ENGLISH1==5:WaitTime=20;ENGLISH==5 |
"English1" and "English" indicates the Enterprise Name of Precision Attribute.
The following example shows a Steps field with three steps. The first step has a Wait Time expression and the condition expression. The second has a Consider If expression and a Wait Time expression as well as the condition expression. The third step is the last step, so it has only a condition expression.
First Step:
Specify the time in seconds to wait for the conditions in the step to be satisfied. This syntax is a part of the step, so it ends with a colon.
WaitTime=10:Specify the condition expression to be used. This syntax is the end of the step, so it ends with a semicolon.
Spanish >= 5 && MortgageTrained == True && Location == London;Second Step:
Specify the circumstances to consider this step. This syntax is part of the step, so it ends with a colon. See the note below for the syntax for the Consider If statement.
ConsiderIf=TestforSituation:Specify the time in seconds to wait for the conditions in the step to be satisfied. This syntax is a part of the step, so ends with a colon.
WaitTime=20:Specify the condition expression to be used. This syntax is the end of the step, so it ends with a semicolon.
Spanish >= 5 && MortgageTrained == True;Third Step:
Specify the condition expression to be used if all previous steps fail.
(Spanish >= 5) || (Spanish >=3 && MortgageTrained == True),Manage Roles
Roles are collections of tasks that can be grouped together and applied to users or groups. Like tasks, roles can be folder-based, containing a collection of folder-based tasks, or global, containing a collection of global tasks. Folder roles always apply to folders. A user that has a particular folder role can perform all the tasks in that role on the items in that folder. A user with a global role can perform all the tasks for that global role.
Default Roles
Following default roles are provided in the system:
-
Default global roles
-
Global Basic - Allows a user to perform basic provisioning and management functions.
-
Global Advanced - Allows a user to perform advanced provisioning and management functions, including all those allowed by the global basic role.
-
Global Host - Allows a user to perform all licensed functions.
-
-
Default folder roles
-
Supervisor - Allows a user to manage users and most resources in the specified folder.
-
Basic - Allows a user to browse most resources and to manage reports and parameter sets in the specified folder.
-
Advanced - Allows a user to browse and access most resources in the specified folder, including all those allowed by the basic folder role and the supervisor folder role.
-
Full Permissions - Allows a user to perform all licensed functions in the specified folder.
-
Create a Global Role
Complete the following procedure to create a global role.
Procedure
| Step 1 |
Log in to CCDM portal as administrator. |
| Step 2 |
Click the burger icon and select . |
| Step 3 |
Click New. |
| Step 4 |
In Name field, enter new role name that reflects the permissions or category of the user it is intended. |
| Step 5 |
Optional, in Description field, enter description. It can be summary of the permissions granted. |
| Step 6 |
Select the tasks you want to enable the role. |
| Step 7 |
Click Save. |
Assign a Global Role
Complete the following procedure to assign users with global roles.
Procedure
| Step 1 |
Login as administrator and configure the following, to grant or remove global permissions: |
| Step 2 |
Click delete icon and click Confirm, to remove a user or group from this global role. |
Edit a Global Role
Complete the following procedure to edit a global role.
Procedure
| Step 1 |
Login as administrator and select . |
| Step 2 |
Select the global role that you want to edit. |
| Step 3 |
Select Details tab and change the details if required. |
| Step 4 |
Check Enabled check box to ensure that global role is available to users. |
| Step 5 |
Check Hidden check box if you want to hide global roles from system users. |
| Step 6 |
Select Tasks tab and check the tasks that you want to add and uncheck the tasks that you want to remove from the global role. |
| Step 7 |
Click Save. |
Delete a Global Role
Complete the following procedure to delete a global role.
Procedure
| Step 1 |
Login as System Administrator and click Global Roles in Security. |
| Step 2 |
In Global Roles window, check the required global role check box you want to delete and click Delete. |
| Step 3 |
Click OK to confirm the deletion. |
Create a Folder Role
Complete the following procedure to create a folder role.
Procedure
| Step 1 |
Login the CCDM Portal as System Administrator. |
| Step 2 |
Click the burger icon and select . |
| Step 3 |
In Roles window, click New. |
| Step 4 |
In Name field, enter new role name that reflects the permissions or category of the user it is intended. |
| Step 5 |
Optional, in Description field, enter description. It can be summary of the permissions granted. |
| Step 6 |
Select the tasks you want to enable the role. |
| Step 7 |
Click Save. |
Assign a Folder Role
Complete the following procedure to assign a folder role.
Procedure
| Step 1 |
Login the CCDM Portal as Administrator and click . |
| Step 2 |
In Security Manager, click the location in the folder tree that contains the users or groups you want to assign folder roles to. Then, do one of the following:
|
| Step 3 |
Check the check boxes beside the users or groups that you want to edit the permissions for. |
| Step 4 |
Click Change Permissions to change the folder roles for the selected users or groups. |
| Step 5 |
If you see a message that states that the current folder is inheriting permissions, and you want to stop this process and set different permissions for this folder, click Edit Item Security, and then click OK to confirm the action. Click Cancel if you do not want to set different permissions for the folder. |
| Step 6 |
If you are continuing to set folder roles, in the Folder Permissions dialog box, select a folder location from the folder tree on the left side of the screen, and one or more folder roles from the right side of the screen. |
| Step 7 |
Check the Change Permissions for Subfolders check box if you want to copy the changed permissions to the subfolders of the selected folder also. |
| Step 8 |
Click Save to see a summary of the folder roles that you changed. |
| Step 9 |
Click Confirm to apply the new folder roles. |
Edit a Folder Role
Complete the following procedure to edit a folder role.
Procedure
| Step 1 |
Login the CCDM Portal as Administrator and click Roles under Security. |
| Step 2 |
In Role Manager, click the name of the folder role you want to edit. |
| Step 3 |
Check the tasks you want to add to the folder role, and uncheck the tasks you want to remove from the folder role. |
| Step 4 |
Click Save to save your changes. |
Delete a Folder Role
Complete the following procedure to delete a folder role:
Procedure
| Step 1 |
To delete a folder role, in Role Manager, check the check box beside the folder role you want to delete. |
| Step 2 |
Click Delete, and then click OK. You cannot delete a folder role that is still being used. |
Global Role Tasks
Global roles such as Basic, Advanced, Host and System Administrator are applied to users or groups of users, enabling them to access the same set of functions on all the folders to which they have access. The following table displays a list of all available tasks configurable for a global role, accessed through Security > Global.
|
Global Task Name |
Comments |
Basic |
Advanced |
|---|---|---|---|
|
Security Manager |
Displays Security Manager and Security Manager options on the user's tools page. |
x |
|
|
Service Manager |
Displays Service Manager on the tools page. |
x |
|
|
System Manager |
Displays System Manager on the tools page. |
x |
|
|
Advanced User |
Displays a check box on the user settings page, enabling access to Advanced User mode, which displays the tools page on startup. |
x |
|
|
Manage site |
Allows the user to save system settings, security settings, reporting settings, and provisioning settings on the Settings page. |
||
|
Self skill |
Allows the user to save system settings, security settings, reporting settings, and provisioning settings on the Settings page. |
||
|
Browse Roles |
Allows the user to view folder-based roles within Role Manager and Security Manager. |
x |
|
|
Manage Roles |
Allows the user to create, modify, and delete folder-based roles within Security Manager > Role Manager. |
||
|
Browse Global Roles |
Allows the user to view global roles in Global Security Manager. |
x |
|
|
Manage Global Roles |
Allows the user to add, modify, and delete global roles using Global Security Manager. |
||
|
Browse Global Security |
Enables Global Security Manager within the Security Manager tool on the home page. Access is view-only. Roles are unable to be edited. |
x |
|
|
Manage Global Security |
Displays the Global Security Manager option within Security Manager tool on the tools page enabling the user to view and edit global security roles. |
||
|
Browse Dimension type |
Allows the user to select dimension types (such as Agent or Call Type) from an Item Type drop-down when creating a Parameter Set in Reports. |
x |
x |
|
Bulk Import Dimensions |
Allows the user to select dimension types (such as Agent or Call Type) from an Item Type drop-down when creating a Parameter Set in Reports. |
x |
|
|
Provision Agent |
Allows the user to create and manage an Agent using System Manager, or Agent Team Manager, provided the user also has granted permission to Manage Dimensions on the specified folder, and Browse Connected Systems is enabled. |
x |
x |
|
Provision Agent Desktop |
Allows the user to add an Agent Desktop, through the New > Resource Items menu within System Manager, provided the user also has granted permission to Manage Dimensions on the specified folder, and Browse Connected Systems is enabled. |
x |
|
|
Provision Agent Team |
Allows the user to add an Agent Team item to a folder, through the New > Resource Items menu within System Manager. |
x |
x |
|
Provision Call Type |
Allows the user to add a new Call Type to a folder using the System Manager, New > Resource Items menu. |
x |
|
|
Provision Dialed Number |
Allows the user to provision new dialed Numbers. |
x |
|
|
Provision Directory Number |
Allows the user to provision new directory numbers. |
x |
|
|
Provision Enterprise Skill Group |
Allows the user to provision new Enterprise skill groups. |
x |
|
|
Provision Expanded Call Variable |
Allows the user to create an Expanded Call Variable and manage its settings and active dates through System Manager > New Resource. |
x |
|
|
Provision Label |
Allows the user to create labels through System Manager > Resource Folder > Resource Item. |
x |
|
|
Provision Person |
Allows the user to provision a person using System Manager or Service Manager, provided the user also has granted permission to Manage Dimensions on the specified folder, and Browse Connected Systems is enabled. |
x |
|
|
Provision Service |
Allows the user to provision and manage a service, including setting Service Level Type, associated Skill Groups, and peripherals, using System Manager. |
x |
|
|
Provision Skill Group |
Allows the user to manage skill groups using System Manager, Skill Group Manager (within Service Manager) provided the user also has given permission to Manage Dimensions on the folder where the skill group is located. |
x |
|
|
Provision User Variable |
Allows the user to provision a user-defined variable using System Manager. |
x |
Folder-Based Roles
You can apply roles to a specific folder, so that users that are assigned the folder-based role have access to the task-based permissions specified only for that folder. The following table lists the tasks available to create a folder-based role, using Security Manager > Role Manager. The Basic, Supervisor, and Advanced columns indicate whether the task is enabled by default for these preconfigured roles in Unified CCDM.
| Name | Comments | Basic | Supervisor | Advanced |
| Folder Settings | ||||
| Browse Folders | Allows the user to see a folder in the folder tree. | x | x | |
| Manage Folders | Allows the user to edit, create, and remove folders in the specified folder. | x | ||
| Users and Security | ||||
| Browse Users | Allows the user to view the details of all users in the specified folder. | x | x | |
| Manage Users | Allows the user to modify settings of users within the specified folder. | x | x | |
| Reset passwords | Allows the user to reset the password of other users within the specified folder. | x | ||
| Manage Tenants | Allows the user to manage the tenant items within the specified folder. | |||
| Manage Security | Allows the user to modify security permissions on the selected folder. Access to the Security Manager tool is required. | x | ||
| Dimensions and Prefixes | ||||
| Browse Dimensions | Allows the user to list system resources in the specified folder. | x | x | |
| Manage Dimension | Allows the user to edit, move, and delete dimensions such as agents, agent teams, or skill groups in the specified folder using System Manager. | x | x | |
| Manage Dimension Memberships | Allows the user to add, modify, and delete dimension memberships. | |||
| Clone Dimensions | Allows user to copy agents. | x | ||
| Browse Prefixes | Allows the user to browse automatic resource movement prefixes in the specified folder on the prefix details tab of a tenant item in the System Manager. | x | ||
| Manage Prefixes | Allows the user to add and remove automatic resource movement prefixes in the specified folder on the prefix details tab of a tenant item in the System Manager. | |||
Configure Gadgets
Create Gadget
Procedure
| Step 1 |
Login to the CCDM portal as tenant or sub-customer user. |
| Step 2 |
Click Gadget. |
| Step 3 |
Select Add Gadget from the drop-down list. |
| Step 4 |
Click Resource Manager. |
| Step 5 |
Click the burger icon and select a tenant. |
| Step 6 |
Select a resource from the search bar list. The list includes Agent, Agent Desktop, Agent Team, Call Type, Department, Dialed number, Enterprise Skill Group, Expanded Call Variable, Label, Network Vru Script, Person, Precision Attribute, Precision Queue, Service, Service, Skill Group, and User Variable. |
| Step 7 |
Click , enter a name for the gadget and browse a folder to save the gadget. |
Edit Gadget
Procedure
| Step 1 |
Login to the CCDM portal as tenant or sub-customer user. |
| Step 2 |
Click Gadget and select Open App, choose the app that you have created. |
| Step 3 |
Select the gadget you want to modify. |
| Step 4 |
Select the required tenant and required resource to modify the gadget. |
| Step 5 |
Click , click Yes to save the modified fields. |
Delete Gadget
Procedure
| Step 1 |
Login to the CCDM portal as tenant or sub-customer user. |
||
| Step 2 |
Click and select an app. |
||
| Step 3 |
Select the gadget that you want delete from the app and click Delete. |
||
| Step 4 |
Click Save to save the app.
|
Provision Unified CCE Using Administration Workstation
Complete the following procedures to provision Unified CCE using Administration Workstation.
Note |
|
Set up Agent Targeting Rules
Complete the following procedure to configure individual agent targeting rules.
Procedure
| Step 1 |
In the Configuration Manager, navigate to Configure or navigate to . |
| Step 2 |
In the ICM Agent Targeting Rules dialog box, click Retrieve. |
| Step 3 |
Click Add. |
| Step 4 |
Enter a name for the rule. |
| Step 5 |
Choose a peripheral where the rule will be associated. |
| Step 6 |
Choose Agent Extension from the Rule Type drop-down list. |
| Step 7 |
Choose one or more routing clients that can initiate the route request. |
| Step 8 |
Enter the agent extension range. |
| Step 9 |
Click Save. |
Provision Unified CCE Using Web Administration
Set Up Reason Code
Complete the following procedure to set up the reason code.
Procedure
| Step 1 |
Login to the CCE Web Administration page, click Manage and select Reason Codes. |
| Step 2 |
Click New on the List of Reason Codes page to open the New Reason Code page. |
| Step 3 |
Complete fields as follows:
|
| Step 4 |
Save the reason code to return to the List page, where a message confirms the successful creation. |
Provision Routing Script Using Internet Script Editor
Complete the following procedure to log in to ISE:
Procedure
| Step 1 |
Launch Internet Script Editor iscriptEditor.exe. |
||
| Step 2 |
Enter your Username, Password and Domain. Example: |
||
| Step 3 |
Click Connection. |
||
| Step 4 |
Enter the AW Server Address, Port, and ICM Instance Name. |
||
| Step 5 |
Click OK. |
||
| Step 6 |
Click OK. Upgrade Internet Script Editor, if necessary.
|
 Feedback