- Preface
- Cisco HCS for Contact Center
- Prerequisites
- Design Consideration
- Shared Management and Aggregation
- Golden Template Process
- Create Golden Template
- Configure Customer Instance for Network Infrastructure
- Clone and OS Customization
- Configure Customer Instance
- Integration of Customer Instance with Shared Management
- Administration
- Configure Core Component Integrated Options
- Install and Configure Optional Cisco Components
- Remote Deployment Options
- Solution Serviceability
- Appendix
- Index
Installing and Configuring Guide for Cisco HCS for CC 11.0(1)
Bias-Free Language
The documentation set for this product strives to use bias-free language. For the purposes of this documentation set, bias-free is defined as language that does not imply discrimination based on age, disability, gender, racial identity, ethnic identity, sexual orientation, socioeconomic status, and intersectionality. Exceptions may be present in the documentation due to language that is hardcoded in the user interfaces of the product software, language used based on RFP documentation, or language that is used by a referenced third-party product. Learn more about how Cisco is using Inclusive Language.
- Updated:
- January 20, 2016
Chapter: Configure Core Component Integrated Options
- Configure Gateway
- Configure Unified CVP
- Configure Unified CCE
- Configure Unified Communications Manager
Configure Core Component Integrated Options
Configure Courtesy Callback
The following diagram shows the components that you must configure for Courtesy Callback.
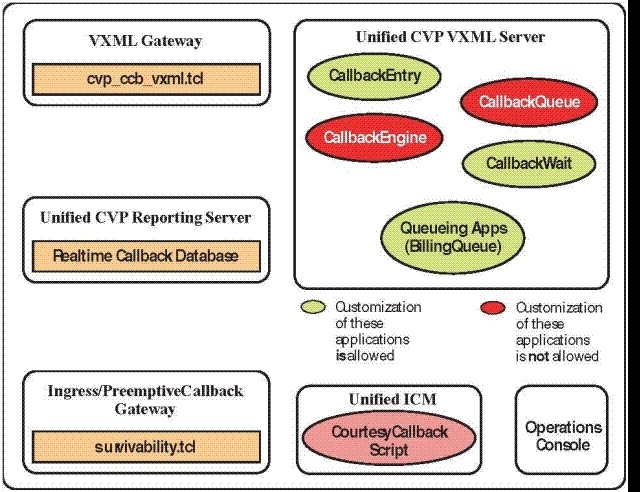
Complete the following procedures for Courtesy Callback configurations:
Configure Gateway
Configure the VXML Gateway for Courtesy Callback
Complete the following procedure to configure the VXML gateway for Courtesy Callback:
Configure the Ingress Gateway for Courtesy Callback
Complete the following procedure to configure the ingress gateway for courtesy callback:
| Step 1 | Copy surviability.tcl from the Operations Console to the flash memory of the gateway, as follows: |
| Step 2 | Log onto the ingress gateway. |
| Step 3 | Add the
following to the survivability service:
Example: The following example shows a basic configuration: service cvp-survivability flash:survivability.tcl param ccb id:10.86.132.177;loc:doclab;trunks:1! |
| Step 4 | Create the
incoming POTS dial peer, or verify that the survivability service is being used
on your incoming POTS dial peer.
Example: For example, dial-peer voice 978555 pots service cvp-survivability incoming called-number 9785551234 direct-inward-dial! |
| Step 5 | Create outgoing
POTS dial peers for the callbacks. These are the dial peers that place the
actual call back out to the PSTN.
Example: For example, dial-peer voice 978555 pots destination-pattern 978555.... no digit-strip port 0/0/1:23! |
| Step 6 | Use the
following configuration to ensure that SIP is set up to forward SIP INFO
messaging:
voice service voip signaling forward unconditional |
Configure CUBE-E for Courtesy Callback
 Note | If you are using CUBE-E then you need sip profile configuration and apply it on outgoing dial-peer through cvp. See the below the example: |
A "sip-profile¨ configuration is needed on ISR CUBE E for the courtesy callback feature. To configure the "sip-profile", the following must be added
voice class sip-profiles 103
request INVITE sip-header Call-Info add "X-Cisco-CCBProbe: <ccb param>"
where "<ccb param>" is the "ccb" parameter defined in the survivability service. Add this "sip-profile" to the outgoing dial-peer to the CVP.
The following is a configuration example
voice class sip-profiles 103
request INVITE sip-header Call-Info add "X-Cisco-CCBProbe: id:10.10.10.180;sydlab;trunks:4"
dial-peer voice 5001 voip
description Comprehensive outbound route to CVP
destination-pattern 5001
session protocol sipv2
session target ipv4:10.10.10.10
dtmf-relay rtp-nte
voice-class sip profiles 103
codec g711ulaw
no vad
In the above example, 10.10.10.180 is the CUBE IP and 10.10.10.10 is the CVP Call Server IP.
Note | If CUBE E is used for Courtesy Call Back then under voice service voip class in CUBE E must have media flow-through for Courtesy Call Back to work. |
Configure Unified CVP
Configure the Reporting Server for Courtesy Callback
A reporting server is required for the Courtesy Callback feature. Complete the following procedure to configure a reporting server for Courtesy Callback:
Install and configure the Reporting Server.
| Step 1 | In the
Operations Console, select
System >
Courtesy Callback.
The Courtesy Callback Configuration page displays. | ||
| Step 2 | Choose the General tab. | ||
| Step 3 | Click the Unified CVP Reporting Server drop-down, and select the Reporting Server to use for storing Courtesy Callback data. | ||
| Step 4 | If required, select Enable secure communication with the Courtesy Callback database. | ||
| Step 5 | Configure
allowed and disabled dialed numbers.
These are the numbers that the system should and should not call when it is making a Courtesy Callback to a caller.
| ||
| Step 6 | Adjust the
Maximum Number of Calls per Calling Number to the desired number.
By default, this is set to 0 and no limit is imposed. This setting allows you to limit the number of calls that are eligible to receive a callback from the same calling number. If this field is set to a positive number (X), then the Courtesy Callback Validate element only allows X callbacks per calling number to go through the preemptive exit state at any time. If there are already X callbacks offered for a calling number, new calls go through the none exit state of the Validate element. In addition, if no calling number is available for a call, the call always goes through the none exit state of the Validate element. | ||
| Step 7 | Choose the Call Server Deployment tab and move the Call Server you want to use for Courtesy Callbacks from the Available box to the Selected box. | ||
| Step 8 | Click
Save.
The configuration becomes active (is deployed) the next time the Reporting Server is restarted. | ||
| Step 9 | You can also
deploy the new Reporting Server configuration immediately by clicking
Save &
Deploy.
|
Configure the Call Studio Scripts for Courtesy Callback
| Step 1 | Access the .zip file from the CVP OAMP machine from the location C:\Cisco\CVP\OPSConsoleServer\StudioDownloads\CourtesyCallbackStudioScripts.zip. | ||
| Step 2 | Extract the
example Call Studio Courtesy Callback scripts contained in
CourtesyCallbackStudioScripts.zip to a folder of your choice on the computer
running CallStudio.
Each folder contains a Call Studio project having the same name as the folder. The five individual project comprise the Courtesy Callback feature.
| ||
| Step 3 | Modify the scripts BillingQueue, CallbackEntry, and CallbackWait to suit your business needs. | ||
| Step 4 | Start Call Studio by selecting Start > All Programs > Cisco > Cisco Unified Call Studio. | ||
| Step 5 | Select
File >
Import.
The Import dialog box displays. | ||
| Step 6 | Expand the Call Studio folder and select Existing Call Studio Project Into Workspace. | ||
| Step 7 | Click
Next .
The Import Call Studio Project From File System displays. | ||
| Step 8 | Browse to the
location where you extracted the call studio projects. For each of the folders
that were unzipped, select the folder (for example BillingQueue) and select
Finish.
The project is imported into Call Studio. | ||
| Step 9 | Repeat the
action in previous step for each of the five folders.
The five projects display in the upper-left of the Navigator window. | ||
| Step 10 | Update the Default Audio Path URI field in Call Studio to contain the IP address and port value for your media server. | ||
| Step 11 | For each of the Call Studio projects previously unzipped, complete the following steps: | ||
| Step 12 | Under BillingQueue Project, if required, change the music played to the caller while on hold. | ||
| Step 13 | Under
CallbackEntry Project, if required, modify the caller interaction settings in
the
SetQueueDefault_01 node.
| ||
| Step 14 | In the
CallbackEntry project, on the Wants Callback page, configure the following:
| ||
| Step 15 | Right-click each Courtesy Callback project in the Navigator window and select Validate. | ||
| Step 16 | Right-click on one of the project and click Deploy. | ||
| Step 17 | Check the check box against each project to select the required projects. | ||
| Step 18 | In the Deploy Destination area, select Archive File and click Browse. | ||
| Step 19 | Navigate to
the archive folder that you have set up.
Example:C:\Users\Administrator\Desktop\Sample. | ||
| Step 20 | Enter the
name of the file.
Example: For example Samplefile.zip. | ||
| Step 21 | Click Save. | ||
| Step 22 | In the Deploy Destination area click Finish. | ||
| Step 23 | Log in to OAMP and choose Bulk Administration\File Transfer\VXMLApplications. | ||
| Step 24 | Select the VXML Server to which you want to deploy the applications. | ||
| Step 25 | Select the
zip file that contains the applications.
Example:Samplefile.zip. | ||
| Step 26 | Click Transfer. | ||
| Step 27 | Right-click each of the projects and click Deploy, then click Finish. | ||
| Step 28 | Using windows explorer, navigate to %CVP_HOME%\VXMLServer\applications. | ||
| Step 29 | For each of the five Courtesy Callback applications, open the project's admin folder, in%CVP_Home%\VXMLServer\applications, and double-click deployApp.bat to deploy the application to the VXML Server. | ||
| Step 30 | Verify that all the applications are running by going into %CVP_HOME%\VXMLServer\admin and double-clicking status.bat. All five applications should display under Application Name and with the status Running. |
Configure the Media Server for Courtesy Callback
Several Courtesy Callback specific media files are included with the sample scripts for Courtesy Callback. Complete the procedure to configure the Media Server for Courtesy Callback:
| Step 1 | During the Unified CVP installation, the media files are copied as: %CVP_HOME%\OPSConsoleServer\CCBDownloads\CCBAudioFiles.zip. |
| Step 2 | Unzip the
special audio files and copy to your media server
VXMLServer\Tomcat\webapps\CVP\audio.
The sample scripts are set up to use the default location "\CVP\audio" for the audio files. |
| Step 3 | Change the default location of the audio files in the sample scripts to be your media server path. |
Configure Unified CCE
Configure the ICM Script for Courtesy Callback
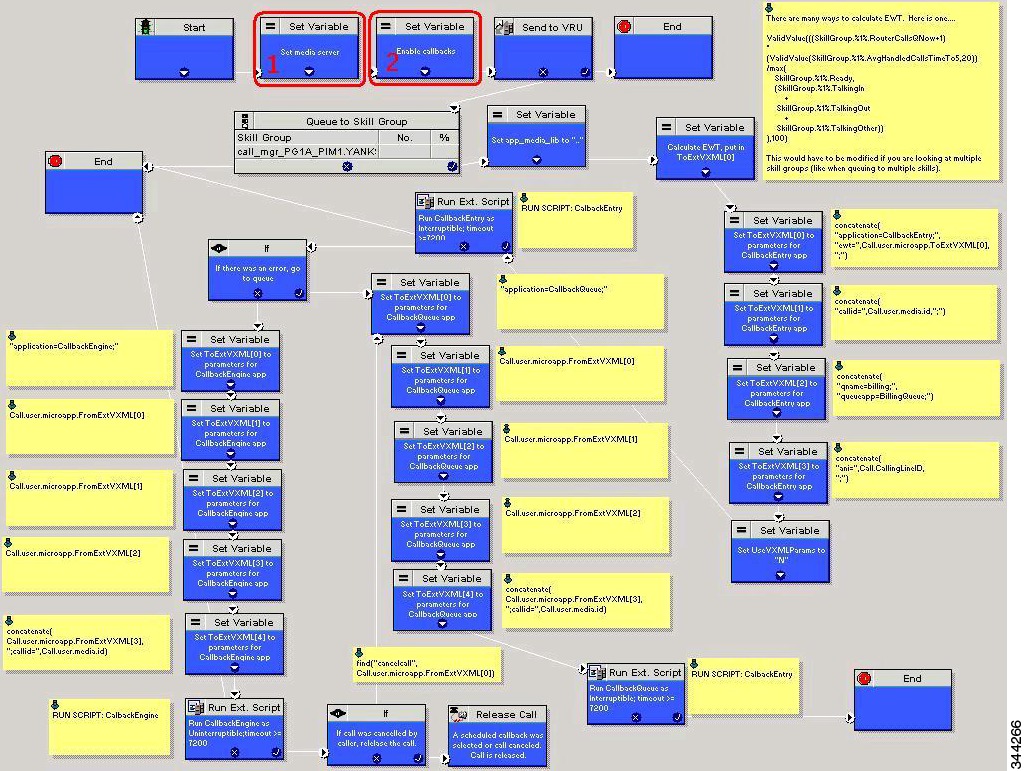
Following figure shows the sample Courtesy Callback ICM script.
Complete the following procedure to configure ICM to use the sample Courtesy Callback ICM script:
| Step 1 | Copy the CCE
example script,
CourtesyCallback.ICMS to the CCE Admin Workstation.
The
example CCE script is available in the following locations:
| ||
| Step 2 | In Script
Editor, select
File > Import
Script...
| ||
| Step 3 | In the script location dialog, select the CourtesyCallback.ICMS script and click Open. You can bypass the set variable "Set media server" Highlighted as number 1 node in the Figure 1, as VXML Server, Call Server, and Media Server are collocated. | ||
| Step 4 | Define a new
ECC variable for courtesy callback.
A new ECC variable is used to determine if a caller is in a queue and can be offered a callback. | ||
| Step 5 | Navigate to ICM Admin Workstation > ICM Configuration Manager > Expanded Call Variable List tool to create the ECC Variable user.CourtesyCallbackEnabled specific to Courtesy Callback. | ||
| Step 6 | Set up the
following parameters that are passed to CallbackEntry (VXML application):
Example:
ewt is calculated in Block #2. qname is the name of the VXML Server queue into which the call will be placed. There must be a unique qname for each unique resource pool queue. queueapp is the name of the VXML Server queuing application that will be executed for this queue. ani is the caller's calling Line Identifier. | ||
| Step 7 | Create Network VRU Scripts. | ||
| Step 8 | Navigate to
ICM
Configuration Manager > Network VRU Script List tool, create the
following Interruptible Script Network VRU Scripts.
Name: VXML_Server_Interruptible Network VRU: Select your Type 10 CVP VRU VRU Script Name: GS,Server,V,interrupt Timeout: 9000 seconds Interruptible: Checked | ||
| Step 9 | Choose
ICM
Configuration Manager > Network VRU Script List tool to create the
following Non-Interruptible Script Network VRU Scripts.
Name - VXML_Server_NonInterruptible Network VRU - Select your Type 10 CVP VRU VRU Script Name - GS,Server,V, nointerrupt Timeout - 9000 seconds ( must be greater than the maximum possible call life in Unified CVP)Interruptible: Not Checked | ||
| Step 10 | Verify that the
user.microapp.ToExtVXMLECC variable is set up for an array of five items with a
minimum size of 60 characters and the user.microapp.FromExtVXML variable is set
up for an array of four with a minimum size of 60 characters.
Verify that you have at least one available route and skill group to map to the route and skillgroup in the example script. | ||
| Step 11 | Save the
script, then associate the call type and schedule the script.
|
Configure Agent Greeting
To use Agent Greeting, your phone must meet the following requirements:
-
The phones must have the BiB feature.
-
The phones must use the firmware version delivered with Unified CM 8.5(1) or greater.
(In most cases phone firmware is upgraded automatically when you upgrade Unified CM installation.)
Complete the following procedures for Agent Greeting configuration:
Configure Gateway
Republish the tcl scripts to VXML Gateway
The .tcl script files that ship with Unified CVP include updates to support Agent Greeting. You must republish these updated files to your VXML Gateway.
Republishing scripts to the VXML Gateways is a standard task in CVP upgrades. You must republish the scripts before you can use Agent Greeting.
Set Cache Size on VXML Gateway
To ensure adequate performance, set the size of the cache on the VXML Gateway to the maximum allowed. The maximum size is 100 megabytes; the default is 15 kilobytes. Failure to set the VXML Gateway cache to its maximum can result in slowed performance to increased traffic to the media server.
Use the following Cisco IOS commands on the VXML Gateway to reset the cache size:
conf t
http client cache memory pool 100000
exit
wr
For more information about configuring the cache size, see the Configuration Guide for Cisco Unified Customer Voice Portal at http://www.cisco.com/en/US/products/sw/custcosw/ps1006/tsd_products_support_series_home.html.
Configure Unified CVP
Complete the following procedures for Unified CVP configuration:
- Configure FTP Enabled in Server Manager
- Configure the Call Studio Scripts for Record Agent Greeting
- Set Content Expiration in IIS (Windows 2012) in Media
Configure FTP Enabled in Server Manager
Complete the following procedure to configure the FTP enabled in server manager.
| Step 1 | Right- Click Roles in the left navigation page of server manager. |
| Step 2 | Select Add Roles. |
| Step 3 | Click Next. |
| Step 4 | Check the checkbox Web Server (IIS) and click Next. |
| Step 5 | Check the checkbox FTP Server and click Next. |
| Step 6 | After the successful installation, click Close. |
| Step 7 | Make sure that the FTP and the IIS share the same root directory, because the recording application writes the file to the media server directory structure, and the greeting playback call uses IIS to fetch the file. The en-us/app directory should be under the same root directory for FTP and IIS. |
| Step 8 | Create a
dedicated directory on the server to store your greeting files.
This lets you specify a lower cache timeout of 5 minutes for your agent greeting files that does not affect other more static files you may be serving from other directories. By default, the Record Greeting application posts the .wav file to the en-us/app directory under your web/ftp root directory. You may create a dedicated directory such as ag_gr under the en-us/app directory, and then indicate this in the Unified CCE script that invokes the recording application. Use the array for the ECC variable call.user.microapp.ToExtVXML to send the ftpPath parameter to the recording application. Make sure the ECC variable length is long enough, or it may get truncated and fail. |
| Step 9 | In IIS
Manager, set the cache expiration for the dedicated directory to a value that
allows re-recorded greetings to replace their predecessor in a reasonable
amount of time, while minimizing requests for data to the media server from the
VXML Gateway.
The ideal value varies depending on the number of agents you support and how often they re-record their greetings. Two minutes may be a reasonable starting point. |
| Step 10 | Find the site you are using, go to the agent greeting folder you created (ag_gr), and then select HTTP Response Headers . |
| Step 11 | Select Add, then Set Common Headers . |
Create Voice Prompts for Recording Greetings
You must create audio files for each of the voice prompts that agents hear as they record a greeting. The number of prompts you require can vary, but a typical set can consist of:
-
A welcome followed by a prompt to select which greeting to work with (this assumes you support multiple greetings per agent)
-
A prompt to select whether they want to hear the current version, record a new one, or return to the main menu
-
A prompt to play if a current greeting is not found.
To create voice prompts for recording greetings:
| Step 1 | Create the
files using the recording tool of your choice. When you record your files:
|
| Step 2 | After recording, deploy the files to your Unified CVP media server. The default deployment location is to the <web_server_root>\en-us\app directory. |
| Step 3 | Note the names of the files and the location where you deployed them on the media server. Your script authors need this information for the Agent Greeting scripts. |
Built-In Recording Prompts
The Unified CVP Get Speech micro-application used to record Agent Greetings includes the following built-in prompts:
-
A prompt that agents can use to play back what they recorded
-
A prompt to save the greeting, record it again, or return to the main menu
-
A prompt that confirms the save, with an option to hang up or return to the main menu
You can replace these .wav files with files of your own. For more information, see the Unified Customer Voice Portal Call Studio documentation at http://www.cisco.com/en/US/products/ps7235/tsd_products_support_series_home.html
Configure the Call Studio Scripts for Record Agent Greeting
The Record Agent Greeting is controlled by a combination of Call Studio script and ICM script. Complete the following procedure to configure the Call Studio script:
| Step 1 | Access the .zip file from the CVP OAMP machine from the location C:\Cisco\CVP\OPSConsoleServer\StudioDownloads\RecordAgentGreeting.zip. |
| Step 2 | Extract the example Call Studio Record Agent Greeting scripts contained in RecordAgentGreeting.zip to a folder of your choice on the computer running CallStudio. The folder contains a CallStudio project having the same name as the folder. |
| Step 3 | Start Call Studio by selecting . |
| Step 4 | Select . The Import dialog box displays. |
| Step 5 | Expand the Call Studio folder and select Existing Call Studio project Into Workspace. |
| Step 6 | Click Next. The Import Call Studio Project From File System displays. |
| Step 7 | Browse to the location where you extracted the call studio
projects. Select the folder and select
Finish.
Example: RecordAgentGreeting |
| Step 8 | Follow the below steps, to save the file in a defined path:
|
| Step 9 | Right-click on Record Agent Greeting project in the Navigator window and select Validate. |
| Step 10 | Right-click on the Record Agent Greeting project and click Deploy. |
| Step 11 | In the Deploy Destination area, select Archive File and click Browse. |
| Step 12 | Navigate to the archive folder that you have set up:
Example: C:\Users\Administrator\Desktop\Sample. |
| Step 13 | Enter the name of the file.
Example:Samplefile.zip |
| Step 14 | Click Save. |
| Step 15 | In the Deploy Destinationarea click Finish. |
| Step 16 | Log in to OAMP and choose Bulk Administration\File Transfer\VXMLApplications. |
| Step 17 | Select the VXML Server to which you want to deploy the applications. |
| Step 18 | Select the zip file that contains the applications.
Example: Samplefile.zip |
| Step 19 | Click Transfer. |
| Step 20 | Right-click on the project and click Deploy, then click Finish. |
| Step 21 | Using windows explorer, navigate to %CVP_HOME%\VXMLServer\applications\RecordAgentGreeting, open the project's admin folder and double-click deployApp.bat to deploy the application to the VXML Server. |
| Step 22 | Verify that the application is running in the following path %CVP_HOME%\VXMLServer\applications\RecordAgentGreeting\admin and double-click status.bat. The application should display under Application Name and with the status Running. |
Set Content Expiration in IIS (Windows 2012) in Media
Complete the following procedure to set content expiration in IIS on a Windows 2008 Server:
| Step 1 | Right-click My Computer on the desktop and select Manage. |
| Step 2 | Select . |
| Step 3 | Select the default website and navigate to Features View. |
| Step 4 | Double-click HTTP Response Headers. |
| Step 5 | Under Actions, select Set Common Headers…. |
| Step 6 | On Set Common HTTP Response Headers, select Enable HTTP keep-alive and Expire Web content and set After 5 minutes. |
Configure Unified CCE
Complete the following procedures for Unified CCE configuration:
- Create Agent Greeting Play Script
- Create Agent Greeting Recording Script
- Import the Example Agent Greeting Scripts
- Configure Call Types
- Configure Dialed Numbers
- Schedule the Script
- Deploy Agent Greeting
- Modify the Unified CCE call routing scripts to use Play Agent Greeting script
Create Agent Greeting Play Script
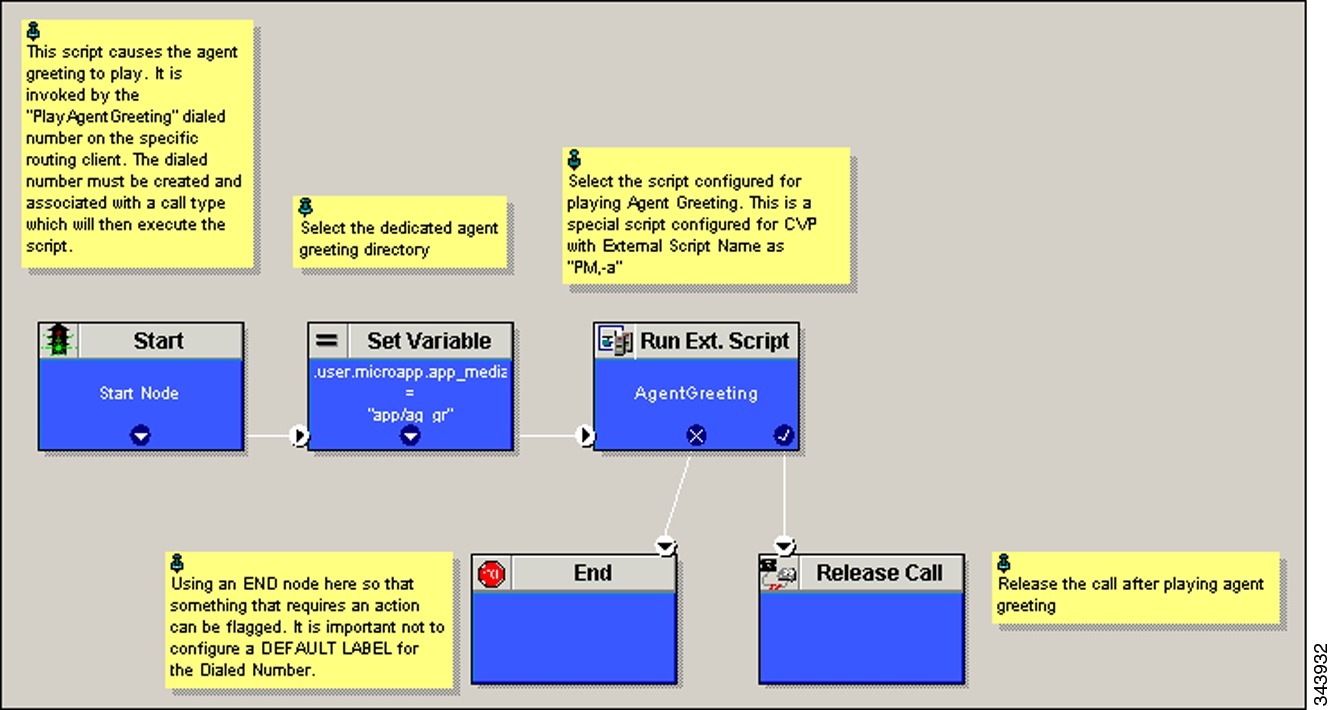
A dedicated routing script plays the Agent Greeting. This script is invoked by the PlayAgent Greeting dialed number on the specific routing client. You must create the dialed number and associate it with a call type that executes the script.
Create Agent Greeting Recording Script
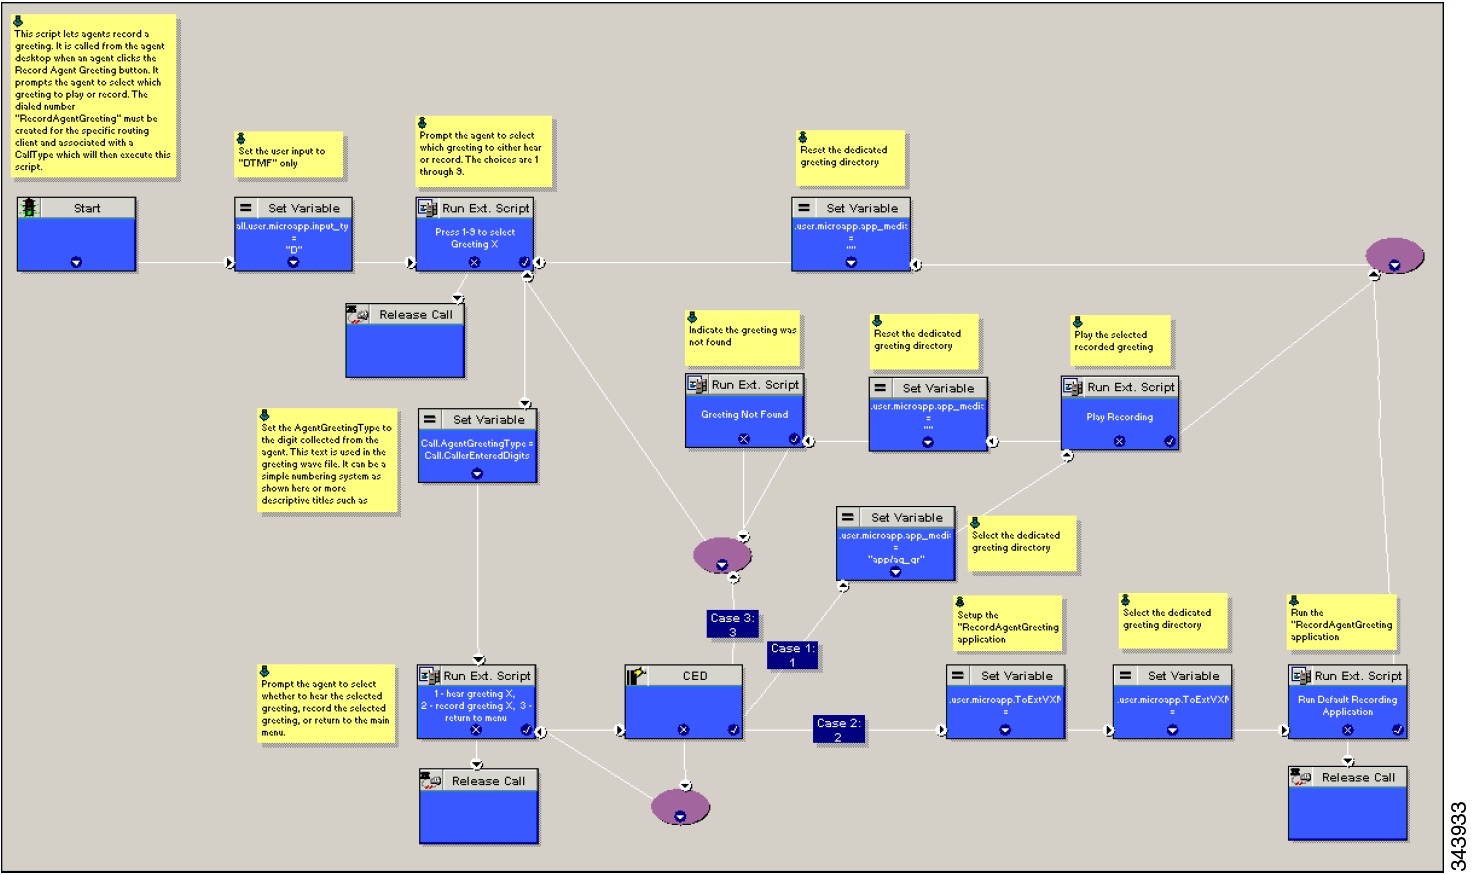
The Agent Greeting Recording script lets agents record a greeting. The agent desktop calls the script when an agent clicks the Record Agent Greeting button, prompting the agent to select which greeting to play or record. Create the dialed number RecordAgentGreeting for the specific routing client and associate it with a call type that then executes this script.
Unified CCE Configuration for Record Agent Greeting
-
user.microapp.ToExtVXML : This is used twice in an Agent Greeting record script, the first time is to queue the Unified CVP Record Agent Greeting application and the second time is to tell the recording application where to save greeting files. Configure it as an array with size 3. Use the Unified CCE Administration tool to ensure this variable includes Maximum Length as 100 and Enabled.
-
user.microapp.app_media_lib :This is required in Agent Greeting record and play scripts to specify the dedicated directory on the media server where your greeting audio files are stored. Maximum Length is 100 and Enabled.
-
user.microapp.input_type: This is required in Agent Greeting record scripts to limit the allowable input type to DTMF. Maximum Length is 100 and Enabled.
Note | To enable the ECC variables refer to Configure Expanded Call Variable. |
Import the Example Agent Greeting Scripts
To view or use the example Agent Greeting scripts, you must first import them into the Unified CCE Script. Complete the following procedure to import the example Agent Greeting scripts:
| Step 1 | Launch Script Editor. | ||||
| Step 2 | Select
File>Import Script and select
the following scripts to import:
The scripts will be located in the icm\bin directory on the data server (DS) node. | ||||
| Step 3 | Repeat for the
remaining scripts.
|
Configure Call Types
Configure Dialed Numbers
| Step 1 | Log into the Unified CCDM Portal and select . |
| Step 2 | Select a folder to create the dialed number. |
| Step 3 | Select . |
| Step 4 | Create a dialed number to record agent greetings and enter RecordAgentGreeting as the name. |
| Step 5 | Create a dialed number to play agent greetings and enter PlayAgentGreeting as the name. |
| Step 6 | Complete the following for each dialed number: |
Schedule the Script
| Step 1 | In the Script Editor ,select . |
| Step 2 | From the Call Type Manager screen, select the Schedules tab. |
| Step 3 | From the Call type drop-down list, select the call type to associate with the script; for example, PlayAgentGreeting. |
| Step 4 | Click Add and select the script you want from the Scripts box. |
| Step 5 | Click OK twice to exit. |
Deploy Agent Greeting
This chapter describes how to deploy and configure the Agent Greeting feature.
Agent Greeting Deployment Tasks
| Step 1 | Ensure your system meets the baseline requirements for software, hardware, and configuration described in the System Requirements and Limitations section. |
| Step 2 | Configure IIS and FTP on
Media Server.
|
| Step 3 | In Unified CVP, add media servers, configure FTP connection information, and deploy the media servers. |
| Step 4 | Configure a Unified CVP media server, if you have not already done so. See Configure Unified CVP Media Server. |
| Step 5 | In Unified CVP Operations Console, republish the VXML Gateway.tcl scripts with updated Agent Greeting support. See Republish the tcl scripts to VXML Gateway for Agent Greeting support. |
| Step 6 | Set the cache size on the VXML Gateway. See Set Cache Size on VXML Gateway. |
| Step 7 | Record the voice prompts to play to agents when they record a greeting and to deploy the audio files to your media server, see Create Voice Prompts for Recording Greetings. |
| Step 8 | Configure Call Types to record and play agent greetings. |
| Step 9 | Configure Dialed Numbers to record and play agent greetings. |
| Step 10 | Schedule the Script
|
| Step 11 | In Script
Editor:
|
| Step 12 | Modify the Unified CCE call routing scripts to use Play Agent Greeting script. |
Modify the Unified CCE call routing scripts to use Play Agent Greeting script
For an Agent Greeting play script to run, you must add an AgentGreetingType Set Variable node to your existing Unified CCE call routing scripts: This variable's value is used to select the audio file to play for the greeting. Set the variable before the script node that queues the call to an agent (that is, the Queue [to Skill Group or Precision Queue], Queue Agent, Route Select, or Select node).
Specify AgentGreetingType Call Variable
To include Agent Greeting in a script, insert a Set Variable node that references the AgentGreetingType call variable. The AgentGreetingType variable causes a greeting to play and specifies the audio file it should use. The variable value corresponds to the name of the greeting type for the skill group or Precision Queue. For example, if there is a skill group or Precision Queue for Sales agents and if the greeting type for Sales is '5', then the variable value should be 5.
You can use a single greeting prompt throughout a single call type. As a result, use one AgentGreetingType set node per script. However, as needed, you can set the variable at multiple places in your scripts to allow different greetings to play for different endpoints. For example, if you do skills-based routing, you can specify the variable at each decision point used to select a particular skill group or Precision Queue.
Note | Only one greeting can play per call. If a script references and sets the AgentGreetingType variable more than once in any single path through a script, the last value to be set is the one that plays. |
Use these settings in the Set Variable node for Agent Greeting:
Configure Unified Communications Manager
To enable Built-in Bridge, see Enable or Disable the Built-in-Bridge
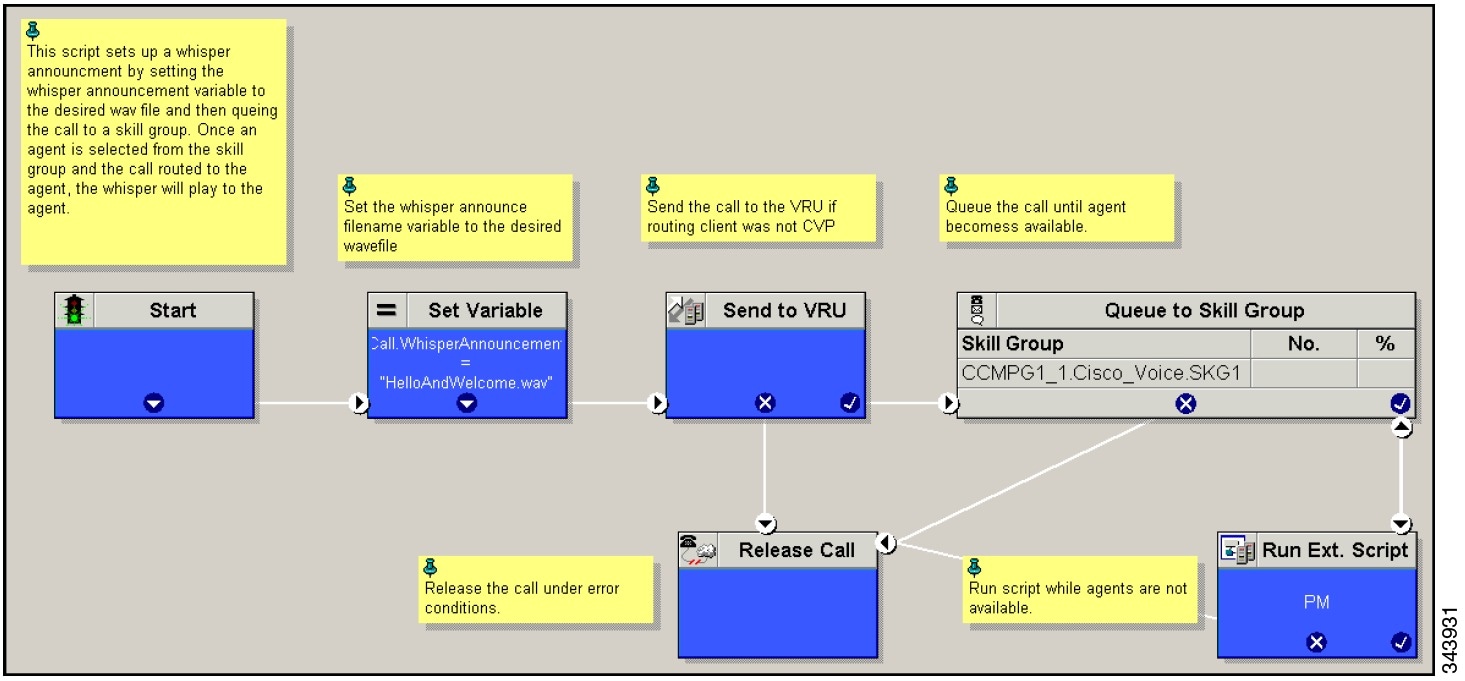
Configure Whisper Announcement
Complete the following procedures for Whisper Announcement configuration:
Configure Gateway
Configure a dial peer for incoming number 9191919100 and 91919191 as follows:
dial-peer voice 919191 voip
description CVP SIP ringtone dial-peer
service ringtone
incoming called-number 9191T
voice-class sip rel1xx disable
dtmf-relay rtp-nte
codec g711ulaw
no vad
Configure Unified CVP
Configure the Whisper Announcement Service Dialed Numbers
Unified CVP uses two different dialed numbers for Whisper Announcement:
The first number calls the ring tone service that the caller hears while the whisper plays to the agent. The Unified CVP default for this number is 91919191.
The second number calls the whisper itself. The Unified CVP default for this number is 9191919100.
For Whisper Announcement to work, your dial number pattern must cover both of these numbers. The easiest way to ensure coverage is through the use of wild cards such as 9191*. However, if you decide to use an exact dialed number match, then you must specify both 91919191 and 9191919100.
Configure Unified CCE
Create Whisper Announcement Script
It is very important to deploy Whisper Announcement with the Call. Whisper Announcement variable and to set .wav file in your Unified CCE routing scripts.
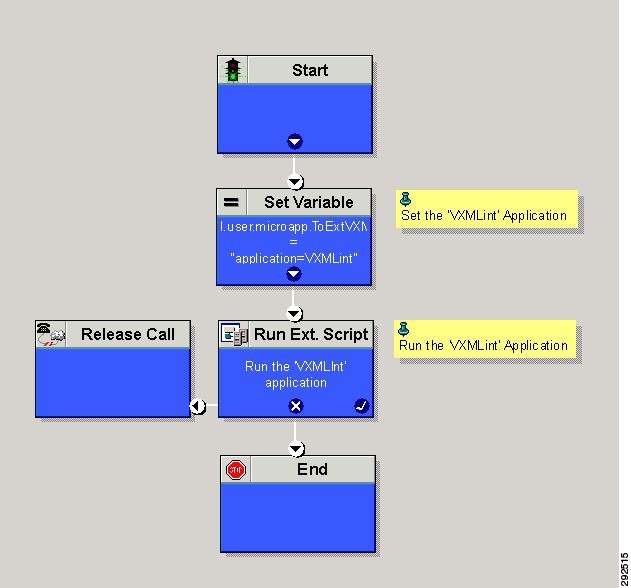
Configure Database Integration
Complete the following procedures for Database Integration configuration:
Note | Small Contact Center deployment model supports only CVP Database Integration. |
Configure Unified CVP
Configure VXML Database Element
You need to configure Java Database Connectivity (JDBC) for VXML Database Element configuration.
Complete the following procedures for JDBC configuration:
Install JDBC driver
Complete the following procedure to install the JDBC driver:
| Step 1 | Download the
.exe file for Microsoft JDBC Driver for SQL Server
Example:1033\sqljdbc_3.0.1301.101_enu.exe |
| Step 2 | Run the executable and install the .exe file in the location C:\temp\ |
| Step 3 | Copy the file C:\temp\sqljdbc_3.0\enu\sqljdbc4.jar to the Unified CVP VXML servers' folder C:\Cisco\CVP\VXMLServer\Tomcat\common\lib |
Add JNDI Context
Complete the following procedure to add the Java Naming and Directory Interface (JNDI) context configuration:
| Step 1 | Go to the context.xml file located at C:\Cisco\CVP\VXMLServer\Tomcat\conf\context.xml file. | ||
| Step 2 | Enter the JNDI
name, SQL server address, SQL database name, username and password.
The following is an example of the SQL authentication context.xml file: <Context> <WatchedResource>WEB-INF/web.xml</WatchedResource> <Manager pathname="" /> <Resource name="jdbc/dblookup" auth="Container" type="javax.sql.DataSource" DriverClassName="com.microsoft.sqlserver.jdbc.SQLServerDriver" url="jdbc:sqlserver://<dblookupnode_ipaddress>:1433;databaseName=DBLookup;user=sa;password=sa" > </Context> | ||
| Step 3 | Perform
following steps to restart VXML server services:
|
Configure VXML Studio Script
Complete the following procedure to configure the VXML studio script:
| Step 1 | Configure the following to create the VXML application with the database element. |
| Step 2 | Deploy the script to the local computer or to the remote computer (VXML call server directly) to create CVP Subdialog return element. |
| Step 3 | If you saved this to the local machine, copy the whole folder to the following location: <Install dir>:\Cisco\CVP\VXMLServer\applications and deploy it using deployApp windows batch file located inside the admin folder of applications. |
Create ICM Script
Create an ICM script similar to the one shown in the following figure:
Configure Unified CCE
Configure ICM Database Lookup
Complete the following procedure to configure ICM Database Lookup.
| Step 1 | Select Enable Database Routing in Router options to edit Router setup for database lookup changes. |
| Step 2 | Configure Database Lookup explorer: |
| Step 3 | Configure the following to change the registry settings in Unified CCE: Where DBLookup is the external database name and (sa,sa) are the SQL server authentication. |
| Step 4 | Create the ICM script with the database lookup node with the respective table and lookup value. The following figure shows AccountInfo as the table name and Call.CallingLineID as the lookup value. 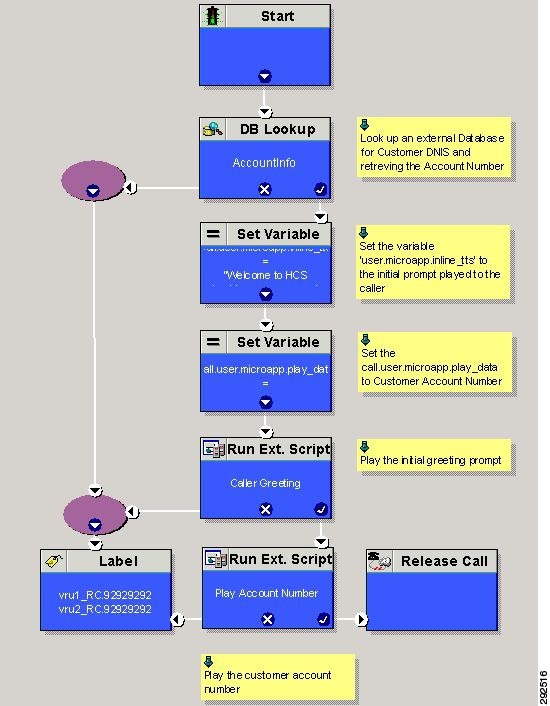 |
Configure Unified Mobile Agent
Configure Unified CCE
Complete the following procedure to configure Mobile Agent in Unified CCE:
| Step 1 | Log in to CCDM. |
| Step 2 | In System Manager under the tree panel folder, select a folder where you want to create the agent desktop. |
| Step 3 | In the Tree panel folder, click Resource, and click Agent Desktop. |
| Step 4 | Enter unique name of up to 32 characters for the record. This name can use alphanumeric characters, periods, and underscores. |
| Step 5 | Enter the mandatory fields such as Incoming Work mode, Outgoing Work mode, Wrap-up time, and other required fields. |
| Step 6 | From Remote Agent Type drop-down list, select the required routing option. |
| Step 7 | Click Save. |
Enable Mobile Agent Option in CTI OS Server
Complete the following procedure to enable Mobile Agent option in CTI OS server:
Configure Unified Communications Manager
Configure CTI Port
Ensure that directory numbers are added. See, Add Directory Number Inventory.
Unified Mobile Agent needs two configured CTI Port pools on Unified Communications Domain Manager:
-
A local CTI port as the agent's virtual extension
-
A network CTI port to initiate a call to the Mobile Agent's phone
Note | For 12000 agent deployment model, add CTI ports for all three CUCM clusters. |
Complete the following procedure to configure CTI port:
Configure CTI Port as Provider or Reseller
What to Do Next
Note | Local CTI port and Network CTI port should be same |
Configure CTI Port as Customer
What to Do Next
Note | Local CTI port and Network CTI port should be same |
Tag CTI Ports as Contact Center Agent Lines
Ensure CTI ports are added. See, Configure CTI Port
Note | For 12000 agent deployment model, the CTI port for all three CUCM clusters should be tagged. |
Perform the below steps for both LCP and RCP CTI ports:
| Step 1 | Login to Cisco Unified Communication Domain Manager as provider, reseller or customer. |
| Step 2 | Ensure that hierarchy is set to appropriate level. |
| Step 3 | Navigate |
| Step 4 | Click Add. |
| Step 5 | Choose Phones from Device Types drop-down list. |
| Step 6 | Choose CTI Ports from Device Name drop-down list. |
| Step 7 | Choose Line from the drop-down list. |
| Step 8 | Choose Application User from drop-down list. |
| Step 9 | Click Save. |
Configure Outbound
Complete the following procedure to configure Outbound Dialer:
Configure Gateway
Note |
Follow the below procedure to configure gateway/CUBE(E):
| Step 1 | Create a voice
encapsulation type with following voip parameters
Example: voice service voip
no ip address trusted authenticate
mode border-element
allow-connections sip to sip
no supplementary-service sip refer
supplementary-service media-renegotiate
redirect ip2ip
signaling forward none
sip
header-passing
error-passthru
asymmetric payload full
options-ping 60
midcall-signaling passthru
!
| ||
| Step 2 | Default, CPA
is enabled for gateway/CUBE(E). Otherwise, enable CPA for CUBE(E).
Example: voice service voip cpa | ||
| Step 3 | Create a
voice codec class
Example: voice class codec 1
codec preference 1 g729r8
codec preference 2 g711ulaw
| ||
| Step 4 | Create dial
peer configuration to reach the customer PSTN number.
Example: dial-peer voice 978100 voip
session protocol sipv2
incoming called-number <Customer Phone Number Pattern>
voice-class codec 1
voice-class sip rel1xx supported "100rel"
dtmf-relay rtp-nte sip-kpml
no vad
dial-peer voice 97810 pots
destination-pattern 97810[1-9]
port 1/0:23
forward-digits all
progress_ind alert enable 8
| ||
| Step 5 | Create dial
peer configuration to reach the agent extension (VOIP)
Example: dial-peer voice 40000 voip
description ***To CUCM Agent Extension***
destination-pattern <Agent Extension Pattern to CUCM>
session protocol sipv2
session target ipv4:<CUCM IP Address>
voice-class codec<Codec Preference number>
voice-class sip rel1xx supported "100rel"
dtmf-relay rtp-nte
no vad
!
| ||
| Step 6 | Create dial
peer configuration to reach CVP
Example: dial-peer voice 99995 voip
description ******To CVP for IVR OB*****
destination-pattern 9999500T
session protocol sipv2
session target ipv4:10.10.10.10
codec g711ulaw
voice-class sip rel1xx disable
dtmf-relay rtp-nte h245-signal h245-alphanumeric
no vad
!
!
| ||
| Step 7 | Configure
Transcoding Profile for CUBE E:
Example: dspfarm profile 4 transcode universal
codec g729r8
codec g711ulaw
codec g711alaw
codec g729ar8
codec g729abr8
maximum sessions 250
associate application CUBE
!
|
Configure Unified CVP
Add Outbound Configuration to an Existing Unified CVP Call Server
Complete the following procedure to add Outbound configuration to an existing Unified CVP Call Server.
| Step 1 | Go to Unified CVP OAMP server and login to Operations console page. |
| Step 2 | Click the Device Management tab and open Unified CVP Call Server from the menu. |
| Step 3 | Open a Call Server and click the ICM tab and add DNIS. DNIS number should match with the label configured in the Network VRU Explorer for Outbound in Unified CCE. |
| Step 4 | Click Save and deploy. |
| Step 5 | Repeat Step 3 for all Call Servers. |
Configure Unified CCE
- Add Outbound Database Using ICMDBA Tool
- Configure Logger
- Configure Outbound Dialer
- Create Outbound PIM
- Configure SIP Outbound
- Install SIP Dialer Using Peripheral Gateway Setup
- Add DNP Host File
- Outbound Option Enterprise Data
Add Outbound Database Using ICMDBA Tool
Complete this procedure for Side A only.
Note |
|
| Step 1 | Select Start > All Programs > Cisco Unified CCE Tools > ICMdba. Click Yes at the warnings. |
| Step 2 | Navigate to Server > Instance >Logger. Right-click on the logger that is installed and choose Create to create the Outbound database. |
| Step 3 | In the Create Database dialog box, click Add to open the Add Device dialog box. Click Data. Choose the E drive. Leave the DB size with default value and clickOK to return to the Create Database dialog box. |
| Step 4 | In the Add Device dialog box, Click Log. Choose the E drive. Leave the log size field with default value. Click OK to return to the Create Database dialog box. |
| Step 5 | In the Create Database dialog box, click Create; then click Start. When you see the successful creation message, click OK and then click Close. |
Configure Logger
Configure Outbound Dialer
Note | The Dialer, MR PG, and MR PIM are pre-configured with the day one configuration database for 500,1000,4000 and 12000 deployment models. Steps 1 to 4 are specific to Small Contact Center only. |
| Step 1 | On the Unified CCE Admin Workstation Server, navigate to Start > Cisco Unified CCE Tools > Administration Tools > Configuration Manager . | ||
| Step 2 | In Configuration Manager window, select Outbound> Dialer. | ||
| Step 3 | Click Retrieve > Add and enter the following details: | ||
| Step 4 | Click Save. | ||
| Step 5 | Click the Port Map Selection tab to display the port map configuration. | ||
| Step 6 | Click Add to configure a set of ports and their associated extensions. | ||
| Step 7 | Click OK | ||
| Step 8 | Click
Save and
Close.
|
Create Outbound PIM
- Create Outbound PIM for 500 and 1000 Agent Deployment
- Create Outbound PIM for 4000 Agent Deployment
- Create Outbound PIM for Small Contact Center Deployment
- Create Outbound PIM for 12000 Agent Deployment
Create Outbound PIM for 500 and 1000 Agent Deployment
To create Outbound PIM for 500 and 1000 Agent Deployment, see Configure Media Routing Peripheral Gateway.
Create Outbound PIM for 4000 Agent Deployment
- To create Outbound PIM for 4000 Agent Deployment in Agent PG1, See Configure Multichannel and Outbound PIM's 4000 Agent Deployment.
- To create Outbound PIM for 4000 Agent Deployment in Agent PG2, See Configure Outbound PIM for 4000 Agent Deployment.
Create Outbound PIM for Small Contact Center Deployment
Complete the following procedure to configure the outbound PIM.
| Step 1 | Navigate Start > All programs > Cisco Unified CCE Tools>Peripheral Gateway Setup . | ||
| Step 2 | Click Add in the Instance Components pane, and from the Component Selection dialog box choose Peripheral Gateway . | ||
| Step 3 | In the Peripheral Gateway Properties dialog box: | ||
| Step 4 | In the
Peripheral Interface Manager pane of the Peripheral Gateway Component
Properties dialog box, click
Add and
configure PIM1 with the Client Type of Media Routing as follows
| ||
| Step 5 | Refer to PG Explorer and Enter the value in the Logical Controller ID field.Leave all other fields with default values and click Next . | ||
| Step 6 | In the Device
Management Protocol Properties dialog box, configure as follows:
| ||
| Step 7 | In the Peripheral Gateway Network Interface dialog box, enter the PG Private interface and PG Public (visible) interfaces. Click Next . | ||
| Step 8 | Click the QoS button in the private interfaces section for Side A. In the PG Private Link QoS Settings, check Enable QoS and click OK .This step applies only to Side A. | ||
| Step 9 | Click the QoS button in the visible interfaces section. In the PG Visible Link QoS Settings, check Enable QoS , click OK and click Next. This step applies only to Side A. | ||
| Step 10 | Click Next and Finish. | ||
| Step 11 | Click
Exit
Wizard.
|
Create Outbound PIM for 12000 Agent Deployment
To create Outbound PIM for 12000 Agent Deployment, see Configure Media Routing Peripheral Gateway for 12000 Agent Deployment.
Configure SIP Outbound
- Add Import Rule
- Add Query Rule
- Add Campaign
- Create Admin Script
- Add Routing Script for Agent Based Campaign
- Add Routing Script for IVR Based Campaign
- Create Contact Import File
- Create Do Not Call List
Add Import Rule
Add Query Rule
One or more Import rules must be defined. See Add Import Rule
What to Do Next
-
Goto and add two call types; one for agent-based and another for IVR-based campaigns.
-
Goto and add two dialed numbers under Media routing domain. Map the dial numbers with the call types created in the previous step (one dial number for each call type).
-
Goto and add a skill group under the call manger peripheral. Add a route for this skill group.
-
Goto and add an agent. Associate the agent with the skill group created in the previous step.
Add Campaign
Add Agent Based Campaign
| Step 1 | Goto Unified CCE Data Server or Unified CCE AW-HDS-DDS machine. |
| Step 2 | Navigate to and click Retrieve. |
| Step 3 | Click Add. |
| Step 4 | Enter Campaign Name. |
| Step 5 | Goto Campaign Purpose tab: |
| Step 6 | Goto Query Rule Selection tab and click Add: |
| Step 7 | Goto Skill Group Selection tab: |
| Step 8 | Goto Call Target tab, choose Daylight Savings Zone from the drop-down list. |
| Step 9 | Click Save. |
Add IVR Based Campaign
| Step 1 | Goto Unified CCE Data Server or Unified CCE AW-HDS-DDS machine. |
| Step 2 | Navigate to and click Retrieve. |
| Step 3 | Click Add. |
| Step 4 | Enter Campaign Name. |
| Step 5 | Goto Campaign Purpose tab: |
| Step 6 | Goto Query Rule Selection tab and click Add: |
| Step 7 | Goto Skill Group Selection tab: |
| Step 8 | Goto Call Target tab, choose Daylight Savings Zone from the drop-down list. |
| Step 9 | Click Save. |
Create Admin Script
For more information, see Outbound Option Guide.
Add Routing Script for Agent Based Campaign

For more information, see Outbound Option Guide.
Add Routing Script for IVR Based Campaign
Configure the following for IVR based campaign:
| Step 1 | Open Network VRU Explorer Tool from Configuration Manager tool. Add a label (label should match with the DNIS value configured in CVP call server) to the existing Network VRU of type 10 and select Media Routing type as "Outbound" from drop down list. |
| Step 2 |
Add IVR Based Campaign.
|
What to Do Next
Create Contact Import File
When creating a contact import file, observe the format you designed according to the database rules set up in Import Rule Definition Tab Page.
The following example assumes that you have contact information with AccountNumber, FirstName, LastName, and Phone column types.
| Step 1 | Using a text editor, create a text file that contains the information for these fields. |
| Step 2 | Enter an
account number, first name, last name, and phone number for each entry on a new
line.
Use either Comma Delimited or Fixed Length, as defined on the Import Rule General Tab Page. |
| Step 3 | Save the text file to the local server. |
The following is an example of a contact import file in the comma-delimited format:
6782,Henry,Martin,2225554444
3456,Michele,Smith,2225559999
4569,Walker,Evans,2225552000
6782Henry Martin 2225554444
3456Michele Smith 2225559999
4569Walker Evans 2225552000
Create Do Not Call List
When creating a Do_Not_Call list file, format it correctly using the following instructions.
| Step 1 | Using a text editor, create a text file that contains all the do-not-call phone numbers. |
| Step 2 | Enter a phone number for each Do Not Call entry on a new line. |
| Step 3 | Observe the
following characteristics for each Do Not Call entry:
|
| Step 4 | Save the text file to the local server. |
The following is an example of a Do_Not_Call list:
2225554444
2225556666
2225559999
To add a customer to this list, import a Do Not Call list.
The Campaign Manager reads the Do Not Call import files. Dialing List entries are marked as Do Not Call entries only when the Campaign Manager fetches the Dialing List entry and only when there is an exact, digit-for-digit match. This allows Do Not Call imports to happen while a Campaign is running without rebuilding the Dialing List.
Note | If the Dialing List includes a base number plus extension, this entry must match a Do Not Call entry for that same base number and same extension. The dialer will not dial the extension. |
When the Campaign Manager starts it automatically imports from the DoNotCall.restore file that is stored in the <drive>\icm\<instance>\la\bin directory. When reading Do Not Call import files, the Campaign Manager appends the data to the DoNotCall.restore file. This restore file allows recovery of Do Not Call records after the Campaign Manager stops unexpectedly or for planned maintenance, such as a Service Release installation.
The restore file can grow to approximately 1 GB if 60 million DNC records are imported, each having ten-digit numbers plus five-digit extensions. Sufficient disk space must be available on LoggerA to store the DoNotCall.restore file.
Note | To clear the Do Not Call list, import a blank file with the Overwrite table option enabled. |
Install SIP Dialer Using Peripheral Gateway Setup
Complete this procedure for both Side A and Side B.
Note |
|
| Step 1 | Select Start > All Programs > Cisco Unified CCE Tools >Peripheral Gateway Setup. | ||
| Step 2 | Click Add under Instance Component, then click Outbound Dialer to add the dialer. | ||
| Step 3 | On the Outbound Dialer properties page, ensure that the SIP radio button is checked and then click Next. | ||
| Step 4 | In the SIP Dialer Name field, type the SIP dialer name exactly as it is configured in the Dialer tool under configuration manager. | ||
| Step 5 | In SIP Server Type, ensure that Cisco voice Gateway is selected. | ||
| Step 6 | Provide the
Outbound gateway IP in the
SIP Server
field and click
Next.
| ||
| Step 7 | In the
Campaign Manager Server field, provide the following IP address.
| ||
| Step 8 | In the CTI Server A field, provide the A side CTIOS server IP Address; in the CTI Server Port A field, enter 42027 as the port number. | ||
| Step 9 | In the CTI Server B field, provide the B side CTIOS server IP address; in the CTI Server Port B field, enter 43027 as the port number. | ||
| Step 10 | Leave all other field as default and click Next. In the following window that opens, click Next to complete the install. |
Add DNP Host File
Complete this procedure to add DNP Host file.
| Step 1 | In the C drive of the virtual machine where dialer is installed, navigate to \icm\customerInstanceName\Dialer directory. | ||
| Step 2 | Modify the DNP
Host file for static route mapping.
The format for a static route is wildcard pattern, IP address or hostname of the Gateway that connects to the dialer, description. Example : 7????? (Dial pattern), 10.86.227.144 (gateway ip) , calls to agent extensions
|
Outbound Option Enterprise Data
In order for Outbound Option enterprise data to appear in the Cisco Agent Desktop Enterprise Data window, the administrator must edit the Default layout to include some or all Outbound Option variables. These variables are prefixed with “BA.” (Edit the default enterprise data layout in the Cisco Desktop Administrator.)
Note | To enable the ECC variables, See Configure Expanded Call Variable. The BAStatus field is required. All other BA fields are optional for Progressive and Predictive modes. In Preview mode, the Skip button will not work if BADialedListID is not enabled. |
- The BABuddyName field is required, if you want to see the customer’s name being called.
- If a call is part of a Preview dialing mode campaign, the first letter in the BAStatus field entry is a P. If a call is part of a Direct Preview dialing mode campaign, the first letter in the BAStatus field entry is a “D.”
Configure Unified Communications Manager
Add Normalization Script
This script is needed to disable Ringback during Transfer to Agent for SIP calls.
| Step 1 | Log in to Unified Communications Manager Administration page. |
| Step 2 | Navigate to . |
| Step 3 | Click Add New. Displays SIP Normalization Script page. |
| Step 4 | Enter Name of the script. |
| Step 5 | Enter the following script in
Content field:
M = {}
function M.outbound_180_INVITE(msg)
msg:setResponseCode(183, "Session in Progress")
end
return M
|
| Step 6 | Keep default values for remaining fields. |
| Step 7 | Click Save. |
Configure Trunk towards the Outbound Gateway
To configure trunk towards the outbound gateway, see Add SIP Trunks. While updating SIP info tab:
| Step 1 | Enter IP address of outbound gateway in Address IPv4 field. | ||
| Step 2 | Choose newly
added
Normalization Script from the drop-down list.
|
Configure Post Call Survey
Complete the following procedures to configure post call survey:
Configure Unified CVP
| Step 1 | Log in to the Operations Console and choose System > Dialed Number Pattern. |
| Step 2 | Enter the following configuration settings to associate incoming dialed numbers with survey numbers:
|
| Step 3 | Click Deploy to deploy the configuration to all Unified CVP Call Server devices. |
Configure Unified CCE
Configure ECC Variable
You need not configure Unified CCE to use Post Call Survey, however, you can turn the feature off (and then on again) within an ICM script by using the ECC variable user.microapp.isPostCallSurvey and a value of n or y (value is case insensitive) to disable and re-enable the feature.
Configure the ECC variable to a value of n or y before the label node or before the Queue to Skillgroup node. This sends the correct value to Unified CVP before the agent transfer. This ECC variable is not needed to initiate a Post Call Survey call, but you can use it to control the feature when the Post Call Survey is configured using the Operations Console.
When the DN is mapped in the Operations Console for Post Call Survey, the call automatically transfers to the configured Post Call Survey DN.
Complete the following procedure to enable or disable the Post Call Survey:
Configure a-Law Codec
Configure the following in Cisco HCS core components to support a-law codec:
Configure Gateway
Configure Ingress Gateway
| Step 1 | Add the voice
class codec 1 to set the codec preference in dial-peer:
voice class codec 1
     codec preference 1 g729r8
     codec preference 2 g711alaw
Example: dial-peer voice 70021 voip
description Used for Switch leg SIP Direct
preference 1
max-conn 225
destination-pattern xxxx...... # Customer specific destination
session protocol sipv2
session target ipv4:###.###.###.### # IP Address for Unified CVP
session transport tcp
voice class codec 1
voice-class sip options-keepalive up-interval 12 down-interval 65 retry 2
dtmf-relay rtp-nte
no vad
|
| Step 2 | Modify the
dial-peer to specify the codec explicitly for a dial-peer:
dial-peer voice 9 voip
     description For Outbound Call for Customer
     destination-pattern <Customer Phone Number Pattern>
     session protocol sipv2
     session target ipv4:<Customer SIP Cloud IP Address>
     session transport tcp
     voice-class sip rel1xx supported "100rel"
     voice-class sip options-keepalive up-interval 12 down-interval 65 retry 2
     dtmf-relay rtp-nte
     codec g711alaw
     no vad

dial-peer voice 10 voip
     description ***To CUCM Agent Extension For Outbound***
     destination-pattern <Agent Extension Pattern to CUCM>
     session protocol sipv2
     session target ipv4:<CUCM IP Address>
     voice-class sip rel1xx supported "100rel"
     dtmf-relay rtp-nte
     codec g711alaw
|
Configure VXML Gateway
dial-peer voice 919191 voip
     description Unified CVP SIP ringtone dial-peer
     service ringtone
     incoming called-number 9191T
     voice-class sip rel1xx disable
     dtmf-relay rtp-nte
     codec g711alaw
     no vad

dial-peer voice 929292 voip
     description CVP SIP error dial-peer
     service cvperror
     incoming called-number 9292T
     voice-class sip rel1xx disable
     dtmf-relay rtp-nte
     codec g711alaw
     no vad

dial-peer voice 7777 voip
     description Used for VRU leg #Configure VXML leg where the incoming called
     service bootstrap
     incoming called-number 7777T
     dtmf-relay rtp-nte
     codec g711alaw
     no vad

dial-peer voice 5 voip
     description for SIP TTS Media Call
     preference 1
     session protocol sipv2
     session target ipv4: <ASR primary server IP>
     destination uri tts
     voice-class sip options-keepalive up-interval 12 down-interval 65 retry 2
     dtmf-relay rtp-nte
     codec g711alaw
     no vad

dial-peer voice 6 voip
     description for SIP ASR Media Call
     preference 1
     session protocol sipv2
     session target ipv4: <TTS primary server IP>
     destination uri asr
     voice-class sip options-keepalive up-interval 12 down-interval 65 retry 2
     dtmf-relay rtp-nte
     codec g711alaw
     no vad

dial-peer voice 7 voip
     description for SIP TTS Media Call
     preference 2
     session protocol sipv2
     session target ipv4: <ASR secondary server IP>
     destination uri tts
     voice-class sip options-keepalive up-interval 12 down-interval 65 retry 2
     dtmf-relay rtp-nte
     codec g711alaw
     no vad

dial-peer voice 8 voip
     description for SIP ASR Media Call
     preference 2
     session protocol sipv2
     session target ipv4: <TTS secondary server IP>
     destination uri asr
     voice-class sip options-keepalive up-interval 12 down-interval 65 retry 2
     dtmf-relay rtp-nte
     codec g711alaw
     no vad
|
Configure Unified CVP
You must convert the following files to A-law:
- C:\inetpub\wwwroot\en-us\app
- C:\inetpub\wwwroot\en-us\app\ag_gr
- C:\inetpub\wwwroot\en-us\sys
- C:\Cisco\CVP\OPSConsoleServer\GWDownloads in OAMP server
- C:\Cisco\CVP\VXMLServer\Tomcat\webapps\CVP\audio
- C:\inetpub\wwwroot\en-us\VL (optional, applicable only for RSM)
Note |
|
Complete the following procedure to convert mu-law audio files to a-law format:
| Step 1 | Copy the wav file from Unified CVP to your local desktop. |
| Step 2 | Go to . |
| Step 3 | Open the Sound Recorder. |
| Step 4 | Select File and click Open. |
| Step 5 | Browse for the mu-law audio file and click Open. |
| Step 6 | Go to Properties. |
| Step 7 | Click Convert Now. |
| Step 8 | Select CCITT A-Law from Format. |
| Step 9 | Click OK. |
| Step 10 | Select and provide a filename. |
| Step 11 | Copy the new a-law format file into the following directory of media server: C:\inetpub\wwwroot\en-us\app |
Enable Recording for Agent Greeting and Courtesy Callback
Complete the following procedure to enable recording for Agent Greeting and Courtesy Callback.
| Step 1 | Open the call studio and go to the callback entry application. |
| Step 2 | Double-click app.callflow. |
| Step 3 | Go to Record Name element settings and change the File Type to other (default is wav). |
| Step 4 | Set the MIME type to audio/x-alaw-basic. |
| Step 5 | Set the File extension as wav |
| Step 6 | Open the RecordAgentGreeting application and double-click app.callflow. |
| Step 7 | Go to Record Greeting With Confirm element settings and change the File Type to other (default is wav). |
| Step 8 | Set the MIME type to audio/x-alaw-basic. |
| Step 9 | Set the File extension as wav. |
| Step 10 | Validate, save, and deploy the application. |
| Step 11 | Restart the Unified CVP services. |
Configure Unified Communication Manager
Complete the following procedure to provision a-Law through Cisco Unified Communications Manager:
| Step 1 | Login to the Cisco Unified Communication Manager Administration page. |
| Step 2 | Navigate to . |
| Step 3 | Choose publisher server from Server drop-down list. |
| Step 4 | Choose Cisco CallManager (Active) from Service drop-down list. |
| Step 5 | In ClusterWide Parameters (System - Location and region), choose Enabled for All Devices from G.711 A-law Codec Enabled drop-down list. |
| Step 6 | Choose Disable from following drop-down lists: |
| Step 7 | Click Save. |
Configure Unified CM Based Silent Monitoring
Perform the following steps to configure unified CM based silent monitoring:
-
Enable Built-in Bridge. See,Enable or Disable the Built-in-Bridge
Add Monitoring Calling Search Space for the device
Note | During CTIOS Server installation, for IPCC Silent Monitor Type, select CCM Based. |
| Step 1 | Log in to Unified Communication Domain Manager as provider, reseller or customer. |
| Step 2 | Add Calling Search Space for monitoring purpose. See, Add Class of Service. |
| Step 3 | Edit Lines, choose newly added Calling Search Space from the drop-down list. See, Edit Lines. |
| Step 4 | Click Save. |
Configure Music On Hold
Configure Unified Communication Manager
MoH server can be deployed in two modes.
Configure Music On Hold Server Audio Source
Set up Service Parameters for Music on Hold
| Step 1 | Login to Cisco Unified Communications Manager Administration page. |
| Step 2 | Select . |
| Step 3 | Select the MoH server from the drop-down list . |
| Step 4 | Select the app service from Cisco IP Voice Media Streaming App Service drop-down list. |
| Step 5 | Select the required codec in the Supported MOH Codecs field and click Ok. |
| Step 6 | Click Save. |
Set up Phone Configuration for Music on Hold
| Step 1 | Login to Cisco Unified Communications Manager Administration page. |
| Step 2 | Select . |
| Step 3 | Select the phone to configure MOH. |
| Step 4 | Select a audio source from User Hold MOH Audio Source drop-down list. |
| Step 5 | Select a audio source from Network Hold MOH Audio Source drop-down list. |
| Step 6 | Click Save and click Apply and reset the phone. |
 Feedback