Schedule Reports

Overview

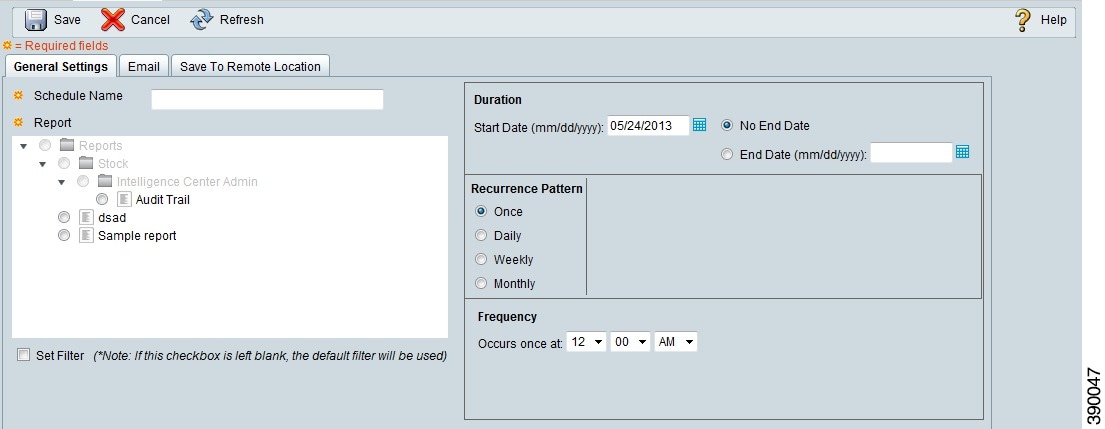
You can automate the generation of reports on a regular and recurring basis by setting up a schedule. The Scheduler lets you run large dataset reports once to be sent to, and viewed by, many users.

Only users with Report Designer and System Configuration Administrator roles can access the Scheduler drawer. System Configuration Administrators can perform all scheduler functions on any reports. They can read, edit, and run any scheduled report and can create a schedule for any report. Report designers can create a schedule only for those reports that they created or for which they have Execute permissions.

Figure 1. The Report Scheduler


You can schedule reports in any of the following ways:

  • Run at predetermined times

  • Automatically email reports

  • Save reports to remote location

Create a Schedule for a Report

You can schedule reports to run automatically within a dashboard. For example, an interval report can be run every 30 minutes to capture a day's activity up to the prior interval.


Note

Live Data does not support scheduling.

Procedure


Step 1

In the Scheduler, click Create.

Step 2

In the General Settings tab, enter a Schedule Name for the scheduled report.

Step 3

In the Report area, select Reports and then select a report.

Step 4

Check the Set Filter check box to configure the filters. To use the default filter, do not check the check box.

You cannot schedule a report that does not have a filter.

Step 5

Click the Set filtering criteria link to go to the filter configuration page.

Step 6

In the Duration section, click the calendar icon to select the Start Date and check No End Date, or use the calendar icon to End Date.

Step 7

In the Recurrence Pattern section, specify the frequency of the scheduled report. Choose from one of the following options:

  • Once—Specify the time of day for the single occurrence.

  • Daily—Specify a number for recurrence of days; for example, every four days.

  • Weekly—Specify the number of weeks and the days of the week that you want the scheduled report to be run.

  • Monthly—Select a day of the month and specify the number of months that you want the scheduled report to run.

    Note 
    Use Last to specify the last day of the month.

In the Frequency section, specify the number of times the report should run on the scheduled days.

Note 

The maximum frequency with which you can schedule a report is once every five minutes.

Step 8

Click Save.


Configure a Scheduled Report to Be Sent by Email

In the Scheduler, click the Email tab to set up a schedule to email a scheduled report.

Procedure


Step 1

In the Email Distribution field, click Add, and enter the recipient email address.

Tip 
Repeat Step 1 to add multiple recipients.
Note 

Email page validation occurs when the email ID is entered in the Email Distribution field. No validation is performed if there is no email ID entered in the Email Distribution field.

Step 2

In the Email View drop-down menu, select the view of the report that you want to email.

Note 

Only grid views can be scheduled.

Step 3

In the Email Subject field, enter text for the subject line.

Step 4

In the File Type drop-down menu, select the type of file. Choose one of the following:

  • INLINE HTML—Sends the report in HTML format.

    • The historical report has an upper limit of 8000 rows.

    • The real-time report has an upper limit of 3000 rows.

  • XLS—Sends the report as a Microsoft Excel file attachment.

    • The historical report has an upper limit of 8000 rows.

    • The real-time report has an upper limit of 3000 rows.

  • PDF—Sends the report as a PDF file attachment.

    PDF attachments have the following limitations:

    • The generated PDF has either landscape or portrait orientation. Landscape orientation is the default setting.

    • The generated PDF uses standard font sizes: 10 pixels for landscape orientation and 8 pixels for portrait orientation. The PDF bypasses the font size set in grid view editor to keep the font output printer-friendly.

      Note 

      PDF supports images only in the HTTP format.

    • The generated PDF retains rows that fit within the page for the selected orientation. Columns that do not fit within the page are truncated.

    • Only 1000 rows are supported for a PDF file attachment. An email message is sent if the scheduled report exceeds 1000 rows.

    • The generated PDF does not support word-wrap for columns. In case of larger text, you can customize the column width in the grid editor to avoid overlaps. However, this customization might reduce the number of columns shown in the PDF.

    • The generated PDF does not support multibyte characters. Also, characters with diacritical marks like é, ô, ü are not supported.

Step 5

Click Save.


Note

Every time you edit a scheduled report and click Save, scheduler runs and sends the scheduled report by email to all the recipients that are configured in the Email Distribution field.

Configure a Report to Be Posted to a Remote Location

In the scheduler, click the Save to Remote Location tab to post a report.

Procedure


Step 1

In the Protocol drop-down list, select SFTP to establish secure connection to the remote location.

Step 2

In the Report View drop-down list, select the view of the report to be posted.

Step 3

In the Host field, enter the IP address of the remote location.

Step 4

Enter a Port number for the SFTP.

Note 

The default port number is 22.

Step 5

Enter a User name for the host.

Step 6

Enter a Password for the host.

Step 7

In the Directory Path field, enter the location on the host to save your .csv file to.

Step 8

Click Save.


Note

  • Date Time format in a scheduled report of type CSV is: Day_of_week Month Date_of_Month HH:MM:SS SERVER_TIMEZONE YYYY. For Example, Fri Oct 24 01:00:00 EDT 2014.
  • The time field in a scheduled report of type CSV is displayed in seconds only.