Cisco Unified Wireless IP Phone Guide 7920 for Cisco CallManger Express 3.2 and Later
Bias-Free Language
The documentation set for this product strives to use bias-free language. For the purposes of this documentation set, bias-free is defined as language that does not imply discrimination based on age, disability, gender, racial identity, ethnic identity, sexual orientation, socioeconomic status, and intersectionality. Exceptions may be present in the documentation due to language that is hardcoded in the user interfaces of the product software, language used based on RFP documentation, or language that is used by a referenced third-party product. Learn more about how Cisco is using Inclusive Language.
- Updated:
- January 20, 2005
Chapter: Using Advanced Call Features
Using Advanced Call Features
Advanced call handling tasks require access to special features. Your system administrator might configure these features for your phone depending on your call-handling needs and work environment.
Parking and Retrieving Parked Calls
You can use the Call Park feature to store a connected call in the Cisco Unified CallManager system, then you or a co-worker can retrieve the parked call from another phone in a conference room or in a co-worker's office.
 or
or 

Tip![]() •
•![]() If the screen does not display a call park number, then the Call Park feature is not available for your phone.
If the screen does not display a call park number, then the Call Park feature is not available for your phone.
•![]() You have a limited amount of time to retrieve the parked call before it reverts to ringing at its original destination. See your system administrator for this time limit.
You have a limited amount of time to retrieve the parked call before it reverts to ringing at its original destination. See your system administrator for this time limit.
Redirecting a Ringing Call to Your Phone By Using Call PickUp
Call PickUp allows you to redirect a call that is ringing on a co-worker's phone to your own phone so you can answer it. Your system administrator can set up a Call Pickup group for extensions that share call handling responsibilities.
When you want to answer calls to phones that do not belong to your Call Pickup group, you need to have the call group pickup code. Your system administrator defines Call Pickup groups and group pickup codes.

Tip ![]() If several calls come in when you activate Pickup or Group Pickup, the first unanswered call rings at your phone.
If several calls come in when you activate Pickup or Group Pickup, the first unanswered call rings at your phone.
Understanding Shared Lines
Your system administrator might give you a "shared" line. Shared line features do not apply to standard, unshared lines. Typically, a shared line has two main uses:
•![]() One person applies a shared line to multiple phones—For example, your shared line, 23456, applies to your wireless IP phone and to your office desktop phone. An incoming call to 23456 rings on your desk and on your wireless IP phone, and you can use either phone to answer the call.
One person applies a shared line to multiple phones—For example, your shared line, 23456, applies to your wireless IP phone and to your office desktop phone. An incoming call to 23456 rings on your desk and on your wireless IP phone, and you can use either phone to answer the call.
•![]() Multiple people share a line—For example, you are a manager who shares a line and extension number with your assistant. An incoming call to the extension rings on both of the phones.
Multiple people share a line—For example, you are a manager who shares a line and extension number with your assistant. An incoming call to the extension rings on both of the phones.
|
|
|
|---|---|
|
|
Place the shared-line call on hold. Press Resume on another phone with the shared line. |
Using the Phone Book and Speed Dial Features
The Directory menu provides access to these features:
•![]() Personal Phone Book
Personal Phone Book
•![]() Speed Dial
Speed Dial
•![]() Corporate Directory
Corporate Directory
To help you set up and use these features, this chapter includes the following sections:
•![]() Configuring Speed Dial Hot Keys
Configuring Speed Dial Hot Keys
Your Cisco Unified Wireless IP Phone 7920 comes with a local phone book feature. Use the Phone Book option to view phone book entries, to add or edit phone book entries, and to set up speed-dial numbers. You can access entries in your phone book by pressing the PhBook softkey.
Using the Phone Book
|
|
|
|---|---|
|
|
Press PhBook. The phone displays entry names. If there are no phone book entries, "Empty" displays. |
|
|
Scroll to the desired phone book entry and press Detail. The phone book entry item displays the name with the list of associated phone numbers. |
|
|
Press PhBook and scroll to an entry. Press |
|
|
Press PhBook and scroll to an entry. Press Detail and scroll to the desired phone number. Press |
|
|
Press PhBook and scroll to an entry. Press Detail and scroll to the item in the entry to edit. See Figure 7. Press Edit and follow the instructions in the Entering and Editing Text, page 21. When you have edited the entry, press OK, then press Save. |
Adding or Changing Entries in the Phone Book
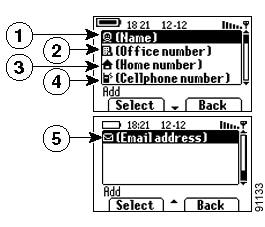
You can add a new phone book entry or change an existing entry by using the Directory menu. You must enter the phone number for each phone book entry exactly as you would dial the number. You can add the information as shown in Figure 7.
Figure 7 Phone Book Entry
|
|
Contact person's name |
|
|
Office phone number entry |
|
|
Home phone number entry |
|
|
Cellular phone number entry |
|
|
E-mail address entry |
|
|
|
|---|---|
|
|
Press Menu and select Directory > Phone Book then select Names to see the entries. |
|
|
Scroll to a phone book entry and press Detail. |
|
|
Choose Menu > Directory > Phone Book > Add. The screen displays as shown in Figure 7. Scroll to the entry item and press Select. Enter the name or phone number by following instructions in the Entering and Editing Text, page 21. When you have finished the entry, press OK, then press Save. Press Back to return to the Directory menu. |
|
|
Choose Menu > Directory >Phone Book > Names, then scroll to an entry. Press Detail and scroll to the item to edit, such as Home number. Edit the item by following instructions in Entering and Editing Text, page 21. When you have finished, press OK, then press Save. Press Back to return to the Directory menu. |
|
|
Choose Menu > Directory > Phone Book > Names, then scroll to an entry. Press Press Erase and press OK to confirm that you want to erase the phone record. Press |
Tip![]() •
•![]() When adding external phone numbers, enter your external access number, such as 9, and the entire telephone number, including 1 and the area code.
When adding external phone numbers, enter your external access number, such as 9, and the entire telephone number, including 1 and the area code.
•![]() To use the corporate directory, see the "Using the Phone Book and Speed Dial Features" section.
To use the corporate directory, see the "Using the Phone Book and Speed Dial Features" section.
Configuring Speed Dial Hot Keys
On the Cisco Unified Wireless IP Phone 7920 keypad, the numeric keys (2-9) are hot keys that access speed-dial numbers.You can assign phone numbers to eight Speed Dial hot keys. The number 1 key is reserved for accessing the voice messaging system.
|
|
|
|---|---|
|
|
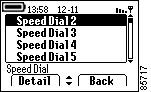
Press Menu and select Directory > Phone Book. Scroll to and select Speed Dial. The Speed Dial hot keys display as shown in Figure 8. Check marks appear when the Speed Dial number hot keys already have assigned phone numbers. |
|
|
Scroll to the Speed Dial number hot key and press Detail. See Figure 8. |
Figure 8 Speed Dial Menu
|
|
|
|---|---|
|
|
Scroll to an available Speed Dial number hot key and press Detail. Press Edit to enter the information. See the Entering and Editing Text, page 21. Press OK to save the speed-dial number, then Back to exit the menu. |
|
|
Scroll to a configured Speed Dial number and press Detail. Press Edit to change or clear an existing phone number. To confirm the change, press OK, then Back to exit the menu. |
|
|
Press and hold See the "Using the Phone Book and Speed Dial Features" section. |
|
|
Log in to your IP Phone User Options web page and choose your Cisco Unified 7920 device. Choose Add/Update Your Speed Dials... from the main menu. You can set up or change speed-dial numbers by entering the phone number and name on this web page. Refer to Customizing Your Cisco Unified IP Phone on the Web for more information. |
 (2-9) for the Speed Dial number that you want to use. The phone displays and dials the number stored for that hot key.
Tip![]() •
•![]() Your screen displays the first few names for speed-dial numbers set up on the User Options web page.To make a call from your speed dial list, scroll to the name and press
Your screen displays the first few names for speed-dial numbers set up on the User Options web page.To make a call from your speed dial list, scroll to the name and press  .
.
•![]() You must enter the external phone number exactly as you would dial it, including an access code, such as 9, and the area code, if required.
You must enter the external phone number exactly as you would dial it, including an access code, such as 9, and the area code, if required.
•![]() To make a call using Speed Dial, see the "Using the Phone Book and Speed Dial Features" section.
To make a call using Speed Dial, see the "Using the Phone Book and Speed Dial Features" section.
Using Voice Messaging and Call History Logs
The Cisco Unified Wireless IP Phone 7920 main menu provides access to the voice messaging service and to call history logs.
Playing Voice Messages
When the phone displays, "You have voice mail," you can access your messages by using the Messages menu or the shortcut key .
.
 , for immediate access. Enter your voice messaging password and follow the voice instructions to listen to your messages.
Tip![]() •
•![]() For accurate and detailed information about using your voice message service, refer to the documentation for your voice messaging system.
For accurate and detailed information about using your voice message service, refer to the documentation for your voice messaging system.
•![]() For security reasons, you should change your default password as soon as possible.
For security reasons, you should change your default password as soon as possible.
Viewing and Placing Calls from the Call History Menu
You can view a list of missed calls, received calls, and placed calls in the Call History logs. You can dial a number directly from one of the lists.
 Feedback