- Welcome to DMS-Admin
- DMS-Admin Dashboard
- Licenses
- Server Operations
- Analyze Cisco DMS System Logs
- Allow or Disallow Video Transcoding
- Cisco Hinter for RTSP
- Authentication and Federated Identity
- Users and Groups
- Events and Notifications
- Configure Failover
- Welcome to Centralized DMP Management
- DMP Dashboard
- Register DMPs
- Organize DMPs in Groups
- Configure DMP Wi-Fi Settings
- Touchscreens, Projectors, and Displays
- DMP Remote Control and Its Emulation
- DMP User Permissions
- Media Assets and Embedded Software
- Schedule Media to Play and Commands to Run
- Content Distribution and Delivery
- Touchscreens, Projectors, and Displays
- Playlists
- Proof of Play
- Plan for and Manage Emergencies
- Welcome to Cisco Cast
- Redistribute Live TV
- Video on Demand
- Electronic Program Guide
- Look and Feel
User Guide for Cisco Digital Media Manager 5.3.x
Bias-Free Language
The documentation set for this product strives to use bias-free language. For the purposes of this documentation set, bias-free is defined as language that does not imply discrimination based on age, disability, gender, racial identity, ethnic identity, sexual orientation, socioeconomic status, and intersectionality. Exceptions may be present in the documentation due to language that is hardcoded in the user interfaces of the product software, language used based on RFP documentation, or language that is used by a referenced third-party product. Learn more about how Cisco is using Inclusive Language.
- Updated:
- March 11, 2014
Chapter: Configure DMP Wi-Fi Settings


Concepts
Glossary

Timesaver Go to terms that start with... [ numerals | A | C | E | P | S | T | W ].
|
Based on the Advanced Encryption Standard (AES) defined in the National Institute of Standards and Technology's FIPS Publication 197, AES-CCMP is a symmetric block cipher that can encrypt and decrypt data using keys of 128, 192, and 256 bits. AES-CCMP is superior to WEP encryption and is defined in the IEEE 802.11i standard.
See also
WEP keys.
|

ASCII Passphrases and Hexadecimal Keys for WEP

Tip You can ignore this topic if your Wi-Fi network uses WPA and not WEP.
Many Wi-Fi access points (wireless routers) accept only a hexadecimal passphrase for WEP-64 and WEP-128. And yet, DMPs accept only an ASCII passphrase for WEP. For this reason, it might be necessary at times to translate your WEP passphrase from ASCII to hexadecimal.

Note Many third-party converters are available. We do not offer any Cisco converter for this purpose.
The typical workflow is as follows.
1.![]() Pick an ASCII passphrase. For example,
PassphraseWEP128
.
Pick an ASCII passphrase. For example,
PassphraseWEP128
.
2.![]() Convert your string of ASCII characters to the hexadecimal key or keys for your network.
Convert your string of ASCII characters to the hexadecimal key or keys for your network.
3.![]() Configure your DMP to use the ASCII from which you derived the hexadecimal.
Configure your DMP to use the ASCII from which you derived the hexadecimal.
4.![]() Configure your wireless router to use the appropriate hexadecimal key or keys.
Configure your wireless router to use the appropriate hexadecimal key or keys.
Workflow
It is not necessary, useful, or correct to restart a DMP immediately after you define its Wi-Fi settings. Instead, the typical workflow is as follows.
|
1. 
|

|
b.
c. 
|

|
Restrictions
• Ethernet connections take priority over Wi-Fi connections on DMPs where both are active.
• The Broadcast SSID setting must be enabled on your wireless access points (also known as wireless routers or WLAN controllers ). Otherwise, your DMPs cannot connect to your WLAN and are prevented from obtaining IP addresses.
• We do not support “open” Wi-Fi networks. They are a security risk.
• We do not support multicast or other streams over Wi-Fi.
• DMP 4305G endpoints and DMP 4310G endpoints do not support Wi-Fi.
Procedures
• Establish a Wired Network Connection
Establish a Wired Network Connection
Note See the printed documentation that shipped with your DMP to understand its reliance on DHCP.
A DMP must already be reachable before it can receive Wi-Fi settings. Therefore, you must establish a wired connection before you can deploy Wi-Fi settings.
• Verify that the Broadcast SSID setting is enabled on your wireless access points. Otherwise, your DMPs cannot connect to your WLAN and are prevented from obtaining IP addresses.
• Does a security policy in your network restrict DHCP address assignments to known MAC addresses? If so, locate the MAC address printed on a sticker that is affixed to your DMP. Then, share this address with your security policy administrator.
Step 2![]() Plug the other end of this cable into a network hub, network switch, or router that participates in an IP network that uses DHCP for dynamic address allocation.
Plug the other end of this cable into a network hub, network switch, or router that participates in an IP network that uses DHCP for dynamic address allocation.
Step 3![]() Stop. You have completed this procedure.
Stop. You have completed this procedure.
• Go to the “Establish a Wireless Network Connection (802.11)” section.
Establish a Wireless Network Connection (802.11)
You can create and save applications that describe the important attributes of wireless 802.11 networks throughout your organization. After you define and save these settings, you can deploy them to centrally managed DMPs individually or to any of your DMP groups.
• Do your DMPs all support wireless connectivity? Some models do not. See their datasheets on Cisco.com.
- Verify that the Broadcast SSID setting is enabled on your wireless access points. Otherwise, your DMPs cannot connect to your WLAN and are prevented from obtaining IP addresses.
- Does a security policy in your network restrict DHCP address assignments to known MAC addresses? If so, locate the WLAN address printed on a sticker that is affixed to your DMP. Then, share this address with your security policy administrator.
• Verify that your wireless network is working correctly, is available, and you understand how it authenticates connection requests.
- Complete all steps in the “Establish a Wired Network Connection” section.
Step 2![]() Choose
Digital Media Players > Advanced Tasks > Wi-fi Configuration > Add New Application
.
Choose
Digital Media Players > Advanced Tasks > Wi-fi Configuration > Add New Application
.
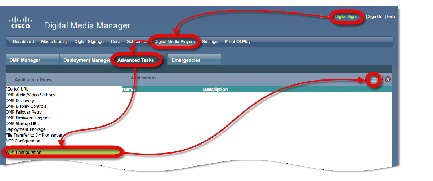
The Create New WIFI Application page opens.

Step 3![]() Enter a meaningful name for the Wi-Fi network that this application describes.
Enter a meaningful name for the Wi-Fi network that this application describes.
For example, you might use a name that specifies the locale, the building, and the security method for this network.
Step 4![]() Enter in the Network SSID field the SSID for the network that this application describes.
Enter in the Network SSID field the SSID for the network that this application describes.
Tip In the future, if you reconfigure SSID settings in your WLAN, your DMPs will lose their network connections. If this occurs, simply restart your DMPs to restore normal operation.
Step 5![]() Choose from the Security list the security method for your network. The options are:
Choose from the Security list the security method for your network. The options are:
The security method that you choose controls, in part, which other fields and options you see.
Step 6![]() Do the following, as needed.
Do the following, as needed.
- Did you choose a WEP-based security method? And do you see the Passphrase field? If so, enter in it the key from which your 64-bit or 128-bit passphrase is cryptographically derived.
- Did you choose a WPA-based or WPA-2-based security method? And do you see the Passphrase field? If so, enter in it the pre-shared key for your network.
- Do you see the Encryption list? If so, choose from it either TKIP or CCMP .
- Do you see the EAP list? If so, choose from it either FAST , MD5 , or PEAP (ver.0) .
- Do you see the Username and Password fields? If so, enter in them respectively a valid username for your wireless network and the password to authenticate that username.
Step 7![]() Click
Submit
to save this application.
Click
Submit
to save this application.
Step 8![]() Deploy this application to your DMPs, as appropriate.
Deploy this application to your DMPs, as appropriate.
Step 9![]() Verify that your DMPs have IP addresses as nodes on the wireless network.
Verify that your DMPs have IP addresses as nodes on the wireless network.
Step 10![]() After the deployment is successful,
unplug the Ethernet cables
from your DMPs.
After the deployment is successful,
unplug the Ethernet cables
from your DMPs.
Otherwise, their Ethernet connections will take priority over their Wi-Fi connections.
Step 11![]() After you unplug their Ethernet cables, restart these DMPs.
After you unplug their Ethernet cables, restart these DMPs.
Step 12![]() Stop. You have completed this procedure.
Stop. You have completed this procedure.
Reference
DMP Network Interfaces
Wired2 |
||
FAQs and Troubleshooting
• FAQs
FAQs
Q. What configuration errors might cause the following combination of symptoms to occur simultaneously?
- I cannot ping DMPs on my WLAN.
- I cannot open any instances of DMPDM for DMPs on my WLAN.
- Digital Signs software on my DMM appliance shows that DMPs are rea on my WLAN.
- I can deploy commands and assets from my Digital Signs software to DMPs in my WLAN.
It is likely that your DMPs are configured correctly. Please check for errors in the network security settings for your WLAN.
Q. What might prevent my DMPs from connecting to my WLAN or obtaining IP addresses?
The Broadcast SSID setting must be enabled on your wireless access points.
Q. Why did my DMPs lose their wireless network connectivity?
This can occur after you change SSID settings for your WLAN. Please restart your DMPs to restore their connections.
Q. Can I overcome the SSID broadcast requirement if I wait until my DMP is connected before I turn off the SSID broadcast?
No. Your DMP will lose its connection to your WLAN.
Q. What prevents my DMPs from receiving IP addresses even after they have associated to my WLAN access point?
This can occur whenever you change SSID settings for your WLAN. Please restart your DMPs to restore their connections.
Q. How can my wireless DMP use a static IP address?
Configure your wireless access point to assign the address.
Q. Why might I see references to TKIP after I configure my DMPs to use WPA2-EAP with AES CCMP?
This is a known issue. Although the Digital Signs software user interface might state that you use TKIP, your DMP uses WPA2-EAP with AES CCMP successfully, just as you configured it to do.
Q. Why might I see references to DHCP after I configure my DMPs to use static IP addresses on my WLAN?
This is a known issue. Although the Digital Signs software user interface might state that you use DHCP, your DMPs continue to use the static IP addresses that you configured.
 Feedback