- DMM User's Guide Preface
- DMM User's Guide Overview
- Understanding the Digital Media Manager
- Managing User Accounts
- Create Content Offering
- Creating Playlists
- Categorizing Content
- Customizing Video Portal
- Managing Deployments
- Config Settings
- Linking to the Video Portal
- Setting Up the DME 1000 and DME 2000 Encoders
- Setting Up Live Events Using a DME 1000 or DME 2000 Encoder
- Setting Up Live Events Using Third-Party Live Streams
- Archive and Delete
- Video Reports Metrics Overview
- DMM User's Guide Glossary
Cisco Digital Media Manager User Guide (version 3.5)
Bias-Free Language
The documentation set for this product strives to use bias-free language. For the purposes of this documentation set, bias-free is defined as language that does not imply discrimination based on age, disability, gender, racial identity, ethnic identity, sexual orientation, socioeconomic status, and intersectionality. Exceptions may be present in the documentation due to language that is hardcoded in the user interfaces of the product software, language used based on RFP documentation, or language that is used by a referenced third-party product. Learn more about how Cisco is using Inclusive Language.
- Updated:
- March 13, 2015
Chapter: Setting Up Live Events Using Third-Party Live Streams
Setting Up Live Events Using Third-Party Live Streams
This chapter describes how to manage live events using third-party streams within the DMS.
Understanding Live vs. On-Demand
Live event offerings differ from on-demand offerings in the following ways:
•![]() Live events are scheduled to start and stop at a certain date and time. After a live event has started, end users who access the event late cannot start from the beginning of the event. All concurrent end users access the same and current time point of the offering. End users canot access a live stream before the event starts, go backwards, or skip ahead within the live offering. When the live event has concluded, it is longer be accessible to end users.
Live events are scheduled to start and stop at a certain date and time. After a live event has started, end users who access the event late cannot start from the beginning of the event. All concurrent end users access the same and current time point of the offering. End users canot access a live stream before the event starts, go backwards, or skip ahead within the live offering. When the live event has concluded, it is longer be accessible to end users.
•![]() Live events are generally recorded as they occur. At the conclusion of a live event, the recording is edited and then made available for on-demand access shortly thereafter.
Live events are generally recorded as they occur. At the conclusion of a live event, the recording is edited and then made available for on-demand access shortly thereafter.
•![]() On-demand offerings are scheduled to be available at a certain date and time and remain accessible for weeks or months, depending on the freshness or relevance of the content. Each end user who accesses an on-demand offering can start at the beginning of the event. Each end user can also rewind, skip ahead, or jump to different parts of the offering at any time, if these video controls are made available. As long as an on-demand offering is available, it can be accessed 24x7.
On-demand offerings are scheduled to be available at a certain date and time and remain accessible for weeks or months, depending on the freshness or relevance of the content. Each end user who accesses an on-demand offering can start at the beginning of the event. Each end user can also rewind, skip ahead, or jump to different parts of the offering at any time, if these video controls are made available. As long as an on-demand offering is available, it can be accessed 24x7.
•![]() On-demand offerings can be archived (made unavailable) at any time. After an offering is archived, no end user can access it.
On-demand offerings can be archived (made unavailable) at any time. After an offering is archived, no end user can access it.
Setting Up a Live Event
Conducting a complete live event offering consists of four different elements. Each element is treated as a separate Video Part within the same Video family. Each Video Part should be published in sequential order within the DMS:
1. ![]() Pre-event listing: Intended to notify Video Portal end users of the upcoming live event.
Pre-event listing: Intended to notify Video Portal end users of the upcoming live event.
2. ![]() Live event: Actual live offering.
Live event: Actual live offering.
3. ![]() Post-event listing: Intended to notify Video Portal end users who missed the live event that it has concluded and is no longer available.
Post-event listing: Intended to notify Video Portal end users who missed the live event that it has concluded and is no longer available.
4. ![]() On-demand offering: Recorded version of the live event for Video Portal end users who were not able to attend the live version.
On-demand offering: Recorded version of the live event for Video Portal end users who were not able to attend the live version.
Adding a New Pre-Event Listing
Live events are generally pre-announced via an email and/or web site notification. The notification should contain information as to the time and date of the event, the subject matter, speaker, and moderator information. The notification can also contain a link to the pre-event listing, published to the Video Portal. A pre-event listing is intended to inform Video Portal end users of the upcoming live event. Like any other content offering in the Video Portal, the pre-event listing can be located via direct URL (if provided in an email or web site), the Featured Playlist, the Program Guide function, or the Search function.
The four Video Parts that comprise an entire live event offering should be grouped under a single Video family. You must first create the Video family.
To add a new pre-event listing, follow these steps:
Step 1 ![]() Follow the steps in the "Adding a New Video" section, in to create a Video family that represents your set of live event Video Parts (see Figure 13-1). Enter an appropriate title indicating that the offering is live (for example, CEO Live Webcast: Q4 FY05 State-of-the-Business Address). This title appears in the Video Portal in the Video listing of the Playlist, Program Guide, and Search tabs.
Follow the steps in the "Adding a New Video" section, in to create a Video family that represents your set of live event Video Parts (see Figure 13-1). Enter an appropriate title indicating that the offering is live (for example, CEO Live Webcast: Q4 FY05 State-of-the-Business Address). This title appears in the Video Portal in the Video listing of the Playlist, Program Guide, and Search tabs.
Step 2 ![]() After you have created your live event Video family, add a new Video Part by following Step 1 through Step 3 in the "Adding a New Video Part" section, for the Pre-Event Listing.
After you have created your live event Video family, add a new Video Part by following Step 1 through Step 3 in the "Adding a New Video Part" section, for the Pre-Event Listing.
Figure 13-1 Setting a Video Part for a Pre-Event Listing
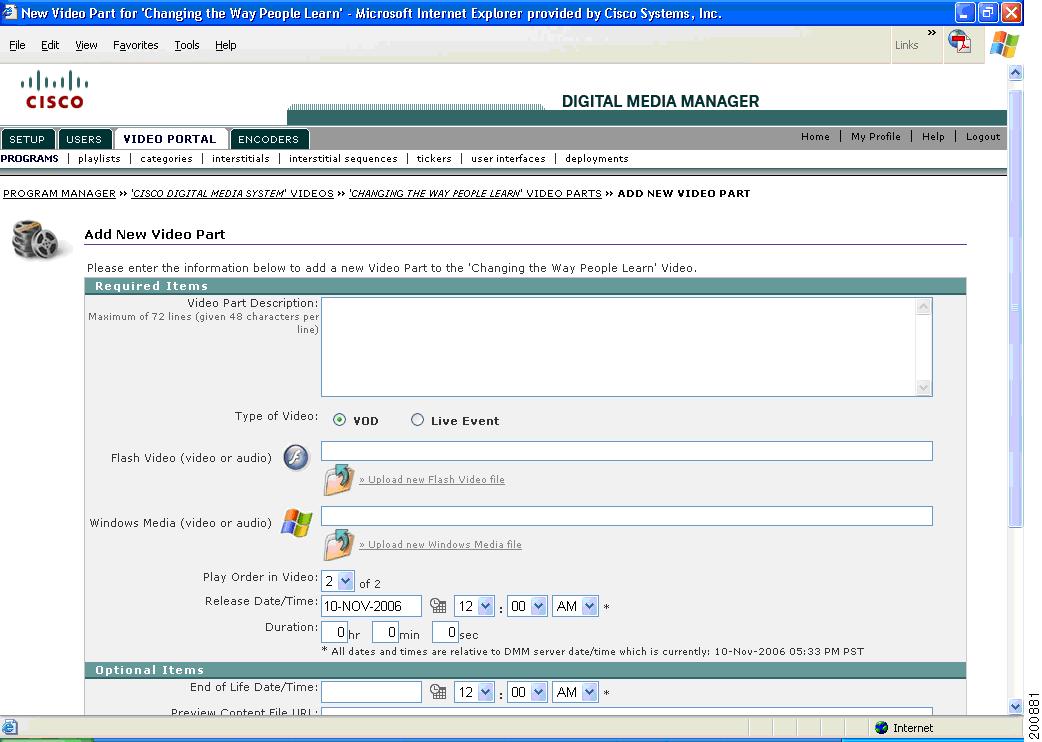
Step 3 ![]() In Step 5 of "Adding a New Video Part," set Media Files to reference a static image, an on-demand video, or audio file containing information about the start and end date and time for the live event.
In Step 5 of "Adding a New Video Part," set Media Files to reference a static image, an on-demand video, or audio file containing information about the start and end date and time for the live event.
Be sure that ALL supported media format fields (that is, Flash, Windows Media, Real, and QuickTime where applicable) are populated with the image, audio, or video file to upload.

Note ![]() All images must be in non-progressive JPG format in order to be viewed in the Video Portal. Audio files should be in .mp3 format to ensure playability across all media plugins (that is, Flash, Windows Media, Real, and Quicktime).
All images must be in non-progressive JPG format in order to be viewed in the Video Portal. Audio files should be in .mp3 format to ensure playability across all media plugins (that is, Flash, Windows Media, Real, and Quicktime).
Step 4 ![]() Follow Step 6 through Step 13 of "Adding a New Video Part" to finish your Pre-Event Video Listing. In Step 7 of "Adding a New Video Part," set the Video Part Release Date to the date on which you want the Pre-Event notification to start.
Follow Step 6 through Step 13 of "Adding a New Video Part" to finish your Pre-Event Video Listing. In Step 7 of "Adding a New Video Part," set the Video Part Release Date to the date on which you want the Pre-Event notification to start.
Step 5 ![]() Follow the steps for "Scheduling a New Live Event Deployment" section to publish this Pre-Event Listing.
Follow the steps for "Scheduling a New Live Event Deployment" section to publish this Pre-Event Listing.
Adding a New Live Event Video
The actual live event should be created as its own Video Part. The metadata associated to the actual live event should contain information that end users should be able to access during a live event (e.g. agenda, downloadable materials, etc.). When you are ready to allow end users to access the live event, you must deploy this Video Part at the start at the event.
Note ![]() It is best practice to deploy the actual live event 10 to 15 minutes before the published start date/time. It is customary to offer live "hold" music for end users who attend the event early. This indicate to them that the event will begin shortly. The four Video Parts that compose an entire live event offering should be grouped under a single Video family. The Live Event Video Family should have been created with the Pre-Event Video Listing.
It is best practice to deploy the actual live event 10 to 15 minutes before the published start date/time. It is customary to offer live "hold" music for end users who attend the event early. This indicate to them that the event will begin shortly. The four Video Parts that compose an entire live event offering should be grouped under a single Video family. The Live Event Video Family should have been created with the Pre-Event Video Listing.
To add a new live event video, follow these steps:
Step 1 ![]() On the PROGRAMS page, locate the Active Program and Video family that represents your live event offering.
On the PROGRAMS page, locate the Active Program and Video family that represents your live event offering.
Step 2 ![]() When you have located your live event Video family, follow the steps in the "Adding a New Video Part" section to add a new video part for the Live Event Video (see Figure 13-2).
When you have located your live event Video family, follow the steps in the "Adding a New Video Part" section to add a new video part for the Live Event Video (see Figure 13-2).
Figure 13-2 Adding a New Live Event Video Part
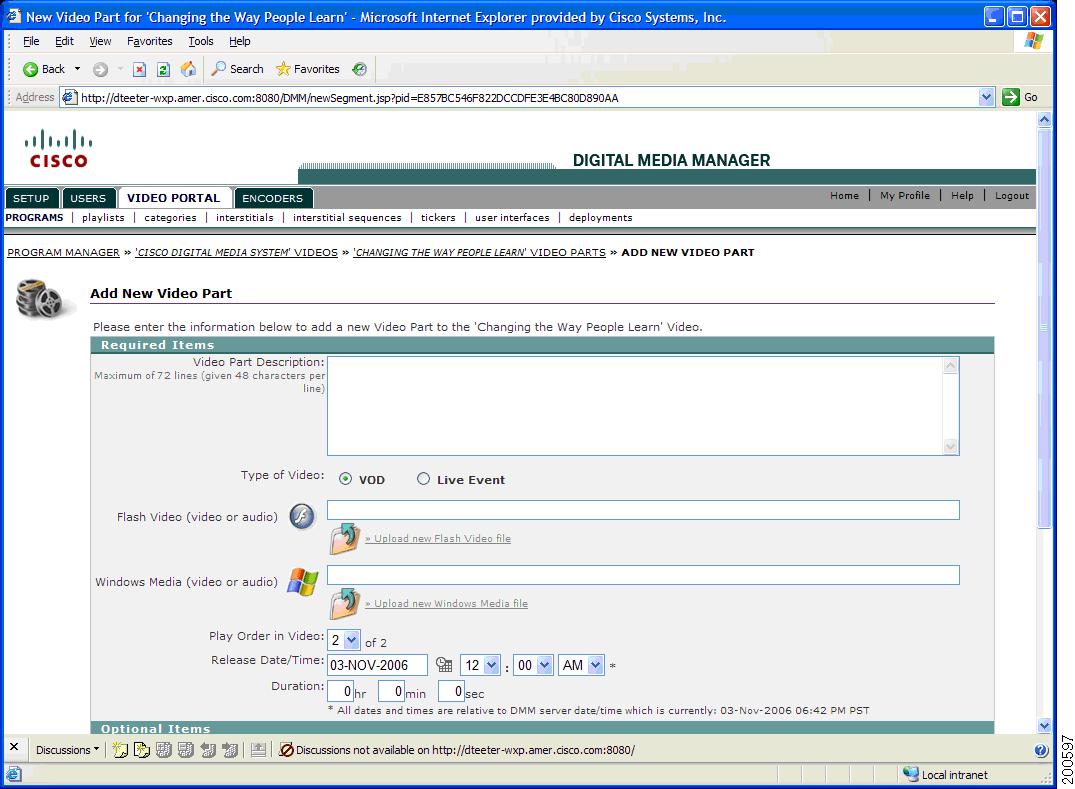
Step 3 ![]() For third-party live events, choose VOD for Type of Video. The Live Event choice is reserved for use with the Cisco Digital Media Encoder 1000 and Digital Media Encoder 2000.
For third-party live events, choose VOD for Type of Video. The Live Event choice is reserved for use with the Cisco Digital Media Encoder 1000 and Digital Media Encoder 2000.
Step 4 ![]() In Step 5 of "Adding a New Video Part," enter the media file(s) URL reference for each available media format of this live event.
In Step 5 of "Adding a New Video Part," enter the media file(s) URL reference for each available media format of this live event.
Be sure that ALL supported media format fields (that is, Flash, Windows Media, Real, and Quicktime where applicable) are populated with the URL reference to the file(s).
Step 5 ![]() Follow Step 6 through Step 13 of "Adding a New Video Part" to finish your Live Event Video Listing. In Step 7, set the Video Part Release Date to the date on which the live event will start.
Follow Step 6 through Step 13 of "Adding a New Video Part" to finish your Live Event Video Listing. In Step 7, set the Video Part Release Date to the date on which the live event will start.
Step 6 ![]() Follow the steps in the "Scheduling a New Live Event Deployment" section to publish this Live Event Video.
Follow the steps in the "Scheduling a New Live Event Deployment" section to publish this Live Event Video.
Adding a Post-Event Listing
After the live webcast has concluded, use a post-event listing to notify end users who missed the event that it has ended. The post-event listing generally consists of a note indicating that the live webcast will be made available as an on-demand version shortly (generally one to two days thereafter).
Note ![]() The four Video Parts that comprise an entire live event offering should be grouped under a single Video family. The Live Event Video Family should have been created with the Pre-Event Video Listing and used with the Live Event Video.
The four Video Parts that comprise an entire live event offering should be grouped under a single Video family. The Live Event Video Family should have been created with the Pre-Event Video Listing and used with the Live Event Video.
To add a Post-Event Listing, follow these steps:
Step 1 ![]() On the PROGRAMS page, locate the Active Program and Video family that represents your live event offering.
On the PROGRAMS page, locate the Active Program and Video family that represents your live event offering.
Step 2 ![]() When you have located your live event Video family, follow the steps in the "Adding a New Video Part" section to add a new video part for the Post-Event Listing (see Figure 13-3).
When you have located your live event Video family, follow the steps in the "Adding a New Video Part" section to add a new video part for the Post-Event Listing (see Figure 13-3).
Figure 13-3 Adding a New Post-Live Event Video Part
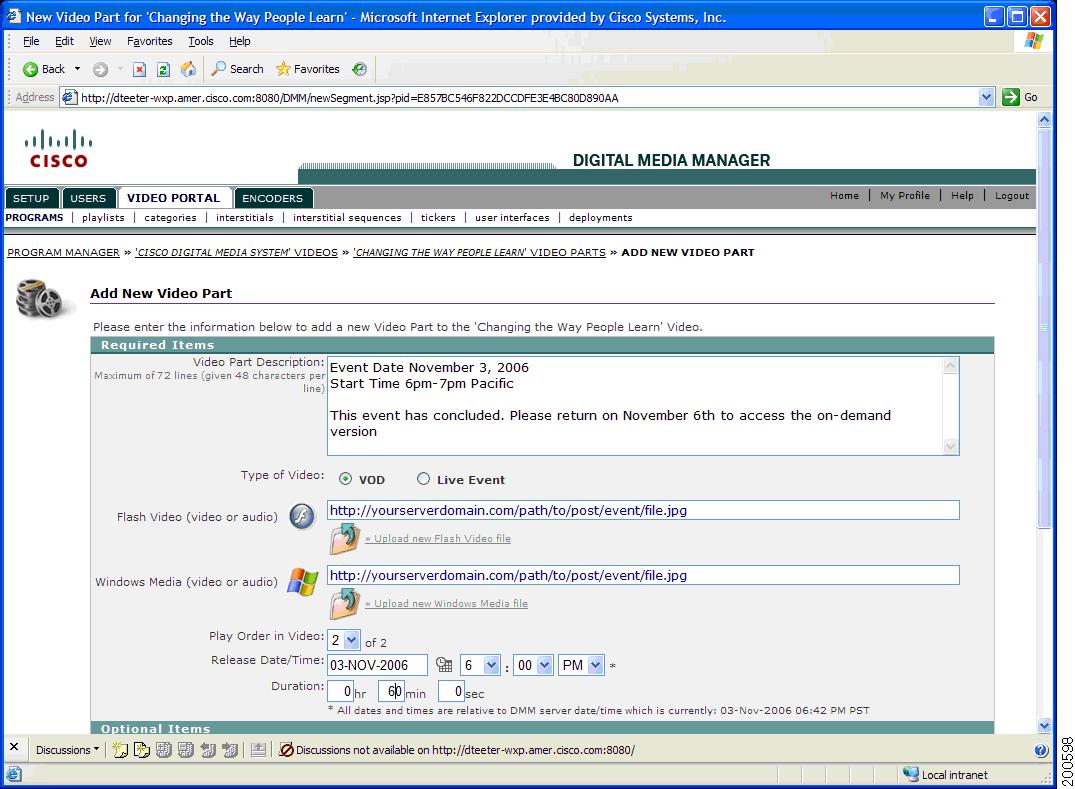
Step 3 ![]() In Step 5 of "Adding a New Video Part," set Media Files to reference a static image, an on-demand video, or audio file containing information about the conclusion of the live event and notifying Video Portal end users of the upcoming on-demand recorded version of the live event.
In Step 5 of "Adding a New Video Part," set Media Files to reference a static image, an on-demand video, or audio file containing information about the conclusion of the live event and notifying Video Portal end users of the upcoming on-demand recorded version of the live event.
Be sure that ALL supported media format fields (that is, Flash, Windows Media, Real, and QuickTime where applicable) are populated with the image, audio, or video file to upload.
Note ![]() All images must be in non-progressive JPG format in order to be viewable in the Video Portal. Audio files should be in .mp3 format to ensure playability across all media plugins (that is, Flash, Windows Media, Real, and Quicktime).
All images must be in non-progressive JPG format in order to be viewable in the Video Portal. Audio files should be in .mp3 format to ensure playability across all media plugins (that is, Flash, Windows Media, Real, and Quicktime).
Step 4 ![]() Follow Step 6 through Step 13 of "Adding a New Video Part" to finish your Post-Event Listing. In Step 7, set the Video Part Release Date to the date on which you would like the Post-Event notification to start.
Follow Step 6 through Step 13 of "Adding a New Video Part" to finish your Post-Event Listing. In Step 7, set the Video Part Release Date to the date on which you would like the Post-Event notification to start.
Step 5 ![]() Follow the steps in the "Scheduling a New Live Event Deployment" section to publish this Post-Event Listing.
Follow the steps in the "Scheduling a New Live Event Deployment" section to publish this Post-Event Listing.
Adding a Video-on-Demand Offering
Note ![]() The four Video Parts that make up an entire live event offering should be grouped under a single Video family. The Live Event Video Family should have been created with the Pre-Event Video Listing and used with the Live Event and Post-Live Event Video Listings.
The four Video Parts that make up an entire live event offering should be grouped under a single Video family. The Live Event Video Family should have been created with the Pre-Event Video Listing and used with the Live Event and Post-Live Event Video Listings.
To Add a Video-on-Demand offering, follow these steps:
Step 1 ![]() On the PROGRAMS page, locate the Active Program and Video family that represent your live event offering.
On the PROGRAMS page, locate the Active Program and Video family that represent your live event offering.
Step 2 ![]() When you have located your live event Video family, follow the steps in the "Adding a New Video Part" section to add a new video part for the Video-On-Demand Listing.
When you have located your live event Video family, follow the steps in the "Adding a New Video Part" section to add a new video part for the Video-On-Demand Listing.
Step 3 ![]() In Step 5 of "Adding a New Video Part," set Media Files to upload or reference the recorded on-demand video or audio file of the live event.
In Step 5 of "Adding a New Video Part," set Media Files to upload or reference the recorded on-demand video or audio file of the live event.
Be sure that ALL supported media format fields (Flash, Windows Media, Real, and QuickTime where applicable) are populated with the image, audio, or video file to upload.
Note ![]() All images must be in non-progressive JPG format in order to be viewable in the Video Portal. Audio files should be in .mp3 format to ensure playability across all media plugins (Flash, Windows Media, Real, and Quicktime).
All images must be in non-progressive JPG format in order to be viewable in the Video Portal. Audio files should be in .mp3 format to ensure playability across all media plugins (Flash, Windows Media, Real, and Quicktime).
Step 4 ![]() Follow Step 6 through Step 13 of "Adding a New Video Part" to finish your Video-On-Demand listing. In Step 7, set the Video Part Release Date to the date when the On-Demand video is available.
Follow Step 6 through Step 13 of "Adding a New Video Part" to finish your Video-On-Demand listing. In Step 7, set the Video Part Release Date to the date when the On-Demand video is available.
Step 5 ![]() Follow the steps in the "Scheduling a New Live Event Deployment" section to publish this Video-on-Demand Live Event Listing.
Follow the steps in the "Scheduling a New Live Event Deployment" section to publish this Video-on-Demand Live Event Listing.
 Feedback