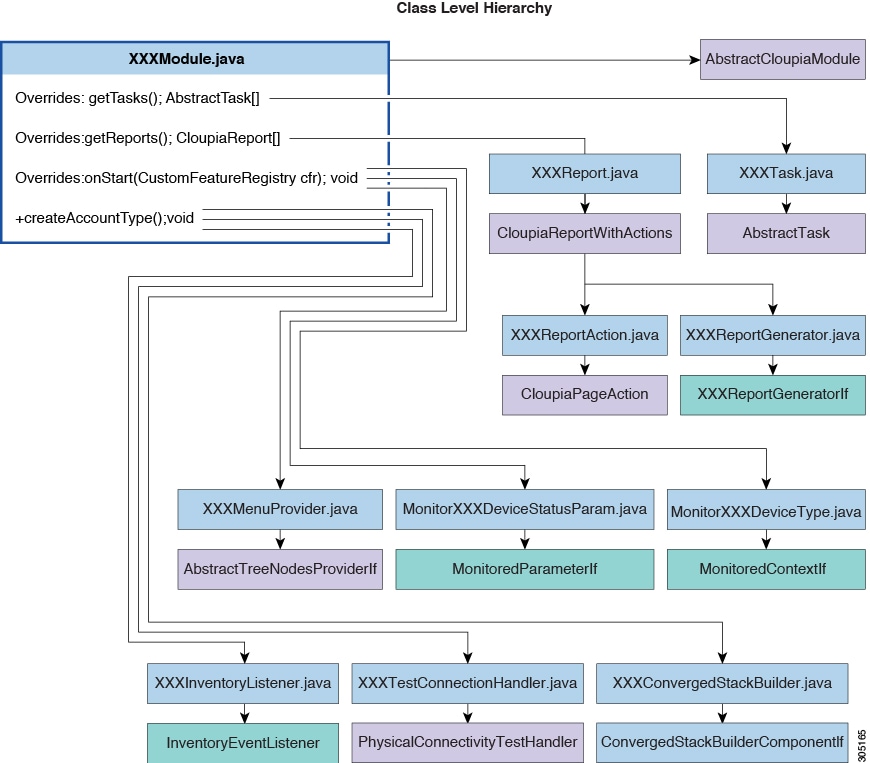
Modules
A module is the top-most logical entry point into Cisco UCS Director.
A module can include the following components:
|
Component |
Description |
|---|---|
|
Task |
A Workflow Task that can be used as part of a Workflow. |
|
Report |
A report that appears in the Cisco UCS Director UI. Reports may (but are not required to) contain clickable actions. |
|
Trigger |
A condition that, once satisfied, can be associated with some action. Examples: shutdown VM, start VM, and so on. |
Creating a Module
The following items must be in place for your custom module to work:
-
A class extending
AbstractCloupiaModule. -
Override the
OnStartmethod in the Module Class that extends theAbstractCloupiaModule. -
A .feature file specifying your dependent jars and module class.
-
A module.properties file is required in the custom module.
Before you begin
Refer to FooModule in the sample project of the Open Automation SDK bundle.
Procedure
| Step 1 |
Extend the |
||
| Step 2 |
Create a .feature file that specifies the dependent jars and module class. |
||
| Step 3 |
Add the necessary custom jar files to the lib folder. |
||
| Step 4 |
Package the properties file at the root level of your module jar.
|
||
| Step 5 |
In the module.properties file, replace the moduleID with the ID of the custom module. |
||
| Step 6 |
From the Eclipse IDE package explorer, right-click the build.xml file and run the ANT target build. This action generates the module zip file and save the file to the base directory of your project. |
The Open Automation SDK Bundle
The following files and directories are supplied in the Open Automation SDK Bundle. The listed files and directories are for an example Compute module. The Open Automation SDK Bundle also includes three other modules:
-
A Storage module
-
A Network module
-
A dummy example module called "foo."
These other modules have similar file and path names, differing only in the module type (compute, storage, network, or foo).
- .classpath
- The .classpath file lists the project's source directory, output directory, and classpath entries such as other projects in the workspace, JAR files, and so on.
- .project
- The .project file is maintained by the core Eclipse platform. It describes the project from a generic, plugin-independent Eclipse view.
- src
- The src directory contains the Java source files and internationalization resource bundles for compilation in Eclipse.
- resources
- The resources directory contains the images to build in the zip file.
- compute.feature
- The compute.feature file defines Open Automation feature metadata for the compute project.
- lib
- The lib directory contains libraries needed for Eclipse to compile the Java source files.
- Poddefinition
- This directory contains the pod.xmlfile.
- cloud sense
- The cloud sense directory contains the compute.report and compute.xml files. These files are required to build the zip file.
- moresources
- the moresources directory contains the .mo and .properties REST API files.
Understanding the module.properties File
The module.properties file exposes the module to the platform runtime. This file defines properties of the module.
Here is a sample module.properties file:
moduleID=foo
version=1.0
ucsdVersion=6.5.0.0
category=/foo
format=1.0
name=Foo Module
description=UCSD Open Automation Sample Module
contact=support@cisco.com
key=5591befd056dd39c8f5d578d39c24172
The contents are described in the following table:
| Name | Description | ||
|---|---|---|---|
|
moduleID |
The unique identifier for the module. This property is mandatory. Example:
|
||
|
version |
The current version of your module. This property is mandatory. Example: |
||
|
ucsdVersion |
The version of Cisco UCS Director designed to support your module (with which your module works best). This property is mandatory. Example: |
||
|
category |
The path (/location) where all your tasks must be placed. This property is mandatory. Example:
|
||
|
format |
The version of the format of this module. This property is mandatory. By default, 1.0 version is set for the custom module. Example:
|
||
|
name |
A user-friendly string that identifies your module in the Open Automation reports. Example: |
||
|
description |
A user-friendly description of what your module does. Example: |
||
|
contact |
An email address that consumers of your module can use to request support. Example: |
||
|
key |
An encrypted key that the Cisco UCS Director Open Automation group provides for validating the module. Example: |
 Note |
Modifying any mandatory properties invalidates your module. If you change any of the mandatory properties, you must request validation again. The name, description, and contact values, which are not mandatory, can be modified or omitted without revalidation. |
Packaging the Module
A module is packaged with all the necessary classes, dependent JAR files, a module.properties file, and a .feature (pronounced "dot-feature") file. The .feature file is placed in the same folder as the root of the project. The .feature file shows the JAR associated with this module and the path to the dependent JAR files. The name of the .feature file is <moduleID>.feature.
Note |
The package name must start with com.cloupia.feature. For example, |
The following example shows the content of a .feature file:
{
      jars:  [ "features/feature-chargeback.jar",
      "features/chargeback/activation-1.1.jar",
      "features/chargeback/axis2-jaxbri-1.5.6.jar",
      "features/chargeback/bcel-5.1.jar",
      "features/chargeback/jalopy-1.5rc3.jar",
      "features/chargeback/neethi-2.0.5.jar",
      "features/chargeback/antlr-2.7.7.jar",
      "features/chargeback/axis2-jaxws-1.5.6.jar",]
      features: [ "com.cloupia.feature.oabc.OABCModule" ]
}
Before you begin
We recommend that you use the Apache ANT build tool that comes with Eclipse. You can use any build tool or create the build by hand, but you must deliver a package with the same characteristics as one built with ANT.
SUMMARY STEPS
- If your module depends on JARs that are not provided with the sample source code, include the jars in the build.xml file so that they are packaged in the zip file.
- From the build.xml file, run the ANT target build.
DETAILED STEPS
| Command or Action | Purpose | |
|---|---|---|
| Step 1 |
If your module depends on JARs that are not provided with the sample source code, include the jars in the build.xml file so that they are packaged in the zip file. |
The following example shows a module layout with a third-party JAR: The module jar and .feature are at the top level of the zip file. We recommend that you put the third-party jars under the /moduleID/lib folder path, then any other sub-directories you may want to add. When you list the jars in the .feature file, ensure that the jars start with features/; this is mandatory. This convention enables you to include the path to the jar. The path of each jar must be the same path that is used in your zip file. We recommend that you put your module jar first, followed by its dependencies, to ensure that your module loads. |
| Step 2 |
From the build.xml file, run the ANT target build. |
|
Deploying a Module on Cisco UCS Director
The Cisco UCS Director user interface provides Open Automation controls that you can use to upload and manage modules. Use these controls to upload the zip file of the module to Cisco UCS Director.
Note |
Only zip-formatted files can be uploaded using the Open Automation controls. |
Before you begin
Acquire shell administrator access on the Cisco UCS Director VM. You can get this access from your system administrator. To use the Cisco UCS Director Shell Menu as a shell administrator, use SSH to access Cisco UCS Director, using the login shelladmin with the password that you got from the administrator.
For SSH access in a Windows system, use PuTTY (see http://www.putty.org/). On a Mac, use the built-in terminal application's SSH utility.
Procedure
| Step 1 |
Choose . |
||||||||||||||||||||||||
| Step 2 |
On the Open Automation page, click Modules. The Modules page displays the following columns:
|
||||||||||||||||||||||||
| Step 3 |
Click Add to add a new module. The Add Modules dialog box appears. |
||||||||||||||||||||||||
| Step 4 |
Choose the module zip file from your local files and click Upload to upload the module zip file. |
||||||||||||||||||||||||
| Step 5 |
Enable the module by choosing the module in the Modules table and clicking Enable. |
||||||||||||||||||||||||
| Step 6 |
Wait while Cisco UCS Director activates the module.
|
What to do next
Enabling Modules
Restarting Cisco UCS Director is no longer required to enable a module. However, you must restart Cisco UCS Director to modify, disable, or delete the new module.
An Open Automation module is enabled when you upload it to Cisco UCS Director. In previous versions of Cisco UCS Director, enabling a new Open Automation module required restarting the Cisco UCS Director server.
This is a short technical description of how a module is enabled when you upload the module to Cisco UCS Director.
When you upload an Open Automation module, the following events occur:
-
The module class and its resources are loaded using a new
URLClassLoader. The newURLClassLoaderis used for all classes loaded into the JVM. -
Components of the Open Automation module are entered into various registries without restarting Cisco UCS Director.
-
The FeatureFileUploadEntry table is updated with the zip file name, timestamp, and status.
-
The system reloads the Pod Definition and Menu xml files, if they are available.
-
The system reloads the REST API resource files, recreates the MoPointer objects, and reloads the MoPointers into their respective collections.
-
The system recreates reports, workflow tasks, LOVs, system tasks, and other objects.
Deactivating a Module
To deactivate a module you must stop and restart the Cisco UCS Director services for your change to take effect.
Procedure
| Step 1 |
Choose the module you need to deactivate in the Modules table, then click the Deactivate control. |
| Step 2 |
Stop and restart the Cisco UCS Director services. Follow the same procedure that you use after activating a module. |
 Feedback