Cisco TelePresence Content Server Release 7.2 Administration and User Guide
Bias-Free Language
The documentation set for this product strives to use bias-free language. For the purposes of this documentation set, bias-free is defined as language that does not imply discrimination based on age, disability, gender, racial identity, ethnic identity, sexual orientation, socioeconomic status, and intersectionality. Exceptions may be present in the documentation due to language that is hardcoded in the user interfaces of the product software, language used based on RFP documentation, or language that is used by a referenced third-party product. Learn more about how Cisco is using Inclusive Language.
- Updated:
- November 15, 2015
Chapter: VBrick
Integration Overview
What is the Cisco TelePresence Content Server
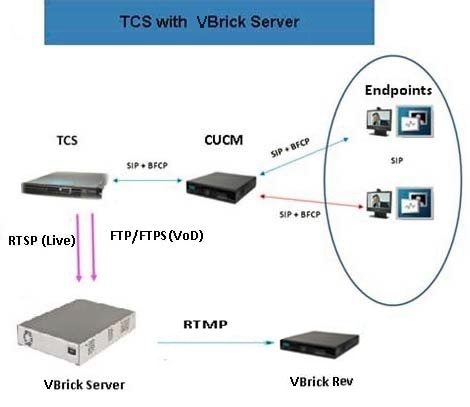
The Cisco TelePresence Content Server (Cisco TCS) is a network appliance that enables organizations to share knowledge and enhance communication by recording their video conferences and multimedia presentations for live and on demand access. The Cisco TCS can be scheduled by Cisco TMS to automatically include the Cisco TCS into any scheduled event or be used in an ad - hoc manner. The Cisco TCS workflow will automatically produce high quality videos of any standards based on conference from a MCU, TelePresence Server, or directly from a TelePresence endpoint including the video participants and any secondary content for example a presentation. Whether it’s a university lecture, a corporate training session, an executive meeting or any other critical event – the Cisco TelePresence Content Server streamlines the process of capturing content throughout the organization.
Figure 2-1 TCS Integration with VBrick
What is VBrick DME
The VBrick Distribute Media Engine (DME) is a multi-faceted platform that performs a variety of serving, reflecting, transmuxing, and transrating activities. DME receives a unicast stream over the WAN link (often over TCP) to effectively traverse the LAN and pass through firewalls. The DME streams via unicast and/or multicast to a variety of different clients in the streaming protocol of choice for each client.
The DME has a fully functional web server that uses File Transfer Protocol (FTP/FTPS) to populate the DME with files for progressive download. You can FTP to the FTP folder on the DME or to a sub folder.
It is a versatile, high configurable media distribution engine that moves streaming media to and from a wide variety sources and endpoints. You can distribute your video to anyone with the DME.
Configure VBrick VoD on TelePresence Content Server
1. Configuring Media Server for VBrick VoD
2. Configuring Template for VBrick VoD
3. Configuring Recording Alias for VBrick VoD
Configuring Media Server for VBrick VoD
You need to create the Media server configuration in the Cisco TCS. Follow these steps for VBrick VoD:
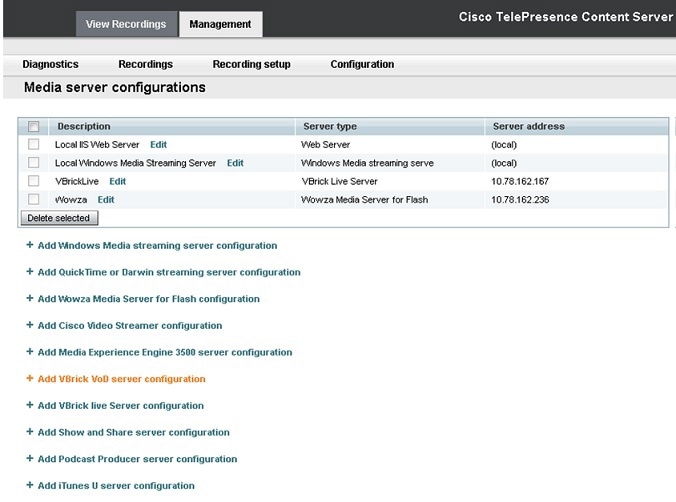
Step 3 Navigate to Recording setup > Media server configurations .
Step 4 Click VBrick VoD server configuration.
Figure 2-2 VBrick VoD server configuration
Step 5 Enter the name for VBrick server.
Step 6 Enter the VBrick server address
Step 7 Choose File Transfer Protocol for VBrick DME. The available options are FTP (File Transfer Protocol) or FTPS (Secure FTP using SSL).
Step 8 Enter Command port for FTPS file transfer

Note Command port is enabled, if FTPS is selected as File Transfer Protocol. This port number should be same as the command port configured on VBrick DME server.(Configuring FTPS on VBrick DME is explained at FTPS Configuration on VBrick DME
Note FTPS is supported only for VBrick DME by TelePresence Content Server Release 7.2.
Step 9 Enter ftp/ftps username and password.

Green check mark indicates the successful connection of FTP/FTPS.
Configuring Template for VBrick VoD
You need to associate the template to the recording alias to automate the delivery of the transformed recording to VBrick. Follow these steps:
Step 1 Click the Management tab, appearing at the top of the screen.
Step 2 Click Recording > Setup > Templates > Add Template.
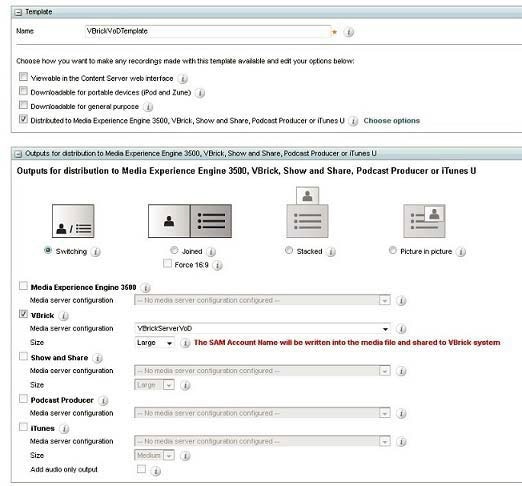
Step 3 Under Template section do the following:
a. Add Template name for VBrick VoD.
b. Check the option ‘Distribute to Media Experience Engine 3500, VBrick, Show and Share, Podcast Producer or iTunes U’.
c. Decide which media layout to be displayed Cisco TCS web interface. For this example, Switching is chosen.
d. Under ‘Outputs for distribution to Media Experience Engine 3500, Show and Share, VBrick, Podcast Producer, or iTunes U’, choose the media layout for VBrick output. By default switching would be selected.
e. Check the box next to the VBrick to enable the media server. Under Media Server Configuration list, select VBrick Server from the VBrick drop down.
Note This media server has been created in step 1 under the ‘Media Server Configuration’ section.
f. Choose the size of the output that will be used to upload to VBrick.
Note The SAM account name will be written into the media file and shared to the VBrick system.
Figure 2-4 Output distribution
Step 4 Scroll to the top or bottom, click Save and click Return.
Configuring Recording Alias for VBrick VoD
Step 1 Click the tab at the top labeled Management.
Step 2 Click Recording Setup > Recording Aliases > Add Recording Alias.
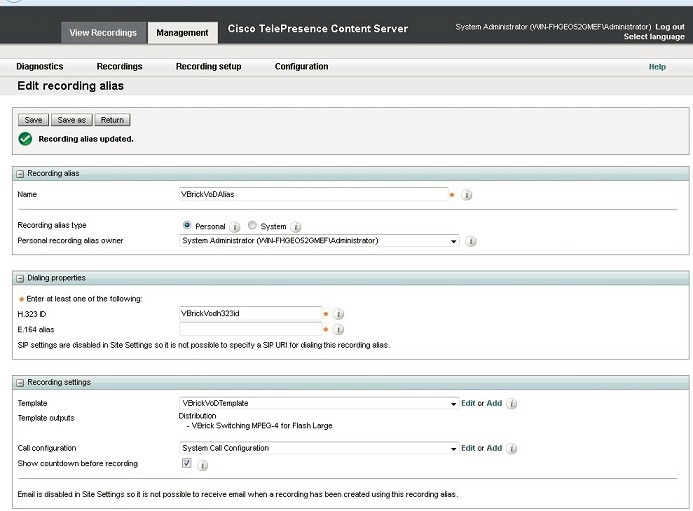
Step 3 A new page will appear, fill the recording aliases information.
a. Enter a Name for the recording alias, VBrick VoD.
Note The “Personal Recording Alias owner” for VBrick should match with the user on VBrick Rev
b. Enter the H323ID, e164alias, SIP URI, and SIP display name. Below is an example of the configuration.
c. Under the Recording Setting, select VBrick VoD template from the Template drop down.
Note This is the same template that was created in Configuring Template section > Step 3> point a.
Step 4 Click Save and click Return.
Configure VBrick Live on TelePresence Content Server
1. Configuring Media Server for VBrick Live
2. Configuring Template for VBrick Live
3. Configuring Recording Alias for VBrick Live
Configuring Media Server for VBrick Live
You need to create the Media server configuration in the Cisco TCS. Follow these steps for VBrick Live:
Step 1 Log in to Cisco TCS, and click the Management tab.
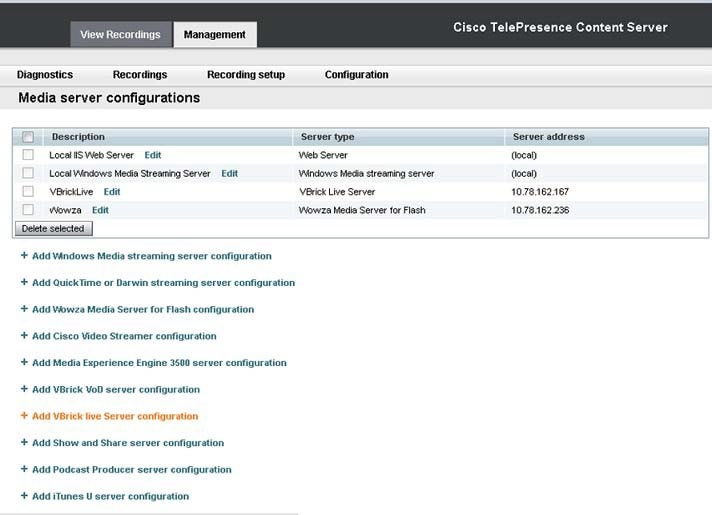
Step 2 Navigate to Recording setup > Media server configurations.
Step 3 Click VBrick live Server configuration.
Figure 2-6 Media server configuration
Step 4 Enter the name for VBrick Live server.
Step 5 Enter the VBrick server address, VBrick server username and password.
Note The default username and password for VBrick server is ‘broadcast’.
Note The default value of RTSP port for VBrick is 5544.
Note An error message is displayed, if RTSP connection is not established.
Figure 2-7 Media Server Configuration: VBrick Server
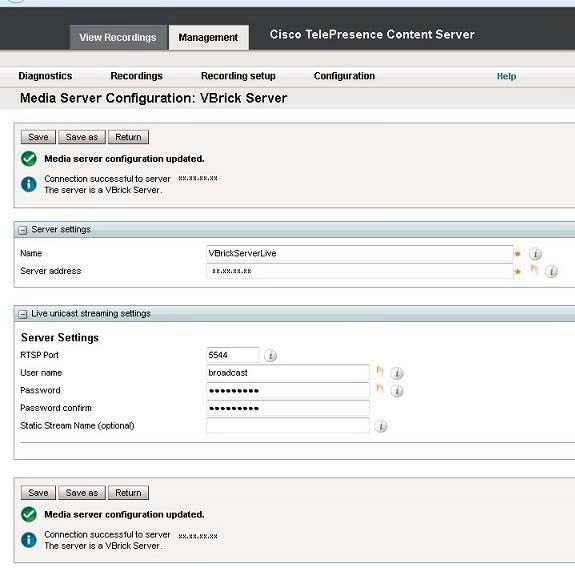
Note To view Live recording on VBrick Rev Portal, it is mandatory to give static stream name.
Green checkmark indicates the successful connection of RTSP.
Configuring Template for VBrick Live
You need to associate the template to the recording alias to automate the delivery of the transformed recording to VBrick. Follow these steps:
Step 1 Click the Management tab, appearing at the top of the screen.
Step 2 Click Recording > Setup > Templates > Add Template.
Step 3 Under Template section do the following:
a. Add Template name for VBrick Live.
b. Check the ‘Viewable in the Content Server web interface’.
c. Decide which media layout to be displayed on Cisco TCS web interface. For this example, Switching is chosen.
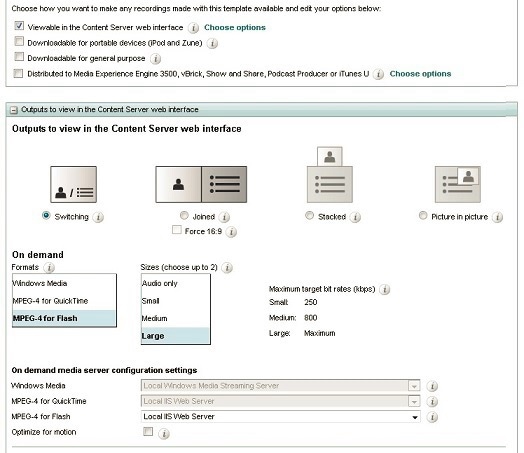
d. Choose the MPEG-4 for Flash and size of the output that will be used to upload to VBrick. For this example a large output was chosen.
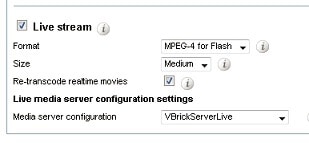
e. Select the Live stream check box.
f. Choose the VBrick Media Server from the drop-down list.
Note You must select the option in Media server configuration that you have selected for VBrick server.
Note VBrick Live and VBrick VoD can be configured in a single template.
Configuring Recording Alias for VBrick Live
Step 1 Click the tab at the top labeled Management.
Step 2 Click Recording Setup > Recording Aliases > Add Recording Alias.
Step 3 A new page will appear to fill out the recording aliases information.
a. Enter a Name for the recording alias, for VBrick Live.
Note The “Personal Recording Alias owner” for VBrick should match with the user on VBrick Rev
b. Enter the H323ID, e164alias, SIP URI, and SIP display name. Below is an example of the configuration.
c. Under the Recording Setting, select VBrick Live template from the Template drop down list.
Note The template you select under Step 3 > c is the same the template that was created in Configuring Template for VBrick Live section Step 3 > a.

Installing VBrick DME (Software only version)
For VBrick DME Admin Guide, see the link
http://www.vbrick.com/doc/DME/v344/AdminGuide/wwhelp/wwhimpl/js/html/wwhelp.htm
FTPS Configuration on VBrick DME
To configure FTPS on VBrick DME performquit following tasks:
1. Configure FTPS as File Transfer Protocol
Configure FTPS as File Transfer Protocol
Step 1 Login to VBrick DME server and browse to System Configuration > Security.
Step 2 Select External FTP Server Mode as “FTPS TLS Forced”.
Figure 2-11 FTPS Configuration on VBrick DME

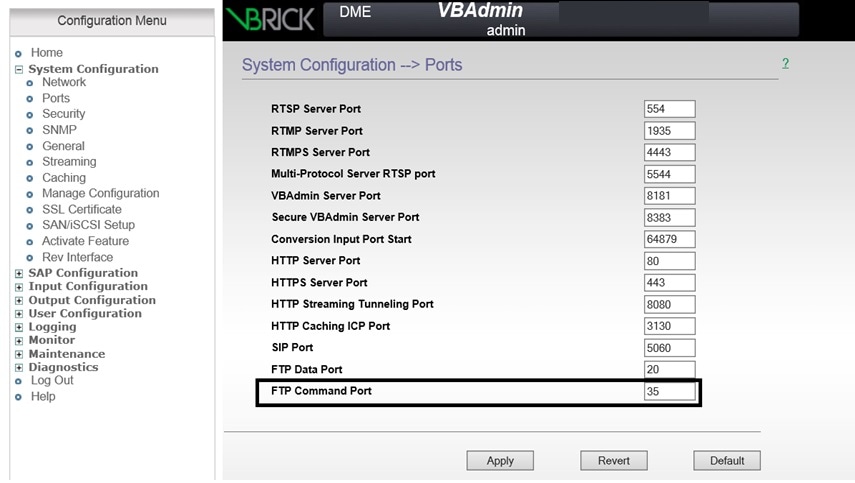
Configure Command Port
Step 1 Login to VBrick DME server and browse to System Configuration > Ports.
Step 2 Configure FTP Command Port, default port is 21.
Note This Command Port should be same on TCS VBrick VoD configuration page.
Figure 2-12 Command Port configuration on VBrick DME
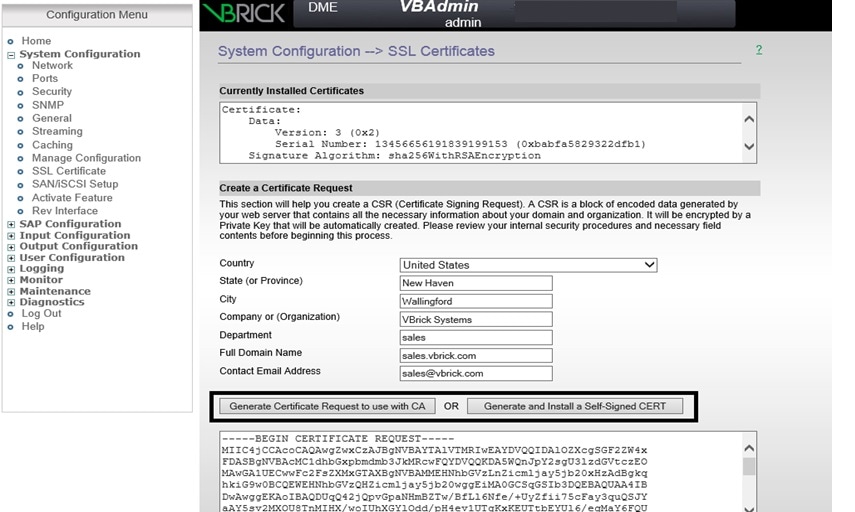
Upload SSL Certificate
Step 1 Login to VBrick DME server and browse to System Configuration > SSL Certificates.
Step 2 User can upload Self Signed certificate (Step 3) or Certification Authority (CA) signed certificate (Step 4) on VBrick DME.
Step 3 For uploading Self Signed certificate, click on Generate and Install a Self-Signed CERT button.
Step 4 For uploading CA Signed certificate, click on Generate Certificate Request to use with CA button, it will generate Certificate Signing Request (CSR), sign this CSR with CA. Copy signed certificate in Install a New Certificate and click on Verify and Install New Certificate.
Figure 2-13 Certificate Installation on VBrick DME
For additional product information, see these resources:
http://www.vbrick.com/doc/DME/v344/AdminGuide/wwhelp/wwhimpl/js/html/wwhelp.htm
http://www.vbrick.com/doc/DME/v344/PDF_Files/DME_ReleaseNotes.pdf
Disclaimers and Notices
The objective of this guide is to provide the reader with assistance in using and configuring this product. Product capabilities of Cisco and other manufacturers’ products change over time and so the required configuration may be different from that indicated here. If you have any suggestions for changes to this document, please feed them back to Cisco through your Cisco Authorized Service Representative.
If you need technical support, please contact your Cisco Authorized Service Representative.
The specifications for the product and the information in this Guide are subject to change at any time, without notice, by Cisco. Every effort has been made to supply complete and accurate information in this Guide; however, Cisco assumes no responsibility or liability for any errors or inaccuracies that may appear in this document.
Cisco® is a registered trademark belonging to Cisco ASA. Other trademarks used in this document are the property of their respective holders.
This Guide may be reproduced in its entirety, including all copyright and intellectual property notices, in limited quantities in connection with the use of this product. Except for the limited exception set forth in the previous sentence, no part of this Guide may be reproduced, stored in a retrieval system, or transmitted, in any form, or by any means, electronically, mechanically, by photocopying, or otherwise, without the prior written permission of Cisco.
Obtaining Documentation and Submitting a Service Request
For information on obtaining documentation, submitting a service request, and gathering additional information, see the monthly What’s New in Cisco Product Documentation , which also lists all new and revised Cisco technical documentation, at:
http://www.cisco.com/en/US/docs/general/whatsnew/whatsnew.html
Subscribe to the What’s New in Cisco Product Documentation as a Really Simple Syndication (RSS) feed and set content to be delivered directly to your desktop using a reader application. The RSS feeds are a free service and Cisco currently supports RSS Version 2.0.
 Feedback