-
null
Bias-Free Language
The documentation set for this product strives to use bias-free language. For the purposes of this documentation set, bias-free is defined as language that does not imply discrimination based on age, disability, gender, racial identity, ethnic identity, sexual orientation, socioeconomic status, and intersectionality. Exceptions may be present in the documentation due to language that is hardcoded in the user interfaces of the product software, language used based on RFP documentation, or language that is used by a referenced third-party product. Learn more about how Cisco is using Inclusive Language.
- Updated:
- August 7, 2015
Chapter: Maintain
Maintaining the Content Server
This chapter includes the following Content Server maintenance procedures:
Backing Up the Content Server
To ensure that you do not lose data, you should back up the Content Server on a regular basis. You should also back up the Content Server before you install a security update, or perform a software reimage. See these sections:
Before Backing Up
You can back up Content Server files to an external USB drive, to a network drive, or to a network share. The backup procedure captures all Content Server data and media files and portal configuration (call configurations, site settings, media servers, templates, recording aliases, etc).
The Content Server backup procedure does not backup the Windows Server 2008, Internet Authentication Service (IAS)/Network Policy Server (NPS), or Windows Media Services (WMS) configurations. If you are experiencing difficulties with the Content Server operating system, you should perform a software reimage to restore the operating system and reconfigure the Windows services. See the “Performing a Software Reimage” section.
The Content Server backup procedure does not back up media files that are located on a Network Attached Storage (NAS) device or on an external media server. You should back up the media on the external devices at the same time as the Content Server. If you restore from backup, you must restore the media backup taken at the same time as the Content Server backup. Otherwise, you might not be able to play some recordings.
If you are using an external USB drive for a manual or schedule backup, connect the drive to a USB port on the Content Server rear panel. Log in to the Content Server by using Windows Remote Desktop Connection and confirm that the USB hard drive appears under My Computer. Also, make sure that there is sufficient capacity on the USB drive or network drive for the backed-up files.

Note Virtual Disk service should be enabled and running in order to do backup/restore using Windows Server Backup.
Performing a Manual Backup
To perform a manual on-demand backup, follow these steps:
Step 1 Log in to the Content Server by using Windows Remote Desktop Connection. Go to Start > Administrative Tools > Windows Server Backup . The Windows Server Backup window appears.
Step 2 In the Actions menu, click Backup Once . The Backup Once Wizard window appears. To create a backup now, click the Different options radio button. Click Next .
Step 3 In the Select Backup Configuration window, click the Full server radio button. Click Next .
Step 4 In the Specify Destination Type window, choose the type of storage (local drive or remote shared folder) for the backup. Click Next .
Step 5 Specify the USB drive or network location for the backed-up files. Type a name for the backup. Click Next .
Step 6 In the Confirmation window, click Backup . The Backup Progress window displays the backup progress and status details. The backup process takes approximately 10 minutes per 5 GB of data.
Step 7 When the backup is complete, click Close .
Configuring a Scheduled Backup
To configure a scheduled backup, follow these steps:
Step 1 Log in to the Content Server by using Windows Remote Desktop Connection. Go to Start > Administrative Tools > Windows Server Backup . The Windows Server Backup window appears.
Step 2 In the Actions menu, click Backup Schedule . The Backup Schedule Wizard, Getting Started pop up window appears. Click Next .
Step 3 In the Select Backup Configuration window, click the Full server radio button. Click Next .
Step 4 In the Specify Backup Time window, enter how often and when to run the backup. Click Next .
Step 5 In the Specify Destination Type window, choose the storage location (local drive or remote shared folder) for the backup. Click Next .
If you select a shared folder location, each backup will erase the previous backup and only the latest backup will be available.
Step 6 Specify the USB drive or network location for the backed-up files. Type a name for the backup. For a remote shared folder location, enter the username and password for scheduling the backup on the network share. Click Next .
Step 7 In the Confirmation window, review your settings for the scheduled backup. Click Finish .
The backup process is now scheduled to run according to the schedule that you entered.
Restoring Files
You can restore all Content Server files and portal configuration, or specific folders and files. See these sections:
If you want to restore files after performing a software reimage see this section:
Before Restoring
Make sure that you are using a backup that was taken from the same Content Server that you are restoring. If you want to restore to a different Content Server, contact your Cisco reseller.
If your media files are located on a NAS or on an external media server, the Content Server restore procedure does not restore those files. You must have a media backup that was taken at the same time as the Content Server backup and you must also restore this media backup. Otherwise, you might not be able to play some recordings.
The Content Server backup procedure captures all Content Server data and media files and portal configuration (call configurations, site settings, media servers, templates, recording aliases, etc). You can restore all Content Server files and portal configuration, or specific folders and files. The Restoring from a Backup procedure describes how to recover all Content Server files and portal configuration.
The Content Server restore procedure does not restore the original Windows Server 2008, IAS/NPS, or WMS default settings. If you are experiencing difficulties with the Content Server operating system, you should perform a software reimage to restore the operating system and reconfigure the Windows services. See the “Performing a Software Reimage” section. To restore data and media files following a software reimage, see “Restoring Files After a Software Reimage”.
If you are using an external USB drive to restore backed-up files, connect the drive to a USB port on the Content Server rear panel. Log in to the Content Server by using Windows Remote Desktop Connection and confirm that the USB hard drive appears under My Computer.
Restoring from a Backup
To restore the Content Server from a backup, follow these steps:
Step 1 Log in to the Content Server by using Windows Remote Desktop Connection. Go to Start > Administrative Tools > Windows Services . The Windows Services window appears.
Step 2 In the Services window, Stop these services:
a. SQL Server (Content Server)
b. Content Server Content Engine
c. Content Server Control Service
e. Content Server Offline Transcode Engine
Step 3 Go to Start > Administrative Tools > Windows Server Backup . The Windows Server Backup window appears.
Step 4 In the Actions menu, click Recover . The Recovery Wizard window appears. To select a stored backup, click the A backup stored on another location radio button. Click Next .
Step 5 In the Specify Location type window, select the location of the backup file that you want to use for recovery. Click Next .
Step 6 Enter the path of the storage location (local drive or remote shared folder) for the backup file that you want to use to recovery. Click Next .
Step 7 In the Select Backup Date window, choose the backup file date. Click Next .
Step 8 In the Select Recovery Type window, click the File and Folders radio button. Click Next .
Step 9 In the Select Items to Recover, select a drive (C: or E:) to recover. To restore all Content Server files, you will need to recover each drive one at a time. Click Next .
Step 10 In the Specific Recovery Options window, enter the recovery destination drive (that you specified in Step 9) to overwrite. Click the Overwrite the existing versions with the recovered versions radio button. Click Next .
Step 11 In the Confirmation window, click Recover . The Recovery Progress window displays the recovery progress and status details.
Step 12 Repeat Step 4 to Step 11 to restore the second Content Server drive. When the recovery of both drives is complete, click Close .
Step 13 Restart the services that you stopped in Step 2.
Performing a Software Reimage
To return a Content Server to the factory-default software, you can perform a software reimage. This procedure clears the server hard drive and then reinstalls the Content Server system software.
You should backup the Content Server before performing a software reimage. See the “Backing Up the Content Server” section.

Caution Content Server Release 7.0 software is applicable only on M4 hardware.Content Server Release 7.0 software cannot be installed on First-Generation, Second-Generation or Third-Generation. Content Server hardware. If you attempt to run the USB media kit 7.0 installer on older hardware it may fail and could cause unrecoverable damage to the Content Server. Also on fourth generation hardware, Content Server is not supported on CIMC BIOS version 2.0(3e) with manufacturing USB. It works fine with CIMC BIOS version 2.0(10e).
The device serial number is on a label located on the top right hand front of the Content Server, and in the web interface (go to Management > Diagnostics > Server overview ). These are the device serial number formats:
- Fourth-generation serial number: 49A4 xxxx
- Third-generation serial number: 49A3 xxxx
- Second-generation serial number: 49A2 xxxx
- First-generation serial number: 49A0 xxxx
You must have administrator privileges to perform a software reimage.
These are the software reimage tasks:
- Task 1: Clear the hard drive and install the software
- Task 2: Install the license files
- Task 3: Configure the basic settings
After you complete the software reimage, see the “Restoring Files After a Software Reimage” section to restore the data and media files on the Content Server.
Reimage Instructions
You need these items to complete the Content Server software reimage:
- Content Server Release 7.x USB media kit
- USB keyboard, mouse, and VGA monitor
- IP address, subnet mask, and gateway for the Content Server
- Content Server license files
– Go to cisco.com/go/license and log in. Choose Get Existing > Tandberg License to Resend and Download
– Enter the Content Server serial number in the 49A4 xxxx format in the Serial Number field

If you need assistance obtaining the Content Server license files, you can open a case with Cisco TAC: http://www.cisco.com/cisco/web/support/index.html )
Task 1: Clear the hard drive and install the software
Step 1 Disconnect any external hard drives or USB drives from the Content Server.
Step 2 Install the USB drive in a USB port on the Content Server rear panel.
Step 3 Use the supplied KVM cable to connect a USB keyboard, mouse, and a VGA monitor to the KVM connector on the Content Server front panel.
Alternatively, you can use the VGA and USB ports on the rear panel. However, you cannot use the front panel VGA and the rear panel VGA at the same time. If you do so, the first VGA connector is disabled.
Step 4 Log in to the Content Server Windows Server Manager. Verify that the USB drive is installed by going to Start > Computer > Removable Disk (USB drive:) .
Step 5 Restart the Content Server. Go to Start > Log off > Restart > Application Installation (Planned) .
Step 6 In the BIOS utility, press F6 to select the Boot Menu.

Step 7 When the boot device menu appears, choose Toshiba USB DRV PMAP and press Enter .
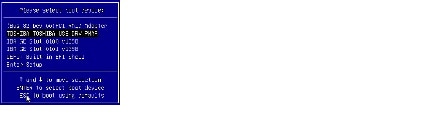
Step 8 Wait while Windows restarts and boots from the USB drive. The system will cycle through several screens. This could take a few minutes.
Step 9 When the Content Server Installation menu appears, choose number 1 (Clear HDD Partitions) and press Enter .

Step 10 After clearing the hard drive the Content Server restarts and reboots from the USB drive. When the Content Server Installation menu appears, choose number 2 (Install Content Server) and press Enter .
Step 11 When the installation process is complete, the Content Server restarts. Continue with Task 2: Install the license files.
Task 2: Install the license files
Step 1 Log in to the Content Server Windows Server Manager by using the default password, Cisco123 .
Step 2 Go to Start > Computer > Removable Disk (USB drive) > Tools . Copy the generic Licensedata text file to the Content Server (any folder). The generic license file has these entries that you need to overwrite with your specific license key information:
Step 3 Obtain your Content Server Checksum and License Release Keys from Cisco.com .
Step 4 Open the text file that has your specific license key information. Select each data line one at a time, copy, and then overwrite each data line in the generic license file. There should be no extra spaces or lines after you transfer the data to the generic license file.
This example license file shows the Content Server software serial number, the checksum, and three release keys:
Step 5 Save and close the generic Licensedata text file on the Content Server.
Step 6 Go to Start > Command Prompt to run the License Install application. Change the directory to USB drive > Tools: and run the setupLicense.exe -l Licensedata.txt file-path .

Step 7 When the setup application is finished, it will display “Successfully read license data from licenseData.txt” and other specific license information.
Step 8 In the Command Prompt window, enter restore.bat .

Step 9 Close the Command Prompt window and restart the Content Server. Go to Start > Log off > Restart > Application Installation (Planned) .
Step 10 Remove the USB drive from the Content Server rear panel. Continue with Task 3: Configure the basic settings.
Note To install additional license keys such as the cluster, premium resolution, or port options, complete the Content Server basic configuration. Navigate to the user interface. Go to Management > Configuration. In the Software option area add the license option keys. Click Restart service to activate the license keys.
Task 3: Configure the basic settings
After the software reimage, you should reset the administrator password, assign an IP address, set the date and time, and enable Windows Remote Desktop Connection. For more information about the Content Server initial configuration, see the Cisco TelePresence Content Server Release Quick Start Guide on Cisco.com. Follow these steps:
Step 1 Go to Start > Control Panel > User Accounts > Change your Windows password > Change your password .
Step 2 In the Change your password window, enter the current password ( Cisco123 ), the new password, and confirm the new password. Click Change password . Click OK .
Step 3 Go to Start > Control Panel > Network and Internet . From the Network and Sharing Center, click View network status and tasks .
Step 4 In the Connect or disconnect section, click Local Connection . Choose IPv4 from the list. In the IPv4 Properties window, click the Use the following IP address radio button. Enter the Content Server IPv4 address , subnet-mask , and default-gateway . Click OK .
Step 5 In the Server Manager window, click the time and date box in the lower right corner to open the settings window. Or, go to Start > Control Panel > Clock, Language, and Region > Set the time and date .
Step 6 Click Change date and time settings . Update the date, time, and time zone. Click OK .
Step 7 Go to Start > Control Panel > System Security > System > Remote Settings .
Step 8 From the System Properties window Remote tab, select and click a radio button to enable Remote Desktop on the Content Server. Click OK .
Step 9 Restart the server. Go to Start > Log Off > Restart . (Optional) Continue with Restoring Files After a Software Reimage.
You can now disconnect the KVM cable from the Content Server and continue configuring the server by accessing the Content Server user interface and by using Windows Remote Desktop Connection.
Restoring Files After a Software Reimage
After you complete the Content Server software reimage, you should restore the files that you backed up before the reimage. This will restore all Content Server data and media files and portal configuration (call configurations, site settings, media servers, templates, recording aliases, etc). See these sections:
- Restore Files on a Reimaged Standalone Content Server
- Restore Files on a Reimaged Content Server with Network Attached Storage
- Restore Files on a Reimaged Content Server in a Cluster
Restore Files on a Reimaged Standalone Content Server
Follow these step to restore files on the Content Server after completing the “Performing a Software Reimage” procedure:
Step 1 Log in to the Content Server by using Windows Remote Desktop Connection. Go to Start > Administrative Tools > Windows Services . The Windows Services window appears.
Step 2 In the Services window, stop these services:
a. SQL Server (Content Server)
b. Content Server Content Engine
c. Content Server Control Service
e. Content Server Offline Transcode Engine
Step 3 Go to Start > Administrative Tools > Windows Server Backup . The Windows Server Backup window appears.
Step 4 In the Actions menu, click Recover . The Recovery Wizard window appears. To choose a stored backup, click the A backup stored on another location radio button. Click Next .
Step 5 In the Specify Location type window, choose the location of the backup file that you want to use for recovery. Click Next .
Step 6 Enter the path of the storage location (local drive or remote shared folder) for the backup file that you want to use for recovery. Click Next .
Step 7 In the Select Backup Date window, choose the backup file date. Click Next .
Step 8 In the Select Recovery Type window, click the File and Folders radio button. Click Next .
Step 9 In the Select Items to Recover, choose only drive E: to recover. Click Next .
Step 10 In the Specific Recovery Options window, enter the recovery destination drive E: to overwrite. Click the Overwrite the existing versions with the recovered versions radio button. Click Next .
Step 11 In the Confirmation window, click Recover . The Recovery Progress window displays the recovery progress and status details. When the recovery process is finished, click Close.
Step 12 Restart the services that you stopped in Step 2. Restart the Content Server.
Restore Files on a Reimaged Content Server with Network Attached Storage
Follow these step to restore files on the Content Server with NAS after completing the “Performing a Software Reimage” procedure:
Step 1 Add the Content Server to the same domain as the NAS. For more information, see Chapter13, “Setting Up External Media Storage”
Step 2 Log in to the Content Server by using Windows Remote Desktop Connection.
Step 3 Run the Content Server Wizard and click Alternate Storage [NAS] Wizard . Follow the on-screen instructions to configure the NAS.
Step 4 Go to Start > Administrative Tools > Windows Services . The Windows Services window appears.
Step 5 In the Services window, stop these services:
a. SQL Server (Content Server)
b. Content Server Content Engine
c. Content Server Control Service
e. Content Server Offline Transcode Engine
Step 6 Go to Start > Administrative Tools > Windows Server Backup . The Windows Server Backup window appears.
Step 7 In the Actions menu, click Recover . The Recovery Wizard window appears. To select a stored backup, click the A backup stored on another location radio button. Click Next .
Step 8 In the Specify Location Type window, choose the location of the backup file that you want to use for recovery. Click Next .
Step 9 Enter the path of the storage location (local drive or remote shared folder) for the backup file that you want to use for recovery. Click Next .
Step 10 In the Select Backup Date window, choose the backup file date. Click Next .
Step 11 In the Select Recovery Type window, click the File and Folders radio button. Click Next .
Step 12 In the Select Items to Recover window, select only drive E: to recover. Click Next .
Step 13 In the Specific Recovery Options window, enter the recovery destination drive E: to overwrite. Click the Overwrite the existing versions with the recovered versions radio button. Click Next .
Step 14 In the Confirmation window, click Recover . The Recovery Progress window displays the recovery progress and status details. When the recovery process is finished, click Close .
Step 15 Restart the services that you stopped in Step 5. Restart the Content Server.
Restore Files on a Reimaged Content Server in a Cluster
Follow these step to restore files on a Content Server in a cluster after completing the “Performing a Software Reimage” procedure:
Step 1 Add the Content Server to the same domain as the NAS. For more information, see Chapter13, “Setting Up External Media Storage”
Step 2 Log in to the Content Server by using Windows Remote Desktop Connection.
Step 3 Run Content Server Wizard and click the Cluster Management Wizard . Follow the on-screen instructions to configure the cluster. For more information, see Chapter6, “Creating and Managing a Content Server Cluster”
Step 4 Configure the cluster by using the ClusterSettings.xml file. Make sure that the NAS path/external database is the same and is available.
Step 5 Go to Start > Administrative Tools > Windows Services . The Windows Services window appears.
Step 6 In the Services window, stop these services:
a. SQL Server (Content Server)
b. Content Server Content Engine
c. Content Server Control Service
e. Content Server Offline Transcode Engine
Step 7 Go to Start > Administrative Tools > Windows Server Backup . The Windows Server Backup window appears.
Step 8 In the Actions menu, click Recover . The Recovery Wizard window appears. To select a stored backup, click the A backup stored on another location radio button. Click Next .
Step 9 In the Specify Location Type window, choose the location of the backup file that you want to use for recovery. Click Next .
Step 10 Enter the path of the storage location (local drive or remote shared folder) for the backup file that you want to use for recovery. Click Next .
Step 11 In the Select Backup Date window, choose the backup file date. Click Next .
Step 12 In the Select Recovery Type window, click the File and Folders radio button. Click Next .
Step 13 In the Select Items to Recover window, select only drive E: to recover. Click Next .
Step 14 In the Specific Recovery Options window, enter the recovery destination drive E: to overwrite. Click the Overwrite the existing versions with the recovered versions radio button. Click Next .
Step 15 In the Confirmation window, click Recover . The Recovery Progress window displays the recovery progress and status details. When the recovery process is finished, click Close .
Step 16 Restart the services that you stopped in Step 6. Restart the Content Server.
Shutting Down and Powering Off the Content Server
The server can run in two power modes:
- Main power mode—Power is supplied to all server components and any operating system on your drives can run.
- Standby power mode—Power is supplied only to the service processor and the cooling fans and it is safe to power off the server from this mode.
You can invoke a graceful shutdown or an hard shutdown by using either of the following methods:
- Use the Cisco Integrated Management Controller (CIMC) management interface. For more information, see the Cisco TelePresence Content Server Release Quick Start Guide and the Cisco UCS C220 Server Installation and Service Guide on Cisco.com.
- Use the Power button on the server front panel.
To use the Power button, do the following:
Step 1 Stop any recording calls that are in progress on the Content Server.
Step 2 Check the color of the Power Status LED.
Step 3 Invoke either a graceful shutdown or a hard shutdown:
Caution To avoid data loss or damage to your operating system, you should always invoke a graceful shutdown of the operating system.
- Graceful shutdown—Press and release the Power button. The operating system performs a graceful shutdown and the Content Server goes to standby mode, which is indicated by an amber Power Status LED.
- Emergency shutdown—Press and hold the Power button for four seconds to force the main power off and immediately enter standby mode.
Step 4 Disconnect the power cords from the power supplies in the Content Server to completely power off the server.
Securing the Content Server
You can use antivirus protection on the Content Server. If using antivirus software we recommend that you do not scan the E:\ volume or the C:\program files\Tandberg directory where the data files are located.
You can apply Microsoft security patches to the Content Server. We recommend that you download and install the patches during normal maintenance windows. You can manually install recommended patches from the Microsoft website or use Windows Update.
Content Server security bulletins inform you of patches that we recommend, or not recommend (because of known instability issues with the Content Server application). These bulletins are published if aspects of Microsoft patches are critical to performance or security of the Content Server.
You can access the latest Content Server security bulletins on Cisco.com:
http://www.cisco.com/c/en/us/support/conferencing/telepresence-content-server/products-field-notices-list.html
http://www.cisco.com/en/US/products/ps11347/prod_bulletins_list.html
Joining the Content Server to a Domain
The Content Server can be joined to a Microsoft Active Directory Domain in the same way as any Windows Server 2008 server. Domain group policies may be applied to the Content Server.
The Content Server must be joined to a domain to configure external storage or a cluster of Content Servers.
- Changes the Administrator account name. If the Administrator account name is changed, the Serial Port/LCD panel password reset tool will not work.
- Restricts the guest group. This will disable the IIS user account. The IIS user account is necessary to provide the web user interface for the Content Server.
 Feedback