Catalyst 2960-XR Switch Stack Manager Configuration Guide, Cisco IOS Release 15.0(2)EX1
Bias-Free Language
The documentation set for this product strives to use bias-free language. For the purposes of this documentation set, bias-free is defined as language that does not imply discrimination based on age, disability, gender, racial identity, ethnic identity, sexual orientation, socioeconomic status, and intersectionality. Exceptions may be present in the documentation due to language that is hardcoded in the user interfaces of the product software, language used based on RFP documentation, or language that is used by a referenced third-party product. Learn more about how Cisco is using Inclusive Language.
- Updated:
- May 19, 2014
Chapter: Managing Switch Stacks
- Finding Feature Information
- Prerequisites for Switch Stacks
- Restrictions for Switch Stacks
- Information About Switch Stacks
- Switch Stack Membership
- Stack Member Numbers
- Stack Member Priority Values
- Switch Stack Bridge ID and MAC Address
- Stack Master Election and Reelection
- Switch Stack Configuration Files
- Offline Configuration to Provision a Stack Member
- Stack Protocol Version
Managing Switch Stacks
Finding Feature Information
Your software release may not support all the features documented in this module. For the latest feature information and caveats, see the release notes for your platform and software release.
Use Cisco Feature Navigator to find information about platform support and Cisco software image support. To access Cisco Feature Navigator, go to http://www.cisco.com/go/cfn. An account on Cisco.com is not required.
Prerequisites for Switch Stacks
All stack members must run the same Cisco IOS software image to ensure compatibility among stack members.
For switch stack hardware considerations, see the Catalyst 2960-XR Switch Hardware Installation Guide.
Restrictions for Switch Stacks
The switch does not support mixed stacking. Stacking is supported only with other Catalyst 2960-XR switches.
Information About Switch Stacks
- Switch Stack Overview
- Switch Stack Membership
- Stack Member Numbers
- Stack Member Priority Values
- Switch Stack Bridge ID and MAC Address
- Stack Master Election and Reelection
- Switch Stack Configuration Files
- Offline Configuration to Provision a Stack Member
- Stack Protocol Version
- SDM Template Mismatch in Switch Stacks
- Switch Stack Management Connectivity
Switch Stack Overview
A switch stack is a set of up to eight stacking-capable switches connected through their stack ports. The Catalyst 2960-XR switch does not support mixed stacking. Stacking is supported only with other Catalyst 2960-XR switches.
One of the switches controls the operation of the stack and is called the stack master. The stack master and the other switches in the stack are all stack members.
The stack master is the single point of stack-wide management. From the stack master, you configure:
- System-level (global) features that apply to all stack members
- Interface-level features for each stack member
The stack master contains the saved and running configuration files for the switch stack. The configuration files include the system-level settings for the switch stack and the interface-level settings for each stack member. Each stack member has a current copy of these files for back-up purposes.
Supported Features in a Switch Stack
The system-level features supported on the stack master are supported on the entire switch stack.
Encryption Features
If the stack master is running the cryptographic universal software image (supports encryption), the encryption features are available on the switch stack.
FlexStack-Plus
The stack members use the Cisco FlexStack-Plus technology to work together as a unified system. Layer 2 and Layer 3 protocols support the entire switch stack as a single entity in the network.
 Note |
Switch stacks running the LAN Base image do not support Layer 3 features. |
The FlexStack-Plus bandwidth for a single stack port is 20 Gbps. With FlexStack-Plus technology, up to eight members can be joined into a single stack. In a mixed stack of Catalyst 2960-X and Catalyst 2960-S switches, FlexStack-Plus reverts to FlexStack capabilities of 10 Gbps stack port bandwidth and a maximum of four members per stack.
Switch Stack Membership
A switch stack has up to eight stack members connected through their stack ports. A switch stack always has one stack master.
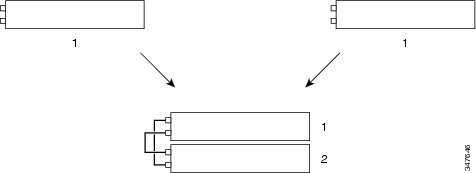
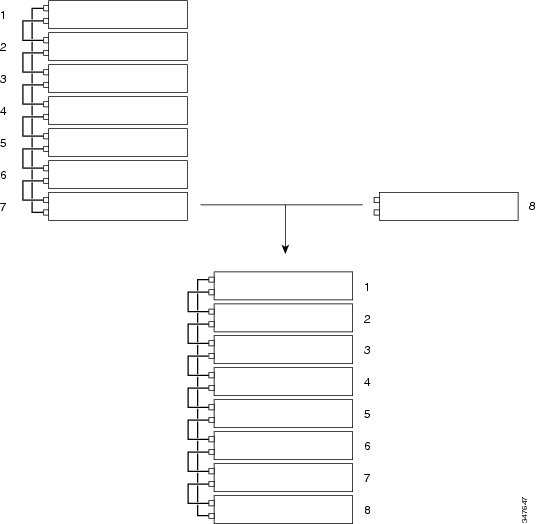
A standalone switch is a switch stack with one stack member that also operates as the stack master. You can connect one standalone switch to another to create a switch stack containing two stack members, with one of them as the stack master. You can connect standalone switches to an existing switch stack to increase the stack membership.
Changes to Switch Stack Membership
If you replace a stack member with an identical model, the new switch functions with exactly the same configuration as the replaced switch, assuming that the new switch (referred to as the provisioned switch) is using the same member number as the replaced switch.
The operation of the switch stack continues uninterrupted during membership changes unless you remove the stack master or you add powered-on standalone switches or switch stacks.
- Adding powered-on switches (merging) causes the stack masters of the merging switch stacks to elect a stack master from among themselves. The reelected stack master retains its role and configuration as do its stack members. All remaining switches, including the former stack masters, reload and join the switch stack as stack members. They change their stack member numbers to the lowest available numbers and use the stack configuration of the reelected stack master.
- Removing powered-on stack members causes the switch stack to divide (partition) into two or more switch stacks, each with the same configuration. This can cause an IP address configuration conflict in your network. If you want the switch stacks to remain separate, change the IP address or addresses of the newly created switch stacks.
Note |
Make sure that you power off the switches that you add to or remove from the switch stack. After adding or removing stack members, make sure that the switch stack is operating at full bandwidth (40 Gbps). Press the Mode button on a stack member until the Stack mode LED is on. The last two right port LEDs on all switches in the stack should be green. Depending on the switch model, the last two right ports are 10-Gigabit Ethernet ports or small form-factor pluggable (SFP) module ports (10/100/1000 ports). If one or both of these LEDs are not green on any of the switches, the stack is not operating at full bandwidth. |
If you remove powered-on members but do not want to partition the stack:
- Power off the switches in the newly created switch stacks.
- Reconnect them to the original switch stack through their stack ports.
- Power on the switches.
For cabling and power considerations that affect switch stacks, see the Catalyst 2960-XR Switch Hardware Installation Guide.
Stack Member Numbers
The stack member number (1 to 8) identifies each member in the switch stack. The member number also determines the interface-level configuration that a stack member uses. You can display the stack member number by using the show switch EXEC command.
A new, out-of-the-box switch (one that has not joined a switch stack or has not been manually assigned a stack member number) ships with a default stack member number of 1. When it joins a switch stack, its default stack member number changes to the lowest available member number in the stack.
Stack members in the same switch stack cannot have the same stack member number. Every stack member, including a standalone switch, retains its member number until you manually change the number or unless the number is already being used by another member in the stack.
- If you manually change the stack member number by using the switch current-stack-member-number renumber new-stack-member-number command, the new number goes into effect after that stack member resets (or after you use the reload slot stack-member-number privileged EXEC command) and only if that number is not already assigned to any other members in the stack. Another way to change the stack member number is by changing the SWITCH_NUMBER environment variable. If the number is being used by another member in the stack, the switch selects the lowest available number in the stack. If you manually change the number of a stack member and no interface-level configuration is associated with that new member number, that stack member resets to its default configuration. You cannot use the switch current-stack-member-number renumber new-stack-member-number command on a provisioned switch. If you do, the command is rejected.
- If you move a stack member to a different switch stack, the stack member retains its number only if the number is not being used by another member in the stack. If it is being used, the switch selects the lowest available number in the stack.
- If you merge switch stacks, the switches that join the switch stack of a new stack master select the lowest available numbers in the stack.
As described in the hardware installation guide, you can use the switch port LEDs in Stack mode to visually determine the stack member number of each stack member.
Stack Member Priority Values
A higher priority value for a stack member increases the probability of it being elected stack master and retaining its stack member number. The priority value can be 1 to 15. The default priority value is 1. You can display the stack member priority value by using the show switch EXEC command.
Note |
We recommend assigning the highest priority value to the switch that you prefer to be the stack master. This ensures that the switch is reelected as stack master if a reelection occurs. |
To change the priority value for a stack member, use the switch stack-member-number priority new priority-value command.
The new priority value takes effect immediately but does not affect the current stack master. The new priority value helps determine which stack member is elected as the new stack master when the current stack master or the switch stack resets.
Switch Stack Bridge ID and MAC Address
A switch stack is identified in the network by its bridge ID and, if it is operating as a Layer 3 device, its router MAC address. The bridge ID and router MAC address are determined by the MAC address of the stack master.
If the stack master changes, the MAC address of the new stack master determines the new bridge ID and router MAC address.
If the entire switch stack reloads, the switch stack uses the MAC address of the stack master.
Persistent MAC Address on the Switch Stack
You can use the persistent MAC address feature to set a time delay before the stack MAC address changes to the MAC address of the new stack master. When this feature is enabled, the stack MAC address changes in approximately 4 minutes. During this time, if the previous stack master rejoins the stack, the stack continues to use its MAC address as the stack MAC address, even if the switch is now a stack member and not a stack master. If the previous stack master does not rejoin the stack during this period, the switch stack takes the MAC address of the new stack master as the stack MAC address.
You can also configure stack MAC persistency so that the stack MAC address never changes to the new master MAC address.
Stack Master Election and Reelection
All stack members are eligible stack masters. If the stack master becomes unavailable, the remaining members elect a new stack master from among themselves.
The stack master is elected or reelected based on one of these factors and in the order listed:
- The switch that is currently the stack master.
-
The switch with the highest stack member priority value.
Note
We recommend assigning the highest priority value to the switch that you prefer to be the stack master. This ensures that the switch is reelected as stack master if a reelection occurs.
- The switch that has the configuration file.
- The switch with the lowest MAC address.
A stack master retains its role unless one of these events occurs:
- The switch stack is reset.*
- The stack master is removed from the switch stack.
- The stack master is reset or powered off.
- The stack master fails.
- The switch stack membership is increased by adding powered-on standalone switches or switch stacks.*
In the events marked by an asterisk (*), the current stack master might be reelected based on the listed factors.
When you power on or reset an entire switch stack, some stack members might not participate in the stack master election. Stack members that are powered on within the same 20-second time frame participate in the stack master election and have a chance to become the stack master. Stack members that are powered on after the 20-second time frame do not participate in this initial election and become stack members. All stack members participate in reelections. For all powering considerations that affect stack-master elections, see the “Switch Installation” chapter in the hardware installation guide.
The new stack master becomes available after a few seconds. In the meantime, the switch stack uses the forwarding tables in memory to minimize network disruption. The physical interfaces on the other available stack members are not affected during a new stack master election and reset.
After a new stack master is elected and the previous stack master becomes available, the previous stack master does not resume its role as stack master.
For all powering considerations that affect stack-master elections, see the Catalyst 2960-XR Switch Hardware Installation Guide.
Switch Stack Configuration Files
The stack master has the saved and running configuration files for the switch stack. All stack members periodically receive synchronized copies of the configuration files from the stack master. If the stack master becomes unavailable, any stack member assuming the role of stack master has the latest configuration files.
The configuration files record these settings:
- System-level (global) configuration settings such as IP, STP, VLAN, and SNMP settings that apply to all stack members
- Stack member interface-specific configuration settings that are specific for each stack member
Note |
The interface-specific settings of the stack master are saved if the stack master is replaced without saving the running configuration to the startup configuration. |
A new, out-of-box switch joining a switch stack uses the system-level settings of that switch stack. If a switch is moved to a different switch stack, that switch loses its saved configuration file and uses the system-level configuration of the new switch stack.
The interface-specific configuration of each stack member is associated with the stack member number. Stack members retain their numbers unless they are manually changed or they are already used by another member in the same switch stack.
- If an interface-specific configuration does not exist for that member number, the stack member uses its default interface-specific configuration.
- If an interface-specific configuration exists for that member number, the stack member uses the interface-specific configuration associated with that member number.
If you replace a failed member with an identical model, the replacement member automatically uses the same interface-specific configuration as the failed switch. You do not need to reconfigure the interface settings. The replacement switch (referred to as the provisioned switch) must have the same stack member number as the failed switch.
You back up and restore the stack configuration in the same way as you would for a standalone switch configuration.
Offline Configuration to Provision a Stack Member
You can use the offline configuration feature to provision (to supply a configuration to) a new switch before it joins the switch stack. You can configure the stack member number, the switch type, and the interfaces associated with a switch that is not currently part of the stack. The configuration that you create on the switch stack is called the provisioned configuration. The switch that is added to the switch stack and that receives this configuration is called the provisioned switch.
You manually create the provisioned configuration through the switch stack-member-number provision type global configuration command. The provisioned configuration is automatically created when a switch is added to a switch stack and when no provisioned configuration exists.
When you configure the interfaces associated with a provisioned switch (for example, as part of a VLAN), the switch stack accepts the configuration, and the information appears in the running configuration. The interface associated with the provisioned switch is not active, operates as if it is administratively shut down, and the no shutdown interface configuration command does not return it to active service. The interface associated with the provisioned switch does not appear in the display of the specific feature; for example, it does not appear in the show vlan user EXEC command output.
The switch stack retains the provisioned configuration in the running configuration whether or not the provisioned switch is part of the stack. You can save the provisioned configuration to the startup configuration file by entering the copy running-config startup-config privileged EXEC command. The startup configuration file ensures that the switch stack can reload and can use the saved information whether or not the provisioned switch is part of the switch stack.
- Effects of Adding a Provisioned Switch to a Switch Stack
- Effects of Replacing a Provisioned Switch in a Switch Stack
- Effects of Removing a Provisioned Switch from a Switch Stack
Effects of Adding a Provisioned Switch to a Switch Stack
When you add a provisioned switch to the switch stack, the stack applies either the provisioned configuration or the default configuration. This table lists the events that occur when the switch stack compares the provisioned configuration with the provisioned switch.
| Scenario |
Result |
|
|---|---|---|
| The stack member numbers and the switch types match. |
The switch stack applies the provisioned configuration to the provisioned switch and adds it to the stack. |
|
| The stack member numbers match but the switch types do not match. |
The switch stack applies the default configuration to the provisioned switch and adds it to the stack. The provisioned configuration is changed to reflect the new information. |
|
| The stack member number is not found in the provisioned configuration. |
The switch stack applies the default configuration to the provisioned switch and adds it to the stack. The provisioned configuration is changed to reflect the new information. |
|
| The stack member number of the provisioned switch is in conflict with an existing stack member. |
The stack master assigns a new stack member number to the provisioned switch. The stack member numbers and the switch types match: |
The switch stack applies the provisioned configuration to the provisioned switch and adds it to the stack. The provisioned configuration is changed to reflect the new information. |
| The stack member numbers match, but the switch types do not match: |
The switch stack applies the default configuration to the provisioned switch and adds it to the stack. The provisioned configuration is changed to reflect the new information. |
|
| The stack member number of the provisioned switch is not found in the provisioned configuration. |
The switch stack applies the default configuration to the provisioned switch and adds it to the stack. |
|
If you add a provisioned switch that is a different type than specified in the provisioned configuration to a powered-down switch stack and then apply power, the switch stack rejects the (now incorrect) switch stack-member-number provision type global configuration command in the startup configuration file. However, during stack initialization, the nondefault interface configuration information in the startup configuration file for the provisioned interfaces (potentially of the wrong type) is executed. Depending on the differences between the actual switch type and the previously provisioned switch type, some commands are rejected, and some commands are accepted.
Note |
If the switch stack does not contain a provisioned configuration for a new switch, the switch joins the stack with the default interface configuration. The switch stack then adds to its running configuration with a switch stack-member-number provision type global configuration command that matches the new switch. |
Effects of Replacing a Provisioned Switch in a Switch Stack
When a provisioned switch in a switch stack fails, it is removed from the stack, and is replaced with another switch, the stack applies either the provisioned configuration or the default configuration to it. The events that occur when the switch stack compares the provisioned configuration with the provisioned switch are the same as those when you add a provisioned switch to a stack.
Effects of Removing a Provisioned Switch from a Switch Stack
If you remove a provisioned switch from the switch stack, the configuration associated with the removed stack member remains in the running configuration as provisioned information. To completely remove the configuration, use the no switch stack-member-number provision global configuration command.
Stack Protocol Version
Each software image includes a stack protocol version. The stack protocol version has a major version number and a minor version number (for example 1.4, where 1 is the major version number and 4 is the minor version number). Both version numbers determine the level of compatibility among the stack members. You can display the stack protocol version by using the show platform stack manager all privileged EXEC command.
Switches with the same Cisco IOS software version have the same stack protocol version. Such switches are fully compatible, and all features function properly across the switch stack. A switch with the same Cisco IOS software version as the stack master can immediately join the switch stack.
If an incompatibility exists, the fully functional stack members generate a system message that describes the cause of the incompatibility on the specific stack members. The stack master sends the message to all stack members.
- Major Stack Protocol Version Number Incompatibility Among Stack-Capable Switches
- Minor Stack Protocol Version Number Incompatibility Among Stack-Capable Switches
- Auto-Upgrade
- Auto-Advise
Major Stack Protocol Version Number Incompatibility Among Stack-Capable Switches
Switches with different major Cisco IOS software versions usually have different stack protocol versions. Switches with different major version numbers are incompatible and cannot exist in the same switch stack.
Minor Stack Protocol Version Number Incompatibility Among Stack-Capable Switches
Switches with the same major version number but with a different minor version number are considered partially compatible. When connected to a switch stack, a partially compatible switch enters version-mismatch (VM) mode and cannot join the stack as a fully functioning member. The software detects the mismatched software and tries to upgrade (or downgrade) the switch in VM mode with the switch stack image or with a tar file image from the switch stack flash memory. The software uses the automatic upgrade (auto-upgrade) and the automatic advise (auto-advise) features.
The port LEDs on switches in version-mismatch mode will also remain off. Pressing the Mode button does not change the LED mode.
Auto-Upgrade
The purpose of the auto-upgrade feature is to allow a switch to be upgraded to a compatible software image, so that the switch can join the switch stack.
When a new switch attempts to join a switch stack, each stack member performs compatibility checks with itself and the new switch. Each stack member sends the results of the compatibility checks to the stack master, which uses the results to determine whether the switch can join the switch stack. If the software on the new switch is incompatible with the switch stack, the new switch enters version-mismatch (VM) mode.
If the auto-upgrade feature is enabled on the new switch, the stack master automatically upgrades the new switch with the same software image running on a compatible stack member. Auto-upgrade starts a few minutes after the mismatched software is detected before starting.
By default, auto-upgrade is enabled (the boot auto-copy-sw global configuration command is enabled). You can disable auto-upgrade by using the no boot auto-copy-sw global configuration command on the stack master. You can check the status of auto-upgrade by using the show boot privileged EXEC command and by checking the Auto upgrade line in the display.
Auto-upgrade includes an auto-copy process and an auto-extract process.
-
Auto-copy automatically copies the software image running on any stack member to the new switch to automatically upgrade it. Auto-copy occurs if auto-upgrade is enabled, if there is enough flash memory in the new switch, and if the software image running on the switch stack is suitable for the new switch.
Note
A switch in VM mode might not run all released software. For example, new switch hardware is not recognized in earlier versions of software. - Automatic extraction (auto-extract) occurs when the auto-upgrade process cannot find the appropriate software in the stack to copy to the new switch. In that case, the auto-extract process searches all switches in the stack for the tar file needed to upgrade the switch stack or the new switch. The tar file can be in any flash file system in the switch stack or in the new switch. If a tar file suitable for the new switch is found on a stack member, the process extracts the file and automatically upgrades the new switch.
The auto-upgrade (auto-copy and auto-extract) processes start a few minutes after the mismatched software is detected.
When the auto-upgrade process is complete, the new switch reloads and joins the stack as a fully functioning member. If you have both stack cables connected during the reload, network downtime does not occur because the switch stack operates on two rings.
Auto-Advise
Automatic advise (auto-advise) occurs when the auto-upgrade process cannot find appropriate stack member software to copy to the new switch. This process tells you the command (archive copy-sw or archive download-sw privileged EXEC command) and the image name (tar filename) needed to manually upgrade the switch stack or the new switch. The recommended image can be the running switch stack image or a tar file in any flash file system in the switch stack (including the new switch). If an appropriate image is not found in the stack flash file systems, the auto-advise process tells you to install new software on the switch stack. Auto-advise cannot be disabled, and there is no command to check its status.
Examples of Auto-Advise Messages
When you add a switch that has a different minor version number to the switch stack, the software displays messages in sequence (assuming that there are no other system messages generated by the switch).
This example shows that the switch stack detected a new switch that is running a different minor version number than the switch stack. Auto-copy starts, finds suitable software to copy from a stack member to the switch in VM mode, upgrades the switch in VM mode, and then reloads it:
*Mar 11 20:31:19.247:%STACKMGR-6-STACK_LINK_CHANGE:Stack Port 2 Switch 2 has changed to state UP
*Mar 11 20:31:23.232:%STACKMGR-6-SWITCH_ADDED_VM:Switch 1 has been ADDED to the stack(VERSION_MISMATCH)
*Mar 11 20:31:23.291:%STACKMGR-6-SWITCH_ADDED_VM:Switch 1 has been ADDED to the stack(VERSION_MISMATCH) (Stack_1-3)
*Mar 11 20:33:23.248:%IMAGEMGR-6-AUTO_COPY_SW_INITIATED:Auto-copy-software process initiated for switch number(s) 1
*Mar 11 20:36:15.038:%IMAGEMGR-6-AUTO_COPY_SW:
*Mar 11 20:36:15.038:%IMAGEMGR-6-AUTO_COPY_SW:Searching for stack member to act
*Mar 11 20:36:15.038:%IMAGEMGR-6-AUTO_COPY_SW:as software donor...
*Mar 11 20:36:15.038:%IMAGEMGR-6-AUTO_COPY_SW:Found donor (system #2) for
*Mar 11 20:36:15.038:%IMAGEMGR-6-AUTO_COPY_SW:member(s) 1
*Mar 11 20:36:15.038:%IMAGEMGR-6-AUTO_COPY_SW:System software to be uploaded:
*Mar 11 20:36:15.038:%IMAGEMGR-6-AUTO_COPY_SW:System Type: 0x00000000
*Mar 11 20:36:15.038:%IMAGEMGR-6-AUTO_COPY_SW:archiving c2960x-universalk9-mz.150-2.EX1 (directory)
*Mar 11 20:36:15.038:%IMAGEMGR-6-AUTO_COPY_SW:archiving c2960x-universalk9-mz.150-2.EX1.bin (4945851 bytes)
*Mar 11 20:36:15.038:%IMAGEMGR-6-AUTO_COPY_SW:archiving c2960x-universalk9-mz.150-2.EX1/info(450 bytes)
*Mar 11 20:36:15.038:%IMAGEMGR-6-AUTO_COPY_SW:archiving info (104 bytes)
*Mar 11 20:36:15.038:%IMAGEMGR-6-AUTO_COPY_SW:examining image...
*Mar 11 20:36:15.038:%IMAGEMGR-6-AUTO_COPY_SW:extracting info (104 bytes)
*Mar 11 20:36:15.038:%IMAGEMGR-6-AUTO_COPY_SW:extracting c2960x-universalk9-mz.150-2.EX1/info(450 bytes)
*Mar 11 20:36:15.038:%IMAGEMGR-6-AUTO_COPY_SW:extracting info (104 bytes)
*Mar 11 20:36:15.038:%IMAGEMGR-6-AUTO_COPY_SW:
*Mar 11 20:36:15.038:%IMAGEMGR-6-AUTO_COPY_SW:Stacking Version Number:1.4
*Mar 11 20:36:15.038:%IMAGEMGR-6-AUTO_COPY_SW:
*Mar 11 20:36:15.038:%IMAGEMGR-6-AUTO_COPY_SW:System Type: 0x00000000
*Mar 11 20:36:15.038:%IMAGEMGR-6-AUTO_COPY_SW: Ios Image File Size: 0x004BA200
*Mar 11 20:36:15.038:%IMAGEMGR-6-AUTO_COPY_SW: Total Image File Size:0x00818A00
*Mar 11 20:36:15.038:%IMAGEMGR-6-AUTO_COPY_SW: Minimum Dram required:0x08000000
*Mar 11 20:36:15.038:%IMAGEMGR-6-AUTO_COPY_SW: Image Suffix:universalk9-mz.150-2.EX1
*Mar 11 20:36:15.038:%IMAGEMGR-6-AUTO_COPY_SW: Image Directory:c2960x-universalk9-mz.150-2.EX1
*Mar 11 20:36:15.038:%IMAGEMGR-6-AUTO_COPY_SW: Image Name:c2960x-universalk9-mz.150-2.EX1
*Mar 11 20:36:15.038:%IMAGEMGR-6-AUTO_COPY_SW: Image 1:flash1:c2960x-universalk9-mz.150-2.EX1
*Mar 11 20:36:15.038:%IMAGEMGR-6-AUTO_COPY_SW: Old image will be deleted after download.
*Mar 11 20:36:15.038:%IMAGEMGR-6-AUTO_COPY_SW:
*Mar 11 20:36:15.038:%IMAGEMGR-6-AUTO_COPY_SW:Extracting images from archive into flash on switch 1...
*Mar 11 20:36:15.038:%IMAGEMGR-6-AUTO_COPY_SW:c2960x-universalk9-mz.150-2.EX1 (directory)
*Mar 11 20:36:15.038:%IMAGEMGR-6-AUTO_COPY_SW:extracting c2960x-universalk9-mz.150-2.EX1/c2960x-universalk9-mz.150-2.EX1 (4945851 bytes)
*Mar 11 20:36:15.038:%IMAGEMGR-6-AUTO_COPY_SW:extracting c2960x-universalk9-mz.150-2.EX1/info (450 bytes)
*Mar 11 20:36:15.038:%IMAGEMGR-6-AUTO_COPY_SW:extracting info (104 bytes)
*Mar 11 20:36:15.038:%IMAGEMGR-6-AUTO_COPY_SW:
*Mar 11 20:36:15.038:%IMAGEMGR-6-AUTO_COPY_SW:Installing (renaming):`flash1:update/c2960x-universalk9-mz.150-2.EX1' ->
*Mar 11 20:36:15.038:%IMAGEMGR-6-AUTO_COPY_SW: `flash1:c2960x-universalk9-mz.150-2.EX1'
*Mar 11 20:36:15.038:%IMAGEMGR-6-AUTO_COPY_SW:New software image installed in flash1:c2960x-universalk9-mz.150-2.EX1
*Mar 11 20:36:15.038:%IMAGEMGR-6-AUTO_COPY_SW:
*Mar 11 20:36:15.038:%IMAGEMGR-6-AUTO_COPY_SW:
*Mar 11 20:36:15.038:%IMAGEMGR-6-AUTO_COPY_SW:Removing old image:flash1:c2960x-universalk9-mz.150-2.EX1
*Mar 11 20:36:15.038:%IMAGEMGR-6-AUTO_COPY_SW:
*Mar 11 20:36:15.038:%IMAGEMGR-6-AUTO_COPY_SW:All software images installed.
*Mar 11 20:36:15.038:%IMAGEMGR-6-AUTO_COPY_SW:Requested system reload in progress...
*Mar 11 20:36:15.038:%IMAGEMGR-6-AUTO_COPY_SW:Software successfully copied to
*Mar 11 20:36:15.038:%IMAGEMGR-6-AUTO_COPY_SW:system(s) 1
*Mar 11 20:36:15.038:%IMAGEMGR-6-AUTO_COPY_SW:Done copying software
*Mar 11 20:36:15.038:%IMAGEMGR-6-AUTO_COPY_SW:Reloading system(s) 1
This example shows that the switch stack detected a new switch that is running a different minor version number than the switch stack. Auto-copy starts but cannot find software in the switch stack to copy to the VM-mode switch to make it compatible with the switch stack. The auto-advise process starts and recommends that you download a tar file from the network to the switch in VM mode:
*Mar 1 00:01:11.319:%STACKMGR-6-STACK_LINK_CHANGE:Stack Port 2 Switch 2 has changed to state UP
*Mar 1 00:01:15.547:%STACKMGR-6-SWITCH_ADDED_VM:Switch 1 has been ADDED to the stack (VERSION_MISMATCH)
stack_2#
*Mar 1 00:03:15.554:%IMAGEMGR-6-AUTO_COPY_SW_INITIATED:Auto-copy-software process initiated for switch number(s) 1
*Mar 1 00:03:15.554:%IMAGEMGR-6-AUTO_COPY_SW:
*Mar 1 00:03:15.554:%IMAGEMGR-6-AUTO_COPY_SW:Searching for stack member to act
*Mar 1 00:03:15.554:%IMAGEMGR-6-AUTO_COPY_SW:as software donor...
*Mar 1 00:03:15.554:%IMAGEMGR-6-AUTO_COPY_SW:Software was not copied
*Mar 1 00:03:15.562:%IMAGEMGR-6-AUTO_ADVISE_SW_INITIATED:Auto-advise-software process initiated for switch number(s) 1
*Mar 1 00:04:22.537:%IMAGEMGR-6-AUTO_ADVISE_SW:
*Mar 1 00:04:22.537:%IMAGEMGR-6-AUTO_ADVISE_SW:
*Mar 1 00:04:22.537:%IMAGEMGR-6-AUTO_ADVISE_SW:Systems with incompatible software
*Mar 1 00:04:22.537:%IMAGEMGR-6-AUTO_ADVISE_SW:have been added to the stack. The
*Mar 1 00:04:22.537:%IMAGEMGR-6-AUTO_ADVISE_SW:storage devices on all of the stack
*Mar 1 00:04:22.537:%IMAGEMGR-6-AUTO_ADVISE_SW:members have been scanned, and it has
*Mar 1 00:04:22.537:%IMAGEMGR-6-AUTO_ADVISE_SW:been determined that the stack can be
*Mar 1 00:04:22.537:%IMAGEMGR-6-AUTO_ADVISE_SW:repaired by issuing the following
*Mar 1 00:04:22.537:%IMAGEMGR-6-AUTO_ADVISE_SW:command(s):
*Mar 1 00:04:22.537:%IMAGEMGR-6-AUTO_ADVISE_SW:
*Mar 1 00:04:22.537:%IMAGEMGR-6-AUTO_ADVISE_SW: archive download-sw /force-reload /overwrite /dest 1 flash1:c2960x-universalk9-mz.150-2.EX1.tar
*Mar 1 00:04:22.537:%IMAGEMGR-6-AUTO_ADVISE_SW:
Note |
Auto-advise and auto-copy identify which images are running by examining the info file and by searching the directory structure on the switch stack. If you download your image by using the copy tftp: boot loader command instead of the archive download-sw privileged EXEC command, the proper directory structure is not created. For more information about the info file, see the Catalyst 2960-XR Switch Managing Cisco IOS Image Files Configuration Guide. |
SDM Template Mismatch in Switch Stacks
All stack members use the Switch Database Management (SDM) template configured on the stack master. When a new switch is added to a stack, the SDM configuration that is stored on the stack master overrides the template configured on an individual switch.
You can use the show switch privileged EXEC command to see if any stack members are in SDM-mismatch mode.
Version-mismatch (VM) mode has priority over SDM-mismatch mode. If a VM-mode condition and an SDM-mismatch mode exist, the switch stack first attempts to resolve the VM-mode condition.
For more information about SDM templates, see the Catalyst 2960-XR Switch System Management Configuration Guide.
Switch Stack Management Connectivity
You manage the switch stack and the stack member interfaces through the stack master. You can use the CLI, SNMP, and supported network management applications such as CiscoWorks. You cannot manage stack members on an individual switch basis.
Note |
Use SNMP to manage network features across the stack that are defined by supported MIBs. The switch does not support MIBs to manage stacking-specific features such as stack membership and election. |
- Connectivity to Specific Stack Members
- Connectivity to the Switch Stack Through an IP Address
- Connectivity to the Switch Stack Through Console Ports or Ethernet Management Ports
Connectivity to Specific Stack Members
If you want to configure a specific stack member port, you must include the stack member number in the CLI command interface notation.
To debug a specific stack member, you can access it from the stack master by using the session stack-member-number privileged EXEC command. The stack member number is appended to the system prompt. For example, Switch-2# is the prompt in privileged EXEC mode for stack member 2, and the system prompt for the stack master is Switch. Only the show and debug commands are available in a CLI session to a specific stack member.
Connectivity to the Switch Stack Through an IP Address
The switch stack is managed through a single IP address. The IP address is a system-level setting and is not specific to the stack master or to any other stack member. You can still manage the stack through the same IP address even if you remove the stack master or any other stack member from the stack, provided there is IP connectivity.
Note |
Stack members retain their IP addresses when you remove them from a switch stack. To avoid a conflict by having two devices with the same IP address in your network, change the IP addresses of any switches that you remove from the switch stack. |
Connectivity to the Switch Stack Through Console Ports or Ethernet Management Ports
You can connect to the stack master by using one of these methods:
- You can connect a terminal or a PC to the stack master through the console port of one or more stack members.
- You can connect a PC to the stack master through the Ethernet management ports of one or more stack members.
Be careful when using multiple CLI sessions to the stack master. Commands that you enter in one session are not displayed in the other sessions. Therefore, it is possible that you might not be able to identify the session from which you entered a command.
We recommend using only one CLI session when managing the switch stack.
How to Configure a Switch Stack
- Default Switch Stack Configuration
- Enabling Persistent MAC Address
- Assigning a Stack Member Number
- Setting the Stack Member Priority Value
- Provisioning a New Member for a Switch Stack
- Removing Provisioned Switch Information
Default Switch Stack Configuration
The following table shows the default switch stack configuration settings:
Feature |
Default Setting |
|---|---|
Stack MAC address timer |
Disabled. |
Stack member number |
1 |
Stack member priority value |
1 |
Offline configuration |
The switch stack is not provisioned. |
Persistent MAC address |
Disabled. |
Enabling Persistent MAC Address
This procedure is optional.
Note |
When you enter the command to configure this feature, a warning message appears with the consequences of your configuration. You should use this feature cautiously. Using the old stack master MAC address elsewhere in the same domain could result in lost traffic. |
1. configure terminal
2. stack-mac persistent timer [0 | time-value]
3. end
4. copy running-config startup-config
DETAILED STEPS
Assigning a Stack Member Number
This optional task is available only from the stack master.
1. configure terminal
2. switch current-stack-member-number renumber new-stack-member-number
3. end
4. reload slot stack-member-number
5. copy running-config startup-config
DETAILED STEPS
| Command or Action | Purpose | |
|---|---|---|
| Step 1 | configure terminal Example: Switch# configure terminal
|
Enters global configuration mode. |
| Step 2 | switch current-stack-member-number renumber new-stack-member-number Example: Switch(config)# switch 3 renumber 4 |
Specifies the current stack member number and the new stack member number for the stack member. The range is 1 to 8. You can display the current stack member number by using the show switch user EXEC command. |
| Step 3 | end Example: Switch(config)# end
|
Returns to privileged EXEC mode. |
| Step 4 | reload slot stack-member-number Example: Switch# reload slot 5
|
Resets the stack member. |
| Step 5 | copy running-config startup-config Example: Switch# copy running-config startup-config
|
Saves your entries in the configuration file. |
Setting the Stack Member Priority Value
This optional task is available only from the stack master.
1. configure terminal
2. switch stack-member-number priority new-priority-number
3. end
4. copy running-config startup-config
DETAILED STEPS
| Command or Action | Purpose | |
|---|---|---|
| Step 1 | configure terminal Example: Switch# configure terminal
|
Enters global configuration mode. |
| Step 2 | switch stack-member-number priority new-priority-number Example: Switch(config)# switch 3 priority 2 |
Specifies the stack member number and the new priority for the stack member. The stack member number range is 1 to 8. The priority value range is 1 to 15. You can display the current priority value by using the show switch user EXEC command. The new priority value takes effect immediately but does not affect the current stack master. The new priority value helps determine which stack member is elected as the new stack master when the current stack master or switch stack resets. |
| Step 3 | end Example: Switch(config))# end |
Returns to privileged EXEC mode. |
| Step 4 | copy running-config startup-config Example: Switch# copy running-config startup-config
|
(Optional) Saves your entries in the configuration file. |
Provisioning a New Member for a Switch Stack
This optional task is available only from the stack master.
1. show switch
2. configure terminal
3. switch stack-member-number provision type
4. end
5. copy running-config startup-config
DETAILED STEPS
| Command or Action | Purpose | |
|---|---|---|
| Step 1 | show switch Example: Switch# show switch
|
Displays summary information about the switch stack. |
| Step 2 | configure terminal Example: Switch# configure terminal
|
Enters global configuration mode. |
| Step 3 | switch stack-member-number provision type Example: Switch(config)# switch 3 provision WS-xxxx
|
Specifies the stack member number for the preconfigured switch. By default, no switches are provisioned. For stack-member-number, the range is 1 to 8. Specify a stack member number that is not already used in the switch stack. See Step 1. For type, enter the model number of a supported switch that is listed in the command-line help strings. |
| Step 4 | end Example: Switch(config)# end
|
Returns to privileged EXEC mode. |
| Step 5 | copy running-config startup-config Example: Switch# copy running-config startup-config
|
(Optional) Saves your entries in the configuration file. |
Removing Provisioned Switch Information
Before you begin, you must remove the provisioned switch from the stack. This optional task is available only from the stack master.
1. configure terminal
2. no switch stack-member-number provision
3. end
4. copy running-config startup-config
DETAILED STEPS
| Command or Action | Purpose | |
|---|---|---|
| Step 1 | configure terminal Example: Switch# configure terminal
|
Enters global configuration mode. |
| Step 2 | no switch stack-member-number provision Example: Switch(config)# no switch 3 provision |
Removes the provisioning information for the specified member. |
| Step 3 | end Example: Switch(config)# end
|
Returns to privileged EXEC mode. |
| Step 4 | copy running-config startup-config Example: Switch# copy running-config startup-config
|
(Optional) Saves your entries in the configuration file. |
If you are removing a provisioned switch in a stack with this configuration:
- The stack has four members
- Stack member 1 is the stack master
- Stack member 3 is a provisioned switch
and want to remove the provisioned information and to avoid receiving an error message, you can remove power from stack member 3, disconnect the stack cables between the stack member 3 and switches to which it is connected, reconnect the cables between the remaining stack members, and enter the no switch stack-member-number provision global configuration command.
Troubleshooting the Switch Stack
Accessing the CLI of a Specific Member
This optional task is for debugging purposes, and is available only from the stack master.
You can access all or specific members by using the remote command {all | stack-member-number} privileged EXEC command. The stack member number range is 1 to 8.
You can access specific members by using the session stack-member-number privileged EXEC command. The member number is appended to the system prompt. For example, the prompt for member 2 is Switch-2#, and system prompt for the stack master is Switch#. Enter exit to return to the CLI session on the stack master. Only the show and debug commands are available on a specific member.
Temporarily Disabling a Stack Port
If a stack port is flapping and causing instability in the stack ring, to disable the port, enter the switch stack-member-number stack port port-number disable privileged EXEC command. To reenable the port, enter the switch stack-member-number stack port port-number enable command.
Note |
Be careful when using the switch stack-member-number stack port port-number disable command. When you disable the stack port, the stack operates at half bandwidth. |
A stack is in the full-ring state when all members are connected through the stack ports and are in the ready state.
The stack is in the partial-ring state when the following occurs:
1. switch stack-member-number stack port port-number disable
2. switch stack-member-number stack port port-number enable
3. copy running-config startup-config
DETAILED STEPS
| Command or Action | Purpose | |
|---|---|---|
| Step 1 | switch stack-member-number stack port port-number disable Example: Switch# switch 2 stack port 1 disable
|
Disables the specified stack port. |
| Step 2 | switch stack-member-number stack port port-number enable Example: Switch# switch 2 stack port 1 enable
|
Reenables the stack port after the problem is resolved. |
| Step 3 | copy running-config startup-config Example: Switch# copy running-config startup-config
|
(Optional) Saves your entries in the configuration file. |
When you disable a stack port and the stack is in the full-ring state, you can disable only one stack port. This message appears:
Enabling/disabling a stack port may cause undesired stack changes. Continue?[confirm]
When you disable a stack port and the stack is in the partial-ring state, you cannot disable the port. This message appears:
Disabling stack port not allowed with current stack configuration.
Reenabling a Stack Port While Another Member Starts
Stack Port 1 on Switch 1 is connected to Port 2 on Switch 4. If Port 1 is flapping, you can disable Port 1 with the switch 1 stack port 1 disable privileged EXEC command. While Port 1 on Switch 1 is disabled and Switch 1 is still powered on, follow these steps to reenable a stack port:
| Step 1 | Disconnect the stack cable between Port 1 on Switch 1 and Port 2 on Switch 4. |
| Step 2 | Remove Switch 4 from the stack. |
| Step 3 | Add a switch to replace Switch 4 and assign it switch-number 4. |
| Step 4 | Reconnect the cable between Port 1 on Switch 1 and Port 2 on Switch 4 (the replacement switch). |
| Step 5 | Reenable the link between the switches. Enter the switch 1 stack port 1 enable privileged EXEC command to enable Port 1 on Switch 1. |
| Step 6 | Power on Switch 4. |
 Caution |
Powering on Switch 4 before enabling the Port 1 on Switch 1 might cause one of the switches to reload. If Switch 4 is powered on first, you might need to enter the switch 1 stack port 1 enable and the switch 4 stack port 2 enable privileged EXEC commands to bring up the link. |
Monitoring the Switch Stack
| Command |
Description |
|---|---|
show controller ethernet-controller stack port {1 | 2} |
Displays stack port counters (or per-interface and per-stack port send and receive statistics read from the hardware). |
show controller ethernet-controller fastethernet0 |
Displays information about the Ethernet management port, including the port status and the per-interface send and receive statistics read from the hardware. |
show platform stack compatibility |
Displays information about HULC feature compatibility. |
show platform stack manager all |
Displays all stack manager information, such as the stack protocol version. |
show platform stack passive-links |
Displays information about stack passive links. |
| show switch |
Displays summary information about the stack, including the status of provisioned switches and switches in version-mismatch mode. |
| show switch stack-member-number |
Displays information about a specific member. |
| show switch detail |
Displays detailed information about the stack. |
| show switch neighbors |
Displays the stack neighbors. |
| show switch stack-ports |
Displays port information for the stack. |
Configuration Examples for Switch Stacks
- Switch Stack Configuration Scenarios
- Enabling Persistent MAC Address: Example
- Provisioning a New Member for a Switch Stack: Example
Switch Stack Configuration Scenarios
| Scenario |
Result |
|
|---|---|---|
| Stack master election specifically determined by existing stack masters |
Connect two powered-on switch stacks through the stack ports. |
Only one of the two stack masters becomes the new stack master. |
| Stack master election specifically determined by the stack member priority value |
The stack member with the higher priority value is elected stack master. |
|
| Stack master election specifically determined by the configuration file |
Assuming that both stack members have the same priority value: |
The stack member with the saved configuration file is elected stack master. |
| Stack master election specifically determined by the MAC address |
Assuming that both stack members have the same priority value, configuration file, and feature set, restart both stack members at the same time. |
The stack member with the lower MAC address is elected stack master. |
| Stack member number conflict |
Assuming that one stack member has a higher priority value than the other stack member: |
The stack member with the higher priority value retains its stack member number. The other stack member has a new stack member number. |
| Add a stack member |
The stack master is retained. The new switch is added to the switch stack. |
|
| Stack master failure |
Remove (or power off) the stack master. |
One of the remaining stack members becomes the new stack master. All other stack members in the stack remain as stack members and do not reboot. |
| Add more than eight stack members |
Two switches become stack masters. One stack master has eight stack members. The other stack master remains as a standalone switch. Use the Mode button and port LEDs on the switches to identify which switches are stack masters and which switches belong to each stack master. |
|
Enabling Persistent MAC Address: Example
This example shows how to configure the persistent MAC address feature for a 7-minute time delay and to verify the configuration:
Switch(config)# stack-mac persistent timer 7
		WARNING: The stack continues to use the base MAC of the old Master
		WARNING: as the stack MAC after a master switchover until the MAC
		WARNING: persistency timer expires. During this time the Network
		WARNING: Administrators must make sure that the old stack-mac does
		WARNING: not appear elsewhere in this network domain. If it does,
		WARNING: user traffic may be blackholed.
		Switch(config)# end
		Switch# show switch
		Switch/Stack Mac Address : 0016.4727.a900
		Mac persistency wait time: 7 mins
		                                           H/W   Current
		Switch#  Role   Mac Address     Priority Version  State
		----------------------------------------------------------
		*1       Master 0016.4727.a900     1      P2B     Ready
Provisioning a New Member for a Switch Stack: Example
This example shows how to provision a switch with a stack member number of 2 for the switch stack. The show running-config command output shows the interfaces associated with the provisioned switch:
Switch(config)# switch 2 provision switch_PID
		Switch(config)# end
		Switch# show running-config | include switch 2
		switch 2 provision switch_PID
Additional References for Switch Stacks
Related Documents
| Related Topic | Document Title |
|---|---|
Cabling and powering on a switch stack. |
Catalyst 2960-XR Switch Hardware Installation Guide |
Standards and RFCs
| Standard/RFC | Title |
|---|---|
None |
— |
MIBs
| MIB | MIBs Link |
|---|---|
All supported MIBs for this release. |
To locate and download MIBs for selected platforms, Cisco IOS releases, and software images, use Cisco MIB Locator found at the following URL: |
Technical Assistance
| Description | Link |
|---|---|
| The Cisco Support website provides extensive online resources, including documentation and tools for troubleshooting and resolving technical issues with Cisco products and technologies. To receive security and technical information about your products, you can subscribe to various services, such as the Product Alert Tool (accessed from Field Notices), the Cisco Technical Services Newsletter, and Really Simple Syndication (RSS) Feeds. Access to most tools on the Cisco Support website requires a Cisco.com user ID and password. |
Feature Information for Switch Stack Features
This table lists the features in this module and provides links to specific configuration information:
Feature Name |
Releases |
Feature Information |
FlexStack-Plus |
Cisco IOS 15.0(2)EX1 |
FlexStack-Plus is the name of the stacking technology used by the Catalyst 2960-XR Series of fixed Ethernet switches. |
20 Gbps Stack Port Speed |
Cisco IOS 15.0(2)EX1 |
In a homogenous stack, the bandwidth for a single stack port is 20 Gbps unlike Flexstack where the port bandwidth is 10 Gbps. |
 Feedback