Cisco Remote Integrated Services Engine with Cisco Prime NAM and Cisco Nexus 7000 Series Switches Configuration Guide
Bias-Free Language
The documentation set for this product strives to use bias-free language. For the purposes of this documentation set, bias-free is defined as language that does not imply discrimination based on age, disability, gender, racial identity, ethnic identity, sexual orientation, socioeconomic status, and intersectionality. Exceptions may be present in the documentation due to language that is hardcoded in the user interfaces of the product software, language used based on RFP documentation, or language that is used by a referenced third-party product. Learn more about how Cisco is using Inclusive Language.
- Updated:
- December 23, 2016
Chapter: Preparing for Integrating Cisco RISE with Cisco Prime NAM
Preparing for
Integrating Cisco RISE with Cisco Prime NAM
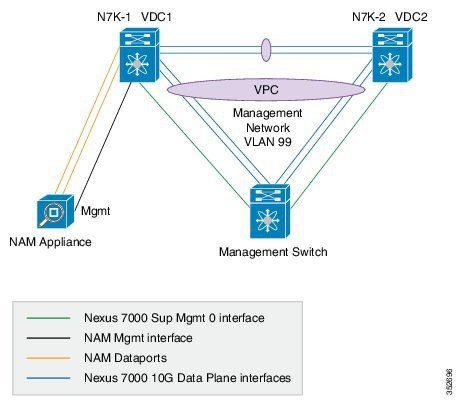
This chapter describes how to prepare for integrating the Cisco Remote Integrated Services Engine (RISE) with a Cisco Prime Network Analysis Module (NAM) appliance connected to aCisco Nexus 7000 Series switch. The Cisco NX-OS software supports the Cisco Nexus 7000 Series switches, which includes the Cisco Nexus 7000 Series switches and Cisco Nexus 7700 Series switches.
This chapter includes the following sections:
- Finding Feature Information
- Information About Preparing for RISE Integration
- Licensing for Cisco RISE with Cisco Prime NAM
- Guidelines and Limitations for Preparing for Cisco RISE with Cisco Prime NAM
- Preparing for Cisco RISE with Citrix Application Delivery Controller (ADC)
Finding Feature Information
Your software release might not support all the features documented in this module. For the latest caveats and feature information, see the Bug Search Tool at https://tools.cisco.com/bugsearch/ and the release notes for your software release. To find information about the features documented in this module, and to see a list of the releases in which each feature is supported, see the “New and Changed Information” chapter.
Information About Preparing for RISE Integration
This section includes the following topics:
Connection Modes
Licensing for Cisco RISE with Cisco Prime NAM
| Product | License Requirements |
|---|---|
|
Cisco NX-OS |
The Cisco Remote Integrated Services Engine (RISE) with Cisco Prime Network Analysis Module (NAM) requires the Enhanced Layer 2 Package on the Cisco Nexus 7000 Series switch. For a complete explanation of the Cisco NX-OS licensing scheme and how to obtain and apply licenses, see the Cisco NX-OS Licensing Guide. For a complete explanation of the Cisco NX-OS licensing scheme, see the Cisco NX-OS Licensing Guide |
Guidelines and Limitations for Preparing for Cisco RISE with Cisco Prime NAM
-
The following Cisco Prime NAM Series modules are supported for a Cisco RISE with Cisco Prime NAM deployment: Cisco Prime NAM Series Model Control Ports Data Monitoring Ports 2304
2 x 1 Gb/s
4 x 1 Gb/s
2320
2 x 1 Gb/s
20 x 1 Gb/s
-
For the Cisco Nexus 7000 Series switches in a Cisco RISE integration with Cisco Prime NAM, Cisco NX-OS Release 6.2(8) and later releases is required.
-
For the Cisco Prime NAM in a Cisco RISE integration, the Cisco Prime NAM 6.0(2) software release is required.
Preparing for Cisco RISE with Citrix Application Delivery Controller (ADC)
This chapter describes how to prepare for integrating the Cisco Remote Integrated Services Engine (RISE) with Citrix Application Delivery Controller (ADC) appliance connected to the Cisco Nexus Series switches. The Cisco NX-OS software supports the Cisco Nexus Series switches, which includes the Cisco Nexus Series switches.
This section includes the following topics:
Installing the Cisco Nexus Series Switch
 Note | For installation and configuration information, see the Cisco Nexus Series configuration guides |
Installing the Cisco Prime NAM
Note | For installation and configuration information, see the Cisco Prime Network Analysis Module (NAM) 2300 Series Appliances Installation and Configuration Guide. |
The Cisco Prime NAM is typically mounted in a rack and all models ship with rack-rail hardware. Installation can include the following tasks:
What to Do Next
After the appliance is securely mounted on the rack, you are ready to connect the cables. Connect the power cable first. Do not power on the unit yet. Connect the appliance cables next.
 Feedback