Configuring Layer 2 Interfaces

This chapter contains the following sections:

Information About Ethernet Interfaces

The Ethernet ports can operate as standard Ethernet interfaces connected to servers or to a LAN.

The Ethernet interfaces are enabled by default.

Interface Command

You can enable the various capabilities of the Ethernet interfaces on a per-interface basis using the interface command. When you enter the interface command, you specify the following information:

  • Interface type—All physical Ethernet interfaces use the ethernet keyword.

  • Slot number:

    • Slot 1 includes all the fixed ports.

    • Slot 2 includes the ports on the upper expansion module (if populated).

    • Slot 3 includes the ports on the lower expansion module (if populated).

    • Slot 4 includes the ports on the lower expansion module (if populated).

  • Port number— Port number within the group.

The interface numbering convention is extended to support use with a Cisco Nexus Fabric Extender as follows:

switch(config)# interface ethernet [chassis/]slot/port

  • The chassis ID is an optional entry that you can use to address the ports of a connected Fabric Extender. The chassis ID is configured on a physical Ethernet or EtherChannel interface on the switch to identify the Fabric Extender discovered through the interface. The chassis ID ranges from 100 to 199.


Note


After you perform an upgrade from Cisco NX-OS 6.0(2)A7(2) to Cisco NX-OS 6.0(2)A8(10) and later, you may see the display format of transceiver type for DACs changed to decimal format. However, there wil be no change in the functionality of the device.


Information About Unified Ports

Cisco Nexus unified ports allow you to configure a physical port on a Cisco Nexus device switch as a 1/10-Gigabit Ethernet, Fibre Channel over Ethernet (FCoE), or 2-, 4-, 8-Gigabit native Fibre Channel port.

Currently, most networks have two types of switches for different types of networks. For example, LAN switches carry Ethernet traffic up to Catalyst or Nexus switches carry FC traffic from servers to MDS switches. With unified port technology, you can deploy a unified platform, unified device, and unified wire approach. Unified ports allow you to move from an existing segregated platform approach where you choose LAN and SAN port options to transition to a single, unified fabric that is transparent and consistent with existing practices and management software. A unified fabric includes the following:

  • Unified platform—Uses the same hardware platform and the same software code level and certifies it once for your LAN and SAN environments.

  • Unified device—Runs LAN and SAN services on the same platform switch. The unified device allows you to connect your Ethernet and Fibre Channel cables to the same device.

  • Unified wire—Converges LAN and SAN networks on a single converged network adapter (CNA) and connects them to your server.

A unified fabric allows you to manage Ethernet and FCoE features independently with existing Cisco tools.

Guidelines and Limitations for Unified Ports

    Unidirectional Link Detection Parameter

    The Cisco-proprietary Unidirectional Link Detection (UDLD) protocol allows ports that are connected through fiber optics or copper (for example, Category 5 cabling) Ethernet cables to monitor the physical configuration of the cables and detect when a unidirectional link exists. When the switch detects a unidirectional link, UDLD shuts down the affected LAN port and alerts the user. Unidirectional links can cause a variety of problems, including spanning tree topology loops.

    UDLD is a Layer 2 protocol that works with the Layer 1 protocols to determine the physical status of a link. At Layer 1, autonegotiation takes care of physical signaling and fault detection. UDLD performs tasks that autonegotiation cannot perform, such as detecting the identities of neighbors and shutting down misconnected LAN ports. When you enable both autonegotiation and UDLD, Layer 1 and Layer 2 detections work together to prevent physical and logical unidirectional connections and the malfunctioning of other protocols.

    A unidirectional link occurs whenever traffic transmitted by the local device over a link is received by the neighbor but traffic transmitted from the neighbor is not received by the local device. If one of the fiber strands in a pair is disconnected, and if autonegotiation is active, the link does not stay up. In this case, the logical link is undetermined, and UDLD does not take any action. If both fibers are working normally at Layer 1, then UDLD at Layer 2 determines whether those fibers are connected correctly and whether traffic is flowing bidirectionally between the correct neighbors. This check cannot be performed by autonegotiation, because autonegotiation operates at Layer 1.

    A Cisco Nexus device periodically transmits UDLD frames to neighbor devices on LAN ports with UDLD enabled. If the frames are echoed back within a specific time frame and they lack a specific acknowledgment (echo), the link is flagged as unidirectional and the LAN port is shut down. Devices on both ends of the link must support UDLD in order for the protocol to successfully identify and disable unidirectional links.

    The following figure shows an example of a unidirectional link condition. Device B successfully receives traffic from Device A on the port. However, Device A does not receive traffic from Device B on the same port. UDLD detects the problem and disables the port.
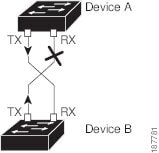
    Figure 1. Unidirectional Link

    Default UDLD Configuration

    The following table shows the default UDLD configuration.

    Table 1. UDLD Default Configuration

    Feature

    Default Value

    UDLD global enable state

    Globally disabled

    UDLD aggressive mode

    Disabled

    UDLD per-port enable state for fiber-optic media

    Enabled on all Ethernet fiber-optic LAN ports

    UDLD per-port enable state for twisted-pair (copper) media

    Enabled

    UDLD Aggressive and Nonaggressive Modes

    UDLD aggressive mode is disabled by default. You can configure UDLD aggressive mode only on point-to-point links between network devices that support UDLD aggressive mode. If UDLD aggressive mode is enabled, when a port on a bidirectional link that has a UDLD neighbor relationship established stops receiving UDLD frames, UDLD tries to reestablish the connection with the neighbor. After eight failed retries, the port is disabled.

    To prevent spanning tree loops, nonaggressive UDLD with the default interval of 15 seconds is fast enough to shut down a unidirectional link before a blocking port transitions to the forwarding state (with default spanning tree parameters).

    When you enable the UDLD aggressive mode, the following occurs:

    • One side of a link has a port stuck (both transmission and receive)

    • One side of a link remains up while the other side of the link is down

    In these cases, the UDLD aggressive mode disables one of the ports on the link, which prevents traffic from being discarded.

    Interface Speed

    The Cisco Nexus 6004 switch has default port in 40 Gigabit Ethernet mode. The port speed can be changed in group of 12 Quad Small Form-factor Pluggable (QSFP) ports. You need to reset the group after the port mode is changed. The hardware support is provided for port speed of every 3 QSFP interfaces.

    Information About Ethernet Interfaces

    The Ethernet ports can operate as standard Ethernet interfaces connected to servers or to a LAN.

    The Ethernet interfaces are enabled by default.

    Cisco Discovery Protocol

    The Cisco Discovery Protocol (CDP) is a device discovery protocol that runs over Layer 2 (the data link layer) on all Cisco-manufactured devices (routers, bridges, access servers, and switches) and allows network management applications to discover Cisco devices that are neighbors of already known devices. With CDP, network management applications can learn the device type and the Simple Network Management Protocol (SNMP) agent address of neighboring devices that are running lower-layer, transparent protocols. This feature enables applications to send SNMP queries to neighboring devices.

    CDP runs on all media that support Subnetwork Access Protocol (SNAP). Because CDP runs over the data-link layer only, two systems that support different network-layer protocols can learn about each other.

    Each CDP-configured device sends periodic messages to a multicast address, advertising at least one address at which it can receive SNMP messages. The advertisements also contain time-to-live, or holdtime information, which is the length of time a receiving device holds CDP information before discarding it. Each device also listens to the messages sent by other devices to learn about neighboring devices.

    The switch supports both CDP Version 1 and Version 2.

    Default CDP Configuration

    The following table shows the default CDP configuration.

    Table 2. Default CDP Configuration

    Feature

    Default Setting

    CDP interface state

    Enabled

    CDP timer (packet update frequency)

    60 seconds

    CDP holdtime (before discarding)

    180 seconds

    CDP Version-2 advertisements

    Enabled

    Error-Disabled State

    An interface is in the error-disabled (err-disabled) state when the inteface is enabled administratively (using the no shutdown command) but disabled at runtime by any process. For example, if UDLD detects a unidirectional link, the interface is shut down at runtime. However, because the interface is administratively enabled, the interface status displays as err-disabled. Once an interface goes into the err-disabled state, you must manually reenable it or you can configure an automatic timeout recovery value. The err-disabled detection is enabled by default for all causes. The automatic recovery is not configured by default.

    When an interface is in the err-disabled state, use the errdisable detect cause command to find information about the error.

    You can configure the automatic err-disabled recovery timeout for a particular err-disabled cause by changing the time variable.

    The errdisable recovery cause command provides automatic recovery after 300 seconds. To change the recovery period, use the errdisable recovery interval command to specify the timeout period. You can specify 30 to 65535 seconds.

    If you do not enable the err-disabled recovery for the cause, the interface stays in the err-disabled state until you enter the shutdown and no shutdown commands. If the recovery is enabled for a cause, the interface is brought out of the err-disabled state and allowed to retry operation once all the causes have timed out. Use the show interface status err-disabled command to display the reason behind the error.

    About Port Profiles

    You can create a port profile that contains many interface commands and apply that port profile to a range of interfaces on the . Port profiles can be applied to the following interface types:

    • Ethernet

    • VLAN network interface

    • Port channel

    A command that is included in a port profile can be configured outside of the port profile. If the new configuration in the port profile conflicts with the configurations that exist outside the port profile, the commands configured for an interface in configuration terminal mode have higher priority than the commands in the port profile. If changes are made to the interface configuration after a port profile is attached to it, and the configuration conflicts with that in the port profile, the configurations in the interface will be given priority.

    You inherit the port profile when you attach the port profile to an interface or range of interfaces, When you attach, or inherit, a port profile to an interface or range of interfaces, the switch applies all the commands in that port profile to the interfaces.

    You can have one port profile inherit the settings from another port profile. Inheriting another port profile allows the initial port profile to assume all of the commands of the second, inherited, port profile that do not conflict with the initial port profile. Four levels of inheritance are supported. The same port profile can be inherited by any number of port profiles.

    To apply the port profile configurations to the interfaces, you must enable the specific port profile. You can configure and inherit a port profile onto a range of interfaces prior to enabling the port profile; you then enable that port profile for the configurations to take effect on the specified interfaces.

    When you remove a port profile from a range of interfaces, the switch undoes the configuration from the interfaces first and then removes the port profile link itself. When you remove a port profile, the switch checks the interface configuration and either skips the port profile commands that have been overridden by directly entered interface commands or returns the command to the default value.

    If you want to delete a port profile that has been inherited by other port profiles, you must remove the inheritance before you can delete the port profile.

    You can choose a subset of interfaces from which to remove a port profile from among that group of interfaces that you originally applied the profile. For example, if you configured a port profile and configured ten interfaces to inherit that port profile, you can remove the port profile from just some of the specified ten interfaces. The port profile continues to operate on the remaining interfaces to which it is applied.

    If you delete a specific configuration for a specified range of interfaces using the interface configuration mode, that configuration is also deleted from the port profile for that range of interfaces only. For example, if you have a channel group inside a port profile and you are in the interface configuration mode and you delete that port channel, the specified port channel is also deleted from the port profile as well.

    After you inherit a port profile on an interface or range of interfaces and you delete a specific configuration value, that port profile configuration will not operate on the specified interfaces.

    If you attempt to apply a port profile to the wrong type of interface, the switch returns an error.

    When you attempt to enable, inherit, or modify a port profile, the switch creates a checkpoint. If the port profile configuration fails, the switch rolls back to the prior configuration and returns an error. A port profile is never only partially applied.

    Guidelines and Limitations for Port Profiles

    Port profiles have the following configuration guidelines and limitations:

    • Each port profile must have a unique name across interface types and the network.

    • Commands that you enter under the interface mode take precedence over the port profile’s commands if there is a conflict. However, the port profile retains that command in the port profile.

    • The port profile’s commands take precedence over the default commands on the interface, unless the default command explicitly overrides the port profile command.

    • After you inherit a port profile onto an interface or range of interfaces, you can override individual configuration values by entering the new value at the interface configuration level. If you remove the individual configuration values at the interface configuration level, the interface uses the values in the port profile again.

    • There are no default configurations associated with a port profile.

    • A subset of commands are available under the port profile configuration mode, depending on which interface type that you specify.

    • You cannot use port profiles with Session Manager.

    Debounce Timer Parameters

    MTU Configuration

    The Cisco Nexus device switch does not fragment frames. As a result, the switch cannot have two ports in the same Layer 2 domain with different maximum transmission units (MTUs). A per-physical Ethernet interface MTU is not supported. Instead, the MTU is set according to the QoS classes. You modify the MTU by setting class and policy maps.


    Note


    When you show the interface settings, a default MTU of 1500 is displayed for physical Ethernet interfaces.


    Information About Default Interfaces

    You can use the default interface feature to clear the configured parameters for both physical and logical interfaces such as the Ethernet, loopback, VLAN network, and the port-channel interface.

    The default interface feature allows you to clear the existing configuration of multiple interfaces such as Ethernet, loopback, VLAN network, and port-channel interfaces. All user configuration under a specified interface will be deleted. You can optionally create a checkpoint before clearing the interface configuration so that you can later restore the deleted configuration.


    Note


    The default interfaces feature is supported for management interfaces but is not recommended because the device might be in an unreachable state.


    Configuring Ethernet Interfaces

    The section includes the following topics:

    Configuring Unified Ports

    Before you begin

    Confirm that you have a supported Cisco Nexus switch. Unified Ports are available on the following Cisco Nexus switches:

    If you're configuring a unified port as Fibre Channel or FCoE, confirm that you have enabled the feature fcoe command.

    Procedure

      Command or Action Purpose

    Step 1

    switch# configure terminal

    Enters global configuration mode.

    Step 2

    switch(config) # slot slot number

    Identifies the slot on the switch.

    Step 3

    switch(config-slot) # port port number type {ethernet | fc}

    Configures a unified port as a native Fibre Channel port and an Ethernet port.

    • type —Specifies the type of port to configure on a slot in a chassis.

    • ethernet —Specifies an Ethernet port.

    • fc —Specifies a Fibre Channel (FC) port.

    Note

     
    • Changing unified ports on an expansion module (GEM) requires that you power cycle the GEM card. You do not have to reboot the entire switch for changes to take effect.

    • When you configure unified ports as Fibre Channel, the existing configuration for Fibre Channel interfaces and VSAN memberships are unaffected.

    Step 4

    switch(config-slot) # copy running-config startup-config

    Copies the running configuration to the startup configuration.

    Step 5

    switch(config-slot) # reload

    Reboots the switch.

    Step 6

    switch(config) # slot slot number

    Identifies the slot on the switch.

    Step 7

    switch(config-slot) # no port port number type fc

    Removes the unified port.

    Example

    Configuring the UDLD Mode

    You can configure normal or aggressive unidirectional link detection (UDLD) modes for Ethernet interfaces on devices configured to run UDLD. Before you can enable a UDLD mode for an interface, you must make sure that UDLD is already enabled on the device that includes the interface. UDLD must also be enabled on the other linked interface and its device.

    To use the normal UDLD mode, you must configure one of the ports for normal mode and configure the other port for the normal or aggressive mode. To use the aggressive UDLD mode, you must configure both ports for the aggressive mode.


    Note


    Before you begin, UDLD must be enabled for the other linked port and its device.


    Procedure

      Command or Action Purpose

    Step 1

    switch# configure terminal

    Enters global configuration mode.

    Step 2

    switch(config)# feature udld

    Enables UDLD for the device.

    Step 3

    switch(config)# no feature udld

    Disables UDLD for the device.

    Step 4

    switch(config)# show udld global

    Displays the UDLD status for the device.

    Step 5

    switch(config)# interface type slot/port

    Specifies an interface to configure, and enters interface configuration mode.

    Step 6

    switch(config-if)# udld {enable | disable | aggressive}

    Enables the normal UDLD mode, disables UDLD, or enables the aggressive UDLD mode.

    Step 7

    switch(config-if)# show udld interface

    Displays the UDLD status for the interface.

    Example

    This example shows how to enable UDLD for the switch:

     
    switch# configure terminal
    switch(config)# feature udld


    This example shows how to enable the normal UDLD mode for an Ethernet port:

     
    switch# configure terminal
    switch(config)# interface ethernet 1/4
    switch(config-if)# udld enable


    This example shows how to enable the aggressive UDLD mode for an Ethernet port:

    
    switch# configure terminal
    switch(config)# interface ethernet 1/4
    switch(config-if)# udld aggressive


    This example shows how to disable UDLD for an Ethernet port:

     
    switch# configure terminal
    switch(config)# interface ethernet 1/4
    switch(config-if)# udld disable


    This example shows how to disable UDLD for the switch:

    
    switch# configure terminal
    switch(config)# no feature udld
    

    Disabling Link Negotiation

    You can disable link negotiation using the no negotiate auto command. By default, auto-negotiation is enabled on 1-Gigabit ports and disabled on 10-Gigabit ports and 40-Gigabit ports.

    This command is equivalent to the Cisco IOS speed non-negotiate command.


    Note


    The auto-negotiation configuration is not applicable on 10-Gigabit or 40-Gigabit Ethernet ports. When auto-negotiation is configured on a 10-Gigabit port or 40-Gigabit port , the following error message is displayed:
    ERROR: Ethernet1/40: Configuration does not match the port capability

    Procedure

      Command or Action Purpose

    Step 1

    switch# configure terminal

    Enters global configuration mode.

    Step 2

    switch(config)# interface ethernet slot/port

    Selects the interface and enters interface mode.

    Step 3

    switch(config-if)# no negotiate auto

    Disables link negotiation on the selected Ethernet interface (1-Gigabit port).

    Step 4

    (Optional) switch(config-if)# negotiate auto

    (Optional)

    Enables link negotiation on the selected Ethernet interface. The default for 1-Gigabit Ethernet ports is enabled.

    Note


    This command is not applicable for 10GBASE-T ports. It should not be used on 10-GBASE-T ports.

    Example

    This example shows how to disable auto-negotiation on a specified Ethernet interface (1-Gigabit port):

    switch# configure terminal
    switch(config)# interface ethernet 1/1
    switch(config-if)# no negotiate auto
    switch(config-if)#

    This example shows how to enable auto-negotiation on a specified Ethernet interface (1-Gigabit port):

    switch# configure terminal
    switch(config)# interface ethernet 1/5
    switch(config-if)# negotiate auto
    switch(config-if)#

    Configuring the CDP Characteristics

    You can configure the frequency of Cisco Discovery Protocol (CDP) updates, the amount of time to hold the information before discarding it, and whether or not to send Version-2 advertisements.

    Procedure

      Command or Action Purpose

    Step 1

    switch# configure terminal

    Enters global configuration mode.

    Step 2

    (Optional) switch(config)# [no] cdp advertise {v1 | v2 }

    (Optional)

    Configures the version to use to send CDP advertisements. Version-2 is the default state.

    Use the no form of the command to return to its default setting.

    Step 3

    (Optional) switch(config)# [no] cdp format device-id {mac-address | serial-number | system-name}

    (Optional)

    Configures the format of the CDP device ID. The default is the system name, which can be expressed as a fully qualified domain name.

    Use the no form of the command to return to its default setting.

    Step 4

    (Optional) switch(config)# [no] cdp holdtime seconds

    (Optional)

    Specifies the amount of time a receiving device should hold the information sent by your device before discarding it. The range is 10 to 255 seconds; the default is 180 seconds.

    Use the no form of the command to return to its default setting.

    Step 5

    (Optional) switch(config)# [no] cdp timer seconds

    (Optional)

    Sets the transmission frequency of CDP updates in seconds. The range is 5 to 254; the default is 60 seconds.

    Use the no form of the command to return to its default setting.

    Example

    This example shows how to configure CDP characteristics:

    switch# configure terminal
    switch(config)# cdp timer 50
    switch(config)# cdp holdtime 120
    switch(config)# cdp advertise v2
    

    Enabling or Disabling CDP

    You can enable or disable CDP for Ethernet interfaces. This protocol works only when you have it enabled on both interfaces on the same link.

    Procedure

      Command or Action Purpose

    Step 1

    switch# configure terminal

    Enters global configuration mode.

    Step 2

    switch(config)# interface type slot/port

    Enters interface configuration mode for the specified interface.

    Step 3

    switch(config-if)# cdp enable

    Enables CDP for the interface.

    To work correctly, this parameter must be enabled for both interfaces on the same link.

    Step 4

    switch(config-if)# no cdp enable

    Disables CDP for the interface.

    Example

    This example shows how to enable CDP for an Ethernet port:

    switch# configure terminal
    switch(config)# interface ethernet 1/4
    switch(config-if)# cdp enable


    This command can only be applied to a physical Ethernet interface.

    Enabling the Error-Disabled Detection

    You can enable error-disable (err-disabled) detection in an application. As a result, when a cause is detected on an interface, the interface is placed in an err-disabled state, which is an operational state that is similar to the link-down state.


    Note


    Base ports in Cisco Nexus 5500 never get error disabled due to pause rate-limit like in the Cisco Nexus 5020 or 5010 switch.


    Procedure

      Command or Action Purpose

    Step 1

    switch# configure terminal

    Enters global configuration mode.

    Step 2

    switch(config)# errdisable detect cause {all | link-flap | loopback}

    Specifies a condition under which to place the interface in an err-disabled state. The default is enabled.

    Step 3

    switch(config)# shutdown

    Brings the interface down administratively. To manually recover the interface from the err-disabled state, enter this command first.

    Step 4

    switch(config)# no shutdown

    Brings the interface up administratively and enables the interface to recover manually from the err-disabled state.

    Step 5

    switch(config)# show interface status err-disabled

    Displays information about err-disabled interfaces.

    Step 6

    (Optional) switch(config)# copy running-config startup-config

    (Optional)

    Saves the change persistently through reboots and restarts by copying the running configuration to the startup configuration.

    Example

    This example shows how to enable the err-disabled detection in all cases:

    switch# configure terminal
    switch(config)# errdisable detect cause all
    switch(config)# shutdown
    switch(config)# no shutdown
    switch(config)# show interface status err-disabled
    switch(config)# copy running-config startup-config

    Enabling the Error-Disabled Recovery

    You can specify the application to bring the interface out of the error-disabled (err-disabled) state and retry coming up. It retries after 300 seconds, unless you configure the recovery timer (see the errdisable recovery interval command).

    Procedure

      Command or Action Purpose

    Step 1

    switch# configure terminal

    Enters global configuration mode.

    Step 2

    switch(config)# errdisable recovery cause {all | udld | bpduguard | link-flap | failed-port-state | pause-rate-limit}

    Specifies a condition under which the interface automatically recovers from the err-disabled state, and the device retries bringing the interface up. The device waits 300 seconds to retry. The default is disabled.

    Step 3

    switch(config)# show interface status err-disabled

    Displays information about err-disabled interfaces.

    Step 4

    (Optional) switch(config)# copy running-config startup-config

    (Optional)

    Saves the change persistently through reboots and restarts by copying the running configuration to the startup configuration.

    Example

    This example shows how to enable err-disabled recovery under all conditions:

    switch# configure terminal
    switch(config)# errdisable recovery cause all
    switch(config)# show interface status err-disabled
    switch(config)# copy running-config startup-config

    Configuring the Error-Disabled Recovery Interval

    You can use this procedure to configure the err-disabled recovery timer value. The range is from 30 to 65535 seconds. The default is 300 seconds.

    Procedure

      Command or Action Purpose

    Step 1

    switch# configure terminal

    Enters global configuration mode.

    Step 2

    switch(config)# errdisable recovery interval interval

    Specifies the interval for the interface to recover from the err-disabled state. The range is from 30 to 65535 seconds. The default is 300 seconds.

    Step 3

    switch(config)# show interface status err-disabled

    Displays information about err-disabled interfaces.

    Step 4

    (Optional) switch(config)# copy running-config startup-config

    (Optional)

    Saves the change persistently through reboots and restarts by copying the running configuration to the startup configuration.

    Example

    This example shows how to enable err-disabled recovery under all conditions:

    switch# configure terminal
    switch(config)# errdisable recovery interval 32
    switch(config)# show interface status err-disabled
    switch(config)# copy running-config startup-config

    Configuring a Default Interface

    Procedure

      Command or Action Purpose

    Step 1

    switch# configure terminal

    Enters global configuration mode.

    Step 2

    switch(config)# default interface int-if [checkpoint name]

    Deletes the configuration of the interface and restores the default configuration. The value of int-if can be one of the following:

    • ethernet

    • loopback

    • mgmt

    • port-channel

    • vlan

    Use the checkpoint keyword to store a copy of the running configuration of the interface before clearing the configuration.

    Step 3

    exit

    Exits the configuration mode.

    Step 4

    (Optional) show interface

    (Optional)

    Displays the interface status and information.

    Example

    This example shows how to delete the configuration of an Ethernet interface while saving a checkpoint of the running configuration for rollback purposes:

    switch# configure terminal
    switch(config)# show running-config interface e1/10
    !Command: show running-config interface Ethernet1/10
    !Time: Tue Jul 2 10:23:50 2013
    
    version 6.0(2)N2(1)
    
    interface Ethernet1/10
    switchport mode trunk
    channel-group 1
    
    default interface ethernet 3/1 checkpoint chk1
    .......Done
    switch(config)# show running-config interface e1/10
    !Command: show running-config interface Ethernet1/10
    !Time: Tue Jul 2 10:24:41 2013
    
    version 6.0(2)N2(1)
    
    interface Ethernet1/10
    
    switch(config)#

    Configuring Default Interface Mode

    Procedure

      Command or Action Purpose

    Step 1

    switch# configure terminal

    Enters global configuration mode.

    Step 2

    switch(config)# system default switchport [ shutdown]

    Sets default interface mode.

    Note


    When the system default switchport shutdown command is issued, any switchports (including FEX HIFs) that are not configured with no shutdown command are shut down. To avoid the shutdown, configure the switchports with no shutdown command.

    Example

    This example shows how to set the default interface mode:

    switch# configure terminal
    switch(config)# system default switchport

    Configuring the Description Parameter

    You can provide textual interface descriptions for the Ethernet ports.

    Procedure

      Command or Action Purpose

    Step 1

    switch# configure terminal

    Enters global configuration mode.

    Step 2

    switch(config)# interface type slot/port

    Enters interface configuration mode for the specified interface.

    Step 3

    switch(config-if)# description test

    Specifies the description for the interface.

    Example

    This example shows how to set the interface description to Server 3 interface:

    switch# configure terminal
    switch(config)# interface ethernet 1/3
    switch(config-if)# description Server 3 Interface

    Disabling and Restarting Ethernet Interfaces

    You can shut down and restart an Ethernet interface. This action disables all of the interface functions and marks the interface as being down on all monitoring displays.

    Procedure

      Command or Action Purpose

    Step 1

    switch# configure terminal

    Enters global configuration mode.

    Step 2

    switch(config)# interface type slot/port

    Enters interface configuration mode for the specified interface.

    Step 3

    switch(config-if)# shutdown

    Disables the interface.

    Step 4

    switch(config-if)# no shutdown

    Restarts the interface.

    Example

    This example shows how to disable an Ethernet port:

    switch# configure terminal
    switch(config)# interface ethernet 1/4
    switch(config-if)# shutdown


    This example shows how to restart an Ethernet interface:

    switch# configure terminal
    switch(config)# interface ethernet 1/4
    switch(config-if)# no shutdown


    Configuring Slow Drain Device Detection and Congestion Avoidance

    Fibre Channel Slow Drain Device Detection and Congestion Avoidance- An Overview

    All data traffic between end devices in the SAN fabric is carried by Fibre Channel Class 3, and in some cases, Class 2 services, that use link-level, per-hop-based, and buffer-to-buffer flow control. These classes of service do not support end-to-end flow control. When slow devices are attached to the fabric, the end devices do not accept the frames at the configured or negotiated rate. The slow devices lead to an Inter-Switch Link (ISL) credit shortage in the traffic that is destined for these devices and they congest the links. The credit shortage affects the unrelated flows in the fabric that use the same ISL link even though destination devices do not experience a slow drain.

    This feature provides various enhancements that enable you to detect slow drain devices are cause congestion in the network and also provide congestion avoidance.

    The enhancements are mainly on the edge ports that connect to the slow drain devices to minimize the frames stuck condition in the edge ports due to slow drain devices that are causing an ISL blockage. To avoid or minimize the stuck condition, configure lesser frame timeout for the ports. You can use the no-credit timeout to drop all packets after the slow drain is detected using the configured thresholds. A smaller frame timeout value helps to alleviate the slow drain condition that affects the fabric by dropping the packets on the edge ports sooner than the time they actually get timed out (358 ms). This function frees the buffer space in ISL, which can be used by other unrelated flows that do not experience slow drain condition.


    Note


    This feature supports edge ports that are connected to slow edge devices. Even though you can apply this feature to ISLs as well, we recommend that you apply this feature only for edge F ports and retain the default configuration for ISLs as E and TE ports. This feature is not supported on Generation 1 modules.

    Configuring a Stuck Frame Timeout Value

    The default stuck frame timeout value is 358 ms. The timeout value can be incremented in steps of 10. We recommend that you retain the default configuration for ISLs and configure a value that does not exceed 500 ms (100 to 200 ms) for fabric F ports.

    Procedure

      Command or Action Purpose

    Step 1

    switch# configure terminal

    Enters global configuration mode.

    Step 2

    switch(config)# system timeout congestion-drop seconds mode E | F

    Specifies the stuck frame timeout value in milliseconds and the port mode for the switch.

    Step 3

    switch(config)# system timeout congestion-drop default mode E | F

    Specifies the default stuck frame timeout port mode for the switch.

    Example

    This example shows how to configure a stuck frame timeout value of 100 ms:

    switch# configure terminal
    switch(config)# system timeout congestion-drop 100 mode F
    switch(config)# system timeout congestion-drop default mode F


    Configuring a No-Credit Timeout Value

    When the port does not have the credits for the configured period, you can enable a no-credit timeout on that port, which results in all frames that come to that port getting dropped in the egress. This action frees the buffer space in the ISL link, which helps to reduce the fabric slowdown and congestion on other unrelated flows that use the same link.

    The dropped frames are the frames that have just entered the switch or have stayed in the switch for the configured timeout value. These drops are preemptive and clear the congestion completely.

    The no-credit timeout feature is disabled by default. We recommend that you retain the default configuration for ISLs and configure a value that does not exceed 358 ms (200 to 300 ms) for fabric F ports.

    You can disable this feature by entering the no system timeout no-credit-drop mode F command.


    Note


    The no-credit timeout value and stuck frame timeout value are interlinked. The no-credit timeout value must always be greater than the stuck frame timeout value.

    Procedure

      Command or Action Purpose

    Step 1

    switch# configure terminal

    Enters global configuration mode.

    Step 2

    switch(config)# system timeout no-credit-drop seconds mode F

    Specifies the no-credit timeout value and port mode for the switch. The seconds value is 500ms by default. This value can be incremented in steps of 100.

    Step 3

    switch(config)# system timeout no-credit-drop default mode F

    Specifies the default no-credit timeout value port mode for the switch.

    Example

    This example shows how to configure a no-credit timeout value:

    switch# configure terminal
    switch(config)# system timeout no-credit-drop 100 mode F
    switch(config)# system timeout no-credit-drop default mode F


    Displaying Credit Loss Counters

    Use the following commands to display the credit loss counters per module per interface for the last specified minutes, hours, and days:

    Procedure

    Command or Action Purpose

    show process creditmon {credit-loss-event-history | credit-loss-events | force-timeout-events | timeout-discards-events}

    Displays Onboard Failure Logging (OBFL) credit loss logs.

    Displaying Credit Loss Events

    Use one of the following commands to display the total number of credit loss events per interface with the latest three credit loss time stamps:

    Command

    Purpose

    show process creditmon credit-loss-events [module module number]

    Displays the credit loss event information for a module.

    show process creditmon credit-loss-event-history [module module number]

    Displays the credit loss event history information.

    Displaying Timeout Drops

    Use the following command to display the timeout drops per module per interface for the last specified minutes, hours, and days:

    Command

    Purpose

    show logging onboard flow-control timeout-drops [last mm minutes] [last hh hours] [last dd days] [module module number]

    Displays the Onboard Failure Logging (OBFL) timeout drops log.

    Displaying the Average Credit Not Available Status

    When the average credit nonavailable duration exceeds the set threshold, you can error-disable the port, send a trap with interface details, and generate a syslog with interface details. In addition, you can combine or more actions or turn on or off an action. The port monitor feature provides the command line interface to configure the thresholds and action. The threshold configuration can be a percentage of credit non-available duration in an interval.

    The thresholds for the credit nonavailable duration can be 0 percent to 100 percent in multiples of 10, and the interval can be from 1 second to 1 hour. The default is 10 percent in 1 second and generates a syslog.

    Use the following command to display the average credit-not-available status:

    Command

    Purpose

    show system internal snmp credit-not-available {module | module-id}

    Displays the port monitor credit-not-available counter logs.

    Port Monitoring

    You can use port monitoring to monitor the performance of fabric devices and to detect slow drain devices. You can monitor counters and take the necessary action depending on whether the portguard is enabled or disabled. You can configure the thresholds for various counters and trigger an event when the values cross the threshold settings. Port monitoring provides a user interface that you can use to configure the thresholds and action. By default, portguard is disabled in the port monitoring policy.

    Two default policies, default and default slowdrain, are created during snmpd initialization. The default slowdrain policy is activated when the switch comes online when no other policies are active at that time. The default slowdrain policy monitors only credit-loss-reco and tx-credit-not-available counters.

    When you create a policy, it is created for both access and trunk links. The access link has a value of F and the trunk link has a value of E.

    Enabling Port Monitor

    Procedure

      Command or Action Purpose

    Step 1

    switch# configure terminal

    Enters global configuration mode.

    Step 2

    switch(config)# [no] port-monitor enable

    Enables (default) the port monitoring feature. The no version of this command disables the port monitoring feature.

    Configuring a Port Monitor Policy

    Procedure

      Command or Action Purpose

    Step 1

    switch# configure terminal

    Enters global configuration mode.

    Step 2

    switch(config)# port-monitor name policyname

    Specifies the policy name and enters the port monitor policy configuration mode.

    Step 3

    switch(config-port-monitor)# port-type all

    Applies the policy to all ports.

    Step 4

    switch(config-port-monitor)# counter {credit-loss-reco | timeout-discards | tx-credit-not-available } poll-interval seconds {absolute | delta} rising-threshold value1 event event-id1 falling-threshold value2 event event-id2

    Specifies the poll interval in seconds, the thresholds in absolute numbers, and the event IDs of events to be triggered for the following reasons:
    • credit-loss-reco—Credit loss recovery
    • timeout-discards—Timeout discards
    • tx-credit-not-available—Average credit non-available duration

    Step 5

    switch(config-port-monitor)# [no] counter {credit-loss-reco | timeout-discards | tx-credit-not-available } poll-interval seconds {absolute | delta} rising-threshold value1 event event-id1 falling-threshold value2 event event-id2

    Turns on monitoring for the specified counter.

    The no form of this command turns off monitoring for the specified counter.

    Example

    This example shows how to specify the poll interval and threshold for timeout discards:

    switch# configure terminal
    switch(config)# port-monitor cisco
    switch(config-port-monitor)# counter timeout-discards poll-interval 10

    This example show how to specify the poll interval and threshold for credit loss recovery:

    switch# configure terminal
    switch(config)# port-monitor cisco
    switch(config-port-monitor)# counter credit-loss-reco poll-interval 20 delta rising-threshold 10 event 4 falling-threshold 3 event 4

    Activating a Port Monitor Policy

    Procedure

      Command or Action Purpose

    Step 1

    switch# configure terminal

    Enters global configuration mode.

    Step 2

    switch(config)# port-monitor activate policyname

    Activates the specified port monitor policy.

    Step 3

    (Optional) switch(config)# port-monitor activate

    (Optional)

    Activates the default port monitor policy.

    Step 4

    (Optional) switch(config)# no port-monitor activate policyname

    (Optional)

    Deactivates the specified port monitor policy.

    Example

    This example shows how to activate a specific port monitor policy:

    switch# configure terminal
    switch(config)# port-monitor activate cisco

    Displaying Port Monitor Policies

    Use the following command to display port monitor policies:

    Command

    Purpose

    switch# show port-monitor policyname

    Displays details of the specified port monitor policy.

    Example

    This example shows how to display a specific port monitor policy:

    FCoE Slow Drain Device Detection and Congestion Avoidance

    The data traffic between end devices in Fibre Channel over Ethernet (FCoE) uses link level, per-hop Priority Flow Control (PFC). This allows the FCoE class on a link to be paused independently in each direction, while other classes continue to transmit and receive on the link. When end devices transmit PFC pause frames to the switch port they prevent the switch port from being able to transmit FCoE frames to the end device. Although some of this occurs normally, if it occurs in large amounts it can cause congestion in the fabric. End devices doing this are called a slow devices, or slow drain devices. When this occurs it can cause frames to queue at the switch which results in the switch transmitting its own PFC pause frames back towards the source of the incoming frames. If the switch port where the frames are being received (the source of the incoming frames) is connected to an end device, then this end device will temporarily be paused. It will not be able to transmit any frames into the switch for any destination (not just for the slow device). If switch port where the frames are being received on is an Inter-Switch-Link (ISL) then all inbound traffic across that ISL will be paused. This will affect all devices transiting that ISL.

    There are two ways to mitigate FCoE slowdrain on a Cisco Nexus 5500 switch:

    Congestion timeout

    Congestion timeout measures the age of frames that have been received by the switch. It automatically drops the FCoE frames that have been received by the switch, but are not able to transmit for 358 milliseconds. You cannot modify the congestion timeout value for FCoE.

    Pause timeout

    Pause timeout automatically drops all the FCoE frames that have been received by the switch and queued for an egress port when the egress port is in a continual paused state for the associated time. By default this feature is off, but it can be configured to be 90 milliseconds, 180 milliseconds, 358 milliseconds, 716 milliseconds, or 1433 milliseconds. The lower the value the quicker the switch will react to a port in a continual state of a pause. When a port reaches the pause timeout threshold, all the FCoE frames queued for egress on that port are emptied from the queue regardless of their exact age. The threshold is detected by a software process that runs every 100 milliseconds. Since all the frames queued to a given egress port are dropped this can have a dramatic effect on reducing the congestion on affected ISLs (ISLs from which the frames originated). When this condition is detected it is called a "Pause Event". The switch issues the following message when a pause event is detected:

    switchname %$ VDC-1 %$ %CARMELUSD-2-CARMEL_SYSLOG_CRIT: FCoE Pause Event Occurred on interface ethernet 1/1

    For every pause event that lasts for the specified timeout value, a pause event is published to the Embedded Event Manager (EEM). The EEM maintains the count of pause events per port and triggers the policy action when the threshold is reached.

    The following are the two EEM policies that exist by default. Use the show event manager system-policy command to view the EEM policies.

    • switch# show event manager system-policy
       Name : __ethpm_slow_drain_core
       Description : 10 Pause Events in 1 minute. Action: None by default
       Overridable : Yes
    • switch# show event manager system-policy
       Name : __ethpm_slow_drain_edge
          Description : 5 Pause Events in 1 minute. Action: None by default
          Overridable : Yes

    You can override the default policy with the new thresholds and actions. If you try to override the EEM system policies _ethpm_slow_drain_edge and _ethpm_slow_drain_core, the default-action, default syslog, will also appear. We recommend that you specify action err-disable to isolate the faulty port where this condition occurs. This can be done by overriding the _ethpm_slow_drain_edge EEM policy.

    The following is a sample output to override the EEM system policy:

    event manager applet custom_edge_policy override __ethpm_slow_drain_edge
    event policy-default count 5 time 360
    action 1.0 syslog msg FCoE Slowdrain Policy Was Hit 
    exit

    In the above example, the EEM policy generates a syslog if five pause events occur in 360 seconds on an edge port.

    Configuring a Pause Frame Timeout Value

    You can enable or disable a pause frame timeout value on a port. The system periodically checks the ports for a pause condition and enables a pause frame timeout on a port if it is in a continuous pause condition for a configured period of time. This situation results in all frames that come to that port getting dropped in the egress. This function empties the buffer space in the ISL link and helps to reduce the fabric slowdown and the congestion on the other unrelated flows using the same link.

    When a pause condition is cleared on a port or when a port flaps, the system disables the pause frame timeout on that particular port.

    The pause frame timeout is disabled by default. We recommend that you retain the default configuration for the ISLs and configure a value that does not exceed the default value for the edge ports.

    For a faster recovery from the slow drain device behavior, you should configure a pause frame timeout value because it drops all the frames in the edge port that face the slow drain whether the frame is in the switch for a congested timeout or not. This process instantly clears the congestion in the ISL. You should configure a pause frame timeout value to clear the congestion completely instead of configuring a congestion frame timeout value.

    Use the no system default interface pause timeout milliseconds mode {core | edge} command to disable the pause frame timeout value on the edge ports. The default pause timeout value is 358 milliseconds.

    Procedure

      Command or Action Purpose

    Step 1

    switch# configure terminal

    Enters global configuration mode.

    Step 2

    switch# system default interface pause timeout milliseconds mode {core | edge}

    Configures a new pause frame timeout value in milliseconds and the port mode for the device.

    Step 3

    switch# system default interface pause mode {core | edge}

    Configures the default pause frame timeout value in milliseconds and the port mode for the device.

    Step 4

    switch# no system default interface pause timeout milliseconds mode {core | edge}

    Disables the pause frame timeout for the device.

    Step 5

    switch# no system default interface pause mode {core | edge}

    Disables the default pause frame timeout for the device.

    Step 6

    (Optional) switch# show logging onboard flow-control pause-event

    (Optional)

    Displays the total number of the pause events per module per interface.

    Step 7

    (Optional) switch# show logging onboard flow-control timeout-drop

    (Optional)

    Displays the timeout drops per module per interface with the time-stamp information.

    Example

    This example shows how to configure a pause frame timeout value:

    switch# configure terminal
    switch(config)# system default interface pause timeout 358 mode core
    switch(config)# system default interface pause mode edge
    switch(config)# no system default interface pause timeout 358 mode core
    switch(config)# no system default interface pause mode edge
    switch(config)# end
    switch# show logging onboard flow-control pause-event 
    switch# show logging onboard flow-control timeout-drop


    This example shows how to display the total number of the pause events for the entire switch:

    switch# show logging onboard flow-control pause-events 
    List of Pause Events
    ----------------------------------------------------
    Ethernet      Timestamp
    Interface     
    ----------------------------------------------------
     1/1          01/01/2009 10:15:20.262951 
     1/1          01/01/2009 10:15:21.462869 
     1/1          01/01/2009 10:15:22.173349 
     1/1          01/01/2009 10:15:22.902929 
     1/1          01/01/2009 10:15:23.642984 
     1/1          01/01/2009 10:15:24.382961 
     1/1          01/01/2009 10:15:25.100497 
     1/1          01/01/2009 10:15:25.842915 


    This example shows how to display the timeout drops per interface with time-stamp information for the supervisor CLI:

    switch# show logging onboard flow-control timeout-drops
    Number of Pause Events per Port
    ----------------------------
    Ethernet 	 Number of
    Interface 	Pause Events
    ----------------------------
    1/1 		     38668
    1/15 		    232
    2/16 		    2233
    2/17 		    2423


    Displaying Interface Information

    To view configuration information about the defined interfaces, perform one of these tasks:

    Command

    Purpose

    switch# show interface type slot/port

    Displays the detailed configuration of the specified interface.

    switch# show interface type slot/port capabilities

    Displays detailed information about the capabilities of the specified interface. This option is available only for physical interfaces.

    switch# show interface type slot/port transceiver

    Displays detailed information about the transceiver connected to the specified interface. This option is available only for physical interfaces.

    switch# show interface brief

    Displays the status of all interfaces.

    switch# show interface flowcontrol

    Displays the detailed listing of the flow control settings on all interfaces.

    switch# show interface debounce

    Displays the debounce status of all interfaces.

    The show interface command is invoked from EXEC mode and displays the interface configurations. Without any arguments, this command displays the information for all the configured interfaces in the switch.

    This example shows how to display the physical Ethernet interface:

    
    switch# show interface ethernet 1/1
      Ethernet1/1 is up
      Hardware is 1000/10000 Ethernet, address is 000d.eca3.5f08 (bia 000d.eca3.5f08)
      MTU 1500 bytes, BW 10000000 Kbit, DLY 10 usec,
         reliability 255/255, txload 190/255, rxload 192/255
      Encapsulation ARPA
      Port mode is trunk
      full-duplex, 10 Gb/s, media type is 1/10g
      Input flow-control is off, output flow-control is off
      Auto-mdix is turned on
      Rate mode is dedicated
      Switchport monitor is off
      Last clearing of "show interface" counters never
      5 minute input rate 942201806 bytes/sec, 14721892 packets/sec
      5 minute output rate 935840313 bytes/sec, 14622492 packets/sec
      Rx
        129141483840 input packets 0 unicast packets 129141483847 multicast packets
        0 broadcast packets 0 jumbo packets 0 storm suppression packets
        8265054965824 bytes
        0 No buffer 0 runt 0 Overrun
        0 crc 0 Ignored 0 Bad etype drop
        0 Bad proto drop
      Tx
        119038487241 output packets 119038487245 multicast packets
       0 broadcast packets 0 jumbo packets
        7618463256471 bytes
        0 output CRC 0 ecc
        0 underrun 0 if down drop     0 output error 0 collision 0 deferred
        0 late collision 0 lost carrier 0 no carrier
        0 babble
        0 Rx pause 8031547972 Tx pause 0 reset


    This example shows how to display the physical Ethernet capabilities:

    switch# show interface ethernet 1/1 capabilities
    Ethernet1/1
      Model:                 734510033
      Type:                  10Gbase-(unknown)
      Speed:                 1000,10000
      Duplex:                full
      Trunk encap. type:     802.1Q
      Channel:               yes
      Broadcast suppression: percentage(0-100)
      Flowcontrol:											rx-(off/on),tx-(off/on)
      Rate mode:             none
      QOS scheduling:        rx-(6q1t),tx-(1p6q0t)
      CoS rewrite:           no
      ToS rewrite:           no
      SPAN:                  yes
      UDLD:                  yes
      Link Debounce:         yes
      Link Debounce Time:    yes
      MDIX:                  no
      FEX Fabric:            yes


    This example shows how to display the physical Ethernet transceiver:

    switch# show interface ethernet 1/1 transceiver
    Ethernet1/1
        sfp is present
        name is CISCO-EXCELIGHT
        part number is SPP5101SR-C1
        revision is A
        serial number is ECL120901AV
        nominal bitrate is 10300 MBits/sec
        Link length supported for 50/125mm fiber is 82 m(s)
        Link length supported for 62.5/125mm fiber is 26 m(s)
        cisco id is --
        cisco extended id number is 4


    This example shows how to display a brief interface status (some of the output has been removed for brevity):

    switch# show interface brief
    
    --------------------------------------------------------------------------------
    Ethernet      VLAN   Type Mode   Status  Reason                   Speed     Port
    Interface                                                                   Ch #
    --------------------------------------------------------------------------------
    Eth1/1        200    eth  trunk  up      none                        10G(D) --
    Eth1/2        1      eth  trunk  up      none                        10G(D) --
    Eth1/3        300    eth  access down    SFP not inserted            10G(D) --
    Eth1/4        300    eth  access down    SFP not inserted            10G(D) --
    Eth1/5        300    eth  access down    Link not connected         1000(D) --
    Eth1/6        20     eth  access down    Link not connected          10G(D) --
    Eth1/7        300    eth  access down    SFP not inserted            10G(D) --
    ...


    This example shows how to display the link debounce status (some of the output has been removed for brevity):

    switch# show interface debounce
    
    --------------------------------------------------------------------------------
    Port          Debounce time   Value(ms)
    --------------------------------------------------------------------------------
    ...
    Eth1/1        enable               100
    Eth1/2        enable               100
    Eth1/3        enable               100
    ...


    This example shows how to display the CDP neighbors:

    
    switch# show cdp neighbors
    Capability Codes: R - Router, T - Trans-Bridge, B - Source-Route-Bridge
                      S - Switch, H - Host, I - IGMP, r - Repeater,
                      V - VoIP-Phone, D - Remotely-Managed-Device,
                      s - Supports-STP-Dispute
    Device ID              Local Intrfce   Hldtme  Capability  Platform      Port ID
    d13-dist-1               mgmt0           148     S I      WS-C2960-24TC  Fas0/9
    n5k(FLC12080012)         Eth1/5          8       S I s    N5K-C5020P-BA  Eth1/5


    Default Physical Ethernet Settings

    The following table lists the default settings for all physical Ethernet interfaces:

    Parameter

    Default Setting

    Debounce

    Enable, 100 milliseconds

    Duplex

    Auto (full-duplex)

    Encapsulation

    ARPA

    MTU1

    1500 bytes

    Port Mode

    Access

    Speed

    Auto (10000)

    1 MTU cannot be changed per-physical Ethernet interface. You modify MTU by selecting maps of QoS classes.